普鲁狮智能锁介绍
- 格式:ppt
- 大小:4.23 MB
- 文档页数:12
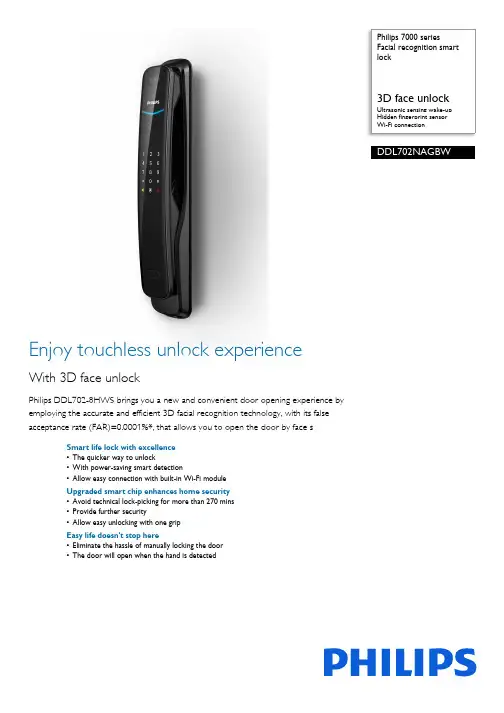
Philips 7000 seriesFacial recognition smartlock3D face unlockUltrasonic sensing wake-upHidden fingerprint sensorWi-Fi connectionDDL702NAGBWEnjoy touchless unlock experienceWith 3D face unlockPhilips DDL702-8HWS brings you a new and convenient door opening experience byemploying the accurate and efficient 3D facial recognition technology, with its falseacceptance rate (FAR)=0.0001%*, that allows you to open the door by face sSmart life lock with excellence•The quicker way to unlock•With power-saving smart detection•Allow easy connection with built-in Wi-Fi moduleUpgraded smart chip enhances home security•Avoid technical lock-picking for more than 270 mins•Provide further security•Allow easy unlocking with one gripEasy life doesn't stop here•Eliminate the hassle of manually locking the door•The door will open when the hand is detectedHighlights3D facial recognitionPhilips DDL702-8HWS comes with a dual camera that simulates human eye imaging to obtain dynamic three-dimensional data of objects and creates 3D images of the user's face. It can effectively recognize not just people in pictures or videos but also people wearing makeup, which offers you the zero-operation unlocking experience.Ultrasonic sensing wake-upWhen a target approaches and stops in front of the lock, the equipped ultrasonic sensor module will quickly calculate the wavesreflected from the target. If it detects a human movement, facial recognition will start to work. Test data shows the powerconsumption of the ultrasonic sensor module is only 10% of the traditional infrared sensor module, which is highly energy-efficient and guarantees the long-lasting battery life of DDL702-8HWS.Wi-Fi connection A built-in Wi-Fi module allows easy access to the internet. You can check the smart lock access records and PIN code information via the Philips EasyKey App anywhere. Remote distribution of a temporary PIN code makes your home accessible to relatives and friends even if you are not at home.Hidden fingerprint sensor With a hidden design of the fingerprint sensor on the inside of the handle, Philips DDL702-8HWS could effectively protect the sensor from malicious destruction and extend its lifetime. Once you hold the handle, yourfingertip will naturally fall on the sensor. Upon a successful authentification, you can push the handle to unlock the door.Dual verificationIn the dual verification mode, you could open the door with any two verification methods (facial recognition, fingerprint, and PIN code), which provides double protection for home security.C-grade lock cylinderThe lock cylinder is the key component that controls the opening of the lock. The Philips DDL702-8HWS employs multiple anti-theft technologies with a unique design of pin tumbler and vane structure. As the time for avoiding technical lock-picking is more than 270 mins, plus the hidden lock cylinder design, the security level of the lock has been further enhanced.Indoor infrared sensor unlockWith a touch sensor and an infrared sensor on the handle, the door could be open much simpler. Once the hand touches the touch sensor and the infrared sensor detects the obstruction, the lock will open.Fully automatic mortisePhilips DDL702-8HWS utilizes fully automatic mortise. Without the need for any extra action, the deadbolt will spontaneously pop out after you close the door. If the door is not locked fitly, it will trigger an alert to remind you of the door lock status.Issue date 2023-11-29 Version: 1.0.1EAN: 69 71318 50302 3© 2023 Koninklijke Philips N.V.All Rights reserved.Specifications are subject to change without notice. Trademarks are the property of Koninklijke Philips N.V. or their respective owners.SpecificationsDesign & Appearance•Color: Obsidian black•Handle: Push-pull handle•Fingerprint Sensor: SemiconductorAccess Solution•Fingerprint•Password/PIN Code•Mechanical Key•Face UnlockLock Capacity•Master PIN Code: 1•User PIN Code: Up to 20•One-time PIN Code: 1Power Specification•Time of Use: 6 months*•Maximum Batteries Capacity: 8 batteries •Emergency Power Supply: 5V power bankEasy Operation•Indicator: Door locks status prompt, Low batteryprompt, Mute status prompt, Outside forced lockprompt, System locking prompt•Voice Guide: Human voice guideSmart Lock Functions•Mortise: C grade lock cylinder•Locking Function: Indoor deadlock, System locking•Safety Function: Dual verification, Fake PIN code,Outside forced lock function•Alarm Function: Abnormal bolt alarmMode•Operationg Mode: Auto mode, Manual modeInstallation•Door Thickness: 38-60 mm, 60-90 mm, 90-120mm, Other range*•Door Opening Direction: Left inward opening, Leftoutward opening, Right inward opening, Rightoutward oepning•Door Type: Antitheft door, Copper door,Wooden door*May be less depending on the actual usage*The effect of the digital keypad showed in the photos of this productmay be inconsistent with the actual display effect. Please be subjectto the digital keypad displaying status under the actual usagescenarios.*Other door thickness range: If the thickness of the door is out of thementioned range, please contact our local dealers or consumer carecenter.。
德国大熊智能锁说明书
1、进入管理模式:打开智能锁的电池盖,然后按下密码键,再按
下【#】键,进入管理模式。
2、设置管理员密码:在管理模式中,输入管理员密码(默认为
123456),然后按下【#】键确认,进入设置用户密码界面。
输入新密码,按下【#】键确认,进入设置管理密码界面。
再次输入新密码,按下【#】键确认,即完成管理员密码的设置。
3、添加用户:在管理模式中,按下【*】键,进入添加用户界面。
输入用户密码(即步骤2中设置的管理员密码),然后按下【#】键确认,进入添加用户信息界面。
输入用户的姓名、性别、生日、编号等信息,然后按下【#】键确认,完成用户的添加操作。
4、删除用户:在管理模式中,按下【-】键,进入删除用户界面。
输入用户密码(即步骤2中设置的管理员密码),然后按下【#】键确认,进入删除用户信息界面。
选择要删除的用户,然后按下【#】键确认,完成用户的删除操作。
5、修改密码:在管理模式中,按下【0】键,进入修改密码界面。
输入当前密码,然后输入新密码,按下【#】键确认,即完成密码的修改操作。
6、锁定和解锁:在管理模式中,按下【#】键,进入锁定和解锁界
面。
按下【0】键,进入锁定模式,输入管理员密码(默认为123456),然后按下【#】键确认。
如果要解锁,请再次按下【0】键,输入管理员密码(默认为123456),然后按下【#】键确认。
7、关闭智能锁:在管理模式中,按下【*】键,进入关闭智能锁界
面。
输入管理员密码(默认为123456),然后按下【#】键确认,即可关闭智能锁。
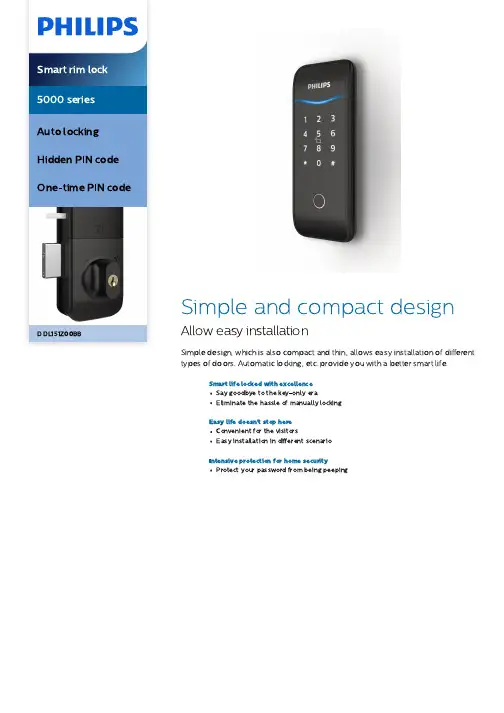
DDL151Z00BBand compact design llow easy installationSimple design, which is also compact and thin, allows easy installation of different types of doors. A utomatic locking, etc. provide you with a better smart life.Smart life locked with excellenceSay goodbye to the key-only eraEliminate the hassle of manually lockingEasy life doesn't stop hereConvenient for the visitorsEasy installation in different scenarioIntensive protection for home securityProtect your password from being peepingSmart rim lockDDL 151Z 00BB /97HighlightsSpeci ficationsVarious ways ofunlockingMultiple choices as fingerprint , PIN code , key tag , and app meet di fferent unlocking needs and allow users to enjoy a smart and convenient door opening experience .Fully automortisePhilips 5100-6HBS employs fully automatic mortise . Without the need for any extraaction , the deadbolt will spontaneously pop up after closing the door . If the door is not locked properly , the mortise will give an alert to remind you of the door lock status .One -time PINcodeWhen visitors or cleaners come while you are not at home , you can set a one -time password in advance , and it will becomeinvalid after being used . There is no need to change the master PIN code frequently ,which eliminates the hassle of resetting the PIN code (s ).CompactdesignThe simple and compact design allows easy installation for home , studio , o ffice , etc .,which is widely suitable for installation on both inside and outside doors , which could also ensure a private space .Hidden PINcodeFeatured 32-digit hidden PIN codetechnology , Philips 5100-6HBS allows you to enter any random number combination to get identi fied and unlock the door as long as there is a consecutive input of the real password . This feature can e ffectively prevent peeping and safeguard your real password .A ccess Solution Card /Key Tag FingerprintPassword /PIN CodeDesign & A ppearanceColor : Champagne gold , Obsidian black Fingerprint Sensor : SemiconductorEasy OperationIndicator : Door locks status prompt , Lowbattery prompt , Mute status prompt , Outside forced lock prompt , System locking prompt Voice Guide : Human voice guideInstallationDoor Opening Direction : Left inwardopening , Left outward opening , Right inward opening , Right outward oepningDoor Thickness : 30-50 mm , 50-90 mm ,Other range *Door Type : A ntitheft door , Copper door ,Wooden door Lock Capacity Master PIN Code : 1One -time PIN Code : 1ModeOperationg Mode : A uto mode , Manual modePower Speci ficationEmergency Power Supply : 5V power bank Maximum Batteries Capacity : 4 batteries* May be less depending on the actual usage .* The e ffect of the digital keypad showed in the photos of this product may be inconsistent with the actual display e ffect . Please be subject to the digital keypad displaying status under the actual usage scenarios .* Other door thickness range : If the thickness of the door is out of the mentioned range , please contact our local dealers or consumer care center .© 2022 Koninklijke Philips N .V .A ll Rights reserved .Speci fications are subject to change without notice . Trademarks are the property of Koninklijke Philips N .V . or their respective owners .Issue date 2022‑11‑19Version : 1.0.112 NC : 8670 001 77655E A N : 69 71318 50279 8www .philips .com。

2
⼆、如何开通微信提醒
4
1. 点击“开通提醒”进⼊设置⻚⾯,如未登录,请先登录;“开通提醒”,如下图即为开通成功;
.当智能锁发⽣开锁或远程开锁等事件时,微信实时提醒。
2 . 远程开锁操作
远程开锁需在锁上按⻔铃键发出请求,“客⼈请求,主⼈开锁”,⽤收到开锁请求,或点击播放进视频对讲,或直接输⼊安全密码开锁
五、如何备注⻔锁⽤⼾
. 进⼊⻔锁界⾯,点击右上⻆“更多−⽤⼾列表”,进⼊⽤⼾列表界
⾯,如下图;
.点击⽤⼾,直接备注⽤⼾名称如下图。
3. ⽤⼾备注好后,就清楚地知道是谁开了锁,关⼼家⼈。
四、如何分享设备
侧边栏,选择“家庭管理”−点击
输⼊要添加的⽤⼾⼿机号码和称谓。
注意该
⽤⼾必须提前关注此公众号并注册。
6。
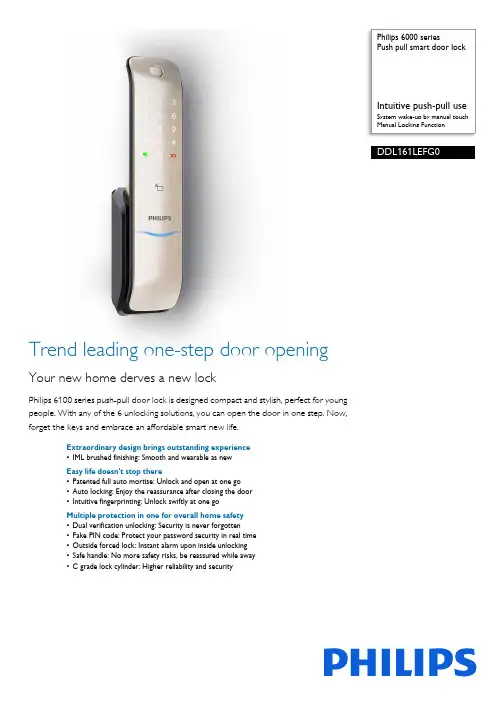
Philips 6000 seriesPush pull smart door lockIntuitive push-pull useSystem wake-up by manual touchManual Locking FunctionDDL161LEFG0Trend leading one-step door openingYour new home derves a new lockPhilips 6100 series push-pull door lock is designed compact and stylish, perfect for youngpeople. With any of the 6 unlocking solutions, you can open the door in one step. Now,forget the keys and embrace an affordable smart new life.Extraordinary design brings outstanding experience•IML brushed finishing: Smooth and wearable as newEasy life doesn't stop there•Patented full auto mortise: Unlock and open at one go•Auto locking: Enjoy the reassurance after closing the door•Intuitive fingerprinting: Unlock swiftly at one goMultiple protection in one for overall home safety•Dual verification unlocking: Security is never forgotten•Fake PIN code: Protect your password security in real time•Outside forced lock: Instant alarm upon inside unlocking•Safe handle: No more safety risks, be reassured while away•C grade lock cylinder: Higher reliability and securityHighlightsAuto locking functionPhilips 6100 series push-pull smart door lock employs full automatic mortise. Without the need for any extra action, the deadbolt will spontaneously pop out after you close the door. If the door is not locked properly, the mortise will give an alarm to remind you of the door lock status.Dual verification unlockingIn dual verification mode, you can use a combination of any two factors (fingerprint, password and card) as the unlocking solution to ensure doubled security for your home.Fake PIN codePhilips 6100 series push-pull smart door lock comes with the feature of Fake PIN Code technology which allows you to enter random number combinations to successfully getidentified as long as there is consecutive input of the real password. This feature caneffectively prevent peeping and safeguard your real password.IML brushed finishing The IML brushed surface has the hardness higher than 2H. Besides, it's waterproof, moisture proof and can keep fingerprint residue out.Intuitive fingerprintingThe fingerprint sensor is integrated in the push-pull handle so that when you hold the handle, your finger will naturally fall on the snesor. You can simply reach out andintuitively touch the sensor, then push to open after a successful fingerprint verification. The one-step unlocking feature will definately bring you a fast and convenient door opening experience.One-key outside forced lockBefore leaving home, you can touch theoutside forced lock key to enable the function.In this mode, opening the door from inside the room will trigger an alarm. This feature can effectively warn you of security risks and upgrade the level of home security.Patented full auto mortiseThe upgraded full automatic mortise makes it possible for instant unlocking right after a successful verification. Once you arerecognized, you can directly push or pull the handle to open the door, which greatlysimplifies the use of your door lock and brings you a fast and convenient in and out experience.Safe handle switchYou can enable the safe handle function before you leave home. After the door is locked, the indoor handle will be fixed to ensure that nobody could open the door by pushing the indoor handle. This feature can effectively prevents unlocking from indoor, thuseliminating security risks and improves anti-theft performance.Issue date 2023-11-28 Version: 1.2.1EAN: 69 71318 50060 2© 2023 Koninklijke Philips N.V.All Rights reserved.Specifications are subject to change without notice. Trademarks are the property of Koninklijke Philips N.V. or their respective owners.SpecificationsDesign & Appearance•Color: Champagne gold•Main Material: Zinc alloy•Surface Processing: Electroplating •Fingerprint Sensor: Semiconductor •Emergency Escape Design: Indoor fast opening mortise•Ergonomic Design: Push-pull handle design Access Solution•Fingerprint•Password/PIN Code•Card/Key Tag•Mechanical KeyLock Capacity•Fingerprint: Up to 100•Card/Key Tag: Up to 100•Master PIN Code: 1•User PIN Code: Up to 10•One-time PIN Code: 1Power Specification•Power Supply: 4 AA batteries•Battery Type: Alkaline Batteries•Time of Use: 8 months*•Maximum Batteries Capacity: 8 batteries •Emergency Power Supply: 5V power bank •Working Voltage: 4.5-6VEasy Operation•Indicator: Door locks status prompt, Low battery prompt, Mute status prompt, Outside forced lock prompt, System locking prompt•Voice Guide: Human voice guide Smart Lock Functions•Mortise: Full auto mortise, Super B-class lockcylinder•Locking Function: Electronic deadlock, Systemlocking•Safety Function: Dual verification, Fake PIN code,Outside forced lock function, Safe handle funtion•Alarm Function: Anti-dismantle alarm, Anti-pryingalarm, Outside forced lock alarmMode•Operationg Mode: Auto mode, Manual mode•System Setup Mode: Dual verification mode,Normal modeInstallation•Door Thickness: 38-60 mm, 60-90 mm, 90-120mm, Other range*•Door Opening Direction: Left inward opening, Leftoutward opening, Right inward opening, Rightoutward oepning•Door Type: Antitheft door, Copper door,Wooden doorAccessory Parts•Accessorial Battery: 4 AA alkaline batteries•Mechanical Key: 2 keys•Smart Key Tag: 2 cards•Installation Accessories•Mortise•Mounting Plate•Drilling Template•Certificate•Cleaning Pad•User Manual•Warranty Card•Quick Start Guide*May be less depending on the actual usage.*Please contact our service agents or authorized dealers for otherdoor range.。

Philips 1000 seriesVisor de puerta inteligenteamplioDetección del cuerpo con elsensor PIRMonitoreo remoto inteligenteInterconexión con cerradurainteligenteDDA131FCWNuevo horizonte visualSeguridad visible, al alcance de su manoLa lente ultra gran angular de 170° con función de visión nocturna por infrarrojos con cancelación deruido y la detección del cuerpo humano de 24 horas de la IA permiten ver lo que sucede delante desu puerta en cualquier momento y en cualquier lugar, lo que hace que su hogar sea mucho más seguro.La visión nocturna HD hace que la seguridad sea visible•La lente de 170° y la pantalla HD de 1080P ofrecen una mejor visión•Llamada de audio bidireccional: comuníquese en tiempo real y en todas partes•Pantalla táctil HD de 5 pulgadas: manejo simple para toda la familiaUn chip inteligente permite almacenar más información•Procesador de cuatro núcleos ARM: asegúrese de contar con un sistema estable•Detección de movimiento humano de la IA:La vida inteligente nunca se detiene aquí•Estructura de metal intensivo: con alarma antiapalancamiento•Almacenamiento local y en la nube: permite ver los registros a través de la aplicación encualquier momento•El soporte magnético permite desmontar y cargar fácilmente•Batería de litio grande: hasta 90 días de duración•Enlace con el bloqueo de puerta inteligente: para garantizar una mayor seguridadLente de 170° y pantalla HD Cuenta con una lente de 170° de nivel de monitoreo, el visor de puerta inteligente puede absorber un alto volumen de luz, junto con cuatro luces infrarrojas brillantes, ofrece una mejor visión nocturna, incluso en entornos que tienen poca iluminación.Llamada de audio bidireccionalCuando toque el timbre o presione el botón de llamada en la pantalla, puede iniciar la llamada de audio en tiempo real con elmicrófono y el altavoz integrados. Le permite disfrutar de una experiencia de llamada perfecta.Pantalla táctil HD de 5 pulgadasLa pantalla con tecnología IPS multitáctil HD de 5 pulgadas cuenta con gafas curvas delaminación completa 2.5D, lo que hace que todo luzca fabuloso. El diseño interactivo es simple de manejar para los niños y ancianos.Procesador de cuatro núcleos ARMSe incorpora el procesador de cuatro núcleos ARM, el producto muestra un rendimiento sólido con un menor consumo de energía, que ejecuta varias tareas con mayor facilidad y hace que el sistema de control de alertas de la puerta sea más rápido y estable.Detección de movimiento humano de laIAEquipado con un sensor infrarrojo PIR, cuando alguien aparece en un rango de tres metros hacia el exterior de la puerta, el visor de puerta inteligente realizará la identificación a través del algoritmo de detección de cuerpo humano de la IA y capturará instantáneamente una foto o un video. Al mismo tiempo, envíanotificaciones a la aplicación móvil a través del servidor de cifrado en la nube para monitorear la situación en la puerta.Estructura de metal intensivoCuenta con el diseño de estructura metálica robusta y el sensor integradoantiapalancamiento que, cuando el visor de puerta inteligente reconoce la dinámica anormal y se desconecta de Internet, elproducto activará una alarma para advertir a los extraños y a la familia, luego, recibiránotificaciones automáticas en tiempo real en la aplicación móvil.Almacenamiento local y en la nubeEl almacenamiento local 4G en la nube podría satisfacer sus necesidades diarias, ya que puede guardar los registros incluso sin conexión a Internet. Cualquier foto o video cifrado que se suba al servidor de la nube se puede guardar durante 3 días y puede ver los registros a través de la aplicación Philips en cualquier momento.El soporte magnéticoSimplemente utilice los cuatro imanesintegrados para instalar el producto y retirar la pantalla a fin de desmontar el producto. Con el cable reforzado, el producto podría ser muy duradero.Fecha de publicación 2023-11-29Versión: 3.1.1EAN: 69 71318 50230 9© 2023 Koninklijke Philips N.V.Todos los derechos reservados.Las especificaciones quedan sujetas a modificaciones sin previo aviso. Las marcas comerciales son propiedad de Koninklijke Philips N.V. o sus respectivos titulares. Diseño y apariencia •Color: Cobre rojo Función extendida •Módulo IoT:Wi-Fi Piezas de accesorios •Adaptador de corriente •Soporte magnético •Manual del usuario •Tarjeta de garantía。
解析智能门锁组成结构及防盗五大要点
智能锁的结构—智能锁的简介智能锁是指区别于传统机械锁,但也是基于传统锁具结构上,结合生物识别技术的应用,才有了如今技术层次更高、带有智能化的锁具。
在用户识别、安全性、管理性方面更加智能化的锁具,门禁系统中锁门的执行部件。
智能锁区别于传统机械锁,是具有安全性,便利性,先进技术的复合型锁具。
使用非机械钥匙作为用户识别ID的成熟技术,如:指纹锁、虹膜识别门禁(生物识别类,安全性高,不存在丢失损坏;但不方便配置,成本高)、磁卡、射频卡(非接触类,安全性较高,塑料材质,配置携带较方便,价格低廉)、TM卡(接触类,安全性很高,不锈钢材质,配置携带极为方便,价格较低)。
智能门锁的结构智能锁的结构由机械插芯、电子主板、指纹采集器等零部件组成,这些元件相互之间的合作赋予了智能门锁更多的智能性。
1、面板
市场上智能锁面板使用的材料有:锌合金、不锈钢、铝合金、塑料等。
2、锁体
锁体的材料主要是不锈钢,但是也有铁的。
锁体主要分为标准常规锁体和非标锁体两种。
3、电路板
电路板是智能锁的核心,电路板的好坏会影响智能锁使用性能。
4、马达
马达是智能锁提供动力的电机,耗电都很小。
当用密码或者刷卡、指纹开锁时,都会听到马达转动一下的声音。
5、把手
把手有长把手和圆把手两种,可以根据不同的需要选购不同的智能锁把手。
PORIS PR250NT 门禁控制器使用说明PR-250NT简易操作手册Updata:2011/5/13PR-250NT快速操作设定,如下:系统开机当系统(指控制器及所连接的全部模组)打开电源后,设备本身会先自动故障检测,然后,控制器LCD会显示【初始画面】,再转换成【初始时间】,控制器面板LED灯会全亮,哔声消失后,就只剩POWER和A灯亮着。
面板按键说明面板指示灯说明:: : : : : ~ 启动功能菜单菜单确认与执行键(Enter Key)退出当前画面,回上一项功能画面向上翻页向下翻页: 数字键使用者登入操作方式:按【MENU】键,显示【系统主选单】按[EN]键进入,显示【登入系统操作人员】按[EN]键进入,显示【登入系统密码:_____】画面。
输入操作员默认密码为[1234],输入后按[EN]键确认,若登入成功,则画面显示【主管人员确认】,即表示已进入系统设定程序。
PORIS Electronics Co. Ltd.1 / 5PR-250NT简易操作手册Updata:2011/5/13系统初始化-清除原有设定资料功能说明:本项功能为将控制器所有设定值(不含卡片)清除恢复成出厂默认状态。
操作方式:进入【系统主选单】按[EN]键,按上下翻页键选择【系统处理】按[EN]键进入,按上下翻页键选择【系统初始化】按[EN]键进入,按上下翻页键选择【系统初始化[是]】按[EN]键确认,系统会做初始化动作,并自动重新启动控制器。
改变显示语言功能说明:控制器系统语言切换。
操作方式:进入【系统主选单】按[EN]键,按上下翻页键选择【【语言[English][英文]】【System Menu】【Language Setting】语言设定】按[EN]键进入,LCD会显示语言种类【语言[CHS][简体中文]】,按上下翻页键选择系统要显示语言种类,按[EN]键确认,系统马上会切换到选定的语言。
控制器识别码(ID)设定功能说明:如果控制器只有一台,则本项设定可免(控制器出厂时ID 皆设为001)。
UIOT超级智能锁说明书温馨提醒:1.智能锁配套的机械钥匙,作为紧急开锁方式,切记请勿放于室内,可存放于非室内的安全场所,以备紧急状况下使用(如自家车内或办公室内)。
2.产品安装视频、设置视频,请关注公司微信公众号或者拨打服务热线。
3.产品规格参数表如下(以下数据以实验室测试为准):一、产品概述1.产品示意图2.产品功能配置二、系统功能与介绍1.初始状态1.1初始状态下管理员密码为“123456”;1.2初始状态需通过管理员密码,进入系统菜单增加用户才可正常开门。
注:“123456”为出厂默认的管理员密码,当注册管理员用户后,该密码会自动失效,下次进入系统菜单需要验证已经注册的管理员指纹或密码。
2.操作概述◆系统菜单:唤醒状态下按“*#”号键后可开始验证管理员用户,并进入系统菜单,支持指纹/密码验证,不支持刷卡进入系统菜单----管理员用户。
◆开门:直接刷卡/输入密码/指纹正常开门,不进入系统菜单----管理员/普通用户。
◆系统导航键:系统将播报数字对应的语音内容,通过选定数字来进入对应功能设置。
◆门铃键:在系统主界面按“门铃符号按键”触发门铃。
3.开锁用户管理与信息概述3.1用户信息包括:用户指纹信息(1个),用户密码信息(1个),用户刷卡信息(1个);用户ID号将对应用户权限等级信息。
3.2用户权限等级分为管理员用户,普通用户。
普通用户无法进行相关设置,只可验证身份开门;管理员用户除验证开门外,还可进入系统配置菜单。
3.3用户信息可创建,修改,删除;不能删除当前登录的管理员信息。
3.4开锁用户存储个数为100组,开锁记录信息为512个,此为门锁本地贮存的开锁日志,而云端开锁日志不限制个数。
注:密码不可重复设置,即用户A设置过的密码,用户B不可再重复使用。
4.密码开锁4.1有效密码位为最低不少于6位,最高不超过9位。
两个管理级别的密码,分为管理员密码,普通用户密码;4.2支持虚位密码,输入密码不超过12位,其中有连续的密码信息在其中,即可开锁。
REMOVAL AND INSTALLATIONRF KeypadRemoval - RF Keypad1.Please read ALL of these instructions before proceeding.Removal and Reprogram ProcedureNOTE:This procedure should be used if the remote entry transmitters need to be reprogrammed to vehicle after the RF keypad has been installed to the exterior.NOTE:Step 3 is to be completed only if Step 2 is unsuccessful. If Step 2 is successful no further action is required.2.Try to reprogram the RF keypad and other remote entry transmitters while the RF keypad is stillattached to the exterior of the vehicle.To program the RF keypad to your vehicle go to the appropriate "Programming and Installation"section, reference the application table below.3.Remove the RF keypad from the vehicle exterior.1Clean area around RF keypad.2Slide cutting line behind RF keypad to cut tape.3Remove the RF keypad.4Remove adhesive from the vehicle using adhesion remover or strip off wheel.5Remove adhesive from the back of the RF keypad.6Scuff the back side of the keypad, with a scuff pad or wire brush.7Clean the back of the keypad.8Add new tape if the RF keypad is to be re-used.▪To ensure proper keypad mounting, avoid covering the protruding portion of the keypad back.▪Use 3M™ Acrylic Plus Tape PT1100.4.Reprogram the RF keypad from the driver seat area.To program the RF keypad refer to the table below for appropriate reprogramming procedure.CONFIGURATION CHARTModel Year Model Communication Type Installation Method 2014+Fusion2C2015+F-1502C2015+Edge2C2016+Explorer2C2017+Super Duty2C2010+Transit Connect1A2007+Focus1A2011+Fiesta1A2013+Escape1A2013+C-Max1A2014+Transit1A2013Fusion Not Supported Not Supported-Intelligent Access Not Supported Not SupportedVehicles2005+All Else1B Configure DeviceNOTE:Reference the table above for communication type that applies for the vehicle.NOTE:The keyless entry keypad can be used in various vehicle applications. The following procedure describes the method to switch between the two communication types.5.Upon pressing the 1/2, 3/4, and 9/0 buttons simultaneously for at least one second, all five buttonswill flash at a two flashes per second rate. This indicates the keypad is waiting for master code entry. The master code is entered as in a normal keypad unlock, each button press will give another five second window for the next button press. If no button is pressed within five seconds theconfigure mode will exit.6.When the proper master code is entered the 9/0 button will flash a pattern that corresponds to thecurrent protocol set:•One flash per second for "Communication Type 2".•Three flashes per second for "Communication Type 1" (Default).7.You will have 10 seconds to:•Press the 9/0 button to change the protocol to "Communication Type 2".•Press the 1/2 button to change the protocol to "Communication Type 1" (Default).Type A - Programming and InstallationNOTE:It is easier to program the keypad prior to attaching it to the vehicle.NOTE:After five seconds of idle time, the keypad will reset itself.NOTE:You must have all remote entry transmitters available before beginning this procedure, IKTs, Fobs and RF keypads. Check owners guide "Locks and Security" for maximum remote entry transmitters allowed,and proper key positions.If all remote entry transmitters are not present during the programming procedure, the missing transmitters will not work following programming.NOTE:The vehicle will exit programming mode after 20 seconds of inactivity.NOTE:Ensure the brake pedal is not depressed during this procedure; the electronic signal could interfere with programming.9.Make sure that you have all of the IKTs, fobs and RF keypads for this vehicle.NOTE:Only one button press is recognized. After the button press is registered, the flash rate will change to reflect the new setting of the protocol. If you first press the 1/2 button, you cannot then press the 9/0button to change the selection. You must exit the session.8.Press the 5/6 button to confirm the entry, the 1/2, 3/4, 5/6 and 7/8 buttons will flash four times to confirm protocol change and the keypad will turn off and sleep. If the 5/6 button is not pressed within 10 seconds of protocol change, the protocol will NOT change and the procedure will need to be repeated.13.Within 10 seconds of completing the previous step, press any button on remote entry transmitter, ifequipped.The system will chime once, to confirm that the Fob has been programmed.14.Within 10 seconds of completing the previous step, press any button on remote entry transmitter, ifequipped.The system will chime once, to confirm that the Fob has been programmed.15.Within 10 seconds of completing the previous step, press the 7/8 and 9/0 buttons simultaneously onthe RF keypad 1.The system will chime once, to confirm that the RF keypad has been programmed.Repeat this step if more than one RF keypad is used.16.After all remote entry transmitters have been programmed; turn the ignition to the RUN position forthe vehicle to exit programming mode.17.Test all remote entry transmitters for proper operation, perform a lock/unlock cycle on all remoteentry transmitters.NOTE:Most vehicles have an audible feedback when programming such as horn honks, door locks/unlocks, or chimes.Some vehicles may not have audible feedback e.g C-MAX18.If the remote entry transmitters do not program properly repeat the "Type A - Programming andInstallation" procedure. The driver's door may need to be opened and closed to reset the system.10.Unlock the vehicle with programmed keyfob.11.Insert a key in the ignition.12.NOTE:Some vehicles may require eight key cycles before returning to the OFF position.Turn the key from the OFF position to the RUN (not START) position four times within sixseconds.The fourth turn must end in the OFF position.The system will chime to confirm the vehicle is in programming mode.20.Unlock the vehicle with programmed keyfob.21.Put a key in the ignition.22.Turn the key from the OFF position to RUN (not START) position eight times within 10 secondswith the eighth turn ending in the RUN position. The doors will lock, and then unlock, to confirm the vehicle is in programming mode.23.Within 20 seconds of completing the previous step, press any button on fob 1, if equipped. Thedoors will lock, and then unlock, to confirm that the fob has been programmed.24.Within 20 seconds of completing the previous step, press any button on fob 2, if equipped. Thedoors will lock, and then unlock, to confirm that the fob has been programmed.25.Within 20 seconds of completing the previous step, press the 7/8 and 9/0 buttons simultaneously onthe RF keypad 1.The doors will lock, and then unlock, to confirm that the RF keypad has been programmed.Repeat this step if more than one RF keypad is used.NOTE:2Q VRPH ,.7 NH\V WKH GRRU ORFNV ZLOO QRW DFWLYDWHType B - Programming and Installation19.Make sure that you have all of the fobs and RF keypads for this vehicle.28.If the remote entry transmitters do not program properly repeat the "Type B- Programming andInstallation" procedure. The Driver's door my need to be opened and closed to reset the system.Type C - Programming and Installation30.Verify that the Integrated Diagnostic System (IDS) is updated to the most current version.31.Connect IDS:•Follow the prompts to select new vehicle session.•Enter VIN.32.Program the keyless entry keypad to the vehicle using the IDS.•Select the Tool Box icon.•Select Body.•Select RF Keypad Learn Process.26.After all remote entry transmitters have been programmed, turn the ignition to the OFF position.The doors will lock, and then unlock, to confirm that the vehicle has exited programming mode.27.Test all remote entry transmitters for proper operation, perform a lock/unlock cycle on all remoteentry transmitters.29.Refer to the Configuration Chart of this document to ensure the correct Communication Type isused on the keyless entry keypad. Instructions for programming to the correct communication type may be found under Configure Device.34.Enter the device’s serial number and select the tick button.•The serial number is up to six digits.•The serial number is located on the part package.•If IDS responds with “Serial Number is not Valid”, go to the "Alternate Programming Method" section.•If all four storage locations are in use, go to the "Free Storage Location" section.Synchronize Keyless Entry Keypad to Vehicle (Type C - Continued)35.Once the unique data is entered, the programming routine will ask to select the tick button andactivate the Lock command on the keypad. This step will ensure that the keypad and the vehicle are synchronized.• A progress bar will be displayed and will complete over 10 seconds while the vehicle is commanded to synchronize with the keypad.•During the display of the 10 second progress bar, activate the Lock command by pressing DQG WKHQ UHOHDVLQJ the 7/8 and 9/0 buttons on the keypad simultaneously.33.Follow On-screen instructions until the screen below is displayed:4Within 5 seconds of Master Code entry, press the 3/4 button to unlock all doors.5Within 5 seconds of pressing the 3/4 button, press the 5/6 button multiple times to release the trunk.Alternate Programming Method (Type C - Continued)37.If IDS responds with “Serial Number is not Valid”, answer YES to the question “Would you like toenter 48-character SK/TIC/RC string?”•The 48-character string is located on the part package.•Using either the computer keyboard or the on-screen buttons, enter the 48 characters, 4 digits at a time.•Select the tick button when all 48 characters have been entered.Test Keyless Entry Keypad Operation (Type C - Continued)36.When the synchronization is complete, the programming routine will instruct the installer to turn offthe vehicle ignition key and test operation of the keypad. At this time, perform the following steps:1Close all vehicle doors.2Press the 7/8 and 9/0 buttons on the keypad to lock all doors.3Enter the keypad’s Master Code to unlock the driver’s door.Free Storage Location (Type C - Continued)38.If all four storage locations are in use, IDS will ask if you would like to determine which keypadunits are programmed to which storage locations. The process will begin by asking you to activate device #1:•Press the 7/8 and 9/0 buttons on the first keypad that is already programmed to the vehicle. Then, select the tick button on IDS.•IDS will ask if you would like to check another device. If there is another keypad on the vehicle, select YES on IDS to check that keypad unit. Proceed with the activation process to see if it isprogrammed to the vehicle.•Repeat this process for all keypads attached to the vehicle. Up to four keypads can be programmed to the vehicle.39.When all keypads have been tested, select NO when asked by IDS whether you would like to testanother device. A screen similar to the one below will be displayed:1Location # 1 – 4 refers to the four storage locations on the vehicle that may be programmed with information for a keypad.2“2 in use” refers to the second keypad device that was activated during the device check.3“2 in use” is listed next to the storage location where it is programmed.▪If you want to delete keypad #2 from the vehicle, select Location #2 and select the tick button.▪If you want to keep keypad #2 programmed to the vehicle and delete all other locations, selectLocation #1, Location #3, and Location #4. Then select the tick button.Troubleshooting (Type C - Continued)40.If the programming procedure has been completed, and the vehicle does not respond to commandsfrom the keyless entry keypad, try these suggestions:•Ensure that the vehicle is NOT a push-button start vehicle.•Ensure that the device is configured properly by following the steps in the "Configure Device"section.•Ensure that the device is synchronized to the vehicle:▪Enter the programming process ("Program Device to Vehicle" section).▪Instead of entering the device’s serial number, select the Delete button to determine whetherthe vehicle recognizes the keypad.▪If the device is recognized by the vehicle (listed as In Use when activated), delete the storagelocation contents.▪Re-enter the programming process and complete all steps through the synchronization process and the operational test.Programming a Personal Entry Code (if desired) - All VehiclesNOTE:If you lose your code card, please contact your Ford or Lincoln dealership for factory code retrieval. NOTE:Do not set a personal code that uses five of the same number. Do not set a personal code that uses five numbers in sequential order. There is a maximum of two access codes; the factory set code and one personal code. If you reprogram the personal code the prior personal code will be erased.NOTE:Do not repeat the "Programming and Installation" section if a mistake is made in the "Programminga Personal Entry Code" section.41.Enter the factory set code, as indicated on your code card.42.Within five seconds of entering the factory code, press and hold the 1/2 button for 1 second, the 9/0button will flash twice to confirm the keypad is in programming mode.43.Within five seconds, enter your desired personal 5-digit code. Each digit must be entered within fiveseconds of the previous digit.44.The vehicle doors will unlock-lock-unlock to confirm that your personal code has been programmedto the keypad and the 9/0 button will flash twice to confirm that the keypad has exited programming mode.Adhering the Keypad to the Vehicle - All VehiclesNOTICE:Do not adhere to moveable glass or windshield.NOTE:For proper adhesion, the mounting surface should be at least 60°F (15°C).NOTE:The tape is very sticky and will adhere quickly once contact is made.NOTE:This product is designed to attach to your car door, centered between the door handle and the window sill, but will work mounted to a relatively flat surface.45.Hold keypad up to desired mounting surface to confirm that all the tape will contact the mountingsurface.46.Clean the vehicle surface where the keypad is to be adhered with the alcohol wipe provided.47.Pull the tape tabs off the keypad tape, orient the keypad in the desired location and press onto thedoor surface.•Be sure to press firmly on all edges to ensure proper adhesion of the tape.Using the Keypad - All VehiclesNOTE:Refer to the "Locks and Security" section of your vehicle Owner’s Guide for operation of remote transmitters during RUN/START. Remote transmitter operation in RUN/START key position is model dependent.48.To unlock the drivers door, enter your personal 5-digit code or the factory set code.•Each digit must be pressed within five seconds of each other.49.To unlock all doors, press 3/4 button within five seconds of entering a valid keypad code.51.To unlock and open the driver side power sliding door, if equipped, press the 7/8 button twicewithin five seconds of entering a valid code.52.To lock all doors, press the 7/8 and the 9/0 keys simultaneously.•You do not have to enter a 5-digit code.Low Power Warning - All Vehicles53.If you unlock the door with the keypad and the locks cycle one additional time, it is time to replacethe unit.•The battery is not replaceable.50.To unlock the trunk or hatch, if equipped, press the 5/6 button within five seconds of entering avalid keypad code (IKT vehicles may require the 5/6 button to be pressed twice). Press the 5/6button twice to open or close the passenger side power sliding door, if equipped.Anti-Scan Mode - All Vehicles54.If the wrong code has been entered 7 times (35 consecutive button presses) the keypad is disabledfor one minute and the keypad lights will flash during this time.To Remove a Personal Code, If Desired - All Vehicles55.Enter the factory code, then within five seconds press and hold the 1/2 button, for 5 seconds. Thevehicle will unlock, lock and then unlock to confirm that your personal code has been removed. The 9/0 key will flash four times (2 quick then 2 slow) to confirm that your personal code has been removed.56.Release the 1/2 button.Owners Instructions - All Vehicles57.Place the user manual with the vehicle's owners manual when programming and installation iscomplete.58.This device complies with part 15 of the FCC rules and with RSS-210 of Industry Canada.Operation is subject to the following two conditions:1This device may not cause harmful interference.2This device must accept any interference received, including interference that may cause undesired operation.•Changes or modifications not expressly approved by the party responsible for compliance could void the user's authority to operate this equipment.。
目录1 重要信息 022 安装您的智能锁 035 如何使用智能锁 166 其他功能 197 提示灯光的含义与使用 208 故障排除 224 如何设置您的智能锁 10安全警告旧产品和电池的处理产品清单安装立体装配图安装前须知安装步骤防猫眼功能恢复出厂设置一键静音功能门锁状态提示灯低电量提示灯静音状态提示灯系统锁定提示灯报警功能的种类与报警方式如何使用紧急电源如何更换电池-设置前须知-修改管理密码-用户设置-用户删除-系统设置-扩展功能-系统查询-关于本机查询开启室外开锁-密码开门-指纹开门(选配)-卡片开门(选配)室内开锁-执手开门上锁-室外上锁-室内上锁室内反锁机械钥匙开启3 了解您的智能锁 09外面板内面板1 重要信息安全◆在使用智能锁前,请阅读并理解所有说明。
因未遵守说明而造成的损坏不在保修范围内。
◆建议使用制造商指定的附件/配件◆仅使用本产品配置的碱性电池,或同样规格类型的电池◆请勿强行拆卸本产品,以免触发警报或损坏产品◆请勿用尖锐物品擦指纹采集器,否则可能造成永久性损坏◆请勿将产品暴露在漏水或溅水环境下◆请勿将产品接触腐蚀性物质,以免破坏外壳保护层◆请勿在执手上悬挂物件,以免影响门锁的正常使用◆清洁产品,请用软布擦拭◆请勿在设置操作时拆卸电池◆请你选择专业的工人安装门锁,并按照本公司提供的安装标准进行操作。
切勿私自拆装门锁,并保护好相关固封标志◆门锁安装调试合格后,请在第一时间内修改出厂设置的默认管理密码,并妥善保管好机械钥匙,不要轻易泄露密码信息。
◆门锁触发低电量报警后,请及时更换掉全部电池,并确保电池正负极安装正确。
警告◆不要将电池靠近火源,以免发生爆炸◆请勿使用不符合安全规定的应急电源给产品供电◆请勿用金属物将电池引线的两极连接短路,以免引起爆炸◆确保由飞利浦、飞利浦授权的服务中心或专业的维修人员进行更换部件。
◆请勿使用其它制造商生产的,或未经飞利浦特别推荐的附件或部件。
如果使用此类附件和部件,您的保修可能失效。
BF300智能锁说明书第一章、概述1.简介感谢购买本公司智能锁系列产品,该系列产品采用了先进的指纹技术、非接触式刷卡、密码和钥匙作为开锁方式,并且具有多种开门模式选择,使用更灵活、更方便、更安全!2.产品优势和特点开锁方式多样化:指纹、密码、刷卡、应急钥匙。
采用半导体指纹头,杜绝假指纹开锁。
有应急钥匙,电池没电或线路故障也能开锁。
应急外接电源,USB接口。
人性化设计,语音提示音量大小可调。
组合开锁,双开模式,使门锁安全更具保障。
具有防旁人窥视密码功能。
具有防撬报警功能。
具有防猫眼功能。
第二章、产品外观、尺寸适用范围适用场所:高档住宅区、别墅、办公大楼、商务写字楼、星级酒店等。
适合门厚:40-125mm6.键盘功说明注意:触摸面板,自动唤醒按键屏指纹锁键盘采用的是12键设计,其具体功能如下:✓“0-9”号键:为数字键;✓“#”号键:进入菜单功能键;✓“*”号键:为清除键、返回键、退出键;✓“#”号键:在菜单功能状态下按“#”表示确认;第三章、功能与操作1.初始状态:无密码、无指纹、无感应卡,可以任意指纹、密码、卡片、直接开门、按#键进入管理菜单。
录入管理员信息后,无注册指纹、密码、卡片将自动失效。
2.硬件初始化拆开电池盖,按住按键5秒,等语音提示请输入编号后松开,然后按1和2,再按#号键确认,即可初始化成功。
3.功能设置录入管理员后,直接管理员验证后,按#进入功能设置,按9进入常开模式4.开门方式4.1指纹开门唤醒显示屏按键盘,把录好的手指压在指纹传感器上;验证通过时会有电机转动的声音,“#”键会常亮,有语音提示“验证成功,请按把手开门”。
4.2密码开门唤醒显示屏按键盘,输入录入好的密码+#键;验证通过时会有电机转动的声音,“#”键会常亮,有语音提示“验证成功,请按把手开门”。
伪码功能在正确密码前后添加的任意数字均称为伪码;验证密码时添加伪码可保障密码的安全,降低他人窥视密码或恶意破解密码的成功率。
多款智能指纹锁介绍在近两年兴起的智能家居潮流中,家庭安防设备以其紧贴日常生活、使用频次高等特点备受消费者青睐。
其中,作为家庭安全最重要防线的智能门锁产品更是深得消费者的厚爱。
传统门锁产品往往让消费者陷入“安全的不够方便,方便的不够安全”的尴尬局面,智能指纹锁的诞生完美化解了这一困境,既满足了消费者的安全需求,又让开锁变得轻而易举。
下面小编就为大家盘点几款市面上安全可靠的智能指纹锁:T135还支持钥匙分享功能,主人可将密码前六位分享至访客手机APP,手机APP自动加密生成密钥,访客首次开锁需要主人确认权限,确认后访客便可以在有效期内用密钥快速开锁。
这样,家里来客人而自己又恰好不在的时候,客人就不必吃闭门羹了。
普罗巴克F202采用独创的双电双核技术及世界领先的BioSure9.0指纹算法,安全性能卓越,拥有十分强劲的报警功能,如防撬报警,斜舌报警,密码错误报警,低压报警,胁迫报警等功能。
其中最为突出的是胁迫报警,当使用者被歹徒要挟打开锁时,被胁迫的人可以按动之前设置的反劫持设置,此锁就会即刻报警,十分智能。
此外,F202在设计上采用黑贝式滑盖天窗,游弋着精简的车型线条,勾勒出一种刚柔并济的美感,让用户在开合之间感受科技魅力。
三星这款推拉式智能门锁可以通过指纹、密码、RF卡或插钥匙这4种方式开门。
为了防止不法分子通过扫描触摸屏上指纹获取密码,SHS-P718机智地在输入门锁密码前增加随机密码,也就是说,在输入门锁密码之前,触摸屏上会随机显示2个随机数字,你需要先点选这两个数字,然后输入真正的门锁密码,才能解锁。
同时,如果有陌生人在室外门锁前逗留超过1分钟,智能锁的传感器就会监测到,并自动发出警报,以防止坏人窃取密码。
此外,此锁由行业顶级工程师打造,凝聚多项行业领先技术,如生物活体触摸屏、语音提示、防撬报警,智能家居、虚位密码等。
同时也是行业第一款磁卡操作区与密码操作区同在一个位置上的指纹锁。
欧乐智能锁说明书欧乐智能锁是一款具有智能化功能的现代化安全设备,它将为您的生活带来便利和安心。
本说明书将为您介绍欧乐智能锁的安装、设置、使用方法和注意事项,帮助您更好地使用和维护这一智能设备。
一、安装欧乐智能锁安装简单,只需按照以下步骤进行操作即可:1. 确保门体平整牢固,适合安装智能锁。
2. 仔细阅读说明书,了解锁具组装方式和所需工具。
3. 使用提供的工具,将锁具安装在门体上,并将配件固定牢固。
4. 进行电源连接,确保锁具能够正常运行。
5. 安装完成后,检查锁具是否安装牢固,各功能是否正常运作。
二、设置设置是使用欧乐智能锁的重要步骤,您可以根据以下步骤进行操作:1. 按下锁具上的设置按钮,进入设置模式。
2. 根据提示,在锁具上输入预设的管理员密码,确认进入设置模式。
3. 在设置模式下,您可以根据系统提示设置一系列参数,包括开门方式、密码规则、胁迫密码等。
确保密码设置符合个人需求和安全标准。
4. 设置完成后,按下确认键确认设置,锁具将保存并退出设置模式。
三、使用方法欧乐智能锁的使用非常便捷,只需简单操作即可完成开锁和锁门的动作,具体步骤如下:1. 输入正确的密码或使用配套的智能钥匙进行开锁。
如果输入错误的密码,系统将进行提示,请重新输入。
2. 开锁成功后,您可以将门体直接推开。
3. 关门时,只需将门体关上并轻轻按下门把手即可自动上锁。
系统会发出“嘟嘟”声和灯光提示,表示锁门成功。
四、注意事项1. 欧乐智能锁属于电子产品,请避免长时间暴露在高温、潮湿或受到强烈磁场干扰的环境中,以免影响正常使用。
2. 请勿在电池电量低于20%时,继续使用智能锁,以免造成电池耗尽无法开锁的情况。
3. 如果有需要添加或删除用户的密码权限,请按照说明书的指示进行操作,确保密码权限管理的安全性和有效性。
4. 如需更换电池,请按照说明书上的操作指引进行更换,并确保使用正常品牌、型号的电池。
5. 请勿将锁具内部的电子元件和密码泄露给不法之徒,以免遭受盗窃和其他安全风险。