CYL660-S称重控制器说明书
- 格式:pdf
- 大小:495.78 KB
- 文档页数:20

User's ManualController MCTRL660Rev1.3.1 NS110100125XI 'AN N OVA S T AR T EC HCO .,L T D.Statement Dear users,W elcome to use the product from Xi’an NovaStar Tech Co., Ltd. (hereinafter referred to as “Novastar”). We are pleased to offer this manual to help you understand and use the product. In the preparation of the manual, we try to make it accurate and reliable. NovaStar may revise and alter the contents of the manual at any time without notice. If you have any problems in the use, or you have any suggestions, please inform us in accordance with the contact provided in this manual. For the problems you encounter in the use, we will do our best to provide support. For your suggestions, we would like to express our thanks and make assessment as soon as possible for adoption.CopyrightNo part of this manual may be reproduced or transmitted in any form or by any means without prior written consent of NovaStar. All rights reserved. Trademarkis the registered trademark of NovaStar.XI 'AN N OVA S T AR T EC HCO .,L T D.Contents1 Safety statement .................................................................................................................................................... 52 Overview ................................................................................................................................................................... 6 3Hardware connection ........................................................................................................................................... 8 3.1 Front panel................................................................................................................................................... 8 3.2 Rear panel . (9)4 Signal Connection .............................................................................................................................................. 105 Operation Instructions ...................................................................................................................................... 116 Main Interface ...................................................................................................................................................... 11 7Procedures............................................................................................................................................................. 12 7.1 Setp1 EDID Resolution Setting .......................................................................................................... 12 7.2 Step 2 Screen Setting ............................................................................................................................ 13 7.3 Step 3 Adjusting the Brightness of the Screen ............................................................................ 15 7.4Advanced Setting ................................................................................................................................... 15 7.4.1Offset Position ............................................................................................................................ 16 7.4.2Image Quality .............................................................................................................................. 16 7.4.3Master/Redundancy .................................................................................................................. 16 7.4.4 Loading Cabinet Files ............................................................................................................... 17 7.4.5 Save RV Card Parameters ........................................................................................................ 21 7.4.6 Smart Brightness ........................................................................................................................ 21 7.4.7Restoring to Factory Settings (21)7.5 Display Control (22)XI 'AN NOVA S T AR T EC HCO .,L T D.7.6Language Setting (23)8Hardware Program Updating (23)9FAQ and Precautions (26)10Technical Specifications (26)11Installation Dimensions (28)X I'A NN OV AS TA RT EC HC O.,LT D.1 Safety statementPlease use this equipment according to the stipulations to avoid possible dangers. In the case of any damage, non-professionals shall not disassemble and repair it without authorization and you shall timely contact after-sales department of this company. High voltageProcessor has high voltage and non-professional maintenance personnel shall not open the rear cover to avoid danger. Warnings1) Water is strictly prohibited to drop or splash on this equipment and any object containingliquid is strictly prohibited to be placed on this equipment;2) Keep this equipment away from fire sources to prevent fires;3) When this equipment has abnormal sound, smoke or abnormal smell, power plug shall beimmediately pulled out. Notice1) Please carefully read this instruction before using and properly keepping it for use later; 2) If there is lightning or it is not used for a long time, please pull out the power plug;3) This equipment is not suitable for operation and debugging by non-professionals and usersmust accept guidance from professionals;4) Do not inset any object from vent hole of this equipment to avoid equipment damage orelectric shock;5) This equipment shall not be placed in the places near water or other wet places for use; 6) This equipment shall not be placed on cooling fins or in other places with high temperatureXI 'AN N OVA S T AR T EC HCO .,L T D.for use;7) Please properly tidy and place power lines to avoid damage;8) In the case of occurrence of the following circumstance, power plug of this equipment shallbe pulled out and repairing shall be entrusted: a) When liquid splashes into this equipment;b) When this equipment falls or the case is damaged;c) When this equipment obviously has abnormal function or change of performance.Please carefully read the above precautions. If personal safety problem or product damage is caused due to misoperation because you do not follow this instruction, this company will assume no liability!2 OverviewMCTRL660 is the latest independent master controller of NovaStar, which is mainly applied for display rental service. It supports screen configuration at any time without a computer. It has the following characteristics:1) It has adopted an innovative design to implement smart configuration and the screenconfiguration can be completed within 30 seconds;2) It has adopted Nova G4 engine, which makes the screen stable and flicker free withoutscanning lines. The images become exquisite and bring a good sense of depth;3) It supports Nova's new-generation pixel-by-pixel calibration technology which is fast andefficient;4) It can implement white balance calibration and color gamut mapping based on differentfeatures of LEDs used by displays to ensure restoration of true colors;XI 'AN N OVA S T AR T EC HCO .,L T D.5)It is the only control system supporting the input of 12-bit high-definition multimediainterface (HDMI) and high-bandwidth digital content protection (HDCP) in China;6)It supports screen configuration at any time without a computer;7)It supports manual adjustment of screen brightness, which is convenient and efficient. Thesefeatures have satisfied the special needs of display rental service to the maximum extent;8)HDMI/DVI Input;9)HDMI/DVI Output;10)HDMI/external audio input;11)12bit/10bit/8bit HD video source;12)Resolution supported: 2048×1152,1920×1200,2560×960;13)Resolution supported: 1440×900, (12 bit/10 bit);14)Cascading supported;15)18 bit gray scale processing and presentation;16)Video format: RGB, YCrCb4:2:2, YCrCb4:4:4.X I'A NN OV AS TA RT EC HC O.,LT D.3Hardware connection3.1Front panel.3.2Rear panelNotes: The arrangement of interfaces can be slightly adjusted to enhance user experience. Please in kind prevail.4 Signal ConnectionFig. 4-1 MCTRL660 Signal connectionConnect as follows if it is necessary to control multiple MCTRL660 controllers simultaneously.Fig. 4-2 Multi-controller cascadeXI 'AN N OVA S T AR T EC HCO .,L T D.5Operation InstructionsAll the operations of MCTRL660 can be achieved by one knob, one return key, two toggle keys of video source, 3D/2D toggle key and user-defined shortcut key.Knob:✧Press the knob under main interface to enter the operation interface of menu;✧Rotate the knob to select menu or press the knob under the operation interface of menu to selectcurrent menu or enter submenu;✧Rotate the knob to adjust the parameter after selecting the menu with parameter; press the knobagain for confirmation after adjustment.ESC: Return key to exit from current menu or operation.6Main InterfaceAfter starting the controller, the main interface of OLED display is as follows:.Indicate access of a video source on the HDMI. It blinks in the case ofno video source inputIndicate that the machine is in the master modeLED Output (it is Port 2 output )The current brightness is 50%Sign of press key lock. When this icon appears at the main interface, it X I'A NN OV AS TA RT EC HC O.,LT D.Indicate that and that the frame frequency is 60 Hz. 7 ProceduresMCTRL660 is powerful and the operation is very simple. In general, the display can be started and normally used after the user complete the first three steps. Other options in advanced setting can be selectively set so as to achieve a better display. Please refer to 7.4 Advanced Setting .7.1 Setp1 EDID Resolution SettingThe function can be used to set the output resolution of video card. In general, the content shown in screen cannot exceed the output resolution of video card.Enter the menu “Advanced Setting ” to set the resolution of video source. It can be achieved in two modes: preset resolution selection and user-defined resolution.Mode 1: Preset resolution settingSelect proper resolution and refresh rate among the standard resolutions preset in controller . If there is no proper preset value, mode 2 user-defined resolution can be selected.XI 'AN N OVA S T AR T EC HCO .,L T D.Mode2: User-defined resolutionRotate the knob to set user-defined width (gradually increase in even number), height and refresh rate, select “Application ” and then press the knob for confirmation. The user-defined resolution cannot work if it is not applied.7.2 Step 2 Screen Setting1) Power on the screen. If the cabinet is in normal display, enter into step 2). If the cabinet is inabnormal display, load the cabinet file first and fix it to the receiving card. See detailed operation in 7.4 Advanced Setting .2) Return to “Screen Setting" submenu. Rotate the knob to switch to submenus of other optionsrespectively to perform configurations, as shown in the following figures:XI 'AN N OVA S T AR T EC HCO .,L T D.a) Set Cabinet Row QTY and Cabinet Col QTY according to the actual situation of the screen; b) Set Cabinet Out1 Num . The device has some limitations on the cabinet quantity of networkinterfaces. For details, see precautions for screen setting i);c) Set the alignment of the screen. Pay attention to precautions for screen setting iii), iv) and v)below;d) Set the EDID resolution of the video source.S T AR T EC HCO .,L T D.7.3 Step 3 Adjusting the Brightness of the ScreenReturn to the main menu interface. Press the knob to select the corresponding value. Y ou can rotate the knob to adjust the brightness at this time.7.4 Advanced SettingEnter the submenu of advanced setting, rotate the knob, and then the user can see the following eight setting options contained in advanced setting. The user can set the parameters by taking the followingXI 'AN N Oitems.7.4.1 Offset PositionAdjust the starting point coordinates. Here the upper limit of offset is regulated, that is, the total of offset and screen size cannot exceed the output resolution of video card.7.4.2 Image QualitySet Gamma, contrast, saturation, Hue value of image as required. Save these parameters to receiving card by applying “Save RV Card Parameters ” after proper adjustment.7.4.3 Master/RedundancySet this controller to the master mode or Redundancy mode when the system has multiple controllers.XI 'AN N OVA S T AR T EC HCO .,L T D.7.4.4Loading Cabinet FilesAfter the screen is powered on, you must load cabinet files first if the cabinet fails to display normally. The cabinet files must be sent to the MCTRL660 through the NovaLCT-Mars beforehand. The following figures show the procedure:1)Save the configuration file of cabinetClick to save the configuration file of cabinet (.rcfg) to the local file of PC after the configuration of receiving card has been completed.X I'A NN OV AS TA RT EC HC O.,LT D.Select the corresponding COMport of the MCTRL660.X I'A NN OV AS TA RT EC HC O.,LT D.X I'A NN OV AS TA RT EC HC O.,LT D.2)Import the configuration file of cabinet into MCTRL660.The operation steps are as follows:Tip: After the MCTRL660 Setting interface is displayed, the NovaLCT-Mars automatically reads theexisting configuration files in the MCTRL660. The NovaLCT-Mars can perform operations such as modification of file name, adjustment of file order and deletion to these files.3)Load the configuration file of cabinetX I'A NN OV AS TA RT EC HC O.,LT D.4) Save the configuration file of cabinet into receiving card. See detailed operation in 7.4.5 Save RV CardParameters .7.4.5 Save RV Card ParametersSave the current configuration parameters to the hardware so that the data will not disappear when there is outage.7.4.6 Smart BrightnessThis parameter is set to Disable by default. T o successfully enable this function, you must load the configuration files first. Currently, only non-pulse-width modulation (PWM) chips are supported.7.4.7 Restoring to Factory SettingsRestore to the factory Settings for the MCTRL660.XI 'AN N OVA S T AR T EC HCO .,L T D.7.5Display Control1)Normal: The screen is restored to normal display.2)Black Out: The screen is black out, then the home page display of MCTRL660 operation screen is asfollows:3)Freeze: Screen freezes, then the home page display of MCTRL660 operation screen is as follows:4)T est Pattern: The screen shall be tested through four colors (red, green, blue and white) and fourshapes.Then the home page display of MCTRL660 operation screen is as follows:X I'A NN OV AS TA RT EC HC O.,LT D.7.6 Language Setting8 Hardware Program UpdatingConnect MCTRL660 to a computer and run NovaLCT-Mars on this computer . Log in as an advanced user and type in admin on the NovaLCT-Mars main interface to open the page for updating the hardware program.XI 'AN N OVA S T AR T EC HCO .,L T D.N O V AS TA RT EC HC O.,LT D.X I' A NCurrent Serial PortSelect the serial port through which the hardware to be updated is connected to the computer . Program PathSelect the program to be loaded to the hardware here. Sending Board MCUSelect this option if the MCU program of a sending board is to be updated. Sending Board FPGASelect this option if the FPGA program of a sending board is to be updated. Scan Board FPGASelect this option if the FPGA program of a scan board is to be updated. UpdateClick this button to load the selected program to the selected hardware. Refresh AllIf this option is selected, the version information of all sending boards and scan boards connected to the current serial port will be refreshed when the Refresh button is clicked. Set positionIf this option is selected, only the version information of the selected scan board will be refreshed when the Refresh button is clicked. RefreshClick this button to show the current version information of the hardware. This can be used to check whether the hardware program has been updated.XI 'AN N OVA S T AR T EC HCO .,L T D.9 FAQ and Precautions10 SpecificationsN N OVX I'A NN OV AS11Installation Dimensions 19" 1U Standard cabinet. (Unit: mm)X I'A NN OV AS TA RT EC HC O.,LT D.。

GM8006H称重控制器注意:使用本仪表钱前认真阅读本说明书a:仪表电源进线必须接触良好,不允许出现:手超生锈,接触不好现象。
b:仪表器、通讯、及速度信号等弱电线缆不可与强电电缆同走一个电缆沟。
c:仪表控制柜接地线必须单独接大地。
d:传感器屏蔽接地线必须单独接大地。
仪表控制柜接地传感器屏蔽线接地和强电电气接地。
不能共用一个接地。
e:变频器控制柜必须接大地。
f:变频器控制的电机必须接大地。
g:仪表供电电源严禁与大功率火气大png频繁的电器共相。
本说明说如另有变动,恕不另行通知表一显示参数一级修改参数Y03 给定值<10000KG/分默认值200 K值XXXXX.XX Y04 预控值1 <255 默认值100 给定值<10000KG/分Y05 零点<65535 默认值200 速度值<30000Y06 p 值<100 默认值.20 给定AD 0--65536Y07 I 值<255 默认值10 控制量I <255Y08 预控值2 <255 默认值50 AD值<255Y09 上线零点<255 默认值5 零点<30000总产量XXXXXX.XX吨每米科重<99KG/M速度值2 <3000日期及时间二级修改参数E00 K值xxxx.xx 默认值500.00 E01 周期<999秒默认值60E02 校零时间<999秒默认值60E03 失控停机时间<255秒默认值0E04 自动校零时间<255秒默认值0E05 停机延迟时间<255秒默认值0E06 启动时间<255秒默认值0E07 标定时间<999秒默认值60E08 启动是否校零0,校零,1不校零默认值1E09 称体选择0,1,2,3,分别对应恒速,调速默认值0E10 启动选择0,本机;1,远程1;2,远程2 默认值0E11 给定选择0,本机;1,远程;2,485 默认值0E12 程控放大倍数0,1,2 分别对应1倍2倍4倍默认值0E13 计量单位选择1,KG;0,吨默认值1 E14 波特率0,1,2,3,E15 停机是否累计0不累计;1累计E16 速度零点0-255E17 标定砝码重量<10000KGE18 日期年,月,日E19 时间时,分,秒E20 远程给定输入量最大值<10000KG/分默认值500KG E21 远程流量输出量最大值<10000KG/分默认值500KG E22 远程给定上限10-20mA对应65536 默认值12228 E23 远程给定下限0—4mA对应0-xxxxx 默认值2278 E24 流量输出上限1023对应10-20mA 默认值891E25 流量输出下限0xxx对应0-4mA 默认值178E26 自动停机1到给定自动停机,0反之默认值0E27 设备地址<255 默认值0E28 计量选择0,启动开始计量1端口控制开始量默认值0E29 报警选择0,报警开放1报警关默认值0E30 控制步距<30 默认值10E31 序列号1 默认值E32 序列号2 默认值E33 一周总脉冲数默认值5000 E34 称体有效计量段长度<99米默认值0.6E35 皮带周长单位:米默认值4.0 E36 提前量1 单位KG 默认值5.0 E37 显示选择下排显示选择显示累积量或给定默认值0E38 累计输出脉冲<10000KG 默认值100 E39 提前量2 单位:KG 默认值3.0 E40 班次1—累计一班,2—累计二班,3—累计三班默认值3E41 自动打印选择0—是1—否默认值1E42 一班换班时间0-2359 默认0800 E43 1600 二班换班时间0-2359 默认值1600 E44 2359三班换班时间0-2359 默认值2359 E45 15.00 流量报警上限0-65535 默认600E46 流量报警下限0-65535 默认值15.00 E47 流量滤波<10 0否;1是默认值0GM8006C称重控制器操作使用说明一:简介GM8006H系列简称称重控制器采用国际最近技术研制和生产的新一代配料仪表,是静态,动态计量和配料的专用称重仪表。

珠海永刚公司第1页,共4页YONG GANG (ZH),CO.,LTDPage 1 of 4珠海永刚公司第2页,共4页YONG GANG (ZH),CO.,LTD Page 2 of 4操作名称:电子秤操作指示书Operation 文件编号:YG/QC--Doc.No.版本:V1Rev:一、目的:确定电子秤的操作方法,防止任何因误用所引起的仪器估障或误差。
二、适用范围:永刚公司的电子秤BH-600三、按键的说明:3.1 为开关键,用来打开或关闭该电子秤。
3.2 为功能模式键,可选择计重、计数、百分比三种模式。
3.3 为单位选择键,共有十三种国际标准单位可供选择。
3.4 为取样键,在计数模式时用来采样计数之物品单重。
3.5 为去皮键,用来扣除物品重量。
3.6 为归零键,用来清除显示窗之微小重量。
3.7 为背光键,用来选择背光状态:常亮、自动、关闭。
3.8 为确认键,在功能设置中用来确认有效之操作。
四、基本操作方法:4.1 擦作前准备:将天平置于稳定的工作台上,避免震动、阳光照射、和气流。
使用前观察水平仪,调节水平调节脚,使水泡位于水平仪中心。
4.2 开机:擦上电源,按一次面板上的键,电子秤在自检归零后自动进入秤重状态,这时可以将所要秤量的物品轻轻地放到秤盘上,待显示屏上显示的数据稳定后为所要秤取物品的重量。
4.3 关机:在秤完物品后,再按一次面板上的键,电子秤进入关机状态,在电子秤完成关机后,若长时间不用可拔掉电子秤的电源适配器。
4.4 清洁:当电子秤在秤量有腐蚀性的物品(化学药品)落到到电子秤上时,在秤完所要秤量的物品并关机后用干净的毛巾(或干净的纸巾)擦掉电子秤上的残留物,以保持电子秤的清洁性。
珠海永刚公司第3页,共4页YONG GANG (ZH),CO.,LTD Page 3 of 4操作名称:电子秤操作指示书Operation 文件编号:YG/QC--Doc.No.版本:V1Rev:五、其它按键的操作:5.1 (归零键):当显示值在零点边上不能归零时,按键,显示窗数字回到零位状态,归零范围:±2%全秤量。
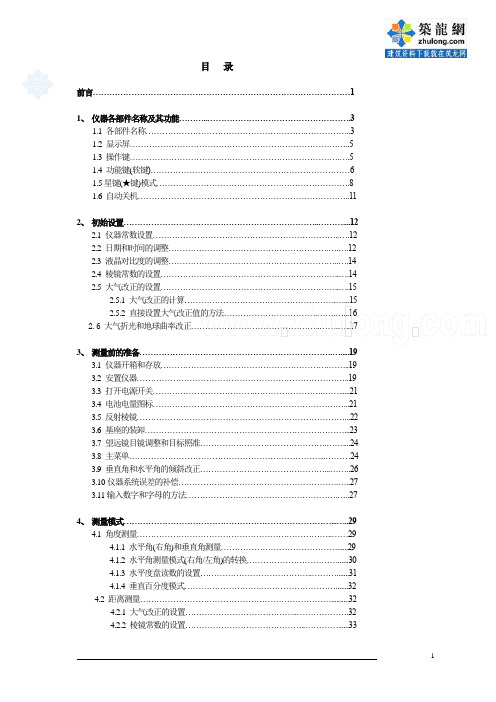
目录前言 (1)1、仪器各部件名称及其功能 (3)1.1 各部件名称 (3)1.2 显示屏 (5)1.3 操作键 (5)1.4 功能键(软键) (6)1.5星键(★键)模式 (8)1.6 自动关机 (11)2、初始设置 (12)2.1 仪器常数设置 (12)2.2 日期和时间的调整 (12)2.3 液晶对比度的调整 (14)2.4 棱镜常数的设置 (14)2.5 大气改正的设置 (15)2.5.1 大气改正的计算 (15)2.5.2 直接设置大气改正值的方法 (16)2.6 大气折光和地球曲率改正 (17)3、测量前的准备 (19)3.1 仪器开箱和存放 (19)3.2 安置仪器 (19)3.3 打开电源开关 (21)3.4 电池电量图标 (21)3.5 反射棱镜 (22)3.6 基座的装卸 (23)3.7 望远镜目镜调整和目标照准 (24)3.8 主菜单 (24)3.9 垂直角和水平角的倾斜改正 (26)3.10仪器系统误差的补偿 (27)3.11输入数字和字母的方法 (27)4、测量模式 (29)4.1 角度测量 (29)4.1.1 水平角(右角)和垂直角测量 (29)4.1.2 水平角测量模式(右角/左角)的转换 (30)4.1.3 水平度盘读数的设置 (31)4.1.4 垂直百分度模式 (32)4.2 距离测量 (32)4.2.1 大气改正的设置 (32)4.2.2 棱镜常数的设置 (33)4.2.3 距离测量(连续测量) (33)4.2.4 距离测量(单次/N次测量) (34)4.2.5 精测/跟踪模式 (35)4.2.6 放样 (36)4.3 坐标测量 (37)4.3.1 设置测站点坐标 (37)4.3.2 设置仪器高/棱镜高 (39)4.3.3 坐标测量的操作 (39)4.4 数据输出 (41)4.5 通过软键输出数据(记录) (42)5、程序模式(应用测量程序部分) (44)5.1 设置水平方向定向角 (44)5.2 导线测量(保存坐标) (46)5.3 悬高测量 (48)5.4 对边测量 (51)5.5 角度复测 (54)5.6 放样 (56)5.6.1 选项 (57)5.6.2 坐标数据 (68)5.6.3 查询数据 (69)5.6.4 确定新点 (71)5.6.5 格网因子 (77)5.6.6 设置方向角和放样坐标点 (79)5.6.7 定向功能 (84)5.7 线高测量 (85)5.8 偏心测量模式 (88)5.8.1 角度偏心测量模式 (88)5.8.2 距离偏心测量模式 (90)5.8.3 平面偏心测量模式 (93)5.8.4 圆柱偏心测量模式 (95)6、存储管理模式 (98)6.1 查阅内存状态 (98)6.2 文件的保护 (99)6.3 文件的更名 (100)6.4 文件的删除 (101)6.5 内存的格式化 (101)7、数据通信模式 (102)7.1 通信参数的设置 (102)7.2 数据文件的输入 (103)7.3 数据文件的输出 (104)8、参数设置模式 (105)8.1 参数设置项目 (105)8.1.1 测量与显示参数 (105)8.1.2 数据通讯参数 (106)8.2 参数设置的方法 (107)8.2.1 测量与显示参数 (107)8.2.2 数据通信参数 (108)8.2.3 密码的设置 (108)标准测量程序部分9、标准测量程序的特点 (111)10、概述 (114)10.1专用键 (114)10.2 菜单选择 (114)10.3 键盘输入 (114)10.4 系统选项屏幕 (115)10.5 水平角输入 (115)11、启动标准测量软件 (116)12、设置菜单 (117)12.1 作业 (117)12.2 系统选择 (120)12.3 作业选择 (121)12.4 格网因子 (121)12.5 温度、气压输入 (122)13、记录菜单 (123)13.1 设置测站点 (123)13.1.1 后方交会 (124)13.1.2 测量测站点高程 (128)13.2 设置后视点 (129)13.3 后视测量 (131)13.4 前视测量 (131)13.5 侧视测量 (133)13.5.1 偏心([F3]键) (133)13.5.2 平面([F4]键) (137)13.5.3 点线(用于点到直线的测量)([F5]键) (139)13.6 横断面测量 (141)14、编辑菜单 (143)14.1 原始数据 (143)14.2 坐标点数据 (144)14.3 固定点读数 (145)14.4 编码数据 (145)14.5 填/挖数据 (148)15、传输菜单 (149)15.1 发送数据(将文件传输到计算机) (149)15.1.1 发送原始数据 (150)15.1.2 发送坐标 (151)15.1.3 发送填挖数据 (151)15.1.4 发送横断面数据 (151)15.2 接收数据(从计算机装入文件) (151)15.2.1 装入放样坐标(坐标数据) (152)15.2.2 装入固定点文件 (153)15.2.3 装入编码库文件 (153)15.2.4 装入水平定线数据 (153)15.2.5 装入垂直定线数据 (153)15.2.6 装入横断面设计数据文件 (154)15.3 通讯参数 (154)16、程序菜单 (155)16.1 放样菜单 (155)16.1.1/2 设置测站点和后视点 (156)16.1.3 点放样 (157)16.1.4 串放样 (160)16.1.5 定线放样 (161)16.1.6 横断面放样 (165)16.1.6-1 斜坡放样 (166)16.2 道路设计 (168)16.2.1 定义水平定线(最多100个数据) (168)16.2.2 编辑水平定线 (172)16.2.3 定义垂直定线(最多100个数据) (173)16.2.4 编辑垂直定线........................................................ .. (174)16.3 导线平差 (175)16.4 坐标解析计算 (179)16.4.1 前方交会计算 (179)16.4.2 4点前方交会 (180)16.4.3 坐标反算 (182)16.4.4 面积计算 (183)16.4.4-1 用具体的点号计算面积 (183)16.4.4-2 用编码计算面积 (185)16.4.5 极坐标计算 (186)16.4.6 对边测量计算 (187)16.5 龙门板标定 (188)16.5.1 方法一:测量龙门板两端 (191)16.5.2 方法二:测量龙门板一端 (193)16.6 钢尺联测 (195)17、检验与校正 (199)17.1 管水准器 (199)17.2 圆水准器 (199)17.3 望远镜分划板 (200)17.4 视准轴与横轴的垂直度(2C) (200)17.5 竖盘指标零点自动补偿 (201)17.6 竖盘指标差( i 角)和竖盘指标零点设置 (201)17.7 光学对中器 (203)17.8 仪器常数(K) (203)17.9 视准轴与发射电光轴的平行度 (205)17.10 基座脚螺旋 (205)17.11 反射镜有关组合件 (205)18、技术指标 (207)19、附件 (209)【附录A】 (210)1、原始数据格式 (210)2、坐标数据格式 (210)3、横断面数据格式 (211)4、点编码格式 (211)5、水平定线 (212)6、垂直定线 (213)【附录B】计算道路定线元素 (213)1、道路定线元素 (213)2、计算道路定线元素 (215)【附录C】 (220)1、NTS系列全站仪的数据输出格式 (220)2、控制指令及其格式 (221)3、南方全站仪与计算机的实时通讯过程 (222)3.1 单次测量模式和重复测量模式下启动并接收测量数据的过程 (222)3.2 改变测量模式的通讯过程 (223)。

設備操作說明書設備名稱 電子稱 設備功能 稱重 文件編號設備型號通用廠商/版次A0一﹑面板介紹﹕ 1.載物盤﹕待稱重物放置區 2.顯示窗口﹕顯示目前工作 狀態。
3.指示燈﹕顯示目前使用功能4.功能鍵﹕進入各功能菜單5.電源線﹕電子稱儲電池充電二﹑操作說明﹕電子稱應置于穩定平整的地面上﹐調整四個底腳螺釘使稱處于水平位置。
1.開機﹕插上交流電源﹐此時交流指示燈亮﹐然后開機﹐重量窗顯示(SANFEN)再顯示(Dc x.xx)﹐表示蓄電磁電壓(小于5.80V ﹐需充電后才可使用)。
然后進行自檢﹐最后窗口顯示“0”﹐便可正常使用。
2.置零功能﹕在使用過程中﹐如發現零點漂移現象﹐按『置零』鍵﹐重量即可歸零。
(置零范圍﹕≦10%FS ﹐去皮狀態下無效。
3.去皮功能﹕按『去皮』鍵﹐重量顯示為零﹐“去皮”燈亮﹐此時顯示的是淨重。
原稱重物取下﹐重量顯示為負值﹐再按『去皮』鍵﹐稱重歸零﹐“去皮”燈滅。
(去皮范圍﹕≦100%FS ﹐重量為負不能去皮)4.計數功能﹕開機歸“0”﹐放上已知個數的同一物體﹐按『計數』鍵﹐顯示[C----],通過按『←』『↑』鍵輸入取樣個數﹐再按『計數』鍵即可計數。
(注﹕按『↑』鍵輸入數字﹐按『←』鍵向左移一位。
)計數狀態下再按一次『計數』鍵返回稱重狀態﹐計數燈滅。
注﹕原則上要求計數物體的單個重量應不小于稱分度值﹐否則影響計數精度。
5.省電功能﹕當重量窗口為『0.0』﹐且無稱量操作時﹐過几秒后﹐電子稱自動進入節能狀態。
液晶系列會關閉背光﹐數碼系列就會變成“0”﹐有稱量操作時﹐自動恢復。
使用交流電時﹐不會進入節能狀態。
6.背光開啟(液晶稱系列)按住『去皮』鍵不放(3秒鐘后)﹐即可開啟液晶背光﹐按照此方法可關閉背光。
7.速度切換﹕同時按住『標定』和『置零』不放(大于3秒)﹐儀表顯示“----X ”后已實現稱重速度切換﹐X 為速度模式﹕1---最快﹐3---最慢。
三﹕注意事項﹕1.蓄電池使用注意事項﹕在開機或稱重狀態下﹐當顯示窗口提示『LobAt 』﹐表示蓄電池電量 即將用完﹐請用戶盡快充電﹐當顯示提示『Lo 』時﹐應立即關機進行充電﹐否則將影響蓄電1 5234 第2頁﹐共2頁設備操作說明書。

申克配料秤仪表说明书目录第一章概述 (1)第二章控制 (4)第三章系统参数 (10)第四章效验与标定 (24)第五章系统服务值 (27)第六章事件信息 (28)第七章安装与调整 (31)第八章维护 (33)通讯协议第一章概述一、FIP-403称重控制仪FIP-403是DEL/DEM定量给料机的测量和控制系统。
本说明书涉及配有传送皮带的控制系统。
1.称重给料机通过调节皮带速度来控制给料速率。
2.控制预给料机的皮带秤通过调节皮带负载来控制给料速率。
3.具有恒定负载的皮带秤通过控制传送带速度来调节皮带负载。
二、显示5×7点阵规格,6mm高字符上部显示左侧:运行信息右侧:设定的给料速率,单位为kg/h或t/h 下部显示左侧:事件信息右侧:可设定给料速率、皮带速度等三、信号灯2个绿色和3个红色LED。
绿色信号灯:就绪待用红色信号灯:错误或极限值信息四、键盘微动开关启动或停止。
预选下部显示;功能选择。
复位计数器。
FUNC 调用功能菜单和事件信息正文。
DEL 确认事件信息;删除输入。
ESC 中止功能。
ENT 启动功能;确认输入。
DAT 准备输入,如输入设定值。
输入参数。
输入符号和小数点。
五、符号定义I = 给料速率单位:kg/h或t/h在单位时间里从皮带上卸下的物料数量。
P = 给料速率设定值单位:kg/h或t/hZ = 给料速率单位:kg或t给料数量=给料速率×给料时间。
V = 传送皮带速度单位:m/sQ = 皮带负载单位:kg/m每米传送皮带上的物料重量。
重量测定:受控方式体积测定:非受控方式六、测量原理连续测量传送带负载Q和传送带速度V,并将二者相乘,乘积便是给料速率,进而可计算出给料数量。
I=Q·V·3600I kg/h Q kg/m V m/s第二章控制一、上电上电出现故障期间·计数器读数·计数器脉冲无输出·预选项正常显示服务值等,如ON-time以上各项能持续保持。
碧彩秤配置操作手册一、碧彩秤作为普通条码秤使用配置操作1、清内存:按菜单→回车→输入66 → Clear all data and reconfigure →选Yes →回车→等待系统自动清内存,然后系统自动重启,进入设备配置项2、配置数据库:清内存后需要重新配置秤,输入2311 →下移至Number of PLUs(最大PLU个数,大约1.5万左右,一般设置为3000即可)→输入PLU数→回车→按返回键4次→选4 start database config →回车→选Yes →回车→按[↓] 1次,选中Do not load data →回车→回车,等待系统创建数据库直至配置完成。
3、允许输入的最大PLU位数:按菜单→回车→输入5363 →下移至PLU-No Basic settings →回车→PLU-input digit places 输入PLU号需要的最大位数一般为5位→回车,按[返回]键一步步返回退出即可。
4、更改秤的IP地址:按菜单→回车→输入53833 →按[↓]或[↑]键选择到IP address 的地方输入需要的IP地址→回车→在 SubnetMask 输入子网掩码(一般为255.255.255.0)→回车,系统自动重启。
5、测试网络连接:按菜单→回车→输入53831 →选择1 Ping →回车→输入后台或者是与秤相连的设备IP地址→选择Start ping测试网络是否连通6、设置秤号及联网方式:按菜单→回车→输入5381 →在Device address的地方输入秤号→回车→在Highest device address的地方设置此系统中允许接入的最大的秤的数量→回车→下移至Sys.bus type的地方(有TCP/IP和Profibus两个选项),选择TCP/IP方式为普通联网方式,选择Profibus为秤串联方式→回车→在System ID的地方输入系统号(在同一系统中,秤可以互相同步)→回车,按[返回]键一步步返回退出即可。
66-Lb. Digital ScaleOwner’s ManualWARNING: Read carefully and understand all ASSEMBLY AND OPERATION INSTRUCTIONS before operating. Failure to follow the safety rules and other basic safety precautions may result in serious personal injury.Item #52864Thank you very much for choosing a Strongway™ product!For future reference, please complete the owner’s record below:Serial Number/Lot Date Code: ________________________________ Purchase Date: ____________________________________________ Save the receipt, warranty, and this manual. It is important that you read the entire manual to become familiar with this product before you begin using it.This 66-Lb. Digital Scale is designed for certain applications only. Northern Tool and Equipment is not responsible for issues arising from modification or improper use of this product such as an application for which it was not designed. We strongly recommend that this product not be modified and/or used for any application other than that for which it was designed.For technical questions, please call 1-800-222-5381.Intended Use (4)Technical Specifications. (4)Important Safety Information (4)Grounding (6)Before Each Use (6)Operating Instructions (6)Maintenance (7)Parts Diagram (8)Parts List (8)Replacement Parts (8)Limited Warranty (9)The Strongway 66-Lb. Digital Scale features a large 11 inch x 8 inch stainless steel platform that provides a smooth surface for operations.Note: This equipment has been tested and found to comply with the limits for a Class B digital device, pursuant to part 15 of the FCC Rules. These limits are designed to provide reasonable protection against harmful interference in a residential installation. This equipment generates, uses and can radiate radio frequency energy and, if not installed and used in accordance with the instructions, may cause harmful interference to radio communications. However, there is no guarantee that interference will not occur in a particular installation. If this equipment does cause harmful interference to radio or television reception, which can be determined by turning the equipment off and on, the user is encouraged to try to correct the interference by one or more of the following measures:—Reorient or relocate the receiving antenna.—Increase the separation between the equipment and receiver.—Connect the equipment into an outlet on a circuit different from that to which the receiver is connected. —Consult the dealer or an experienced radio/TV technician for help.Changes or modifications to this equipment could void the user’s authority to operate the equipment.1. Connect the AC port of the adaptor with AC while inserting the DC port of the adaptor to the faucet titled in the under pan of the scale.2. Adjust the scale feet before using to ensure the scale is placed evenly.3. Place the scale in an environment of stability and non-electromagnetism interference.4. Turn on the power switch, the three displays will flash the number from 0 to 9 in succession and then back to 0. The zero tracking indicator light will turn on. If the weight is not at zero, please press the zero tracking key to change it to zero.Key Chart∙WEIGHT lbs. - To display the weight or net weight of the unit.∙UNIT WEIGHT lbs.- To display the average weight of samples; to display the unit weight known set.∙NUMBER PCS: To display the total number.∙→0← light: When the light is on, the weight is at zero.∙TARE light: When the light is on, tare is deducted.∙M+ light - When the light is on, the accumulation function is in use.∙NUMBER light: When the light is on, the alarm number is set.∙CHARGE light: When the light is on, the scale is charging. When the battery is charging, the light will begin to dim. When the battery is full, the light is off.Key Use:0~9 - For entering a number (example: the number of samples or unit weight value).‘‘ - For entering the radix point.ZERO - For ensuring the start weight as zero before weighing.TARE - For deducting the weight of the vessel on the platform, such as the plate.NUMBER SET - For ensuring the sample number before entering it.WEIGHT SET - For ensuring the unit weight before entering it.CLEAR - For clearing the number or unit weight falsely set.CHECK - For setting the alarm number.M+ - For memory accumulation.CM - For clearing the memory accumulation.TOTAL - For displaying the memory time accumulation and the total accumulation numbers. Operation Process:1. Plug in the power cord or install the batteries. Turn on the power switch and the three displays willflash the number from 0 to 9 in succession and then back to 0. Then the zero tracking indicator light will turn on. If the weight is not zero, press the zero tracking key to make it zero.2. Load the weight on the weighing platform of the scale. The LCD digits will indicate the value of theweight.1. Load the weight slowly and evenly on the platform of the scale. Avoid sudden impacts whichcould cause sensor damage.2. Keep the scale clean to ensure the normal operation.3. Remove the batteries if the scale will be left unused for an extended period of time.∙For replacement parts and technical questions, please call Customer Service at 1-800-222-5381. ∙Not all product components are available for replacement. The illustrations provided are a convenient reference to the location and position of parts in the assembly sequence.∙When ordering parts, the following information will be required: item description, item model number, item serial number/item lot date code, and the replacement part reference number.∙The distributor reserves the rights to make design changes and or improvements to product lines and manuals without notice.Northern Tool and Equipment Company, Inc. ("We'' or '"Us'') warrants to the original purchaser only ("You'' or “Your”) that the Strongway product purchased will be free from material defects in both materials and workmanship, normal wear and tear excepted, for a period of one year from date of purchase. The foregoing warranty is valid only if the installation and use of the product is strictly in accordance with product instructions. There are no other warranties, express or implied, including the warranty of merchantability or fitness for a particular purpose. If the product does not comply with this limited warranty, Your sole and exclusive remedy is that We will, at our sole option and within a commercially reasonable time, either replace the product or product component without charge to You or refund the purchase price (less shipping). This limited warranty is not transferable.Limitations on the WarrantyThis limited warranty does not cover: (a) normal wear and tear; (b) damage through abuse, neglect, misuse, or as a result of any accident or in any other manner; (c) damage from misapplication, overloading, or improper installation; (d) improper maintenance and repair; and (e) product alteration in any manner by anyone other than Us, with the sole exception of alterations made pursuant to product instructions and in a workmanlike manner.Obligations of PurchaserYou must retain Your product purchase receipt to verify date of purchase and that You are the original purchaser. To make a warranty claim, contact Us at 1-800-222-5381, identify the product by make and model number, and follow the claim instructions that will be provided. The product and the purchase receipt must be provided to Us in order to process Your warranty claim. Any returned product that is replaced or refunded by Us becomes our property. You will be responsible for return shipping costs or costs related to Your return visit to a retail store.Remedy LimitsProduct replacement or a refund of the purchase price is Your sole remedy under this limited warranty or any other warranty related to the product. We shall not be liable for: service or labor charges or damage to Your property incurred in removing or replacing the product; any damages, including, without limitation, damages to tangible personal property or personal injury, related to Your improper use, installation, or maintenance of the product or product component; or any indirect, incidental or consequential damages of any kind for any reason.Assumption of RiskYou acknowledge and agree that any use of the product for any purpose other than the specifieduse(s) stated in the product instructions is at Your own risk.Governing LawThis limited warranty gives You specific legal rights, and You also may have other rights which vary from state to state. Some states do not allow limitations or exclusions on implied warranties or incidental or consequential damages, so the above limitations may not apply to You. This limited warranty is governed by the laws of the State of Minnesota, without regard to rules pertaining to conflicts of law. The state courts located in Dakota County, Minnesota shall have exclusive jurisdiction for any disputes relating to this warranty.Distributed by:Northern Tool & Equipment Company, Inc.Burnsville, Minnesota 55306Made in China。
前言尊敬的用户!感谢您选用我公司自主研发生产的便携式称重仪,该产品为轴重计量称重精密设备,为保证您能在以后的使用过程中可以有效安全的使用,充分发挥产品的功能,请你在使用之前务必仔细阅读该使用说明书。
我公司保留修改本手册的权利!如有修改,恕不另行通知!概述行驶道路的车辆超限超载是造成道路加速损坏以及引发交通事故的潜在重要原因,随着《道路交通安全法》的实施,我国交通和交警等相关部门对超限超载的执法力度不断加强,同时相关执法部门更需要一种能够在其执法过程中精确检测车辆动态重量的高质量设备。
为了给相关执法管理部门提供一个便捷、高效的执法工具,提供有力的执法依据,根据交通部及有关部委对车辆轴类型和轴载质量的相关规定标准,我公司于1999年初自主研发生产出符合我国车辆行驶公路管理规范要求的便携式称重仪(轴重仪),为交通管理部门实施有效的超限超载治理提供了强有力的执法工具。
您所使用的便携式称重仪是我公司基于自身多年的实际动态称重经验以及客户的实际需要,而最新研发生产的JJ系列新一代全数字便携式称重仪(轴重仪),旨在改善提高目前市场上同类产品不能满足用户的实际使用需求而研发生产,具有多项创新功能,主要体现在:1、采用7寸全彩触摸式大屏显示,完全满足用户在夜间操作的方便性2、国内首家将电脑技术应用于便携式动态称重仪领域,即采用用户熟悉的鼠标操作方式,使得产品实用性更强,操作更简单明了,大大提高操作人员的工作效率。
3、国内首家推出交警和路政联合执法模式功能4、国内首家推出功能性更强的后台软件管理功能,只要把我们的仪表与安装有后台管理软件的计算机连接,就可以实时的控制仪表操作,为更高功能的扩展打下基础产品设计定位高、精度高、性能稳定、使用可靠、环保节能、故障率低、维修简捷等特点。
可方便的对机动车进行轴载质量、车货总质量的动、静态测量。
适用于公路执法部门超限检查、交警进行车载质量检查、高速公路收费站进行车载质量计量等,也适用于低值车载货物计量,如交通运输车载质量计量、建筑施工工地配料计量等场合。