欧姆龙计步器说明书
- 格式:pdf
- 大小:7.23 MB
- 文档页数:28
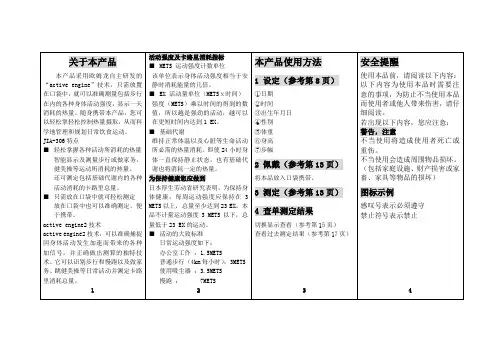
Model UA-767PCInstruction ManualOriginalManuel d’instructionsTraductionManual de InstruccionesTraducciónManuale di IstruzioniTraduzioneBedienungsanleitungÜbersetzungGebruiksaanwijzingVertaling使用手冊1WMPD4002088B翻譯目 錄親愛的顧客 (2)前 言 (2)用前需知 (2)用件說明 (4)標識含意 (5)設定時鐘 (6)使用血壓計 (7)1. 安裝/更換電池 (7)2 連接充氣管 (7)3 連接交流電轉接器 (7)4. 選擇適當的袖帶 (8)5. 繞緊袖帶於上臂 (9)6. 怎樣正確測量 (9)7. 測量 (9)8. 測量結束後 (9)測量方法 (10)注意正確的測量方法 (12)記憶體中的資料 (13)將資料儲存在記憶體中 (13)調用記憶體中的資料 (13)清除儲存在記憶體中的資料 (13)將讀數傳輸至電腦 (14)有關血壓的一些知識 (15)什麼是血壓? (15)什麼是高血壓?它是怎樣被控制的? (15)為什麼在家裡測量血壓? (15)WHO(世界衛生組織)血壓分類標準 (15)血壓差異 (15)故障檢修 (16)維修和保養 (17)技術資料 (17)親愛的顧客感謝您購買最新型的A&D血壓計。
為追求本血壓計的正確利用和方便使用起見,使它能成為您每天血壓管理上的最佳助手。
敬請在第一次使用前, 能詳細閱讀此使用手冊後使用。
前 言本血壓計符合歐盟管理文件93/43EEC的有關醫療產品之相關規定,且有關本血壓計只適用於成年人, 而非新生兒或嬰幼兒。
應用環境: 本血壓計適用於家庭保健環境。
本血壓計專用於測量血壓與脈搏次數,供診斷用。
用前需知本血壓計是採用精密部件製造的。
盡量避免處於,諸如過高過低的溫度,過高過低的濕度,陽光直射,震盪或灰塵之下。
欧姆龙PLC驱动产品规格说明书(本说明书说明驱动产品的功能,性能指标,是测试工程师、文档工程师和开发人员交流的重要依据,是编写测试用例和帮助文档的重要依据。
下边几项是必须填写的,如果还有需要说明的部分,需要编写更多的内容)[修订记录][项目经理填写]一、产品功能简介a)硬件功能概述(简要说明硬件设备功能):欧姆龙PLCb)支持协议说明(说明支持的协议,特别是针对多协议的设备一定要说明该驱动支持哪种协议,对协议支持到什么程度)欧姆龙HostLink协议(包括C-mode指令和FINS指令)此次是对旧有驱动的升级,对旧有驱动作如下修改:1. 对CS1系列和CJ1系列PLC的DM区增加批量写的功能2. 对CJ1系列和CS1系列PLC去掉TSV和CSV寄存器,因为这两个系列的PLC中并没有对应的TSV和CSV内存区3. 增加了国际化支持c)支持的硬件型号说明:支持C系列、CS1系列、CJ1系列、CV系列二、驱动接口:(3.0开发包 3.0以前的开发包开发配置工具)(程序员必须填写,对于3.0开发包的编程规范参加附录,测试工程师按下面的规范要求执行测试)三、设备添加方式a)在组态王中定义设备时请选择:组态王定义设备时请根据所选用的PLC的具体型号定义设备[PLC] > [欧姆龙] > [C Series] > [HostLink][PLC] > [欧姆龙] > [CJ1] > [HostLink][PLC] > [欧姆龙] > [CS1] > [HostLink][PLC] > [欧姆龙] > [CV Series] > [HostLink]英文版设备列表路径:[PLC] > [OMRON] > [C Series] > [HostLink][PLC] > [OMRON] > [CJ1] > [HostLink][PLC] > [OMRON] > [CS1] > [HostLink][PLC] > [OMRON] > [CV Series] > [HostLink]本次测试是用C Series系列PLC进行测试b)c)四、本设备的地址格式及地址范围有两种连接方式,直连和通过网络连接,因此地址格式有2种1直通:nUnitNo2网络连接:nUnitNo:DNA.DA1.DA2nUnitNo:与上位机直接相连的PLC的HostLink单元号,取值范围0~31DNA:PLC所在网络的FINS网络号,取值范围0~127,通过PLC编程软件可以设置DA1:PLC所在网络的FINS节点号,取值范围0~62,通过PLC编程软件可以设置DA2:PLC所挂接的模块的单元号,必须为0,即只能读写CPU单元的数据注意:1. 若是通过PLC与其它的PLC通信也就是通过FINS网络,则要采取nUnitNo:DNA.DA1.DA2这种格式,这种情况下,与计算机直连的PLC不能是C系列PLC,因为C系列的不支持网络连接功能。

CJ系列内置I/OCJ1M CPU22/CPU23 CPU单元操作手册2002年11月ivv注意:OMRON 产品是为合格的操作人员按照正常步骤使用并只为本手册中所叙述的目的而制造的。
下列约定是用来指出本手册中的注意事项,并对其进行分类。
始终注意它们所规定的情况。
不注意这些注意事项能导致对人体的伤害或危及财产。
! 指出一个急迫的危险情况,如不避免之,它会导致死亡或严重伤害。
! 指出一个潜在的危险情况,如不避免之,它能导致死亡或严重伤害。
! 指出一个潜在的危险情况,如不避免之,它可能导致轻度的或中度的伤害,或财产损失。
OMRON 产品附注所有OMRON 产品在本手册中都以大写字母表示。
当字“单元”表示 OMRON 产品时,它也以大写字母表示,不管它是否以产品的正式名称出现。
缩写“Ch ”,它出现在某些显示中和某些OMRON 产品上,往往表示“字”,在这个意义上在文件中缩写为“Wd ”。
缩写“PLC ”表示可编程序控制器。
但是,在有些编程设备的显示中用“ PC ”来表示可编程序控制器。
直观标题列在本手册左侧的下列标题是帮助读者确定各种不同类形的资料。
注指出对有效而方便地运用产品特别重要的资料。
1,2,3...1.指出一种或另一种的列举说明,如步骤,检查表,等。
OMRON, 2002版权所有,事先未经OMRON 公司书面许可,本出版物的任何部分都不可用任何形式,或用任何方法,机械的,电子的,照相的,录制的或其它方式进行复制,存入检索系统或传送。
对使用这里所包含的资料不负专利责任。
然而,因为OMRON 公司不断努力改进其高质量的产品,所以本手册中所含有的资料可随时改变而不另行通知。
在编写本手册时注意了一切可能的注意事项,然而,OMRON 公司对于可能的错误或遗漏不承担责任。
对于使用本出版物中所包含的资料导致的损害也不承担任何责任。
危险警告注意vi注意事项 . . . . . . . . . . . . . . . . . . . . . . . . . . . . . . . . . . . . .xi 1面向的读者 . . . . . . . . . . . . . . . . . . . . . . . . . . . . . . . . . . . . . . . . . . . . . . . . . . . . . . . xii2一般注意事项 . . . . . . . . . . . . . . . . . . . . . . . . . . . . . . . . . . . . . . . . . . . . . . . . . . . . . xii3安全注意事项 . . . . . . . . . . . . . . . . . . . . . . . . . . . . . . . . . . . . . . . . . . . . . . . . . . . . . xii4操作环境注意事项. . . . . . . . . . . . . . . . . . . . . . . . . . . . . . . . . . . . . . . . . . . . . . . . . . xiv5应用注意事项 . . . . . . . . . . . . . . . . . . . . . . . . . . . . . . . . . . . . . . . . . . . . . . . . . . . . . xiv6与EC规程的一致性 . . . . . . . . . . . . . . . . . . . . . . . . . . . . . . . . . . . . . . . . . . . . . . . . xviii第1章性能. . . . . . . . . . . . . . . . . . . . . . . . . . . . . . . . . . . . . . . . .1 1-1性能 . . . . . . . . . . . . . . . . . . . . . . . . . . . . . . . . . . . . . . . . . . . . . . . . . . . . . . . . . . . . 21-2按用途划分的功能. . . . . . . . . . . . . . . . . . . . . . . . . . . . . . . . . . . . . . . . . . . . . . . . . . 5第2章概述. . . . . . . . . . . . . . . . . . . . . . . . . . . . . . . . . . . . . . . . .11 2-1内置CPU单元输入的分配 . . . . . . . . . . . . . . . . . . . . . . . . . . . . . . . . . . . . . . . . . . . 122-2内置CPU单元输出的分配 . . . . . . . . . . . . . . . . . . . . . . . . . . . . . . . . . . . . . . . . . . . 152-3原点搜索功能的分配. . . . . . . . . . . . . . . . . . . . . . . . . . . . . . . . . . . . . . . . . . . . . . . . 16第3章I/O规格和配线. . . . . . . . . . . . . . . . . . . . . . . . . . . . . . . . .19 3-1I/O 规格. . . . . . . . . . . . . . . . . . . . . . . . . . . . . . . . . . . . . . . . . . . . . . . . . . . . . . . . . . 203-2配线 . . . . . . . . . . . . . . . . . . . . . . . . . . . . . . . . . . . . . . . . . . . . . . . . . . . . . . . . . . . . 233-3配线示例. . . . . . . . . . . . . . . . . . . . . . . . . . . . . . . . . . . . . . . . . . . . . . . . . . . . . . . . . 32第4章数据区分配和PLC设置设定 . . . . . . . . . . . . . . . . . . . . . .51 4-1内置I/O的数据区分配 . . . . . . . . . . . . . . . . . . . . . . . . . . . . . . . . . . . . . . . . . . . . . . 524-2PLC设置设定. . . . . . . . . . . . . . . . . . . . . . . . . . . . . . . . . . . . . . . . . . . . . . . . . . . . . 524-3辅助区数据分配 . . . . . . . . . . . . . . . . . . . . . . . . . . . . . . . . . . . . . . . . . . . . . . . . . . . 654-4脉冲输出时标志操作. . . . . . . . . . . . . . . . . . . . . . . . . . . . . . . . . . . . . . . . . . . . . . . . 72第5章内置I/O功能使用说明. . . . . . . . . . . . . . . . . . . . . . . . . . .73 5-1内置输入. . . . . . . . . . . . . . . . . . . . . . . . . . . . . . . . . . . . . . . . . . . . . . . . . . . . . . . . . 745-2内置输出. . . . . . . . . . . . . . . . . . . . . . . . . . . . . . . . . . . . . . . . . . . . . . . . . . . . . . . . . 915-3原点搜索和原点返回功能 . . . . . . . . . . . . . . . . . . . . . . . . . . . . . . . . . . . . . . . . . . . . 113第6章编程举例 . . . . . . . . . . . . . . . . . . . . . . . . . . . . . . . . . . . . .135 6-1内置输出. . . . . . . . . . . . . . . . . . . . . . . . . . . . . . . . . . . . . . . . . . . . . . . . . . . . . . . . . 136vii附录A脉冲控制指令的组合 . . . . . . . . . . . . . . . . . . . . . . . . . . . . . . . . . . . . . . . . . . . . . . . 145 B脉冲指令在其它CPU单元中的应用. . . . . . . . . . . . . . . . . . . . . . . . . . . . . . . . . . . . 149 C中断响应时间 . . . . . . . . . . . . . . . . . . . . . . . . . . . . . . . . . . . . . . . . . . . . . . . . . . . . . 153viii关于本手册:本手册介绍CJ1M CPU22和CJ1M CPU23 CPU单元支持的内置I/O的安装和操作,还含有下面介绍的章节。
第2章 商品型號、規格
2-3 驅動器規格
g 型號/名稱 : R7D -AP □型/ SMARTSTEP A 系列伺服驅動器
0~+55℃ 90% RH 以下 (不可以結露) 20~+85℃ 90% RH 以下(不可以結露)無腐蝕性氣體。
10~55Hz 複振.1mm 或是加速度4.9 m/s 2以下,其中較低的一方,X 、 Y 、 Z 方向
加速度19.6 m/s 2 以下X 、 Y 、 Z 方向 各3次
電源端子、動力端子與FG 之間 0.5M Ω 以上 (DC500V 電阻)
控制盤內置型(IP10)
項
目
請配合目前使用的馬達,選擇伺服驅動器。
※1. 上述項目是單獨評估試驗的結果。
複合條件下的結果不在此限。
※2. 驅動器嚴禁實施耐電壓試驗、電阻測試,否則內部元件可能受損。
※3. 驅動器的組件中,有部份組件必須因其使用條件而善加維修。
詳細內容請參閱「4-5 定期維護」。
※4. 在平均環境溫度40℃之下,驅動器的使用壽命為5萬小時(額定轉矩的80%輸出)。
2-3-1 一般規格
規
格
保存環境的溫度、濕度使用、保存環境耐振性耐撞擊 絕緣電阻 耐電壓 保護構造
使用環境的溫度、濕度電源端子、動力端子與FG 之間 AC1500V 50∕60Hz 1分鐘 各控制訊號與FG 之間 AC500V 1分鐘。
欧姆龙PLC驱动产品规格说明书(本说明书说明驱动产品的功能,性能指标,是测试工程师、文档工程师和开发人员交流的重要依据,是编写测试用例和帮助文档的重要依据。
下边几项是必须填写的,如果还有需要说明的部分,需要编写更多的内容)[修订记录][项目经理填写]一、产品功能简介a)硬件功能概述(简要说明硬件设备功能):欧姆龙PLCb)支持协议说明(说明支持的协议,特别是针对多协议的设备一定要说明该驱动支持哪种协议,对协议支持到什么程度)欧姆龙HostLink协议(包括C-mode指令和FINS指令)此次是对旧有驱动的升级,对旧有驱动作如下修改:1. 对CS1系列和CJ1系列PLC的DM区增加批量写的功能2. 对CJ1系列和CS1系列PLC去掉TSV和CSV寄存器,因为这两个系列的PLC中并没有对应的TSV和CSV内存区3. 增加了国际化支持c)支持的硬件型号说明:支持C系列、CS1系列、CJ1系列、CV系列二、驱动接口:(3.0开发包 3.0以前的开发包开发配置工具)(程序员必须填写,对于3.0开发包的编程规范参加附录,测试工程师按下面的规范要求执行测试)三、设备添加方式a)在组态王中定义设备时请选择:组态王定义设备时请根据所选用的PLC的具体型号定义设备[PLC] > [欧姆龙] > [C Series] > [HostLink][PLC] > [欧姆龙] > [CJ1] > [HostLink][PLC] > [欧姆龙] > [CS1] > [HostLink][PLC] > [欧姆龙] > [CV Series] > [HostLink]英文版设备列表路径:[PLC] > [OMRON] > [C Series] > [HostLink][PLC] > [OMRON] > [CJ1] > [HostLink][PLC] > [OMRON] > [CS1] > [HostLink][PLC] > [OMRON] > [CV Series] > [HostLink]本次测试是用C Series系列PLC进行测试b)c)四、本设备的地址格式及地址范围有两种连接方式,直连和通过网络连接,因此地址格式有2种1直通:nUnitNo2网络连接:nUnitNo:DNA.DA1.DA2nUnitNo:与上位机直接相连的PLC的HostLink单元号,取值范围0~31DNA:PLC所在网络的FINS网络号,取值范围0~127,通过PLC编程软件可以设置DA1:PLC所在网络的FINS节点号,取值范围0~62,通过PLC编程软件可以设置DA2:PLC所挂接的模块的单元号,必须为0,即只能读写CPU单元的数据注意:1. 若是通过PLC与其它的PLC通信也就是通过FINS网络,则要采取nUnitNo:DNA.DA1.DA2这种格式,这种情况下,与计算机直连的PLC不能是C系列PLC,因为C系列的不支持网络连接功能。
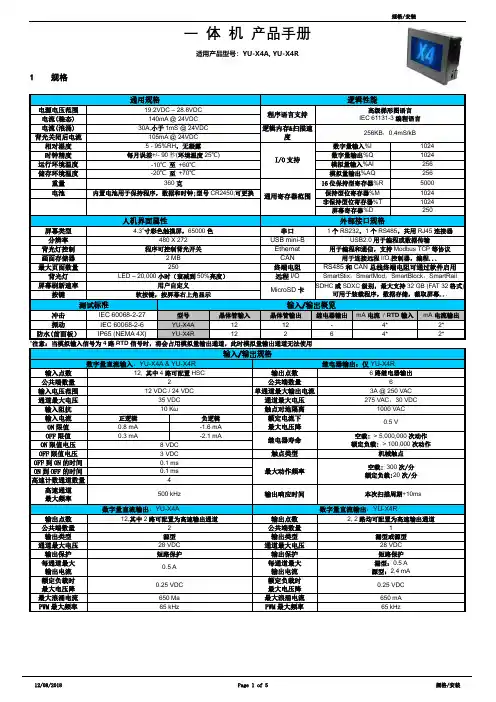
一体机产品手册适用产品型号:YU-X4A, YU-X4R1 规格通用规格逻辑性能电源电压范围19.2VDC – 28.8VDC程序语言支持高级梯形图语言IEC 61131-3编程语言电流(稳态) 140mA @ 24VDC电流(浪涌) 30A,小于1mS@ 24VDC逻辑内存&扫描速度256KB,0.4mS/kB背光关闭后电流105mA @ 24VDC相对湿度 5 - 95%RH,无凝露I/O支持数字量输入%I1024时钟精度每月误差+/- 90秒(环境温度25℃)数字量输出%Q1024 运行环境温度-10℃至+60℃模拟量输入%AI256 储存环境温度-20℃至+70℃模拟量输出%AQ256重量360克通用寄存器范围16位保持型寄存器%R5000电池内置电池用于保持程序,数据和时钟;型号CR2450;可更换保持型位寄存器%M1024非保持型位寄存器%T1024屏幕寄存器%D250人机界面属性外部接口规格屏幕类型 4.3”寸彩色触摸屏,65000色串口1个RS232,1个RS485,共用RJ45连接器分辨率480 X 272 USB mini-B USB2.0用于编程或数据传输背光灯控制程序可控制背光开关Ethernet用于编程和通信,支持Modbus TCP等协议画面存储器 2 MB CAN用于连接远程I/O,控制器,编程...最大页面数量250 终端电阻RS485和CAN总线终端电阻可通过软件启用背光灯LED – 20,000小时(衰减到50%亮度)远程I/O SmartStix,SmartMod,SmartBlock,SmartRail屏幕刷新速率用户自定义MicroSD卡SDHC或SDXC级别,最大支持32 GB (FAT 32格式)可用于装载程序,数据存储,截取屏幕...按键软按键,按屏幕右上角显示测试标准输入/输出概览冲击IEC 60068-2-27 型号晶体管输入晶体管输出继电器输出mA电流/ RTD输入mA电流输出振动IEC 60068-2-6 YU-X4A 12 12 - 4* 2* 防水(前面板)IP65 (NEMA 4X) YU-X4R 12 2 6 4* 2**注意:当模拟输入信号为4路RTD信号时,将会占用模拟量输出通道,此时模拟量输出通道无法使用输入/输出规格数字量直流输入:YU-X4A & YU-X4R继电器输出:仅YU-X4R 输入点数12, 其中4路可配置HSC输出点数6路继电器输出公共端数量 2 公共端数量 6输入电压范围12 VDC / 24 VDC 单通道最大输出电流3A @ 250 VAC通道最大电压35 VDC 通道最大电压275 VAC,30 VDC 输入阻抗10 Kω触点对地隔离1000 VAC输入电流正逻辑负逻辑额定电流下最大电压降0.5 VON限值0.8 mA -1.6 mAOFF限值0.3 mA -2.1 mA继电器寿命空载: > 5,000,000次动作额定负载: > 100,000次动作ON限值电压8 VDCOFF限值电压 3 VDC 触点类型机械触点OFF到ON的时间0.1 ms最大动作频率空载: 300次/分额定负载:20次/分ON到OFF的时间0.1 ms高速计数通道数量 4高速通道最大频率500 kHz 输出响应时间本次扫描周期+10ms 数字量直流输出:YU-X4A数字量直流输出:YU-X4R 输出点数12,其中2路可配置为高速输出通道输出点数2, 2路均可配置为高速输出通道公共端数量 2 公共端数量 1输出类型源型输出类型漏型或源型通道最大电压28 VDC 通道最大电压28 VDC 输出保护短路保护输出保护短路保护每通道最大输出电流0.5 A每通道最大输出电流漏型:0.5 A源型:2.4 mA额定负载时最大电压降0.25 VDC额定负载时最大电压降0.25 VDC最大浪涌电流650 Ma 最大浪涌电流650 mA PWM最大频率65 kHz PWM最大频率65 kHz模拟量输入:YU-X4A & YU-X4R输入通道数 4精度 12位 输入范围 0 – 20 mA 或 4 – 20 mA 或 PT-100 (-50℃ 至 +200℃) %AI 寄存器比例分度32000分度 安全输入 电压范围 -0.5 V 至 +12 V 内部保护至24VDC转换速度同控制器扫描周期 输入阻抗 100 Ω25℃时最大误差小于满量程的1.5% 模拟量输出:YU-X4A & YU-X4R输出通道数 2 %AQ 寄存器比例分度32000分度 输出范围 4 – 20 Ma 转换速度 同控制器扫描周期 精度 12位 25℃时最大误差小于满量程的1.5%最大负载阻抗500 Ω2 设备和面板开孔尺寸3 端口和端子1. 彩色触摸屏2. 大容量microSD 卡插槽3. MJ1/MJ2串行接口4. 位于红色RJ45连接器上的 CAN 总线接口5. 以太网接口6. USB Mini-B:编程口7. 模拟量IO 接口8. 数字量输入IO 接口9. 数字量输出IO 接口10. 直流电源接口X4端口分布示意面板开孔尺寸MJ1/2 串口针脚 MJ1/2口针脚定义 信号 方向8 TXD OUT7 RXD IN 6 0 V Ground 5 5V @ 60mA OUT4 RTS OUT3 CTS IN 2 RX-/TX- IN/OUT1 RX+/TX+ IN/OUT电源端子针脚定义 针脚 信号 信号描述 1 Ground 接地 2 V- 电源输入端0V 3V+电源输入端正极电源端子连接至大地 提供直流电源 额定扭矩0.5-0.78 Nm V-内部已连接到IO 端子上的0VCAN 总线接口CAN 总线接口定义针脚 信号描述 方向 8 无连接 - 7 公共端 0V 6 屏蔽连接 - 5 无连接 - 4 无连接 - 3 公共端 0V 2 CAN 数据低 IN/OUT 1CAN 数据高IN/OUT注意:X4控制器内置120欧姆CAN 总线终端电阻。
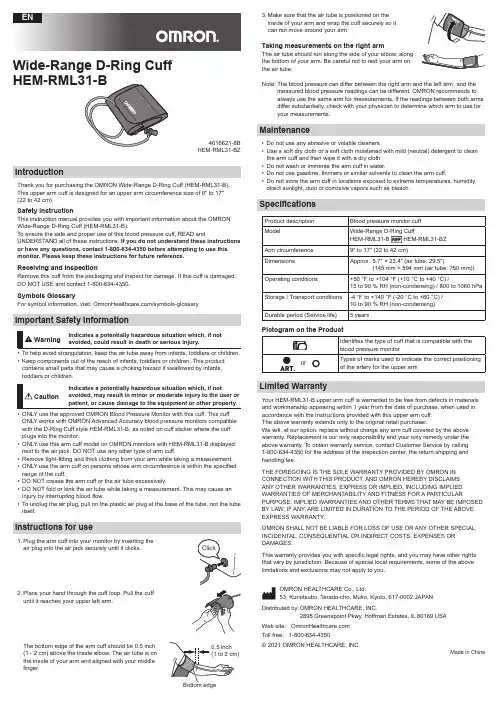
ENWide-Range D-Ring Cuff HEM-RML31-BIntroductionThank you for purchasing the OMRON Wide-Range D-Ring Cuff (HEM-RML31-B).This upper arm cuff is designed for an upper arm circumference size of 9" to 17" (22 to 42 cm).Safety InstructionThis instruction manual provides you with important information about the OMRON Wide-Range D-Ring Cuff (HEM-RML31-B).To ensure the safe and proper use of this blood pressure cuff, READ andUNDERSTAND all of these instructions. If you do not understand these instructions or have any questions, contact 1-800-634-4350 before attempting to use this monitor. Please keep these instructions for future reference.Receiving and InspectionRemove this cuff from the packaging and inspect for damage. If this cuff is damaged, DO NOT USE and contact 1-800-634-4350.Symbols GlossaryFor symbol information, visit: /symbols-glossaryImportant Safety InformationWarningIndicates a potentially hazardous situation which, if not avoided, could result in death or serious injury.• To help avoid strangulation, keep the air tube away from infants, toddlers or children.• Keep components out of the reach of infants, toddlers or children. This product contains small parts that may cause a choking hazard if swallowed by infants, toddlers or children.CautionIndicates a potentially hazardous situation which, if notavoided, may result in minor or moderate injury to the user or patient, or cause damage to the equipment or other property.• ONLY use the approved OMRON Blood Pressure Monitor with this cuff. This cuffONLY works with OMRON Advanced Accuracy blood pressure monitors compatible with the D-Ring Cuff style HEM-RML31-B, as noted on cuff sticker where the cuff plugs into the monitor.• O NLY use this arm cuff model on OMRON monitors with HEM-RML31-B displayed next to the air jack. DO NOT use any other type of arm cuff.• Remove tight-fitting and thick clothing from your arm while taking a measurement.• ONLY use the arm cuff on persons whose arm circumference is within the specified range of the cuff.• DO NOT crease the arm cuff or the air tube excessively.• DO NOT fold or kink the air tube while taking a measurement. This may cause an injury by interrupting blood flow.• To unplug the air plug, pull on the plastic air plug at the base of the tube, not the tube itself.Instructions for use1. Plug the arm cuff into your monitor by inserting the air plug into the air jack securely until it clicks.2. Place your hand through the cuff loop. Pull the cuff until it reaches your upper left arm.The bottom edge of the arm cuff should be 0.5 inch (1 - 2 cm) above the inside elbow. The air tube is on the inside of your arm and aligned with your middle finger.ClickBottom edge0.5 inch (1 to 2 cm)3. Make sure that the air tube is positioned on the inside of your arm and wrap the cuff securely so it can not move around your arm.Taking measurements on the right armThe air tube should run along the side of your elbow, along the bottom of your arm. Be careful not to rest your arm on the air tube.Note: The blood pressure can differ between the right arm and the left arm, and themeasured blood pressure readings can be different. OMRON recommends to always use the same arm for measurements. If the readings between both arms differ substantially, check with your physician to determine which arm to use for your measurements.Maintenance• Do not use any abrasive or volatile cleaners.• Use a soft dry cloth or a soft cloth moistened with mild (neutral) detergent to clean the arm cuff and then wipe it with a dry cloth.• Do not wash or immerse the arm cuff in water.• Do not use gasoline, thinners or similar solvents to clean the arm cuff.• Do not store the arm cuff in locations exposed to extreme temperatures, humidity, direct sunlight, dust or corrosive vapors such as bleach.SpecificationsProduct description Blood pressure monitor cuffModelWide-Range D-Ring CuffHEM-RML31-B HEM-RML31-BZ Arm circumference 9" to 17" (22 to 42 cm)Dimensions Approx. 5.7" × 23.4" (air tube: 29.5")(145 mm × 594 mm (air tube: 750 mm))Operating conditions+50 °F to +104 °F (+10 °C to +40 °C) /15 to 90 % RH (non-condensing) / 800 to 1060 hPa Storage / Transport conditions -4 °F to +140 °F (-20 °C to +60 °C) / 10 to 90 % RH (non-condensing)Durable period (Service life)5 yearsPictogram on the ProductIdentifies the type of cuff that is compatible with the blood pressure monitorTypes of marks used to indicate the correct positioning of the artery for the upper armLimited WarrantyYour HEM-RML31-B upper arm cuff is warranted to be free from defects in materials and workmanship appearing within 1 year from the date of purchase, when used in accordance with the instructions provided with this upper arm cuff.The above warranty extends only to the original retail purchaser.We will, at our option, replace without charge any arm cuff covered by the above warranty. Replacement is our only responsibility and your only remedy under the above warranty. To obtain warranty service, contact Customer Service by calling 1-800-634-4350 for the address of the inspection center, the return shipping and handling fee.THE FOREGOING IS THE SOLE WARRANTY PROVIDED BY OMRON IN CONNECTION WITH THIS PRODUCT, AND OMRON HEREBY DISCLAIMS ANY OTHER WARRANTIES, EXPRESS OR IMPLIED, INCLUDING IMPLIED WARRANTIES OF MERCHANTABILITY AND FITNESS FOR A PARTICULARPURPOSE. IMPLIED WARRANTIES AND OTHER TERMS THAT MAY BE IMPOSED BY LAW, IF ANY , ARE LIMITED IN DURATION TO THE PERIOD OF THE ABOVE EXPRESS WARRANTY .OMRON SHALL NOT BE LIABLE FOR LOSS OF USE OR ANY OTHER SPECIAL, INCIDENTAL, CONSEQUENTIAL OR INDIRECT COSTS, EXPENSES OR DAMAGES.This warranty provides you with specific legal rights, and you may have other rights that vary by jurisdiction. Because of special local requirements, some of the above limitations and exclusions may not apply to you.OMRON HEALTHCARE Co., Ltd.53, Kunotsubo, Terado-cho, Muko, Kyoto, 617-0002 JAPANDistributed by: O MRON HEALTHCARE, INC. 2895 Greenspoint Pkwy. Hoffman Estates, IL 60169 USA Web site: Toll free: 1-800-634-4350© 2021 OMRON HEALTHCARE, INC.Made in China4616621-8B HEM-RML31-BZ。
前言本文档介绍GP-4402WW和GP-4502WW(以下统称GP-4*02WW)的相关信息(包括规格和限制)。
这些信息在GP-Pro EX参考手册或控制器/PLC连接手册中均没有描述。
•GP-Pro EX从V4.04开始支持GP-4*02 WW。
•本文档中未描述的规格和限制与GP-4000系列相同。
关于这些信息的详情,请参阅GP-Pro EX参考手册和控制器/PLC连接手册。
目录前言 (1)目录 (1)参考手册 (2)支持的型号列表 (2)支持的功能 (2)支持的颜色 (5)特殊功能和限制 (5)控制器/PLC连接手册 (9)GP-4402WW/GP-4502WW连接控制器/PLC (9)电缆接线图 (9)支持的驱动程序 (10)本节描述有关GP-Pro EX操作方面的规格和限制。
支持的型号列表支持的功能支持的颜色特殊功能和限制支持的型号列表支持的功能*1 取决于外接控制器/PLC的类型。
*2 指挥中心部件列在支持网站上(/otasuke/)支持的颜色•显示颜色65,536色,无闪烁•绘图时的颜色256色特殊功能和限制GP-4*02WW的特殊功能和限制如下:特殊功能不支持的功能限制特殊功能SRAM•GP-4*02WW未配备备份存储器(SRAM),因此内部存储器的一部分会被用作备份区。
GP-Pro EX参考手册中将这一区域称为“虚拟备份存储器”。
和备份存储器(SRAM)一样,虚拟存储器中的数据在人机界面关机后仍能得到保存。
通过下述方法可查看虚拟存储器的容量:从[工程(F)]菜单中选择[信息(I)],再选择[工程信息(I)],然后选择[SRAM信息]。
•虚拟备份存储器保存以下数据:•历史报警数据•配方数据(配方)时钟•重置或关闭GP-4*02WW会初始化时钟。
需要对时钟进行更新。
本产品支持从控制器/PLC获取时钟信息。
详情请参阅GP-Pro EX中的“通用设置- 时钟更新设置”。
2点触摸•GP-4*02WW不支持2点触摸。
®All for Healthcare E N G L I S HWide-Range D-Ring CuffHEM-RML31-B1. Introduction (3)2. Important Safety Information (3)3. Instructions for use (4)4. Maintenance (5)5. Specifications (6)6. Limited Warranty (7)Thank you for purchasing the OMRON Wide-Range D-Ring Cuff (HEM-RML31-B).This upper arm cuff is designed for an upper arm circumference size of 9" to 17"(22 to 42 cm).Safety InstructionThis instruction manual provides you with important information about the OMRONWide-Range D-Ring Cuff (HEM-RML31-B).To ensure the safe and proper use of this blood pressure cuff, READ and UNDERSTAND all of these instructions. If you do not understand these instructions or have any questions, contact 1-800-634-4350 before attempting to use this monitor. Please keep these instructions for future reference.Receiving and InspectionRemove this cuff from the packaging and inspect for damage. If this cuff is damaged, DO NOT USE and contact 1-800-634-4350.Symbols GlossaryFor symbol information, visit: /symbols-glossary• To help avoid strangulation, keep the air tube away from infants, toddlers or children.• Keep components out of the reach of infants, toddlers or children. This product contains small parts that may cause a choking hazard if swallowed by infants, toddlers or children.• ONLY use the approved OMRON Blood Pressure Monitor with this cuff. This cuff ONLY works with OMRON Advanced Accuracy blood pressure monitors compatible with theD-Ring Cuff style HEM-RML31-B, as noted on cuff sticker where the cuff plugs into the monitor.• O NLY use this arm cuff model on OMRON monitors with HEM-RML31-B displayed next to the air jack. DO NOT use any other type of arm cuff.• Remove tight-fitting and thick clothing from your arm while taking a measurement.• ONLY use the arm cuff on persons whose arm circumference is within the specified range of the cuff.• DO NOT crease the arm cuff or the air tube excessively.• DO NOT fold or kink the air tube while taking a measurement. This may cause an injury by interrupting blood flow.• To unplug the air plug, pull on the plastic air plug at the base of the tube, not the tube itself.2. Place your hand through the cuff loop. Pull the cuff until itreaches your upper left arm.The bottom edge of the arm cuff should be 0.5 inch (1 - 2cm) above the inside elbow. The air tube is on the inside ofyour arm and aligned with your middle finger.3. Make sure that the air tube is positioned on the inside ofyour arm and wrap the cuff securely so it can not movearound your arm.Taking measurements on the right armThe air tube should run along the side of your elbow, along thebottom of your arm. Be careful not to rest your arm on the air tube.Note: The blood pressure can differ between the right arm and the left arm, and the measuredblood pressure readings can be different. OMRON recommends to always use the same arm for measurements. If the readings between both arms differ substantially, check withyour physician to determine which arm to use for your measurements.• Do not use any abrasive or volatile cleaners.• Use a soft dry cloth or a soft cloth moistened with mild (neutral) detergent to clean the arm cuff and then wipe it with a dry cloth.• Do not wash or immerse the arm cuff in water.• Do not use gasoline, thinners or similar solvents to clean the arm cuff.• Do not store the arm cuff in locations exposed to extreme temperatures, humidity, direct sunlight, dust or corrosive vapors such as bleach.Pictogram on the ProductYour HEM-RML31-B upper arm cuff is warranted to be free from defects in materials and workmanship appearing within 1 year from the date of purchase, when used in accordance with the instructions provided with this upper arm cuff.The above warranty extends only to the original retail purchaser.We will, at our option, replace without charge any arm cuff covered by the above warranty. Replacement is our only responsibility and your only remedy under the above warranty. To obtain warranty service, contact Customer Service by calling 1-800-634-4350 for the address of the inspection center, the return shipping and handling fee.THE FOREGOING IS THE SOLE WARRANTY PROVIDED BY OMRON IN CONNECTION WITH THIS PRODUCT, AND OMRON HEREBY DISCLAIMS ANY OTHER WARRANTIES, EXPRESS OR IMPLIED, INCLUDING IMPLIED WARRANTIES OF MERCHANTABILITY AND FITNESS FOR A PARTICULAR PURPOSE. IMPLIED WARRANTIES AND OTHER TERMS THAT MAY BE IMPOSED BY LAW, IF ANY, ARE LIMITED IN DURATION TO THE PERIOD OF THE ABOVE EXPRESS WARRANTY.OMRON SHALL NOT BE LIABLE FOR LOSS OF USE OR ANY OTHER SPECIAL, INCIDENTAL, CONSEQUENTIAL OR INDIRECT COSTS, EXPENSES OR DAMAGES.This warranty provides you with specific legal rights, and you may have other rights that vary by jurisdiction. Because of special local requirements, some of the above limitations and exclusions may not apply to you.OMRON HEALTHCARE Co., Ltd.53, Kunotsubo, Terado-cho, Muko, Kyoto 617-0002 JAPANDistributed by:OMRON HEALTHCARE, INC.1925 West Field Court, Lake Forest, IL 60045U.S.A.Web site: Toll free: 1-800-634-4350© 2019 OMRON HEALTHCARE, INC. Made in China4616621-8A HEM-RML31-BZ。
商品选择 ........................210共通注意事项 ..................236技术指南 ........................481用语说明 (485)相关信息温控器E5CS可用DIP 开关轻松进行设置,简单的功能融于这款48×48 mm 的温控器中•可用DIP 开关和旋转开关轻松进行设置。
•系列中新增带双报警的型号,温度报警应用的理想化产品。
•亦提供多输入(热电偶/铂电阻)型号。
•字符高度13.5 mm 的高可见度数字显示。
•符合RoHS 。
型号结构■型号图例E5CS-□□□□U-□① ② ③ ④ ⑤注.此处提供了功能说明的例子,但并非所有型号都可用于所有组合。
订购时请参阅订购信息。
《示例》· 继电器控制输出、无警报、热电偶输入、插件构造、浅灰色外壳 :E5CS-RKJU-W·继电器控制输出、一个报警输出、多输入、插件构造、浅灰色外壳: E5CS-R1TU-W种类■本体注.带两个报警输出的型号总是对报警2的输出采用上限报警模式。
■附件(另售)●无警报的插座(8个端子)●带警报的插座(11个端子)●保护盖操作篇请参见626页。
尺寸电源电压报警点数控制输出TC/Pt 通用输入,外壳颜色 :浅灰TC 输入,外壳颜色 :浅灰Pt 输入,外壳颜色 :浅灰热敏电阻输入1/16 DIN 48×48×72.5(W ×H ×D )100~240VAC继电器E5CS-RTU-W E5CS-RPU-W E5CS-RPU-W E5CS-RGU-W 电压(用于驱动SSR )E5CS-QTU-W E5CS-QKJU-W E5CS-QPU-W E5CS-QGU-W 1继电器E5CS-R1TU-W E5CS-R1KJU-W E5CS-R1PU-W E5CS-R1GU-W 电压(用于驱动SSR )E5CS-Q1TU-W E5CS-Q1KJU-WE5CS-Q1PU-WE5CS-Q1GU-W2(见注)继电器E5CS-R2TU-W ------电压(用于驱动SSR )E5CS-Q2TU-W------24 VAC/VDC0继电器--E5CS-RKJDU-W E5CS-RPDU-WE5CS-RGDU-W电压(用于驱动SSR )--E5CS-QKJDU-W ----1继电器--E5CS-R1KJDU-W E5CS-R1PDU-WE5CS-R1GDU-W电压(用于驱动SSR )--E5CS-Q1KJDU-W----① 输出类型R :继电器Q :用于驱动SSR 的电压② 报警数空白:无报警1 :1个警报2 :2个警报③ 输入类型KJ :热电偶P :铂电阻G :热敏电阻T :热电偶/铂电阻(多输入)④ 电源电压空白:100~240 VAC D :24 VAC/VDC ⑤ 外壳颜色W :浅灰类型型号表面连接插座P2CF-08背面连接插座(嵌入式安装)P3G-08表面连接插座(防指触保护型)P2CF-08-E P3G 用防指触保护端子盖Y92A-48G类型型号表面连接插座P2CF-11背面连接插座(嵌入式安装)P3GA-11表面连接插座(防指触保护型)P2CF-11-E P3G 用防指触保护端子盖Y92A-48G类型型号硬质型前盖Y92A-48B额定值/性能■额定值■性能注:1.以下为热电偶的特例。
2.1 安装 / 更换电池1. 产品的组成及各部件名称安全注意事项2. 使用前的准备臂肘侧。
注:• 请注意手臂不要压到空气管,否则会 阻碍空气流向臂带。
• 臂带应位于臂肘之上 1 cm ~ 2 cm 处。
注:如果希望中止测量,按下「开始 / 停止」按钮关闭血压计,臂带的 空气排出。
2.臂带: 在右手臂上测量适用臂周范围:22 cm ~ 32 cm (上臂中央部)I. 7 号干电池 4 节1.将本体翻过来。
1.2.将臂带缠在上臂上。
臂带空气管应位于手臂的内侧中央并向下指向手臂内侧,使臂带空气管位于前臂内侧并与中指在同一条直线上。
3.正确缠上臂带后,使用布扣将臂带固定在手臂上。
1.身体坐直放松,两脚平放在地板上,将手臂放在桌面上,使臂带与心脏处于同一高度。
测量过程中,身体保持不动,不要说话。
2.2.轻按中央锯齿部并沿箭头方向推动电池盖。
3.安装或更换 4 节 7 号电池,电池的正(+)负(-)极与电池盒中标注的正负极要一致。
4.重新关上电池盖。
已关上。
仍然被保存。
A.显示屏B.「开始 / 停止」 按钮C.AC 电源适配器接口(用于连接另售的 AC 电源适配器)D.电池盖E.空气管接口2.2 电池的寿命与更换3.2 测量血压如果显示屏上显示电池低电量图标更换 4 节新电池。
若已经知道您的高压值高于 140 mmHg (18.7 kPa),请按照如下方法进1.3.3 关于特殊情况的说明2.臂带开始充气时,按住「开始 / 停止」按钮,直到臂带的充气压力比预计高压高出 30 mmHg ~ 40 mmHg (4 kPa ~5.3 kPa) 为止。
3.当臂带加压至目标值时,松开「开始 / 停止」按钮。
臂带开始减压,测量开始。
注:臂带充气压力不能超过 299 mmHg (39.9 kPa)。
(如果臂带加压至 300 mmHg (40 kPa) 以上将出现错误。
)4.接下来的步骤和正常测量一样。
请参照“3.2 测量血压”中的步骤 3 至 5。