Wokamon:能养电子宠物的计步器
- 格式:doc
- 大小:22.00 KB
- 文档页数:3
梦龙宠物机2代说明书梦龙宠物机2代说明书1. 产品介绍梦龙宠物机2代是一款虚拟宠物游戏机,用户可以通过它养育、训练和玩耍自己的梦龙宠物。
宠物机具有高清显示屏和触摸控制屏,支持多种游戏和交互功能,给用户带来更多乐趣体验。
2. 开始使用(1)将梦龙宠物机2代插入电源,按下电源按钮开机。
(2)首次开机需要进行初始设置,包括选择语言、设置时间和日期等。
(3)通过触摸控制屏进行操作,主界面上有各种游戏和功能图标,可通过点击进入相应的功能。
3. 养育宠物(1)用户可以通过宠物机提供的食物、水、洗澡等功能来满足宠物的生活需求。
(2)按照提示,定时给宠物喂食、喝水,保持宠物的健康成长。
(3)需要定期给宠物洗澡,保持清洁,并可以更换宠物的外观和装饰。
4. 训练宠物(1)宠物机提供了多种训练游戏,用户可以通过与宠物互动来训练宠物的技能和能力。
(2)根据宠物的特点和需求,选择适当的训练方法,增加宠物的等级和经验值。
5. 交互功能(1)宠物机支持与其他宠物机的对战和交配功能,可以通过无线连接与其他玩家进行宠物对战和交换。
(2)用户可以通过宠物机的社交功能来结识其他梦龙宠物机的玩家,并互相赠送礼物和合作玩乐。
6. 存储和管理(1)宠物机提供了存档功能,用户可以将宠物的数据保存到存档空间中,以便日后继续游戏。
(2)用户可以通过宠物机提供的管理功能查看宠物的成长记录和状态,以及进行数据备份和恢复。
7. 注意事项(1)请勿将宠物机长时间放置在高温、潮湿或受阳光直射的环境中。
(2)请勿使用尖锐物体或化学溶剂清洁宠物机的屏幕,以避免划伤或损坏。
(3)在使用过程中,宠物机可能会产生电磁干扰,请尽量避免将宠物机靠近电视或其他电子设备。
注意:以上为梦龙宠物机2代的简要说明书,具体操作和功能请参考官方详细说明书。
智能电子宠物机器人的说明书本产品为智能电子宠物机器人,将为您带来独特的宠物伴侣体验。
在使用本产品之前,请您仔细阅读本说明书以确保正确使用和操作。
一、功能概述1. 智能互动:该机器人具备智能识别、语音交互和动作感应等功能,能够与用户进行真实的沟通和互动。
2. 多种模式:机器人提供众多游戏、学习、娱乐模式,如自主行走、跳舞、唱歌、讲故事等,以满足用户的多样化需求。
3. 健康照护:机器人具备健康监测和提醒功能,可根据用户的需求,为用户提供定期的健康报告和用药提醒。
4. 远程控制:用户可通过手机应用程序或其他智能设备,远程控制机器人的动作和功能。
二、产品组成1. 主机:智能电子宠物机器人主体,包含感应器、扬声器、显示屏等关键部件。
2. 充电器:用于给机器人进行电池充电的充电设备。
3. 说明书:本文所提供的智能电子宠物机器人的说明书。
三、安全使用须知1. 请使用原装充电器进行充电,不得使用非原装充电器或不符合标准的充电设备。
2. 请在使用过程中避免过度摔打或碰撞机器人,以防损坏关键部件。
3. 未成年人应在成年人指导下正确使用机器人,避免造成不必要的伤害。
4. 请勿将机器人暴露在高温、潮湿或极端环境中,以免影响其正常使用和寿命。
5. 当机器人出现异常情况或故障时,请立即停止使用,并与售后服务中心联系。
四、使用步骤1. 开机:按下机器人背部的开关按钮,机器人会发出开机提示音,并在显示屏上显示欢迎词。
2. 连接应用程序:下载并安装手机应用程序,在设置中连接机器人,确保手机和机器人在同一网络环境下互通。
3. 语音交互:通过语音指令与机器人进行交流,例如:“嗨,小宝贝,你好!”机器人将根据指令作出相应回应。
4. 选择模式:用户可在机器人显示屏上选择不同模式,或通过手机应用程序进行控制。
5. 结束使用:长按机器人背部的开关按钮,机器人将发出关机提示音,并显示关机信息。
五、维护保养1. 定期清洁:请使用柔软干净的布进行机器人主体和配件的清洁,避免使用含有酸碱性的清洁剂。
飞猫系统话术飞猫心率系统是一款用于测量心率、步数及步频等运动参数的臂式运动监测器。
本设备内置了强大的运动传感器以及精准的运动算法,能够计算出各种运动及人体参数,同时连接手机,运动器材等多种设备以管理运动数据。
优势1测量精准专业级测量芯片及内置的强大算法能够为用户带来准确的身体数据测量,产品的性能经过了研发阶段大量专业的测试与调校,确保各种身体条件的用户在不同运动中测量准确可靠。
优势2臂带5色LED训练强度提示灯不同的颜色显示提示不同的心率区间,方便运动中随时掌握运动节奏,当心率过快超过最大安全心率时, 主机也就是老师的端口会发出震动3次,提示调整学员的运动强度,避免运动损伤,也便于落实我们的分层次教学。
优势3数据直观,保证运动的安全性,科学性显示当前所有会员的最大心率百分比、卡路里、实时心率等数据,通过颜色区分运动所处的心率区间,家长可以通过场外数据直观的了解到自己孩子在这堂课中的运动强度,提高运动效率、控制运动风险,让运动充满了乐趣,同时便于您回收课堂效果,监督监控教学质量。
对会员运动档案的管理,会员的体重记录、体成分测试记录、心率训练记录、健康调查表及相关的变化曲线都通过智能设备完整的存放在云端数据库中,家长也可以通过手机,就能查看自己的运动数据,教练也可通过会员的运动数据,及时调整训练强度,做到科学、有效的锻炼。
1.课程顾问在讲解上课环节的同时,引导家长看你孩子看孩子的心率监控情况。
先介绍一下显示屏上各项数值代表的含义屏幕最上面是学员实时的心率监控状态显示,对应当下该学员整个区域的颜色状态接下来是学员的头像和学员的名字接下来的百分比是该学员的心率值(是当下心跳数/(220-学员年龄的最大心率)这个心率值会对应孩子运动的六种状态,具体内容如下:①休闲状态:心率值在41%--50%,屏幕显示颜色为灰色。
②热身运动:心率值在51%--60%。
屏幕显示颜色为蓝色。
③脂肪燃烧:心率值在61%--70%。
2023年新款智能宠物跟踪器产品说明书一、产品概述本产品是一款智能宠物跟踪器,旨在帮助宠物主人实时追踪和监控他们的宠物。
通过使用最新的定位技术,该设备可以轻松追踪宠物的位置,并提供实时位置更新,使主人能够及时掌握宠物的动态。
二、产品特点1. 高精度定位:采用先进的全球定位系统(GPS)技术,提供高精度的宠物定位,误差范围小于2米,确保主人能够准确掌握宠物的位置。
2. 实时追踪:通过移动应用程序,主人可以实时追踪宠物的位置,无论在任何时间和任何地点,都能及时获取宠物的最新位置信息。
3. 安全警示:当宠物离开设定的安全区域时,设备会自动发送警示通知给主人,确保主人能够第一时间知晓宠物的离开情况。
4. 历史轨迹回放:提供宠物的历史轨迹回放功能,主人可以查看宠物在一段时间内的运动轨迹,了解宠物的习性和活动范围。
5. 云端存储:宠物的位置数据将以云端存储的方式进行管理,主人可以随时随地通过移动应用程序访问和管理这些数据。
6. 远程控制:通过移动应用程序,主人可以远程控制设备,例如发送指令进行语音播报,实时与宠物进行互动,给予宠物指导和安抚。
三、产品规格1. 尺寸:50mm × 50mm × 15mm2. 重量:30克3. 电池容量:600mAh4. 充电方式:Micro USB充电5. 运行时间:单次充电可持续使用48小时6. 定位精度:小于2米7. 支持的网络:2G/3G/4G四、产品操作1. 下载并安装移动应用程序:用户需要在智能手机上下载并安装与设备配套的移动应用程序。
2. 创建用户账号:用户首次使用产品时需要创建一个个人账号,并登录到移动应用程序中。
3. 激活设备:将宠物跟踪器插入充电器,待电量充满后开启设备,然后通过移动应用程序激活设备。
4. 绑定设备:在移动应用程序中,按照操作指引将设备与个人账号进行绑定。
5. 设置安全区域:用户可以在移动应用程序中指定宠物的安全区域,当宠物离开这个区域时,会收到警示通知。
自动寻宠机器人的说明书欢迎购买自动寻宠机器人!本说明书将为您提供机器人的详细介绍以及使用方法。
在使用之前,请仔细阅读本说明书,并按照说明操作。
一、产品介绍自动寻宠机器人是一款专为宠物主人设计的智能机器人。
它通过先进的人工智能技术和传感器,可以实时监测宠物的需求并作出相应的反应。
无论您是狗主人还是猫主人,该机器人都能成为您的贴心伴侣。
二、产品特点1. 智能识别:自动寻宠机器人可以根据宠物的外观和声音,智能识别宠物的种类和状态。
无论是狗还是猫,它都能准确辨识,并作出相应的行动。
2. 自动喂食:机器人内置智能喂食系统,可以根据宠物的饥饿程度和体重,合理配给食物。
您只需在机器人上设定喂食的时间和量,机器人会自动按照设定执行。
3. 运动陪伴:自动寻宠机器人可以移动并陪伴宠物进行活动。
它会根据宠物的需求,主动与宠物互动,比如追逐、抓取等。
这样可以有效消耗宠物的体力,保持其健康。
4. 智能语音交互:机器人内置语音识别系统,可以与宠物进行简单的语音交流。
您可以通过语音指令让机器人做出相应的动作或互动,增强与宠物之间的沟通。
5. 安全保护:- 自动避障:机器人配备传感器,可以及时感知障碍物,并自动避免碰撞。
- 防丢失功能:机器人连接到手机APP,当宠物离开设定的活动范围,机器人会自动发出警报,提醒主人及时寻找宠物。
三、使用方法1. 开箱准备:打开包装,取出自动寻宠机器人及其配件。
确认配件齐全后,将机器人放置在宠物常活动的区域。
2. 配置设置:- 电源连接:将机器人与电源适配器连接,并将适配器插入电源插座。
- 网络连接:打开手机的Wi-Fi功能,并连接到机器人所在的网络。
- APP下载:在手机中下载并安装机器人对应的APP,并按照指示进行注册和绑定设备。
3. 机器人操作:- 开机:按下机器人上的开机按钮,等待机器人启动。
- 设定喂食:通过APP设置机器人的喂食时间和食物量,并安装食物供给装置。
- 语音交互:可以通过APP或机器人上的语音按钮调用语音交互功能。
玩具电子宠物说明书注意事项:欢迎您购买我们的玩具电子宠物!在开始使用之前,请仔细阅读本说明书以确保您正确地操作和享受玩具电子宠物带来的乐趣。
本说明书将介绍玩具电子宠物的特性、功能、使用方法以及维护保养事项等内容。
一、产品简介玩具电子宠物是一种逗趣可爱、陪伴您度过休闲时光的小伙伴。
它拥有多种功能和特性,包括:1. 多样化的外观:玩具电子宠物有不同品种和外观供选择,包含各种可爱的动物造型,例如小狗、小猫等。
2. AI智能交互:玩具电子宠物能够通过内置的人工智能与您进行互动,根据您的动作和声音做出相应的反应。
3. 多种功能:玩具电子宠物可以发出声音、模仿动作、播放音乐等,让您享受与它互动的乐趣。
二、使用方法1. 电源开关:玩具电子宠物的电源开关位于其背部,打开电源开关后,屏幕上将显示相应的欢迎画面。
2. 功能选择:通过屏幕上的菜单按钮,您可以选择不同的功能,例如喂食、玩耍、学习等。
根据屏幕上的指示操作即可。
3. 交互方式:与玩具电子宠物互动可以通过触摸屏、声音传感器等方式进行。
您可以触摸屏幕进行摸头、抚摸等操作,也可以用声音与它交流。
4. 充电方式:当玩具电子宠物电量低时,您可以使用附带的充电器进行充电。
将充电器插入电源插座,并将充电端口连接到玩具电子宠物上即可,充电时间约2小时。
三、注意事项在使用玩具电子宠物时,需要注意以下事项:1. 避免碰撞:请尽量避免将玩具电子宠物摔落或碰撞,以免造成损坏。
2. 防水防潮:玩具电子宠物不具备防水防潮功能,请避免将其浸泡在水中或暴露在潮湿环境中。
3. 使用环境:请在室内平坦、干燥的地方使用玩具电子宠物,并避免长时间暴露于阳光下。
4. 年龄限制:玩具电子宠物适用于3岁及以上的儿童使用,未成年人请在家长或监护人的指导下使用。
5. 电池安全:请勿将玩具电子宠物撕开或将电池暴露在火源附近,以免引起火灾或爆炸。
四、维护保养为了您能够长时间地享受玩具电子宠物的乐趣,请注意以下维护保养事项:1. 储存方式:当不使用玩具电子宠物时,请将其存放在干燥、避免阳光直射的地方。
MONGOOSE VT604 GPS-GPRS TRACKEROWNERS MANUALInstallationandM-TRAK ConfigurationM-TRAK is the Mongoose internet web-server which is hosted in New Zealand for fast24/7access.M-TRAK requires no software to install on your computer.M-TRAK can be accessed through any internet ready PC,tablet or smart-phone.You control your vehicles reported locations,therefore the cost.M-TRAK records and preserves the travel history for you to download and produce electronic or printed reports..auHow it worksThe Mongoose VT604is a GPS tracker which uses the GPRS(General Packet Radio System)mobile network to transmit its location‘data’to our M-TRAK web-server located in Auckland,New Zealand.GPRS uses data,not SMS text messages,to send location information from the tracker to the M-TRAK web-server.It also uses GPRS to send commands from the web-server to the tracker.A SIM card with data allowance is required.Most contract cards have a certain amount of data usage Always use a SIM with adequate data for up to10mb per month per vehicle.‘Data/text’contracts are only available from the card providers directly.M-TRAK records the vehicle movement from its last reported‘live’location as well as maintaining a full record of current and previous travel history.This travel history can be searched by date and time,viewed on-screen or printed as a report.There is also the option of saving the location data on your own computer.The VT604is controlled by GPRS commands from the M-TRAK website.SMS text messaging is used for;a)initial setup to instruct the tracker where to send the tracking data.b)to ask its actual current location.An M-TRAK account will be created for you with your own unique username and password.These give you24/7access to the M-TRAK web-server where you can have full control of your vehicle(s)frequency of reporting.You can also view,save and print reports.The M-TRAK programme is self explanatory as it is very similar to other Windows based programmes.The VT604can report locations by either time or distance travelled–or both.To keep costs really low,the VT604was designed to be installed to only report when the engine is running and the vehicle driven.This can be changed if constant24/7reporting is required.When the engine is started,a GPRS session is opened with the mobile provider and when the engine is stopped,the session ends.Most mobile data SIM providers usually only charge per session.The tracker doesn’t transmit its location when the engine is off,so just use the SMS text command if you need to know where it is at any time.Basic functionsFunction DetailsLive Tracking Monitor online vehicles’last LIVE reported location with our M-TRAK web based fleet management server.Or send an SMS to find out where it is right now.Track according to time interval The tracker sends its location to M-TRAK at your selected time intervals from5seconds and above. From within M-TRAK you control and select the time intervals.(30seconds is typical as this gives an accurate map trace)Track according to distance The tracker can send its location to M-TRAK at pre-set distance intervals.From within M-TRAK you control and select the distance intervals.(250~500 metres is typical for an accurate map trace)Geo-fence Detect when a vehicle is driven out or into a pre-defined‘geo-fenced’area.Speeding alert Monitor vehicle’s speed.Send speeding alarm to the M-TRAK server.Mileage Calculate mileage and report by using of GPS speed.SMS tracking Simply send a text to tracker to request current location.Tracker will check the location in Google maps and reply with location address.ALERTSSOS If the driver presses and holds the‘SOS’button in emergency,the GPS tracker will report the emergency to the M-TRAK server and send an SMS to the controller mobile phone.External power cut off report When the GPS tracker’s power supply is cut off,it will report to the M-TRAK server.Immobilise thevehicle If the vehicle is stolen or used without permission, you can immobilise the engine.This is usually the starter motor which prevents the engine being started next time–far safer than simply cutting the engine at any time.COMMUNICATIONDouble reporting The VT604has the ability to send its data to two servers.UDP/TCP Connection Tracker supports both SMS and GPRS (TCP /UDP)communication.Tracker controlThe VT604is controlledby you from the M-TRAK web-server.Set M-TRAK address via mobile phoneYour mobile phone is used to setup the basic parameters such as:-APN,server’s IP address,server port number,controller number and trackersSIM number.POWER MANAGEMENTTracker self test Tracker will test itself to ensure correct operation.If it detects a fault,it will report to the M-TRAK server with a fault description.Power SavingMode While engine off,device automatically switch off GPS and GPRS connection,extend more battery lifeLow Voltage ProtectionWhen vehicle battery voltage is lower than normal,the VT604will switch off so as to avoid further discharge.InstallationNote:This product is for professional installation.Any fault to this product or the vehicle caused by incorrect installation by unauthorised persons voids any warranties.Insert the SIM card and turn on the battery back-up∙Remove back cover and slide open the SIM card holder.∙Insert SIM card into holder,fold down and slide clip into place.∙Turn circled micro switch to ‘on’.(This turns on the battery back-up)∙Re-fit rear coverWiring connections RED -Constant (+)12v fused BLACK -Ground (-neg)YELLOW -Ignition detect (+12v)–sometimes marked ‘ACC’THIN RED -Immobiliser ground out (-),use a relay (not supplied)SOS switch-Pre-wired,mount in a handy but hidden location.Connection to a vehicles car alarm siren (if vehicle equipped)Mongoose alarms have a (+)positive siren e a suitable low impedance miniature relay,not supplied,to convert this positive siren output to negative –fig 1.Connect to pin 1(black)as shown in the diagram below.For (-)negative siren connection;No relay required,connect siren trigger wire to thin black pin 1with a diode in-line to prevent pressing SOS button sounding the siren.Fig11.Thin black –SOS input (-)2.Thin red –SOS output (-)3.Black/red –Ground (-)4.Thin red –no connection5.Green –no connection6.Red -+12v constant (+)7.Thin black –No connection8.Thin red –Immobiliser output (-)9.Yellow –Ignition input (+)‘ACC’Note:SOS alarm feature inoperative from a pulsed horn honk -input must be constant ground for 5seconds or more.GSM antenna –mount above interior mirror for best reception.Dress cable around windscreen and down ‘A’pillar.GPS antenna –mount where it can ‘see’the sky to receive satellite reception.Hide antenna from view and tampering.Under dash above glove box is ideal providing dash is plastic.Antenna cannot ‘see’through metal.OPTIONAL ENGINE IMMOBILISER RELAYThin Red from tracker #88785863087+12VSTARTERCUQuick Start GuideDevice Start-up:1.Insert the SIM card.2.Connect the trackers wiring to the vehicle.3.Install and connect the GSM and GPS antennas.4.Turn on the trackers battery back-up battery.(see photos)5.Mount and secure the GPS module from tampering.6.Turn the ignition‘on’and start the engine to activate the unit.7.Move vehicle outdoors for good GPS reception.8.Check status LED’s for correct operation.See chart below.9.Install and hide the GPS module from access and tampering.GREEN GSM LED DescriptionFlashes onceevery3secondsGSM connected and working LED off No power in or IGN not connected.Flashes onceevery0.2secondsData transmissionLED constant on–not flashing No GSM signal or connection.Check GSMantenna connection.RED GPS LEDFlashes once every1second GPS satellites acquired and working LED off No power in or IGN not connected.LED constant on–not flashing No GPS satellites acquired.Check GPS antenna connection–outdoors.Configure the tracker for M-TRAKJust one SMS text message is all that is required to set-up the VT604.(4U,Controller mobile number,IPaddress,port,APN,,SIM number of tracker) Description:Controller Mobile Number=The phone number of the controlling mobile phone IP address=IP address of the M-TRAK serverport=port number of the M-TRAK serverAPN=‘Access Point Name”-mobile service providersaddressSIM=The SIM card mobile number in tracker Example:(4U,021*******,220048083028,12342332,,,021*******) Include brackets and commas.Tracker will reply"Done!"when completed. SMS commands Default Password as111111.Request Location(where is it right now?)When ignition is on:Command:(AI*RPassword)Sample:(AI*R111111)1st3letters are upper case-include brackets in SMS.The tracker will reply with latitude and longitude with a link to Google maps for Smartphones.When ignition is on or off:Command:(AI*PPassword)Sample:(AI*P111111)1st3letters are upper case-include brackets in SMS.The tracker will reply with location address text message.Change PasswordCommand:(AI*WOld Password*New Password)Sample:(AI*W111111*123456)Controlling the VT604The M-Trak web server is used to control the GPS tracker.This control can be found under‘device parameters’.Select‘add’and a vehicle list will appear.A drop down box shows the various options of control.Please note,some options do not apply to the model VT604.The most common options are highlighted in bold.1.Driver access n/a2.Call restriction n/a3.Speed limit warning set limit for warning4.Time for power saving mode Save power after ignition offDefault30minutes5.Sleep parameters Time to sleep mode withignition on if speed is zero6.Overtime parking Set time limit for parking withignition on before reporting7.Function switch a)Turn off GSM or not underpower save modeb}When speed is zero stillupload GPS data or noteage When to upload data9.Interval to upload time data Set how often to locatevehicle and upload data toserver.Default is30seconds 10.Link to maintain GPRS How long to keep GPRSconnection open whentracker is in sleep mode.Default3minutes.11.Fuel alarm n/a12.Snapshot of parameters n/a13.Wake-up after power save Restart the tracker14.Cancel alarm warning Resets alarm parameters15.Engine lock Immobilise the vehicle,on or off16.Device software version Checks software version17.Check fuel level setting n/a18.RFID n/a19.Temperature threshold n/a20.Interval to upload distance Set how often to locatevehicle by distance travelled.Default is250metres.Set parameters9or20–both can be used but will double the data usage.Technical SpecificationGSM module Huawei GTM900,GSM850/900/1800/1900, Support dual-band or quad-bandGPS Chipset SIRF-Star III chipsetGPS Sensitivity-159dBmGPS Frequency L1,1575.42MHzC/A Code 1.023MHz chip rateChannels20channel all-in-view tracking Position Accuracy10meters,2D RMSVelocity Accuracy0.1m/sTime Accuracy1us synchronized to GPS time Datum WGS-84Reacquisition0.1sec.,averageHot start1sec.,averageWarm start38sec.,averageCold start42sec.,averageAltitude Limit18,000meters(60,000feet)max.Velocity Limit515meters/second(1000knots)max.Acceleration Limit Less than4gJerk Limit20m/secOperating temperature-25℃to70℃Humidity5%to95%Non-condensing Battery Back-up Voltage Rechargeable1300mAh battery(3.7V) Operating Voltage DC12~24V11Mongoose New Zealand Web site: 41A View Road,Glenfield,Auckland PO Box 101-599NSMC Ph:(09)4433128Fax:(09)4433129Email:*****************.nz。

梦龙宠物机2代说明书摘要:一、梦龙宠物机2 代简介1.产品背景2.产品特点3.适用人群二、梦龙宠物机2 代功能介绍1.互动功能2.喂养功能3.清洁功能4.健康管理功能5.娱乐功能三、梦龙宠物机2 代使用说明1.安装与启动2.基本操作3.高级设置四、梦龙宠物机2 代维护与保养1.清洁与保养2.故障排查与处理3.注意事项五、梦龙宠物机2 代常见问题解答1.使用问题2.功能问题3.维护问题正文:【梦龙宠物机2 代简介】梦龙宠物机2 代是一款集互动、喂养、清洁、健康管理和娱乐于一体的智能宠物机。
它以其可爱的外观、丰富的功能和便捷的操作赢得了广大消费者的喜爱,特别适合喜欢宠物但又无法养宠物的人群。
【梦龙宠物机2 代功能介绍】1.互动功能:梦龙宠物机2 代内置了丰富的互动游戏,能够模拟真实的宠物互动,带给用户乐趣。
2.喂养功能:梦龙宠物机2 代设有自动喂食系统,能够定时定量地喂养宠物,让宠物健康成长。
3.清洁功能:梦龙宠物机2 代具有自动清洁功能,能够自动清理宠物粪便,保持宠物环境的清洁。
4.健康管理功能:梦龙宠物机2 代能够实时监测宠物的健康状况,包括体温、心率等,并通过数据分析提供合理的喂养建议。
5.娱乐功能:梦龙宠物机2 代内置了音频和视频播放功能,能够播放舒缓的音乐和有趣的视频,为宠物提供娱乐。
【梦龙宠物机2 代使用说明】1.安装与启动:将梦龙宠物机2 代的电源插头插入电源插座,打开电源开关,启动宠物机。
2.基本操作:通过触摸屏进行操作,包括喂食、清洁、互动游戏等。
3.高级设置:通过设置菜单进行详细设置,包括喂养时间、喂养量、清洁频率等。
【梦龙宠物机2 代维护与保养】1.清洁与保养:定期清洁宠物机的表面和内部,保持其清洁卫生。
2.故障排查与处理:如果遇到故障,可以先通过说明书进行排查,如无法解决,可以联系售后服务。
3.注意事项:使用梦龙宠物机2 代时,应确保宠物机在通风、干燥的环境中使用,避免阳光直射。
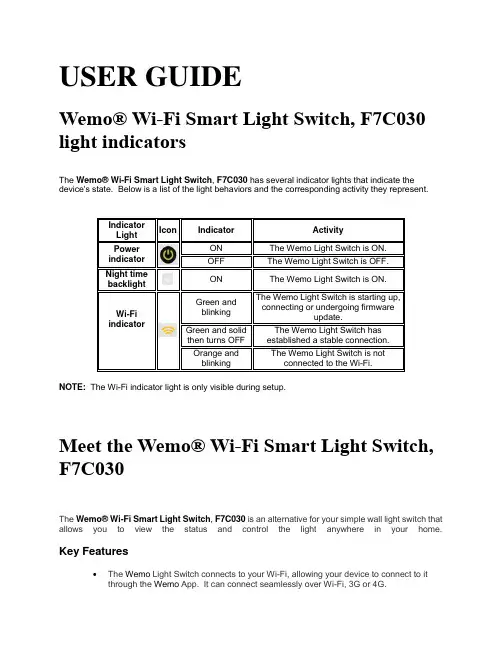
USER GUIDEWemo® Wi-Fi Smart Light Switch, F7C030 light indicatorsThe Wemo® Wi-Fi Smart Light Switch, F7C030 has several indicator lights that indicate the device's state. Below is a list of the light behaviors and the corresponding activity they represent.NOTE: The Wi-Fi indicator light is only visible during setup.Meet the Wemo® Wi-Fi Smart Light Switch, F7C030The Wemo® Wi-Fi Smart Light Switch, F7C030 is an alternative for your simple wall light switch that allows you to view the status and control the light anywhere in your home. Key FeaturesThe Wemo Light Switch connects to your Wi-Fi, allowing your device to connect to it through the Wemo App. It can connect seamlessly over Wi-Fi, 3G or 4G.∙You can easily set the turn ON or OFF times manually or enter your city name and have lights to turn ON at sunrise then OFF at sunset.∙The Wemo Light Switch comes with an elegant clip-on face plate that hides all screws giving it a modern look and it has a back light to make it easy to find at night.∙Compatible with any smartphone or tablet running Android™ 4.4 or higher or iOS 9 or higher.HardwareFeaturesA. Wi-Fi Indicator - This indicator changes alternatively in color between green and orange and is only visible during setup.B. Power Indicator - This indicator lights up if the Wemo Light Switch is ON.C. Night Light - This indicator lights up only when the room is dark that makes the Wemo Light Switch easy to find.D. Reset Button - This is also known as the Wi-Fi Reset button that is dedicated for resetting the Wi-Fi settings of your Wemo Light Switch. This is located right below the Night Light beside the Power Restart button.E. Restart Button - This is also known as the Power Restart button that is dedicated to power restart your Wemo Light Switch without losing any Wi-Fi settings. This is located right below the Night Light beside the Wi-Fi Reset button.F. Clip-on Face Plate - This hides all screws, giving a modern look to the Wemo Light Switch. NOTE: The MAC address of the Wemo Light Switch can be found underneath if you remove the face plate.G. Easy ON / OFF - Push anywhere to toggle ON and OFF.Resetting or restarting your Wemo® Wi-Fi Smart Light Switch, F7C030 is easy with itsdedicated Reset and Restart buttons.Restart if:∙The Wemo Light Switch is not detected by the Wemo App.∙The Wemo Light Switch is blinking orange after a firmware update.∙The Wemo Light Switch has become unresponsive to both the app and manual controls. Reset if:∙You recently changed your wireless router or your Wi-Fi name or password.∙You want to erase any stored settings.QUICK TIP: On the Wemo Light Switch faceplate, the Reset button is also known as the Wi-Fi Reset button, while the Restart button as the Power Restart button.How to restart your Wemo Light SwitchTo restart the Wemo Light Switch, press the Restart button for 1 second and then release. The Wi-Fi Indicator light will begin to blink green to show it is restarting.QUICK TIP: If the Wemo Light Switch is not responding to the Restart button, turn OFF the power of the Wemo Light Switch by turning the circuit breaker OFF and then turning it back ON.How to reset your Wemo Light SwitchResetting using the Wemo AppResetting using the Reset buttonResetting using the Wemo AppStep 1:Launch the App.Step 2: Tap .Step 3:Tap WeMo Light Switch.Step 4: Tap Reset Options.Step 5:Tap Reset Name, Rules & Data.Resetting using the Reset buttonIMPORTANT: This process will delete all previous settings done in the Wemo App and reset your Wemo Light Switch to factory default settings. You will need to set up the Wemo Light Switch with the Wemo App again.Step 1: Press the Restart button for 1 second and then release. The Wi-Fi Indicator light will begin to blink green to show it is restarting.QUICK TIP: If the Wemo Light Switch is not responding to the Restart button, turn OFF the power of the Wemo Light Switch by turning the circuit breaker OFF and then turning back ON.Step 2:Immediately press and hold the Reset button for 5 seconds. The Wemo Light Switch Wi-Fi icon will blink orange rapidly, indicating a successful restore.The Wemo Light Switch will take about 90 seconds to perform the restore. When ready, the Wi-Fi Indicator light will begin to alternate between green and orange to show it is ready to be set up. For setup instructions, click here.Installation of the Wemo Light Switch to the electrical line If you’re familiar and comfortable with basic electrical work, it only takes a few minutes to set up your Wemo Light Switch. Otherwise, do not try and do it yourself, please call a professional electrician.Electrical Installation Requirements∙ A Neutral wire (requires all three AC electrical connections at the wall switch)∙ A single pole light switch (not compatible with lights controlled by more than one switch)∙The light switch box must be 2inches deepIMPORTANT: The Wemo Light Switch is not designed to work with metal faceplates because they interfere with the Wi-Fi signal. It is recommended to use the light switch for residential and dry indoor locations only.Once these electrical requirements are complete, proceed with the electrical installation instructions below.Step 1:Shut OFF the power at the circuit breaker for the switch you are replacing. You may need to shut OFF more than one circuit breaker/switch to make sure the switch you're working on is powered OFF.IMPORTANT:USE A NON-CONTACT VOLTAGE DETECTOR OR FLIP YOUR LIGHT SWITCH A FEW TIMES TO MAKE SURE THAT THE POWER IS OFF.Step 2: Unscrew and disconnect the wires from the old switch using a screw driver.Step 3: Identify the wires on your Wemo Light Switch.∙Switch (Live/Load) wires - On this light switch, the Switch wires are the two black wires. Every light switch will have both of these wires. But they could beeither red or black in color.∙Neutral wire - The Wemo Light Switch requires this wire, but isn't always present in your electrical wiring at home. If present, the neutral wire is normally foundwithin the wall box with a wire nut on top of it.∙Ground wire - If present, it should be plugged into the top of the light switch here. It's normally green or copper in color. Don't worry if you can't find theground wire, Wemo Light Switch doesn't require one.WARNING! THE FOLLOWING WIRING SCENARIOS MAY BE DANGEROUS OR ILLEGAL.NOTE: For more details, see Wiring your Wemo® Wi-Fi Smart Light Switch, F7C030 Step 4: Install the Wemo Light Switch. Connect each of the two black wires from the Wemo Light Switch to the available Switch (Live/Load) wires. In case you found more than one wire, just place them into the wire nut.NOTE: The wire nut is the cap-like object connecting the wires.Step 5:If you have a Ground wire (optional), disconnect it from the old switch and connect it to the green wire on the Wemo Light Switch.Step 6:Unscrew the wire nut that is holding together the existing Neutral wires. Connect the white wire from the Wemo Light Switch to the outlet's exposed Neutralwires. Securely screw them together inside the wire nut.IMPORTANT: Wrap electrical tape around the wire nuts to make sure the copper conductor is fully concealed.Step 7:Screw in the Wemo Light Switch and attach the faceplate. Push all the wires back into the wall box and try to allow as much space for the switch as possible. Align thetwo screw terminals and screw in the Wemo Light Switch. Attach the faceplate. NOTE: Belkin discourages using metal faceplates as they may interfere with your Wi-Fisignal.Step 8: Turn the power back ON at your circuit breaker.QUICK TIP: To verify that the Wemo Light Switch has been successfully installed to your electrical line, manually switch it ON.You have now installed the Wemo Light Switch to your electrical line.IMPORTANT: If you have electrical concerns, please call a professional electrician and do not try to do it by yourself.Wemo App and Wemo Light Switch SetupBefore setting up the Wemo Light Switch with the Wemo App, make sure you have the following:∙ A Wemo Light Switch that is already installed to your electrical line and is functioning.∙Active Wi-Fi and internet connection.∙The Wi-Fi name and password of your router. To know how to get them, click here.∙An iOS 9.0 device or higher; or an Android™ 4.4 device or higher.Once these requirements are complete, proceed with the instructions below.Step 1: Download and install the Wemo App on your mobile device from theApp Store® if you are using an iOS device or from Google Play™ if you are using anAndroid device.Step 2: Enable the Wi-Fi feature of your mobile device and make sure it is connected to your Wi-Fi. This is required to ensure no error is encountered upon installation.NOTE: If you have a dual-band router, Wemo can only connect to your 2.4 GHz band.Step 3: Look for the Wi-Fi Name of the Wemo Light Switch. The default name for your Wemo Light Switch is WeMo.Light.xxx.NOTE: If you have multiple Wemo devices, connect to the one with the same Wemo ID at the back of the device. The Wemo ID is the word WeMo, followed by Wemo model, and then three alphanumeric characters. Once connected to the Wi-Fi, look for the Wi-Fi Name of the Wemo Light Switch and tap it to connect your device.QUICK TIP: If the Wemo Light Switch does not show up in the Wi-Fi search, you can try setting it up with your mobile device near the Wemo LightSwitch. Alternatively, you can press the Reset button on the faceplate of the light switch. For step-by-step reset instructions, click here.Step 4:Once connected to the Wemo Light Switch, launch the WemoApp. Then, on the Let's get started! screen, tap NEXT.Step 5: Enter your email address then tap NEXT.Step 6: Select your Wi-Fi name and enter your password.Wait while the Wemo App connects to your Wi-Fi.NOTE: Observe the light indicators of your Wemo Light Switch. Click here to know about light behaviors.QUICK TIP: If the Wemo encounters difficulty connecting to the Wi-Fi, try refreshing your mobile device’s Wi-Fi and try connecting again. If that doesn't work, click here for more troubleshooting tips.The Remote Access Enabled message will then pop up. By default, this feature is enabled.Step 7: When the Wemo Light Switch setup is complete, the Wemo App will look for devices. If you have multiple Wemo devices, the Wemo App will display all these. You should see the Wemo Light Switch on the list.NOTE: If your Wemo device is not detected by the Wemo App, click here for troubleshooting instructions.QUICK TIP: You can customize the Name, Device Picture, and Reset Options of your Wemo Light Switch by tapping the pencil icon and then selecting the Wemo LightSwitch.You should now have successfully installed the Wemo Light Switch with the Wemo App. With the Wemo App, you can create different rules for your Wemo Light Switch. To learn how, click here.。
数码宝贝月光金手指介绍数码宝贝(Digimon)是日本万代公司于1997年推出的一款虚拟宠物游戏,故事背景设定在一个由数据构成的数字世界。
玩家通过培养、进化和战斗,训练出自己的数码宝贝,与其他玩家的数码宝贝进行对战。
随着游戏的发展,玩家们不断探索新的关卡和挑战更强的对手。
为了帮助玩家更轻松地获得胜利,开发者推出了月光金手指(Moonlight Cheats)功能。
数码宝贝月光金手指是一种作弊功能,可以为玩家提供额外的资源、能力和便利。
它可以让玩家获得更强大的数码宝贝、更高级别的技能和更多的游戏道具。
通过使用月光金手指,玩家可以快速提升自己的游戏进度,轻松战胜困难的敌人,并享受游戏胜利的快感。
如何使用月光金手指使用数码宝贝月光金手指非常简单。
首先,你需要确保你的游戏版本允许使用作弊功能。
某些版本的数码宝贝游戏允许玩家自由使用月光金手指,而其他版本可能需要特定的代码或密码来解锁。
一旦你确认你的游戏版本允许使用月光金手指,你可以按照以下步骤来启用它:1.打开游戏控制台或设置菜单:不同的游戏版本可能有不同的方式来打开控制台或设置菜单。
你可以查阅游戏的官方指南或在线论坛来获取相关信息。
2.输入月光金手指代码:在控制台或设置菜单中,你需要输入适用于你的游戏版本的月光金手指代码。
这些代码通常以特定的格式呈现,比如以特定字符开头或结尾。
确保按照正确的格式输入代码。
3.启用月光金手指功能:一旦你输入了正确的代码,你需要按下确认键或相应的按钮来启用月光金手指功能。
游戏将会提示你是否愿意启用作弊功能,你需要确认以继续使用。
4.享受月光金手指的好处:一旦月光金手指功能启用,你将能够获得额外的资源、能力和便利。
你可以通过游戏中的菜单或指定的快捷键来访问这些好处,并在游戏中使用它们。
月光金手指的好处使用数码宝贝月光金手指可以带来许多好处,让玩家更容易达到游戏目标和战胜强敌。
以下是一些常见的月光金手指好处:1.获得无限资源:通过使用月光金手指,玩家可以获得无限的游戏资源,如金钱、道具和经验值。

pokefinder用法
PokeFinder 是一个虚拟现实游戏 Pokemon GO 的工具,可以帮助玩家在游戏中找到周围的 Pokemon。
以下是 PokeFinder 的使用方法:
1. 下载和安装:首先,在您的手机应用商店中搜索并下载PokeFinder 应用。
一旦下载完成,按照指示进行安装。
2. 注册和登录:打开应用后,您需要创建一个账户并登录。
您可以使用现有的社交媒体账户(如谷歌帐户或 Facebook)进行登录,或者根据应用的要求创建一个新账户。
3. 选择位置:在登录后,PokeFinder 会要求您提供当前的位置信息。
您可以选择手动输入您的位置或允许应用程序自动检测您的位置。
4. 寻找 Pokemon:一旦您的位置被确认,PokeFinder 将在地图上显示周围的 Pokemon。
您可以点击 Pokemon 图标以获取更多信息,如名称、种类和出现频率等。
5. 导航:如果您想要前往特定的 Pokemon,请点击所选Pokemon 的图标并选择“导航”选项。
应用程序将为您提供导航至该 Pokemon 的最佳路径。
6. 分享和交流:PokeFinder 还允许用户与其他玩家分享他们在游戏中发现的 Pokemon。
您可以使用应用内的社交功能与其他玩家交流并获取有关 Pokemon 的信息。
请注意,PokeFinder 可能会收集您的位置信息和其他个人数据,了解应用的隐私政策是很重要的。
此外,请遵守 Pokemon GO 的规则和条例,在游戏中合法使用 PokeFinder。
训狗对讲定位器使用说明书型号GY90编制单位:深圳市逸协电子股份有限公司序言非常感谢您购买我们的“Sloth训狗对讲定位器”,使用说明书将详细说明如何操作本产品,请您在使用前认真阅读并妥善保管以备日后参考,如有更改恕不另行通知。
因使用者未按照使用说明书造成的意外和损失,本公司不承担法律责任。
专业制造商简介:深圳市逸协电子股份有限公司是集研发、生产、销售为一体的专业制造商。
主营:多功能定位对讲机、感应相机、监管定位腕带、训狗定位器/手持机等高科技电子定位产品。
公司采用计算机辅助设计系统进行研发设计并配备先进的测试设备,产品经过严格的检验测试,确保性能稳定。
我们承诺以高品质的产品、一流的服务来答谢广大客户朋友和消费者多年来对我们的关心和支持。
一、产品介绍品牌:树懒Sloth型号:GY90适用宠物:狗(中、大型犬)遥控距离:2000米(无障碍物可达9000米)随着生活水平的提高,人们对宠物质量的关注也在不断提高,越来越多人将宠物视为家庭的一员并开始对宠物进行训练,对宠物的训练不是一个短暂的过程,而是一个需要长期坚持的工作。
Sloth遥控训犬器由对讲机和定位器两大部分构成,通过对宠物狗进行条件反射为依据对宠物狗的日常行为训练,设备均采用防水磁吸式充电,电池置于定位器内部,可反复充电。
对讲机是公司最新研发手持式即时定位产品,借助高精准度GPS/北斗定位对已通过验证的设备实现多模式的位置服务。
产品体积小巧、功能强大、稳定性能好,具备APRS定位功能、电话功能、群里对讲、拍照、面积测量、呼救/搜救等功能。
可用于使用者的定位追踪,与宠物身上佩戴的定位器匹配可以随时了解宠物行踪、遥控训练宠物的日常行为、并与宠物远程对话。
定位器与对讲机需要配对才能工作,集定位、对讲、震动、电刺激功能于一体,佩戴定位器的宠物位置信息通过UHF无线信号或GPRS信号发送到对应的手持设备或云服务器。
在“树懒定位APP”设置宠物活动的安全围栏范围,当宠物进出设定的电子围栏区域系统将自动发送预警信息到手机上。
虚拟养成游戏Kinectimals正式登陆WP8应用商店
据WP8应用商店消息,微软日前为WP8用户推出了一款全新的虚拟养成游戏K inectimals。
这是一款Xbox LIVE游戏带成就,允许用户在手机上玩耍和照顾虚拟宠物。
市场介绍:
Kinectimals广受好评,现在我们推出了Kinectimals Unleashed!你曾经想带著你的小狗伙伴一起探险刺激的小狗城村岛吗?或者你想和你的孟加拉虎朋友在神秘的热带小岛冒险呢?我们都帮你想好了!Kinectimals Unleashed包含超过85隻毛茸茸的新朋友让你玩耍或照顾牠们。
你有办法收集到全部吗?我们还为玩家设置了最有趣的游戏,包括海滩排球,飞盘以及跳绳。
还有数百种新玩具及收集品让你和你的小伙伴们百玩不厌!
Kinectimals Unleashed:更多毛茸茸的小家伙,更多新地点等你发掘,且更好玩!用户现在便可去WP8应用商店免费下载,或扫描以下二维码,可同时适用于W P8/WP8.1手机。
/news/129834.html。
虚拟电子宠物策划书3篇篇一《虚拟电子宠物策划书》一、项目背景随着科技的不断发展,人们对于虚拟互动体验的需求日益增长。
虚拟电子宠物作为一种具有趣味性和陪伴性的产品,拥有广泛的市场潜力。
二、项目目标1. 开发一款具有吸引力和创新性的虚拟电子宠物应用。
2. 为用户提供有趣、互动性强的宠物养成体验。
3. 吸引大量用户并建立活跃的用户社区。
三、产品概述1. 用户可以领养各种可爱的虚拟宠物。
2. 通过互动、喂养、训练等方式培养宠物成长。
3. 宠物具有独特的性格和外观,会根据用户的行为和培养方式而变化。
4. 提供丰富的场景和道具,增加游戏的趣味性和多样性。
四、功能设计1. 宠物领养系统:多种宠物可供选择。
2. 互动功能:抚摸、玩耍、对话等。
3. 喂养系统:提供各种食物和饮料。
4. 训练系统:教导宠物技能和行为。
5. 装扮系统:为宠物搭配各种服装和饰品。
6. 任务系统:完成任务获取奖励。
7. 社交系统:与其他用户交流、互动、分享。
五、技术实现1. 前端开发:采用先进的界面设计技术,确保流畅的用户体验。
2. 后端开发:稳定的服务器架构,保障数据安全和流畅运行。
3. 技术:赋予宠物一定的智能表现。
六、运营策略1. 通过社交媒体、广告等渠道进行推广。
2. 举办线上活动,提高用户参与度。
3. 不断更新内容,保持用户的新鲜感。
4. 建立用户反馈机制,及时改进产品。
七、盈利模式1. 应用内购买:道具、服装等。
2. 会员制度:提供额外的特权和福利。
3. 广告合作。
八、风险评估与应对1. 技术风险:确保技术团队具备解决问题的能力。
2. 竞争风险:持续创新,提升产品竞争力。
3. 用户流失风险:通过优质内容和服务留住用户。
篇二《虚拟电子宠物策划书》一、项目背景随着科技的不断发展,人们对于虚拟互动体验的需求日益增长。
虚拟电子宠物作为一种具有趣味性和陪伴性的产品,具有广阔的市场前景。
我们旨在打造一款独特、有趣且富有情感连接的虚拟电子宠物,为用户带来全新的体验。
宠物就是「人们喜欢的小动物」,如此而已,喂的只是这些动物。
我们平时经常看到有人养一只狗,有人养一只猫….可我喜欢的养电子宠物,它跟真的宠物又有点不一样;它也需要「喂」,不过不是真的动物那种:是「电子」的。
当然,喂养电子宠物也很好玩。
我的电子宠物的外壳有点像小狗。
打开盖子以后就会有个小电子屏幕,还有四个按键,一个是复位,一个是确定,一个是取消,另一个是选择。
我拿到电子宠物以后,打开「选择」,看到里面有五十四种动物可以选择:有鸭子狗,猫…...还有幽灵。
它们的功能有吃饭,睡觉,运动… 过半小时就会吃一次饭吃好两次饭就会拉一次便,拉好六次便后就会增加体重20斤,到100斤就长一岁,到5岁时会进化一次变成别的宠物太有趣啦。
我就挑选了一种宠物来养。
我选了一只狗。
过了十天以后,我把它养到五岁,它变成了一只小龙,可爱极了。
马上我拿去给妈妈看看。
妈妈也说非常可爱,并且还说你真聪明。
但是,好景不长,在它七岁的时候,我忘了喂它吃饭。
等到我想起来的时候,已经太晚了。
我打开它的盖子,揿出画面,看见小龙变成了天使飞走了。
我想阻止它,从小龙的后面拉一针。
我马上按键。
但是,很不幸,它并没有变回来,转而化成了一个坟墓。
唉,好不容易养到这么大,真是………电子宠物,我现在还留着,而只是不大养。
虽然养它是想养,一般可以养到四岁左右,而只是因为我没有那么多的空闲时间,所以就不大愿再去养它。
我只得亲自回忆它,因为它陪伴了我一段非常美好的时光。
电子宠物
宠物是人类比较喜欢的小动物,加以喂养。
我们在日常生活中可以看到有人养一只狗,有人养一只猫……我却喜欢养电子宠物。
它和真的宠物不一样,它不用像真的动物那样喂养,它是靠电子来喂养的。
不过,喂养电子宠物也是非常好玩的。
我的电子宠物外形像一只小狗。
打开盖子以后,就会出现一个小小的电子屏幕,还有四个按键。
四个按键是一个复位,一个确定,一个取消,一个是选择。
我拿到电子宠物以后,就打开选择,看到里面有五十四种动物可以喂养,有鸭子、狗、猫……还有幽灵。
它们的功能有吃饭、睡觉、运动……每过半个小时就会吃一次饭,吃好两次饭就会拉一次便,拉好六次便以后会增加体重20斤。
到100斤时就长一岁。
长到五岁时会进化一次,变成另一种宠物,十分有趣。
我就挑选了一种宠物来养。
我选了一只狗。
十天以后,我把它养到了五岁,它便进化成了一条小龙,可爱极了。
我立刻拿去给妈妈看了。
妈妈也说非常可爱,还夸我真聪明。
可是,好日子不长,在它七岁的时候,我忘了喂它吃饭。
等到我想起来的时候,已经晚了。
我打开盖子,揿出画面,看到小龙变成天使飞走了。
我想阻止它,不让它飞走,想给它打一针。
我立刻按键。
可惜得很,它没有变回来,却化成了一座坟墓。
哎,好不容易养到这么大,真是……
电子宠物,我现在还留着,只是不大养了。
虽然,我想要养
它,一般可以养到四岁左右,只是,我没有那么多的空闲时间,所以,我不大愿意再去养它了。
现在,我只能够作为回忆想想它,因为它曾经陪伴我渡过了一段美好的时光。
Wokamon:能养电子宠物的计步器
wokamon是一款结合电子宠物和计步器功能的移动应用。
用户带着手机、健康手环、计步器等走路时,消耗的卡路里会成为电子宠物的食量,走动越多,电子宠物成长越快,相当于在走路的过程中将电子宠物养成。
这是创始人mars专门为不喜欢运动的人群开发的一款应用。
他希望用户在使用wokamon或穿戴式设备的过程中,享受更多乐趣的同时,身体得到锻炼。
mars并不是为了迎合热门趋势而创业,当初研发产品的初衷是帮助难以坚持运动的太太减肥,目前太太已经成为产品的深度用户。
去年6月份,mars将这个项目拿到Indiegogo上面做众筹,获得不错效果。
今年4月份,他带着wokamon项目来到InnoSpace开始了正式创业。
如何增强用户粘度,刺激用户持续不断运动?这个难度其实非常大,也是很多可穿戴产品难以卖到爆款的原因。
mars分析,单纯使用可穿戴设备,产生的数据经常重复,且非常枯燥无聊。
“比如使用计步器,可能看到每天上班路上产生的数据都是5000步左右,过了新鲜劲儿之后,很容易放弃使用。
尽管用户知道运动的重要性,但对很多用户来说属于亚需求,算不上刚需。
”
为此,mars让wokamon更加游戏化,以宠物养成的方式刺激用户持续使用。
目前上面有4款宠物,后期他们会邀请外部插画师制作
不同角色的电子宠物形象。
初期,每个宠物只是一颗蛋,玩家每天上下班途中走动时也能积累一些数据,相当于积累一定经验值,经验值达到一定程度,宠物变成长大。
现在每个宠物有5种不同形态,用户很难猜达到下一个经验值,宠物会变成什么样子。
这整好驱动玩家有好奇心和动力继续运动“练级”。
玩家平时可以跟宠物做互动,互动之后能掉钻石。
钻石相当于虚拟货币,可以解锁更多宠物,购买饰品、道具,也能让电子宠物加速成长。
新版本会做成PVE关卡形式,诱导用户一步步破解。
玩的过程中会给予玩家不一样的背景,同时也会解锁一些视频和宠物背景故事。
为了增强朋友间的互动性,玩家可以看到其他朋友宠物的样子和等级。
新版本也会增强社交属性,加入更多互动方式。
完成任务后,能获得成就,再分享到微信、微博等社交网络,还会增加点赞等功能。
用户除了使用wokamon这款产品的手机计步器外,还可以绑定智能手环、智能手表等其他可穿戴设备。
目前,他们已经跟乐动力、jawboneUp、Fitbitclips、Bong等多家可穿戴公司达成合作或正在洽谈。
如此以来,用户使用这些可穿戴设备运动时,也能养成wokamon上面的电子宠物。
wokamon能增加这些可穿戴公司的用户粘度。
wokamon还会跟更多可穿戴设备合作,设计符合他们品牌元素的专属宠物。
wokamon目前还属于一款比较轻度的宠物养成类游戏,现在次日留存率大概在66%,约30%的用户愿意花费一星期将一个宠物养
大,相当于每天走7000-8000步(约为6公里)。
宠物养成之后,用户可以玩一些关卡、饰品、Pk,或者可以再换一款电子宠物。
未来,wokamon会研发一系列跟运动相关的重度游戏产品,并且跟越来越多的可穿戴公司合作,不断开发更多款宠物形象,供玩家收费或者免费下载。
wokamon创始人mars跟另外一位合伙人曾经为广告公司的同事。
二者分工合作,mars主要负责技术和产品,其合伙人主要负责创意,为知名的插画师,曾为某4A广告公司的创意总监,给不少500强公司做过涂鸦和插画短片。