Oracle 11.2.0.3.6升级到11.2.0.3.12
- 格式:docx
- 大小:15.60 KB
- 文档页数:2
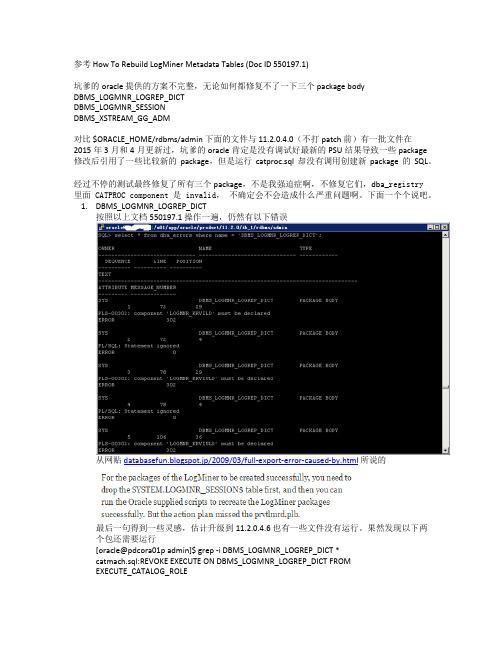
参考 How To Rebuild LogMiner Metadata Tables (Doc ID 550197.1)坑爹的oracle 提供的方案不完整,无论如何都修复不了一下三个package bodyDBMS_LOGMNR_LOGREP_DICTDBMS_LOGMNR_SESSIONDBMS_XSTREAM_GG_ADM对比 $ORACLE_HOME/rdbms/admin 下面的文件与11.2.0.4.0(不打patch前)有一批文件在2015年3月和4月更新过,坑爹的oracle肯定是没有调试好最新的PSU结果导致一些package 修改后引用了一些比较新的package,但是运行catproc.sql却没有调用创建新package的SQL。
经过不停的测试最终修复了所有三个package,不是我强迫症啊,不修复它们,dba_registry里面CATPROC component 是invalid,不确定会不会造成什么严重问题啊。
下面一个个说吧。
1.DBMS_LOGMNR_LOGREP_DICT按照以上文档550197.1 操作一遍,仍然有以下错误从网贴databasefun.blogspot.jp/2009/03/full-export-error-caused-by.html所说的最后一句得到一些灵感,估计升级到11.2.0.4.6 也有一些文件没有运行。
果然发现以下两个包还需要运行[oracle@pdcora01p admin]$ grep -i DBMS_LOGMNR_LOGREP_DICT *catmach.sql:REVOKE EXECUTE ON DBMS_LOGMNR_LOGREP_DICT FROMEXECUTE_CATALOG_ROLEdvremov.sql:GRANT EXECUTE ON DBMS_LOGMNR_LOGREP_DICT TOEXECUTE_CATALOG_ROLE;prvtlmrb.plb:CREATE OR REPLACE PACKAGE BODY dbms_logmnr_logrep_dict wrapped prvtlmrb.plb:grant execute on dbms_logmnr_logrep_dict to execute_catalog_role prvtlmrb.plb: where package = 'DBMS_LOGMNR_LOGREP_DICT'prvtlmrb.plb: values ('DBMS_LOGMNR_LOGREP_DICT','SYS', 1,100);prvtlmrs.plb:CREATE OR REPLACE PACKAGE dbms_logmnr_logrep_dict wrapped先运行@prvtlmrs.plb 猜测s表示specification,也就是package声明部分,运行完,DBMS_LOGMNR_LOGREP_DICT package body就变有效了2.DBMS_LOGMNR_LOGREP_DICT按照以上文档550197.1 操作一遍,仍然有以下错误,[oracle@pdcora01p admin]$ grep -i DBMS_LOGMNR_SESSION *catlmnr.sql: /* pass this scn into dbms_logmnr_session.purge_session */catmach.sql:REVOKE EXECUTE ON DBMS_LOGMNR_SESSION FROM EXECUTE_CATALOG_ROLE dbmslms.sql:CREATE OR REPLACE PACKAGE sys.dbms_logmnr_session asdbmslms.sql:END dbms_logmnr_session;dbmslms.sql:grant execute on dbms_logmnr_session to execute_catalog_role;dvremov.sql:GRANT EXECUTE ON DBMS_LOGMNR_SESSION TO EXECUTE_CATALOG_ROLE;prvtlms.plb:CREATE OR REPLACE PACKAGE BODY sys.dbms_logmnr_session wrapped运行prvtlms.plb 即可重建dbms_logmnr_session 有效3.DBMS_XSTREAM_GG_ADM显示DBMS_CAPTURE_ADM_IVK包里面有一个新的procedure不存在,也就是说这个包需要重建成新的,[oracle@pdcora01p admin]$ grep -i DBMS_CAPTURE_ADM_IVK *prvtbcap.plb:CREATE OR REPLACE PACKAGE BODY dbms_capture_adm_ivk wrapped prvthcap.plb:CREATE OR REPLACE PACKAGE dbms_capture_adm_ivk wrappedprvthcap.plb:GRANT EXECUTE ON dbms_capture_adm_ivk TO execute_catalog_role运行prvthcap.plb, prvtbcap.plb 即可,只有CATPROC 组件就也变valid了,总结,用ORACLE最新的版本一直是坑爹的,哪怕最新的PSU patch都能坑爹坑到死,一堆的bug而且metalink以及万能的谷哥度娘都找不到多少有用的信息。
Oracle数据库基本知识Oracle数据库基本知识Oracle Database,又名OracleRDBMS,或简称Oracle。
是甲骨文公司的一款关系数据库管理系统。
本文为大家分享的是Oracle数据库的基本知识,希望对大家有所帮助!它是在数据库领域一直处于领先地位的产品。
可以说Oracle数据库系统是目前世界上流行的关系数据库管理系统,系统可移植性好、使用方便、功能强,适用于各类大、中、小、微机环境。
它是一种高效率、可靠性好的适应高吞吐量的数据库解决方案。
介绍ORACLE数据库系统是美国ORACLE公司(甲骨文)提供的以分布式数据库为核心的一组软件产品,是目前最流行的客户/服务器(CLIENT/SERVER)或B/S体系结构的数据库之一。
比如SilverStream 就是基于数据库的一种中间件。
ORACLE数据库是目前世界上使用最为广泛的数据库管理系统,作为一个通用的数据库系统,它具有完整的数据管理功能;作为一个关系数据库,它是一个完备关系的产品;作为分布式数据库它实现了分布式处理功能。
但它的所有知识,只要在一种机型上学习了ORACLE知识,便能在各种类型的机器上使用它。
Oracle数据库最新版本为OracleDatabase 12c。
Oracle数据库12c引入了一个新的多承租方架构,使用该架构可轻松部署和管理数据库云。
此外,一些创新特性可最大限度地提高资源使用率和灵活性,如Oracle Multitenant可快速整合多个数据库,而Automatic Data Optimization和Heat Map能以更高的密度压缩数据和对数据分层。
这些独一无二的技术进步再加上在可用性、安全性和大数据支持方面的主要增强,使得Oracle数据库12c 成为私有云和公有云部署的理想平台。
就业前景从就业与择业的角度来讲,计算机相关专业的大学生从事oracle 方面的技术是职业发展中的最佳选择。
其一、就业面广:ORACLE帮助拓展技术人员择业的广度,全球前100强企业99家都在使用ORACLE相关技术,中国政府机构,大中型企事业单位都能有ORACLE技术的工程师岗位,大学生在校期间兴趣广泛,每个人兴趣特长各异,不论你想进入金融行业还是电信行业或者政府机构,ORACLE都能够在你的职业发展中给你最强有力的支撑,成为你最贴身的金饭碗。
用dbua使ORACLE10G升级到ORACLE11G编写:肖小明日期:2012-11-16审核:肖小明日期:2012-11-16 批准:严磊日期:2012-11-16 受控状态:是发布版次:10.0.2 日期:2012-11-16 编号:MDS20121116-2514变更记录日期原版本变更后版本作者2012/11/16 oracle10.2.0 Oracle11.2.0 肖小明签字确认职务姓名签字日期组长2012-11-161、实验配置实验环境Redhat Enterprise 5.4.升级对象oracle10.2.0.1 升级到oracle11.2.0.12、实验步骤一、oracle11.2.0.1软件的安装(由于oracle11安装比较智能就不加以讲解了(是在不懂请参阅oracle11g安装文档))二、oracle11g软件安装好后,以oracle用户登陆输入dbua 即可如下图:选择你所要升级的数据库下一步出现上述情况,经过一番资料的查阅,终于找到原因,原来是oracle10.2.0.,不可以直接升级到oracle11.2.0现让oracle10.2.0升级到10.2.5 步骤如下先把升级包解压unzip 包名修改权限chown -R oracle:oinstall /oradisk 我的包名在/oradisk 下解压的chmod -R 775 /oradisk/注销一oracle用户登录后并运行该指令[oracle@oracle Disk1]$ ./runInstaller跟oracle10g安装差不多就不过多的解释了路径一定要跟原来oracle10.2.0安装的主目录一致若出现下面的错误:数据库实例已经开启了,需要关闭并重试关闭数据库shutdown immediate 启动到nomount 状态下startup nomountSQL> alter system set java_pool_size=120M scope=spfile;SQL> alter system set shared_pool_size=120M scope=spfile;需要执行如下脚本SQL> startup upgradeSQL> spool patch.logSQL> @?/rdbms/admin/catupgrd.sqlSQL> spool offSQL> startup(数据库可以正常启动) 在运行下面的脚本(重新编译PL/SQL包,使其能够被使用)SQL> @?/rdbms/admin/utlrp.sql关闭数据库在.bash_profile 引入oracle11g 的oracle_home 我的变量如下:export ORACLE_BASE=/u01/app/oracleexport ORACLE_SID=ora10export ORACLE_HOME=/u01/app/oracle/product/11.2.0/db_1export PA TH=$ORACLE_HOME/bin:$PA TH注销以oracle 用户登录输入dbua接下来就会出现需要运行purge dba_recyclebin[oracle@oracle ~]$ export ORACLE_HOME=/u01/app/oracle/product/10.2.0/db_1 [oracle@oracle ~]$ export PATH=$ORACLE_HOME/bin:$PA TH[oracle@oracle ~]$ sqlplus / as sysdbaSQL> purge dba_recyclebin 这样就可以了接着yes 如下图:接下来选下一步其余默认在下一步如下图接下来需要很长的一段时间至此使用dbua升级数据库已经完成用sql语句使ORACLE10G升级到ORACLE11G1、实验配置实验环境Redhat Enterprise 5.4.升级对象oracle10.2.0.1 升级到oracle11.2.0.12、实验步骤一、oracle11.2.0.1软件的安装(由于oracle11安装比较智能就不加以讲解了(是在不懂请参阅oracle11g安装文档))数据库不能有10.2.0.0升级到11.2.0.0 oracle版本至少要10.2.0.2 以上才可以直接升级到11.2.0.0 (数据库中间升级不在讲述不懂请参阅上面的文档)第一部分数据库升级的准备二、在升级之前,确保所有的组件和对象都是valid:select substr(comp_name,1,40) comp_name,status,substr(version,1,10) version fromdba_registry order by comp_name; (针对组件)Select object_name, object_type,status ,owner from dba_objects order byowner,object_type;(针对对象)select object_name,object_type from dba_objects where object_name||object_type in (select object_name||object_type from dba_objects where owner='SYS') AND owner='SYSTEM';结果如下:OBJECT_NAME OBJECT_TYPE------------------------------ -------------------AQ$_SCHEDULES TABLEAQ$_SCHEDULES_PRIMARY INDEXDBMS_REPCAT_AUTH PACKAGEDBMS_REPCAT_AUTH PACKAGE BODY如果有其它记录返回则必须删除接下来登录数据库运行下面的脚本:SQL> spool upgrade.logSQL> @/u01/app/oracle/product/11.2.0/db_1/rdbms/admin/utlu112i.sqlSQL> spool offUpgrade.log 很有用的,后面编写pfile 需要他接下来在调用脚本SQL> @dbupgdiag.sql三、检查Timezone版本,主要参考:注意:11g的软件里已经自带了版本1-14的Timezone。

OracleUpgrade12c⾄19cOracle Upgrade 12c升⾄19c【官⽅⽂档】1 升级与迁移1.1 区别 升级和迁移是不同类型的数据库更改 升级将现有的Oracle数据库环境(包括已安装的组件和相关应⽤程序)转换为新版本的 Oracle数据库环境。
数据库的数据字典升级到新版本。
升级不直接影响⽤户数据;在升级过程中,不会碰触、更改或移动任何数据) 迁移数据指的是将数据从⼀个Oracle数据库迁移到之前为迁移或移动数据⽽创建的另⼀个数据库。
当需要将数据库环境迁移到新的硬件或操作系统平台,或迁移到新的字符集时,可以迁移数据。
迁移不包括升级到最新版本。
数据迁移后,升级过程将单独进⾏1.2 ⽅法Oracle提供了⼀些特性和产品来⾃动化升级过程,并帮助您有效地完成升级Oracle数据库⽀持以下⽅法将数据库升级或迁移到新版本:数据库升级助⼿ (DBUA)提供图形⽤户界⾯,指导您升级数据库。
DBUA可以在安装过程中使⽤Oracle Universal Installer启动,或者您可以在以后的任何时间将DBUA作为独⽴⼯具启动。
使⽤并⾏升级实⽤程序和其他命令⾏实⽤程序⼿动升级允许使⽤shell脚本执⾏升级。
使⽤Oracle Data Pump迁移数据提供导出和导⼊实⽤程序。
Oracle Data Pump可以从您的数据库执⾏完全或部分导出,然后完全或部分导⼊到新版本的Oracle数据库。
Oracle数据泵中的导出/导⼊可以复制数据的⼀个⼦集,⽽保持数据库不变。
CREATE TABLE AS SQL语句将数据从数据库迁移到新的Oracle数据库版本。
通过使⽤此⽅法,您可以复制数据的⼀个⼦集,⽽保持数据库不变。
使⽤优先级列表升级CDB和PDB,根据其优先级对PDB进⾏分组和升级。
使⽤选项运⾏并⾏升级实⽤程序(dbupgrade、或catctl.pl)-L以使⽤优先级列表运⾏升级,并在升级运⾏时调⽤该列表。

Oracle 通用补丁安装操作手册1.概述近几年,随着我们用户ORACLE数据库的应用越来越深入,环境越来越复杂,一些ORACLE常见的BUG也会偶尔的被触发.因此,我们对技术人员要求不能再像以前一样只要求会安装数据库,还应该要求其掌握在遇到数据库BUG的时候,能够熟练的找到并安装对应的修复补丁才行。
因此该文档用于指导技术人员,能够查看和检查数据库环境的补丁安装情况,并对提供的ORACLE补丁文件进行安装操作。
2. ORACLE补丁体系ORACLE数据库同其他企业软件一样,正式版的发布和运维都要经过一个漫长的周期,当正式版发布后,在其生命周期内会oracle公司会在官网上定期发布更新补丁程序,根据发布周期和集合程度不同,它们分别是维护版本(Version)、补丁集(Patch Set)、关键补丁更新(Critical Patch Update)、补丁集更新(Patch SetUpdate)和小补丁(One—off patch)几类,下面简单的介绍下它们的区别.Ø Version/维护版本针对前一个维护版本的所有补丁进行整理,增加新的功能或对软件有较大的改动,进行整体测试,得到一个软件版本”包”,称为版本Version.比如 11.2Ø Patch Set/补丁集在两次产品版本之间发布的一组经过全面测试的累计整体修复程序(一般每年发布一两次),如11.2。
0。
211.2。
0.3。
Ø Critical Patch Update(CPU)/关键补丁更新指每季度提供一次的一组高优先级修复程序(往往针对安全性问题)。
对于以前的安全性修复程序而言,这些CPU是累积的,只需要安装最近最后一个就可以,它就包含了之前的所有CPU补丁,但也可包含其他修复程序,目的是解决与非安全性补丁之间的补丁冲突问题(即降低合并请求的必要性).目前已经更名为Security Patch Update (SPU)。

升级Oracle11G到Oracle12C到PDB⽬录⽬录 (1)1.升级ORACLE 11G到ORACLE 12C (2)执⾏EMREMOVE.SQL删除O RACLE 11G的EM (2)关闭O RACLE 11G数据库及所有O RACLE进程 (2)打开O RACLE 12C的DBUA⼯具 (3)单击“应⽤操作”修改部分错误 (4)修改升级后的O RACLE兼容参数 (13)2.创建⼀个CDB数据库 (14)3.迁移NONCDB数据库ORCL到PDB数据库 (23)关闭数据库,以限制模式MOUNT,以只读⽅式打开数据库,导出ORCL实例的XML描述⽂件,然后关闭数据库 (24)执⾏兼容性检查,报错属于正常,因为还没有执⾏NONECDB_TO_PDB.SQL脚本 (25)指定⼀个O RACLE默认的创建⽂件放置的路径 (26)⽤导出的XML⽂件创建⼀个PDB数据库 (26)执⾏NONECDB_TO_PDB.SQL升级⾮插播数据库到可插拔数据库 (26)打开可插播数据库,查看升级后的数据库数据完整性 (27)数据库监听,只监听CDB即可,PDB默认创建时服务已注册 (28)服务名配置 (29)连接测试 (29)1.升级Oracle 11G到Oracle 12C 1.1.执⾏emremove.sql删除Oracle 11G的EM1.2.关闭Oracle 11G数据库及所有Oracle进程1.3.打开Oracle 12C的DBUA⼯具1.4.单击“应⽤操作”修改部分错误升级过程中报错,经处理后再次升级正常。
SQL> startup upgrade1. Drop the synonym:SQL> drop public synonym XMLCONCAT;2. Recompile the packageSQL> alter package DBMS_SQLTUNE_INTERNAL compile body; If the above is successful, then re-run CATUPGRD.SQL again: SQL> spool /tmp/catupgrd.logSQL> @$ORACLE_HOME/rdbms/admin/catupgrd.sql SQL> exit1.5.修改升级后的Oracle兼容参数2.创建⼀个CDB数据库。
Upgrading to Oracle Solaris11.1 November2012This article details the steps required to upgrade your Oracle Solaris1111/11system to Oracle Solaris11.1 using the Image Packaging System(IPS),a feature of Oracle Solaris.Introduction to Upgrading a System to Oracle Solaris11.1 There are two main approaches for upgrading a system to Oracle Solaris11.1.■Using the Oracle Solaris support repository,for customers with an Oracle support agreement■Using the Oracle Solaris release repository,for customers without an Oracle support agreementUsing the Oracle Solaris Support RepositoryCustomers who have an Oracle support agreement can use the Oracle Solaris support repository as their configured package repository.If you are using the support repository,the package publisher definition should look like the following:%pkg publisherPUBLISHER TYPE STATUS URIsolaris origin online https:///solaris/supportThe release process for Oracle Solaris11was changed to accelerate the release of critical bug fixes.A consequence of this process is that the update might not contain some bug fixes released in a Support Repository Update(SRU)for the preceding release.For example,the most recent SRU for Oracle Solaris1111/11is SRU#12.4.Some packages in SRU#12.4have a version number that is higher than the version number in the Oracle Solaris11.1release.To preserve these bug fixes,the version difference will prevent the upgrade to the Oracle Solaris11.1release.If the upgrade process is not blocked because of the version numbers,some fixes that are part of the SRU will be removed if you upgrade to the Oracle Solaris11.1release.For convenience,these bug numbers are listed in“Bugs Fixed in Later SRUs”on page7.For instructions,see“Upgrading a System With a Support Agreement to Oracle Solaris11.1”on page3. Once an SRU for Oracle Solaris11.1is released,the process is simplified if you want to install the11.1release, as well as the latest SRU.For instructions,see“How to Upgrade a System to Oracle Solaris11.1With the Latest SRU”on page6.Using the Oracle Solaris Release RepositoryUsers who have installed Oracle Solaris11without an Oracle support agreement can use the Oracle Solaris release repository as their configured package repository.If you are using the release repository,the package publisher definition should look like the following:%pkg publisherPUBLISHER TYPE STATUS URIsolaris origin online /solaris/release/For instructions,see“How to Upgrade a System to Oracle Solaris11.1Using the Oracle Solaris Release Repository”on page7.Upgrading From Oracle Solaris10There are no upgrade methods or tools available to transition from Oracle Solaris10to Oracle Solaris11or 11.1.You must either do a fresh installation of Oracle Solaris11or migrate your Oracle Solaris10OS instances or zones to an Oracle Solaris11system.For more information,refer to Transitioning From Oracle Solaris10to Oracle Solaris11.Upgrading to Oracle Solaris11.1and ZonesAll of the zones on your system should automatically be upgraded when you upgrade the global zone.Make sure that you follow any specific instructions to deal with specific packages as noted in the following procedures.Upgrading to Oracle Solaris 11.1and Third-Party Packages In general,third-party packages are not touched during the upgrade process.Third-party services,and the software they deliver,will only be disturbed by the upgrade process when the service shares configuration files with the OS,or when the files are installed in directories that are written over by the upgrade process.Upgrading a System With a Support Agreement to Oracle Solaris 11.1The steps that are required might be different due to some systems running different SRU versions.First,follow the instructions in “How to Verify Which SRU a System Is Running”on page 3.Depending on the SRU that the system is running,perform one of the following procedures:■“How to Upgrade a System Running A SRU Before SRU#10.5”on page 4■“How to Upgrade a System Running SRU#10.5or SRU#11.4”on page 4■“How to Upgrade a System Running at Least SRU#12.4”on page 5Note –The amount of time each procedure takes is dependent on many factors,including system and network resources.▼How to Verify Which SRU a System Is Running Display the information about pkg:/entire .In this example,SRU#10.5is installed.%pkg info entire Name:entire Summary:entire incorporation including Support Repository Update (Oracle Solaris 1111/11SRU 10.5).Description:This package constrains system package versions to the same build.WARNING:Proper system update and correct package selection depend on the presence of this incorporation.Removing this package will result in an unsupported system.For more information see https:///CSP/main/article cmd=show&type=NOT&doctype=REFERENCE&id=1372094.1.Category:Meta Packages/Incorporations State:Installed Publisher:solaris Version:0.5.11(Oracle Solaris 11SRU 10.5)Build Release:5.11Branch:0.175.0.10.0.5.0Packaging Date:Fri Aug 0318:26:272012Size:5.45kB FMRI:pkg://solaris/**********.11,5.11-0.175.0.10.0.5.0:20120803T182627Z Package Information Displayed for Oracle Solaris 1111/11If your system has Oracle Solaris 1111/11installed,without any SRUs,the package information looks like:#pkg info entire Name:entire Summary:Incorporation to lock all system packages to the same build Description:This package constrains system package versions to the same build.WARNING:Proper system update and correct package selection depend on the presence of this incorporation.Removing this package will result in an unsupported system.Category:Meta Packages/Incorporations State:Installed Publisher:solaris Version:0.5.11Build Release:5.11Branch:0.175.0.0.0.2.0Packaging Date:October 20,201102:38:22PM●Example 1Size:5.45kB FMRI:pkg://solaris/**********.11,5.11-0.175.0.0.0.2.0:20111020T143822Z▼How to Upgrade a System Running A SRU Before SRU#10.5You can choose to update to SRU#10.5or to a later SRU release.Note that SRUs starting with SRU#12.4havecertain fixes that will not be present in Oracle Solaris 11.1until the first Oracle Solaris 11.1SRU is available.Verify which Solaris 11SRU you have installed.For instructions,see “How to Verify Which SRU a System IsRunning”on page 3.Become an administrator.For more information,see “How to Use Your Assigned Administrative Rights”in Oracle Solaris 11.1Administration:Security Services .Update the system.These commands create a new boot environment.■To update to SRU#10.5,use the following command:#pkg update --accept **********.11,5.11-0.175.0.10■To update to the latest SRU,use the following command:#pkg update --acceptReboot using the updated boot environment.#rebootFollow the instructions for upgrading the SRU that you installed in Step 2.■“How to Upgrade a System Running SRU#10.5or SRU#11.4”on page 4■“How to Upgrade a System Running at Least SRU#12.4”on page 5▼How to Upgrade a System Running SRU#10.5or SRU#11.4Verify that you have SRU#10.5or SRU#11.4installed.For instructions see “How to Verify Which SRU aSystem Is Running”on page 3.Become an administrator.For more information,see “How to Use Your Assigned Administrative Rights”in Oracle Solaris 11.1Administration:Security Services .SPARC only:For each zone,remove the ldomsmanager package.For any SPARC based system that has one or more zones installed,you must perform an additional step.Foreach zone installed on the system,remove the pkg:/system/ldoms/ldomsmanager package as follows:#for z in ‘zoneadm list‘;do zlogin $z pkg uninstall ldomsmanager;done Update the IPS package.#pkg update pkg:/package/pkgDue to earlier bugs in some packages,it was possible to incorrectly install those packages on a system.Thiscommand removes the following bad packages,if they are installed:■x86:pkg://solaris ldoms/ldoms-incorporation ■SPARC:pkg://solaris/consolidation/nvidia/nvidia-incorporationpkg://solaris/driver/network/ethernet/elxlBeforeYou Begin 1234BeforeYou Begin 123pkg://solaris/driver/network/ethernet/pcnpkg://solaris/driver/network/ethernet/dnetpkg://solaris/driver/network/ethernet/iprbUpdate the remaining system packages.#pkg update --be-name s11.1ga --acceptReboot using the updated boot environment.#reboot▼How to Upgrade a System Running at Least SRU#12.4If any of the following packages are installed,you must either remove them and add them back after theupdate to Oracle Solaris 11.1,or disassociate them from the constraints on the system (called unlocking ),asdescribed in this procedure:■pkg://solaris/network/dns/bind ■pkg://solaris/service/network/dns/bind ■pkg://solaris/mail/fetchmailFor SRU#13.4,the pkg://solaris/networkdhcp/isc-dhcp package must be removed or unlocked as well.Become an administrator.For more information,see “How to Use Your Assigned Administrative Rights”in Oracle Solaris 11.1Administration:Security Services .Adjust packaging for the DNS and fetchmail services.If you are not using these packages,you can remove them.If you have dependencies on these packages,youmust unlock them.Only follow this step if one or more of the three packages listed is installed on your server.■To remove the packages,run this command:#pkg uninstall pkg://solaris/network/dns/bind pkg://solaris/service/network/dns/bind\pkg://solaris/mail/fetchmailFor SRU#13.4,also remove pkg://solaris/network/dhcp/isc-dhcp .If you have any zones installed on your system,you must also uninstall these packages in each zone.Forexample:#for z in ‘zoneadm list‘;do zlogin $z pkg uninstall pkg://solaris/network/dns/bind;done■To unlock the packages,run this command:#pkg change-facet facet.version-lock.mail/fetchmail=false #pkg change-facet work/dns/bind=false #pkg change-facet work/dns/bind=falseFor SRU#13.4,also unlock pkg://solaris/network/dhcp/isc-dhcp .Note –To save time,it is possible to combine these commands into one command:#pkg change-facet facet.version-lock.mail/fetchmail=false \work/dns/bind=false \work/dns/bind=falseThe previous commands must be performed in each configured zone with the packages installed.Update the IPS package.#pkg update pkg:/package/pkg45123Update the rest of the packages.#pkg update --be-name s11.1ga --acceptReboot using the updated boot environment.#rebootReverse the changes to the DNS and fetchmail services.■If you removed the packages in Step 2,reinstall them.#pkg install pkg://solaris/service/network/dns/bind #pkg install pkg://solaris/mail/fetchmailNote –The first command installs pkg://solaris/network/dns/bind ,so it is not necessary to install that package.For SRU#13.4,also reinstall pkg://solaris/network/dhcp/isc-dhcp .■If you unlocked the packages in Step 2,when the first SRU is released for Oracle Solaris 11.1,lock thepackages.#pkg change-facet facet.version-lock.mail/fetchmail=true #pkg change-facet facet.version-lock.service/network/dns/bind=true #pkg change-facet work/dns/bind=trueRelocking the packages updates them as required.For SRU#13.4,also lock pkg://solaris/network/dhcp/isc-dhcp .Note –To save time,it is possible to combine these commands into one command:#pkg change-facet facet.version-lock.mail/fetchmil=true \work/dns/bind=true \work/dns/bind=true▼How to Upgrade a System to Oracle Solaris 11.1With the Latest SRUOnce the first SRU for Solaris 11.1is released,use the following procedure to upgrade to Oracle Solaris 11.1with the new SRU.Verify which Solaris 11SRU you have installed.For instructions,see “How to Verify Which SRU a System IsRunning”on page 3.Become an administrator.For more information,see “How to Use Your Assigned Administrative Rights”in Oracle Solaris 11.1Administration:Security Services .For early SRUs only:Upgrade to the latest Oracle Solaris 11SRU.Perform these steps only on systems running an SRU earlier than 10.5.a.Update the SRU.This command updates the OS to Oracle Solaris 11with the latest SRU.#pkg update --accept b.Reboot using the updated boot environment.#reboot456BeforeYou Begin 12For all SRUs:Update to Oracle Solaris 11.1with the latest SRU.#pkg update --accept --be-name s11.1sruReboot using the updated boot environment.#rebootBugs Fixed in Later SRUsThe following is a list of the bug fixes that have been addressed in SRU#12.4,but not in Oracle Solaris 11.1until SRU#1for 11.1is released.Kernel fixes:■7071362tcp_icmp_source_quench and other tunables may no longer be field modifiable ■7181137sol_umad should allow userland MAD operations in NGZs ■7196540After 7174929integration 0.9.0is shown for first disk in second RAID volumeOther software fixes:■7166132vim should be able to run its test suite ■7190213libibmad and associated files need to be delivered in an NGZ ■7191495mkisofs install is incomplete ■7195687Update fetchmail to version 6.3.2■7195704Problem with utility/fetchmail ■7196234Problem with network/dns ■7197223vim shows high CPU usage when editing dtrace script with syntax highlighting enabledThe following is a list of bugs that have been addressed in SRU#13.4,but not in Oracle Solaris 11.1untilSRU#1for 11.1is released.■15805793SUNBT7186501-11.2net-snmp crashes in net_cpu_arch_load ■15494128assertion failed:zvol_get_stats(os,nv)==0,when encounter i/o error ■15797349Problem with shell/korn93■15800889s11:zonestat core dumps when executed in non-global zone ■15816060update zoneinfo timezones to 2012f (Fiji)■15797515SUNBT7176189-12.0nfs4_write()can dirty too much pages during an unmount attemptUpgrading a System Without a Support Agreement toOracle Solaris 11.1Use the following procedure to upgrade a Oracle Solaris 1111/11system if you do not have a supportagreement,or have no SRUs installed.Note –The amount of time the procedure takes is dependent on many factors,including system and network resources.▼How to Upgrade a System to Oracle Solaris 11.1Using theOracle Solaris Release RepositoryUpgrading to Oracle Solaris 1111/11is a multistep process due to the requirement that certain systempackages must be updated first in order to achieve a successful update for the remaining system packages.34Become an administrator.For more information,see “How to Use Your Assigned Administrative Rights”in Oracle Solaris 11.1Administration:Security Services .Update the system packages.This command creates a new boot environment.#pkg update --acceptNote –For systems that cannot directly connect to Oracle's hosted package repositories,download the Oracle Solaris 11.1Pre-Upgrade Repository Image.This image contains packages that you must update prior toupdating to Oracle Solaris 11.1.See /technetwork/server-storage/solaris11/downloads/index.htm for more information.The ISO image contains a README file that describes thenecessary steps for constructing the repository and updating to Oracle Solaris 11.1.Reboot using the updated boot environment.#rebootSPARC only:For each zone,remove the ldomsmanager package.For any SPARC based system that has one or more zones installed,you must perform an additional step.Foreach zone installed on the system,remove the pkg:/system/ldoms/ldomsmanager package as follows:#for z in ‘zoneadm list‘;do zlogin $z pkg uninstall ldomsmanager;doneUpdate the IPS package.#pkg update pkg:/package/pkgUpdate the rest of the packages.#pkg update --be-name s11.1ga --acceptReboot using the updated boot environment.#reboot1234567Copyright©2012Oracle and/or its affiliates.All rights reserved.This software and related documentation are provided under a license agreement containing restrictions on use and disclosure and are protected by intellectual property laws.Except as expressly permitted in your license agreement or allowed by law,you may not use,copy,reproduce,translate,broadcast,modify,license,transmit,distribute,exhibit,perform,publish,or display any part,in any form,or by any means.Reverse engineering, disassembly,or decompilation of this software,unless required by law for interoperability,is prohibited.The information contained herein is subject to change without notice and is not warranted to be error-free.If you find any errors,please report them to us in writing.If this is software or related documentation that is delivered to the ernment or anyone licensing it on behalf of the ernment,the following notice is applicable:ERNMENT END USERS.Oracle programs,including any operating system,integrated software,any programs installed on the hardware,and/or documentation,delivered to ernment end users are "commercial computer software"pursuant to the applicable Federal Acquisition Regulation and agency-specific supplemental regulations.As such,use,duplication,disclosure,modification,and adaptation of the programs, including any operating system,integrated software,any programs installed on the hardware,and/or documentation,shall be subject to license terms and license restrictions applicable to the programs.No other rights are granted to the ernment.This software or hardware is developed for general use in a variety of information management applications.It is not developed or intended for use in any inherently dangerous applications,including applications that may create a risk of personal injury.If you use this software or hardware in dangerous applications,then you shall be responsible to take all appropriate fail-safe,backup,redundancy,and other measures to ensure its safe use.Oracle Corporation and its affiliates disclaim any liability for any damages caused by use of this software or hardware in dangerous applications.Oracle and Java are registered trademarks of Oracle and/or its affiliates.Other names may be trademarks of their respective owners.Intel and Intel Xeon are trademarks or registered trademarks of Intel Corporation.All SPARC trademarks are used under license and are trademarks or registered trademarks of SPARC International,Inc.AMD,Opteron,the AMD logo,and the AMD Opteron logo are trademarks or registered trademarks of Advanced Micro Devices.UNIX is a registered trademark of The Open Group.This software or hardware and documentation may provide access to or information on content,products,and services from third parties.Oracle Corporation and its affiliates are not responsible for and expressly disclaim all warranties of any kind with respect to third-party content,products,and services.Oracle Corporation and its affiliates will not be responsible for any loss,costs,or damages incurred due to your access to or use of third-party content,products,or services.E38227-01Oracle Corporation500Oracle Parkway,Redwood City,CA94065U.S.A.。
Oracle升级方案1. 简介Oracle是一种强大的关系数据库管理系统(RDBMS),被广泛用于企业级应用程序。
随着时间的推移,Oracle不断推出新的版本和升级,以提供更好的性能、功能和安全性。
本文档旨在介绍Oracle数据库升级的一般步骤和最佳实践。
2. 升级前的准备工作在进行Oracle数据库升级之前,需要进行一些准备工作,以确保顺利完成升级过程,并最大程度地减少潜在的风险和中断。
以下是一些准备工作的关键部分:2.1. 确定升级类型首先,需要确定要执行的Oracle升级类型。
可以是小版本的升级,例如从Oracle 11.2.0.2到11.2.0.4,也可以是大版本的升级,例如从Oracle 11g到Oracle 12c。
2.2. 评估硬件和软件要求在选择升级版本之前,需要评估现有硬件和软件的要求。
必须确保新版本的Oracle数据库可以在现有硬件上运行,并且与现有的操作系统和其他应用程序兼容。
2.3. 创建备份在进行任何数据库升级之前,最重要的一步是创建完整的数据库备份。
这样,在升级过程中出现任何问题或数据丢失的风险时,可以恢复到原始状态。
2.4. 检查数据库健康状况在升级之前,建议进行数据库的健康检查和性能评估。
可以使用Oracle提供的工具,例如Enterprise Manager或AWR报告,来评估数据库的性能和稳定性。
2.5. 计划测试环境在进行升级之前,应该创建一个测试环境,用于模拟实际的升级流程。
可以将生产环境的数据库和应用程序复制到测试环境,以便测试升级过程和验证应用程序的兼容性。
3. 升级过程一旦完成了准备工作,就可以开始实施Oracle数据库的升级。
下面是一个一般的升级过程:3.1. 升级前检查在进行升级之前,需要执行一些先决条件检查,以确保满足升级的要求。
这些检查通常涉及硬件和软件的一些要求,并可以使用Oracle提供的预升级检查工具来执行。
3.2. 安装升级程序安装升级程序是升级过程的下一步。
Oracle 11.2.0.3.6升级到11.2.0.3.12
2015年1月13日
9:15
# cd /opt/oracle/product
# tar -cvf 11.2.0.3.tar.1209 11.2.0.3 tar完再打,两个节点都tar
1、环境监察
export PATH=$PATH:/usr/ccs/bin
查看OPatch版本
$ORACLE_HOME/OPatch/opatch lsinventory
确定是否有任何当前已安装的一次性补丁与PSU冲突:
unzip p1*******_11203_<platform>.zip
cd 19121548
opatch prereq CheckConflictAgainstOHWithDetail -ph ./
2、安装方法
关闭所有实例以及监听以及所有相关进程
回滚一次性补丁冲突检测过程中发现的任何修补程序。
设置你的当前目录到补丁所在,然后运行通过输入以下命令
unzip p1*******_11203_<platform>.zip
cd 19121548
opatch apply
Install all resolutions to conflicts found during the One-off Patch Conflict Detection.
把升级信息注册到数据库
连接到数据库运行一下脚本
cd $ORACLE_HOME/rdbms/admin
sqlplus /nolog
SQL> CONNECT / AS SYSDBA
SQL> STARTUP
SQL> @catbundle.sql psu apply
SQL> QUIT
The catbundle.sql execution is reflected in the dba_registry_history view by a row associated with bundle series PSU.
Check the following log files in $ORACLE_HOME/cfgtoollogs/catbundle or $ORACLE_BASE/cfgtoollogs/catbundle for any errors:
catbundle_PSU_<database SID>_APPLY_<TIMESTAMP>.log
catbundle_PSU_<database SID>_GENERATE_<TIMESTAMP>.log
SQL> select * from dba_registry_history;
3、卸载
确认$ORACLE_HOME/rdbms/admin/catbundle_PSU_<database
SID>_ROLLBACK.sql文件存在$ORACLE_HOME下面
关闭所以实例和监听
运行OPatch工具指定rollback参数如下.
opatch rollback -id 19121548
补丁卸载后说明
Start all database instances running from the Oracle home. (For more information, see Oracle Database Administrator's Guide.)
For each database instance running out of the ORACLE_HOME, connect to the database using SQL*Plus as SYSDBA and run the rollback script as follows:
cd $ORACLE_HOME/rdbms/admin
sqlplus /nolog
SQL> CONNECT / AS SYSDBA
SQL> STARTUP
SQL> @catbundle_PSU_<database SID>_ROLLBACK.sql
SQL> QUIT
In a RAC environment, the name of the rollback script will have the format
catbundle_PSU_<database SID PREFIX>_ROLLBACK.sql.
Check the log file for any errors. The log file is found in
$ORACLE_BASE/cfgtoollogs/catbundle and is named catbundle_PSU_<database SID>_ROLLBACK_<TIMESTAMP>.log where TIMESTAMP is of the form YYYYMMMDD_HH_MM_SS. If there are errors, refer to Section 5, "Known Issues".
如果要tar到备机
那么tar过去后还有把原先的参数文件,密码文件,监听文件,tnsname放进新tar的里面。