酒店前台Opera软件培训学习手册(图文版)上篇
- 格式:doc
- 大小:344.50 KB
- 文档页数:28
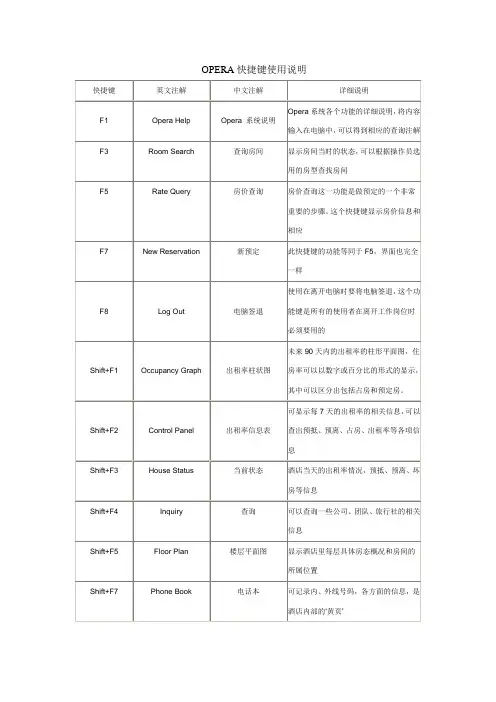
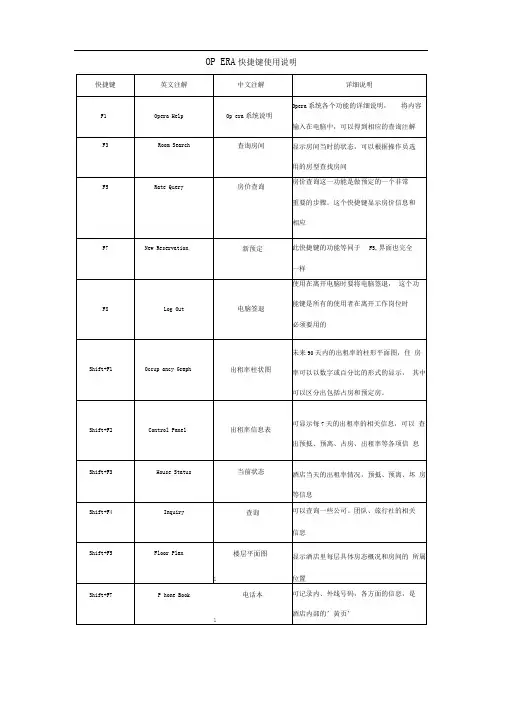
OPERA快捷键使用说明LOG IN、LOG OUTØ LOG IN:USER NAME是姓氏的拼音+英文名的第一个字母\PASSWORD是自己的密码\ 然后用鼠标点一下LOG INØ LOG OUT:然后直接按F8键即可退出OPERA注:每次前台员工在离开电脑时,无论去做什么,都要按F8。
(启到保护自己的作用)OPERATOR、TELEPHONE BOOKØ OPERATOR:可以查询客人信息:- ARRIVALS- IN HOUSE- CHECK OUT- CANCELLATION- NO SHOW输入客人所提供的信息点SEARCH注:STATUS跟着RESERVATION状态来查模糊查询:先打%再输入其中的几个字母(必须是相连的),如果仍找不到可向客人多咨询一些信息和资料。
MESSAGE:²留MESSAGE:进入OPERATOR点MESSAGE点NEW在MESSAGE FROM处打上留言人的名字在右侧空白处输入留言内容点SAVE要将MESSAGE 打印出来送房间点YESMESSAGE留好后会有一个红色的MESSAGE字样双击红色的MESSAGE可以看其内容²MESSAGE下的几个功能键:- NEW:点此键可以新建MESSAGE- DELET:点此键删除MESSAGE- SAVE TEXT:点此键保存MESSAGE- PRINT:点此键打印MESSAGE- PRINT ALL:点此键打印所有MESSAGE- RECEIVED:点此键收取MESSAGE- RECEIVED ALL:点此键收取所有MESSAGE- LAMP:点此键房间内的MESSAGE灯会亮,再点一下会灭- CLOSE:点此键可以关掉此屏留LOCATOR:输入FROM TIME选择日期点NEW点LOCATOR进入OPERATOR输入TO TIME在LOCATIONS 处选相应的地方点SAVELOCATOR TEXS会有相关的地方出现,如过期可DELETE 双击红色的LOCATOR可以看其内容系统会有红色的LOCATOR字样注:只要有LOCATOR,就要看LOCATOR留TRACE:进入OPERATOR点TRACE进入TRACE会有客人的信息点NEW可选日期(先选TO DATE,再选FROM DATE系统会有红色的TRACE字样点SAVE输入相关内容先相应的部门注:TRACE解决完后,可按RESOLVEØ TELEPHONE BOOK:新加INFORMATION内容:点CATEGORY选择INFORMATION种类输入分类名称查询INFORMATION:点PARTIAL NAME SEARCHNAME CATEGORY SEARCHPROFILEØ PROFILE分几种类型:²INDIVIDUAL:个人²COMPANY:公司²TRAREL AGENT:旅行社²SOURCE:来源²GROUP:团队在RESERVATION 菜单下点击PROFILE图标,选择查找种类(IN DIVIDUAL、COMPANY、CONTACT、SOURCE、GROUP)。
OPERA系统培训教程一、引言OPERA系统是一款功能强大的酒店管理系统,为酒店提供全面、高效的解决方案。
本教程旨在帮助酒店员工熟练掌握OPERA系统的各项功能,提高工作效率,提升客户满意度。
二、OPERA系统概述1.系统特点(1)集成性:OPERA系统集成了酒店各个部门的管理功能,如预订、前台、客房、餐饮、财务等,实现数据共享,提高工作效率。
(2)灵活性:OPERA系统可根据酒店实际情况进行个性化设置,满足不同酒店的需求。
(3)安全性:OPERA系统采用先进的加密技术,确保数据安全。
(4)稳定性:OPERA系统具有高稳定性,保证酒店业务正常运行。
2.系统模块(1)预订模块:实现客房预订、团队预订、宴会预订等功能。
(2)前台模块:包括入住、退房、换房、预订变更等功能。
(3)客房模块:管理客房状态、房务安排、客房维护等功能。
(4)餐饮模块:实现餐饮预订、点餐、收银等功能。
(5)财务模块:管理酒店财务数据,包括应收账款、应付账款、营业报表等。
(6)客户关系管理模块:管理客户信息、会员信息、客户反馈等。
三、OPERA系统操作流程1.登录与退出(1)打开OPERA系统,输入用户名和密码,“登录”。
(2)登录成功后,进入系统主界面。
(3)退出系统:右上角的“退出”按钮,确认退出。
2.预订管理(1)预订查询:输入客户姓名、方式、预订号等信息,查询预订信息。
(2)新增预订:录入客户信息、预订日期、房型等信息,保存预订。
(3)预订变更:修改预订日期、房型等信息,保存变更。
(4)预订取消:选择预订记录,“取消”,确认取消。
3.前台管理(1)入住登记:录入客户信息、证件号码、入住日期等,完成入住。
(2)退房结账:选择入住记录,“退房”,录入消费信息,完成结账。
(3)换房:选择入住记录,“换房”,选择新房型,完成换房。
(4)预订变更:选择预订记录,“变更”,修改相关信息,完成变更。
4.客房管理(1)房态管理:查看客房状态,包括在住、空房、维修等。
Opera PMS Reference Manual Hotel Edition V5.0Reservation1Front Desk1.1Arrivals and Check In1.1.1Searching for ArrivalsThe Arrivals function is the gateway to checking in guests with or without reservations. You can search for incoming guests via a number of customizable criteria, check them in, or perform a walk in.To search for arriving guests, follow the steps below:1)From the main menu, select Front Desk.2)Select Arrivals.The ARRIVALS screen displays.The top portion of the screen provides a variety of fields to narrow your search for the arriving guest. The bottom portion of the screen displays reservations and search results in the grid.3)Enter the search information into the appropriate fields. Select Advanced toproduce more search options. Use the Clear feature to remove all searchoptions and begin a new search.NOTE: Commons fields used in searching for arriving guests are the Name, CRS No/TA Rec Loc, and Conf. No.)4)Select Search to display results.With a reservation highlighted, various function buttons become available. Below are the addition features and functions on this screen:•Lamps in the lower part of the screen alert you when the reservation has preferences, deposit or cancellation requirements, shares, profile notes,reservation comments, routing, or other features associated with it.•Check In offers a quick check-in of the highlighted reservation. Refer to the “Checking In a Guest” section of this chapter for more instructions.•Cancel removes the reservation of an expected arrival (the reservation is no longer displayed on the Arrivals dialog box and the reservation statuschanges to Cancelled). You can cancel an expected reservation if the guest has not made a deposit to guarantee the reservation, if the reservation is a duplicate, or if the guest informed the property that they would not arrive. Canceling a reservation releases the room back to availability.NOTE: If the guest has made a deposit, you cannot cancel the reservation with this option. You must refund a deposit through the Cashiering module.•Reinstate returns a canceled reservation to reserved status.•Reg. Card prints a registration card for the highlighted guest. The default registration card is automatically selected. If no default card exists, theRegistration Card screen prompts the user to select a registration card from the Registration Cards reports group.•Profile displays the profile screen for the selected reservation.•Options display the Reservation Options dialog box without displaying the full reservation.•Edit displays the Reservation screen for the selected reservation.1.1.2Checking In a GuestFollow the steps below to check in a guest:1)From the main menu, select Front Desk and Arrivals.2)Search for and highlight the arriving guest.3)Select Edit if the guests’ accommodation needs to change in any way (additionalnights requested or a change in room type. Otherwise, select Check In.The PAYMENT METHOD screen appears A Room number automatically assigns for the room type reserved. If no rooms are available, the Room field is blank.4)To change the room number assigned, or to search for an alternate room, clickthe drop down arrow next to the Room field.5)Search for and highlight an available room (clean or inspected), and select OK toreturn.The Method of Payment defaults from the reservation. Whether the presented method of payment is the same or needs to change, swipe the credit card at thispoint for accuracy purposes. If the card is not available to swipe, manually enter the card or payment details.6)Click the drop down arrow next to the Method of Payment field to select theform of payment. Alternately, if there are multiple forms of payment (i.e. a credit card for room and tax and one for incidentals), select the ellipsis button next to this field.7)Enter the Credit Card No. and Expiration Date.8)Select OK to save.9)Answer Yes or No to print the registration card. This depends on your hotel’sprocedure for registration cards.A message displays confirmation the successful check in.10)S elect OK to complete.1.1.3Checking In a Walk-In GuestGuests that arrive without reservations are walk-in guests.To perform a Walk-In, follow the steps below:1)From the main menu, select Front Desk and Arrivals.2)Select Walk In.The RATE QUERY screen displays.3)Complete the Rate Query screen and select OK.The RESERVATION screen displays.\4)Complete all fields as outlined in the Reservations chapter of this manual.NOTE: Choose “Walk In” as the Source.5)Select OK to save the check in.NOTE: It is very important that you select OK while performing a walk-in. If you select Save, OPERA only saves the reservation but does not move forward with the check in.A confirmation message displays reading, “Check In [Guest Name]?”6)Answer Yes.The PAYMENT METHOD screen displays.7)Confirm the payment information or change it as needed. Remember to swipethe credit card if applicable.8)Select OK to save.A message displays asking to print a registration card.9)Answer Yes or No to print a registration card.A message displays to confirm the successfully check-in.10)Select OK to complete.1.2Queue Reservations1.2.1Placing an Arrival into QueueThe Queue feature helps your hotel to manage guest arrivals before their room is available for assignment. Reservations put on queue go into a priority list for Housekeeping to attend to first. Coordinated Front Desk and Housekeeping operations help to better service guests and prioritize assigning them clean rooms upon arrival.A reservation does not necessarily have to have a room number assigned to be in the queue. You may place a room reservation on queue without pre-assigning a room number. As soon as a room is available for the particular reserved room type, you may assign a clean/inspected room and complete the check-in.To place an arriving reservation into the Queue, follow the steps below:1)From the main menu, select Front Desk and Arrivals.2)Once you locate the guest reservation, highlight the record and select Options.3)Select Queue.A message prompts to place the reservation on Queue.4)Answer Yes.A confirmation screen displays indicating the guests’ status in the Queue.5)Select OK to complete.1.2.2Managing the QueueOnce a reservation is in the queue, the Front Desk can manage the queue by following the step below:1.From the main menu, select Front Desk and Queue Reservations.The QUEUE RESERVATIONS screen displays.Reservations already placed in queue display on this screen in priority order. Click on any column header to resort the display. Note the Q-Time and Room Status columns.2. If a reservation is ready to check-in and the room is available, highlight the reservation and select Check In. Continue the process to check in the reservation as outlined earlier in this chapter.3. To alter a reservations place in the queue, highlight the record and select Priority to move the reservation to the top of the queue.Additional features within the QUEUE RESERVATIONS screen are as follows:•Resv. display the reservation record for the highlighted reservation. •Details display the ROOM EDITS screen for the guest's room when there is an assigned room number to the guest.•Statistics displays a detailed view of the current reservations in queue. •Report prepares and prints the Queue Reservations report.1.3In House Guests1.3.1Searching for In-House GuestsThe IN HOUSE GUESTS screen allows you to view and modify reservation information and/or profiles of in-house guests. This feature is identical to the RESERVATION SEARCH screen, except that reservation statuses do not list on this screen (since the guests are in-house).To search for an in-house guest, follow the steps below:1)From the main menu, select Front Desk and In-House Guests.2)Enter in the desired search information (i.e. Name, Room No., etc). SelectAdvanced for additional search criteria options.3)Select Search.Search results display in the grid at the bottom of the IH HOUSE GUESTS screen.1.3.2Editing In-House Guest RecordsIt may be necessary to modify a guests’ stay information after the guest has checked in. For example, when a guest wishes to extend their stay, editing thein-house record is required.To modify an in-house guest reservation, follow the steps below:1)From the main menu, select Front Desk and Arrivals.2)Enter search criteria (i.e. Name, Room No., etc.) and select Search.3)Highlight the record and either double-click it or select Edit.The RESERVATION screen display for that guest.4)Make any applicable modifications to the in-house record and select OK to savechanges.1.3.3Canceling a Check-InFrom time to time, there may be a need to return a guest’s reservation status from checked in to reserved. For example, if you accidentally checked in an incorrect reservation, it may be necessary to cancel that check-in.NOTE: Canceling a check in can only happen on the day of arrival while no charges exist on the guest folio. In addition, canceling a check-in does NOT cancel the reservation – the record only returns to a Due-In status.To cancel a checked in reservation, follow the steps below:1)From the main menu, select Front Desk and Arrivals.2)Enter search criteria (i.e. Name, Room No., etc.) and select Search.3)Highlight the incorrectly checked in reservation record.4)Select Cancel C/I.A message displays asking if you indeed would like to cancel this check in.5)Answer Yes.A message displays asking if you would like to block the room.6)Answer Yes to leave the room number pre-blocked on the arriving reservation.Answer No to return the reservation to a due-in status, without having a room number pre-assigned.1.4Additional Front Desk Features1.4.1Accounts – Posting MastersPosting Masters are reservations and folios that exist only for billing purposes. Another name for a Posting Master (PM) is a House Account. Posting Masters commonly exist for Banquet charges and internal financial purposes. The Accounts feature is a simple way to check in Posting Masters or House Accounts.To use the Accounts function, follow the steps below:1)From the main menu, select Front Desk and Accounts.The ACCOUNTS screen displays.2)Enter the profile Name used to create the posting master or the last name of aguest. Select the ellipsis button next to this field to access the PROFILESEARCH screen for locating existing company or guest profiles.3)Enter the First Name of the guest if the PM is for an individual rather than acompany or group.4)Enter the Date From and Date To for the arrival and departure date of the PMaccount.5)Enter the “PM” Room Type for posting master. Click the drop down arrow toselect the PM room type or simply type “PM” in the field.NOTE: Your hotel may have several different types of Posting Master room types. If this is the case, select the room type that best serves the intended purpose of the reservation. For example, if creating the reservation for a Banquet Charge, the hotel may have a room type called PB (Posting Banquets).6)Click the down arrow next to the Room field to select any available roomnumber from the AVAILABLE ROOMS SEARCH screen. Most PM roomnumbers are in the 9000 series (i.e. 9001, 9002, etc.).7)Enter the Rate Code defined by your hotel for PM accounts (i.e. HOUSE).8)Enter the Market Code defined by your hotel for PM accounts (i.e.H=HouseUse).9)Enter the appropriate Source Doe defined by your hotel for PM accounts (i.e.HU=House Use).10)S elect OK to complete the account.If the Date From date for the Posting Master is the current business date, a message displays asking if you would like to check in the guest.11)Answer “Yes” to check in the PM account.1.4.2Room Assignment – IndividualThe Room Assignment feature offers a variety of useful functions, allowing you to easily pre-block rooms for your arriving guests and speed up the check in process at the desk when working with large group check ins. If there are a large number of special room type requests or VIP arrivals, pre-blocking rooms can help eliminate last minute rushing to prepare rooms for their arrival.To individually pre-assign room numbers to incoming guests, follow the steps below:1)From the main menu, select Front Desk and Room Assignment.The ROOM ASSIGNMENT screen displays.NOTE: This screen only displays reservations that do not have a room number assigned.2)Enter the search criteria desired for the arriving guests to pre-block.3)Highlight the individual reservation you wish to pre-block and select Assign. The Housekeeping ROOM ASSIGNMENT screen appears.4)Highlight the desired room number and select OK.The reservation pre-assigns to a room and removes from the display.1.4.3Room Assignment – AutoThere may be a need to have the system automatically assign rooms to guest. For example, if it is your hotel’s policy to pre-assign all incoming VIP rooms, or all members of a group, the Auto feature is the most practical way to assign rooms.To automatically assign rooms to a range of reservations, follow the steps below:1)From the main menu, select Front Desk and Room Assignment.2)Using the search criteria in the ROOM ASSIGNMENT screen, search for thereservation that you want to assign rooms, such as a group or all incoming smoking guests.3)Select the Auto option.NOTE: The Auto option automatically assigns rooms for any reservations displayed in the main ROOM ASSIGNMENT screen. Searching for the reservations prior to selecting Auto is strongly encouraged.The AUTOMATIC ROOM ASSIGNMENT screen displays.4)Choose the Assign radio button at the top of the screen.5)To assign certain room types or specific features (i.e. King Non-Smoking, 3rdFloor, etc.) make the applicable selections on this screen (i.e. Room Type, Smoking, Floor, etc.).6)To vary the Housekeeping statuses in the assignment process, select the checkboxes to the right of the screen for Dirty Rooms, Clean Rooms, andInspected Rooms.7)To use the preferences indicated on the guests’ profiles and reservations, checkthe Use Associated Preferences feature.8)When completed entering information, select Start.As the system automatically assigns a room to each reservation, in the Status section of the screen shows the room number assigned to each. After completing the automatic room assignment, the display counts the rooms assigned and unassigned.NOTE: If reservations fail to assign during this process, change the selection criteria and attempt the automatic assignment again. Typically, reservations with too many preferences or limited availability on clean/inspected rooms cause reservation not to assign.1.4.4Room Assignment – UnassignTo remove pre-blocked rooms from arriving reservations, follow the steps below:1)From the main menu, select Front Desk and Room Assignment.2)Select the Advanced search option and place a check mark in the IncludeAssigned Res. box.3)Search for the reservation(s) to unassign rooms and highlight the desiredrecord.4)Select Unassign.To remove a range of reservations with pre-blocked rooms, follow the steps below:1)Search for existing pre-assigned reservations using steps 1-3 above.2)Select Auto to display the AUTOMATIC ROOM ASSIGNMENT screen.3)At the top of the screen, select the Unassign radio button.4)Input any search criteria to narrow the reservations affected (i.e. Group,Arrival Date, etc.) and select Start.All rooms that meet the criteria are no longer pre-blocked.1.4.5MessagesThe Messages function enables you to send messages to individual guests, groups of guests, and selected guests such as a Party or Block. The database retains an unlimited number of messages for every guest, with functionality to mark them as “Received” or “Not Received”, as well as the ability to print messages on a standard message form. The database retains messages in the system until you delete it or until the End of Day sequence (Night Audit) following the recipient guest's check out.All features explained in the “Reservations” chapter of this manual also apply in the Messages function of the Front Desk. Typically, when leaving a message for an individual, the Reservations Options is the most practical place to manage the message for the guest. When managing messages for multiple guests, the function within the Front Desk menu allows extended capabilities.CREATE A NEW MESSAGETo enter a new message for a guest using the Front Desk > Messages feature, follow the steps below:1)From the main menu, select Front Desk and Messages.The main MESSAGES screen displays.2)Select New.The SELECT GUESTS screen displays.3)Input the Name or Room of the party to receive the message(s) and select Search.4)Place an “X” next to the guest and select OK.The NEW MESSAGE screen displays.5)Enter the caller’s information and message as learned in the “Reservations” chapterof this manual.6)Select OK to deliver the message.EDIT AN EXISTING MESSAGE:To edit an existing message from within the SELECT GUESTS screen in theFront Desk > Messages feature, follow the steps below:1)Search for and highlight the guest with a message to edit. Select OK.The main MESSAGES screen displays.\2)Highlight the message to alter and select Edit.The EDIT MESSAGE screen appears.3)Make any necessary changes to the caller information or message text.4)Select OK to save changes.If you sent this message to more than one guest, a message prompts you to save the change for the current guest only or for all guests who received this message.5)Select This Guest or All Guests, as appropriate.DELIVER MESSAGES:When you relay a message to a guest, either verbally or via a printed message, the message delivers to the guest and marks as received. This prevents accidentally delivering the same message to guests more than once.To deliver a message to a guest and mark the message received, follow the steps below:1.Select Front Desk and Messages.2.Search for the party to receive the message(s).3.Highlight the message and select Receive to indicate that you have given themessage to the guest. To marked multiple messages, place an “X” next toeach message (or choose All to mark all messages) and then select Receive.1.4.6Traces – Viewing and ResolvingVIEWING DEPARTMENT TRACES:Traces are internal interdepartmental messages that serve as reminders for other employees. Traces assist the hotel in taking actions on guests’ special requests.For more information on entering traces directly on a reservation, refer to the “Reservations” chapter of this manual.Follow the steps below to view existing traces for your department:From the main menu, select Front Desk and Traces.The TRACES screen appears.2. Click the drop down arrow next to the Department field in the search criteria and choose your department (i.e. Front Desk, Reservations, Housekeeping, etc.)3. Select OK to return to the TRACES screen.4. Ensure the check box next to Unresolved is active to only few traces that require action.5. Select Search.Traces for your department display in the results grid.6. To view details or modify on an individual trace, select Edit.The TRACES – EDIT screen displays.7. Make any applicable modifications and select OK to save changes.RESOLVING EXISTING TRACES:To resolve an existing trace on a reservation or multiple reservations, follow the steps below:1)Locate any traces for your department as outlined in the previous section.2)Highlight the trace that has a completed action, and select Resolve.3)To resolve multiple traces at one time, place an “X” next to each trace and thenselect Resolve. To resolve all department traces, select All and then Resolve.1.4.7Wake Up CallsThe Wake-Up Calls function allows you to set, view, and delete wake up calls for rooms, guests within a room, or room blocks. The Wake-up Call feature is functional with a PBX interface. If no active PBX interface functionality exists, it is possible to use this feature to log manual wake up requests for reporting.To create new wake-up call and manage the call log, follow the steps below:1)From the main menu, select Front Desk and select Wake-up Calls.The WAKE-UP CALLS screen displays.2)Select New.The WAKE-UP CALLS - NEW screen appears.3)Enter the Room number or click the down arrow to display the IN HOUSEGUEST SEARCH screen.4)Enter in the Time of the wake-up call, and the Date From, No Days, To if thedates requested are more than one night.5)To select to set wake up calls for an entire group, click the drop down arrow nextto the Block field and select the appropriate group.6)Enter any Notes regarding the call request.7)Select OK to save.The new wake-up call displays in the grid.NOTE: You may set up individual wake-up calls for guests sharing the same room, whether or not they have individual phone extensions. If you select a room with shares, sharing guests list individually on the IN HOUSE GUEST SEARCH screen. You may select the sharers individually to set up separate wake-up calls.From within the WAKE-UP CALLS screen, there are several additional functions.•If you manually deliver a wake-up call, you may change the status of the wake-up call directly in the grid from “Pending” to “Completed” or “NoAnswer”. This feature marks the actual time the PBX Operator delivered the wake-up call.To print a Report of all wake-up call requests, select Report.Page 21 of 21。
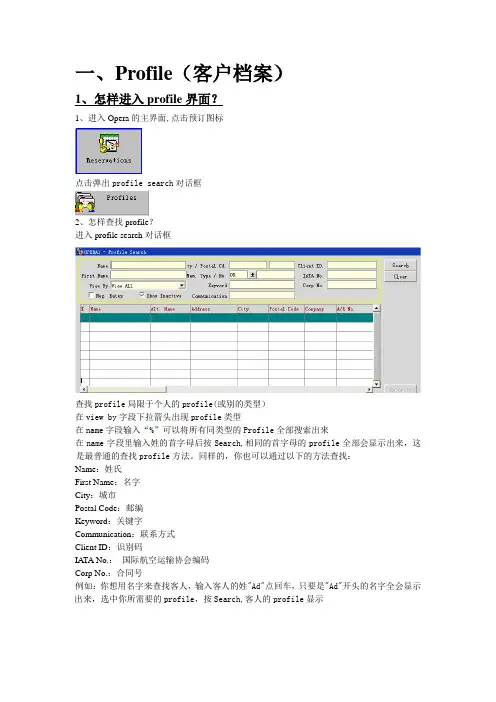
一、Profile(客户档案)1、怎样进入profile界面?1、进入Opera的主界面,点击预订图标点击弹出profile search对话框2、怎样查找profile?进入profile search对话框查找profile局限于个人的profile(或别的类型)在view by字段下拉箭头出现profile类型在name字段输入“%”可以将所有同类型的Profile全部搜索出来在name字段里输入姓的首字母后按Search,相同的首字母的profile全部会显示出来,这是最普通的查找profile方法。
同样的,你也可以通过以下的方法查找:Name:姓氏First Name:名字City:城市Postal Code:邮编Keyword:关键字Communication:联系方式Client ID:识别码IATA No.:国际航空运输协会编码Corp No.:合同号例如:你想用名字来查找客人,输入客人的姓"Ad"点回车,只要是"Ad"开头的名字全会显示出来,选中你所需要的profile,按Search,客人的profile显示3、Profile的六种类型Individual:个人档案Company:公司档案Travel Agent:旅行社档案Source:来源档案Group:团队档案Contact:联系人档案2、Individual Profile(客人档案)Last Name:姓First/Middle:名/中间名Language:语言,可以控制与语言有关的功能和表单Title:职位、尊称。
Address:地址City:城市Postal Cd.:邮编Country/State:国家/州(或其它一级行政区)Salutation:称呼(会作为信函的开头)Vip:VIP代码,识别客人等级及服务标准Nationality:国籍Bus.Seg.:市场分段(作为客源统计使用)Mail Action:为客人发送那些邮件Mailing List:批量发送邮件时此客人是否参与Keyword:关键字,作为一种识别字段Date of Birth:客人生日Passport:护照号ID Card:身份证号Client ID:识别码Communications:联系方式Active:是否为激活状态Contact:是否为联系人History:是否保留客史Profile InformationRestricted:是否对客史档案进行限制Rule:限制内容A/R No.:应收账号2、Company Profile(公司档案)Account:公司名称Address:公司地址City:公司所在城市Postal Code:公司的邮编County:公司所在国家Owner:负责此公司的销售员,可以为业绩统计提供数据Territory:区域分段Keyword:可供搜索的关键字Type:公司类型A/R No.:应收账号Corporate ID:合同标号Active:是否激活Communications:联系方式Company InformationRestricted:是否对此客户档案进行限制Rule:限制条件A/R No.:应收账号Potential Rm Ngts:该客户预计带来的间夜数Potential Revenue:该客户预计带来的收入3、Travel Agent Profile(旅行社档案)Account:旅行社名称Address:旅行社地址City:旅行社所在城市Postal Code:旅行社的邮编County:旅行社所在国家Owner:负责此旅行社的销售员,可以为业绩统计提供数据Territory:区域分段Keyword:可供搜索的关键字Type:公司类型A/R No.:应收账号Corporate ID:合同标号Active:是否激活Communications:联系方式Travel Agent InformationBank Account:结算佣金的账户所在的银行Commission Code:佣金代码,可以标示返佣比例Restricted:是否对此客户档案进行限制Rule:限制条件A/R No.:应收账号Potential Rm Ngts:该客户预计带来的间夜数Potential Revenue:该客户预计带来的收入Account:来源名称Address:来源地址City:来源所在城市Postal Code:来源的邮编County:来源所在国家Owner:负责此来源的销售员,可以为业绩统计提供数据Territory:区域分段Keyword:可供搜索的关键字Type:公司类型A/R No.:应收账号Corporate ID:合同标号IATA:国际航空运输协会,如果是通过IATA所获取的客户需填写IATA编号Active:是否激活Communications:联系方式Account:团队名称Address:团队地址Language:语言City:来源所在城市Postal Code:来源的邮编County:来源所在国家VIP:VIP代码Acct.Contact:财务联系人Industry Code:行业代码Account Type:团队类型Communications:联系方式History:是否保留客史Notes:备注信息Group InformationRestricted:是否对此客户档案进行限制Rule:限制条件A/R No.:应收账号Potential Rm Ngts:该客户预计带来的间夜数Potential Revenue:该客户预计带来的收入6、Profile Options(Profile功能)Add On:复制档案Attachment:添加附近,可以是文本的也可以是图片的Changes:操作记录Credit Cards:信用卡信息Delete:删除档案Future:未来订房信息History:历史入住信息Merge:合并档案,只可合并同一类型的档案Neg.Rates:协议价Notes:备注信息Preferences:特殊要求Privacy:隐私二、Reservation1、怎样查找现有预定1、进入Opera主界面,点击上端的RESERVATION2、在屏幕左侧点击Update Reservation按钮3、出现Reservation Search界面,上端为查询条件,下端为查询结果查询条件包括:Name:姓氏First Name:名字Company:公司Group:团队名称Source:来源名称Agent:旅行社名称Crop No.:合同号Block:团队代码Arrival From、Arrival To:到店日期从那天到那天IATA No.:国际航空运输协会的预定编号CRS No.:中央预定系统的预定编号Conf/Cxl No.:预定确认号或取消预定号Party:集体名称2、如果进入一个预定找到要进入的预定,双击或者点击Last Name:姓First:名Language:语言,可以控制与语言有关的功能和表单Title:职位、尊称。
OP ERA快捷键使用说明LOG IN、LOG OUTLOG IN :USER NAM是姓氏的拼音+ 英文名的第一个字母\PASSWOR是自己的密码\然后用鼠标点一下LOGINLOG OUT然后直接按F8键即可退出OPERA注:每次前台员工在离开电脑时,无论去做什么,都要按F8。
(启到保护自己的作用)OP ERATORTELE PH ONE BOOKOPERATOR可以查询客人信息:ARRIVALSIN HOUSECHECK OUTCANCELLATIONNO SHOW输入客人所提供的信息点SEARCH注: STATUS艮着RESERVATION态来查模糊查询:先打%再输入其中的几个字母(必须是相连的),如果仍找不到可向客人多咨询一些信息和资料。
MESSAGE留MESSAGE:进入OPERATOR点MESSAGE点NEW 在MESSAGE FRO处打上留言人的名字点SAVE要将MESSAGE:印出来送房间点YES在右侧空白处输入留言内容MESSAG留好后会有一个红色的MESSAG字样双击红色的MESSAG可以看其内容MESSAGE的几个功能键:-NEW点此键可以新建MESSAGE-DELET:点此键删除MESSAGE-SAVE TEXT:点此键保存MESSAGE-PRINT :点此键打印MESSAGE-PRINT ALL :点此键打印所有MESSAGE-RECEIVED 点此键收取MESSAGE-RECEIVED ALL点此键收取所有MESSAGE-LAMP:点此键房间内的MESSAG灯会亮,再点一下会灭-CLOSE:点此键可以关掉此屏留LOCATOR输入FROM TIME选择日期点NEW 点LOCATOR进入OPERATOR输入TO TIME在LOCATIONS处选相应的地方点SAVELOCATOR TEX会有相关的地方出现,如过期可DELETE 双击红色的LOCATOR!以看其内容系统会有红色的LOCATORS样注:只要有LOCATOR就要看LOCATOR留TRACE点TRACE进入TRAC哙有客人的信息点NEW可选日期(先选TO DATE 再选FROM DATE系统会有红色的TRACE字样点SAVE输入相关内容先相应的部门注:TRAC解决完后,可按RESOLVE新加INFORMATIO内容:选择INFORMATIONS类输入分类名称查询INFORMATION点PARTIAL NAME SEARCHNAME CATEGORY SEARCHP ROFILEP ROFILE分几种类型:INDIVIDUAL 个人COMP ANY公司TRAREL AGENT旅行社SOURCE来源GRO UP团队在RESERVATIO菜单下点击PROFILE图标,选择查找种类(INDIVIDUAL COMPANYCONTACTSOURCEGROUP。
Opera培训资料目录第一部分基础知识 (3)第二部分 Reservation (4)一、Profile (5)1、查找profile (5)2、新建profile (5)3、profile option (7)二、Reservation (8)1、新建Reservation (8)2、Update reservation (14)3、Reservation Option (14)4、Comments/Alerts/Trace的区别 (18)5、Accompanying VS Share (18)三、Block (18)1、新建团队预定 (18)2、Group Option (19)第三部分 Front Desk (20)一、Arrival (20)二、In house Guest (20)三、Room Assignment (20)第四部分 Cashier (21)一、Billing (21)二、Fast Posting (25)三、Cashier Function (25)四、Cashier Shift Function (25)五、Quick Check Out (25)第五部分Miscellaneous (26)一、Report (26)二、Quick Key (26)第六部分:Night Audit Procedure (30)后记 (31)第一部分基础知识Opera是目前国际上最通用的酒店前台操作系统,它可以与POS机、PSB系统、BMP 系统、Vincard系统等相连接。
目前我们酒店采用的是Opera5.0,这是目前Opera中最新的系统。
打开Opera:在桌面上有Opera Login的图标,双击即可。
如没有,则打开IE浏览器,在地址栏输入10.154.147.12,回车。
在左上角输入用户名和密码后,可选择相对应的数据库,Production为正式库,training 为练习库。


LOG INLOG OUT注:每次前台员工在离开电脑时,无论去做什么,都要按F8。
(启到保护自己的作用) CHANGE PASSWORD注:建议两至三个月更改一次密码3 OPERATOR 、TELEPHONE BOOKOPERATOR可以查询客人信息: -ARRIVALS -IN HOUSE -CHECK OUT -CANCELLTION -NO SHOW注:STATUS 跟着RESERVATION 状态来查 模糊查询:先打%再输入其中的几个字母(必须是相连的),如果仍找不到可向客人多咨询一些信息和资料。
MESSAGE :✧ 留MESSAGE: ✧ MESSAGE 下的几个功能键: - NEW :点此键可以新建军MESSAGE- DELET :点此键删除MESSAGE- SAVE TEXT :点此键保存MESSAGE - PRINT :点此键打印MESSAGE- PRINT ALL :点此键打印所有MESSAGE - RECEIVED :点此键收取MESSAGE- RECEIVED ALL :点此键收取所有MESSAGE- LAMP :点此键房间内的MESSAGE 灯会亮,再点一下会灭 - CLOSE :点此键可以关掉此屏留LOCATOR :在OPERA 的原始界面 (OPERA 的功能退干净) 然后直接按F8键即可退出OPERA先点击进入MISCELLANEOUS点击CHANGE PASSWORD 输入旧的PASSWORD然后输入两遍 新的PASSWORD进入OPERATOR 点MESSAGE 点NEW 在MESSAGEFROM 处打上留言人的名字 在右侧空白处输入留言内容 点SAVE要将MESSAGE 打印出来送房间点YES MESSAGE 留好后会有一个红色的MESSAGE 字样 双击红色的MESSAGE 可以看其内容 进入OPERATOR 点LOCATOR 点NEW 输入FROM TIME 输入TO TIME 在LOCATIONS 处选相应的地方 点SAVE LOCATOR TEXS 会有相关的地方出现,如过期可DELETE系统会有红色的LOCATOR 字样 双击红色的LOCATOR 可以看其内容 输入客人所提供的信息 点SEARCH 选择日期注:只要有LOCATOR ,就要看LOCATOR 留TRACE : 注:TRACE 解决完后,可按RESOLVE TELEPHONE BOOK新加INFORMATION 内容:查询INFORMATION :4 PROFILEPROFILE 分类✧ INDIVIDUAL :个人 ✧ COMPANY :公司✧ TRAREL AGENT :旅行社 ✧ SOURCE :来源 ✧ GROUP :团队在RESERVATION 菜单下点击PROFILE 图标,选择查找种类(INDIVIDUAL 、COMPANY 、 CONTACT 、SOURCE 、GROUP )。
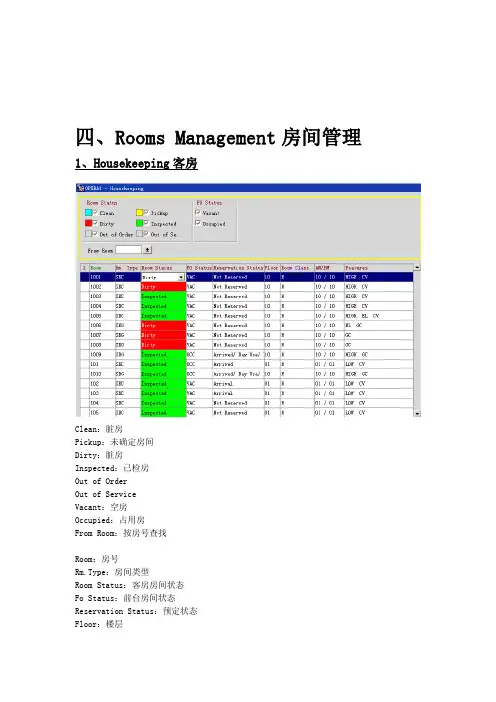
四、Rooms Management房间管理1、Housekeeping客房Clean:脏房Pickup:未确定房间Dirty:脏房Inspected:已检房Out of OrderOut of ServiceVacant:空房Occupied:占用房From Room:按房号查找Room:房号Rm.Type:房间类型Room Status:客房房间状态Fo Status:前台房间状态Reservation Status:预定状态Floor:楼层Room Class:楼域Features:房间特征2、Room Discrepancie矛盾房Sleeps:客房为占用房,前台为空房Skips:客房为空房,前台为占用房Person Discrepancy:存在人数差异的房间Room:房间号Room Type:房间类型Room Status:清洁状态HK Status:客房占用状态FO Status:前台占用状态FO Persons:前台人数HK Persons:客房人数Discrepancy:差异类型五、Cashiering收款1、如何进入客人账单Billing大多数的客人挂账都是通过Billing里面的某些功能来管理的;您可以通过这些功能来选择任何客人、浏览客人的帐单、过账、更正现有的帐目、调整之前的帐目、为客人办理离店,也可以执行一些其他的功能;当客人有消费时,酒店会将消费入到相对应的科目当中,在过夜审时,房费会自动过账到客人的帐单中,结帐时前台会选择相应的付款方式来结帐;如果客人的账目由问题,可以通过相应的功能来为客人的帐单进行调帐;点击Cashiering点击Billing进入In House Guest Search界面我们可以通过这个界面查找具体的客人Room:房间号码Name:名字Group:团队名称Company:公司名称Party:集体名称Block:Block代码Stay Overs:留宿Due Outs:当日应离Checked Out:当日已离Room:房间号码Name:名字:另名Arrival:到店日期Departure:离店日期Balance:账号余额Status:预定状态Group:团队名称双击进入客人的账单Balance:账号余额Status:客人状态Arrival:到店日期Depart:离店日期Company:公司名称Group:团队名称Rate Code:价格代码Rate:价格Prs:人数Rm.Type:房间类型Date:交易发生的日期Code:交易代码Description:交易名称Amount:交易金额Supplement:交易注解Reference:单据号码2、交易是如何产生的PostingPosting是指产生交易的动作,在客人的账户中通常产生交易的动作有3种,收银员手工Posting,通过夜审Posting通常产生的都是房费和一些Fixed Charge,还有通过外围系统向PMS进行Posting;使用Fast Posting功能入账点击Fast Posting输入密码进入Transaction Posting界面选中要入账的房间选择Transaction Code输入金额和数量点击Post3、Billing Options账单功能Agent/Company:旅行社及公司信息Changes:修改记录Comments:有关账务方面的备注Credit Cards:信用卡信息Deposit/CXL:预定金缴纳Fixed Charges:固定收费设置Folio History:账单历史Phone Detail:电话明细Post Rate Code:按照价格代码生成房费Posting History:入账历史Privileges:隐私Profile:客户资料Reservation:预定信息Room Move:换房Routing:转账路径设置。
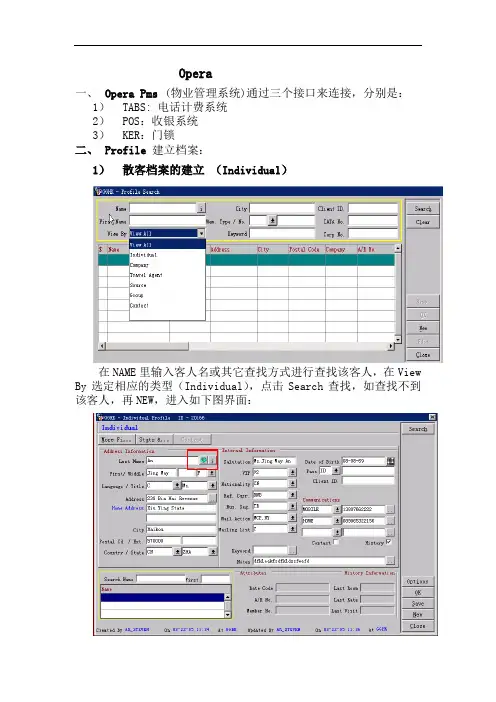
Opera一、Opera Pms(物业管理系统)通过三个接口来连接,分别是:1)TABS: 电话计费系统2)POS:收银系统3)KER:门锁二、 Profile建立档案:1)散客档案的建立(Individual)在NAME里输入客人名或其它查找方式进行查找该客人,在View By选定相应的类型(Individual),点击Search查找,如查找不到该客人,再NEW,进入如下图界面:根据以上档案显示的内容输入相关信息。
在绿色的地球形图标里可输入客人中文名,图标后面的“i”表示如客人不想公开自己的真实姓名时,在Last name 和 First name里输入假名,在Incognito里输入真实姓名。
注:在opera里凡是用黄色线圈住都是作查找用。
档案合并如一客人有两份档案时,可使用Profile Options里的Merge功能。
选中要保留的, 进入Options的Merge, 查找被合并的档案,选中该档案,出现如下图:再点击Merge,合并成功。
2)新建公司档案 (Company)首先进入Profile search里,在View by处选Company,查找要新建的公司,查找不到再New,如图:Owner:负责人,可同时选几个负责人,如有两个以上的负责人,在Owner上显现的是首选的人。
Keyword: 设置查找该公司时的关键词。
根据具体要求填写完毕,Save保存。
如要建立公司合同价的从Options的Neg Rates项进入,如下图:在Rate Code的下拉菜单下选定相应的合同价,或New 进入也可,如下图:和酒店建立合同价的公司有在Search界面上有“$”符号,如下图:如要做个人连公司或公司连公司的连接,进入Options选Relation Ship项,如下图:开价日期停价日期点击New,进入:选定下拉菜单进入如下图:选择种类查找到连接的目标,OK完成连接。
(注:只能是个人连公司,公司连公司,公司不能连个人。
进入系统:打开桌面上的OPERA THIN 图标,输入用户名密码,点击Login 。
请注意选择要用的系统。
(Production 为真实系统,底色为蓝色;Training 为培训系统,底色为绿色),点击右侧PMS 图标进入前台管理系统。
屏幕左下方有 5 盏提示灯(Available Sessions ),绿灯表示未开窗口,红灯表示已开窗口。
注意最多只可打开 5 个窗口,尽量避免重复打开窗口以免死机。
退出系统:点击屏幕左上角的EXIT ,和主界面上的LOG OFF ,注意不能直接点击右上角的“X ”或直接关闭窗口!快捷键明细ALT+_ 字幕下划线,可打开相应功能的窗口CTRC+C 复制所选内容,CTRL+V 粘贴所选内容TAP 换行SHIFT+TAP 向上换行F1 :Help ;在线帮助;Shift+F1 :Occ. Graph ;简单的酒店出租率表;Ctrl+F1 :O pera Help ;快捷键说明;Shift+F2 :Control Panel ;控制面板;Ctrl+F2 :D et. Avail ;显示每个房型在将来每天的可卖房情况;F3 :Available Room Search ;具体可卖房查询;Shift+F3 :House Status ;房间状态;Ctrl+F3 :R oom Plan ;房间列表;Ctrl+F4 :C alendar ;日历;F5 :R ate Query ;价格查询;Shift+F5 :Floor Plan ;楼层图;Shift+F6 :Quick Book ;团队预订新建;F7 :New Reservation. ;新建散客预订;Shift+F7 :Telephone Book ;系统黄页;Ctrl+F7 :Telephone Operator ;总机;F8 :Logout ;用户切换;(如下班需完全退出系统则禁用此键!)Shift+F8 :IFC Menu ;与其它系统连接的程序(接口程序);Ctrl+F8 :Maximum Availability ;最多可卖房数;F9: 下拉菜单.Shift+F9 :Function Diary ;宴会、活动预订;Occ. Graph Percentage :房间数与百分比之间的切换;Scope :退回到选择界面;Start Date :开始日期;Room Class :酒店区域;Include Non Deducted :包括未确认预订;Show Grid :显示格线;Day :按日显示;Week :按周显示;Number of Days :横坐标比例;Sack Bar :选择显示数据类型;Total :所有;Reservations :预订;Blocks :团队;Room Type :房间类型;All :选中所有;None :取消所有;Ctrl+F1 :Opera Help ;Shift+F2 :Control PanelSearch:刷新;Blocks :团队,显示所有在店的团队;Details :详情;Waitlist :候补预订;Total Physical Rooms: 酒店全部物理存在的房间数目Out of Order: 当前酒店停止服务的房间数目Inventory Rooms : 酒店当前实际可卖房(Total Physical Rooms –Out of Order)Overbooking : 酒店当前可以超预定的房间数Sell Limits : 酒店可卖房数( Total Physical Rooms + Overbooking)Deducted Block Rooms Not P/U: 当前全部已确认的团队预定数,但没有Pick upDeducted Block Rooms P/U: 当前全部已确认团队预定数,已经Pick upTotal Deducted Rooms : 全部已经确认的预定,包括在店的客人及已经确认的当天的预定Non Deducted Block Rooms Not P/U: 不确认的团队预定,没有Pick upNon Deducted Block Rooms P/U: 不确认的团队预定,但已经Pick upTotal Non Deducted Rooms: 全部不确认的预定,包括团队及前台预定Out of Service: 当前酒店暂停服务的房间Available Physical Rooms: 当前可用房数(Inventory Rooms –Total Deducted Rooms)Maximum Availability: 最大可卖房(Hotel Availability + Overbooking )Minimum Availability: 最小可卖房(Hotel Availability + Overbooking –Total Non Deducted Rooms)Min. Occupancy %: 最小出租率Max Occupancy %: 最大出租率Total Rooms Reserved: 当日实际预定数(Total Deduct Rooms + Total Non-Deduct Rooms )Event: 活动Day TypeAdults in-house: 当日全部在店成人数目Children in-house: 当日在店儿童数目People in-house: 当日全部人数Arrival Rooms: 预抵房间数Arrival Persons: 预抵人数Departure Rooms: 预离房间数Departure Persons: 预离人数Room Type Overbooking: 是否可以超预定Day Rooms/Person: 日用房房数/人数Waitlist Rooms/Persons: 候补房间/人数Ctrl+F2 :D et. Avail ;Start Date :开始日期;Room Class :酒店区域;Include OOO :打√表示不包含严重坏房,默认为打√;Include Non Deducted :打√表示包括不确认的预订(一般为不确认团队);Include Overbooking :打√表示包含可超额订房间数;不打√为实际房间数,默认为打√;Search :刷新;Details :预订详情;Availability :汇总信息;Toggle :切换成占用房情况;Blocks :查看当天发生的团队。
Opera 系统培训资料一、Profile(档案)1、Individual (散客)1)Last Name(姓):要求一定要英文名,第一个字母大写,后面小写(后面有个小地球,点击进去可输中文姓名,如果输中文输在Last Name后面则在查找预订时NAME后面是查找不到预订。
2)First Name / CN(名字):要求一定要英文第一个字母大写,后面小写/ 中文姓名,姓名之间可以用空格空开。
如果是保密入住,则在First Name前加三个***号做标记3)Language / Title:语言/ 称号:只有中、英文4)Address:地址:可中文,可英文,如果是英文地址则先写小的地点再写大的地点5)City:城市(要求一定要英文输写)6)Postal Cd / Ext:邮编号码(一般此处不用输)7)Country / State:国家/ 省份:如中国/ 广东(要求国家此处一定要输写,否则过不了夜审报表8)Salutation:打招呼:此处前面输了姓名和性别,这里会自动生成:如Ms SammiZou9)VIP:VIP等级或是其它特别的特殊宾客(自己设置)10)Nationality:国籍:要求一定要输写,否则夜审过不了11)Bus.seg:是指行业,此处可以不用输12)Keyword:指建此档案人13)ID Type:证件类型14)VISA Type:信用卡类型15)VISA No:信用卡卡号(通过信用卡卡号在预订界面可查找客人档案)16)Gender:性别17)Date of Birth:生日18)Passport:身份证号码或是护照号码(只能看到14位后面的数字,有权限人可看到所有数字)19)Client ID:不用输写20)Communications:联系方式:可以是电话号码,传真号码,邮件地址)(通过电话号码或是传真号码或邮件可在预订界面可查找客人档案)21)Active:指这个人还在;22)Contact指这个人是公司的联系人,建议联系人时要在此处打上∨23)History指客史24)Notes指备注25)AttributesA)Rate CodeB)A/R NoC)Member No26)History Information(可查看到上次客人入住的记录)A)Last RoomB)Last RateC)Last Visit27)Options功能键里的内容1)Attrachment (可以在此添加附件,如:照片,签名)—目前酒店未开发此功能2)Changes (操作的日志)只可能保存3-6个月3)Delete (没有人有这个权限)4)Future (客人未来的预订信息)5)History (客人之前的入住记录,进去有一个Summary(总的记录,如消费总金额,入住次数,No-show, 未到等数字),还有一个View Folio(客人以前入住的账单)6)Memberships (记录会员号)7)Merge (合并客史功能), 个人档案只能和个人档案合并,公司联系人也只能和公司联系人合并).合并只能二个二个合并,不能一次性2个以上档案合并8)Neg. Rates (Neg(全称是:Negotiated))指协议价9)Notes 备注客人信息(如果是公司也可以备注:如此公司特有的优惠类说明)10)Preferences (客人的喜好)11)Relationship (关系:如公司联系人或是成员)28)其它2、Company (公司)1)一定要英文名,第一个字母大写,后面小写(后面有个小地球,点击进去可输中文姓名)2)Corporate ID(不用管)3)A/R NO:应收账号(只有建立了此号码,由财务部建)有此号码才可以挂帐)在左上角STATS里面建立4)Owner:指负责公司的销售员,记住一定要输,这也是公司档案和个人档案的区别,个人档案没有Owner., Opera没有统一批量的权限,如果需要,则应通Opera远程控制3、travel agent (旅行社)及Company建议内容一样4、Contact (联系人)Individual (散客),在Contact(打∨)→Edit→Contact→Options→News→Company(选定所要的公司)→OK ,有个人资料才能成为联系人5、6、Source(第三方)订房中心或是签单挂帐人,及散客一样7、Group (团队):此档案不用建议,团队档案自动生成二、Reservations1、预订8个要素1)Profile (证件上的信息)2)arrival and departure date (抵达和退房日期)3)nights (房晚数)4)adults (人数)5)rooms (房间数)6)room type and room rates (房型和房价)7)payments type (付款方式)8)comments (附加备注)2、预订电脑步骤1)F7快捷进入预订界面2)在黄色方框内name处查找是否有客人的档案(必须操作),如果没有此客人的预订,按左下方的News键。
OPERA快捷键使用说明LOG IN、LOG OUTØ LOG IN:USER NAME是姓氏的拼音+英文名的第一个字母\PASSWORD是自己的密码\ 然后用鼠标点一下LOG INØ LOG OUT:然后直接按F8键即可退出OPERA注:每次前台员工在离开电脑时,无论去做什么,都要按F8。
(启到保护自己的作用)OPERATOR、TELEPHONE BOOKØ OPERATOR:可以查询客人信息:- ARRIVALS- IN HOUSE- CHECK OUT- CANCELLATION- NO SHOW输入客人所提供的信息点SEARCH注:STATUS跟着RESERVATION状态来查模糊查询:先打%再输入其中的几个字母(必须是相连的),如果仍找不到可向客人多咨询一些信息和资料。
MESSAGE:²留MESSAGE:进入OPERATOR点MESSAGE点NEW在MESSAGE FROM处打上留言人的名字在右侧空白处输入留言容点SAVE要将MESSAGE 打印出来送房间点YESMESSAGE留好后会有一个红色的MESSAGE字样双击红色的MESSAGE可以看其容²MESSAGE下的几个功能键:- NEW:点此键可以新建MESSAGE- DELET:点此键删除MESSAGE- SAVE TEXT:点此键保存MESSAGE- PRINT:点此键打印MESSAGE- PRINT ALL:点此键打印所有MESSAGE - RECEIVED:点此键收取MESSAGE- RECEIVED ALL:点此键收取所有MESSAGE- LAMP:点此键房间的MESSAGE灯会亮,再点一下会灭- CLOSE:点此键可以关掉此屏留LOCATOR:输入FROM TIME选择日期点NEW点LOCATOR进入OPERATOR输入TO TIME在LOCATIONS 处选相应的地方点SAVELOCATOR TEXS会有相关的地方出现,如过期可DELETE 双击红色的LOCATOR可以看其容系统会有红色的LOCATOR字样注:只要有LOCATOR,就要看LOCATOR留TRACE:进入OPERATOR点TRACE进入TRACE会有客人的信息点NEW可选日期(先选TO DATE,再选FROM DATE系统会有红色的TRACE字样点SAVE输入相关容先相应的部门注:TRACE解决完后,可按RESOLVE Ø TELEPHONE BOOK:新加INFORMATION容:点CATEGORY选择INFORMATION种类输入分类名称查询INFORMATION:点PARTIAL NAME SEARCHNAME CATEGORY SEARCHPROFILE Ø PROFILE分几种类型:²INDIVIDUAL:个人²COMPANY:公司²TRAREL AGENT:旅行社²SOURCE:来源²GROUP:团队在RESERVATION 菜单下点击PROFILE图标,选择查找种类(IN DIVIDUAL、COMPANY、CONTACT、SOURCE、GROUP)。
OPERA培训教程2.1 LOG IN2.2 LOG OUT注:每次前台员工在离开电脑时,无论去做什么,都要按F8。
(启到保护自己的作用)2.3 CHANGE PASSWORD先点击进点击输入旧然后输入注:建议两至三个月更改一次密码3 OPERATOR、TELEPHONE BOOK3.1 OPERATOR可以查询客人信息:-ARRIVALS-IN HOUSE-CHECK OUT-CANCELLTION-NO SHOW输入客人所提供的信点注:STATUS跟着RESERVATION状态来查模糊查询:先打%再输入其中的几个字母(必须是相连的),如果仍找不到可向客人多咨询一些信息和资料。
MESSAGE:留MESSAGE:MESSAGE 下的几个功能键:- NEW :点此键可以新建军MESSAGE - DELET :点此键删除MESSAGE - SAVE TEXT :点此键保存MESSAGE - PRINT :点此键打印MESSAGE- PRINT ALL :点此键打印所有MESSAGE - RECEIVED :点此键收取MESSAGE- RECEIVED ALL :点此键收取所有MESSAGE- LAMP :点此键房间内的MESSAGE 灯会亮,再点一下会灭- CLOSE :点此键可以关掉此屏 留LOCATOR :进入点点在右侧点要将MESSAGEMESSAGE 留好后会双击红色的进入点点输入选择系统会有双击红色注:只要有LOCATOR,就要看LOCATOR留TRACE:进入点进入点可选日期(先先输点系统会注:TRACE解决完后,可按RESOLVE3.2 TELEPHONE BOOK新加INFORMATION内容:点选择输入分查询INFORMATION:点PARTIAL NAME4 PROFILE4.1 PROFILE分类✧INDIVIDUAL:个人✧COMPANY:公司✧TRAREL AGENT:旅行社✧SOURCE:来源✧GROUP:团队在RESERVATION 菜单下点击PROFILE图标,选择查找种类(INDIVIDUAL、COMPANY、CONTACT、SOURCE、GROUP)。
一、Profile(客户档案)1、怎样进入profile界面?1、进入Opera的主界面,点击预订图标点击弹出profile search对话框2、怎样查找profile?进入profile search对话框查找profile局限于个人的profile(或别的类型)在view by字段下拉箭头出现profile类型在name字段输入“%”可以将所有同类型的Profile全部搜索出来在name字段里输入姓的首字母后按Search,相同的首字母的profile 全部会显示出来,这是最普通的查找profile方法。
同样的,你也可以通过以下的方法查找:Name:姓氏First Name:名字City:城市Postal Code:邮编Keyword:关键字Communication:联系方式Client ID:识别码IATA No.:国际航空运输协会编码Corp No.:合同号例如:你想用名字来查找客人,输入客人的姓"Ad"点回车,只要是"Ad"开头的名字全会显示出来,选中你所需要的profile,按Search,客人的profile显示3、Profile的六种类型Individual:个人档案Company:公司档案Travel Agent:旅行社档案Source:来源档案Group:团队档案Contact:联系人档案2、Individual Profile(客人档案)Last Name:姓First/Middle:名/中间名Language:语言,可以控制与语言有关的功能和表单Title:职位、尊称。
Address:地址City:城市Postal Cd.:邮编Country/State:国家/州(或其它一级行政区)Salutation:称呼(会作为信函的开头)Vip:VIP代码,识别客人等级及服务标准Nationality:国籍Bus.Seg.:市场分段(作为客源统计使用)Mail Action:为客人发送那些邮件Mailing List:批量发送邮件时此客人是否参与Keyword:关键字,作为一种识别字段Date of Birth:客人生日Passport:护照号ID Card:身份证号Client ID:识别码Communications:联系方式Active:是否为激活状态Contact:是否为联系人History:是否保留客史Profile InformationRestricted:是否对客史档案进行限制Rule:限制内容A/R No.:应收账号2、Company Profile(公司档案)Account:公司名称Address:公司地址City:公司所在城市Postal Code:公司的邮编County:公司所在国家Owner:负责此公司的销售员,可以为业绩统计提供数据Territory:区域分段Keyword:可供搜索的关键字Type:公司类型A/R No.:应收账号Corporate ID:合同标号Active:是否激活Communications:联系方式Company InformationRestricted:是否对此客户档案进行限制Rule:限制条件A/R No.:应收账号Potential Rm Ngts:该客户预计带来的间夜数Potential Revenue:该客户预计带来的收入3、Travel Agent Profile(旅行社档案)Account:旅行社名称Address:旅行社地址City:旅行社所在城市Postal Code:旅行社的邮编County:旅行社所在国家Owner:负责此旅行社的销售员,可以为业绩统计提供数据Territory:区域分段Keyword:可供搜索的关键字Type:公司类型A/R No.:应收账号Corporate ID:合同标号Active:是否激活Communications:联系方式Travel Agent InformationBank Account:结算佣金的账户所在的银行Commission Code:佣金代码,可以标示返佣比例Restricted:是否对此客户档案进行限制Rule:限制条件A/R No.:应收账号Potential Rm Ngts:该客户预计带来的间夜数Potential Revenue:该客户预计带来的收入4、Source Profile(来源档案)Account:来源名称Address:来源地址City:来源所在城市Postal Code:来源的邮编County:来源所在国家Owner:负责此来源的销售员,可以为业绩统计提供数据Territory:区域分段Keyword:可供搜索的关键字Type:公司类型A/R No.:应收账号Corporate ID:合同标号IATA:国际航空运输协会,如果是通过IATA所获取的客户需填写IATA 编号Active:是否激活Communications:联系方式5、Group Profile(团队档案)Account:团队名称Address:团队地址Language:语言City:来源所在城市Postal Code:来源的邮编County:来源所在国家VIP:VIP代码Acct.Contact:财务联系人Industry Code:行业代码Account Type:团队类型Communications:联系方式History:是否保留客史Notes:备注信息Group InformationRestricted:是否对此客户档案进行限制Rule:限制条件A/R No.:应收账号Potential Rm Ngts:该客户预计带来的间夜数Potential Revenue:该客户预计带来的收入6、Profile Options(Profile功能)Add On:复制档案Attachment:添加附近,可以是文本的也可以是图片的Changes:操作记录Credit Cards:信用卡信息Delete:删除档案Future:未来订房信息History:历史入住信息Merge:合并档案,只可合并同一类型的档案Neg.Rates:协议价Notes:备注信息Preferences:特殊要求Privacy:隐私二、Reservation1、怎样查找现有预定1、进入Opera主界面,点击上端的RESERVATION2、在屏幕左侧点击Update Reservation按钮3、出现Reservation Search界面,上端为查询条件,下端为查询结果查询条件包括:Name:姓氏First Name:名字Company:公司Group:团队名称Source:来源名称Agent:旅行社名称Crop No.:合同号Block:团队代码Arrival From、Arrival To:到店日期从那天到那天IATA No.:国际航空运输协会的预定编号CRS No.:中央预定系统的预定编号Conf/Cxl No.:预定确认号或取消预定号Party:集体名称2、如果进入一个预定找到要进入的预定,双击或者点击Last Name:姓First:名Language:语言,可以控制与语言有关的功能和表单Title:职位、尊称。
Country:国家Phone:电话Agent:旅行社Company:公司Group:团队Source:来源Arrival:到店日期Nights:间夜数Departure:离店日期Adults:成人数Child:儿童数No.of Rms.:订房数量Room Type:房型Room:房号Rate Code:价格代码Rate:价格Packages:包价代码Block Code:团队代码Fixed Rate:是否锁定价格ETA:预计到店时间Res.Type:预定类型Market:市场代码Source:来源代码Origin:来源代码Payment:付款方式Credit Card No.:信用卡号Exp.Date:信用卡有效期CRS No.:中央预定系统号Approval Code:预授权号码Approval Amt:预授权金额Suite With:连通房号Confirmation:是否已经确认Guest Balance:客人账户余额Disc.:折扣比例Amt:折扣金额Reason:折扣原因Specials:特殊要求Comments:备注Item Inv:物品借用More FieldPickup Reqd:接机要求Transport Type:接机车型Station Code:机场名称Transport No.:航班号Arrival Date:航班到港日期Pickup Time:接机时间Dropoff Reqd:送机要求Transport Type:送机车型Station Code:起飞的机场Transport No.:离岗航班号Departure Date:离港日期Dropoff Time:接机时间2、Reservation Options(预定功能)1、Accompanying:伴随客信息,它只是记录了一个客人的个人信息,不具备Reservation的属性。
实际上就是一个从属于这个预定的Profile。
2、Add On:复制添加预定,将现有预定进行复制。
可以用在类似的两人,预定信息存在共性,只需要修改名字就可以了。
也为同一个人制作两条到到离店日期不同的预定。
当然也可以筛选不同的信息复制。
3、Agent/Company:旅行社或公司信息。
针对于这个个人预定涉及的旅行社或者公司的信息,其链接可能会导致预计价格的改变,以及客史统计的变化。
4、Alerts:预定提示,对于一些关机的业务起到提醒的功能。
它分为:Check-In Alerts(入住提示)、Check-Out Alerts(账单提示)、Reservation Alerts (调取预定提示)5、Cancel:预定取消,我们可以把一条预定进行取消,当然我们也要知道这条预定取消的理由,便于今后的统计,以及需找服务中存在的问题。
6、Billing:账单信息,billing选项是打开收银模块里的BILLING 界面。
在这里可以查看客人的帐单,或使用与其有关系的其他的功能,但要记住的是,只有已入住的客人billing功能是可用的。
进入预定选项对话框,点billing,弹出CASHIER LOGIN界面在CASHIER NO。
字段输入你的收银员号码,在PASSWORD字段输入密码弹出BILLING界面7、Changes:预定操作痕迹,查看有关预定的修改记录,确实修改人、修改时间以及修改内容,如有必要也可以将其打印成报表。
8、Confirmation:预定确认,对于确认可以接受的预定进行确认。