VGA(加音频)转HDMI原理图
- 格式:doc
- 大小:460.50 KB
- 文档页数:7

ADI 中文版数据手册是英文版数据手册的译文,敬请谅解翻译中可能存在的语言组织或翻译错误,ADI 不对翻译中存在的差异或由此产生的错误负责。
如需确认任何词语的准确性,请参考ADI 提供的最新英文版数据手册。
CN-0282Circuits from the Lab™ reference circuits are engineered and tested for quick and easy system integration to help solve today’s analog, mixed-signal, and RF design challenges. For more information and/or support, visit /CN282.ADV7611低功耗、165 MHz HDMI 接收器 ADV7125 三通道、8位、高速视频DACSSM2604 低功耗音频编解码器ADuC7020 模拟微控制器ADP2301降压开关调节器USB 供电的DVI/HDMI 至VGA 转换器(HDMI2VGA),具有音频提取功能Rev. 0Circuits from the Lab™ circuits from Analog Devices have been designed and built by Analog Devicesengineers. Standard engineering practices have been employed in the design and construction of each circuit, and their function and performance have been tested and veri ed in a lab environment at room temperature. However , you are solely responsible for testing the circuit and determining its suitability and applicability for your use and application. Accordingly , in no event shall Analog Devices be liable for direct, indirect, special, incidental, consequential or punitive damages due to any cause whatsoever connected to the use of any Circuits from the Lab circuits. (Continued on last page)One Technology Way, P.O. Box 9106, Norwood, MA 02062-9106, U.S.A. Tel: 781.329.4700 Fax: 781.461.3113©2012 Analog Devices, Inc. All rights reserved. HDMI INPUTTMDS DDC SDA DDC SCL CEC ADV7611CLOCK DATAHS VSADV7125R VGA OUTDDC SDADDC SCL ADuC7020SDASCLSSM2604MCLK SCLK LRCLK AP0AUDIO-L AUDIO OUTPUTAUDIO-RHPD I2C_SWITCH G BHS VS HDMI 5V5VSCL SDAI 2C _C T R LD A C _P W R D W NI N T 1INT FROM ADV7611EXTERNAL RS-232 LEVEL SHIFTERRX TXADP2301ADP2301USB +5VPOWER SUPPLY SECTION+1.8V+3.3V +3.3V+1.8V +3.3V+3.3V+3.3V+3.3V10892-001图1. HDMI 至VGA (HDMI2VGA)转换器功能框图(原理示意图:未显示所有连接)电路笔记连接/参考器件评估和设计支持设计和集成文件原理图、布局文件、物料清单电路功能与优势图1所示电路是一个完整的H D M I /D V I 至V G A (HDMI2VGA)转换解决方案,带有模拟音频输出。

HDMI、DVI、VGA、RGB、分量、S端子)高清接口图片说明各种视频输出端口(HDMI、DVI、VGA、RGB、分量、S端子)图片说明1.S端子标准S端子标准S端子连接线音频复合视频S端子色差常规连接示意图S端子(S-Video)是应用最普遍的视频接口之一,是一种视频信号专用输出接口。
常见的S 端子是一个5芯接口,其中两路传输视频亮度信号,两路传输色度信号,一路为公共屏蔽地线,由于省去了图像信号Y与色度信号C的综合、编码、合成以及电视机机内的输入切换、矩阵解码等步骤,可有效防止亮度、色度信号复合输出的相互串扰,提高图像的清晰度。
一般DVD或VCD、TV、PC都具备S端子输出功能,投影机可通过专用的S端子线与这些设备的相应端子连接进行视频输入。
显卡上配置的9针增强S端子,可转接色差S端子转接线欧洲插转色差、S端子和AV与电脑S端子连接需使用专用线,如VIVO线2.VGA接口DVI接口正在取代VGA,图为DVI转VGA的转接头VGA是Video Graphics Adapter的缩写,信号类型为模拟类型,视频输出端的接口为15针母插座,视频输入连线端的接口为15针公插头。
VGA端子含红(R)、黄(G)、篮(B)三基色信号和行(HS)、场(VS)扫描信号。
VGA端子也叫D-Sub接口。
VGA接口外形象“D”,其具备防呆性以防插反,上面共有15个针孔,分成三排,每排五个。
VGA接口是显卡上输出信号的主流接口,其可与CRT显示器或具备VGA接口的电视机相连,VGA接口本身可以传输VGA、SVGA、XGA等现在所有格式任何分辨率的模拟RGB+HV信号,其输出的信号已可和任何高清接口相貔美。
VGA转DVI线,可用在没有VGA接口的设备上目前VGA接口不仅被广泛应用在了电脑上,投影机、影碟机、TV等视频设备也有很多都标配此接口。
很多投影机上还有BGA输出接口,用于视频的转接输出。
3.分量视频接口3RCA连接线标准的3RCA线头分量视频接口也叫色差输出/输入接口,又叫3RCA。

hdmi转换器原理HDMI转换器是一种电子设备,用于将高清多媒体接口(HDMI)信号转换成其他类型的视频或音频信号。
它通过分析和重新编码输入信号来实现转换。
HDMI转换器的原理基于数字信号的传输和转换。
HDMI信号是一种数字信号,它包含了视频和音频的数据。
当HDMI信号进入转换器时,转换器首先会解析信号,并将视频和音频数据分开处理。
对于视频信号,HDMI转换器会根据输入信号的特性,如分辨率、刷新率和色彩空间等,重新编码成其他类型的视频信号。
常见的转换包括将HDMI信号转换成VGA、DVI或DisplayPort信号。
这涉及到对视频数据进行重新采样、重新编码和重新同步。
对于音频信号,HDMI转换器会提取出HDMI信号中的音频数据,并将其转换成其他类型的音频信号。
常见的转换包括将HDMI信号转换成立体声音频或光纤/同轴数字音频信号。
这涉及到对音频数据进行解码和重新编码。
转换完成后,HDMI转换器会将转换后的信号输出到相应的输出端口,以供连接到其他设备使用。
输出端口可能是VGA、DVI、DisplayPort、立体声音频插孔、光纤音频接口或同轴音频接口等,具体取决于转换器的设计。
需要注意的是,HDMI转换器只能进行数字信号之间的转换,无法实现模拟信号到数字信号的转换。
若需要将模拟信号(如Composite或Component)转换成数字信号,还需要另外的转换器。
综上所述,HDMI转换器通过解析、重新编码和重新同步输入的HDMI信号,将其转换成其他类型的视频或音频信号,并输出到相应的端口。
这样,用户就可以将HDMI设备连接到不同类型的显示器或音响设备上,实现高质量的多媒体传输。

VGA to HDMI Converterwith ScalerInstallation Guide500149SAFETY PRECAUTIONSPlease read all instructions before unpacking, installing or operating this equipment and before connecting the power supply.Please keep the following in mind as you unpack and install this equipment:•Always follow basic safety precautions to reduce the risk of fire, electrical shock and injury to persons.•To prevent fire or shock hazard, do not expose the unit to rain, Moisture or install this product near water.•Never spill liquid of any kind on or into this product.•Never push an object of any kind into this product through any openings or empty slots in the unit, as you may damage parts inside the unit.•Do not attach the power supply cabling to building surfaces.•Use only the supplied power supply unit (PSU). Do not use the PSU if it is damaged.•Do not allow anything to rest on the power cabling or allow any weight to be placed upon it or any person walk on it.•To protect the unit from overheating, do not block any vents or openings in the unit housing that provide ventilation and allow for sufficient space for air tocirculate around the unit.REVISION HISTORY1.0 2014/12/01 Release VersionTable of Contents1. Introduction (4)1.1 Introduction to VGA to HDMI Converter with Scaler (4)1.2 Features (4)1.3 Package Contents (4)2. Specifications (5)3. Panel Description (6)3.1 Front Panel (6)3.2 Rear Panel (7)4. System Connection (8)4.1 Safety Precautions (8)4.2 System Diagram (8)4.3 Connection Procedure (9)4.4 Application (9)5. List of supported resolution (10)5.1 PC Input Resolution (10)5.2 HDMI output resolutions (10)6. Troubleshooting & Maintenance (11)Regulatory Compliance (12)1. Introduction1.1 Introduction to VGA to HDMI Converter with ScalerThe VGA to HDMI Converter with Scaler is designed to scale analog video from PC input source to digital HDMI output of wide-range HD and PC resolutions up to 1080p or WUXGA. Besides video scaling, the device can convert analog stereo audio input to digital format and embed it to HDMI output as 2-Channel LPCM. This unit has a comprehensive resolution button that allows user to select a variety of output resolutions and adjust for best picture quality.1.2 Features•HDMI and DVI 1.0 Compliant.•Scales many PC resolutions to many HD or PC resolutions.•Support high resolution output (see Section 5).•PC resolutions supported: VGA, SVGA, XGA, SXGA, UXGA, WXGA, WSXGA, WUXGA.•SD/HD resolutions supported: 480i, 576i, 480p, 576p, 720p, 1080i, 1080p.•Automatically detects the factory settings of the connected display and outputs the corresponding resolution and refresh rate, when the NATIVEresolution is selected.•Supports stereo analog input with PC video to HDMI output.•Supports firmware upgrading via USB.•Powered by local 5VDC power supply with locking connector.•Elegant Aluminium enclosure designed for ruggedness and better cooling.1.3 Package ContentsThis product is delivered with the following parts.•One (1) VGA to HDMI Converter with Scaler•One (1) Power Adapter; 5VDC, 2.6A with Interchangeable Blades for the US, the UK , Europe and Australia•One (1) Installation GuidePlease confirm that the product and the accessories are all included. If not, please contact your local distributor where the unit was purchased.2. SpecificationsEnvironment HDMI 1.3Devices Plasma, projectors, monitors, TV, PC, laptops, servers. Transmission Transparent to the userVideo Resolution PC: VGA, SVGA, XGA, SXGA, UXGA, WXGA, WSXGA,WUXGASD/HD: 480i, 576i, 480p, 576p, 720p, 1080i, 1080pAudio Bandwidth 20Hz to 20KHzAudio Impedance >10ΩAudio SNR >70dB @ 20Hz to 20KHzSignals HDMI 1.3a protocol and HDCPConnectors One (1) VGA HD-15 input receptacleOne (1) Audio input 3.5mm Stereo JackOne (1) HDMI output receptacle.One (1) Mini USB Service portOne (1) 2.1mm barrel locking power connectorNote: HDMI cables not included.Power Supply One (1) 110-240V/5VDC power supply with interchangeableblades for use in the US, the UK, Europe and Australia. LEDs One (1) Power LED (green)Push buttons Two (2) Push-buttons for Auto Adjust and Resolution settings4.6 WattsPowerConsumptionTemperature Operating: 0° to 40°C Storage: -20° to 85°CHumidity: Up to 95% non-condensingEnclosure MetalChassis Style Ruggedized Aluminium ExtrusionDimensions 4.02” x 4.02” x 0.98” (102 x 102 x 25 mm)Weight 1.43 lb (0.65 kg)Compliance Regulatory: FCC, CE, RoHSWarranty 2 yearsOrder Information 500149 VGA to HDMI Converter with Scaler3. Panel Description3.1 Front PanelItem Name Description 1Service This port is to connect a mini USB B type cable for firmware update. 2HDMI OUT Connect the HDMI output port to the HDMI input port of your display. 3 Auto Adjust Press this button when the display doesn’t fit into the screen.The device will adjust automatically the image position .4 Resolution Press this button to select the output resolution. The devicewill sequentially toggle through all different output resolutionsavailable.5 720PPress these two buttons simultaneously to switch outputresolution to the most common 720p resolution .3.2 Rear PanelName Description 1Power LED Once the device is powered, the Power LED will illuminate indicating that the device is powered. 25VDC, 2.6A Plug and lock the DC power supply into the unit and connect the adaptor to an AC outlet. 3VGA IN Connect the VGA IN port to the VGA output port of your source equipment. 4 Audio In Connect the 3.5mm stereo input port to the analog audiostereo output port of your source equipment.4. System Connection4.1 Safety PrecautionsThe system should be installed in a clean environment with temperature and humidity levels within the specifications.All devices should be connected before powering on the product.4.2 System Diagram4.3 Installation1. Connect VGA source device (i.e. Personal Computer) to VGA input port of the VGAto HDMI Converter with Scaler with a VGA cable.2. Connect the audio source device (e.g. PC audio card) to the audio input port of theVGA to HDMI Converter with Scaler with a 3.5mm stereo cable.3. Connect an HDMI display to the HDMI Out port of the VGA to HDMI Converter withScaler.4. Connect the 5VDC power adaptor to the power port of the VGA to HDMI Converterwith Scaler.4.4 ApplicationThe VGA to HDMI Converter with Scaler can be used for the type of applications such as computer realm, monitoring, video-conference room and meeting rooms, corporate boardroom, classroom auditorium and lecture theatres, training rooms and training facilities, command & control centers, smart homes, etc.The VGA to HDMI Converter with Scaler is used to solve odd VGA resolutions to display on a standard HDMI display.5. List of supported resolution5.1 PC Input ResolutionVGA 640 x 480 @60/72/75HzSVGA 800 x 600 @56/60/72/75HzXGA 1024 x 768 @60/70/75HzXGA+ 1152 x 864 @75Hz1280 x 720 @60Hz1280 x 768 @60RB/60Hz1280 x 800 @60RB/60Hz1280 x 960 @60Hz1280 x 1024 @60/75Hz1360 x 768 @60HzSXGA 1400 x 1050 @60HzWXGA 1440 x 900 @60Hz 5.2 HDMI output resolutionsNative resolution640 x 480 @60Hz800 x 600 @60Hz1024 x 768 @60Hz1280 x 1024 @60Hz1600 x 1200 @60Hz1366 x 768 @60Hz1680 x 1050 @60Hz1920 x 1200 @60Hz1280 x 800 @60Hz1440 x 900 @60Hz1400 x 1050 @60Hz1600 x 900 @60Hz480i @60Hz480p @60Hz720p @60Hz1080i @60Hz1080p @60Hz576i @50Hz576p @50Hz720p @50Hz1080i @50Hz1080p @50Hz6. Troubleshooting & MaintenanceThe following table describes some of the symptoms, probable causes and possible solutions in respect to the installation of the VGA to HDMI Converter with Scaler.Losing color or no video signal output on HDMI display The cables may not beconnected correctly or maybe brokenCheck whether the cablesare connected correctlyand in working conditionNo HDMI signal output in the device while local VGA input is in normal working stateOutput image with snowflakesPower LED indicator doesn’t work or no response to any operation Loose or failed powerconnectionEnsure the power cordconnection is good, andpower supply is connectedto an AC outletCannot hear sound on the HDMI Output Check that the audio cableis connected to the LineOut of the PCCheck whether the cablesare connected correctlyand in working conditionStatic becomes stronger when connecting the video connectors Bad grounding Check the grounding andmake sure it is wellconnectedNo HDMI signal output for a selected resolution The resolution could beunsupported, check if theresolution is in the list ofsupported resolutionPress the Auto Adjust andResolution buttonsimultaneously to force the720P resolution you cannow select a resolutionsupported by the productIf you still cannot diagnose the problem, please call MuxLab Customer Technical Support at 877-689-5228 (toll-free in North America) or (+1) 514-905-0588 (International).Regulatory ComplianceDisclaimerInformation in this document is subject to change without notice. The manufacturer does not make any representations or warranties (implied or otherwise) regarding the accuracy and completeness of this document and shall in no event be liable for any loss of profit or any other commercial damage, including but not limited to special, incidental, consequential, or other damages.No part of this document may be reproduced or transmitted in any form by any means, electronic or mechanical, including photocopying, recording or information recording and retrieval systems without the express written permission of the manufacturer.All brand names and product names used in this document are trademarks, or registered trademarks of their respective holders.8495 Dalton Road, Mount Royal, Quebec, Canada. H4T 1V5Tel: (514) 905-0588 Fax: (514) 905-0589Toll Free (North America): (877) 689-5228E-mail:***********************:。
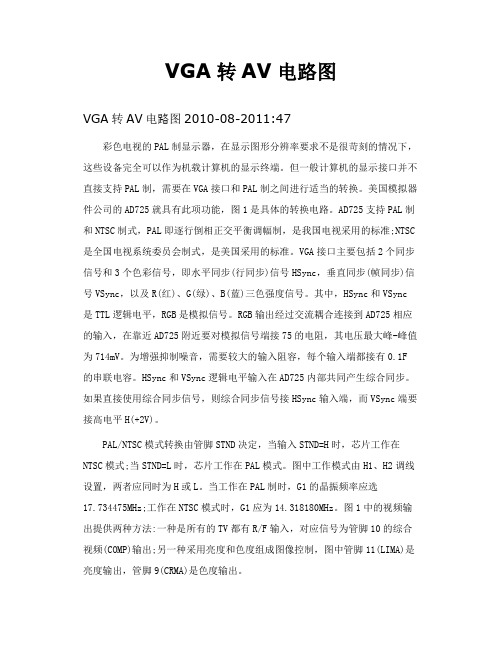
VGA转AV电路图VGA转AV电路图2010-08-2011:47彩色电视的PAL制显示器,在显示图形分辨率要求不是很苛刻的情况下,这些设备完全可以作为机载计算机的显示终端。
但一般计算机的显示接口并不直接支持PAL制,需要在VGA接口和PAL制之间进行适当的转换。
美国模拟器件公司的AD725就具有此项功能,图1是具体的转换电路。
AD725支持PAL制和NTSC制式,PAL即逐行倒相正交平衡调幅制,是我国电视采用的标准;NTSC 是全国电视系统委员会制式,是美国采用的标准。
VGA接口主要包括2个同步信号和3个色彩信号,即水平同步(行同步)信号HSync,垂直同步(帧同步)信号VSync,以及R(红)、G(绿)、B(蓝)三色强度信号。
其中,HSync和VSync 是TTL逻辑电平,RGB是模拟信号。
RGB输出经过交流耦合连接到AD725相应的输入,在靠近AD725附近要对模拟信号端接75的电阻,其电压最大峰-峰值为714mV。
为增强抑制噪音,需要较大的输入阻容,每个输入端都接有0.1F 的串联电容。
HSync和VSync逻辑电平输入在AD725内部共同产生综合同步。
如果直接使用综合同步信号,则综合同步信号接HSync输入端,而VSync端要接高电平H(+2V)。
PAL/NTSC模式转换由管脚STND决定,当输入STND=H时,芯片工作在NTSC模式;当STND=L时,芯片工作在PAL模式。
图中工作模式由H1、H2调线设置,两者应同时为H或L。
当工作在PAL制时,G1的晶振频率应选17.734475MHz;工作在NTSC模式时,G1应为14.318180MHz。
图1中的视频输出提供两种方法:一种是所有的TV都有R/F输入,对应信号为管脚10的综合视频(COMP)输出;另一种采用亮度和色度组成图像控制,图中管脚11(LIMA)是亮度输出,管脚9(CRMA)是色度输出。
蝎子前线精品文章。
绝对是精品。
所有要转文章的一定要标明是"蝎子前线之学会"本文介绍的转换器用于计算机VGA信号转换为彩色电视机PAL和NTSC制式信号,电路的主要技术参数如下。

VGA转HDMI方案简介VGA转HDMI方案是指将视频信号从VGA(Video Graphics Array)接口转换为HDMI(High-Definition Multimedia Interface)接口的转换方案。
VGA接口是早期计算机图形输出标准,而HDMI接口则是现代高清视频和音频传输的标准。
由于现代的电视和投影仪等大屏幕显示设备一般只支持HDMI接口,在某些场景下需要将VGA信号转换为HDMI信号进行显示。
本文将介绍VGA转HDMI的原理、常见的VGA转HDMI方案以及如何选择和使用适合的转换器。
原理VGA信号与HDMI信号的电平、分辨率以及音频传输方式等方面存在差异,因此需要通过转换器来进行信号的转换。
VGA转HDMI转换器一般包括以下主要组成部分:1.VGA输入接口:用于接收VGA信号的输入接口;2.HDMI输出接口:用于输出转换后的HDMI信号的输出接口;3.图像转换芯片:负责将VGA信号中的图像信息进行转换,使其符合HDMI标准;4.音频转换芯片(可选):负责将VGA信号中的音频信息进行转换,使其与HDMI信号一起传输;5.电源管理电路:负责为转换器提供稳定的电源供电。
通过上述组成部分的协同工作,VGA转HDMI转换器可以将VGA信号转换为HDMI信号,从而实现VGA设备与HDMI设备的兼容。
常见的VGA转HDMI方案在市场上存在多种不同的VGA转HDMI方案,常见的包括以下几种:1.有线转换方案:这种方案通过有线连接,将VGA信号传输到转换器中进行转换,再将转换后的HDMI信号输出到HDMI显示设备。
这种方案适用于需要长距离传输的场景,但需要注意传输线的质量对信号质量的影响。
2.无线转换方案:这种方案通过无线传输技术,将VGA信号无线传输到转换器中进行转换,再将转换后的HDMI信号通过HDMI输出接口输出。
这种方案适用于要求灵活布局或无法使用有线连接的场景,但需要注意信号稳定性和延迟等问题。
VGA to HDMI scaler - 1920x1200StarTech ID: VGA2HDPRO2This VGA to HDMI® converter and scaler lets you connect your analog VGA video signal to a digital HDMI display. It features a built-in video scaler that adjusts the output signal to suit virtually any HDMI display. It scales the signal to your choice of resolutions, up to 1080p.The converter and scaler features 3.5mm and optical audio inputs, which let you combine audio into the HDMI output. The scaler creates a digital signal at high resolutions that's perfect for updating legacy VGA video equipment to work with newer HDMI televisions or projectors.Ensure compatibility between your VGA source and HDMI displayNew HDMI displays are phasing out support for lower resolution video signals such as 480i, 480p, and 720p. Without support for these common VGA resolutions, you may not be able to use a standard adapterto connect your legacy video output to your new display.This converter lets you continue using your current VGA source equipment by scaling your video signal to a resolution that’s compatible with your new HDMI display. Scaling your source enables you to upgrade to a sleek new HDMI display while keeping your tried-and-true source material on display at trade shows and storefronts.Continue using your reliable VGA sourceUpgrading every component in your A/V setup can be costly and time consuming. Retaining your source can save you the cost and hassle of buying and configuring new equipment. With the VGA to HDMI converter, you can bridge the gap between old and new technologies by converting your dependable VGA source to high-resolution HDMI.Enjoy hassle-free operationThis converter features automatic resolution detection that minimizes your setup time by avoiding tediousprogramming. Plus, it features an intuitive on-screen menu that lets you customize the parameters of your input to quickly select and compare different output options, ensuring you get the best video solution possible in a very short time period.Notes: This converter does not output digitally-encrypted content. This converter is the direct replacement for VGA2HDMIPRO.The VGA2HDPRO2 and is backed by a 2-year warranty and free lifetime technical support.ApplicationsConvert analog video and audio to digital HDMI contentAdd your VGA video source to a video distribution solution, that only accepts digital contentWatch content from an older computer on an HD TVFeaturesCustomize your analog VGA source to work with any HDMI display, with the built-in video scalerAvoid upgrading your VGA equipment by scaling your source to an HDMI displayEnjoy hassle-free operation with an intuitive on-screen menu and automatic display detectionSupports high-definition resolutions up to 1920x1200 or 1080pSupports 3.5mm analog audio or SPDIF digital audio inputsTechnical SpecificationsWarranty 2 YearsAudio YesConverter Type ScalerOutput Signal HDMIAudio Specifications2-Channel Stereo audio (3.5mm)7.1-channel surround sound audio (SPDIF)Maximum Analog Resolutions1920 x 1200Supported Resolutions Widescreen(16/32 bit):1920x1200, 1920x1080, 1680x1050, 1366x768, 1280x800, 1280x768, 1280x720Standard(16/32 bit):1600x1200, 1400x1050, 1280x1024, 1024x768, 800x600, 640X480Wide Screen Supported YesConnector A 1 - VGA (15 pin; High Density D-Sub) Female InputConnector A 1 - 3.5mm Mini-Jack (3 Position) / Mini-Toslink (SPDIF; Optical) Female Input Connector A 1 - Toslink (SPDIF; Optical) Female InputConnector B 1 - HDMI (19 pin) Female InputConnector B 1 - 3.5 mm Mini-Jack (3 Position) Female OutputConnector B 1 - Toslink (SPDIF; Optical) Female OutputColor BlackEnclosure Type SteelProduct Height 1.2 in [30 mm]Product Length 4.1 in [105 mm]Product Weight21.6 oz [612 g]Product Width 3 in [76 mm]LED Indicators 1 - Power LEDCenter Tip Polarity PositiveInput Current600 maInput Voltage110 ~ 240 ACOutput Current 2.6 AOutput Voltage 5 DCPower Source AC Adapter IncludedHumidity20~90% RH (non-condensing)Operating Temperature0°C to 40°C (32°F to 104°F)Storage Temperature-20°C to 60°C (-4°F to 140°F)Included in Package 1 - VGA to HDMI Converter / ScalerIncluded in Package 1 - 4ft (1.2m) VGA CableIncluded in Package 1 - 6ft (1.8m) 3.5mm to RCA CableIncluded in Package 1 - Universal Power Adapter (US/UK/EU/AUS) Included in Package 1 - Quick install guideCertifications, Reports and Compatibility。
轻松使用HDMI :HDMI-VGA 和VGA-HDMI 转换器作者:Witold Kaczurba 和Brett Li在消费电子市场,电视、投影仪和其它多媒体设备纷纷采用高清多媒体接口(HDMI ®)技术,使得HDMI 成为全球公认的接口。
相信不久之后,所有多媒体设备都需要配备该接口。
HDMI 接口在家庭娱乐中已经广为流行,近来在便携式设备和汽车信息娱乐系统中,它也日渐风行。
实现标准化多媒体接口是竞争高度激烈的消费电子市场的必然要求,上市时间对于该市场而言至关重要。
除了提高市场认可度以外,采用标准接口还能大大改善投影仪、DVD 播放机、高清电视以及不同制造商生产的其它设备之间的兼容性。
然而,在某些工业应用中,从模拟视频向数字视频过渡所需的时间比消费电子市场要长,许多设备尚未采用新的数字方法来发送合成音视频数据。
这些设备仍然使用模拟信号作为唯一的视频传输途径,原因可能是特殊市场或应用有特定要求。
例如,对于投影仪,有些客户仍然偏好使用视频图形阵列(VGA)电缆,而其它一些客户则使用音频/视频接收器(AVR)或媒体盒作为集线器,将一条HDMI 电缆连接到电视,而不是一组凌乱且不美观的电缆,如图1所示。
图1. 媒体盒将模拟信号转换为HDMI新使用者可能认为HDMI 是一种相对较复杂的标准,需要经过验证的软件驱动器、互通性和兼容性测试,从而保证一种设备与其它各种设备结合使用时能够正常工作。
这似乎有点难以把握,遇到新技术时常常会发生这种情况。
然而,先进的半导体技术正在解决这些难题,模拟域和数字域均实现了改进,包括通过更高性能的模块来均衡较差的差分信号,以及利用更复杂的算法来减少软件开销和纠正位错误。
本文说明先进的半导体解决方案和灵巧的软件如何帮助实现HDMI 。
两种基本器件——HDMI-VGA (“HDMI2VGA”)和VGA-HDMI (“VGA2HDMI”)转换器——为熟悉视频应用的工程师提供一种简单的模拟视频与数字视频相互转换的方法。
DE: Bedienungsanleitung - FR: Guide de l'utilisateur - ES: Guía del usuario - IT: Guida per l'uso - NL: Gebruiksaanwijzing - PT:Guia do usuário - VS221VGA2HDVGA+HDMI® to HDMI Audio/Video Converter Switch*actual product may vary from photosFCC Compliance StatementThis equipment has been tested and found to comply with the limits for a Class B digital device, pursuant to part 15 of the FCC Rules. These limits are designed to provide reasonable protection against harmful interference in a residential installation. This equipment generates, uses and can radiate radio frequency energy and, if not installed and used in accordance with the instructions, may cause harmful interference to radio communications. However, there is no guarantee that interference will not occur in a particular installation. If this equipment does cause harmful interference to radio or television reception, which can be determined by turning the equipment off and on, the user is encouraged to try to correct the interference by one or more of the following measures:• Reorient or relocate the receiving antenna.• Increase the separation between the equipment and receiver.• Connect the equipment into an outlet on a circuit different from that to which the receiver is connected.• Consult the dealer or an experienced radio/TV technician for help.Use of Trademarks, Registered Trademarks, and other Protected Names and Symbols This manual may make reference to trademarks, registered trademarks, and other protected names and/or symbols of third-party companies not related in any way to . Where they occur these references are for illustrative purposes only and do not represent an endorsement of a product or service by , or an endorsement of the product(s) to which this manual applies by the third-party company in question. Regardless of any direct acknowledgement elsewhere in the body of this document, hereby acknowledges that all trademarks, registered trademarks, service marks, and other protected names and/or symbols contained in this manual and related documents are the property of their respective holders.Table of ContentsIntroduction (1)Packaging Contents (1)System Requirements (1)Product Diagram (1)Front View (1)Rear View (2)Hardware Installation (3)Mode Selection and Switch Operation (3)Manual Mode (3)Priority Mode (4)Automatic Mode (4)Screen Shift Mode (4)Resolution Alteration Mode (5)LED Indicators (6)Technical Support (7)Warranty Information (7)IntroductionPackaging Contents• VGA+HDMI to HDMI Converter Switch (VS221VGA2HD)• Mounting Bracket Set• Universal Power Adapter (NA/EU/UK)• Instruction ManualSystem Requirements• HDMI-enabled source device w/ HDMI cable (i.e. computer, Blu-ray player)• VGA-enabled source device w/ VGA cable (i.e. computer)• HDMI-enabled display device w/ HDMI cable (i.e. television, projector)• 3.5mm audio cable (optional for VGA audio support)Product DiagramFront View1. Input Selection / Screen Left Adjustment Button2. Resolution adjustment / screen right adjustment button3. HDMI audio/video Input Port #14. HDMI LED Indicator5. VGA LED Indicator6. 3.5mm Audio Input Port #27. VGA Input Port #21345672Rear View1. Power Adapter Port2. HDMI Output Port3. Mode Selection Switch 231Hardware InstallationMode Selection and Switch Operation1. Using an HDMI cable (not included), connect your HDMI-enabled video source device to the HDMI audio/video input port #1 on the VS221VGA2HD.2. Using a VGA cable (not included), connect your VGA-enabled video source device to the VGA audio/video input port #2 on the VS221VGA2HD.3. (Optional) If your VGA-enabled video source device includes an audio output,connect the audio source output on the device to the 3.5mm audio input port #2 on the VS221VGA2HD using a 3.5mm audio cable (not included).4. Using an HDMI cable (not included), connect your HDMI-enabled display device to the VS221VGA2HD.5. Using the included power adapter, connect the power adapter port on the VS221VGA2HD to an available power outlet. 6. Turn on the HDMI-enabled display device as well as any connected HDMI & VGA-enabled video source devices.Change the mode selection switch to choose your desired operation mode. Instructions and descriptions for each operation mode are listed below:Manual ModeManual mode enables you to switch between video sources with push button operation.1. Set the mode selection switch to “Manual Switch” to place the VS221VGA2HD into manual mode.2. Press the Input Selection Button to toggle between each video source device. The active port LED indicator will light as video sources are switched, indicating which port is selected.Priority ModePriority mode enables you to select a prioritized video input device that will automatically be selected should that device be turned on.1. Set the mode selection switch to “HDMI Priority” or “VGA Priority” to place theVS221VGA2HD into your choice Video Source Device priority.2. Your HDMI or VGA Video source device (depending on your selection) will now automatically be displayed on your HDMI-enabled video display device while itis turned on. Turning off the device will automatically switch the display to the remaining device.Automatic ModeAutomatic Mode enables the VS221VGA2HD to automatically select the most recently turned on video source device.1. Set the mode selection switch to “Auto” to place the VS221VGA2HD into automatic mode.2. The VS221VGA2VHD will now automatically switch to the most recently turned on video source device.Screen Shift ModeScreen Shift Mode can move the screen image to right or left side on the monitor (horizonal position) for comfortable viewing.1. Press both screen adjustment buttons simultaneously for 2 seconds and release after the VGA input LED turns to pale blue.2. Press left screen adjustment button or right screen adjustment button (B2) to adjust image to your desired position.Notes:• The system will automatically escape from shift mode if no activity is detected within 20 seconds.• For adjusting horizontal image displacement, the maximum number of adjustments is 50 steps.• The VS221VGA2HD will automatically retain your last setting.Resolution Alteration ModeIf the resolution output from your video source device is not supported by your video display device, the VS221VGA2HD will alert you through the VGA input LED by emitting blue and flashing orange three times. This will be accompanied by your video source not being displayed on the video display device. You can follow the below steps to use Resolution Alteration mode to resolve these symptoms should they occur.1. Press the resolution adjustment button for 2 seconds and release when the VGA input LED flashes purple.2. The LED flashes purple once indicating the setting working.NOTES:• Repeat these steps again to select next available resolution or to switch back to the previous resolution.• The VS221VGA2HD will automatically retain your last setting.LED IndicatorsEmit Green and Flash Blue (3 Times)HDMI NoEmit Green and Flash Blue (2 Times)DVI w/ adapter (not included)NoEmit Blue and Flash Green (3 Times)HDMI YesEmit Blue and Flash Green (2 Times)DVI w/ adapter (not included)YesEmit Green and Flash Red (1 time)No monitor attached NoEmit Blue and Flash Red (1 time)No monitor attached YesEmit Green and Flash Blue (3 Times)HDMI No N/A Emit Green and Flash Blue (2 Times)DVI w/ adapter (not included)No N/A Emits Blue and goes off (3 times)HDMI Yes N/A Emits Blue and goes off (2 Times)DVI w/ adapter (not included)Yes N/A Emits Purple and goes off (3 times)HDMI Yes Yes Emits Purple and goes off (2 times)DVI w/ adapter (not included)Yes Yes Emit Green and Flash Red (1 time)No monitor detected No N/A Emit Blue and Flash Red (1 time)No monitor detected Yes N/ASpecificationsTechnical Support’s lifetime technical support is an integral part of our commitment to provide industry-leading solutions. If you ever need help with your product, visit /support and access our comprehensive selection of online tools, documentation, and downloads.For the latest drivers/software, please visit /downloads Warranty InformationThis product is backed by a two year warranty.In addition, warrants its products against defects in materials and workmanship for the periods noted, following the initial date of purchase. During this period, the products may be returned for repair, or replacement with equivalent products at our discretion. The warranty covers parts and labor costs only. does not warrant its products from defects or damages arising from misuse, abuse, alteration, or normal wear and tear.Limitation of LiabilityIn no event shall the liability of Ltd. and USA LLP (or their officers, directors, employees or agents) for any damages (whether direct or indirect, special, punitive, incidental, consequential, or otherwise), loss of profits, loss of business, or any pecuniary loss, arising out of or related to the use of the product exceed the actual price paid for the product. Some states do not allow the exclusion or limitation of incidental or consequential damages. If such laws apply, the limitations or exclusions contained in this statement may not apply to you.Hard-to-find made easy. At , that isn’t a slogan. It’s a promise. is your one-stop source for every connectivity part you need. From the latest technology to legacy products — and all the parts that bridge the old and new — we can help you find the parts that connect your solutions.We make it easy to locate the parts, and we quickly deliver them wherever they need to go. Just talk to one of our tech advisors or visit our website. You’ll be connected to the products you need in no time.Visit for complete information on all products and to access exclusive resources and time-saving tools. is an ISO 9001 Registered manufacturer of connectivity and technology parts. was founded in 1985 and has operations in the United States,。
如何实现电脑连接电视(VGA+音频)接法(图文)如何实现电脑连接电视以前的旧的CRT电视机可以通过AV端子或S端子连接到电脑上,但这种连接方法的效果很差,电脑上的文字几乎看不清,图像也不是很清晰,并且现在电脑显卡上的S端子也越来越少,所以我们不建议这种连接。
现在的液晶电视几乎都提供VGA接口和HDMI接口,用这两种接口连接电视,效果要好的多,几乎跟电脑显示器的清晰度差不多。
下面我们就从以下几个方面讲解,如何通过电视的VGA口将电脑连接到电视上。
1.电脑连接电视所需的接口及连接线2.电脑和电视之间长距离连接的解决方法(如书房或卧室电脑如何连接到客厅电视上)3.电脑连接电视后,电脑上的软件设置一、电脑连接电视所需的接口及连接线我们先来介绍一下,电视上需要的接口:VGA口和音频口,其中VGA口用来传电脑图像,音频口用来传电脑声音。
下图蓝色框中的梯形蓝色接口就是VGA口,一般会写有PC或电脑等字样。
下图VGA口左边的黄色框内的耳机接口,是用来连接电脑声音的,该接口一般会写有“PC输入”或“电脑输入”等字样。
有的电视的音频接口是莲花头形状的,这种音频接头在电视上很常见,就像下图中接头顶端是红圈和白圈的这种,一般红色是右声道,白色是左声道。
连接线,你需要准备VGA线和音频线,如下图:准备好了线材,就可以开始连接了,连接就很简单,如下图,用VGA线把电脑的VGA输出和电视的VGA输出接起来,并且用音频线把电脑声卡输出也接到电视的音频输入上。
具体的音频线接头根据你的电视来确定,可能是右上图所示,一头是耳机插头一头是莲花插头,也可能是如下图所示,两头都是耳机插头。
但是根据你电脑显卡的接口类型,你可能会碰到以下两种特别的情况需要注意:1、电脑只有一个VGA口,如某些板载显卡等。
这种情况下,一端接电视的VGA口,另一端接电脑的VGA口,把电视当显示器用,所有操作方法和原来在显示器上的操作方法相同,无需任何软件,也无需做任何设置。