皮艺新品Baxter意大利奢华时尚现代设-新建文件夹_6
- 格式:pptx
- 大小:2.11 MB
- 文档页数:20


ON CHAIR STATIONARY BASE MOBILE BASE FLOOR SITTERIN PUSH CHAIRSModel# Series77XXXXXX & 78XXXXXX UMSTS03-15LITSoft-Touch ™Sitter User ManualParts5 Ways To Use Your Special Tomato ® Sitter1 Sitter with 5-point harness2 Attachment strapsUSE UNIVERSAL ATTACHMENT STRAPS TO SECURE SITTER IN THE BELOW APPLICATIONSUNIVERSALThreading & ConnectionsHarness DiagramPelvic Harness InstallationCHEST STRAPS 5-POINT HARNESS3-POINT PELVIC HARNESS WAIST & CROTCH STRAPSATTACHMENT STRAPTO ATTACH TO A CHAIR, ETC.Harness InstalledSTEP 1CROTCH STRAP UP THROUGH BOTTOM CENTER SLOT.STEP 2RIGHT WAIST STRAP UP THROUGH RIGHT SLOT.STEP 3LEFT WAIST STRAP UP THROUGH LEFT SLOT.STEP 4CLIP BUCKLING.Chest Harness InstallationAttachment Strap InstallationSTEP 1UNCLIP RIGHT CHEST STRAP AND SLIDE STRAP THROUGH LEFT SHOULDER SLOT.STEP 2THREAD STRAPPING AROUND THE BACK AND OUT THE RIGHT SHOULDER SLOT.STEP 3CLIP TO THE TOP OF THE RIGHT SHOULDER CHEST HARNESS.STEP 4UNCLIP RIGHT LATERAL STRAP AND SLIDE STRAPTHROUGH LEFT WAIST SLOT.STEP 5THREAD STRAPPING UNDER THROUGH CROTCH LOOP AND UP AND OUT THE RIGHT SLOT.STEP 6REATTACH THE CHEST CLIP TO THE BOTTOM OF THE RIGHT SIDE OF THE CHEST HARNESS.STEP 1THREAD STRAP DOWNTHROUGH THE LEFT WAIST SLOT.STEP 2THREAD STRAP UNDERSITTER ON TOP OF LOOP ANDUP RIGHT WAIST SLOT.Attachment Straps & ApplicationsATTACH TO A CHAIRATTACH TO A SPECIAL TOMATO® WOODEN BASEATTACH TO A SPECIAL TOMATO® FLOOR BASE*BACK STRAPNOT NECCESSARY*POSITION SO THATBUCKLE IS ON SIDE ATTACH TO A SPECIAL TOMATO® JOGGER, EIO OR PUSH CHAIR*INSTALLEDProper Adjustment TechniquesSitter Harness FittingUSE THE SHOULDER COVERS TO PREVENT YOUR CHILD’S NECK AND FACE FROM RUBBING ON THE PLASTIC BUCKLES.TO ENSURE PROPER PLACEMENT OF THE CHESTHARNESS ON YOUR CHILD, MAKE SURE THE CHEST STRAP LAYS IN THE MIDDLE OF THE CHEST (NIPPLE LEVEL).THE PELVIC HARNESS HAS A CAM LOCK WHICH PREVENTS THE PELVIC BELT FROM LOOSENING TO MAINTAIN PROPER POSITIONING OF THE PELVIS.THE PELVIC BELT HAS ONE QUICK-RELEASE BUTTON THAT UNLOCKS BOTH SIDES OF THE PELVIC HARNESS FOR QUICK AND EASY ACCESS TO YOUR CHILD.ADJUST THE LENGTH OF THE CROTCH STRAP TO ALLOW THE PELVIC BELT TO LAY ACROSS THE PELVIS. THIS WILL PREVENT THE PELVIC BELT FROM LAYING ACROSS THE LOWER ABDOMEN.THE PELVIC BELT HAS A CAM LOCK TO KEEP IT AT THEDESIRED LENGTH. FOR GROWTH ADJUSTMENTS, PUSH UP ON WEBBING TO RELEASE THE CAM LOCK.25° Tilt PositioningALL BASES CAN TILT UP TO 25°• Always secure child in the restraint • Never leave child unattended • Always keep child in view • Secure straps tightly• Always be sure to lock casters and/or parking brakes when stationaryPrevent serious injury or death from falls or sliding out5 YEAR LIMITED WARRANTY:Special Tomato warrants to the original retail purchaser of the Soft-Touch Sitter product, that if any part or component proves defective in material or workmanship within five years of the purchase date, the defective part will be repaired or replaced (at Special Tomato’s discretion) free of charge. Warranty service may be performed by an authorized service center or at Special Tomato’s discretion.This warranty does not cover normal wear and tear, or damage caused by accident or misuse.To exercise this limited warranty, the user should first obtain a Return Authorization Number from Special Tomato.The product must be delivered with charges pre-paid (UPS recommended) to the factory or to an authorized service center, together with a copy of the original invoice, the Return Authorization Number and a written description of the problem.SITTER CARE:Special Tomato Products are impermeable to fluids, but do not submerge. Use a mild detergent/cleaner to wipe the chair periodically.To extend the life of the hook and loop strips, comb out the hook portion (hard side) to remove lint and other debris.HARNESS CARE:Place harness in a mesh bag and machine wash with cold water, then air dry.NOTICE:Use only Special Tomato accessories and parts on Special Tomato products. Special Tomato parts are not interchangeable with other manufacturers’ products. Replace any worn parts immediately for safety.STEP 1UNCLIP ATTACHMENT STRAPS.STEP 2ADJUST TO DESIRED ANGLE.STEP 3CLIP ATTACHMENT STRAPS TO SECURE.221,31,3。


sAve these instructionsfor future reference.Before returning to your retailer, our exceptional customer service is available.9 a.m. – 6 p.m., EST, Monday – FridayBefore beginning assembly, make sure all parts are present. Compare parts received with the “Parts List.” If any is missing or damaged, do NOT attempt to assemble the product. Please read and understand this entire manual before attempting to assemble, operate or install this product. If you have any questions regarding theDESCRIPTION QUANTITY2Top Support2Base Support21GEGEG EGEE GBALIMITED WARRANTYCustomers in the Conti guous USWith proof of purchase from an authorized retailer , t his product is warranted for a period of 1 year from original purchase date against defects in materials and workmanship under normal use. This warranty does NOT cover normal wear/weathering, exposure to water, freezing temperatures, oils, fluids, or chemicals OR use in a commercial context if the unit is not designated as a commercial model . At Balkene Home ’s sole discretion, products under warranty will be repaired and/or replaced at no charge to the customer. Returns sent back to Well Traveled Living must be sent via prepaid freight in the original retail packaging.For warranty service , contact Balkene Home at the address, phone numbers or website and email listed in this owner’s manual. Be sure to have your sales receipt, date of purchase and catalogue/model numbers available when calling. All warranty service will be coordinated by Balkene Home's Amelia Island, Florida service center. This warranty is extended only to the original owner. Proof of purchase will be required before warranty service isrendered. The sales receipt is the only valid proof of purchase. This warranty only covers failures due to defects in materials or workmanship which occur during normal use. Failures and/or damage which result from accident, negligence, misuse, abuse, neglect, mishandling, alteration or modification, failure to maintain, improper assembly or maintenance, service byunauthorized agency or use of unauthorized components or damage that is attributable to acts of God are NOT covered.This limited warranty gives you specific legal rights and you may also have other rights which vary from jurisdiction to jurisdiction. The provisions of the United Nations Convention on Contracts for the Sales of Goods shall not apply to this limited warranty or the sale of products covered by this limited warranty.•THERE ARE NO EXPRESS WARRANTIES EXCEPT AS LI STED .• PURCHASER ASSUMES ALL RISKS IN THE ASSEM BL Y AND OPERATION OF THIS UNIT .• FAILURE TO FOLLOW WARNINGS ANDOPERATIONA L INSTRUCTIONS CONTAINED IN THIS MANUA L CAN RESU L T IN SEVERE PROPERTY DAMAGE AND/OR PERSONA L INJURY .• IN NO EVENT WILL BALKENE HOME/WELLTRAVELED LIVING, OR ITS DIRECTORS, OFFICERS OR AGENTS B E LI A BL E TO THE PURCHASER OR ANY THIRD PARTY, WHETHER IN CONTRACT, IN TORT, OR ON ANY OTHER B ASIS, FOR ANY INDIRECT, SPECIA L , PUNITIVE, EXEMP L ARY,CONSEQUENTIA L , OR INCIDENTA L L OSS, COST, OR DAMAGE ARISING OUT OF OR INCONNECTION WITH THE SA L E, MAINTENANCE, USE, OR INA BILI TY TO USE THE PRODUCT, EVEN IF BALKENE HOME/WE L L T RAVE L ED L IVING OR ITS DIRECTORS, OFFICERS OR AGENTS HAVE B EEN ADVISED OF THE POSSI BIL ITY OF SUCH L OSSES, COSTS OR DAMAGES, OR IF SUCH L OSSES, COSTS, OR DAMAGES ARE FORESEEA BL E. IN NO EVENT WI LL BALKENE HOME/WELL TRAVELED L IVING, OR ITS OFFICERS, DIRECTORS, OR AGENTS BE L IA BL E FOR ANY DIRECT L OSSES, COSTS OR DAMAGES THAT EXCEED THE PURCHASE PRICE OF THE PRODUCT.• SOME JURISDICTIONS DO NOT ALLOW THEEXC L USION OR L IMITATION OF INCIDENTA L OR CONSEQUENTIA L DAMAGES, SO THE A B OVEL IMITATION OR EXC L USION MAY NOT APP L Y TO THE PURCHASER.Important NoticeDo NOT return to place of purchase —for customer service and warranty issues:C all toll-free E mail Li ve chat(866)985-78779 a.m. – 9 p.m., EST ************************* 9 a.m. - 6 p.m., EST , Monday - FridayDistributed by:Well Traveled Living716 S 8th Street, Amelia Island, FL 32034 *************************(866) 985-7877Fire Sense ®, Patio Sense,® Avalon Home,® M ojave Sun ®, Vulcan ®, Balkene Home ® and Well Traveled Living ® are registered trademarks of Well Traveled Imports, Inc ®. All assembly instruction presentations are the property of Well Traveled Imports, Inc.® and are protected byU.S. copyrights and trademarks. All rights reserved.E XTEND YOUR WARRANTYWhen you purchase a Fire Sense or Balkene Home product from any authorized retailer , you 'll have peace of mind in knowing that it comes with a one-year warranty. Extend your warranty for an additional year when you review your item at balkenehome .com within 365 days of purchase .。

Model NO: CPO-700Grill Top Pizza Oven KitCustomer Service Hotline1-866-994-6390DO NOT RETURN YOUR ITEM TO THE STORE Call our customer service department at 1-866-994-6390 from 9:00 am to 5:00 pm Eastern Time,OWNER’S MANUALASSEMBLY ANDOPERATING INSTRUCTIONSWarnings and UsageIMPORTANT: ALL INSTRUCTIONS AND SAFEGUARDS ON THIS SECTION MUST BE FOLLOWED TO PREVENT DAMAGE AND/OR INJURY. REMOVE ALL PACKAGING MATERIALS BEFORE FIRST USE. IMPORTANT SAFETY INFORMATIONOnly use your Grill Top Pizza Oven on a properly maintained, well ventilated outdoor grill with the lid fully opened at all times. All surfaces including grill grates, firebox and grease tray on grill must be cleaned prior to each use of the Grill Top Pizza Oven.Always wear heat resistant oven mitts or gloves designed for outdoor cooking when handling the Grill Top Pizza Oven.DO NOT touch the Grill Top Pizza Oven when it is on the grill, until it has completely cooled. The black metal housing can reach temperatures of 400˚F (200˚C) +/- during use.Do not turn on or preheat BBQ before placing the Grill Top Pizza Oven on the grill.Do not leave the Grill Top Pizza Oven unattended or allow unsupervised children nearby while the grill is on or coals are hot.Use only appropriate bake-ware or utensils while baking and cleaning your Grill Top Pizza Oven. Do not use plastic, silicone or glass.Do not allow food other than Pizza or Bread Dough to contact the stones. Any foods that contain fat, oil or butter (meats, items coated with olive oil, cookies, biscuits, etc.) should not contact the stones directly. These items should be baked in a metal baking pan, on a metal baking sheet or in a cast-iron skillet as the stones will absorb the fat, oil and butter which can cause smoking, odors, staining, and can impart rancid flavors to items that you bake in the future.Stones are fragile and can break if dropped. THE GRILL TOP PIZZA OVEN BOX BECOMES EXTREMELY HOT. DO NOT TOUCH THE STONES OR ANY OTHER PART OF THE GRILL TOP PIZZA OVEN BOX WHILE IT IS IN USE.To clean stones, heat the Grill Top Pizza Oven for 15 minutes after food is cooked and scrape off any remaining residue. Do not use any cleaning agents or other liquids to clean the stones.DO NOT REMOVE GRILL TOP PIZZA OVEN UNTIL COMPLETELY COOL.Allow at least 90 minutes after turning off grill to remove. If using a charcoal grilladditional cooling time may be required. Do not use water or other solvents toaid in cooling the Grill Top Pizza Oven after use.Do not place gasoline, alcohol, wood products, charcoal or any other combustible material in the baking chamber.Grill Top Pizza Oven must never be used indoors or for heating purposes.Whats in the boxStep 1•Open the lid on the grill that will be used with the Grill Top Pizza Oven.•Line up the hole on the wooden handle withthe hole on the edge of the pizza peel.•Put the washer onto the bolt and insert thebolt through the pizza peel from the bottomand then through the handle. Secure thescrew with the wooden knob by hand tight-ening.•For storage, loosen the knob enough so thehandle will rotate down over the peel, thenretighten the knob to secure.Step 2•Remove the grill grates from your grill and then remove the heat tents from over the gas burners.•If using on a pellet grill, remove the grease tray components from over the fire pot.•Replace grill grates.Step 3Step 4Step 5•With the grill lid completely open and proper spaces surrounding the Grill Top Pizza Oven,start your grill as instructed by the grill manufacturer.•For gas grills, set all burners to HIGH and preheat theGrill Top Pizza Oven for approximately 20 minutes. Forpellet grills, set the grill to highest temperature settingand preheat for 20 minutes.•Place the Grill Top Pizza Oven on the cooking grate of the grill, leaving at least a 0.5” spacebetween the front edge of the Grill Top Pizza Oven and the front edge of the cooking grate of the grill and at least 1” of space between both side edges of the Grill Top Pizza OvenStep 1Step 2•Open/remove the lid and all ventson the grill that will be used with theGrill Top Pizza Oven.•Heat 75-100 charcoal briquettes as recommendedby grill manufacturer. Increasing or decreasing theamount of charcoal briquettes will affect baking tem-peratures and baking times.•Using barbecue mitts AND long tongs or spatulaspread the hot briquettes on the charcoal grate,under the area the Grill Top Pizza Oven will sit. Placemore briquettes around the outer perimeter, allow-ing more heat to flow into the vent at the rear of thebaking chamber and up the sides to evenly heat theside and top stones.Step 3•Using barbecue mitts, place the Grill Top Pizza Oven on the cooking grate of the grill.•Let the Grill Top Pizza Oven cool completely before removing from grill.•Do not use household cleaners or liquids on stones or any other parts inside the Grill Top Pizza Oven.•Do not use household cleaners on metal housing.•Wipe outer housing with a soft damp cloth only when completely cooled.•After baking your final pizza, you can clean the Grill Top Pizza Oven by letting the burn-ers remain on high for approx 15 minutes. Any residue should burn off and debris can be pushed to the back of the oven.•Darkening of the stone from ingredients or excess flour will occur over time and will not af-fect baking performance of the Grill Top Pizza Oven.•Why is my Grill Top Pizza Oven not getting hot enough?If your Grill Top Pizza Oven does not reach the proper baking temperature, your grill may utilize extra heat tents or Flavorizer® bars. These components sit between the cooking grate and the burners and deflect the heat from the burners downward. Once your grill has completely cooled, remove these pieces and try again. If you have an infrared grill, you will need to remove the heat emitters that sits between the cooking grate and burners as these will block the heat from reaching the Grill Top Pizza Oven.•Can I close the lid of my grill while using the Grill Top Pizza Oven?We advise you to keep the lid of your grill in the fully opened position while using the Grill Top Pizza Oven in order to protect you and your grill. If you fully or partially close your grill lid while using the Grill Top Pizza Oven, it may cause components of your grill to overheat which may result in damage to your grill and/or bodily injury should you touch theoverheated compo-nents.•How do I clean the Grill Top Pizza Oven?To clean the stone, let the burners remain on high for approximately 15 minutes. Theremain-ing residue should burn off or can be scraped off and pushed to the back of the oven by using a long handled cleaning brush. Do not use any cleaning agents or other liquids to clean the stone. Once the oven has cooled completely, a damp cloth can be used to wipe off any char left in the oven. The stone will remain blackened and/or darkened which is natural.If this does not clean the stone to your satisfaction, you can also remove the SupportBrackets and flip the Base Stone over (horizontally) and replace the Support Brackets. This will give you a clean Base Stone to use and the next time you use the Grill Top Pizza Oven, any remaining residue will burn off.Warranty InformationT his warranty covers defects in parts and workmanship for a period of 1 year from theoriginal purchase date. Any damage claim regarding the enameling must be submittedwithin 30 days of purchase to be covered by the warranty.The following conditions are NOT covered by this warranty:•Unevenness and color variations in the enamel coating.•Damage caused by improper assembly or disregard of the manual.•Use of spare parts not supplied by manufacturer.•Damage resulting from modifications or inappropriate use.•Abuse of the item•Damage caused by improper maintenance or repairs by an unauthorized person.•T he Pizza Stone is covered for a period of 1 Year against defects in manufacture.Warranty does not include impact breaks, staining or discoloration.Limitations and Exclusions:1.This warranty applies only to the original purchaser and may not be transferred.2.If you can not verify the purchase date of the item the warranty period will begin on thedate the item was manufactured.3.Replacement or repair parts are warranted for the remaining period of the original partwarranty.。
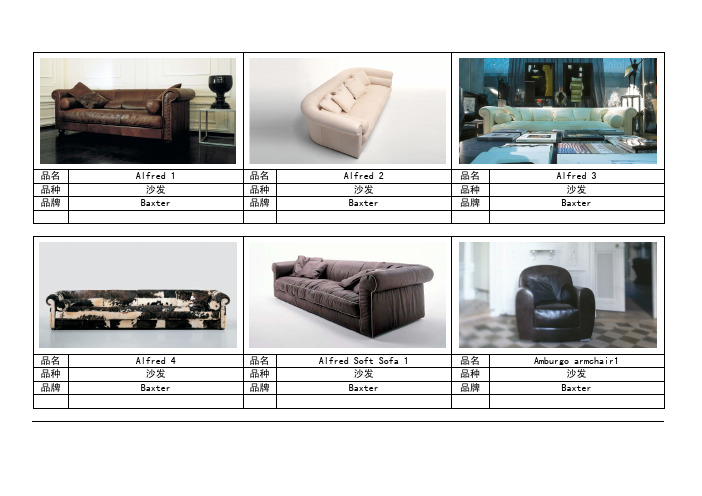
品名 Alfred 1 品名Alfred 2 品名 Alfred 3 品种 沙发 品种沙发 品种 沙发 品牌 Baxter 品牌Baxter 品牌 Baxter品名 Alfred 4 品名Alfred Soft Sofa 1品名 Amburgo armchair1品种 沙发 品种沙发 品种 沙发 品牌 Baxter 品牌Baxter 品牌 Baxter品名 Amburgo armchair2品名Amburgo armchair 3品名 Baby Graz pouf品种 沙发 品种沙发 品种 沙发 品牌 Baxter 品牌Baxter 品牌 Baxter品名 Baby Graz smooth pouf品名Baby Graz smooth stone pouf品名 Baby Graz smooth stone pouf 2品种 沙发 品种沙发 品种 沙发 品牌 Baxter 品牌Baxter 品牌 Baxter品名 Baby Vienna pouf品名Bergere armchair 1品名 Bergere armchair 2品种 沙发 品种沙发 品种 沙发 品牌 Baxter 品牌Baxter 品牌 Baxter品名 Bergere longe armchair 1品名Bergere longe armchair 2品名 Bergere longe sofa品种 沙发 品种沙发 品种 沙发 品牌 Baxter 品牌Baxter 品牌 Baxter品名 Bergere longe sofa 2 品名Bergere sofa 品名 Berlino armchair 品种 沙发 品种沙发 品种 沙发品牌 Baxter 品牌Baxter 品牌 Baxter品名 BOSTON sofa 1 品名BUDAPEST sofa 1 品名 BUDAPEST sofa 2 品种 沙发 品种沙发 品种 沙发品牌 Baxter 品牌Baxter 品牌 Baxter品名 BUDAPEST sofa 3 品名BUDAPEST sofa 4 品名 Budapest Dormeuse 1 品种 沙发 品种沙发 品种 沙发品牌 Baxter 品牌Baxter 品牌 Baxter品名 Budapest Dormeuse 2 品名Budapest soft sofa 1 品名 Budapest soft sofa 2 品种 沙发 品种沙发 品种 沙发品牌 Baxter 品牌Baxter 品牌 Baxter品名 Casper sofa品名Charlotte armchair品名 Charlotte Dormeuse armchair 1品种 沙发 品种沙发 品种 沙发 品牌 Baxter 品牌Baxter 品牌 Baxter品名 Charlotte Dormeuse armchair 2品名Charlotte Longe armchair 1品名 Charlotte Longe armchair 2品种 沙发 品种沙发 品种 沙发 品牌 Baxter 品牌Baxter 品牌 Baxter品名 Charlotte LX armchair 2 品名Charme sofa 品名 Charmine armchair 1 品种 沙发 品种沙发 品种 沙发品牌 Baxter 品牌Baxter 品牌 Baxter品名 Charmine longe armchair 1 品名Charmine longe armchair 2 品名 Charmine longe Dormeuse armchair 品种 沙发 品种沙发 品种 沙发品牌 Baxter 品牌Baxter 品牌 Baxter品名 Charmine longe Dormeuse armchair 2品名Chassis armchair 1 品名 Chester moon sofa 品种 沙发 品种沙发 品种 沙发品牌 Baxter 品牌Baxter 品牌 Baxter品名 DallT armchair 品名Decor small sofa 品名 Desdemona armchair 品种 沙发 品种沙发 品种 扶手椅品牌 Baxter 品牌Baxter 品牌 Baxter品名 Diana Chester armchair品名DIANA Chester sofa品名 Diner armchair 1品种 沙发 品种沙发 品种 沙发 品牌 Baxter 品牌Baxter 品牌 Baxter品名 Dominique sofa 1品名Dominique sofa 2品名 Dublino armchair品种 沙发 品种沙发 品种 沙发 品牌 Baxter 品牌Baxter 品牌 Baxter品名 Dublino sofa品名Etienne armchair品名 Etienne armchair 2品种 沙发 品种沙发 品种 沙发 品牌 Baxter 品牌Baxter 品牌 Baxter品名 Etienne Bergere revolving armchair 1品名Freud Dormeuse 1品名 Hamilton sofa 2品种 沙发 品种沙发 品种 沙发 品牌 Baxter 品牌Baxter 品牌 Baxter品名 Hard & soft sofa 品名Helen armchair 品名 Housse armchair 品种 沙发 品种沙发 品种 沙发品牌 Baxter 品牌Baxter 品牌 Baxter品名 Housse armchair 品名Housse giano sofa 1 品名 Housse giano sofa 2 品种 沙发 品种沙发 品种 沙发品牌 Baxter 品牌Baxter 品牌 Baxter品名 Housse Mono sofa 2品名Housse ottoman pouf 1品名 Housse ottoman pouf 2品种 沙发 品种脚蹬 品种 脚蹬 品牌 Baxter 品牌Baxter 品牌 Baxter品名 Housse sofa品名HOUSSE XXL sofa品名 Istanbul pouf品种 沙发 品种沙发 品种 脚蹬 品牌 Baxter 品牌Baxter 品牌 Baxter品名 Joyce angular 1 品名Joyce sofa 1 品名 Linea Dormeuse 品种 沙发 品种沙发 品种 贵妃榻品牌 Baxter 品牌Baxter 品牌 Baxter品名 Punto pouf 品名Lola armchair 品名 Lucre Zia sofa 1 品种 脚蹬 品种沙发 品种 沙发品牌 Baxter 品牌Baxter 品牌 Baxter品名 Mickey armchair品名Mickey Extra armchair品名 Mickey Extra sofa品种 沙发 品种沙发 品种 沙发 品牌 Baxter 品牌Baxter 品牌 Baxter品名 Mickey sofa品名Monaco armchair 1品名 Monaco armchair 2品种 沙发 品种沙发 品种 沙发 品牌 Baxter 品牌Baxter 品牌 Baxter品名 Monaco Baby sofa 1 品名Monaco bench 品名 Monaco sofa 1品种 沙发 品种长凳 品种 沙发品牌 Baxter 品牌Baxter 品牌 Baxter品名 Namilton sofa 1 品名Oxford sofa 品名 Oxfordine armchair 1 品种 沙发 品种沙发 品种 沙发品牌 Baxter 品牌Baxter 品牌 Baxter品名 Paloma armchair 1品名Pochette armchair 1品名 Pochette armchair 2品种 沙发 品种沙发 品种 沙发 品牌 Baxter 品牌Baxter 品牌 Baxter品名 Regent sofa品名Relax pouf 品名 Relax pouf 2品种 沙发 品种方凳 品种 方凳 品牌 Baxter 品牌Baxter 品牌 Baxter品名 Rocking Housse 1品名Sellerina aluminium armchair 1品名 Sellerina armchair品种 沙发 品种沙发 品种 沙发 品牌 Baxter 品牌Baxter 品牌 Baxter品名 Sellerina XL armchair品名Summer Large pouf品名 Tommy sofa 品种 沙发 品种沙发 品种 沙发 品牌 Baxter 品牌Baxter 品牌 Baxter品名 Vienna armchair 品名Vincent angular 品名 Vincent sofa品种 沙发 品种沙发 品种 沙发品牌 Baxter 品牌Baxter 品牌 Baxter品名 Winter pouf 品名Summer Arms chair 品名 Summer Arms Cuoio chair 1 品种 矮凳 品种沙发 品种 沙发品牌 Baxter 品牌Baxter 品牌 Baxter品名 Summer Legs chair品名Amburgo armchair 3品名 Baby Graz pouf Atollo品种 沙发 品种沙发 品种 沙发 品牌 Baxter 品牌Baxter 品牌 Baxter品名 Cairo small table品名Cairo small table 2品名 Cassandra consolle品种 茶几 品种茶几 品种 茶几 品牌 Baxter 品牌Baxter 品牌 Baxter品名 Cassandra small table 品名Chantal consolle 品名 Metal Cube small table 品种 茶几 品种茶几 品种 茶几品牌 Baxter 品牌Baxter 品牌 Baxter品名 Mumbai small table 品名Mumbai small table 2 品名 Paul small table品种 茶几 品种茶几 品种 茶几品牌 Baxter 品牌Baxter 品牌 Baxter品名 Sfera Armillare small table 品名Slice Benao small table 品名 Trinity small table 品种 茶几 品种茶几 品种 茶几品牌 Baxter 品牌Baxter 品牌 Baxter品名 Turtle small table品种 茶几品牌 Baxter品名 Cassandra table 品名Flat table 品名 Galbés table 品种 餐桌 品种餐桌 品种 餐桌品牌 Baxter 品牌Baxter 品牌 Baxter品名 Gilbert table 1 品名Gilbert table 2 品名 Gilbert table3 品种 餐桌 品种餐桌 品种 餐桌品牌 Baxter 品牌Baxter 品牌 Baxter品名 Liszt table 品名Morfeo table 品名 Mozart table 品种 餐桌 品种餐桌 品种 餐桌品牌 Baxter 品牌Baxter 品牌 Baxter品名 Venus table品种 餐桌品牌 Baxter品名 Decor armchair品名Gambretta chair品名 Graz chair 品种 餐椅 品种餐椅 品种 餐椅 品牌 Baxter 品牌Baxter 品牌 Baxter品名 Levante chair品名Limetta chair品名 Oslo chair 品种 沙发 品种沙发 品种 沙发 品牌 Baxter 品牌Baxter 品牌 Baxter品名 Paloma chair品种 沙发 品牌 Baxter品名 Alouette mirror品名Tassel mirror品名 MAJESTIC mirror品种 镜子 品种镜子 品种 镜子 品牌 Baxter 品牌Baxter 品牌 Baxter品名 Babele metal bookcase品名Borges metal bookcase品名 Borges XL libreria品种 书架 品种书架 品种 书架 品牌 Baxter 品牌Baxter 品牌 Baxter品名 Cube low and Cube high bookcase 1品名Cube low and Cube high bookcase 2品种 书橱 品种书橱 品牌 Baxter 品牌Baxter品名 Frida storage unit 品名Leopold high cabinet 品名 Maxime high cabinet 品种 柜子 品种柜子 品种 柜子品牌 Baxter 品牌Baxter 品牌 Baxter品名 Maxime low cabinet 品名Pandora storage unit 品名 Baby Graz pouf Atollo 品种 柜子 品种柜子 品种 柜子品牌 Baxter 品牌Baxter 品牌 Baxter品名 Mr Clark desk品名Triniy desk品种 书桌 品种书桌 品牌 Baxter 品牌Baxter品名 Alfred bed品名Bill bed 品名 Bookcase bed品种 床 品种床 品种 床 品牌 Baxter 品牌Baxter 品牌 Baxter品名 Budapest bed品名Casper high 1品名 Casper high 2品种 床 品种床 品种 床 品牌 Baxter 品牌Baxter 品牌 Baxter品名 Ginevra bed 1品名Ginevra bed 2品名 Hugo bed 1品种 床 品种床 品种 床 品牌 Baxter 品牌Baxter 品牌 Baxter品名 Nicolas bed 1 品名Nicolas bed 2 品名 Rachel bed 1 品种 床 品种床 品种 床品牌 Baxter 品牌Baxter 品牌 Baxter品名 Rachel bed 2 品名Simons bed 1 品名 Simons bed 2 品种 床 品种床 品种 床品牌 Baxter 品牌Baxter 品牌 Baxter品名 Trevor bed 1 品名Trevor bed 2 品名 Baby Graz pouf Atollo 品种 床 品种床 品种 床 品牌 Baxter 品牌Baxter 品牌 Baxter。
MERCER COLLECTION FURNITURE GUIDEMercer’s polished-nickel frame was inspired by the luxe furnishings of the 1930s.Designed to coordinate with other items from the collection, each Mercer table, chair, bed or fireplace accent features a clean-lined metal frame alongside airy glass, natural marble or soft upholstery.THIS COLLECTION FEATURES:• Metal frams is engineered for superior strength, then plated nickel, polished to a high shine and lacquered to preserve its finish.• Available in a range of sizes to fit any space.• Designated items designed in-house by Williams Sonoma.• Chairs available in signature Tuscan leather; tables available with tempered glass or Italian marble tops; beds available in taupe leather or white linen upholstery.MERCER COLLECTIONFURNITURE GUIDE• Platform Clearance: 4”• Leg Height: 4”• Number of Support Slats: 5• Headboard: 60.75” x 90.5” x 2”• Platform: 83” x 64” x 90.5”• Platform Clearance: 4”• Leg Height: 4”• Number of Support Slats: 5• Platform Clearance: 4”• Leg Height: 4”• Number of Support Slats: 5• Headboard: 77.5” x 90.5” x 2”• Platform: 83” x 80.5” x 90.5”• Platform Clearance: 4”• Leg Height: 4”• Number of Support Slats: 5TALL BED, KINGDINING TABLE, LARGETALL BED. QUEENDINING TABLE, MEDIUM• Width: 60”• Depth: 36”• Height: 30”• Top: 72” x 44” x 1/2”• Base: 48.3” x 30” x 29 1/2”• Clearance: 29.5”• Leg Distance: Front 34” Side 30”• Overhang: Ends 5.85” Sides 3”• Weight: 200 lb • Width: 72”• Depth: 44”• Height: 30”• Top: 72” x 44” x 1/2”• Base: 48.3” x 30” x 29 1/2”• Clearance: 29.5”• Leg Distance: Front 42” Side 30”• Overhang: Ends 11.85” Sides 7”• Weight: 220 lbSIDE TABLEDINING ARM CHAIRROUND DINING TABLECOFFEE TABLE• Height: 30”• Top: 80” x 44” x 1/2”• Base: 448.3” x 30” x 29 1/2”• Clearance: 29.5”• Weight: 260 lb • Height: 30”• Clearance: 29.5”• Weight: 220 lb• Width: 53”• Depth: 53”• Height: 30”• Top: 52” diam. .75” thick • Base: 34” diam., 30”• Clearance: 29.5”• Leg Distance: Front 17” Side 17”• Overhang: 4.75” • Weight: 180 lb • Width: 19”• Depth: 19”• Height: 25”• Top: .5” thick • Overhang: 23.5” • Clearance: 24.5”• Leg Distance: Front 15” Side 15”• Weight Capacity: 110 lb• Weight: 22 lb. 12 oz• Width: 41.5”• Depth: 41.5”• Height: 17.25”• Top: 41.5” diam., .75 thick • Base: 42” x 42” x 16.5”H • Leg Distance: 38”• Weight Capacity: 200 lb • Weight: 150 lb• Width: 20.25”• Depth: 19”• Height: 36”• Seat Height: 20”• Seat Depth: 19”• Seat Width: 20.25”• Seat Back Height: 17”• Legs: 2”W x 14.4”H• Leg Distance: Front 22.8” Side 20”• Weight Capacity: 300 lb • Weight: 37.47 lbDINING COUNTER STOOLDINING BAR STOOL • Width: 18.5”• Depth: 26”• Height: 35.75”• Seat Height: 24”• Seat Depth: 18.5”• Seat Width: 18.5”• Seat Back Height: 13”• Legs: 2”W x 18.6”H• Leg Distance: Front 23.8” Side 13.8”• Weight Capacity: 300 lb• Weight: 37.91 lb• Width: 18.5”• Depth: 26”• Height: 41.75”• Seat Height: 30”• Seat Depth: 18.5”• Seat Width: 18.5”• Seat Back Height: 13”• Legs: 2”W x 24.6”H• Leg Distance: Front 23.75” Side 13.75”• Weight Capacity: 300 lb• Weight: 35.71 lbDINING SIDE CHAIR • Width: 20”• Depth: 26”• Height: 36”• Seat Height: 20”• Seat Depth: 19”• Seat Width: 20.25”• Seat Back Height: 17”• Legs: 2”W x 14.4”H • Leg Distance: Front 22.8” Side 16”• Weight Capacity: 300 lb• Weight: 31.52 lb。
Installation GuidePionite Decorative Surfaces | One Pionite Road, Auburn, Maine 04210 | 1.800.PIONITE (746-6483) | A Subsidiary of Panolam® Surface SystemsSMPBRO00-012 6/14Pionite decorative laminates are designed for finished interior surfaces which require high impact, wear and stain resistance and minimal maintenance. Pionite laminate is available in a wide variety of colors, patterns and surface finishes.This guide in designed to provide any do-it-yourself enthusiast with the information necessary to perform two types of laminate installation: the installation of a ready-made postformed Pionite countertop and the application of laminate sheets to a prepared substrate.Do it yourselfInstalling Pionite laminate can be a very rewarding job, and you don’t need years of woodworking experience to do it yourself. If you read this complete guide before you begin your project, and ask your Pionite dealer any questions you may have in advance, you can achieve professional looking results.One of the most important steps in the laminate installation process is to accurately measure the area that will be surfaced. This step is critical, so if you do not feel comfortable taking these measurements yourself, ask your local Pionite dealer for proper measurement techniques.InSTAllATIOn TOOlS• Measuring tape • Coarse and fine file • Level• Square • Scriber’s compass • Rubber mallet or hammer• Keyhole saw • Hand saw (10–12 teeth) • Contact cement• Paint brush • 30 grit sandpaper • Drill• Wood screws • Latex caulk • Carpenter’s glue• Masking tape • J Roller • Wrench for miter bolts• Miter bolts (supplied with postformed tops)OPTIOnAl TOOlS• Belt sander • Block plane • High speed router with carbide bits• Sabre saw • Saw horses • Circular saw with laminate bladeIf you will be removing a sink or range you will need additional tools todisconnect electrical and plumbing connections.INSTALLATION OFREADY-MADE POSTFORMED COUNTERTOPSRemoval of existing countertopIf you are replacing an existing countertop, now is the time to remove it. You may want to use your existing sink or range cutout as a template on the new top so take care in its removal. The following steps will guide you through removal of your old countertop. Caution:Safety glasses and gloves should be worn during this process and are recommended throughout the installation process.1. Be sure that the water, gas, electricity and any other utilities in your immediate work area are turned off before you beginyour work.2. Disconnect the water supply and drain from the sink.3. Remove the sink fasteners that hold the sink to the countertop and lift the sink from the cutout.4. If a range top is present, disconnect the electrical service, loosen any fasteners and remove the range from the cutout.5. Remove all fasteners that hold the countertop to the cabinet supports.6. lift the old countertop off the cabinets and save any cutouts to use as a template on the new countertop.Cutting to lengthIf your new top has already been cut to length and provided with the necessary cutouts for your installation, you may skip ahead to the next section. (Note: Countertops requiring miter joints, should be ordered with the pre-cut miters.) If you purchased your countertop in a standard length, however, and need to cut it for your application, follow these steps.1. To assure proper fit and verify squareness, measure the required length of your countertop, both at front and back sides.2. Use a square and tape measure to mark the cut line on the countertop. If you are using a hand saw, mark the cut line onthe decorative side of the countertop. If you are using a circular saw, mark the cut line on the back of the countertop.3. If cutting with a hand saw, cut from the decorative side and apply forceOnlY on the down stroke to create a clean, chip free cut.4. If cutting with a circular saw, cut from the back of the countertop. Don’t force the saw,maintain a high blade speed. To protect the decorative surface during fabrication, lay thenew top face down on a blanket, piece of cardboard, or other protective material.Bottom of CountertopTop of Countertop5. To minimize the development of cracks in the surface, smooth the cut edge with a file or sanding block.Place the countertop so the decorative surface is on top. File or sand the cut edge in the downwarddirection. DO nOT file or sand toward the decorative surface as this may cause chipping.Making cutoutsTip: Double check all measurements before you actually begin making cutouts.1. If you need to make a sink or range cutout, use your measurements or the old top as a template to markthe cut lines on the new top. If you are cutting with a hand saw, mark the cut line on the decorative sideof the countertop. If you are using a sabre saw, mark the cut line on the back of the countertop.2. Drill a hole inside the cut line in each corner of the cutout.3. If cutting with a key hole saw, cut from the decorative side and apply forceOnlY on the down stroke to create a clean, chip-free cut.4. If cutting with a circular saw, cut from the back of the countertop. Don’t force the saw, maintain a high blade speed.5. To minimize the development of cracks, finish the cut edge with a file or sandpaper. Place the countertop so thedecorative surface is on top. File or sand the cut edge in the downward direction, DO nOT file or sand toward thedecorative surface as this may cause chipping. To avoid stress cracks be sure to round all inside corners of your cutouts.6. In sink cutouts, seal the edges of the substrate with adhesive or polyurethane to provide an extra moisture minate SurfaceSubstrateInstalling end capsIf the end of your countertop will be butted up to a wall, end cap installation is not required. If the end of the countertop is exposed, however, now is the time to install the end cap. An end cap is a shaped piece of Pionite laminate made of the same design as your countertop. Installing end caps requires the use of contact cement. Contact cement is easy to use and forms a strong bond. For best bonding results, follow the manufacturer’s instructions on the container label.1. Cut a piece of wood to fill in the end of the countertop so it is the same thickness from front to back.ContactAdhesive2. Use a paint brush to apply contact cement to the end of the countertop and the back of the end cap.A second coat of cement should be applied to the countertop end after the first coat has dried.3. When the contact cement is dry, carefully position the cap on the end of the countertop.(Note:Once the end cap is joined to the countertop it cannot be repositioned.)4. Roll the entire end cap with a J roller or tap with a rubber mallet to ensure a strong bond.5. If necessary, finish the edges of the end cap with a file or sandpaper. Rememberto file or sand in the direction that minimizes chipping.Mitered cornersIf your countertop is U or l-shaped, you will need to connect pre-cut miter joints.(Note: Miter joints cannot be cut with a circular saw. Countertops requiring miter joints should be ordered with pre-cut miters.)1. Position the countertop sections upside down on saw horses usinga blanket or cardboard to protect the decorative surface.2. Apply carpenter’s glue or white glue to the inside edges of the miter joints.3. Butt the two pieces together and begin tightening the miter bolts that were supplied with your countertop.Bottom of Countertop4. As the bolts are tightened, be sure to constantly check the alignment on the decorativeside of the two pieces to ensure they are flush and level to each other.5. When the bolts have been tightened, drive a few small nails from one backsplash into another.Be sure the nails are directed away from the decorative surface so as not to break through.6. Repeat these steps for any other mitered corners.Assuring proper clearanceBefore you place your assembled countertop on the cabinets, be sure that you have enough clearance between the bottom edge of the countertop and any drawers, doors or appliances. If necessary, shim the countertop with strips of wood to raise it off the cabinets slightly.HOW TO SHIM YOUR COUnTERTOP1. Cut the shims to the appropriate width needed to achieve adequate clearance.2. Shims can be screwed or nailed along the edges of the countertop and along anycutouts and mitered joints. Make sure nails and screws are short enough so that theywill not penetrate the laminate.3. Shims should be no more than two feet apart.Positioning your countertopYou may need someone to help you pick up your assembled Pionite countertop and place it on your cabinets. Check the fit again for drawer or appliance clearance. Make sure there are no obstructions under the sink or range cutouts. Check the fit of the backsplash against the wall. If there is a tight fit between the backsplash and the wall, you can proceed to the next section for directions on how to fasten your countertop to the cabinets. If you have varying gaps between the backsplash and the wall, however, you may want to scribe the backsplash to get a better fit.SCRIBIng YOUR BACkSPlASH1. Pull the countertop approximately ¼” away from the wall and position it parallel with the cabinets.2. Place a piece of masking tape along the top edge of the backsplash.3. Take the scriber’s compass and adjust it so it is spread as wide as thelargest gap between the backsplash and the countertop.4. With the compass fixed, run the point along the wall and the pencil along thebacksplash. The pencil should leave a mark on top of the backsplash.WallCountertop5. Use a belt sander or block plane to remove the area of the backsplash that is outside the pencil mark.6. Slide the countertop back against the wall and check the fit. Repeat steps 1 through 5 if necessary.Finishing touchesIt is now time to fasten the countertop to the cabinets. Use short wood screws that will not penetrate the laminate. For added support use washers on every screw.1. Screw through the cabinet structure into the bottom of the countertop.2. If necessary, replace the sink and range in the reverse order that they were removed.Apply caulking or plumbers putty around the sink cutout for a tight seal.3. Reconnect all plumbing and drain fixtures.4. Reconnect all electrical fixtures.5. Have utilities turned on and checked for proper operation.6. Seal the seam between the wall and backsplash with caulking for a clean appearance.Stand back and take a look at your handiwork! Your new Pionite countertop is ready to provide years of service!APPLYING PIONITE TO A PREPARED SUBSTRATETaking accurate measurementsMeasure the entire area you will be covering with laminate to determine the laminate size that will produce the fewest seams and provide the best yield. Consider whether or not the pattern you are applying is directional (e.g. woodgrain). In your measurements be sure to include all ends and edges and allow for cut and trim waste.Preparing your surfacelaminate should be applied to a suitable substrate such as particleboard or medium densityfiberboard (MDF). Concrete, gypsum and sheet rock are not recommended substrates for laminate application.Proper conditioning of the laminate and substrate is recommended to prevent possible warping, shrinking or expansion of assembled panels. Ideally, all components should be conditioned at 70°F to 75°F (21°C to 25°C) and 45 to 50 percent relative humidity for 48 hours prior to assembly.If possible, remove any paint, varnish or other surface covering from the substrate prior to applying laminate. For best results, new substrate is recommended.All screws and nails should be secure and sunk into the substrate. Fill nail and screw holes with wood fill and sand flush. Vacuum or wipe the substrate to ensure it is dust free. If you need to remove any range tops or sinks, refer to the “Removal of Existing Countertop” procedure in the “Installation of Ready-Made Postformed Countertops” section of this guide.Cutting to length1. Your Pionite laminate should be cut approximately ¼” wider and longer than you need. The finish cut ismade after the sheet is installed. For best cutting results, run masking tape along the desired cut mark.2. Use a square and tape measure to mark the cut line on the countertop. If you are using a hand saw, mark the cut line onthe decorative side of the countertop. If you are using a circular saw, mark the cut line on the back of the countertop.3. Make sure the sheet is adequately supported when cutting.4. If cutting with a hand saw, cut from the decorative side and apply forceOnlY on the down stroke to create a clean, chip free cut.5. If cutting with a circular saw, cut from the back of the sheet. Don’t force the saw,maintain a high blade speed.Bottom of LaminateTop of Laminate6. If you need to cut narrow strips of Pionite laminate for edgebanding, a table saw can be used. For bestresults, use a fine-tooth, carbide-tipped blade and cut the laminate with the decorative face up.Adhering the laminateFor a neat appearance adhere laminate to all substrate edges and ends before applying the top sheet. This method also prevents water or dirt from building up in the seams of the edges. Contact cement adhesive is recommended for this step because it is easy to use and forms a strong bond. For best bonding results, follow the manufacturer’s instructions on the container label.There are several techniques that can help you correctly position your Pionite laminate before it is permanently placed. Small wood strips or old venetian blinds can be placed between the substrate and the laminate, allowing the laminate to be properly positioned before application. When the laminate is properly positioned the strips can be removed one by one.1. Apply contact cement to the edges and ends of the substrate using a paint brush or solvent-resistant roller.For a good bond, apply a second coat of cement to the substrate after the first coat has dried. Caution:Be sure to follow the manufacturer’s instructions found on the cement container label. Some cements aflammable and should not be used near on open flame. Do not smoke while using contact cement.2. Apply cement to the back of the laminate. Be sure all edges are adequately coveredwith cement to prevent the laminate from lifting up at the corners.3. When the substrate and laminate surfaces are dry, they can be joined together. (Note: Be surethe contact cement is completely dry. Some water-based cements take longer to dry in cool, dampenvironments.) Take your time and position the laminate before joining it to the substrate.4. Finish the edges of the piece you just installed, making sure it is flush with all surfaces. Edges can befinished with a file or sandpaper. File or sand the edge in a motion from the decorative surface to thesubstrate. (Do nOT file or sand toward the decorative surface as chipping may occur). This will providea smooth edge on the laminate and eliminate the chance of cracks forming from the saw cut.5. Apply cement to the substrate and back side of the laminate top. Again, for best bondstrength, apply two coats of cement to the substrate. Make sure there is adequatecement coverage on the laminate edges to prevent corners from lifting up.6. When cement is dry, lay several separator strips of wood or blinds on the top.(Note: It is imperative that the adhesive is completely dry, especially when gluinglarge surfaces. For best results, do not try to rush this step.)7. Position the laminate on the surface. Remove the center separator strip anduse a J roller or rubber mallet to create a strong bond.8. Work from the middle out, removing the separator strips one at a time and forming a strong bond.Finishing touchesAll you have left to do is to finish the edges of the laminate and make any necessary range or sink cutouts.1. Trim laminate overhang with a file, sandpaper or router. Be sure not to damage the laminate on theedges and ends. All saw cuts should be finished to prevent cracks developing from a rough cut.Laminate SurfaceSubstrate2. Cutouts can be made with a sabre saw or router. All inside corners should be rounded.3. If necessary replace the sink and range in the reverse order that they were removed.Apply caulking or plumbers putty around the sink cutout for a tight seal.4. Reconnect all plumbing and drain fixtures.5. Reconnect all electrical fixtures.6. Have utilities turned on and checked for proper operation.Stand back and take a look at your handiwork! Your new Pionite countertop is ready to provide years of service!。
Product PictureShaver series 5000SteelPrecision bladesPower Adapt sensor360-D Flexing headsIntegrated pop-up trimmerS5579/71Powerful shave, gentle on skinwith SkinIQ T echnologyThe Philips Series 5000 delivers a powerful shave, cutting now even more hair per stroke*. Equipped with advanced SkinIQ technology, the shaver senses and adapts to your hair density, for improved skin comfort.A powerful shaveMore cutting performance in every strokeFollows the contours of your faceGuides hair into the optimal cutting positionSkinIQ technologyA shaver with the power to tame beardsFor a convenient shavePowerful cleaning pod for maintenance and hygieneChoose a convenient dry or refreshing wet shaveEven-up your mustache and sideburns60 minutes of shaving from a 1-hour chargeFully charged in one hourThe electric shaver with an Eco passportA more intuitive shaving experienceWet & Dry electric shaver S5579/71 Highlights SpecificationsSteelPrecision bladesPowerful yet gentle, the 45 self-sharpening SteelPrecision blades on this Philips shaver complete up to 90,000 cutting actions per minute, cutting more hair per stroke** for a clean, comfortable finish.Power Adapt sensorThe electric shaver has intelligent facial-hair sensor that reads hair density 125 times per second. The technology auto-adapts cutting power for an effortless and gentle shave.360-D Flexing headsDesigned to follow the contours of your face, this Philips electric shaver has fully flexible heads that turn 360° for a thorough and comfortable shave.Hair-Guide precision headsThis new shape precision shaver is enhanced with hair guiding channels for optimal cutting and skin comfort.Cable-free Quick Clean Pod10x more effective than cleaning with water**, the powerful cleaning pod thoroughly cleans and lubricates your shaver in just 1 minute. Using it helps maintain shaver performance and increase hygiene.Shave wet or dryA wet and dry shaver that adapts to yourpreference. Choose a convenient dry shave, orpair with your favourite foam or gel for arefreshing wet shave.Pop-up trimmerRefine and define your mustache andsideburns with the pop-up trimmer—andcomplete your look with ease.60 minutes of cordless shavingA shaver for at home or on-the-go. Get 60minutes of shaving time from a 1-hour charge,or plug it in for instant and continuous power.1-hour charging timeFully charge your Philips shaver in just 1 hourwith the powerful and energy efficient lithium-ion battery. In a hurry? Plug in your shaver for 5minutes and get enough power for 1 full shave.Sustainable shaving innovationAt Philips, we drive sustainability in all aspectsof product creation. With shaving bladesproduced using 100% renewable electricityand packaging made with recyclable materials,all shavers come with an Eco passport.LED displayYou can easily see how much power is left withthe 3-level LED display. Your Philips shavernot only tells you when it's time to charge, italso has indicators for locking, cleaning andreplacing the head.Shaving PerformanceShaving system: SteelPrecision bladesContour following: 360-D Flexing headsSkinIQ technology: Power Adapt sensorEase of useWet & Dry: Wet and dry useDisplay: LED display, Battery level indicator,Travel lockCleaning: One-touch open, Fully washableDesignHandle: Rubber gripColor: Electric BlueShaving heads: AngularPowerRun time: 60 minutesCharging: 1 hour full charge, 5 min quickchargeAutomatic voltage: 100-240 VStand-by power: 0.04 WMax power consumption: 9 WBattery type: Li-ionService2-year warrantyReplacement head SH71: Replace every 2 yrswith SH71AccessoriesQuick Clean Pod: 1 cartridge included, YesIntegrated pop-up trimmerMaintenance: Cleaning brushTravel and storage: Travel case* Tested versus Philips Series 3000.* * Comparing shaving debris after using cleaning fluidvs. water in the cartridge© 2022 Koninklijke Philips N.V.All Rights reserved.Specifications are subject to change without notice. Trademarks are the property of Koninklijke Philips N.V. or their respective owners.Issue date 2022‑03‑31 Version: 3.0.1。
“baxter了解如何将材料用最自然的方式表达出来,甚至让时间也成为其表达的方式。
我们不会推出只延续六个月的系列产品,产品的寿命往往长达十年以上,这个理念是我们的公司以及设计的DNA”。
——baxter总裁Paolo Bestetti先生baxter的一切,从真皮开始。
1989年,Luigi Bestetti在意大利创建了baxter,它是一个以真皮为唯一软包制作原料的家具品牌,遵循传统手工工艺制造,不拘一格,超越平凡,打造世界上最奢华的真皮家居艺术。
经过30年的发展,baxter已然将真皮家具提升到一个新的高度,其独特而时尚的现代摩登工业风格和亘古不变的品质追求,也将baxter变成现代奢华的精美艺术。
在baxter的品牌哲学中,时间永远是创造细节之美的关键。
上海剪刀石头布家居帝幔进口家具奢品馆内,2018年baxter新品系列再次证明了:有一种美,可以超越时间,直至永恒!01百变大理石秀,彰显不凡品位皮革一直是baxter引以为傲的材质,不过设计师们具有极其自由的创造精神,他们的设计不仅仅局限于某种特定的材质。
baxter擅长以不同石材或金属细节混搭皮革家具,无需过多的加工和装饰,自然展现时光在不同材质间烙印的历史细节与年代韵味,搭配简约的造型设计,提升家居空间的能量场。
今年baxter 就为我们带来了一系列新品,巧妙地将大理石、黄铜和玻璃等相结合,造就了一个个惊艳不凡的作品。
SELENE系列多斗柜和长餐桌就是代表,也是baxter和以色列设计师Hagit Pincovici首次合作推出的2018米兰展新品。
“SELENE”在古希腊神话中是月亮女神的意思,此系列多斗柜正面和餐桌台面皆有一个圆形大理石镶嵌,宛如同一轮明月,赋予家居空间超越时空的美感。
RAIL长几由荣获2018 M&O新锐设计师大奖的Federico Peri设计而成。
它是通过黄铜材质的金属轴将2厘米厚、6厘米宽的大理石切片连接制成,工艺难度极高,并提供三个不同的尺寸可以自由选择搭配,层次丰富,细腻别致,兼具实用性和观赏性。