XGB1688规格书(LED电源)
- 格式:doc
- 大小:97.50 KB
- 文档页数:10
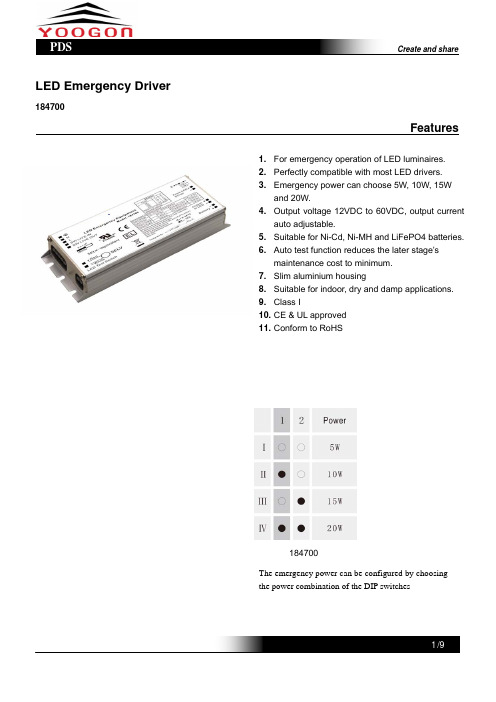
LED Emergency Driver184700Features184700The emergency power can be configured by choosing the power combination of the DIP switches1. For emergency operation of LED luminaires.2. Perfectly compatible with most LED drivers.3. Emergency power can choose 5W, 10W, 15W and 20W.4. Output voltage 12VDC to 60VDC, output currentauto adjustable. 5. Suitable for Ni-Cd, Ni-MH and LiFePO4 batteries.6.Auto test function reduces the later stage’smaintenance cost to minimum. 7.Slim aluminium housing8. Suitable for indoor, dry and damp applications. 9. Class I 10. CE & UL approved11. Conform to RoHSCharacteristicsSpecification 184700Rated voltage 120-277VAC 50/60HzRated current 0.04A (Max)Rated power 4W (Max)Emergency output power 5W, 10W, 15W, 20WOutput voltage12~60VDCOperation frequency 320kHz≥f≥50kHzPower Factor ≥0.8Battery 1.0-4Ah, 9.6V Ni-Cd/Ni-MH/LiFePO4Charging time 24 HoursDischarge time>90 MinutesCharging current0.16ALife time 5 yearsCharging cycles>500Operation temperature Ta: 0~50℃Tc: 70℃Efficiency 80%Abnormal protection Over load, Inrush current limiting, over temperature, open circuit, short-circuit Protection with auto-resetWire 1. 5~2.5mm2EMC& EMF standard EN 55015, EN 61547, EN 61000-3-2, EN 61000-3-3; EN 62493Safety standard EN 61347-1,EN 61347-2-13 ,EN 61347-2-7, UL924Dimension 184700Item No. L W H184700 135 65 22Notes:1.Dimension unit: mm2.Dimension tolerance: ±0.2mmConnection DiagramBattery SelectionEmergency time >90 MinutesOutput voltage 60VDC Emergency power 5W 10W 15W 20WBattery 9.6V 1Ah(Ni‐Cd AA) 9.6V 2Ah(Ni‐Cd SC)9.6V 3Ah(LiFePO4)9.6V 4Ah(Ni‐Cd D)Battery Dimension Battery Ni-Cd AA 9.6VBattery Ni-Cd SC 9.6VBattery Dimension Battery LiFePO4 9.6VBattery Ni-Cd D 9.6VLED Test Switch DimensionAuto Test 1. Instant Auto TestWhen the system is connected well and powered on, the module will Auto Test if the load and battery pack are connected well and if the battery is being charged normally. If there is any abnormal situation, the LED Signal Lamp (LSL) is flickering. When the abnormity is removed, the LSL indicates normally.2. Preprogrammed scheduled Auto Test- Carry out first monthly Auto Test after Initial power on for 24 hours to 7 days, afterwards, carry out a monthly Auto Test every 30 days.- Carry out an annual Auto Test every 52 weeks after first powered on.- Auto Test timingTo reduce the conflict that Auto Test is executed when the lighting is in use, the preprogrammed scheduled Auto Test will be executed 2 hours later than the normal operation is disconnected (switched off). For applications where lightings remain illuminated, the module will postpone the scheduled test accordingly, but should not later than the preprogrammed scheduled latest test time.- Monthly Auto TestMonthly Auto Test should be executed every 30 days and to test:If the switchover of normal and emergency mode is normal;If the emergency function and battery’s charging and discharging condition is normal;Auto Test time is about 30 seconds.- Annual Auto TestAnnual Auto Test should be executed after 24 hours full charging and to test:If the battery’s voltage is equal or higher than the limit after 24 hours full charging;If the emergency operation time is over 90 minutes;If the battery voltage after 90 minutes emergency operation is still equal or high than 87.5% of the battery voltage before testing.- During the Auto Test, in case a power failure happens and the power cannot be on till the Auto Test completes, then the Auto Test will be executed again 24 hours later after the power is on.- If the emergency mode makes the battery discharged completely under the power off condition, then the preprogrammed scheduled Auto Test will resume the first time when the power is connected. 3.Manual Test- Press LED test switch (LTS) one time, then go into emergency mode.- Press LTS 2 times continuously within 5 seconds, then go into monthly test. After finish,the next monthly test will count from this date.- Press LTS 3 times continuously within 5 seconds, then go into annual test, after finish,the next annual test will count from this date.- During the manual test, press LTS 3 times within 5 seconds, then the manual test can be terminated. (The preprogrammed scheduled Auto Test time will not change)4.LED Signal Lamp (LSL) indication- LSL on: Normal- LSL off: Power failure- LSL gradual change: In testing- LSL flickering: Abnormal。
消防应急灯具专用IC---------XGB1688YE760 LED应急电源一.概述XGB1688是依据GB17945-2010《消防应急照明和疏散指示系统》国家标准要求研制开发的专用芯片,XGB1688是在综合原消防应急灯具专用芯片的基础上结合新标准消防应急灯的特点,总结多年从事国标消防应急灯具生产研究经验的环境下开发设计的。
二.应用范围适用于备用电池含以上的消防应急标志灯、消防应急照明灯、集中控制型电源。
三.主要技术参数1.采用DIP14和SOP14两种封装方式。
2.芯片工作电压:—;工作电流:≤3mA(LED输出关闭);工作温度:-15℃~+90℃.3.绿指示灯为主电显示,红指示灯为充电显示,黄指示灯为故障显示;三色指示灯红色为充电状态,绿色为主电状态,黄色为故障状态。
4.按键功能:a)按键时间小于3秒为模拟主电停电。
b)持续按键时间大于3秒小于5秒绿色指示灯1Hz闪时放开按键系统由主电状态进入手动月检(应急120s回到主电状态)。
c)持续按键时间大于5秒小于7秒绿色指示灯3Hz闪时放开按键系统由主电状态进入手动年检(放电到终止并回到主电,如放电时间不足30分钟则回到主电并自动报警至故障排除)。
d)在应急状态时按键时间大于7秒,关断应急工作输出。
e)当在自检过程中发现电池放电时间不足或光源故障时,此时要求排除故障后按动试验按钮确认一次才能回到主电状态。
充电模式:采用定时充电和限压充电两种模式同时控制,对于镍镉电池以定时充电为主,限压充电为辅;对于锂电池以限压充电为主,定时充电为辅的方式。
初次上电(包括上次放电终止):充20h系统会自动转入涓流充电;如充电过程中电池电压达到设定的充电关断电压值此时系统也会自动转入涓流充电(锂电LED计时充电完成后IC14脚输出低电平关断充电回路,在计时充电过程中当电池电压达到IC设定的充电关断电压时IC14脚输出低电平强制关断充电回路,只有当电池电压下降到补充电压时才会重新打开充电回路)。

TCL集团多媒体电子事业本部 文件编号:QP7.3-F01-2006.1 研发中心第 1 页 共 1 页新规格物料■认可书/□取消认可书编制日期:Power Supply Specification(电源规格书)Customer (客户):TCL 王牌Part No. (机种型号):PLE50P-2ERevision (版本): REV 1.0Description(描述1): 24 寸LED LIPSDescription(描述2): LED 55V*120mA*2承认鉴章后请寄回承认书正本一份Please return to us one original of “SPECIFICATION FOR APPROVAL” withyour approved signatures.APPROVED SHEET(承认书)核准人 APPROVED BY:日期 DATE:盖章鉴署 CHOP & SIGNATURES:惠州TCL王牌高频电子有限公司地址:广东省惠州市仲恺高新技术开发区华宇路75号,邮编516006TEL:+86-752-2096984DATE PREPARED CHECKED APPROVED7.1. PCB Dimension: 150mm(L) * 118mm(W) * 15mm(H))7.2. Dimension with soleplate: NONE8. WEIGHT重量9. Pin Connection 连接器脚位定义2PIN-CN1: pitch 3.96mm Connection and FunctionConnection Function Item Pin1 AC-L AC INPUT LINEPLE50P.BZXPLE50PS C H S C H112.5V2A廖静2012-01-09A C I N P U T符运豪张军胜2012-01-092012-01-09CN1F1CX1C414C419C422C403C411C Y 3C412C4164312LF12134LF2R100R101R102R434R443R447R444R445R446R407R406R422R427R428R429R430R425R426R103CE1C424QW1PC1-BPC1-AD401D402DS2L400C405C404A_1R KIC3D400C415C402R414R403R402VDD GATESENSE GND RIFB 123456D101D103D104D102R449FB401RN115VIN 16VCC 1COMP 2EN 5OSC7BOSC 3DBRT 6ISET8LED49LED310LED211LED112OVP 4GND 13ISENSE 14GATE IC5MP3394L601INDD600Q603C 601C 602C 603R 601R 617R 618C 616R 619R 620C 613C 614C 615C 604C 605R 602R 603C 606R 604R 605R 606C 607R 608C 608R 609R 607C 612R 616R 621R 622R 623R 624123456Z 401R 431D 403R 432R 441R 433Q 402D 404R 442R 439Q 401R 438C 417R 440C 418CE2C 420L 602INDD 405R 625C 430C 429C Y 1C Y 2123TS1-A456TS1-B 87TS1-C C 426C 40787654321SWCSWETCGNDCIIVCCIPKDRC I C 4R 436R 43512L 401D 406C 425R421C 406R 450R 451R 453R 452C 421C 413Q 404483Q 403R 408C 620C 619C 618C 617C 623R 423R 612R 615C 610R 610R 611C 428D 601R 437R 401R 627R 628SGNDHV Q1-SQ1-G+12VB+12VT+12V A LED+L E D 1-L E D 2-L E D 3-L E D 4-B L -O NVCCVCC VCC1LED1-LED2-LED+LED3-LED4-DIMVCC1+3_3V+12V BIC1-3-TC+12V B+12VA +12V B+12V P S .O N+12V+3_3V DIM36贴片电容102/50V +/-10%0805/X7R PCS2三新国巨风华高科B C425,C612 37贴片电容102/100V +/-10%0805/X7R PCS2三新国巨风华高科B C618,C620 38贴片电容103/50V +/-10%0805/X7R PCS1三新国巨风华高科B C41939贴片电容104/50V ±10%0805/X7R PCS8三新国巨风华高科BC411,C606,C608,C406,C413,C421,C426,C41840贴片电容104/100V +/-10%0805/X7R PCS2三新国巨风华高科BC613,C61541贴片电容334/50V+/-10%0805/X7R PCS1三新国巨风华高科B C41742贴片电容471/50V+/-10%0805/X7R PCS1三新国巨风华高科B C42243贴片电容474/25V+/-10%0805/X7R PCS2三新国巨风华高科B C604,C60544贴片电容105/50V +/-10%1206/X7R PCS2三新国巨风华高科B C429,C43045贴片电容102/500V +/-10%1206/X7R PCS1三新国巨风华高科B C40346贴片电容101/100V+/-5%0805/NPO PCS1三新国巨风华高科B C61047IC MC34063A SOP-8 HTC PCS1HTC UTC Diodes B IC448IC LD7536R SOT-26 Leadtrend PCS1Leadtrend A IC149IC MP3394 SOIC16PCS1MPS A IC550IC AZ431AZ-AE1 TO-92 BCD PCS1BCD B IC351贴片二极管BAS16H 215mA/100V SOD-123F PCS4NXP先科B D401,D403,D405,D404 52贴片三极管NPN PMBT2222A 600mA/40V SOT-23PCS1NXP先科B Q40453贴片MOS2N7002 300mA/60V SOT-23 NXP PCS2NXP先科B Q401,Q40254MOS管AOD417 P-Channel MOSFET -25A/-30V TO-252 34mΩPCS1AOS B Q40355N-MOS AOD478 11A/100V T0-252PCS1AOS B Q60356N-MOS TK6A60D 6A/600V TO-220F 东芝PCS1东芝华微A QW157快恢复二极管FR104 1A/400V DO-41PCS1沂光佳讯固得D40258快恢复二极管FR207 2A/1000V DO-15 沂光PCS1沂光佳讯固得B D40059整流二极管RL255 2.5A/600V SDO-15 沂光PCS4沂光佳讯固得B D101,D102,D103,D104 60肖特基二极管SB140 1A/40V DO-41 沂光PCS1沂光佳讯固得B D40661肖特基二极管SB260 2A/60V DO-15 沂光PCS2沂光佳讯固得B D600,D60162肖特基二极管MBR20100CTP 20A/100V ITO-220S DIODES PCS1DIODES A DS263光耦PS2561AL1-1(Dip-4) NEC PCS1NEC A PC164金属氧化膜电阻3WS 82KΩ+/-5% T PCS1百亨恒辉B R43465绕线无感电阻NKN2W 0.43Ω ±5% T 百亨PCS1百亨恒辉B R40366热敏电阻MF72-3D11 3Ω±20% 5A 内弯脚 时恒PCS1时恒A RN167电解电容ZP 22uF/100V ±20% 8*11.5 105℃ 275mA 东阳光PCS2东阳光华威A C614,C62368电解电容ZP 470uF/10V ±20% 8*11.5*5 105℃ 东阳光PCS1东阳光华威A C40169电解电容ZP 220uF/25V ±20% 8*11.5*5 105℃ 东阳光PCS2东阳光华威A C405,C60370电解电容ZP 22uF50V ±20% 5×11*5 105℃ 东阳光PCS1东阳光华威A C42471电解电容ZP 1000uF/25V ±20% 12.5*25*5 105℃ 东阳光PCS2东阳光华威A C402,C404第 2 页,共 3 页第 3 页,共 3 页。

Quick Start Guide1 x CB8 Bi-color LED Panel Light1 x 5/8” Baby Pin with 90 degree Mount Holes1 x Controller box1 x Egg Crate1 x Hanging Strap1 x Power Cord1 x Power Supply1 x Soft Box1 x X-Holder with Ball MountGetting StartedThank you for buying the CB8 Canvas Bendable Panel Light from Ikan. Please carefully read the instructions and guide before operating the products. The guide includes product usage and maintenance. When you operate the product, please make sure that you have read the instructions carefully. All the content of the manual is based on up-to-date information; technical data subject to change without notice.Safety Instructions1.Connect the AC power cable to the controller box before plugging into the power source. You risk electrocution by not following this instruction.2.Don’t drag cables with excessive force. Any repairs on the products should be performed by Ikan technicians. Users should not remove the powersupply, or substitute a different power supply. This might damage the unit and will not be covered under warranty.3.Be sure that the power is off before connecting and changing the fixture head or disconnecting your cable from the power source. We recommend usingIkan connecting cables and connectors to avoid electrical shock.4.The voltage shouldn’t exceed the value in the technical specifications. If the voltage is greater than, or less than the regulated values, it could damagethe product.OverviewThe care and cleaning of the Canvas Bendable LED light. The CB8 should be rolled up and placed back into the carrying bag when not in use. The LEDs should be facing out when placed into the carrying bag. The two ends of the Canvas light should meet.If the LED’s should get dirty or covered in dust the unit can be cleaned with mild soap and water on a damp cloth.DO NOT SUBMERGE THE UNIT IN WATERConnecting the 4 prong cable between the controller box and the panel light.Align the male and female plugs so they line up and screw together until the cable is tight.Installation of the X-Holder with ball mountThe X-holder should be loose before inserting the struts into the hook & loop corners.1.Place the struts into the hook & loop flaps at the corners of the panel.2.Place them in opposite of each other for them to stay in place.3.Tighten the tension knob at the center to keep the struts locked in place.Color temperatures for today’s film and TV production are 5600K (daylight) and 3200K (tungsten). Ikan developed the CB8 Bendable Light to handle both these temperatures. With patented technologies, the CB8 offers a professional and customizable LED light source. In addition, the light features coolingflex system for optimizing heat dissipation. Specifically, the CB8 offers the following features:1.The 0-100% brightness incremental adjustment of the 2800K-6500K temperature enable fine-tuning your color range.2.A panel of 336 Bi-color led light gives out 200FC of light.3.Ultra-low noise and active cooling technology contribute to excellent thermal stability.4.The bright LCD readout is easy to view, enabling smooth adjustment of functions.5.Digitally adjustable knob allows you to adjust menu settings quickly and accurately.6.AC/DC power control box allows the light to be powered by battery or DC power supply.7.The softbox with grid cloth and 60 degree egg crate is included with the light.When placing the light mount on the 5/8” baby pin, this allows you to adjust the light in any desirable position.Note: To avoid damage to the LED’s, place the panel light LED side down on soft material.InstructionsAppearance & Structure - LightCB8 is illustrated as follows5/8 Receiver: attaches to a stand or a 5/8” baby pin w/90 degree holes Mount: Adjustable lighting directionHook & Loop around the edge of the lightScreen Display FuctionsIllustration of light’s dimmer:Color Temperature BatteryBrightnessColor : 4600K B:100%Bright: 88%Installation & Power Supply1.Ensure power is off before setting up light.2.Place the light on the Ikan customized stands, release the tension knob on the 5/8” receiver, adjust the light in the desired direction, and then tighten the tension knob on the 5/8” receiver.3.When connecting the power cords, plug the 4-pin XLR power cord into the controller box.Appearance & Structure - Control BoxPower switch: Turn on/turn off powerAC 110-220V Power Connector: Connecting with 110-220V power cable.LED Display: Changing the brightness 0-100%, changing the color 2800K-6500KColor Knob: Adjust the color from 2800K-6500K (press in on button to control the Warm white 0-100% and press brightness to control Cool white 0-100%)Brightness Knob: Adjusts brightness from 0%-100%Notice & Maintenance•The CB8 working temperature range must be regulated. Overheating will reduce the LED working life. Please allow adequate ventilation when using the Canvas light.•Products must be placed on a stable, dry, flat surface. Avoid exposure to sunlight and operating in an environment with high humidity or extreme moisture levels.•Don’t beat, knock or shake the lighting equipment during the operation.•If the CB8 isn’t working normally, please contact the Ikan repair department. Please don’t disassemble/re-assemble by yourself.•Please place the CB8 in a cool and dry place when you don’t use it for an extended period of time.What’s in the box?Please carry and place the packing box carefully. Check the lighting equipment and accessories upon opening the box. Please contact us if anything is damaged or missing. Please save the packing materials for replacing and repairing the products in the future.A.Battery Release ButtonB.Power on/off SwitchC. Color Adjustment KnobD. Brightness Adjustment KnobE.LCD Display ScreenEBAC DSpecifications Electrical Specifications TroubleshootingOptional AccessoriesSome other products that work well with the CB8 available from Ikan include:IBG-STND IBG-SB15 CP-STND-V3 HD-STND-V2Stand BagSaddle Sandbag & Weight Bag - 15 lb Compact Light StandHeavy Duty Light StandFailure Failure Cause TroubleshootingUnit Won’t Turn On The power is connected incorrectly orthe power switch in not turned on.Turn on the light with the switch on the controller box. Make sure the unit is plugged into AC power.During the operation lamp is out.The unit may have malfunctioned.The unit’s connecting cable may not beproperly secured. Try turning the control box off th e n on again.The cable can be disconnected and then reconnected.Learn MoreMore dynamic information at official website: SupportContactemail:********************CONDITIONS OF WARRANTY SERVICE• Free service for one year from the day of purchase if the problem is caused by manufacturing errors.• The components and maintenance service fee will be charged if the warranty period is expired.Free Service will not be Provided in the Following Situations:(*Even if the product is still within the warranty period.)• Damage caused by abuse or misuse, dismantling, or changes to the product not made by the company.• Damage caused by natural disaster, abnormal voltage, and environmental factors, etc.©2018 ikan Corporation. All rights reserved。


产品规格书Product Specification客户名称:产品型号:HCX-M75133WW-57产品名称:注塑防水模组产品描述:3灯5730冷白色外壳带PC罩防水注塑模组客户确认核准审核制作张历运卢干民张远一、产品特点:➢线路板采用高导热玻钎板,光衰小,稳定,LED寿命长高达3万小时以上;➢LED采用优质5730芯片,亮度高,确保高光效、低耗;➢采用防火级PVC优质材料注塑,生产工艺及防水性能好;➢采用外置恒压12V电源,电源转换效率高;➢多种安装方式,螺丝固定或者背面贴胶,安装,维修方便;二、应用范围:1.招牌,广告,灯箱;大型卖场、连锁便利店; 2.办公室、会议室等办公楼内照明;3.展览馆、图书馆、学校、工厂、机场、停车场等公共照明。
三、光参数:`光电参数型号LED光源发光颜色色温(K) 电压( V )功率( W )光通量( LM )光效(LM/W)发光角度( °)HCX-M75133 WW-57 SMD5730正白6000-700012 1.35 130 105 1307000-8000冷白9000~12000其它参数标准级联数(PCS)外壳材料驱动方式重量(20pcs/g)使用寿命工作环境(℃)储存温度(℃)防护等级20 PVC 恒压12V 230 5年-25-+60 -25-+70 IP66 备注:①测试环境温度为25±2℃;②以上数据为典型值,产品的实际参数可能会不同于典型数据。
四、光斑图及配光曲线图:光斑图配光曲线五、外形尺寸图(单位:mm):六、连接示意图:七、安装说明:➢安装产品之前,确保安装表面清洁干净;➢采用连接示意图中方案(单端供电)时:模组标准联级数量20pcs,不可超量串接。
用户也可以根据实际需求单个剪断;➢模组安装时先将模组底部背胶的离型纸撕下,贴到灯箱或广告标识内初步固定,然后可以采用模组两边打玻璃胶的方式固定;➢当模组与模组需要连接时,先用斜口钳居中剪断两模组间的电源线,剥皮10mm左右,并将对应颜色(红白相间线接电源正极,白色线接电源负极)线剥皮部分的导线拧成一股,然后拧入接线头进行绝缘防护,最后检验电源线拧入接线头后的导通性和牢靠性,以徒手不能将电源线从接线头拔出为宜;➢当尾端模组有线材导体裸露时,先用斜口钳将两根电源线剥皮约10mm,并拧入接线头进行绝缘防护;➢为保证防水和防腐,电源线拧入接线头后,建议用单组份硅胶(或者用中性玻璃胶,或者用防水脂)注入接线头,覆盖电源线的裸露铜线进行防护;➢模组不可完全裸露在户外使用,请勿带电触摸、带电作业;➢建议使用通过了相关安规认证的开关电源(带短路保护,过压保护,过流保护)。
Confirmation Audit确认Package Dimensions (封装尺寸)ATTENTIONOBSERVE PRECAUTIONSFOR HANDLING ELECTROSTATIC DISCHARGE SENSITIVE DEVICES 注意:操作时应注意静电敏感释放设备装置3.30 [0.13][0.11][0.08]3.50 [0.14]HL-A-2835D49BC-S1-08 Selection Guide (选择指南)Electrical / Optical Characteristics at Ta=25°C 电性与光学特性Parameter (参数) Symbol (符号)Rating (值)Units (单位)Power Dissipation (功耗) Pd 500 mW Forward Current (正向电流)I F 150 mA Peak Forward Current [1](峰值正向电流)I FP 200 mA Reverse Voltage (反向电压) V R 5 V Electrostatic Discharge (HBM)(静电) ESD 1000 V Operating Temperature (操作温度) Topr -40 ~ +85 ℃ Storage Temperature (保存温度)Tstg-40 ~ +100℃Note:(备注)1/2 is the angle from optical centerline where the luminous intensity is 1/2 the optical centerline value. q1/2 是半值角,指光强是光学中心线光强的1/2处到光学中心线的角度 2. the above luminous intensity measurement allowance tolerance ±10%. 上述发光强度的测试允许公差为±10%Absolute Maximum Ratings at Ta=25°C 绝对最大额定值Note:(备注)1. 1/10 Duty cycle, 0.1ms pulse width.(脉宽0.1ms,周期1/10)2. The above forward voltage measurement allowance tolerance is ±0.1V .(以上所示电压测量误差±0.1V )3. The above dominate wavelength measurement allowance tolerance is ±0.1V .(以上所示波长测量误差±1nm )Parameter (参数)Symbol (符号) Min. (最小) Typ. (平均) Units (单位)Test Conditions 测试条件 Forward Voltage 正向电压V F2.8- -VI F =150mAReverse Current 反向电流 I R - - - - Ua V R = 5VDominate Wavelength 主波长 Λd 452 - - Nm I F =150mAMax. (最大) 3.410 462 Part No. 型号 DiceLens Type 胶体类型Luminous intensity(mcd)光强@ 150mAViewingAngle角度 MinTyp2q1/2 HL-A-2835D49BC-S1-08 WHITE (InGaN ) Water Clear 1700 2200120°OF-SMD2835B-05Test Items 项目 Ref.Standard 参考标准Test Condition 测试条件 Time 时间Quantity 数量Ac/Re 接收/拒收Reflow 回流焊 JESD22-B106 Temp:260℃max T=10 sec 3 times. 22Pcs. 0/1Temperature Cycle温度循环 JESD22-A104 100℃±5℃ 30 min.↑↓5 min-40℃±5℃ 30 min. 100 Cycles 22Pcs. 0/1High Temperature Storage高温保存 JESD22-A103 Temp:100℃±5℃1000Hrs. 22Pcs. 0/1Low Temperature Storage低温保存JESD22-A119 Temp:-40℃±5℃ 1000Hrs. 22Pcs. 0/1Life Test 常温通电JESD22-A108 Ta=25℃±5℃ IF=150mA1000Hrs. 22Pcs. 0/1High Temperature High Humidity Life Test高温高湿通电JESD22-A10185℃±5℃/ 85%RHIF=100mA1000Hrs. 22Pcs. 0/1HL-A-2835D49BC-S1-08Reliability Test Items And Conditions 信赖性测试项目及条件*The technical information shown in the data sheets are limited to the typical characteristics and circuit examples of the referenced products. It does not constitute the warranting of industrial property nor the granting of any license.数据工作表中所示的技术信息仅限于典型特征和电路实例引用的产品.它既不构成工业特性的保证,也不构成任何许可的授权Criteria For Judging Damage 失效判定标准Symbol 符号 Test Condition 测试条件Criteria For Judgement判定标准 Min. 最小Max. 最大 Forward Voltage正向电压 VFIF=150mA- -U.S.L*)x1.1Reverse Current反向电流 IR VR = 5V - - U.S.L*)x2.0Luminous Flux光通量lm IF=150mA L.S.L*)x0.7 - -Test Items 项目 U .S .L : Upper standard level 规格上限 L .S .L : Lower standard level 规格下限载带规格(单位:mm)。
LED驱动电源规格书
3*1w
产品特性
●恒流型,符合LED特性驱动
●隔离型:安全可靠
●全密闭模块封装结构
●直接封装于GU10灯头内部,适用于各种带GU10接头的LED灯具
●可靠性高,使用寿命长
产品说明:
H1WGU10恒流驱动电源是制作一体化LED灯具的专用器件,适用于各种带
E27接头的LED灯具,驱动单只1W大功率发光二极管工作,220V交流市电供电,输出脉动恒定电流。
本驱动器使用高频脉宽调制式开关变换电路,体积小,电压适应范围宽,工作稳定,输入/输出隔离,安全性好。
本驱动器为全密闭模块封装结构,适合在高湿度,高粉尘,强震动等环境下使用。
技术参数:
输入电压:AC 85--260V
输出电压:DC9-11V
输出电流:280-330mA
效率:>70%
驱动管数:3只1W
使用温度:-20-60℃
模块体积:如图所示
输出线长:50MM,剥线长3MM
使用方法:
本模块有4根引出线,2根白色线是输入线,接交流电,红/白线是输出线,红线接发光管正极,白线接发光管负极,驱动3只1瓦大功率发光二极管工作。
使用注意事项:
使用本模块时必须接好发光管再接通电源,不能长时间空载通电。
产品展示图。
产品规格书 -。
产品规范书产品规范书1.产品介绍本产品规范书旨在详细说明产品的技术规格和功能特点,以便用户了解产品的性能和使用方式。
2.产品规格2.1 外观设计- 尺寸:产品尺寸为X厘米长、Y厘米宽、Z厘米高。
- 材质:产品采用高质量的ABC材料制作。
- 颜色:产品提供多种颜色选择,如红色、蓝色、绿色等。
2.2 技术规格- 处理器:产品搭载高性能的X处理器,运行速度快、响应迅速。
- 存储空间:产品内置XGB存储空间,可用于存储大量数据和文件。
- 内存:产品配备XGB内存,可实现多任务处理和运行流畅。
3.产品功能特点3.1 独特设计- 产品采用独特的设计方案,外观美观大方,给人一种高端大气的感觉。
- 独特的功能设计,如X功能、Y功能,使产品更加实用和便捷。
3.2 高性能- 产品具有出色的性能表现,运行速度快,提供流畅的用户体验。
- 产品支持多种高性能应用,如X应用、Y应用,满足用户的不同需求。
4.使用方法请参考产品说明书中的使用指南,详细了解产品的使用方法和注意事项。
5.维护保养5.1 清洁- 请使用柔软的布料轻轻擦拭产品表面,避免使用化学清洁剂。
- 避免产品接触水或其他液体,以防损坏。
5.2 维修- 如有产品故障,请参考产品保修卡上的联系方式,联系我们的售后服务团队。
- 请勿私自拆卸或修理产品,以免造成进一步损坏。
6.保修条款具体保修条款请参考产品保修卡中的规定。
7.免责声明本产品规范书仅为产品介绍和参考之用,不对使用本产品造成的任何损害负责。
以上为产品规范书的内容,如有任何疑问或需要进一步了解,请随时联系我们。
谢谢!。
消防应急灯具专用IC---------XGB1688YE760 LED应急电源一.概述XGB1688是依据GB17945-2010《消防应急照明和疏散指示系统》国家标准要求研制开发的专用芯片,XGB1688是在综合原消防应急灯具专用芯片的基础上结合新标准消防应急灯的特点,总结多年从事国标消防应急灯具生产研究经验的环境下开发设计的。
二.应用范围适用于备用电池含1.2V以上的消防应急标志灯、消防应急照明灯、集中控制型电源。
三.主要技术参数1.采用DIP14和SOP14两种封装方式。
2.芯片工作电压:2.2—5.5V ;工作电流:≤3mA(LED输出关闭); 工作温度:-15℃~+90℃.3.绿指示灯为主电显示,红指示灯为充电显示,黄指示灯为故障显示;三色指示灯红色为充电状态,绿色为主电状态,黄色为故障状态。
4.按键功能:a)按键时间小于3秒为模拟主电停电。
b)持续按键时间大于3秒小于5秒绿色指示灯1Hz闪时放开按键系统由主电状态进入手动月检(应急120s回到主电状态)。
c)持续按键时间大于5秒小于7秒绿色指示灯3Hz闪时放开按键系统由主电状态进入手动年检(放电到终止并回到主电,如放电时间不足30分钟则回到主电并自动报警至故障排除)。
d)在应急状态时按键时间大于7秒,关断应急工作输出。
e)当在自检过程中发现电池放电时间不足或光源故障时,此时要求排除故障后按动试验按钮确认一次才能回到主电状态。
5.1充电模式:采用定时充电和限压充电两种模式同时控制,对于镍镉电池以定时充电为主,限压充电为辅;对于锂电池以限压充电为主,定时充电为辅的方式。
5.1.1 初次上电(包括上次放电终止):充20h系统会自动转入涓流充电;如充电过程中电池电压达到设定的充电关断电压值此时系统也会自动转入涓流充电(11.1V锂电LED计时充电完成后IC14脚输出低电平关断充电回路,在计时充电过程中当电池电压达到IC设定的充电关断电压时IC14脚输出低电平强制关断充电回路,只有当电池电压下降到补充电压时才会重新打开充电回路)。
5.1.2芯片根据不同的充电时间和放电时间来计算出补充电的时间。
5.1.3在主电情况下如更换电池按一下按钮(确认后)正常充电20小时。
5.1.4充电完成后(红指示灯灭),转入涓流流充电。
此充电模式有利避免了电池过充和电量充不足的问题,同时加入限压充电模式,解决了短时掉主电又充20h的弊端,避免反复长时间充电将电池电压充的过高损坏电池(11.1V锂电LED充电完成后系统直接关断充电回路)。
5.1.5 在充电未完成或充电完成后如出现应急放电现象则按照以下进行补充:应急放电时间小于5分钟则补充5分钟,放电时间大于5分钟小于30分钟则补充10小时,放电时间大于30分钟则补充20小时,但累计充电时间不大于20小时。
(例上电充电6小时后放电35分钟则需补充20小时,加上原来的还要补充14小时一共是34小时,但系统设计累计充电时间不得大于20小时则此时系统只计时充电20小时)。
5.2电池判断模式5.2.1电池开路电压设计为电池额定电压的1.3倍以上左右,当电压达到设定的电池开路电压以上时红指示灯灭黄指示灯1HZ闪烁。
5.2.2放电终止电压设定为电池额定电压的83%,国标要求放电终止电压不低于电池额定电压的80%。
5.2.3当充电回路电压低于设定的充电回路短路电压时,停止充电红指示灯灭黄指示灯1HZ闪烁,此时电路仍会打开涓流充电;当充电回路电池端大于设定的充电回路短路电压时转入正常充电模式。
5.2.4充电部分各状态电压点见表1.5.3 IC12脚类型选择电压电阻取值的关系表2注:本集成电路的类型判断是根据IC12脚电压与VDD的比值来区分的,所以各电路中所用来进行类型选择分压的电阻需偏差小,建议采用金属膜电阻(详细使用方法见各型号产品原理图)。
5.4电阻R17与R10与保护电压取值关系表。
(表3)注:IC根据10脚电压的变化来区分电池开路、充电、满电、短路各状态,并根据各电池状态来控制充电回路及电池故障判断。
5.5不同电池放电终止电压和电池开路电压的测试方法:例:12V LED电池的测试方法:用可输入和输出的稳压电源(可用改装过的稳压电源PAB-3005D)代替电池在应急时调内保护电压,当IC内保护符合要求时表1的数据同比例变化。
开路电压偏高一点对电路无影响,只要电池开路能检测到即可(跟电源电压有关),如内保护电压正常而电池开路无法检测应检测判断点电压是否处于电池开路判断点电压以上。
当对产品保护电压进行调节时需通过改变IC10脚外接的两个分压电阻来进行调节,当下端电阻变大时保护变低,下端电阻变小时保护电压变高。
调节保护电压时应注意,保护电压变动的同时电池的短路、开路、满电电压都会变动,所以在对保护电压进行调节后需对各状态电压进行测试,看是否处于合理范围(对于11.1V锂电LED电源不建议对电池检测点进行调节)。
四.芯片管脚功能:XGB1688电源地——电源正类型选择——按键控制低压转换/蜂鸣器驱动——绿指示灯输出电池检测——应急驱动指示灯转换——黄指示灯输出光源检测——红指示灯输出部分管脚功能说明:1. 空脚2.电源正:芯片电源正电压(正常电压为2.5V)。
3.按键控制:控制灯具的各种状态(祥见三.主要技术参数中的4条按键功能)。
4.绿指示灯输出:有主电时长亮,月检时1HZ闪烁,年检时3HZ闪烁5.放电控制:应急时输出5V的高电平。
6.黄指示灯输出:芯片根据不同故障现象输出相应的信号控制黄指示灯(1HZ 闪烁为充电回路故障,3HZ闪烁为光源故障,长亮为自检时放电时间不足)。
7.红指示灯输出:充电时红指示灯亮,充满电或充电回路故障时时红指示灯灭。
8.光源检测:自检及应急状态通过检测IC8脚上电压判断光源工作状态0-2V为正常。
9. 指示灯转换:接地时用三色指示灯,悬空时用单色指示灯。
10电池检测:电池电压的变化引起IC10脚电位的变化从而根据检测到得不同值来判断电池及充电回路状态。
11.低压转换/蜂鸣器驱动:当电压低于一定值时转入应急,高于一定值时转入主电(R2电阻可调节转换电压的高低值)。
IC设定的高低压转换电压为170V/160V左右,对应的IC11脚的电压为1.296V/1.115V;月检、年检故障时每隔50S输出时长为2S、频率2K的方波驱动蜂鸣器。
12.类型选择:通过两个分压电阻取值不同改变脚位电压再将通过计算脚位电位跟IC电源电压的比值来判断不同的电路类型。
13.电源地。
14.充电控制,充电时输出高电平,转入涓流充电状态时输出1/4占空比的方波(11.1V锂电LED充电完成后输出低电平关断充电回路)。
五.电池检测方式说明图一5.1. 电池检测方式说明5.1.1主电及自检电池检测如图一所示,主电及自检状态下,R26上端接开关电源输出端使得D4二级管始终处于导通状态,则R17上端电压始终会比电池电压高0.2V左右。
通过R17和R10电阻的分压IC10脚能检测到一个一定比例的电压,再通过IC 内部比较判断出电池状态。
5.1.2断电应急电池检测如图一所示,在断电应急状态下,Q4三级管导通经D5二级管在R17电阻上端产生一个比电池电压低0.2V的电压,通过R17、R10电阻分压使得IC10脚检测到一个一定比例的电压。
电池电压下降IC10脚上的电压也随之下降,当下降到应急保护关断电压时,IC5脚应急输出关断,电路停止工作。
5.1.3电池开路检测:当电池开路时D4二级管悬空,经R26、R17、R10分压IC10检测到一个高电压,从而IC14脚输出1/4占空比的方波转入涓流充电状态,IC7脚输出关断,IC6脚输出频率为1Hz的方波信号驱动黄指示灯闪烁报警,自检状态下IC11脚输出间隔为50s频率2K的方波驱动蜂鸣器发声报警。
5.1.4 电池短路检测当充电回路短路时,D4二级管导通,R17上端电压为0.2V左右,经R17、R10电阻分压IC10检测到一个低电位,从而IC14脚输出1/4占空比的方波转入涓流充电状态,IC7脚输出关断,IC6脚输出频率为1Hz的方波信号驱动黄指示灯闪烁报警,自检状态下IC11脚输出间隔为50s频率为2K的方波驱动蜂鸣器发声报警。
图二六、光源检测6.1主电状态:根据标准要求,持续型灯具主电状态下不检测光源。
6.2自检及应急状态:自检及应急放电状态下,电流经R25电阻在R25电阻上产生一个电压使U4 PC817光耦导通,此时IC8脚电压由于PC817光耦的导通被拉低,光源正常工作时IC8脚的电压在1V左右。
自检及应急状态下,光源如发生开路现象,输出回路断开 R25电阻无法产生压降,U4 PC817停止工作此时IC8脚电压则为5V,经IC内部比较判断出光源开路,从而IC5脚关断应急输出, IC11脚输出间隔为50s频率为2K的方波驱蜂鸣器发声报警,同时IC6脚输出频率为3Hz的方波驱动黄指示灯闪烁报警。
七.相关数据调节1.充电电流调节:改变R5电阻的大小可对充电电流进行调节,电阻越大电流越小,电阻越小电流越大。
2.放电保护电压调节:R10电阻越大保护电压越低,R10电阻越小保护电压越高。
3.转换电压调节:R2电阻越大转换电压越低,R2电阻越小转换电压越高。
八.注意事项:1. TL431电压必须稳定。
2.类型选择、电池检测、TL431分压电阻需偏差下,建议采用五环电阻。
3.蜂鸣器距离电感应在2.5公分以上(电感工作时周围会产生一个强度不断变化的磁场,当蜂鸣器离电感太近时蜂鸣器的振动膜片就会受磁场干扰振动发声)。