GK-4500型渗压计安装使用手册(REV J)
- 格式:pdf
- 大小:749.11 KB
- 文档页数:24
横锦水库大坝防渗加固效果分析张永泰;杨相球;戴春华【摘要】横锦水库大坝防渗加固设计方案为在原黏土心墙内设置深入坝基0.5 m 及厚0.8 m的防渗墙并结合两坝肩帷幕灌浆.通过对埋设于防渗墙中的应变计、固定式测斜仪、坝体及绕坝渗压计等监测资料进行分析,表明大坝经加固后其整个防渗体系的运行效果较好.【期刊名称】《浙江水利科技》【年(卷),期】2010(000)004【总页数】4页(P34-37)【关键词】防渗加固;监测资料;分析【作者】张永泰;杨相球;戴春华【作者单位】东阳市横锦水库管理局,浙江,东阳,322100;仙居里林水电管理处,浙江,仙居,317300;浙江广川工程咨询有限公司,浙江,杭州,310020【正文语种】中文【中图分类】TV698.21 工程概况横锦水库位于东阳市东阳江镇横锦村之东,钱塘江流域金华江水系东阳江上游,坝址以上流域面积378 km2,总库容2.74亿m3,电站总装机11 500 kW。
水库直接保护下游东阳江沿岸的8 400 hm2(12.6万亩)农田、55万人口、乡村、工厂、东阳市吴宁镇及义嵊公路;间接保护义乌市稠城镇、佛堂镇及浙赣铁路,是一座以灌溉、防洪为主,结合供水、发电综合利用的大 (2)型水利工程。
该工程枢纽建筑物由拦河坝、溢洪道、放空洞、输水洞、电站等组成。
水库大坝坝型为黏土心墙坝,设计坝高62.5 m,坝顶高程174.5 m,坝顶长280.0 m。
迎水坡自上而下坡比为1∶2.25、1∶2.50、1∶5.00, 背水坡自上而下坡比为1∶2.00、1∶2.20、1∶2.46,在变坡处设2.0 m宽马道。
大坝坝体、基础防渗主要靠原黏土心墙。
工程于1958年9月动工兴建,1964年底大坝主体工程基本建成。
1977年8月开始进行保坝工程施工,1984年9月竣工。
水库建成蓄水后,经过20 a的运行,大坝坝体渗漏情况严重,左岸坝肩存在绕坝渗流,2004年10月省水利厅专家对大坝进行安全鉴定,认为大坝存在严重安全隐患,必需进行除险加固。
欧美大地欧美大地欧美大地1我们无所不能用户指南振弦式渗压计 PW 系列本手册翻译由欧美大地仪器设备中国有限公司提供,欧美大地版权所有。
欧美大地欧美大地欧美大地2目录1 产品............................................................................................................................................................3 1.1 仪器制造 .........................................................................................................................3 1.1.1 PWS and PWC ...........................................................................................................................4 1.1.2 PWP ..............................................................................................................................................4 1.1.3 PWF ..............................................................................................................................................4 1.2 振弦原理 ............................................................................................................5 1.3 率定 ..........................................................................................................................................5 1.4 技术规格. (6)2 读数与分析 ..............................................................................................................7 2.1 验货读数............................................................................7 2.2 初始读数 ........................................................................................7 2.3 现场功能检测 ......................................................................................8 2.4 压力公式 (W I T H T H E M B-6T /6T L R EA D O U T ) .................................................9 2.5 压力公式(多项式)(W ITH THE MB-6T/6TLREADOUT)..................................... 11 3 安装......................................................................................................................................12 3.1 过滤器饱和 .......................................................................................................................... 12 3.1.1 低压烧结不锈钢过滤器s......................................................................................12 3.1.2 高压陶瓷过滤器s..............................................................................................................121 3.2在土体里安装....................................................................................................................... 12 3.2.1 紧密的粘土.....................................................................................................................................12 3.2.2 粒状材料...............................................................................................................................12 3.3在钻孔里安装 ...................................................................................................... 13 3.4安装在软基里................................................................................. 14 3.5 电缆标签.................................................................................................................. 15 3.6 电缆铺设................................................................................................................................. 15 3.6.1 从垂直孔到水平沟槽的过渡.................................................................15 3.6.2 水平电缆铺设...........................................................................................................................15 3.7 雷击保护.................................................................................................................. 15 4 综合........................................................................................................................................16 4.1 电缆路线安排..................................................................................................................................... 16 4.2 转换表 (温度 V S 电阻 )....................................................................... 18 4.3 转换因子 ..................................................................................................................... 20 4.4 参考.. (21)欧美大地欧美大地欧美大地31 产品PW 型渗压计是适合于长期监测水位和钻孔水压力的一种稳定性好、精度高的传感器,输出为频率信号 ,与电缆电阻和接点电阻无关,信号适宜于远距离传输。
振弦式仪器在工程中监测扬压力的应用陈欣刚;吴怡;马文锋【摘要】在大坝安全监测中坝基扬压力是一个很重要的监测指标,用于测量坝基扬压力的传感器很多,以GK4500S型振弦式渗压计为例,主要介绍了振弦式渗压计的工作原理、主要结构、适用范围和安装方法,及其在广西合狮面水库大坝中监测坝基扬压力的具体实例.【期刊名称】《水利信息化》【年(卷),期】2010(000)005【总页数】4页(P45-48)【关键词】振弦式;渗压计;扬压力;大坝;监测【作者】陈欣刚;吴怡;马文锋【作者单位】水利部水文仪器及岩土工程仪器质量监督检验测试中心,江苏,南京,210012;水利部水文仪器及岩土工程仪器质量监督检验测试中心,江苏,南京,210012;国网电力科学研究院,江苏,南京,210003【正文语种】中文【中图分类】TV6981 扬压力的概念扬压力是重力坝强度和稳定计算中的重要荷载。
人们对扬压力的认识,从无所知到有所知,从对它有模糊的概念到进行较准确的计算,已经经历了1个多世纪的漫长时期[1]。
直至今日,人们对扬压力的认识也并非进入到了无所不知的境界,仍有许多问题有待进一步研究。
扬压力是指建筑物及其地基内渗水,对某一水平计算截面浮托力与渗透压力之和。
由于扬压力是1个铅直向上力,它减小了重力坝作用在地基上的有效压力,从而降低了坝底的抗滑力,因此存在一定的负面作用。
同时,坝体内也产生扬压力,导致坝体内的应力分布受到一定影响。
为了减小坝底扬压力,提高坝的稳定性,通常采用布设坝基防渗帷幕以增加防渗效果,消耗坝底的渗透水头,并在防渗帷幕后设排水孔幕,以释放剩余水头。
通常将坝体上游坝面 3~5m 范围内的材料的防渗性能提高,以形成防渗层,在防渗层后面再设置排水管。
渗透压力又称动水压力,是指水在建筑物上、下游水位差作用下渗入建筑物及地基内而产生的水压力。
渗透压力对岩、土体稳定性的影响随渗流方向不同而异。
如坝基下当渗流方向与重力一致时,渗透力能提高岩土体稳定性;如与重力方向相反,则将减小颗粒间压力,即产生扬压力对土体稳定不利。
55第43卷 第12期2020年12月Vol.43 No.12Dec.2020水 电 站 机 电 技 术Mechanical & Electrical Technique of Hydropower Station1 前言大坝安全监测是人们了解大坝运行状态和安全状况的有效手段和方法,它的目的主要是了解大坝安全状况及其发展态势,是工程安全的重要保证条件之一,也是工程设计、施工、运行的重要组成部分。
大坝安全监测资料分析是大坝安全监测工作中必不可少、不可分割的组成部分,主要是根据监测资料的定性、定量分析成果,对大坝当前的工作状态作出综合评价,及时发现存在的问题和安全隐患,从而有效控制施工、检验设计,监控大坝工作状态并为进一步加强安全管理和监测和应采取的防范措施提出指导性意见。
通过安全监测和资料整编分析,保证大坝安全运行。
2 工程概况某电站枢纽主要由上水库、水道系统、地下厂房系统和地面出线场、下水库拦河坝及拦排沙工程等组成。
上水库采用库盆开挖的砂岩料筑坝围库而成,采用全库盆沥青混凝土面板防渗,坝顶高程812 m,库顶轴线长2 846.088 m,坝顶宽8.0~10.0 m,上游坝坡1:1.75,下游坝坡1:1.5,最大坝高(坝轴线处)57 m,正常蓄水位为810 m。
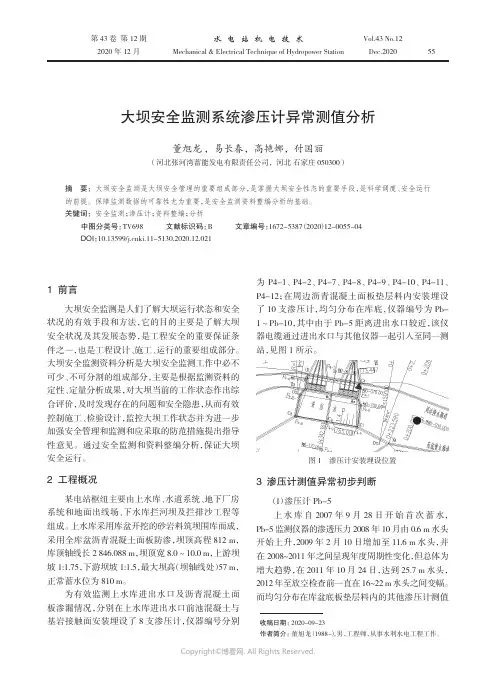
为有效监测上水库进出水口及沥青混凝土面板渗漏情况,分别在上水库进出水口前池混凝土与基岩接触面安装埋设了8支渗压计,仪器编号分别为P4-1、P4-2、P4-7、P4-8、P4-9、P4-10、P4-11、P4-12;在周边沥青混凝土面板垫层料内安装埋设了10支渗压计,均匀分布在库底,仪器编号为Pb-1~Pb-10,其中由于Pb-5距离进出水口较近,该仪器电缆通过进出水口与其他仪器一起引入至同一测站,见图1所示。
图1 渗压计安装埋设位置3 渗压计测值异常初步判断(1)渗压计Pb-5上水库自2007年9月28日开始首次蓄水,Pb-5监测仪器的渗透压力2008年10月由0.6 m 水头开始上升,2009年2月10日增加至11.6 m 水头,并在2008~2011年之间呈现年度周期性变化,但总体为增大趋势,在2011年10月24日,达到25.7 m 水头,2012年至放空检查前一直在16~22 m 水头之间变幅。

目录安全须知 (2)一.简介 (3)二.技术规格 (3)1.基准条件和工作条件 (3)2.一般规格 (4)三.结构 (6)四.操作 (7)1.基本操作 (7)2.测试 (8)五.电池管理 (11)六.装箱单 (12)安全须知●有电!危险!操作者须经严格培训并获得国家相关电工操作认证才能使用本仪表进行现场测试。
注意本仪表面板及背板的标贴文字及符号。
●操作者必须完全理解手册说明并能熟练操作本仪表后才能进行现场测试。
●使用前应确认仪表及附件完好,仪表、测试线绝缘层无破损、无裸露及断线才能使用。
●注意本仪表所规定的测量范围及使用环境。
●不要同时操作2个或2个以上的按键,操作会无效。
●测试时,用不到的电流钳或电压输入线不要与仪表连接,以免引起干扰。
●为保证测量精度,I1、I2、I3电流钳不能混用,需对应接口连接。
●不能用于测试高于600V的电压,不能测试超过30A的电流。
●仪表后盖及电池盖板没有盖好禁止使用。
●确定导线的连接插头已紧密地插入接口内。
●仪表于潮湿状态下,请勿使用,或更换电池。
●禁止在易燃性及危险场所测试。
●测试线须撤离被测导线后才能从仪表上拔出,不能触摸输入插孔,以免触电。
●请勿在强电磁场环境下使用,以免影响仪器正常工作。
●仪表在使用中,机壳或测试线发生断裂而造成金属外露时,请停止使用。
●请勿于高温潮湿,有结露的场所及日光直射下长时间放置和存放仪表。
●仪表及电流钳口必须定期保养,保持清洁,不能用腐蚀剂和粗糙物擦拭钳口。
●避免电流钳受冲击,尤其是钳口接合面。
●仪表具有自动关机功能。
●长时间不用仪表,请定期给电池充电或取出电池。
●更换电池,注意极性,若无法更换,请联系厂家。
●使用、拆卸、校准、维修本仪表,必须由有授权资格的人员操作。
●由于本仪表原因,继续使用会带来危险时,应立即停止使用,并马上封存,由有授权资格的机构处理。
一.简介VICTOR4500三相智能相位伏安表是一款专为现场测试的多功能智能仪表,由主机、电流钳(3把)、测试线(4条)等组成。
DIKGATLHONG DAM PROJECTCONTRACT NO.1:DAM AND ASSOCIATED WORKS AND ACCESS ROAD大坝监测仪器施工方案(振弦式渗压计)批准:审核:编制:SINOHYDRO CORPORATION LTD.November 18th 2008大坝监测仪器施工方案(振弦式渗压计)一、工程简介迪克戈洪大坝工程的观测项目主要有:水位及地下水位观测、坝体表面观测渗流观测、空隙水压力观测。
其主要观测仪器和设施如下:各种仪器将跟随工程的进展而进行安装,其中渗压计分为振弦渗压计和竖管渗压计,振弦渗压计具体分布部位和工程量见下表:二,供货商资料该工程的监测仪器供货商为基康北京公司,该公司的详细资料如下:Geokon INC. of USA has been the world leader in high-quality geotechnical instruments design and manufacturing since it was founded in 1979.Geoko Instruments(Beijing) co.,Ltd.was founded in 1998 as a wholly-owned enterprises of the Geokon Inc.,which specialized in desing, production and sale of security monitoring instruments and automatic monitoring and control systems, the integration projects and the technological consultation and services as well and “china Industrial production permit”Geokon instruments are divided into two large series of vibrating wires (vw) and Fiber Bragg Gratings (FBG),widely used for monitoting security and stability of hydraulic structures,tunnels,brdges,highways and other projects,such as stress,strain,displacement,load,pressure,temperature,tilt,settlement and data acquisition,etc.As a member of china dam security monitoring committee,Geokon Instruments (Beijing) Co.,Ltd. Is one of the most prestigious companies majored in hydropower project security monitoring and the largest supplier of water conservancy and hydropower security monitoring instruments in china.Geokon Beijing Co. Jiang xiaoqangUnit 1111 General Manager Tianchuang Science plaza Mr.G.J.LiNO.8 Caihefang Road Sales DirectorHaidian District Tel:+86-10-62698899 Beijing Fax:+86-10-62698866 100080 China /en三、施工计划根据安全监测的特点,坝内观测仪器,设备及观测等随坝体填筑施工的项目同步进行。


宁波市阳光水利建设信息系统一、项目业主单位:宁波市白溪水库建设发展有限公司二、项目名称:白溪水库大坝安全监测自动观测系统三、项目概况:白溪水库已建成运行十多年,其大坝观测系统已老化,部分仪器已失效。
根据面板堆石坝的特点,其坝体内部及面板内部的监测仪器已难以补设。
但面板死水位以上的周边缝及板间缝接缝变形、绕坝渗流、大坝表面变形等观测项目仍可补设、增设和更换。
现有观测设备为人工观测。
为提高白溪水库大坝安全监测水平,及时了解大坝的工作性态,对大坝安全监测系统进行完善和自动化改造、对大坝的运行状况进行实时的监测和分析,以确保工程安全运行。
观测系统改造项目、内容与要求1、增设测缝计1)增设周边缝三向测缝计4组(12支),左右岸各2组。
2)增设板间缝单向测缝计12支,左右岸各张拉区各6支。
3)以上测缝计均采用TSJ型电位器式测缝计,其电缆引线分别从左、右岸引入坝顶左岸及右岸观测房内。
2、增设绕坝渗流测压管增设绕坝渗流测压管6根3、增设表面水平位移观测系统增设5条引张线,其中坝顶上、下游各1条,下游坝坡3条,坝顶上游引张线设16个测点,坝顶下游引张线设7个测点,坝坡上的引张线每条4个测点,共计35个测点。
引张线及测点的数量、位置与大坝原有的视准线及测点的数量、位置相同。
4、增设表面沉降观测系统1)因现有表面沉降标点进行自动化观测时准确性较差,拟增设可精确测量表面沉降并易于实现自动化的静力水准系统。
2)增设5条静力水准测线,其中坝顶上、下游各1条,下游坝坡3条,坝顶上游静力水准设16个测点,坝顶下游静力水准设7个测点,坝坡上的静力水准每条4个测点,共计35个测点。
静力水准测线及测点的数量、位置与大坝原有的视准线及测点的数量、位置相同。
3)静力水准的观测基点设置于大坝右岸的山体上,用双金属标测定基点变形。
在每条静力水准线的右岸山体各设1个双金属标测点作为基点,共5个双金属标点。
5、相关仪器具备自动化条件1)绕坝渗流测压管具备自动化条件在每个绕坝渗流测压管内放置1个渗压计(美国原装进口GK4500S型),共10个渗压计,以便对测压管水位进行自动观测。
ProtectiveClean4500/5100English 6简体中文 18繁體中文 316EnglishImportantRead this user manual carefully before you use the appliance and save it for future reference.Danger-Keep the charger away from water. Do not place or store it over or near water contained in a bathtub, washbasin, sink etc. Do not immerse the charger in water or any other liquid. After cleaning, make sure the charger is completely dry before you connect it to the wall socket.Warning-The mains cord cannot be replaced. If the mains cord is damaged, discard the charger.-Always have the charger replaced with one of the original type in order to avoid a hazard.-Do not use the charger outdoors or near heated surfaces.-If the appliance is damaged in any way (brush head, toothbrush handle or charger), stop using it. This appliance contains noserviceable parts. If the appliance is damaged, contact theConsumer Care Center in your country (see chapter 'Warranty and support').-This appliance can be used by children and persons with reduced physical, sensory or mental capabilities or lack of experience and knowledge if they have been given supervision or instructionconcerning use of the appliance in a safe way and understand the hazards involved. Cleaning and user maintenance shall not bemade by children without supervision.-Children shall not play with the appliance.Caution-Do not clean the brush head, the handle or the charger in the dishwasher.-If you have had oral or gum surgery in the previous 2 months, consult your dentist before you use the toothbrush.-Consult your dentist if excessive bleeding occurs after using this toothbrush or if bleeding continues to occur after 1 week of use.Also consult your dentist if you experience discomfort or pain when you use the Philips Sonicare.-The Philips Sonicare toothbrush complies with the safetystandards for electromagnetic devices. If you have a pacemaker or other implanted device, contact your physician or the device manufacturer of the implanted device prior to use.-If you have medical concerns, consult your doctor before you use the Philips Sonicare.-This appliance has only been designed for cleaning teeth, gums and tongue. Do not use it for any other purpose. Stop using the appliance and contact your doctor if you experience anydiscomfort or pain.-The Philips Sonicare toothbrush is a personal care device and is not intended for use on multiple patients in a dental practice or institution.-Stop using a brush head with crushed or bent bristles. Replace the brush head every 3 months or sooner if signs of wear appear. Do not use other brush heads than the ones recommended by the manufacturer.-If your toothpaste contains peroxide, baking soda or bicarbonate (common in whitening toothpastes), thoroughly clean the brush head with soap and water after each use. This prevents possible cracking of the plastic.Electromagnetic fields (EMF)This Philips appliance complies with all applicable standards and regulations regarding exposure to electromagnetic fields.Radio Equipment Directive-Radio Equipment in this product operates at 13.56 MHz-Maximum RF power transmitted by the Radio Equipment is 30.16dBm7English8EnglishIntroductionCongratulations on your purchase and welcome to Philips! To fully benefit from the support that Philips offers, register your product at /welcome.Your Philips Sonicare (Fig. 1)1Hygienic travel cap2Smart brush head(s)*3Handle4Power on/off button5Mode/intensity button6Mode light7Brush head replacement reminder light8Battery indication9Charging base10Travel case (specific types only)**Note: The content of the box may vary based on the modelpurchased.Brush headsYour Philips Sonicare comes with one or more brush heads which are designed to deliver superior results for your oral care needs. Philips Sonicare BrushSync TechnologyYour smart brush heads use a microchip to sync with your handle, enabling brush head replacement reminder. For more information regarding the brush head replacement reminder, see 'Features'.This symbol indicates the brush head is equipped with BrushSync technology. (Fig. 2)Brushing modesTo toggle between modes press the mode button located below the on/off button.Your power toothbrush is equipped with either 2 or 3 brushing modes, depending on your model.The following modes are available:Clean modeClean is a 2-minute mode. It gives you a thorough and complete clean and is recommended to be used with the C2 Optimal Plaque Control brush head.White modeWhite is a 2-minute 30-seconds mode, recommended to be used with the W2 Optimal White brush head.Gum Care modeGum Care is a 3-minute mode, recommended to be used with the G2Optimal Gum Care brush head.Using your Philips SonicareBrushing instructions1Press the brush head onto the handle in such a way that the bristles will face the front of the handle. (Fig. 3)2Firmly press the brush head down onto the metal shaft until it stops.Note: It is normal to see a slight gap between the brush head and the handle.3Wet the bristles. (Fig. 4)4Apply a small amount of toothpaste on the bristles. (Fig. 5)5Place the toothbrush bristles against the teeth at a slight angle (45degrees), pressing firmly to make the bristles reach the gumline or slightly beneath the gumline. (Fig. 6) A change in vibration (and a slight change in sound) alerts you when you apply too much pressure while brushing.Note: Keep the center of the brush in contact with the teeth at all times.6Press the power on/off button to turn on the Philips Sonicare. (Fig.7)7Gently keep the bristles placed on the teeth and in the gumline.Brush your teeth with small back and forth motion so the bristles reach between the teeth. (Fig. 8)9English10EnglishNote: The bristles should slightly flare. Do not scrub.8To clean the inside surfaces of the front teeth, tilt the brush handle semi-upright and make several vertical overlapping brushingstrokes on each tooth. (Fig. 9)9To make sure you brush evenly throughout the mouth, divide the mouth into 4 sections using the Quadpacer feature. (Fig. 10) The quadpacer feature beeps after 30 seconds.10Brush for the full 2 minutes following the Quadpacer. (Fig. 11) After2 minutes, the toothbrush will automatically shut off.In white mode, after 2 minutes the handle will continue to brush for 30 seconds so that you can brighten and polish your frontteeth.In gum care mode, after 2 minutes the handle will continue tobrush for an additional minute so you can gently stimulate andmassage your gums.-After you have completed the brushing cycle, you can spend additional time brushing the chewing surfaces of your teeth and areas where staining occurs. (Fig. 12)Your Philips Sonicare toothbrush is safe to use on:-Braces (brush heads wear out sooner when used on braces)-Dental restorations (fillings, crowns, veneers)Note: When the Philips Sonicare toothbrush is used in clinical studies, it must be used in the Clean mode (for plaque and gum health claims) or in White mode (for whitening claims) at high intensity with EasyStart turned off.Features-EasyStart-Brush head replacement reminder-Pressure sensor-QuadpacerEasyStartThis Philips Sonicare model comes with the EasyStart featureactivated. The EasyStart feature gently increases the power over the first 14 brushings to help you get used to the brushing with the Philips Sonicare. The EasyStart feature works in all modes.To deactivate EasyStart see 'Activating or deactivating features'.Brush head replacement reminderYour Philips Sonicare is equipped with BrushSync technology that tracks the wear of your brush head. (Fig. 13)1When attaching a new smart brush head for the first time the brush head replacement reminder light blinks green three times.This confirms you have a Philips brush head with BrushSync technology.2Over time, based on the pressure you apply and the amount of time used, the handle will track brush head wear in order to determine the optimal time to change your brush head. Thisfeature gives you the guarantee for the best cleaning and care of your teeth.3When the brush head replacement reminder light lights up amber,you should replace your brush head.To deactivate the brush head replacement reminder see 'Activating or deactivating features'.Pressure sensorYour Philips Sonicare is equipped with an advanced sensor that measures the pressure you apply while brushing. If you apply too much pressure, the toothbrush will provide immediate feedback to indicate that you need to reduce the pressure. This feedback is given by a change in vibration and therefore brushing sensation.To deactivate the pressure sensor see 'Activating or deactivating features'.QuadpacerThe Quadpacer is an interval timer that has a short beep and pause to remind you to brush the different sections of your mouth.11English12EnglishDepending on the brushing mode you have selected (see 'Brushing modes'), the Quadpacer beeps at different intervals during the brushing cycle.Activating or deactivating featuresYou can activate or deactivate the following features of your toothbrush:-EasyStart-Brush head replacement reminder-Pressure sensorTo activate or deactivate these features, follow the instructions below:EasyStart1Put the handle on the plugged-in charger.2Press and hold the power on/off button while the handle remains on the charger.3Keep the power on/off button pressed until you hear a single short beep (after 2 seconds).4Release the power on/off button.-Triple tone of low-med-high means the EasyStart feature has been activated. The brush head replacement light and batterylight will also blink green 2 times in unison to confirm activation.-Triple tone of high-med-low means the EasyStart feature has been deactivated. The brush head replacement light andbattery light will also blink amber 2 times in unison to confirmdeactivation.Note: To achieve clinical efficacy, EasyStart needs to be deactivated. Brush head replacement reminder1Put the handle on the plugged-in charger.2Press and hold the power on/off button while the handle remains on the charger.3Keep the power on/off button pressed until you hear a series of two short beeps (after 4-5 seconds).4Release the power on/off button.-Triple tone of low-med-high means the Brush headreplacement reminder feature has been activated. The brush head replacement light and battery light will also blink green 2times in unison to confirm activation.-Triple tone of high-med-low means the Brush headreplacement reminder feature has been deactivated. The brush head replacement light and battery light will also blink amber 2times in unison to confirm deactivation.Pressure sensor1Put the handle on the plugged-in charger.2Press and hold the power on/off button while the handle remains on the charger.3Keep the power on/off button pressed until you hear a series of three short beeps (after 6-7 seconds).4Release the power on/off button.-Triple tone of low-med-high means the pressure sensor featurehas been activated. The brush head replacement light andbattery light will also blink green 2 times in unison to confirm activation.-Triple tone of high-med-low means the pressure sensor feature has been deactivated. The brush head replacement light and battery light will also blink amber 1 time in unison to confirm deactivation.If you continue holding the power on/off button after the three short beeps, the activate/deactivate sequence repeats.Battery status and charging1Put the plug of the charger in an electrical outlet.2Place the handle on the charger.-The charger will emit 2 short beeps to confirm that the handle isplaced properly.13English14English-The flashing light of the battery level indicator shows that the toothbrush is charging.-When handle is fully charged on the charger, the battery light shows solid green for 30 seconds and switches off.Note: Your toothbrush comes pre-charged for first use. After first use, charge for at least 24 hours.Battery status (when handle is not on charger)When removing the Philips Sonicare from the charger, the battery light at the bottom of the toothbrush will indicate the status of the battery life.-Solid green LED: full battery-Flashing green LED: medium battery-Flashing amber LED and three beeps: low battery-Flashing amber LED and two sets of five beeps: No brushing sessions left (charge toothbrush)CleaningNote: Do not clean the brush head, handle or travel case in the dishwasher.Toothbrush handle1Remove the brush head and rinse the metal shaft area with warm water. Make sure you remove any residual toothpaste (Fig. 14).Note: Do not push on the rubber seal on the metal shaft withsharp objects, as this may cause damage.2Wipe the entire surface of the handle with a damp cloth.Note: Do not use isopropyl rubbing alcohol, vinegar or bleach to clean handle as this may cause discoloration.Brush head1Rinse the brush head and bristles after each use (Fig. 15).2Remove the brush head from the handle and rinse the brush head connection with warm water at least once a week.Charger1Unplug the charger before you clean it.2Wipe the surface of the charger with a damp cloth.StorageIf you are not going to use your Philips Sonicare for an extended period of time, unplug the charger from the wall socket, clean it and store it in a cool and dry place away from direct sunlight.Locating the model numberLook on the bottom of the Philips Sonicare toothbrush handle for the model number (HX682x/HX683x).Recycling-Do not throw away the product with the normal household waste at the end of its life, but hand it in at an official collection point for recycling. By doing this, you help to preserve the environment.-This product contains a built-in rechargeable battery which shall not be disposed of with normal household waste. Please take your product to an official collection point or a Philips service center to have a professional remove the rechargeable battery.-Follow your country’s rules for the separate collection of electrical and electronic products and rechargeable batteries. Correct disposal helps prevent negative consequences for theenvironment and human health.Removing the rechargeable batteryWarning: Only remove the rechargeable battery when you discard the appliance. Make sure the battery is completely empty when you remove it.To remove the rechargeable battery, you need a towel or cloth, ahammer and a flat-head (standard) screwdriver. Observe basic safety precautions when you follow the procedure outlined below. Be sure to protect your eyes, hands, fingers, and the surface on which you work.15English16English1To deplete the rechargeable battery of any charge, remove the handle from the charger, turn on the Philips Sonicare and let it run until it stops. Repeat this step until you can no longer turn on the Philips Sonicare.2Remove and discard the brush head. Cover the entire handle witha towel or cloth (Fig. 16).3Hold the top of the handle with one hand and strike the handle housing 0.5 inch above the bottom end. Strike firmly with ahammer on all 4 sides to eject the end cap (Fig. 17).Note: You may have to hit on the end several times to break the internal snap connections.4Remove the end cap from the toothbrush handle. If the end cap does not release easily from the housing, repeat step 3 until the end cap is released (Fig. 18).5Holding the handle upside down, press the shaft down on a hard surface. If the internal components do not easily release from the housing, repeat step 3 until the internal components are released (Fig. 19).6Remove the rubber battery cover.7Wedge the screwdriver between the battery and the black frame at the bottom of the internal components. Then pry thescrewdriver away from the battery to break the bottom of theblack frame (Fig. 20).8Insert the screwdriver between the bottom of the battery and the black frame to break the metal tab connecting the battery to the green printed circuit board. This will release the bottom end of the battery from the frame (Fig. 21).9Grab the battery and pull it away from the internal components to break the second metal battery tab (Fig. 22).Caution: Be aware of the sharp edges of the battery tabs so as to avoid injury to your fingers.10Cover the battery contacts with tape to prevent any electrical short from residual battery charge. The rechargeable battery can now be recycled and the rest of the product discarded appropriately (Fig.23).Warranty and supportIf you need information or support, please visit/support or read the international warranty leaflet.Warranty restrictionsThe terms of the international warranty do not cover the following:-Brush heads.-Damage caused by use of unauthorized replacement parts.-Damage caused by misuse, abuse, neglect, alterations or unauthorized repair.-Normal wear and tear, including chips, scratches, abrasions,discoloration or fading.17English18简体中文注意事项使用本产品之前,请仔细阅读本使用说明书,并妥善保管以备日后参考。
Advancing with Technology精密仪器 » 德国制造 « 始于 1947涂层厚度测量经典设计–所有功能均可直接访问–大量的可互换探头–高对比度显示屏和背光键盘–存储和统计–蓝牙和 USB 输出–I P 65防护等级的坚固外壳MiniTest 2500/4500est 2500/4500 2500/4500MiniTest 2500/4500全方位的质量保证F 05 F 3应用:钢铁上的非磁性涂层和有色金属上的绝缘涂层。
用于标准应用的全能型。
同时供应F 1.6版本仅用于在磁性基材上测量或N 1.6 版本仅用于在有色金属上测量。
钢铁上的非磁性涂层和有色金属上的绝缘涂层。
特别适合测量管道或难以进入的物体。
同时供应仅用于在磁性基材上测量的F 1.6/90 版本或仅用于在有色金属上测量的版本 N 1.6/90 。
极薄的有色金属,氧化物或油漆涂层在小钢铁工件上。
最高精度用于薄涂层的。
钢铁上的非磁性涂层,厚涂层和搪瓷涂层。
涂层厚度测量的经典之作。
技术数据测量范围:0…1600 µm0…1600 μm0…500 µm0…3000 µm低端分辨率: 0.1 µm0.1 μm0.1 µm0.2 µm保证公差(读数的):± (1%+1 µm) *± (1%+1 μm) *± (1%+0.7 µm) *± (1%+1 µm) *最小曲率半径(凸/凹):1.5 mm凸面/10 mm凹面平面和凸面/6 mm凹面0.75 mm凸面/5 mm凹面1.5 mm凸面/10 mm凹面最小测量区域:Ø 5 mmØ 5 mmØ 3 mmØ 5 mm最小基体厚度:F 0.5 mm/N 50 µm F 0.5 mm/N 50 µm 0.1 mm0.5 mm*(测量值与ElektroPhysik 校准箔有关)所有插图都不符合比例所有MiniTest series 1100-4100 系列的探头都兼容于 MiniTest 2500 / 4500: 91, Ø 19 mm : 194, Ø 10,9 mm : 79, Ø 16 mm : 91, Ø 19 mm高高高高MiniTest 2500/4500用于更复杂测量任务的行家非常薄涂层的精确解决方案。
振弦式渗压计型号:JWF7-BGK WH32BGK-4500S详细介绍:振弦式渗压计埋设在水工建筑物、基岩内或安装在测压管、钻孔、堤坝管道和压力容器里,测量孔隙水压力或液体液位。
其各种性能非常优异,其主要部件均用特殊钢材制造,适合各种恶劣环境使用。
特别是在完善电缆保护措施后,可直接埋设在对仪器要求较高的碾压混凝土中。
标准的透水石是用带50微米小孔的烧结不锈钢制成,具有好的透水性。
BGK-4500SV和GK-4500SV型弦式渗压计采用专用通气电缆连接,可有效克服气压对测值的影响。
主要技术指标:型号GK/BGK-4500S GK/BGK-4500SV量程0.35,0.7,1.0,2.0,3.0MPa 0.35,0.70MPa分辨率0.025%F.S非线性< 0.5%F.S精度±0.1%F.S过载能力2×F.S.外径19.05mm 17.45mm长度133.35mm 165mm配套设备:GK/BGK02-250V6 4芯屏蔽电缆GK/BGK02-335VT8 专用4芯通气电缆GK-403/BGK-408 振弦式读数仪渗压计型号:JY23JDKYJ渗压计JY23JDKYJ更多信息>>>振弦式孔隙水压力计是一种测量流体压力、例如地下水位、坝体、土体的孔隙水压力等,也可以用来装在孔内,监测井和测压管的压力或水位混凝土或地基内的孔隙(或渗透)水压力,并可同步测量埋设点温度的压力传感器。
并可同步测量埋设点的温度,可选择数字式温度计作为测温元件主要技术参数规格(kgf/cm2) 1 2 3 4 5 6 8 10 16 25 40 60压力测量范围(MPa) 0~0.1 0~0.2 0~0.4 0~0.4 0~0.4 0~0.6 0~0.8 0~1.0 0~1.6 0~2.5 0~4.0 0~6.0工作温度(℃)-25~+60测温精度(℃)±0.1分辨力%F?S ≤0.08综合误差%F?S ≤1.5配ZX-2读数仪使用价格:振弦式渗压计WH32BGK4500S 130000 10%读数仪1台:9900元1-2周.美国渗压计JY23JDKYJ 725 10%/26个550含票和运1-2周振弦式渗压计JWF7-BGK 6300 10% 3-4周美国。
GK-4450振弦式位移传感器操作使用手册(Rev F, 3/00)北京市北美仪器咨询有限公司译目录1.概述 (1)1.1工作原理 (1)2.安装 (2)2.1初步测试 (2)2.2位移传感器的安装 (2)2.3电缆的连接 (3)2.4电气干扰 (3)2.5初始读数 (4)2.6雷击防护 (4)3.读取数据 (5)3.1GK-401读数仪的操作 (5)3.2GK-403读数仪的操作 (6)3.3温度测量 (6)4.数据转换 (7)4.1位移的计算 (7)4.2温度的修正 (8)4.3环境因素 (10)5.故障排除 (10)附录A—技术特性 (13)附录B-半导体温度计温度推导公式 (14)1 .概述1.1工作原理4450位移传感器主要用于基康A系列多点位移计中,它包括经过严格热处理的振弦检测元件,一根一端与振弦连接,另一端与滑动杆相连的消除了应力的弹簧组成。
该结构完全密封,并能在250Psi (约1.7Mpa)的压力下工作。
随着滑动杆的拉动,弹簧开始伸长并引起振弦张力的增加,同时引起钢弦的振动频率产生改变,张力与弹簧的伸长成正比。
因此,位移的变化可以通过测量钢弦的张力即钢弦的振动频率变化来实现,用振弦式读数仪可以非常准确地完成测量。
尼龙扣滑动杆定位销定位槽螺丝图1 - 4450位移传感器示意注意:不可转动位移传感器的滑动杆,这可能导致传感器的永久损坏!滑动杆上的定位销与外同上的定位槽则起调整定位的作用。
2.安装2.1初步测试收到该设备后,即应用测量仪表对传感器作适当地检查。
滑动杆出厂时通常以被拉出大约50%量程的位置就位(见图1),原因是传感器在保持一定张力的情况下,在运输图中起保护作用。
把传感器连接到读数议上,读数应该是稳定的,其频率模数大约在4000—5000字范围内。
当去掉尼龙扣后,滑动杆会弹回外筒内,此时读数应该是2000—3000之间。
注意,通常在定位销落入定位槽时,往往不能获取读数,此时只要将滑动杆拉出5—10mm后即可得到正确读数。