vivi移植
- 格式:doc
- 大小:412.50 KB
- 文档页数:10
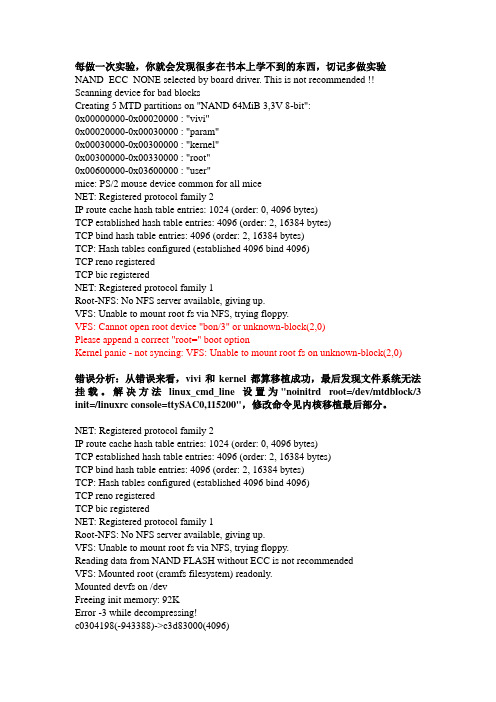
每做一次实验,你就会发现很多在书本上学不到的东西,切记多做实验NAND_ECC_NONE selected by board driver. This is not recommended !! Scanning device for bad blocksCreating 5 MTD partitions on "NAND 64MiB 3,3V 8-bit":0x00000000-0x00020000 : "vivi"0x00020000-0x00030000 : "param"0x00030000-0x00300000 : "kernel"0x00300000-0x00330000 : "root"0x00600000-0x03600000 : "user"mice: PS/2 mouse device common for all miceNET: Registered protocol family 2IP route cache hash table entries: 1024 (order: 0, 4096 bytes)TCP established hash table entries: 4096 (order: 2, 16384 bytes)TCP bind hash table entries: 4096 (order: 2, 16384 bytes)TCP: Hash tables configured (established 4096 bind 4096)TCP reno registeredTCP bic registeredNET: Registered protocol family 1Root-NFS: No NFS server available, giving up.VFS: Unable to mount root fs via NFS, trying floppy.VFS: Cannot open root device "bon/3" or unknown-block(2,0)Please append a correct "root=" boot optionKernel panic - not syncing: VFS: Unable to mount root fs on unknown-block(2,0)错误分析:从错误来看,vivi和kernel都算移植成功,最后发现文件系统无法挂载。
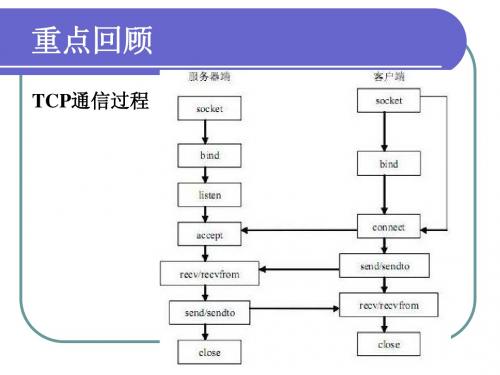
“毕昇杯”全国大学生嵌入式设计大赛“毕昇杯”全国大学生嵌入式设计大赛参赛文档1“毕昇杯”全国大学生嵌入式设计大赛基于嵌入式Linux的视频监控系统Video monitoring system based on the embedded Linux队员:李泳潮任春雷琚汪慧指导教师:张丽平伊芸芸2010年7月22日2“毕昇杯”全国大学生嵌入式设计大赛摘要:以CPU为S3C2410的Techv-2410核心板为硬件平台,通过制作Bootloader,Linux内核,文件系统搭建嵌入式Linux系统。
利用视频监控程序控制 USB摄像头采集并压缩现场视频数据,在服务器的支持下,通过网络将处理后的视频数据传输至客户端,实现对监控现场实时的监控效果。
关键词:嵌入式Linux;S3C2410;采集;压缩;监控;AbstractAs to Techv-2410 core board hardware platform whose CPU is S3C2410, product Bootloader,Linux kernel, file system, to build the embedded Linux system. Making use of controling USB video camera ,video monitoring program collects and compresses field video data. in the server support, the processed video data will be transmitted to the client via the network,as the result of realizing real-time monitoring the field.Keywords:Linux;S3C2410;collect; compress; monitoring3“毕昇杯”全国大学生嵌入式设计大赛0.引言随着多媒体技术、网络技术的迅猛发展和后PC时代的到来,利用嵌入式系统实现远程监控系统、可视电话、和视频会议等应用已成为可能。
合肥学院嵌入式系统设计实验报告(20 13 - 20 14 第 2 学期)专业:实验项目:BootLoader移植实验实验时间:2014年5月19日实验成员:____________________________________________________________________指导老师:电子信息与电气工程系2014 年 4 月制实验三BootLoader 移植实验一、实验目的1、熟悉 Bootloader 工作原理。
2、了解 U-Boot 的代码结构。
3、掌握 U-Boot 移植过程。
二、实验内容本实验熟悉 Bootloader 工作原理,了解 U-Boot 源码结构,基于 S3C2440 处理器,完成 U-Boot 移植,并在目标开发板上测试通过。
三、实验设备硬件: 1、 pc 机2、 FriendlyARM开发套件即MIRCO2440 核心板软件: 1、虚拟机( VMware )2、U-Boot 源码( u-boot-2011.03.tar )四、实验过程1、 Micro2440配置在mini2440/micro2440上的移植准备工作,我们仍然将开发板文件建立在board/samsung 下,2、配置时出现错误,字体要修改,复制粘贴的时候出现的错误,有的地方有中文,去掉就行了。
3、编译完成失败,只有上网查找错误,最后解决了错误。
11124、编译完成后将u-boot.bin下载到SDRAM的 0x33f80000地址处, u-boot已经能在RAM中运行。
二、支持DM90001、编译完成后将u-boot.bin下载到SDRAM的0x33f80000地址处。
三、支持内核启动1、编译完成后将u-boot.bin下载到SDRAM的0x33f80000地址处。
四、支持Nand Flash1、编译完成后将u-boot.bin下载到SDRAM的0x33f80000地址处。
五、实验小结本实验需要熟悉Bootloader 工作原理,了解U-Boot 源码结构,基于S3C2440 处理器,完成 U-Boot 移植,并在目标开发板上测试通过,首先可以看到实验指导书上的介绍,了解U-Boot 的移植。
ViVi移植4.1搭建交叉编译环境1.启动VMware,进入red hat linux 9.0,安装VMtools,由于这不是本文的重点,故此略去具体安装步骤。
2.将arm-linux-gcc-3.4.1.tar.bz2和armv4l-tools-2.95.2.tar.bz2拷贝到虚拟机中进行安装,两个编译器其实都一样,只不过版本高低不同,后经发现低版本的可以编译ViVi,高版本的可以编译U-boot,解压命令是:"tar -jxvf arm-linux-gcc-3.4.1.tar.bz2""tar -jxvf armv4l-tools-2.95.2.tar.bz2"[root@localhost opt]#gedit /etc/profile在umask 022之前加上exportPATH=/opt/crosstool/arm-linux/bin:$PATH,添加了arm-linux-gcc的路径,保存,执行source /etc/profile可更新环境变量文件[16]。
输入arm-linux-gcc -v 若查看到版本信息,则表示安装成功了。
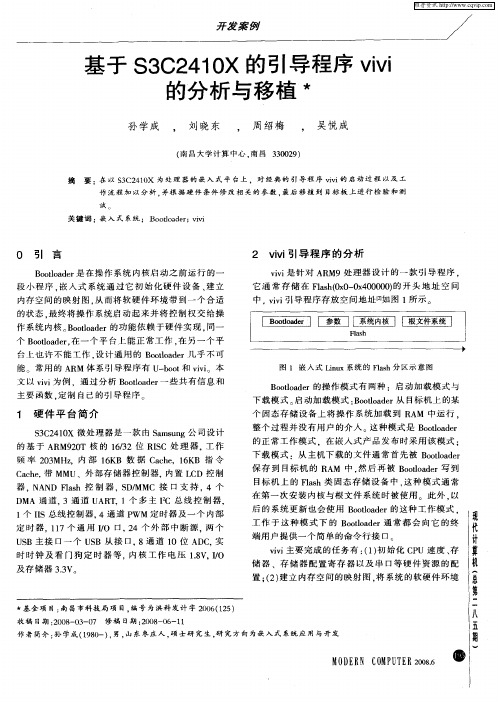
4.2 ViVi移植1.修改Makefile文件,进入到解压缩的ViVi目录里面(注:下面的源码中加粗的都是经过修改的或者添加的,以后都是如此)。
[root@localhost vivi]# gedit Makefile...ARCH := arm/*指定内核架构为ARM*/...LINUX_INCLUDE_DIR = /opt/host/armv4l/include//*内核头文件*/.../*指定交叉编译器路径*/CROSS_COMPILE = /opt/host/armv4l/bin/armv4l-unknown-linux-...2.保存文件。
3.按照自己需求,自定义mtd分区,修改 arch/s3c2410/smdk.c[root@localhost vivi]# gedit arch/s3c2410/smdk.c...mtd_partition_t default_mtd_partitions[] = {{name: "vivi",offset: 0,size: 0x00020000, /*size : 128K*/flag: 0}, {name: "param",offset: 0x00020000, /*size : 64K*/size: 0x00010000,flag: 0}, {name: "kernel",offset: 0x00030000, /*size : 1M*/size: 0x00100000,flag: 0}, {name: "root",offset: 0x00130000, /*size : 3M*/size: 0x00300000,flag: MF_BONFS}, {name: "jffs2",offset: 0x00430000, /*size :58M+992K*/size: 0x03af8000,flag: MF_JFFS2}};...这里的分区信息要和在ViVi命令行下执行"bon part show"的分区信息一致,否则启动系统的时候肯定会出问题。
4.保存文件。
5.配置和编译ViVi,执行make menuconfig配置vivi,如图4-1示:[root@localhost vivi]# make menuconfig图4-1因为ViVi针对S3C2410做了板级的处理,所以按上下键定位到"Load an alternate Configuration File",键入"arch/def-configs/smdk2410",如4-2图示:Ok之后,按左右键Exit之后,会出现如图4-3示:图4-3按下回车键确定即可。
然后执行下面命令即可生产ViVi二进制文件:[root@localhost vivi]# make6.ViVi的使用通过并口烧写到flash中去,这里通过网上的一款工具H-Jtag烧写进去,H-Jtag如图4-4所示:图4-4此时还未连接硬件,未检测到CPU,显示UNKNOWN。
这里先要设置一下,点击Settings->USB/LPT Selection,选择LPT,确定。
Settings->LPT JTAG Setting,设置如图4-5,本文用的是博创UP-NETARM2410-S,CPU采用的是S3C2410,这里的设置每个开发板都是不同的,应该按照你自己的开发板来设置:图4-5点击Settings->LPT Port Settings,若机器自带并口,可选择并口1或并口2,本机器没有并口,并口是通过PCI扩展槽扩展而来,其地址是系统自动分配的16位地址,为0xE880,设置如图4-6:图4-6连接好硬件之后,点击Control->Detect target,不出意外的话,应该可以检测到CPU,如图4-7所示:图4-7点击Flasher->Start H-Flasher,出现如图4-8:图4-8点击Load,定位到H-Jtag安装所在文件夹,进入HFC Examples,选择S3C2410+K9F1208.hfc,确定,然后Flash Selection选择NAND-FLASH,S3C2410+K9F1208,再点击Programming,点击check,就可以检测到CPU 和Flash了,如图4-9示:图4-9再选择Src File,这里选择在虚拟机里生成的ViVi文件,点击Program,即可进行烧写,如图4-10:图4-10烧写成功之后:图4-11复位开发板之后,敲入回车键进入ViVi命令行模式可以看到如图4-12所示:图4-12当烧写内核和根文件系统进去之后,此时如不敲入回车等待一段时间,或敲入boot,即可启动Linux系统。
启动信息如下:ViVi Original,By Aking!Congratulations,Next,Uboot!VIVI version 0.1.4 (root@BC) (gcc version 2.95.2 20000516(release) []) #0.1.4 四 5月 26 09:44:53 CST 2005MMU table base address = 0x33DFC000Succeed memory mapping.NAND device: Manufacture ID: 0xec, Chip ID: 0x76 (Samsung K9D1208V0M) Could not found stored vivi parameters. Use default vivi parameters.Press Return to start the LINUX now, any other key for viviCopy linux kernel from 0x00030000 to 0x30008000, size = 0x00100000 ... done zImage magic = 0x016f2818Setup linux parameters at 0x30000100linux command line is: "noinitrd root=/dev/bon/3 init=/linuxrcconsole=ttyS0"MACH_TYPE = 193NOW, Booting Linux......Uncompressing Linux.............................................................. done, booting the kernel.Linux version 2.4.18-rmk7-pxa1 (zxt@BC) (gcc version 2.95.2 20000516 (release) []) #251 Fri Sep 22 15:11:45 CST 2006CPU: ARM/CIRRUS Arm920Tsid(wb) revision 0Machine: Samsung-SMDK2410On node 0 totalpages: 16384zone(0): 16384 pages.zone(1): 0 pages.zone(2): 0 pages.Kernel command line: noinitrd root=/dev/bon/3 init=/linuxrc console=ttyS0 Console: colour dummy device 80x30Calibrating delay loop... 99.94 BogoMIPSMemory: 64MB = 64MB totalMemory: 62388KB available (1587K code, 430K data, 64K init)Dentry-cache hash table entries: 8192 (order: 4, 65536 bytes)Inode-cache hash table entries: 4096 (order: 3, 32768 bytes)Mount-cache hash table entries: 1024 (order: 1, 8192 bytes)Buffer-cache hash table entries: 4096 (order: 2, 16384 bytes)Page-cache hash table entries: 16384 (order: 4, 65536 bytes)POSIX conformance testing by UNIFIXLinux NET4.0 for Linux 2.4Based upon Swansea University Computer Society NET3.039Initializing RT netlink socketBlueZ Core ver 2.4 Copyright (C) 2000,2001 Qualcomm IncWritten 2000,2001 by Maxim Krasnyansky <maxk@>CPU clock = 202.800000 Mhz, HCLK = 101.400000 Mhz, PCLK = 50.700000 Mhz Initializing S3C2410 buffer pool for DMA workaroundStarting kswapddevfs: v1.10 (20020120) Richard Gooch (rgooch@atnf.csiro.au)devfs: boot_options: 0x1Samsung S3C2410X (i2c) algorithm module version 2.6.1 (20010830)iic_s3c2410_init: Samsung S3C2410X iic adapter module version 2.6.1 (20010830)i2c-dev.o: Registered 'Samsung S3C2410X IIC adapter' as minor 0s3c2410_init: Initialized IIC on S3C2410X, 281kHz clockiic_s3c2410_init: initialized iic-bus at 0xf4000000.tts/%d0 at I/O 0x50000000 (irq = 52) is a S3C2410tts/%d1 at I/O 0x50004000 (irq = 55) is a S3C2410tts/%d2 at I/O 0x50008000 (irq = 58) is a S3C2410Console: switching to colour frame buffer device 80x60Installed S3C2410 frame bufferpty: 256 Unix98 ptys configuredS3C2410 Real Time Clock Driver v0.1block: 128 slots per queue, batch=32ne.c:v1.10 9/23/94 Donald Becker (becker@)Last modified Nov 1, 2000 by Paul GortmakerNE*000 ethercard probe at 0xd1000200: 00 d0 cf 00 00 02eth0: NE2000 found at 0xd1000200, using IRQ 2.PPP generic driver version 2.4.1SCSI subsystem driver Revision: 1.00request_module[scsi_hostadapter]: Root fs not mountedUDA1341 audio driver initializedNAND device: Manufacture ID: 0xec, Chip ID: 0x76 (Samsung K9D1208V0M) Find a MTD partition from BONFS -> nandflash0 (bon4)Creating 1 MTD partitions on "Samsung K9D1208V0M":0x00430000-0x03f28000 : "nandflash0 (bon4)"devfs_mk_dir(bon): using old entry in dir: c036e0a0 ""bon0: 00000000-00020000 (00020000) 00000000bon1: 00020000-00030000 (00010000) 00000000bon2: 00030000-00130000 (00100000) 00000000bon3: 00130000-00430000 (00300000) 00000000bon4: 00430000-03f28000 (03af8000) 00000001bon5: 03f30000-03ffc000 (000cc000) 00000000usb.c: registered new driver usbdevfsusb.c: registered new driver hubusb-ohci.c: USB OHCI at membase 0xe9000000, IRQ 26usb.c: new USB bus registered, assigned bus number 1hub.c: USB hub foundport #1 suspened!port #0 alived!hub.c: 1 port detectedhub.c: USB new device connect on bus1/1, assigned device number 2usb.c: registered new driver usb_mousehub.c: USB hub foundhub.c: 4 ports detectedusbmouse.c: v1.6:USB HID Boot Protocol mouse driverInitializing USB Mass Storage driver...usb.c: registered new driver usb-storageUSB Mass Storage support registered.mice: PS/2 mouse device common for all miceNET4: Linux TCP/IP 1.0 for NET4.0IP Protocols: ICMP, UDP, TCP, IGMPIP: routing cache hash table of 512 buckets, 4KbytesTCP: Hash tables configured (established 4096 bind 4096)NET4: Unix domain sockets 1.0/SMP for Linux NET4.0.NetWinder Floating Point Emulator V0.95 (c) 1998-1999 VFS: Mounted root (cramfs filesystem).Mounted devfs on /devFreeing init memory: 64Kyaffs: dev is 7937 name is "1f:01"Using/mnt/yaffs/lib/modules/2.4.18-rmk7-pxa1/kernel/drivers/i2c/i2c-tomega8.o no PS/2 device found on PS/2 Port 0!no PS/2 device found on PS/2 Port 1!BusyBox v1.00 (2005.01.20-11:59+0000) Built-in shell (ash) Enter 'help' for a list of built-in commands.runing /etc/profile ok[/mnt/yaffs]到这里,ViVi就移植成功了。