3ds Max制作“黄蜂女回归”
- 格式:docx
- 大小:540.38 KB
- 文档页数:11

3Dmax角色动画控制器教程:实现准确动作序言:在当今数字娱乐和游戏产业中,3D角色动画的制作和控制是一个非常重要的环节。
一个准确、流畅的动作能够使角色更加生动和有吸引力。
而3Dmax作为一款常见的三维建模和动画软件,其角色动画控制器功能十分强大,本文将介绍如何使用3Dmax的角色动画控制器来实现准确的动作。
一、了解角色动画控制器的基本概念1. 角色动画控制器是指通过创建和连接控制器,在3Dmax中实现对角色动画进行控制和调整的工具。
2. 角色动画控制器通常由骨骼系统和动画控制器组成,通过对骨骼进行控制和调整,实现角色动画的准确展示。
二、创建角色的基本骨骼系统1. 在3Dmax中,通过创建骨骼系统来为角色建立基本的骨架。
2. 选择骨骼工具,点击场景中的任意位置创建骨骼。
3. 通过选中骨骼的关节,使用ik解算器来连接各个骨骼,确保骨架的运动流畅。
三、创建动画控制器1. 在角色的骨骼系统完成后,可以开始创建动画控制器。
2. 在命令面板中选择“动画”选项卡,点击“运动路径编辑器”。
3. 在“运动路径编辑器”中,按下“创建”按钮,创建一个“动画控制器”。
4. 在属性编辑器中,可以根据需要自定义控制器的名称、颜色等属性。
四、添加动画的关键帧1. 选中角色骨骼系统中的关节,使用3Dmax的关键帧动画功能添加关键帧。
2. 在时间轴中选择动画的起始帧和结束帧。
3. 在3D视图中移动和调整角色的骨骼,使其达到需要的动作效果。
4. 点击“设置关键帧”按钮,将当前帧设置为关键帧。
五、使用控制器调整动作1. 在动画控制器的工具栏中选择相应的控制器。
2. 在3D视图中选中角色的骨骼部分,通过控制器的移动、旋转等功能来调整角色的动作。
3. 每次调整动作后,可以点击“设置关键帧”按钮,将当前帧设置为关键帧,以保留调整后的动作效果。
六、使用预设动画控制器1. 3Dmax中有许多预设的动画控制器,可以直接使用这些控制器来实现特定的动作效果。
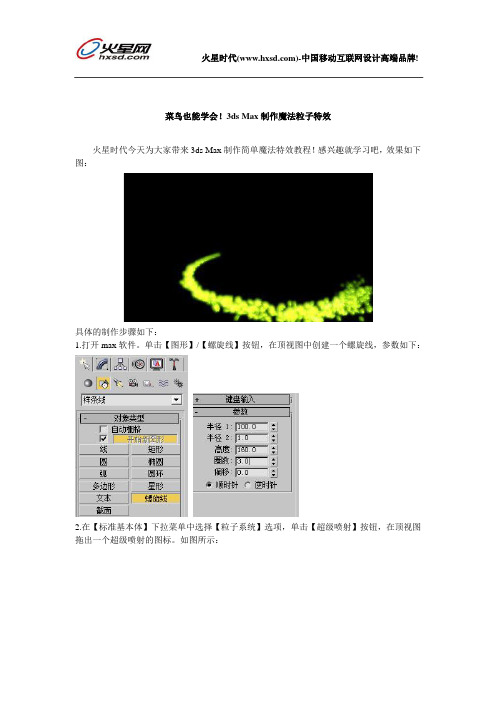
菜鸟也能学会!3ds Max制作魔法粒子特效火星时代今天为大家带来3ds Max制作简单魔法特效教程!感兴趣就学习吧,效果如下图:具体的制作步骤如下:1.打开max软件。
单击【图形】/【螺旋线】按钮,在顶视图中创建一个螺旋线,参数如下:2.在【标准基本体】下拉菜单中选择【粒子系统】选项,单击【超级喷射】按钮,在顶视图拖出一个超级喷射的图标。
如图所示:3.单击【修改】按钮,进入修改命令面板。
在【基本参数】面板中的参数设置如下:4.展开【粒子生成】面板,将参数设置如下:5.展开【粒子类型】面板,将【标准粒子】选项为“六角形”。
6.展开【对象运动继承】/【影响】值为0。
完成粒子的设置:7.选择修改好的超级喷射粒子,选择菜单栏中的【动画】/【约束】/【路径约束】命令,在视图中将虚线引向前面创建的螺旋线。
完成效果如图所示:现在制作粒子的材质。
8.按快捷键“M”键,弹出【材质编辑器】对话框,选择一个材质球。
9.在【明暗器基本参数】面板中,勾选【面贴图】选项。
在【Blinn 基本参数】面板中将【漫反射】的颜色改成亮黄绿色。
将【自发光】调为100。
如图所示:10.选择粒子,将制作好的材质赋予粒子对象,关闭【材质编织器】对话框。
这时效果如下所示:制作粒子外发光的光晕效果。
11.在视图中选择粒子对象并右击,选择【对象属性】选项,在弹出的对话框中,将【G缓冲区】/【对象ID】的通道数值改为1。
12.选择菜单栏中的【渲染】/【效果】命令,在弹出的【环境效果】对话框中,单击【添加】按钮,在弹出的对话框选择【镜头效果】选项,然后单击【确定】按钮。
13.在下面的【镜头效果参数】面板中,选择【Glow】选项,然后单击【>】按钮。
14.在下面的【光晕元素】面板中,将【参数】选项卡中的【径向颜色】改成黄绿色及白色,其他参数设置如下:15.切换到【选项】选项卡,勾选【图像源】/【对象ID】,并确认数值为1。
这样就将光晕指定给了粒子。

3dmax怎么制作动画_3dmax制作蝴蝶动画2.然后点击红色箭头所指向的【新建空场景】。
3.完成2的步骤后,就会出现一个全空的场景。
4.在箭头的指向处单机【茶壶】,并在透视图中按住鼠标左键不动,拖动出一个大小适中的茶壶。
5.接着点击【自动关键点】,然后拖动箭头处的横条到第41帧,然后可以移动茶壶的位置(为茶壶添加一个移动的从近到远的动画)。
6.完成上面的步骤后,点击【设置关键点】,刚刚制作的动画就已经确定了;同时可以在修改器列表改变茶壶的大小,添加做一个茶壶由小变大的动画效果。
7.视频制作完成后,点击红色箭头处的"开始/暂停'按钮,即可预览制作的小视频。
8.小视频做完之后,先点击上面箭头处,会出现下拉列表;然后点击下面的箭头处的【导出】,最后在【导出】中设置小视频的导出格式,即可导出所制作的小视频。
23dmax制作蝴蝶动画用3D max制作蝴蝶飞舞动画1.在网上随便找了一张蝴蝶素材2. 启动max,按ALT+B键打开视背景对话框,选择蝴蝶素材作为顶视图视背景3.按快捷键G取消栅格显示4.用二维线绘制蝴蝶右侧翅膀5.添加挤出修改器,挤出翅膀厚度6. 用相同的方法将另一侧的翅膀创建出来7.接下来绘制蝴蝶身体部分。
创建一个大小跟素材类似的长方体,长度分段调为58.给长方体增加编辑多边形,在顶点级别下用缩放工具,改变长方体的形状9.增加网格平滑,迭代次数为2.完成身体的制作10.用二维线绘出触角部分11.在修改面板下勾选以下选项,并设置厚度为0.1.将触角的二维线转成三维对象12.完成蝴蝶整体建模13. 选中所有对象,编组14. 按快捷键M,打开材质编辑器。
15.点击漫反射贴图方块,选择位图贴图方式,贴上蝴蝶素材16.将材质指定给选定对象,给我们的模型附上材质,这时效果如图所示17. 添加UVW贴图,并更改长度、宽度值,使贴图跟模型刚好匹配制作动画18.解组。
分别选中一侧翅膀,点击层次面板,选仅影响轴,将中心轴移动到如下列图所示19.关闭仅影响轴。

FTV118918Rigging Mechanical Objects in 3ds MaxGeorge MaestriLinkedIn Learning / Description Learn techniques for rigging mechanical objects, vehicles, machines, and other inanimate objects in 3ds Max software. Many people normally use 3ds Max software’s rigging tools for characters, but you can also use them to rig things such as vehicles, motors, pistons,assemblies, conveyor belts, and more. This course will demonstrate practical applications of 3ds Max software’s extensive rigging tools to automate the animation of a variety of mechanical objects and systems.Speaker(s)George Maestri is an animation industry professional with extensive experience as a writer, director, and producer, working on a number of hit television shows, including South Park and Rocko’s Modern Life. As an entrepreneur, he built a successful studio that produced several hundred cartoons for broadcast, education, and film. George has written over a dozen books on computer graphics. As an educator, he has taught at several top animation schools, including California Institute of the Arts. He currently authors and develops CAD and 3D content for LinkedIn Learning and Learning Objectives• Learn how to use scripts and expressions to automate rigging •Learn how to use character animation tools to rig mechanical objects • Learn how to automate the animation of a complex assembly • Learn how to create a control panel to manipulate animationMechanical Rigging in 3ds MaxWhat is Rigging?Rigging is a process that makes complex assemblies of objects easier to animate and manage. Rigging is most commonly associated with character animation, but the same tools directly apply to complex mechanical objects and assemblies.A good rig will do the following :Automate as much as possibleIf parts of the assembly always move in relation to other parts, then these can be automated to cut down on animator overhead. Gears in a clock can be rigged to turn in relation to each other, pistons can automatically compress/expand, and so on…Create Realistic MovementParts in an asssembly should move realistically and stay in proper alignmentBe Animator FriendlyA good rig will abstract the animation to a collection of controls that the animator will manipulate. The goal is to have the animator work the controls and never have to touch the mesh.Easy to UnderstandRigging is essentially a computer interface, so good interface guidelines should apply. Make controls clear and easy to understand, provide labels if needed, and color code key parts of the rig.Designing and Creating a RigDesigning and creating a righ is similar to creating a user interface. When considering how to rig an assembly, you need to go through a general iterative design process:Understand How the Object MovesWhen creating a rig for a mechanical object, you need to know how it should move. You need to know exactly how the parts are connected and how they interact. This may require research about the mechanics of the object, and you may have to talk to engineers or designers. You also need to know limitations of the object’s motion – how far is it supposed to bend? Does the dial go in increments or is it continuous? Finally, you should also consider how the object will be presented. If a particular action is never shown in the presentation, you may not need to rig it.Decide what needs to be controlledAs the rigger, you need to make decisions about what can and cannot be animated in an object or assembly. A hydraulic arm may simply need to be positioned in space, so you can give the animator a single position control and rig the rest. Something more complex, such an airplane, may need additional controls for things like landing gear and propeller rotation.Determine what can be automatedThe rig is supposed to make life easier for the animator. This means the rig should control much of the behavior of the assembly. Hydraulic pistons can automatically expand/contract, hoses can bend automatically, gear assemblies can rotate in sync, and so on. Automating these things is where rigging really matters to an animator. Be sure to understand the animator’s role and what needs to be controlled before rigging.Make it animator friendlyYour rig is the user interface for the scene and the objects being animated. Make that interface easy to use. Observe good interface design practices with your rigs. Make controls easy to spot, use shapes to define function, use color as a guide, and be sure to add labels, if needed.Keep it SimpleAs with any good interface design, simpler is almost always better. Keep the controls direct and easy to understand. Don’t add controls for things that do not need to be animated. Make the resulting animation simple to control as well. You don’t want a spaghetti bowl of animation curves for the animator to wade through.Test until it doesn’t breakThink of every possible way to move the rig and run it through its paces before handing it over to the animator. Make sure the rig is rock solid.Creating ControlsWhen building a rig, we need to create controls that are animator friendly. These controls are typically created using non-renderable objects such as curves and text objects. Proxy objects can also be used as controls. These controls should be easy to understand and placed where they are easy to access. Naming schemes and color schemes can also help with readability.On-object controlsThese are controls that are placed on/near the objects being controlled. The scoop of a digging machine may have a rotational control directly above the scoop.Multi-Purpose controlsSome controls may be easier to use if they control more than one parameter. In the above example, the rotational control for the scoop could be used to determine the position of the digger’s arm.Control PanelsYou may need to abstract and/or consolidate controls into a single control panel. This is often useful for assemblies where there are a lot of parameters to manage.In general, the animator should always be operating the controls and not the object itself. This enables the mesh of the object to be frozen so that is not tampered with, moved out of alignment, deleted, and so on…Rigging Tools3ds Max has a number of rigging tools. Some are very easy to use, others are more complex. Typically, we start with the simpler tools and work towards the more complex ones in the rig. Generally, the goal is to keep the rig as simple as possible, so simpler tools tend to fit this goal. Don’t make things more complicated than necessary just because you have a lot of really cool tools in your arsenal. Other people may have to sue/debug your rigs, so easier to understand rigs make sense.That said, more complex tools can provide a lot of functionality and they should absolutely be used when needed.Basic Four Rigging ToolsThese rigging tools are the simplest, but many times, they are all you need. If you learn these, you’ll be able to do a lot of basic rigging.PivotsThese simply define the axis of rotation and scale for any object. Placement of this axis is critical for anything involving rotation. Centering the pivot may not align directly to the volumetric center of the object. If you need multiple pivots, then you must create helper objects such as a dummy or point to position the other axis of rotation.Links/HierarchiesThis simply connects objects together in a hierarchy. The structure of the hierarchy usually reflects how the object will be animated, but novel hierarchies can also be used. Many times, we may link helper objects or animation controls into a hierarchy to make it easier to animate.Inverse KinematicsAllows objects to rotate automatically to meet a goal object. Traditionally used in character animation, it can be used for all sorts of mechanical assemblies, from robotic armatures to pistons. Several types of IK are availableHI (History-Independent) – Normally used for characters and longer sequences, it allows for the IK solution to be calculated on every frame. It does basic joint rotation but no sliding jointsHI (History-Dependent) - The HD Solver is a solver well-suited to use for animating machines,especially ones with sliding parts that require IK animation. It lets you set up joint limits andprecedence. It has performance problems on long sequences, so ideally use it on shortanimation sequences. It is good for animating machines, especially ones with sliding parts.IK Limb – Only works for two-bone chains. Fast to use, but limited in application.Spline IK – Allows a spline curve to control the orientation of the joints/objects. It is good forhoses, springs, and other flexible objects.ConstraintsA method of connecting parameters together outside of traditional hierarchies. Constraints can be used to align an object’s position, rotation, or scale to another. They can also be used to point objects at one another, and attach them to paths or surfaces.Extended Rigging Tools/Concepts3ds Max has a number of sophisticated rigging tools that go beyond the standard four. These can introduce a finer degree of control over your rigs and add much more sophisticated behaviors. Animation ControllersThese are modules that control an object’s motion, and are really the foundation of all animation in 3ds Max. Controllers can use standard keyframing techniques to create motion, but they can also be used to connect objects together using algorithms, procedures, or other processes.Morphs – Morphs are used to control shape. They can be used for flexible objects such as springs and hoses.Wire ParametersWire Parameters lets you link any two object parameters in the viewport, so that adjusting one parameter changes the other automatically. This enables you to set up one- and two-way connections between specified object parameters, or to control any number of objects with a dummy object containing the desired parameters. By wiring parameters, you can set up custom constraints directly without having to go to Track View and assign controllers.You can also add expressions to Wired Parameters to introduce mathematics and logic to object connections.ExpressionsIf you want to dig even deeper, you can use the Expression Controller to more discretely control objects using math, logic, and basic coding.Reaction ManagerA controller that links the behavior of two objects with user-defined curves that can create sophisticated behavior not available with standard expressions. The controller works by linking a Master parameter to a Slave parameter. Moving or adjusting the Master affects the slave in a non-linear way. The link is controlled by an animation curve that specifies behavior at all points throughout the range of motions.。
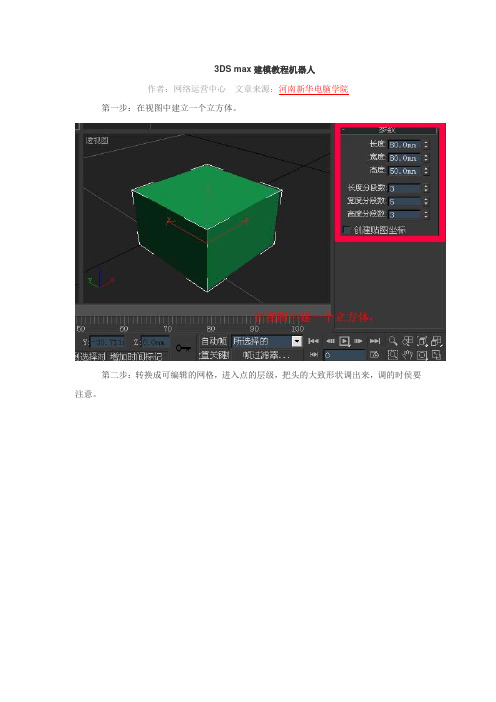
3DS max建模教程机器人作者:网络运营中心文章来源:河南新华电脑学院第一步:在视图中建立一个立方体。
第二步:转换成可编辑的网格,进入点的层级,把头的大致形状调出来,调的时侯要注意。
第三步:增加光滑,设置为1,就在这里做细部的制作。
第四步:选择这些面,拉伸设置为2。
并在光滑之上,给模型在给一个可编辑网格。
第五步:因为模型的突起是前面突起,后面慢慢变平,将拉伸的面进行旋转。
第六步:进入点的层级,进行焊接图中所圈的一排点。
第七步:因为两边是对称的,我们可以用镜象复制的方法,来制作另一半,进入多边形层级,选择另一面,然后进行删除。
第八步:进行镜象操作,选择关联复制。
第九步:选择这个点进行倒角操作,大小自己定。
第十步:选择倒角出来的面,向内拉伸为-10,然后删除拉伸的底面。
第十一步:拉伸面之后,给模型再添加一个光滑,设置为2,渲染一下,如果在空洞的地方出现不平滑,可以适当的增加刚才拉伸面周围点的权重,最好不超过8。
第十二步:进入点的层级,调整出眼睛。
第十三步:选择刚刚调整出来的眼睛的面,向内拉伸-10,并删除底面,然后进行光滑看一下效果。
第十四步:下面我们要将他们进行焊接,因为他们的关系是关联的,所以要先改边关联方式,先删除堆栈修改器里的光滑,然后点我所画的那个按钮,他们就各自分开了,选一种任何一半的模型,进行点结合,把他们结合起来,进入点的层级取消对忽略背面的选择,选择中间的一排点,按一下WELD SELECTED,这样点就焊接起来了。
第十五步:选择头顶的四个面,进行拉伸为4。
第十六步:旋转拉伸的面,就象制作侧面突起一样,然后焊接后面的一排点。
第十七步:选择这四个面,因为他有角度,所以用这个make planar工具让它变平。
第十七步:选择刚才变平的四个面的中心点,用倒角倒出一个新的面,大小自己定。
第十八步:选择倒角出来的面,向内拉伸,删除底面,并加个光滑。
第十九步:把模型转换成可编辑的多边形,注意:刚才是可编辑的网格,选择一个线段,点循环,如图。

利用3Dmax进行角色动画制作标题:利用3Dmax进行角色动画制作导语:3Dmax是一款非常强大的三维建模与动画制作软件,能够创造出逼真、精细的角色动画效果。
本文将以详细的步骤,介绍如何利用3Dmax进行角色动画制作。
一、准备工作1. 安装并打开3Dmax软件:确保计算机已经安装了3Dmax,并成功打开程序。
2. 导入角色模型:选择一个合适的角色模型文件,导入3Dmax软件中。
二、设置场景与摄像机1. 创建一个新场景:在3Dmax软件中新建一个场景,用于进行角色动画制作。
2. 创建摄像机:在场景中创建一个摄像机,用于拍摄角色动画。
三、角色动画制作1. 设置关键帧:通过3Dmax的时间轴工具,设置角色动画的关键帧,包括位置、旋转、缩放等参数。
2. 动画编辑器:使用3Dmax的动画编辑器工具,可以对角色进行动画编辑与调整。
3. 动画曲线编辑器:通过动画曲线编辑器,可以调整角色动画的曲线、速率以及动画插值等参数。
4. 动画绑定:使用3Dmax的骨骼绑定工具,将角色的骨骼与模型绑定,以实现更加自然逼真的动画效果。
四、光照与材质设置1. 设置光源:在3Dmax软件中设置适当的光源,以提供角色动画所需的光照效果。
2. 材质编辑器:通过使用材质编辑器,为角色模型添加合适的材质,以增强动画的真实感。
五、渲染与输出1. 设置渲染参数:在3Dmax中设置合适的渲染参数,包括输出格式、分辨率、帧率等。
2. 渲染动画:点击渲染按钮,开始对角色动画进行渲染。
3. 输出动画:将渲染好的动画输出为视频文件,保存至指定的位置。
六、后期剪辑与效果制作1. 导入编辑软件:将渲染好的动画文件导入到合适的视频编辑软件中,如Adobe Premiere、Final Cut Pro等。
2. 剪辑与编辑:对动画进行剪辑与编辑,包括删减不需要的片段、调整画面顺序等。
3. 添加效果:在编辑软件中添加适当的特效、音效或文字等,以增强动画的表现力。
天狼工作室天狼神鹰工作室孤狼作品3D Max动画基础教程江西理工大学孤独狼搜集制作QQ: 14243347193D Max动画基础教程1基础课程0 …………………………………………………………3D Max窗口2基础课程1 …………………………………………………………创建基础3基础课程2 …………………………………………………………基础练习4第01课………………………………………………………………3D基础5第02课………………………………………………………………创建和排列6第03课………………………………………………………………键盘创建7第04课………………………………………………………………扩展物体8第05课………………………………………………………………旋转和缩放9第06课………………………………………………………………综合应用10第07课………………………………………………………………立体文字11第08课………………………………………………………………弯曲工具12第09课………………………………………………………………锥化工具13第10课………………………………………………………………扭转工具14第11课………………………………………………………………噪波工具15第12课………………………………………………………………旋转工具16第13课………………………………………………………………样条曲线17第14课………………………………………………………………几何运算18第15课………………………………………………………………路径放样19第16课………………………………………………………………*材质贴图20第17课………………………………………………………………*材质练习21第18课………………………………………………………………*材质应用22第19课………………………………………………………………*自制材质23第20课………………………………………………………………*棋盘材质24第21课………………………………………………………………*反射和倒影25第22课………………………………………………………………*渐变色材质26第23课………………………………………………………………*使用摄像机27第24课………………………………………………………………*使用灯光28第25课………………………………………………………………*使用聚光灯29第26课………………………………………………………………*动画基础30第27课………………………………………………………………*动画练习31第28课………………………………………………………………*编辑关键帧32第29课………………………………………………………………*路径动画33第30课………………………………………………………………*燃烧特效343D Max基础3D Max基础0启动3D Max 双击桌面上的3ds max立方体图标或者单击“开始”|“程序”,在程序菜单中找到discreet菜单选择3dmax再选择3dmax立方体图标。
7.1 模型制作前地准备7.2 主体模型地制作7.3 装饰结构地制作7.4 模型UV 拆分及贴图绘制07 3D 幻想风格角色模型实例制作7.1 模型制作前地准备图7-1为网络游戏BOSS角色地原画设定图,从图可以看到这是一个形角色地设计,但除了保留头,颈,躯干与四肢等基本体结构外,角色身上地生物结构都非现实体地结构。
角色全身覆满羽毛,头上长有羽翼,背部有两对巨大地翅膀,手部为锋利地爪子,而腿部也长满尖锐地鳞角。
图7-1地角色就是将类与鸟类融合地生物设计,这就是幻想风格角色地设计地一种基本类型。
图7-2为本章实例制作地角色最终效果渲染图,本章实例模型角色地设计与图7-1有异曲同工之意,都是将体与鸟类形体进行融合。
整体地形态模拟了类地站立姿势,除了躯干与上肢接近于体结构外,其它身体结构都进行了想象化地设计:下肢为动物体地形态结构,手部只有四根手指且长有锐利地指甲,脚部为鸟类生物地爪子,头顶长有细长地羽毛,背部有三对翅膀,除此以外全身还穿戴着金属。
7.2 主体模型地制作首先制作角色地头部模型,利用BOX模型编辑多边形制作,除了眼部与嘴部轮廓外其它结构尽量简单制作,节省面数,后期通过贴图来进行细节表现(见图7-3)。
然后沿着颈部往下,制作躯干胸部地模型(见图7-4),这里可以先留出肩膀地位置,注意整体地布线规律与技巧。
另外,由于角色地对称性特征,我们仍然可以只制作一侧地模型,另一侧通过Symmetry修改器命令来进行镜像完成。
接下来制作角色肩膀地模型结构,由于角色整体健硕粗壮,所以整个上半身呈倒三角地形态,而肩膀更是非常粗大,超越正常类地肩膀(见图7-5)。
沿着肩膀向下制作上臂模型(见图7-6),然后是肘关节跟小臂(见图7-7),最后制作手部模型,手部地基本结构跟体相同,只是少一根手指,另外指关节末端地顶点需要焊接,以形成锐利爪子地结构(见图7-8)。
接下来在颈部周围进行切割布线,利用面层级下地挤出命令,制作出类似于衣领地模型结构,之后将作为躯干铠甲地一部分(见图7-9)。
3Dmax动画教程:实现角色的触发动作3D Max是一种流行的三维建模和动画软件,它被广泛用于电影制作、游戏开发和其他数字媒体领域。
在这篇文章中,我们将介绍如何使用3D Max创建触发动作,以使角色在场景中动起来。
下面是详细步骤:1. 角色建模:首先,在你的3D Max中创建一个新的场景,并导入你的角色模型。
如果你还没有一个角色模型,你可以使用3D Max的建模工具来创建一个。
确保角色的挂点和关节正确设置。
2. 物理引擎:在角色模型上应用物理引擎,例如Havok或PhysX等。
这将使你能够为你的角色添加碰撞体和物理特性。
3. 动作设计:在动作编辑器中创建新的动作,并设计你希望触发的动作。
这可以是跑步、跳跃、攻击等。
确保你有足够的关键帧来定义每个动作的开始和结束。
4. 触发器设置:在场景中放置一个触发器对象。
触发器可以是一个盒子、球体或其他形状,它们将被用来检测角色与其它物体的交互。
5. 触发器动作:设置触发器的属性和条件,以触发特定的动作。
例如,你可以设置当角色进入触发器的区域时触发一个跳跃动作。
6. 触发器事件:在脚本编辑器中创建触发器的事件处理程序。
当触发器被触发时,这些事件处理程序将被执行。
通过编写合适的脚本代码,你可以将角色的动作与触发器之间的交互连接起来。
7. 动作传递:使用动画编辑器或动画层来将触发的动作应用到角色模型上。
确保你的动画与角色的骨骼结构匹配,以确保动作的正确应用。
8. 场景测试:在场景中进行测试,确保你的触发动作按预期工作。
检查角色与触发器之间的交互,并修复任何问题。
9. 优化和改进:根据需要对触发动作进行优化和改进。
你可以尝试不同的动作或触发器设置来获取更好的效果。
10. 渲染和输出:完成后,你可以使用3D Max的渲染功能来生成最终的动画序列。
选择适当的输出设置和格式,以便将角色的触发动作导出为视频或其他格式。
总结:使用3D Max实现角色的触发动作需要一些专业的知识和技巧。
3ds Max制作“黄蜂女回归”
作者:Gediminas Pranckevičius
使用软件:3ds Max,Photoshop
在这个教程中我要向大家介绍一些有用的、有趣的制作图片“黄蜂女回归”的细节。
这张图是为一个电影比赛设计的。
我真的对这个主题很感兴趣,因为那时我正在为一个电影公司工作,而且对电影海报非常感兴趣。
这类电影的海报很吸引人,五彩缤纷又鲜艳,而且经常有非常有趣的合成。
即使有时候这些海报看起来很恐怖但是也非常有趣。
为了使制作稍微简单一点,我没有做自己的电影名称,而是在网络上找了一张旧海报,尝试不太偏离那个时候的风格。
首先要做一些小的草图,使合成与原始的图片不同(图01)。
图01
用3ds Max在背景中创建一个现实场景,3ds Max可以帮我建立纽约的街道和建筑场景。
我还用3D平面建立了道路,添加四边形代替所有的小细节(图02)。
在Photoshop中我绘画了一些简单的小窗户(图03),作为可以添加到高楼、住宅和商店的一种材质(图04)。
图02
图03
图04
接下来我要做与人物有关的东西了。
根据黄金分割的规则设定位置(图05)。
然后我为窗户渲染了一个Ambient Occlusion贴图(图06),然后开始做颜色。
我主要用Lasso和Gradient 工具添加颜色。
图05
图06
完成这一步后我开始做主要的部分:黄蜂女。
用Photoshop中的钢笔工具我仔细观察了照片资料中的脸,选定一块区域然后填充颜色。
然后,用钢笔工具和Soft Round笔刷一点点地画阴影和添加一些突出(图07)。
黄蜂女的腿,汽车和惊恐的受害者是用同样的流程做的。
即使我想按照正确的顺序做,这对我来说是个很大的挑战,我花了很长的时间来尝试寻找正确的通道。
几乎所有的东西都分割成了不同的部分。
图07
值得一提的是第一个建筑,图08中右边的那一栋。
因为它看起来很不错,周围的环境绘画得也很好,我决定在Max中为它做一个细节更多的模型。
我找了一张建筑的照片,开始创建3D模型。
完成之后我渲染了一个Ambient Occlusion贴图,在Photoshop中绘画。
图08
另外就是我对用传统笔刷创建身体和黄蜂的头发很感兴趣。
在这个教程中我忽略了这个步骤的讲解(图09-10)。
图09
图10
本教程由丝路教育为您分享,感谢阅读,希望能够喜欢!。