CDRouter操作指南
- 格式:pdf
- 大小:1.83 MB
- 文档页数:16

1. Register With the NETGEAR Insight AppUse the NETGEAR Insight App to register your switch.1. On your iOS or Android mobile device, visit the app store, search forNETGEAR Insight, and download the latest app.2. Open the NETGEAR Insight app.3. If you did not set up a NETGEAR account, tap Create NETGEAR Account andfollow the onscreen instructions.4. Enter the email address and password for your account and tap LOG IN .5. Tap + in the upper right corner.6. Either use the camera on your phone to scan the serial number bar codelocated on the bottom of the switch, or type in the serial number. 7. Tap Go .8. Tap View Device to add the switch to a network.The switch is registered and added to your account.NETGEAR® S350 Series 8-Port Gigabit Ethernet Smart Managed Pro Switch (GS308T)NETGEAR® S350 Series 8-Port Gigabit PoE+ Ethernet Smart Managed Pro Switch with 2 SFP • Switch model GS308T or GS310TP• GS308T power adapter (varies by region) orGS310TP adapter with detatchable power cord (varies by region)•Installation guide2. Connect the SwitchNote: For more information, see the hardware installation guide which you can download from https:///support/.3. Check the PoE Status (GS310TP Only)PoE+ power is provided by the GS310TP switch on ports 1-8. The switch can supply up to 30W PoE+ (IEEE 802.3at) to each port, with a maximum PoE power budget of 55W across all active PoE+ ports.The PoE Max LED indicates the status of the PoE budget on the switch:• Off . Sufficient (more than 7W of) PoE power is available.• Solid yellow . Less than 7W of PoE power is available.• Blinking yellow . At least once during the previous two minutes, less than 7Wof PoE power was available.4. Discover the IP AddressAn IP address is required to configure your switch. The switch gets an IPaddress from a DHCP server (such as your router) by default. If your switch is not connected to a DHCP server, use the default IP address: 192.168.0.239.Note: Make sure that you are using the latest version of the app.1. On your mobile device, connect with WiFi to the same router as the switch.2. Open the NETGEAR Insight app and log in to your account.The current IP address of the switch is displayed.GS308T switchGaming consoleDesktopNETGEAR, Inc.350 East Plumeria DriveSan Jose, CA 95134, USA NETGEAR INTL LTDBuilding 3, University Technology Centre Curraheen Road, Cork, Ireland© NETGEAR, Inc., NETGEAR and the NETGEAR Logo are trademarks of NETGEAR, Inc. Any non‑NETGEAR trademarks are used for reference purposes only.SupportThank you for purchasing this NETGEAR product. You can visithttps:///support/ to register your product, get help, access the latest downloads and user manuals, and join our community. We recommend that you use only official NETGEAR support resources.Si ce produit est vendu au Canada, vous pouvez accéder à ce document en français canadien à https:///support/download/.(If this product is sold in Canada, you can access this document in Canadian French at https:///support/download/.)For regulatory compliance information including the EU Declaration of Conformity, visit https:///about/regulatory/.See the regulatory compliance document before connecting the power supply.Do not use this device outdoors. If you connect cables or devices that are outdoors to this device, see https:///000057103 for safety and warranty information.November 20185. Configure the SwitchWe recommend that you use a web browser on a computer or tablet to configure the switch.Note: If your computer is a Mac, use the NETGEAR Switch Discovery Tool, as described in the following section.1. Open a web browser from a computer or tablet connected to the samenetwork as your switch.You can use a WiFi or wired connection. 2. Enter the IP address of the switch.3. Enter the password.The default password is password . We recommend that you change the password to a more secure password.4. Click the Login button.Other Discovery and Configuration MethodsThe NETGEAR Switch Discovery Tool and the Smart Control Center Utility let you discover the IP address and configure the switch. •NETGEAR Switch Discovery Tool . You can use a Mac or a 64-bit Windows-based computer that is on the same network as the switch. You can use a WiFi or wired connection. When you discover the switch, this tool provides access to the local browser interface to c onfigure the switch. To download the NETGEAR Switch Discovery Tool, visit/support/product/netgear-switch-discovery-tool.aspx .•Smart Control Center Utility . You can use a Windows-based computer that is on the same network as the switch. This utility requires Adobe Air. If Adobe Air is not detected during Smart Control Center Utility installation, you are prompted to allow Adobe Air to be installed. To download this utility, visit /support/product/SCC .Note: If you cannot discover or configure the switch, you might need totemporarily disable the firewall, Internet security, or antivirus programs. Make sure to reenable these security services after you discover and configure the switch.PoE ConsiderationsThe PoE and PoE+ power supplied by the GS310TP switch is prioritized in ascending port order (from port 1 to port 8), with a total power budget of 55 watts with a 67.5 watt power adapter. If the power requirements for the attached powered devices (PDs) exceed the total power budget of the switch, the PD on the highest-numbered port is disabled to make sure that the PDs that are connected to the higher-priority, lower-numbered ports are supported first.Just because a PD is listed as an 802.3at PoE powered device does notnecessarily mean that it requires the maximum power limit of the specification. Many PDs require less power, allowing all eight PoE+ ports to be active simultaneously.The following table describes the PoE and PoE+ classes and switch allocations.Device ClassStandardClassDescription PowerReserved by the Device PowerDelivered to the Device*0PoE and PoE+Default power (full)15.4W0.44W–12.95W1PoE and PoE+Very low power4.0W 0.44W–3.84W2PoE and PoE+Low power 7.0W 3.84W–6.49W 3PoE and PoE+Mid power 15.4W 6.49W–12.95W 4PoE+ onlyHigh power30.0W12.95W–25.5W* Calculated with the maximum cable length of 328 feet (100 meters). Shorter cable lengths will provide power closer to the power reserved by the switch.。

单纤双光口CC-Link单模光纤链路适配器FO2-CCL-S用户手册德阳四星电子技术有限公司版权所有侵权必究目录前言 (3)版权声明 (3)版本信息 (3)产品包括 (3)1、概述 (4)2、产品特性及主要技术参数 (5)3、外部结构及各部件说明 (6)4、内部原理框图 (8)5、CC-Link光纤链路适配器的各种应用方案 (9)6、常见问题解答 (12)7、订货信息 (13)前言感谢阁下使用德阳四星电子技术有限公司出品的系列现场总线光纤链路产品。
使用前请务必仔细阅读此用户手册,你将领略其完善的功能和简洁的操作方法。
本手册将详细介绍四星电子出品的单纤双光口CC-Link光纤链路适配器FO2-CCL-M(多模)或FO2-CCL-S(单模)的使用方法,多模和单模产品仅是使用的光纤(多模光纤和单模光纤)不同,其它功能完全相同,型号中的FS字符是德阳四星电子技术有限公司注册商标的缩写。
请用户按照用户手册中的技术规格和性能参数进行操作,本公司不承担由于用户操作不当造成的财产损失或人身伤害责任。
本公司有权在未经声明前根据技术发展的需要对本手册内容和产品功能进行修改。
版权声明本手册版权属于德阳四星电子技术有限公司所有,任何个人和机构未经本公司书面同意进行全部或部分的内容复制将承担相应的法律责任。
为德阳四星电子技术有限公司注册商标。
本文档中提及的其他所有商标或注册商标,由各自的商标所有人拥有。
版本信息文档名称:《单纤双光口CC-Link单模光纤链路适配器FO2-CCL-S用户手册》版本:V3.0文档和产品修改历史产品包括1、FO2-CCL-S 1台。
2、光盘1张(内含用户手册,本产品不需任何软件或驱动程序。
)1、概述CC-Link是日本三菱公司推出的著名现场总线,现在已越来越广的应用在各种工业现场,由于CC-Link总线的物理层是采用基于RS485的接口技术,这就使得当高速通信时,只能使用很短的RS485电缆,如速率为10Mbps时,使用专用CC-Link电缆最大长度不到100米。

November 14, 2016Audience: CLEC, ISP, IXC, Resellers, WirelessIndustry LetterSubject: Loyalsock Main Class 5 DCO Switch Retirement, (LYLCPAXLDS0)As set out in the Verizon North LLC “Short Term Pub lic Notice of Network Change Under Rule 51.333(a)”dated November 14, 2016, on or after February 24, 2017, the Loyalsock Main Class 5 DCO Switch (LYLCPAXLDS0) will be retired and removed from the Verizon network as part of ongoing efforts to modernize the network.General Information: The Exchange Code (435) in Numbering Plan Area (NPA) 570 currently residing in the Loyalsock Main Class 5 DCO Switch (LYLCPAXLDS0) will be moved to the Selinsgrove switch (SLGVPAXSDS0) (see details in Table A below).Table ANetwork Changes and Trunk Rearrangements:The Selinsgrove switch (SLGVPAXSDS0) will be the recipient office of traffic migrated from the Loyalsock Main Class 5 DCO Switch (LYLCPAXLDS0). Traffic bound for the code listed in Table A will be delivered via the Bloomsburg 71T tandem (BMBGPABL71T).After all traffic is migrated off of the Loyalsock Main Class 5 DCO Switch (LYLCPAXLDS0), this switch will be retired and removed from the network.All carriers including CLECs, IXCs, IECs, and wireless and paging carriers, will need to secure new trunk groups built to the Selinsgrove switch (SLGVPAXSDS0) or have existing trunk groups to that switch augmented. Carriers that are code holders for access connectivity in the Loyalsock Main Class 5 DCO switch (LYLCPAXLDS0) will be required to reposition the codes to the Selinsgrove switch (SLGVPAXSDS0).All ASRs for the Selinsgrove switch (SLGVPAXSDS0) must be received no later than February 4, 2017 in order to provide sufficient time to migrate the traffic described above.All traffic must be moved by February 18, 2017. All ASRs for the Selinsgrove switch (SLGVPAXSDS0) must carry the project code of LYLCPAXLRS0.Please adhere to industry standards using normal procedures that pertain to updates and changes to the Local Exchange Routing Guide (LERG) for all NXX codes subject to the retirement of the Loyalsock Main Class 5 DCO switch (LYLCPAXLDS0).For inquiries related to the proposed network reconfiguration, or to arrange a meeting with Verizon Network Engineering and Planning personnel, please contact your Verizon Account Manager. Sincerely,。

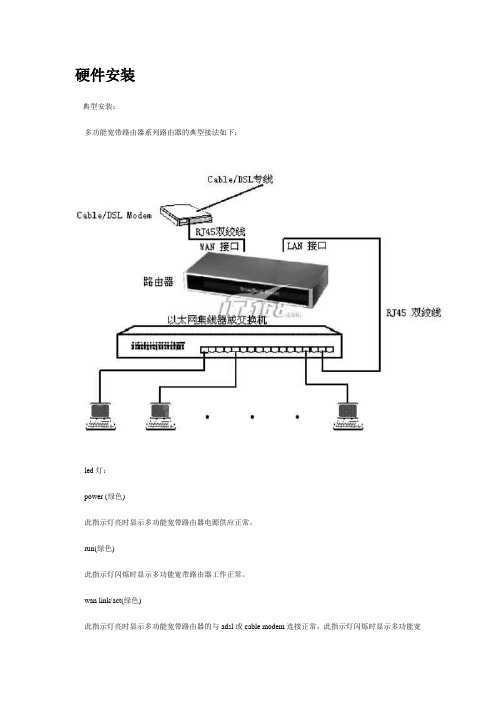
硬件安装典型安装:多功能宽带路由器系列路由器的典型接法如下:led灯:power (绿色)此指示灯亮时显示多功能宽带路由器电源供应正常。
run(绿色)此指示灯闪烁时显示多功能宽带路由器工作正常。
wan link/act(绿色)此指示灯亮时显示多功能宽带路由器的与adsl或cable modem连接正常,此指示灯闪烁时显示多功能宽带路由器正在收发wan端数据。
lan link/act (1,2,3,4)此指示灯亮时显示lan口已连线到局域网,此指示灯闪烁时显示多功能宽带路由器正在收发lan端数据。
wan 10/100m (绿色)此指示灯亮时显示相应的wan口连接速度为100m。
指示灯灭时显示相应的wan口连接速度为10m。
lan 10/100m (1,2,3,4) (绿色)此指示灯亮时显示相应的lan口连接速度为100m。
指示灯灭时显示相应的lan口连接速度为10m。
接口:lan (1,2,3,4)10/100mbps rj45自适应。
如果连通,路由器上的led灯与局域网集线器或交换机相应的led灯均应点亮。
wan10/100mbps rj45自适应。
连接cable/dsl modem或不同网段的局域网接口。
power此口接电源。
reset复位按钮,可用来完成重新启动多功能宽带路由器,或恢复出厂设置等工作。
按住复位按钮10秒钟松开,可将路由器回复到出厂设置。
快速设置路由器通过网页浏览器软件进行设置,目前的浏览器软件都大同小异,下面将以win95/98/win2000/winxp 等系统内置的ie浏览器(microsoft internet explorer)为例,使用其他浏览器的客户可参照执行。
请参照以下步骤,通过浏览器进入及设置多功能宽带路由器。
步骤3:键入预设的用户名称及密码后,将会出现多功能宽带路由器的设置界面。
首页显示为路由器当前状态步骤4:请选取界面左上方菜单中的“快速安装”,快速安装界面用来设置宽带供应商提供的宽带参数。

目錄CD 60 / DVD 100 NAVI (3)CDC 40 OPERA (59)CD 30 / CD 30 MP3類型1 (91)CD 30 / CD 30 MP3類型2 (113)行動電話入口 (133)CD 60 / DVD 100 NAVI說明 (4)收音機 (16)CD播放機 (22)導航 (30)索引 (56)4說明說明一般資訊 (4)防盜特色 (5)概觀 (7)操作 (8)音調設定 (14)音量設定.......................15一般資訊資訊娛樂系統為您提供先進的車內資訊娛樂。
收音機針對每種可用波段,可以設定10個自動電台記憶和10個手動電台記憶。
內建的CD撥放器可撥放音樂CD和MP3CD。
整合式換片匣裝置(若適用)最多可以裝入六張CD。
另外,您可以將外部訊號源,例如,行動電話,連接至資訊娛樂系統。
數位音質處理器為您提供數個預設的等化器模式,以取得最佳的音質。
導航系統帶有動態路徑規劃,會不負所託地引導您前往目的地,而且如果您要的話,該系統可自動避開塞車或其他交通路況問題。
另外,資訊娛樂系統可以透過方向盤上的控制來操作。
此外,資訊娛樂系統可配備行動電話入口(Mobile phone portal)。
控制元件的巧思設計、清楚的顯示幕讓您能夠輕鬆地憑直覺操控系統。
操作與交通安全方面的重要資訊說明5收音機收聽收音機收聽可能被靜電、噪音、失真情況干擾,或者收聽訊號因為■離開發射臺的距離改變、■建築物反射而多路接受,■影射屏蔽等原因而失去。
防盜特色資訊娛樂系統配備有電子安全系統,用於防盜目的。
因此,資訊娛樂系統只能在您的車輛內工作,對於盜賊沒有價值。
6說明說明7概觀儀錶板上的控制元件1e 旋鈕 (8)快速按下:開啟/關閉資訊娛樂系統 (8)按住:啟動/解除靜音 (8)轉動:調整音量 (8)2 b 按鍵 (31)彈出導航CD/DVD (31)3導航CD/DVD槽 (31)4NAVI (31)導航選單 (31)5主 (8)重新調用主顯示幕 (8)6多功能旋鈕 (8)轉動:選擇選單項目和指令 (8)按下:確認選擇(OK) (8)7資訊 (8)額外,取決於狀況的資訊 (8)8聲音 (14)聲音設定 (14)90...9 電台按鍵 (16)長按:儲存電台 (16)短按:選取電台 ............1610u 按鍵 . (45)重複上一道導航訊息 (45)11G 按鍵 (34)重新調用住家地址 (34)12BC (6)行程電腦(如果可用) (6)13設定 (8)設定選單,取決於選取的功能 (8)14搖臂開關 (18)收音機:向前/向後搜尋 (18)CD/MP3: 向後/向前跳過曲目 (23)導航:滾動地圖顯示幕和選擇選項 (49)15TP (19)啟動或關閉交通路況廣播服務 (19)16音訊 (16)在收音機和CD選單之間切換 (16)17音頻/ MP3 CD 插槽 (23)18a 按鍵 (23)彈出音頻/ MP3 CD (23)方向盤音響控制器1指輪 (8)轉動:選擇選單項目和指令 (8)按下:確認選擇(OK) (8)2q 按鍵 (16)收音機:選擇電台按鈕 (16)CD: CD 重啟 (23)MP3: 下一專輯 (23)3p 按鍵 (23)在收音機和CD/MP3模式之間切換 (23)8說明4c 按鍵 (18)收音機:向後搜尋,在電台記憶體向下滾動 (18)CD/MP3: 向後跳過曲目,快退 (23)5d 按鍵 (18)收音機:向前搜尋,在電台記憶體向上滾動 (18)CD/MP3: 向前跳過曲目,快進 (23)6指輪 (15)轉動:調整音量 ............15主顯示幕中的符號音頻功能AM=選擇AM波段FM=選擇FM波段AS=選擇FM 或 AM 自動保存水準。
CD播放器使用说明书范本初次接触CD播放器的人,可能会面临使用上的困惑。
为了帮助大家更好地了解和使用CD播放器,本文将提供一份简明扼要的CD播放器使用说明书范本。
通过了解以下内容,您将能够快速上手和充分享受CD音乐的魅力。
一、开机与关机1. 开机:将CD播放器插入电源插座并打开电源开关,此时屏幕上会显示相关指示灯。
2. 关机:将电源开关关闭后,再拔掉电源插头,待屏幕及其指示灯熄灭后,方可断电。
二、插入光盘1. 将CD光盘轻轻地放入播放器的光盘托盘中,确保盘面朝上。
2. 轻轻按下关闭托盘的按钮,光盘托盘将自动关闭。
三、播放CD音乐1. 打开播放器后,屏幕上会显示菜单选项。
使用遥控器或播放器前面板上的导航按钮,选择“播放”选项并按下“确认”按钮。
2. 屏幕将显示光盘上的曲目,使用导航按钮选择您想要播放的曲目,并按下“播放”按钮即可。
四、音量控制1. 音量的调节可以通过遥控器上的音量加减键进行。
2. 您还可以在播放器前面板上找到音量旋钮,通过顺时针或逆时针旋转来调节音量大小。
五、音效调节1. 大多数CD播放器都具备音效调节功能。
通过遥控器上的声音模式按键,您可以选择自己喜欢的音效模式,如“标准”、“摇滚”、“流行”等。
2. 您也可以根据个人喜好通过播放器前面板上的音效按键自定义音效。
六、暂停和继续播放1. 在播放音乐过程中,您可以按下遥控器上的“暂停”按钮,音乐播放会暂停。
再次按下“继续”按钮,音乐将从暂停位置继续播放。
2. 若您使用的是播放器前面板上的按钮,可以找到相应的暂停和继续播放按键,并操作同上。
七、停止播放和弹出光盘1. 在音乐播放过程中,您可以按下遥控器上的“停止”按钮,音乐会停止播放并回到初始状态。
2. 如需弹出光盘,请在播放器前面板上找到“弹出”按钮并按下,光盘托盘将自动打开,您可以轻轻取出光盘。
八、定时关闭功能1. 如果您希望在一定时间后关闭CD播放器,您可以使用定时关闭功能。
在遥控器上找到“定时关闭”按钮,并按下。
OPERATING MANUAL CD-10 – CD-20 – CD-30* non contractual picturesDear Customer,Thank you for purchasing one of the 3 Micromega CD players: CD-10, CD-20, CD-30. These players are mainly different by their audio characteristics. This manual is then common for the 3 models.This unit provides ease of use and sonics of the highest quality. Please pay close attention to this instruction manual, and read it fully before attempting to operate. It is designed to ensure you maximise your pleasure of CD player and familiarise you with its many unique functions .CHECKINGCheck that the carton has no damage. Should you have any doubt about its condition,The standby LED lightens up indicating that the unit is in standby mode.Press once the CD key of the remote control or the STANDBY key of the unit.If there is a disc, reading starts and its content is displayed. Otherwise it indicates:DISPLAY OFFYou can choose to minimize the display by pressing the key Display ▼ of the remote or by a long pressure on the DISC key of the unit.To come back to normal mode, press again on the MODE key. The display shows:In stop mode, after reading the content of the disc, the unit will display the name of the artist and the title of the albumBecause the display has 10 characters only, if the content is larger than this number, the display will scroll the text.DIGITAL OUPUTYou can activate the Digital output by executing a long pressure on the MODE key at any moment. This is necessary if you wish to use a separate Digital to Analog converter or if you wish to make a Digital recording. When activated, the display indicates:An optional DB9 female connector could be installed on the rear panel of CD player allows controlling it via RS232 interface. It accepts the following format:Baud Rate : 19200 Bauds Data bits : 8 Parity bit : None Stop bits : 1 Flow control : NoneYou will find complete instructions concerning this interface in the separate RS232 CD manual.AUDIS sarl. 13-15, rue du 8 mai 1945, ZA de la Haie Griselle, 94470 Boissy Saint Léger FRANCE TEL: +33 (0)1 4382 8860 - FAX: +33 (0)1 4382 6129 - INTERNET: TECHNICAL CHARACTERISTICS CD-XXDiscs supported ……………………………………………………………………………………..…… CD, CD-R, CD-RWAudio characteristicsBandwidth ( - 0.5dB )…………………………………………………………………………………….………… DC – 20Khz Linearity at –90dB………………………………………………………………………………………….……………. < 0.5dB Signal/Noise + THD…………………………………………………………………………………………….. < -96dB à1kHz Crosstalk………………………………………………………………………………..…………………….… >100dB at 1kHz D/A conversion type………………………………………………………………………………………………..………….. ∑∆ Oversampling (CD-10, CD-20)…………………………………………………………………………………..………… none Oversampling (CD-30)…………………………………………………………………………………….…………. 132.3 kHz Output impedance ……………………………………………………………………………………..………………….. 600 Ω Output level ………………………………………………………………………………………………………… 2Vrms / 0dBPowerPower consumption (Max) CD-10………………………………………………………………………………………... 20 W Power consumption (Max) CD-20, CD-30……………………………………………………………………………….. 40 WDimensions : ( L x P x H mm)………………………………………………………………………………... 430 x 250 x 70Weight CD-10……………………………………………………………………………………………….…….……….. 4.6 kg CD-20, CD-30…………………………………………………………………………………………….…….…. 5.6 kgWARRANTYThis warranty will start from the date of purchase of the Micromega product.Statutory warranty regulations apply in the country where the Micromega product was purchased. In case of complaints please contact the dealer who supplied your Micromega product.WARNING: Warranty will be nulled if the unit is not shipped back in its original packing or if the serial number has been modified or erased.Warranty Certificate Dealer's StampDate of PurchaseSerial Number。
瘦客户机设置、连接操作指南
一、开机界面
终端开机后会出现短暂的花屏现象,然后会出现连接信息,最后固定在登录的界面上,用户可以选择你所要进入的系统进行登录(如图1)。
图1
终端包含的参数:
Connection to 主计算机名:这是 NStation L110 在本地局域网中找到装有 NCT-2000-XP 服务的主计算机名
Connection:中文意思“ 连接” ,登陆到列表框选定的主计算机。
Sleep:中文意思“ 睡眠”
Setup:中文意思“设置”,包括本机IP设置、TS Options设置、CMOS密码设置等。
Info:中文“ 信息”,包括产品系列号,IP 地址等
二、简单设置
打开登录的界面后,如果Connection to选项中没有可供选择的系统名称列表,则需要进行一些简单的设置:
1、点击登录界面上的setup进入设置界面(如图2)。
图2
2、在设置面板选择Autodetdction(自动选择局域网内装有NTC-2000-XP系统的计算机)选
项,然后点击Eable-Diseable按钮添加选项(如图3),Autodetdction后有“√”为已选择。
(TS Options:TS 全称 Terminal Server,是指装有 NCT-2000-XP 软件的服务。
)
图3
3、有时候选择项需要进行编辑设置,这时,需要在选择并点击Autodetdction(或TS2、TS3)
后,再点击Edit按钮进行编辑。
下面是终端设置的其他几个相关界面的简单介绍,在一般应用中基本不用用户自己更改设置。
CDRouter
QAcafe
系统基本要求
一台配有两块网卡的Linux主机
•512M 内存(推荐1G)
•推荐P4以上的CPU
•30M 以上的可用磁盘空间(/usr/bin and /usr/share)
•Linux 内核版本2.4.7-10 或更高
•系统中要装有组件Tcl/Tk8.3
•Acrobat Reader 4.0 用于阅读文档
操作系统推荐:
•Redhat8.0 或更高
•SuSE9.0 或更高
•Debian 3.0 或更高
在下载完成后,开始进行安装。
安装前首先要将license文件拷贝到Linux主机下面的/etc目录中
如果没有该license,CDRouter将不会运行.将下载的可执行文件(cdrouterdemo-3.6.exe) 拷贝到你的Linux主机下面的根目录.
以系统管理员权限运行该可执行文件.注意,在运行之前你可能需要先将文件变为可执行的文件。
该操作可通过chmod命令进行:
Example:
# chmod755 cdrouterdemo-3.6.exe
# ./cdrouterdemo-3.6.exe
cdrouterdemo会被安装到
usr/share/doc/cdrouterdemo
安装完成后,进入该目录,运行buddy –info可以看到有关cdrouterdemo的相关信息。
下面可进入CDRouter的图形化界面buddyweb
注意,针对机顶盒TR069测试,由于有些机顶盒只有WAN上行接口,所以这里还有一个特殊配置项需要修改:
# testvar useInternalDHCP no
改为
testvar useInternalDHCP yes。