日立OSP75VAL1变频空压机说明书
- 格式:pdf
- 大小:13.33 MB
- 文档页数:68
空压机使用说明书目录1. 概述 (90)2. 启动和运行程序 (93)3. 控制和仪表 (95)4. 润滑油、冷却器和油细分离器 (104)5•空气滤清器 (105)6•故障排除 (106)1. 概述压缩机:原装进口的螺杆压缩机主机是一靠啮合的螺旋形转子进行压缩的单 级容积式回转机械。
两转子都靠安装在压缩腔外的高额定负载转子轴承支承, 单 一宽度的圆柱滚子轴承装在吸气端承受径向载荷。
装在排气端的圆锥滚子轴承对 转子进行轴向定位并承受所有轴向载荷和剩余的径向载荷。
压缩原理(图1-1):压缩是通过主辅转子在一气缸内同时啮合来完成的。
主 转子有四个互成90°分布的螺旋形凸齿,辅转子有五个互成 60°分布的螺旋形 凹槽与主转子凸齿啮合。
空气入口位于压缩机气缸顶部靠近驱动轴侧。
排气口在气缸底部相反的一 侧。
图1—1是为了表示吸、排气口的反向视图,当转子在吸气口尚未啮合时, 空气流入主转子凸齿和辅转子凹槽的空腔内,此时压缩循环开始。
(见图A )当转 子与吸气口脱开时,空气被封闭在主辅转子构成的空腔内, 并随啮合的转子轴向 移动,(见图B )当继续啮合,更多的主转子凸齿进入辅转子的凹槽,容积减少, 压力升咼。
喷入气缸的油用以带走压缩产生的热量和密封内部间隙。
容积减少,压力升 高一直持续到封闭在转子内腔中的油气混和物通过排气孔口排入油气桶内的时 候。
为了生成一个连续平稳无冲击的压缩空气流, 转子上的每一容积都以极高的 连续性遵循同样的“吸气一一压缩一一排气”循环。
压缩机系统的空气流程(图4— 1):空气进入空气滤清器,流经吸气卸荷阀进 入压缩机,经压缩后,油气混合物进入油气桶内,在那里,大多数带走的油通过图1 1压缩循环速度变化和撞击从空气中分离出来, 并落入油气桶内。
空气和残留的油进入分离 器,在那里油被分离并通过分离器壳体与压缩机之间的连接管道流回压缩机。
空 气流经压力维持阀,排气止回阀和冷却器,然后进入车间空气管线。
“日立"计算机机房成套空调设备安装、操作和维护说明书适用于中/低室外温度的型号,室内部件:RP-10ACYRP-15ACY室外部件:2×RCR-5AIY2×RCR-8AIY适用于高室外温度的型号,室内部件:RP-10ACTRP-15ACT室外部件:2×RCR-8AIY2×RCR-10AIY本说明书将介绍设备的标准使用,因此,建议不要超出本说明书范围使用设备,如需要可与当地代理商商讨。
本说明书看起来比较费尽,将就着看吧!“日立”成套空调:室内部件:RP-10ACYRP-15ACYRP-10ACTRP-15ACT室外部件:RCR-5AIYRCR-8AIYRCR-10AIY操作说明:设备的启动:1、合上总电源开关2、将热继电器调至你所要求的温度,详见19页说明3、按下“ON”开关,设备就启动了设备运行停止:1、按下“OFF”开关,制冷操作和电扇停止工作2、当设备要长时间停止工作时,切断主电源开关注意:总电源接通以前,机轴箱加垫器至少要工作12小时指示灯:该设备使用了11个指示灯分别表示“电源待用状态”、“工作状态”和“报警状态”,详见19页说明。
排障:设备不能启动:1、总电源是否接通2、总保险是否正常制冷效果差:1、蒸发器和/或压缩机工期是否充分2、检查恒温器所处位置3、检查空气过滤器堵塞情况详情参见第36页维护:1、清理或更换过滤器2、用吸尘器清洁机箱3、清理冷凝液槽,排水管及增湿器箱4、清理空冷压缩机详情参见第28页准备原始检查:所需资料:有关安装场地的测量及建筑方面的信息。
安装场地:所提供的安装场地要便于走线、管路布置和通风,保证室内部件不能出现空气供应短路情况,室外部件应避免强水流。
安装环境:按图1,检查影响维护工作及限制空气流通的障碍物。
地基:检查、确保地面平整,水平并且够硬,要考虑到图2和图3中规定的最大倾斜度和部件的重量平衡,室内部件建议用所提供的地脚螺丝,穿过安装板固定(见“尺寸图”中的位置);室外制冷装置确保设备安装在钢铁结构地基的硬地上,(见图4),使得无论是地面安装或房上安装设备都比较整洁。
空压机说明书空压机说明书工作原理:皮带传动式单级压缩机的工作原理是,电机通过三角带驱动压缩机主机皮带轮带动曲轴,使活塞在气缸内作往复运动压缩空气,引起气缸容积变化。
在压缩行程中,气缸容积缩小,气缸内的空气压缩到额定排气压力后,通过排气阀的作用,经过排气管、单向阀进入储气罐。
皮带传动式两级压缩机的工作原理是,一级压缩空气通过连接管再进入另一只气缸,将气缸内空气压缩到额定排气压力后,通过排气阀的作用,经过排气管、单向阀进入储气罐。
压缩机装有自动压力开关控制电机,当储气罐的空气压力达到所调整的排气压力时,空压机自动停机。
当储气罐的空气压力降低到一定范围内时,压缩机会重新启动,从而使储气罐里的压缩空气的压力保持在一定的范围内,达到自动控制的目的。
安装及准备:1.使用本机前需检查机头、皮带轮螺丝及各部件螺丝是否松动,并锁紧。
2.使用本机前,务必详细阅读本机使用说明书。
3.空压机必须放置于清洁、干燥、通风的地方。
皮带轮传动方向的一侧靠墙或其它物品时,最小距离应大于30cm以上,环境温度-20℃-40℃为宜。
4.启动前必须检查空压机油量是否足够,标准油位应在油镜中红圈(或红线)的中线位置,油位不得过高或过低。
5.外接电源时请参照本说明书中的空压机外接电源配线标准配电源线。
在接线前,务必按空压机出厂时的引出线连接,禁止使用非压缩机所配电机接线盒,内外接电源。
6.确认电源电压及频率是否符合本机产品合格证所规定的电压及频率,安装空压机时,必须安装塑料外壳式断路器(空气开关),禁止使用闸刀控制空压机。
7.确认所购空压机是否符合您所需要的额定排气量和额定排气压力。
使用、维护和保养:1.使用前应检查压缩机皮带轮转动方向,是否符合压缩机防护罩所粘贴的箭头方向。
2.启动或停止空压机必须用压力开关控制,拔起压力开关的圆钮,空压机即启动;反之,空压机即停止。
3.在使用过程中,若发现空压机有异常情况,应立即切断总电源,待事故排除后,方可重新启动。
空气压缩机使用说明书一、操作注意事项:1、压缩机必须定期检修,并保证在良好工作状态下工作。
2、在压缩机组运行前,必须注意不可有人在机器上进行检修工作。
3、压缩机应在技术规范规定的范围内运行。
4、不可以在可能吸入易燃、有毒或腐蚀性蒸汽或气体的环境中运行压缩机。
5、注意人不可以接触管路系统,尤其是排气管或是在运行中的高温部件。
6、压缩机组运行时,操作人员不可做其他别的工作,以适时监控压缩机组的运行状态。
二、维修工作注意事项:1、维修工作只可在停机并完全放空的压缩机上运行。
若有必要,将压缩机系统内的高压气体放空。
首先应断开电源控制箱的总闸,为了防止误开机组,应将总闸锁上,或者贴一张相应的指示标签。
2、开始工作前,应全部打开凝液分离器上的手动排水阀,使得压缩机组完全放空,没有压力。
3、每次修理或改造安全设备时,如果要求有修改后检查合格证的,必须经有关监测主管部门重新验收认可。
4、在压缩机组上,只可用原装备件和推荐使用的零部件进行维修。
5、在维修时要严格保持清洁,拆下的零件应置于干净的地方,并对不同的零件采取用布、纸或胶布遮盖起来,以防尘污。
6、维修后,检查一下确定没有工具,零部件和抹布留在压缩机组上面或者里面。
7、压缩机组完全降温前,决不可用易燃溶剂清洗零部件。
零部件用溶剂清洗后,然后用压缩空气将零部件吹洗干净。
8、用压缩空气吹设备时,应十分小心,并戴护目镜。
三、压缩机的主要性能参数:a、公称容积流量:3m³/minb、吸气压力:0.1MPac、额定排气压力: 4.0MPad、吸气温度:≤45℃e、各级排气温度:<180℃f、输气温度:≤50℃g、压缩介质:空气h、冷却水耗量:≥3.5 m³/hi、润滑油温度:≤70℃j、气缸直径:一级φ285mm二级φ155mm三级φ75mm k、活塞行程:95mml、转速:740r/minm、配备动力:Y280M-8,740r/min,450KW,AC380V/50HzIP44 B3 n、压缩机外形尺寸(长×宽×高):~2350×1900×1500(mm)o、全机重量: 2500kgp、震动烈度:≤28.0q、各级排气压力:一级排气压力:0.27~0.37MPa二级排气压力:1.2~1.39MPa三级排气压力:4.0MPa四、气路系统:气路系统的作用,主要是将气体引向压缩机,经压缩机各级压缩之后,再引向使用场所,本机的主要气路流程示意如下:其中空气滤清器、一级气缸、一级冷却器、二级气缸、二级冷却器、二级油水分离器、三级气缸、三级冷却器、三级油水分离器和以上部件连接的管道组成压缩机的气路主管路,排除油、水用的排污管路以及连接压力表的管路和控制管路等组成压缩机气路的辅助管路;用户在使用该机前,必须增加后续管道和阀门分别与送气接头、排污接头相连接,以备把压缩空气送至使用场所和把油水引至合适的位置排放掉,本机的排污是自动排污,排放的时间间隔约为20~30min排放一次,排放时间约为10s,用户可根据当地的空气湿度进行适当的调整。
空压机的使用手册一、引言空压机作为一种广泛应用于现代工业生产中的设备,具有提供压缩空气的功能。
它广泛应用于各个行业,包括建筑、制造业、化工等等。
本篇文章将为大家提供一个全面的空压机使用手册,以帮助大家更好地理解、操作以及维护空压机。
二、空压机的基本原理1. 压缩空气的生成空压机通过将大气中的空气进行压缩,使其体积减小,压力增加。
这样的过程可以通过一系列的机械装置实现,包括压缩机、冷却器、过滤器等。
压缩空气可用于驱动各种机械设备、工具和控制系统。
2. 压缩空气的质量在使用空压机时,我们需要关注压缩空气的质量。
压缩空气中可能会含有水分、油分、异物等,这些对于一些敏感的设备和工艺会产生不良影响。
我们需要通过适当的过滤设备和处理方法,提高压缩空气的质量。
三、空压机的安全操作1. 了解设备在操作空压机之前,我们需要详细了解设备的工作原理、结构和安全特性。
这包括了解各个控制开关、压力表、冷却器和过滤器的位置和功能,以便我们在操作时可以准确掌握设备的状态及时调整。
2. 操作程序在启动空压机之前,我们需要按照正确的操作程序进行操作。
这包括检查设备的电源、气源和排水系统是否正常,确认各个控制开关的位置是否正确。
在启动设备后,我们需要检查设备是否正常运行,并观察压力表的变化以确保设备工作在正常范围内。
3. 安全操作技巧在操作空压机的过程中,我们需要注意以下安全操作技巧:- 不要将手指、手臂或其他物体伸入运行中的设备内部。
- 避免在压力高的情况下打开设备的排水阀门。
- 当设备需要进行维护或修理时,应首先切断设备的电源,并等待设备冷却。
- 定期清洁设备的过滤器,并定期更换润滑剂等易耗品。
四、空压机的维护保养1. 检查和更换滤芯空压机中的滤芯可以有效地去除压缩空气中的杂质,保证压缩空气的质量。
我们需要定期检查并更换滤芯,以确保设备的正常运行。
2. 清洁冷却器冷却器常常会因为长时间的使用而积累灰尘和脏物,导致散热效果降低。
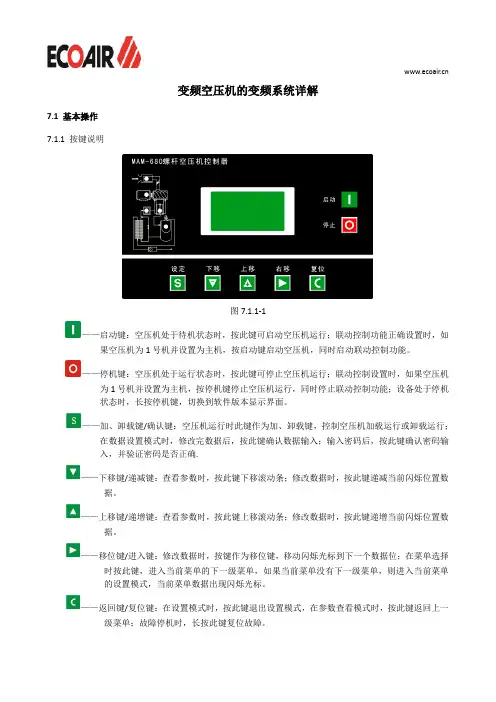
变频空压机的变频系统详解7.1 基本操作7.1.1 按键说明图7.1.1-1——启动键:空压机处于待机状态时,按此键可启动空压机运行;联动控制功能正确设置时,如果空压机为1号机并设置为主机,按启动键启动空压机,同时启动联动控制功能。
——停机键:空压机处于运行状态时,按此键可停止空压机运行;联动控制设置时,如果空压机为1号机并设置为主机,按停机键停止空压机运行,同时停止联动控制功能;设备处于停机状态时,长按停机键,切换到软件版本显示界面。
——加、卸载键/确认键:空压机运行时此键作为加、卸载键,控制空压机加载运行或卸载运行;在数据设置模式时,修改完数据后,按此键确认数据输入;输入密码后,按此键确认密码输入,并验证密码是否正确.——下移键/递减键:查看参数时,按此键下移滚动条;修改数据时,按此键递减当前闪烁位置数据。
——上移键/递增键:查看参数时,按此键上移滚动条;修改数据时,按此键递增当前闪烁位置数据。
——移位键/进入键:修改数据时,按键作为移位键,移动闪烁光标到下一个数据位;在菜单选择时按此键,进入当前菜单的下一级菜单,如果当前菜单没有下一级菜单,则进入当前菜单的设置模式,当前菜单数据出现闪烁光标。
——返回键/复位键:在设置模式时,按此键退出设置模式,在参数查看模式时,按此键返回上一级菜单;故障停机时,长按此键复位故障。
7.1.2 指示灯说明7.1.3 状态显示与操作机组通电后显示如下界面:上电显示画面延时5秒后,显示以下主界面:主画面按下移键进入以下菜单选择界面:一级菜单画面7.1.4 运行参数、菜单按下移键移动黑色滚动条到“运行参数”菜单后,按进入键后切换到下一级菜单:排气温度高时亮、排气温度传感器失灵时亮。
油滤器使用时间到预警时亮。
油分器使用时间到预警时亮。
移动滚动条到对应菜单项,按进入键,查看具体参数,如查看“风机电流”移动滚动条到“风机电流”菜单项,按进入键,切换到风机电流值界面:按返回键,返回上级菜单或主界面。
1 空压机控制面板说明1.1 监控器的功能监控器通过液晶显示器(LCD ,可以显示机组的温度、压力、运行时间及工作状态。
操作人员可以通过监控器面板上的键盘来控制压缩机, 设定控制参数, 还能选择显示所需的参数。
系统图上的指示灯反映各显示参数所在的位置。
灯光闪烁表示报警, 操作人员必须熟悉监控器面板上各种标记的含义;对面板上显示的参数和信号应能作出正确的判断。
1.2 键盘的功能“ O ” 停机——手动停机和清除故障信号。
“ I ” 持续运行——在无故障信号的情况下起动机组。
如机组正在运行, 能清除故障信号。
自动——在无故障信号的情况下起动机组,同时,选择自动运行模式。
显示——显示压力,温度及其它状态参数(1.8.3节状态显示。
编程——进入编程模式,可修改某些控制参数的设定值 (见参数设定节。
向上箭头——在状态显示模式下用于更改所显示的参数, 在参设定模式下用于增加参数的设定值。
向下箭头、指示灯测试——在状态显示模式下用于更改所显示的参数。
在参数设定模式下用于减小参数的设定值。
在缺省模式下用于测试各指示灯。
按下该键后, 所有正常的指示灯都应亮三秒钟。
1.3 状态显示在缺省的情况下, 显示器上显示二排数据, 上面一排表示系统的状态, 下面一排表示管线压力(P2和排气温度(T1。
以下是可能显示的系统状态。
(参数的单位:温度为℃,压力为 bar 。
※停机(STOP ——机组停止运行。
※待机(STANDBY ——机组暂时停止运行。
在停电或卸载计时器动作的情况下,机组进入待机状态。
注意,在该状态下的机组,随时都可能再起动。
※起动(STARTING ——机组正在起动。
※卸载(OFF LOAD——机组处于卸载状态。
※加载(ON LOAD——机组处于加载状态。
※满载(FULL LOAD——机组满载运行。
该状态仅在联机控制时才会显示。
※遥控停机(RTM STOP——机组停止运行。
当遥控起动触点闭合后,机组将重新起动。
东方日立(成都)电控设备有限公司高压大功率变频器HI系列用户使用说明书( Ver.A )目录1.简述 (3)2.变频装置和外部的接口信号列表 (4)3.变频操作 (7)3.1 互锁 (7)3.2 电机速度控制 (7)3.3 启/停变频器的操作流程 (8)4.显示界面 (11)4.1 条形图 (11)4.2 故障显示 (13)4.3 互锁纪录显示 (17)4.4 DIO(输入和输出接触点显示)界面 (18)附:常见故障及处理 (19)1、简述日本日立公司生产的High V oltage Inverter产品是一种交流电机的速度调节控制装置。
变频器的控制方式采用多级PWM叠加技术,结构采用多个变频器单元串联叠加输出的方式。
日立公司的6KV(10KV)系列变频器每相5(8)级单元,变频器输出电压由所有单元输出叠加而成,波形非常接近于正弦波,谐波含量很低,极大的减小了对交流电机的谐波污染。
整套变频装置由旁通柜,变压器柜,功率单元柜和控制柜四部分组成。
在旁通柜内,装有高压断路器和隔离刀闸等,可实现变频和工频的切换,当变频器在运行中发生重故障时,变频器发出变频切换到工频的指令,也可根据需要,人为的切换到工频。
在变压器柜内,装有多重移相变压器,原边绕组采用星形接法,副边绕组采用延边三角形接法和星形接法,可有效的抵消电网中的偶次谐波,并可有效的滤除某些奇次谐波,尽量减少变频器电源的谐波污染,变压器能承受系统过电压和变频装置产生的共模电压以及谐波的影响。
在功率单元柜内装有功率单元,变频器的输出电压为每个单元输出的PWM波形叠加后的输出。
在控制柜内,装有控制各个回路启停的开关和控制各个功率单元协调工作的控制板,以及整套变频装置同外部系统的接口等。
对变频器的启停操作,通过切换开关,既可以通过就地的按钮控制,又可通过远方的DCS控制来完成。
变频装置根据DCS给出的速度调节信号自动的控制电机的转速,并且在就地和远方都可以监视变频装置的状态。
空压机变频器控制系统操作使用说明书2011年8月目录1、简介 (3)1.1、原理 (3)1.2、特点 (3)1.2.1、安全、可靠 (3)1.2.2、四种控制方式,操作方便 (4)1.2.3、人机界面,方便系统参数设置和运行监视 (4)1.2.4 变频控制,效益可观 (4)1.3、主要功能 (5)1.4、适用范围 (5)1.5、技术参数 (5)2、操作指南 (6)2.1、四种控制方式 (6)2.2、现场手动操作 (6)2.3、现场单机操作 (7)2.4、上位机操作 (7)2.5、自动恒压操作(无人职守) (8)2.6、控制参数及设定(人机界面和计算机均适用) (9)3、故障排除 (10)3.1、常见故障及处理 (10)3.1.1、控制台手动方式时,控制按钮或变频调频旋钮不起作用。
(10)3.1.2、各项数据正常,但不能开机。
(10)3.1.3、远控时不能开机。
(10)3.1.4、人机界面不显示 (10)3.1.5、人机界面按键不起作用或显示#### (10)3.2、变频控制的一般故障及排除 (10)4、注意事项: (11)1、简介1.1、原理变频调速技术近年来发展迅速,并在许多领域发挥了重要的作用。
空压机变频节能系统原理框图如图1。
图1空压机变频节能系统原理框图由于许多空压机运行方式是加载、减载方式。
减载时电机空转,那么能源都被白白的浪费了,而电动机转速自身不能改变,只能通过改变电机频率来调节转速。
变频控制即通过改变电动机的转速来控制空压机单位时间的出风量,从而达到控制管路的压力。
原理如上:通过压力变送器测得的管网压力值与压力的设定值相比较,得到偏差,经PID调节器(PLC)计算出变频器作用于异步电动机的频率值。
由变频器输出的相应频率和幅值的交流电,使电动机上得到相应的转速。
那么空压机输出相应的压缩空气至储气罐,使之压力变化,直到管网压力与给定压力值相同。
1.2、特点1.2.1、安全、可靠1、PLC选用世界名牌产品,保证系统的可靠性PLC选用世界名牌产品,如:西门子、欧姆龙等,也可以由用户指定产品,如:施耐德、日立等。
IOD-40249/2016OPERATION MANUALMODELSAir Handling UnitFXTQ09TAVJUA FXTQ09TAVJUD FXTQ12TAVJUA FXTQ12TAVJUD FXTQ18TAVJUA FXTQ18TAVJUD FXTQ24TAVJUA FXTQ24TAVJUD FXTQ30TAVJUA FXTQ30TAVJUD FXTQ36TAVJUA FXTQ36TAVJUD FXTQ42TAVJUA FXTQ42TAVJUD FXTQ48TAVJUA FXTQ48TAVJUD FXTQ54TAVJUA FXTQ54TAVJUD FXTQ60TAVJUAFXTQ60TAVJUDSYSTEM Inverter Air ConditionersRead these instructions carefully before installation. Keep this manual in a handy place for future reference. This manual should be left with the equipment owner.Lire soigneusement ces instructions avant l’installation.Conserver ce manuel à portée de main pour référence ultérieure. Ce manuel doit être donnéau propriétaire de l’équipement.Lea cuidadosamente estas instrucciones antes de instalar.Guarde este manual en un lugar a mano para leer en caso de tener alguna duda. Este manual debe permanecer con el propietario del equipo.•Do not allow children to play on or around the unit to prevent injury.•The heat exchanger fins are sharp enough to cut. To avoid injury, wear gloves or cover the fins while work-ing around them.•Do not put a finger or other objects into the air inlet or air outlet. The fan is rotating at high speed and will cause injury.•Check the unit foundation for damage on a continu-ous basis, especially if it has been in use for a long time. If left in a damaged condition the unit may cause injury.•Placing a flower vase or other containers with water or other liquids on the unit could cause a shock or fire if a spill occurs.•Never touch the internal parts of the controller. Do not remove the front panel because some parts in-side are dangerous to touch. To check and adjustinternal parts, contact your dealer.•Do not use the heat pump for any other purposes other than comfort cooling or heating. Do not use the unit for cooling precision instruments, food, plants, animals or works of art.•Do not place items under the indoor unit as they may be damaged by condensates that may form if the humidity is above 80% or if the drain outlet gets blocked.•Before cleaning, stop the operation of the unit by turning the power off or by pulling the supply cord out from its receptacle. Otherwise, an electric shock and injury may result.•Do not wash the heat pump with excessive water. An electric shock or fire may result.•Avoid placing the controller in a spot splashed with water. Water entering the controller may cause an electric shock or damage the internal electronic parts.•Do not operate the heat pump when using a room fumigation type of insecticide. Failure to observe this could cause the chemicals to be deposited in the unit and can endanger the health of those who are hyper-sensitive to chemicals.•The appliance is not intended for use by young chil-dren or infirm persons without supervision.•The remote controller should be kept away from chil-dren so they cannot play with it.•Consult with the installation contractor for cleaning.•Incorrect cleaning of the inside of the heat pump could make the plastic parts break and cause water leakage or electric shock.•Do not touch the air inlet or aluminum fin of the heat pump as they can cut and cause injury.•Do not place objects in direct proximity of the out-side unit. Do not let leaves and other debris accumu-late around the unit. Leaves are a hotbed for small animals which can enter the unit. Once inside the unit, animals can cause the unit to malfunction and cause smoke or fire when they make contact withelectrical parts.•Never press the button of the remote controller with a hard, pointed object. The remote controller may be damaged.•Never pull or twist the electric wire of the remote con-troller. It may cause the unit to malfunction.•Do not place appliances that produce open flames in places that are exposed to the air flow of the unit or under the indoor unit. It may cause incomplete com-bustion or deformation of the unit due to the heat.•Do not expose the controller to direct sunlight. The LCD display can become discolored and may fail to display the data.•Do not wipe the controller operation panel with ben-zene, thinner, chemical dust cloth, etc. The panel may get discolored or the coating can peel off. If it is heavily dirty, soak a cloth in water-diluted neutral detergent, squeeze it well and wipe the panel clean.Then wipe it with another dry cloth.•Dismantling of the unit, disposal of the refrigerant, oil, and additional parts, should be done in accor-dance with the relevant local, state, and national regu-lations.•Operate the heat pump in a sufficiently ventilated area and not surrounded by obstacles. Do not use the heat pump in the following places.a.Places with a mist of mineral oil, such as cuttingoil.b.Locations such as coastal areas where there is alot of salt in the air.c.Locations such as hot springs where there is a lotof sulfur in the air.d.Locations such as factories where the power volt-age varies a lot.e.In cars, boats, and other vehicles.f.Locations such as kitchens where oil may splat-ter or where there is steam in the air.g.Locations where equipment produces electromag-netic waves.h.Places with an acid or alkaline mist.i.Places where fallen leaves can accumulate orwhere weeds can grow.•Do not attempt to do electrical work or grounding work, unless you are licensed to do so. Consult with your dealer for electrical work and grounding work.•Pay attention to operating sound. Be sure to use the following places:a.Places that can sufficiently withstand the weightof the heat pump yet can suppress the operat-ing sound and vibration of the heat pump.b.Places where warm air from the air outlet of theoutside unit or the operating sound of the out-side unit does not annoy neighbors.•Consult your dealer if the heat pump in operation gen-erates unusual noise.•Make sure that the drainpipe is installed properly to drain water. If no water is discharged from the drain-pipe while the heat pump is in the cooling mode, the drainpipe may be clogged with dust or dirt and water leakage from the indoor unit may occur. Stop oper-ating the heat pump and contact your dealer.2.3.MAINTENANCE•Only a qualified person is allowed to perform mainte-nance without daily maintenance.•Before touching any of the connection wirings, be sure to turn off all power supply switches.•For installation of optional parts, only a qualifited person is allowed to do so.Be sure to use optional parts specified by the manufac-turer. Installation in your own manner may result in wa-ter leakage, electric shock or fire.•Do not use flammable material (e.g. hair-spray or insec-ticide) near the product.•Only proceed with the unit cleaning after stopping the operation and turning the power supply off.Failure to do so may result in electric shocks or injury.•Do not wash the heat pump or air handler with water.Failure to do so may result in an electric shock.•Consult with installation contractor for cleaning the inside of the air handler.Wrong cleaning procedures may break plastic parts or cause water leakage or electric shock.•Use a stable prep stand.Pay extra attention when cleaning the air handler. (Maintenance and inspection)•Clean the drain pan periodically. The drain pipes clogged with dust will cause water leakage.•For cleaning, consult with your Daikin dealer. (Before each season when cooling or heating is required, clean the air handler.)•If the area around the indoor unit is very dusty, use a dust proof cover (local procurement).(Cleaning the inside of the indoor unit)•It is necessary to clean the inside of the indoor unit peri-odically.Since the cleaning requires special technologies, requesta Daikin dealer to clean them.(Electric heater replacement interval)•The electric heater should be replaced every ten years.This replacement interval is a guideline for ensuring safe and trouble-free operation of the product for many years. (Cleaning the air filter)•The air filter is an optional accessory.EXPLANATION:•Removing the air filter except when cleaning the air han-dler may result in accidents.•Replace the filter when one of the following messages displayed on the bottom of remote controller screen.- Time to clean filter & element- Time to clean filter•If using the air handler under very dusty environment, increase the frequency of air filter cleaning.•Reset the filter sign on main menu of remote controller.Refer an operation manual of remote controller for de-tail.•Consult dealer to change filter setting time to display fil-ter change alarm on remote controller screen. (The de-fault factory setting is 2500 hours.)•There are the following time, display pattern: 1250, 2500, 5000, 10000.•Do not allow the indoor unit to get wet as it may cause an electric shock or fire._______________________________________________ 4. PRECAUTIONSIf the following phenomenon occurs, contact your dealer.•Any abnormalities in the operation of the heat pump or air handler such as smoke or fire could result in severe injury or death.Turn off the power and contact your dealer immediately for instructions._______________________________________________ Phenomenon•The unit may operate with the airflow rate at high speed even though the airflow rate was set to low speed using the remote controller during ELECTRIC HEATER opera-tion.Take the following actions before contact.Check to see if an optional electric heater is installed.The unit operates with the airflow rate at high speed dur-ing ELECTRIC HEATER operation regardless of the re-mote controller airflow rate setting or display.Phenomenon•The safety devices such as fuse, breaker, ground fault interrupter, etc. often operate or operations of the opera-tion switch are unstable.Take the following actions before contact.Turn off the switch.•If the ON/OFF switch does not properly work, Take the following actions before contact.Turn off the main power switch.Phenomenon•Water leaks out from the air handle r.Take the following actions before contact.Stop the operation.Phenomenon•Error message is displayed. See the remote controller operation manual for details.Inform the dealer of the details being displayed on the remote controller.。