淋浴房安装说明书
- 格式:doc
- 大小:660.50 KB
- 文档页数:7

致用户:尊敬的用户您好!感谢您对品怡云家的信赖。
品怡云家保温整体淋浴房主要由PTC超导暖风技术与PVC防水阻燃保温板材构成。
彻底满足一年四季在家洗澡需求,为您提供一个温暖舒适安全的洗浴空间。
为保证您正确使用和维护该产品,避免对您造成不必要的麻烦,请认真阅读此安安装使用说明书进行正确使用和维护。
品怡云家保温整体淋浴房目录一、特点介绍二、配件名称三、产品测试及使用方法四、注意事项五、安装方法六、常见故障识别与处理方法七、警示八、保修说明一、特点介绍①专业的技术人员,严格的选材本公司专注淋浴房行业10余年,拥有专业的研发团队。
产品原材料均经过国家3c标准强制认证,请用户放心使用。
②操作简单根据环境温度,只需要洗澡前开启照明,吹风,风暖三个开关键,达到理想温度即可沐洗浴。
③PTC超导暖风系统具有国家3c强制认证标志的PTC超导暖风机升温系统。
三秒钟出热风,三分钟速热,使淋浴房温度达到理想洗浴温度,舒适的环境,安全的保障,让你在冬天洗澡不在寒冷。
④PVC阻燃防水保温墙板20mmPVC保温墙板,具有阻燃、保温、防水、易清理等效果。
⑤配有漏电保护器插头。
漏电保护器是防止人员发生触电事故时进行保护的。
如有人触电,触发漏电保护,自动关闭电源输出,避免触电事故扩大造成人员伤亡。
⑥随时随地都可以洗浴。
本产品可以根据需求安装在卫生间、卧室、偏房、阳台、厨房、施工工地、医院、宾馆等各种环境(因淋浴房外部开关和LED灯等不具有防水性,所以安装在室外时请在产品顶上安装遮挡板或顶棚)。
二、配件名称三、安装完毕后测试1、请先确认电源是否接通,漏电保护插头是否充电,通电状态下,红色指示灯灯亮起,按下黄色测试键,则指示灯熄灭,按下白色复位键后,红色指示灯亮起,则漏电保护插头正常,请确保漏电保护插头与电源接触良好,防止产生接触不良而造成的打火等情况。
2、请在电源接通前提下,打开照明开关,查看LED灯照明是否正常,打开吹风开关,检查PTC超导暖风机是否往淋浴房内吹风(自然风),在保持吹风开关开启的情况下开启风暖开关,正常情况下,3~5秒后能感觉到PTC超导暖风机向下吹出暖风。
欧萝芭整体淋浴房使用说明书1. 引言欧萝芭整体淋浴房是一款高品质的淋浴设备,它采用先进的技术和设计,为用户提供舒适、安全和便利的淋浴体验。
本使用说明书将详细介绍欧萝芭整体淋浴房的安装、使用和维护方法,以确保用户正确操作并延长产品寿命。
2. 安装2.1 准备工作在安装之前,请确保您已具备以下准备工作: - 确定所选位置是否合适,并留出足够的空间进行安装和使用。
- 确保水源、电源和排水管道的位置符合要求。
- 检查所需安装工具是否齐全。
2.2 安装步骤请按照以下步骤进行安装: 1. 清理安装区域,确保地面平整、干净。
2. 根据产品尺寸,在地面上标记出正确的位置。
3. 使用电钻将固定螺丝孔打入地面,并插入膨胀螺丝。
4. 将底座固定在地面上,并使用水平仪进行调整,确保底座水平。
5. 根据产品要求,连接水源和排水管道。
6. 将淋浴房主体组件安装在底座上,并使用螺丝固定。
7. 安装调节阀和喷头,确保连接紧固。
8. 检查所有连接是否牢固,并进行最后的调整。
3. 使用方法3.1 打开淋浴房在使用欧萝芭整体淋浴房之前,请确保以下操作: - 关闭冷热水阀门,以免热水或冷水直接喷出。
- 检查排水管道是否通畅。
3.2 调节温度和水流欧萝芭整体淋浴房配备了温度和水流控制器,您可以按照以下步骤进行调节: 1. 打开冷热水阀门,调节至适宜温度。
2. 转动控制器,调整所需的水流强度。
3.3 进入淋浴房当您完成温度和水流的调节后,请按以下步骤进入淋浴房: 1.打开淋浴房门,并确保门关闭完全。
2. 在进入之前,检查地面是否湿滑,以免滑倒。
3.4 使用注意事项 - 在使用淋浴房时,请不要过度用力关闭门,以免损坏门轨道。
- 使用淋浴房时,请注意保持平衡,以避免摔倒。
- 使用结束后,请及时关闭冷热水阀门,以节约能源。
4. 维护与清洁为了保持欧萝芭整体淋浴房的良好状态和延长使用寿命,请按照以下建议进行维护和清洁: - 每次使用后,用软布擦拭淋浴房表面,以去除水渍和污垢。
欧萝芭整体淋浴房使用说明书一、产品概述欧萝芭整体淋浴房是一种现代化的浴室设备,它采用高质量的材料制造而成,外观精美,功能齐全。
它不仅可以提供舒适的淋浴体验,还具有防水、防霉、防滑等特点,为用户创造一个安全、健康的洗浴环境。
二、安装步骤1. 准备工作:在安装淋浴房之前,确认浴室地面平整、排水畅通,并确保所需的水、电源接口齐全。
2. 安装基座:根据淋浴房的尺寸,选择合适的基座,并用螺丝固定在地面上。
3. 安装玻璃门:将玻璃门安装在基座上,注意门的开启方向和密封条的安装。
确保门的闭合严密,并测试开启和关闭是否顺畅。
4. 安装喷头和控制面板:根据喷头和控制面板的安装位置,将其固定在淋浴房内部墙壁上,并连接好水管和电源线。
5. 安装顶棚和底盆:根据淋浴房的型号,安装相应的顶棚和底盆,并确保与其他部件的连接牢固。
三、使用方法1. 打开淋浴房门:在确保玻璃门密封条无杂物的情况下,轻推门执手,顺畅地打开淋浴房门。
2. 调节水温:根据个人喜好,旋转控制面板上的温度调节钮,调节水温至适宜的温度。
3. 调节水流:根据个人需求,旋转控制面板上的水流调节钮,调节水流大小和强度,以获得理想的淋浴效果。
4. 开启喷头:根据需要,按下控制面板上的喷头开关按钮,启动淋浴喷头。
可以根据自己的喜好选择不同的喷头模式,如雨淋、按摩等。
5. 使用其他功能:根据淋浴房的配置,可以享受音乐、蒸汽、按摩等其他功能。
具体操作方法请参考产品附带的说明书。
四、注意事项1. 使用前请确认淋浴房门是否完全关闭,以免造成水溅出浴室。
2. 使用过程中请注意水温,避免烫伤。
3. 使用后请及时清洁淋浴房,保持干燥,防止滋生细菌和霉菌。
4. 定期检查淋浴房的密封条和连接件,如有损坏及时更换。
5. 长时间不使用淋浴房时,建议关闭电源和水源,以节省能源和水资源。
五、维护保养1. 定期清洁淋浴房的玻璃门、喷头和控制面板,避免水垢和污渍的积累。
2. 清洁玻璃门时,使用中性清洁剂和柔软的布进行擦拭,避免使用含有颗粒物的清洁剂,以免划伤玻璃。
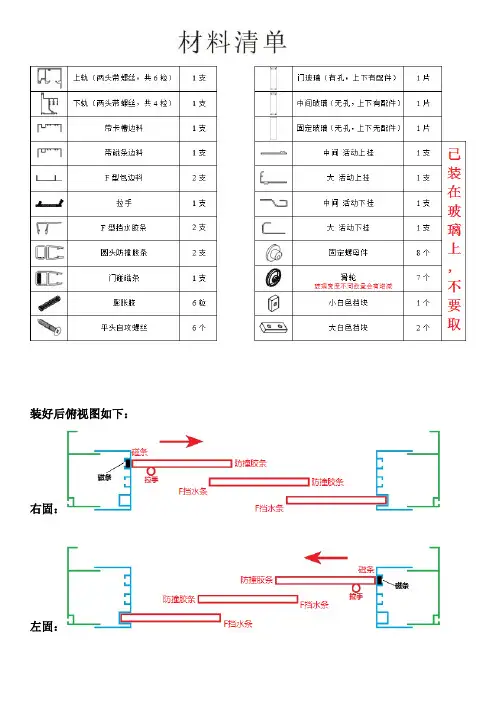
装好后俯视图如下:右固:左固:安装步骤:1、用下轨道两端随附的螺丝,将下轨道和带卡槽边料连接起来;注意立柱是平的那面朝着玻璃2、将固定玻璃卡到带卡槽边料中,并锁紧下轨道上的玻璃夹;3、用同样的方法安装上轨道,并锁紧上轨道上的玻璃夹;4、对准上下轨道中间卡槽推入中间玻璃(滑轮在上,挂钩在下,玻璃无孔,滑轮朝外);5、用同样的方法从侧面推入门玻璃(滑轮在上,挂钩在下,玻璃有拉手孔,滑轮朝内);装好后的样子(见下图)上轨道下轨道6、将带磁条边料与上下轨道用随附的螺丝连接起来;7、在立柱两边拍入F 型包边料(如下图);(以上步骤是将门平放在地面上完成的,注意用厚纸皮垫在地上,保护好玻璃的四角)8、将整个门搬至预装位置,调整好位置后,按包边铝材上的孔位在墙面做钻孔标记;注意一定要用水平尺测量立柱的垂直度9、将门移开,按标记的位置钻孔(用6毫米钻头);10、在钻好的孔内塞入随附的膨胀胶粒,用胶锤打至完全没入墙体;11、再次将整个门搬至预装位置,用随附的膨胀螺丝将框架与墙面固定;12、将门碰磁条拍入门玻璃靠拉手边(磁条分正负极,在拍入前先与边柱上的磁条试吸一下);13、安装拉手,调试滑轮至滑动顺畅,在两片玻璃的交界处卡上F型挡水胶条;14、清洁整个安装区域,在铝材与墙地接触位置均匀的打上中性防霉玻璃胶密封;注意:待48小时玻璃胶干透后方可使用!-------------------------------------------------------------------------------------------------------------------------- 当宽度超过1.6米,或浴室空间狭小不便整体搬动时,还可以采用下面这种安装方法:1. 把装拉手那片玻璃上的大活动上挂拆下来(拧开固定螺母件即可,下图画红圈部分)2. 将大活动上挂预先从侧面卡进上轨道(见下图,注意滑轮是朝向淋浴区的)3. 然后将四面框架组装好固定到墙上后,再按照:固定玻璃---中间玻璃----门玻璃的顺序依次装入玻璃。
淋浴房、整体淋浴房,简易淋浴房的选购与安装宝丽莱不锈钢淋浴房的安装与产品报价1、淋浴房购买前应注意的一些细节。
淋浴房占地面积不大,卫生间面积只要有3~5平方米即可安装。
而且市场上有很多整体淋浴房出售,但是专家表示,在选购淋浴房时,很多细节还应稍加注意。
记者了解到,现在市场上可以买到的最小淋浴房只需要卫生间有4~5平方米(1米×1米左右)。
而安装一个双人淋浴房则需要卫生间有10平方米左右(1.5米×1.5米左右)。
房间高度不能低于2.2米。
所以业内人士提醒消费者说:“不仅要在选购时注意房间的面积和高度,还要注意在基础装修前先进行测量和规划。
对于电线位置、漏电保护开关装置的设置都应及早考虑,不然就难免要返工或者给今后的使用造成不便。
”目前市场上最常见的主要是转角类淋浴房和一字形淋浴房两种。
业内人士表示,选择哪种样式,主要依据浴室格局而定。
一般来说,转角类淋浴房安装在卫生间不太好处理的墙角区域,相对比较节省空间。
窄长形卫生间则宜选择安装一字形淋浴房。
还要注意淋浴房的材料,因为如果是选择亚克力材质淋浴房的话,一些复合亚克力板中使用的玻璃丝含有甲醛,是卫生间污染的来源之一。
那么如何分辨亚克力材质是不是复合的呢?办法是察看淋浴房内部,如果亚克力板的背面与正面不同,比较粗糙,就属于复合亚克力板。
另外,尽管同是亚克力,其承重和耐用度也是不一样的,消费者还应理性选购。
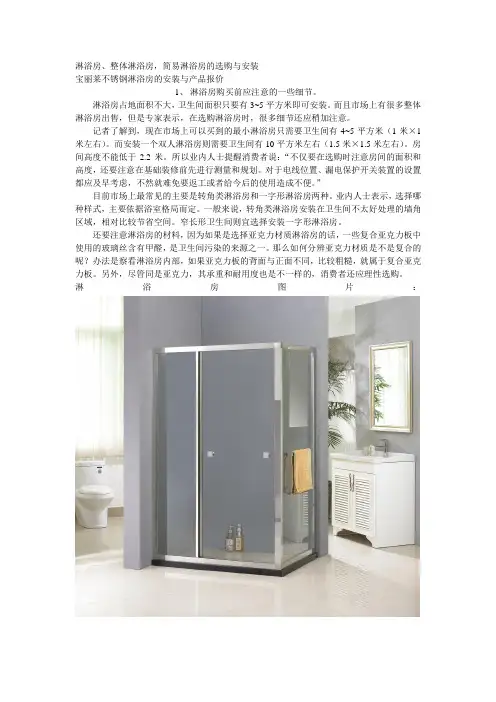
淋浴房图片:关注墙体防渗,汲排水和地漏的处理细节淋浴文化在现代人生活中逐渐被重视,进而展现出无穷的魅力和生机,装点卫生间,打造浪漫生活是家居装修的重头戏,一个经过巧妙构思及用心打点的卫生间,除了赏心悦目以外,请关注墙体防渗,汲排水和地漏的处理细节,做好细节免却日后烦恼。
墙体防渗的处理—房地产公司的毛坯房墙体是未经过防水处理的,在贴磁砖前应事先刮一层防渗水泥然后再贴磁砖,贴完磁砖后应要求装修工人对磁砖缝进行墙缝处理,这样可避免卫生间的水通过砖缝渗透到外墙,免受不厌其烦之苦。
淋浴房安装步骤说明淋浴房的安装步骤可以分为以下几个步骤:1.准备工作:在开始安装淋浴房之前,首先需要准备必要的工具和材料,例如切割工具、螺丝刀、螺丝扳手、墙面防水材料、密封胶等。
还需要测量淋浴房的尺寸,确保安装的尺寸合适,并购买符合尺寸的淋浴房。
2.安装基座:首先要安装淋浴房的基座,基座通常由铝合金或塑料材质制成。
将基座放置在淋浴区域,并使用水平尺测量确保其水平。
然后使用螺丝固定基座的每个角落。
在固定之前,还需要在基座底部涂抹一层密封胶,以防止水分渗透。
3.安装玻璃墙:接下来,安装淋浴房的玻璃墙。
先在地面上铺好保护垫,然后将玻璃墙放置在基座上,确保其与基座紧密贴合。
使用螺丝固定玻璃墙,并使用水平尺来检查其垂直度。
如果有必要,可以使用垫片调整玻璃墙的位置。
安装完第一块玻璃墙后,再安装其他的玻璃墙,确保它们之间的缝隙均匀。
最后,使用密封胶在玻璃墙与基座之间进行密封。
4.安装淋浴门:在安装淋浴门之前,先确保门框的尺寸与淋浴房的尺寸相匹配。
将门框插入到玻璃墙的垂直槽中,然后固定门框与玻璃墙的连接件。
确保门框的水平度,并对其进行调整,以使门开关顺畅。
安装完门框后,再安装门扇,确保门扇与门框紧密贴合,没有松动。
5.安装喷头和其他配件:安装淋浴房的最后一步是安装喷头和其他附属配件,例如挂钩、花洒架等。
根据喷头和配件的类型和规格,使用工具将它们固定在适当的位置。
确保管道连接牢固,并使用密封胶对连接处进行密封,以防止漏水。
6.测试和清洁:在安装完成后,进行必要的测试,例如打开水龙头,测试水流和喷头是否正常工作,检查是否有漏水等问题。
如果发现问题,及时进行修复。
然后,清洁淋浴房的外表面,并清除安装过程中留下的任何污垢和残留物。
总结:以上是淋浴房的安装步骤。
在安装之前,确保做好必要的准备工作,并且按照正确的步骤进行安装。
如果对安装程序不熟悉,建议请专业人士进行安装,以确保安装质量和使用安全。
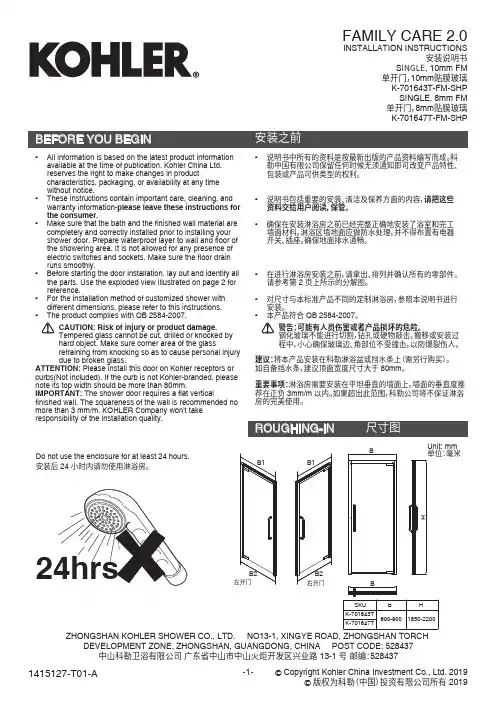
ZHONGSHAN KOHLER SHOWER CO., LTD. NO13-1, XINGYE ROAD, ZHONGSHAN TORCHDEVELOPMENT ZONE, ZHONGSHAN, GUANGDONG, CHINA POST CODE: 528437• 说明书中所有的资料是按最新出版的产品资料编写而成。
科勒中国有限公司保留任何时候无须通知即可改变产品特性、包装或产品可供类型的权利。
• 说明书包括重要的安装、清洁及保养方面的内容,请把这些资料交给用户阅读,保管。
• 确保在安装淋浴房之前已经完整正确地安装了浴室和完工墙面材料。
淋浴区墙地面应做防水处理,并不得布置有电器开关、插座。
确保地面排水通畅。
• 在进行淋浴房安装之前,请拿出、排列并确认所有的零部件。
请参考第 2 页上所示的分解图。
• 对尺寸与本标准产品不同的定制淋浴房,参照本说明书进行安装。
•QB 2584-2007。
• All information is based on the latest product informationavailable at the time of publication. Kohler China Ltd. reserves the right to make changes in productcharacteristics, packaging, or availability at any time without notice.• These instructions contain important care, cleaning, andwarranty information-please leave these instructions for the consumer.• Make sure that the bath and the finished wall material arecompletely and correctly installed prior to installing your shower door. Prepare waterproof layer to wall and floor of the showering area. It is not allowed for any presence of electric switches and sockets. Make sure the floor drain runs smoothly.• Before starting the door installation, lay out and identify allthe parts. Use the exploded view illustrated on page 2 for reference.• For the installation method of customized shower withdifferent dimensions, please refer to this instructions.•警告:可能有人员伤害或者产品损坏的危险。
乐斯怡淋浴房使用说明书
乐斯怡整体淋浴房使用说明书
步骤一:先在要安装的位置安置好石基,将下轨安置在石基正中间,再安装左右两侧固定玻璃。
然后再安装两侧边料(安装边料时应先将铝材塞卡入上下到过中再用4*35的螺丝将边料与上下导轨锁住)。
步骤二:将靠墙铝材卡入左右两边的边料中;再将装好的淋浴房框架放置在石基正中间,在调节好放置位置后,在靠墙铝材上开孔处用铅笔做上标记;用充气钻在墙面所做标记处钻孔;。
用胶锤将绿色膨胀胶锤入墙体;将装好后的淋浴房房体框架移至到石基上用螺丝锁住并装上螺丝装饰盖。
步骤三:安装上滑轮;将安装好上滑轮的活动玻璃挂装入上导轨中。
步骤四:安装活动门玻上的下滑轮,由于活动门已经挂装在上导轨上,活动门玻上的下滑轮安装时安装方法(先将滑轮安装在活动门玻璃上,由于下滑轮是可以调节的在安装好下滑轮后,按住调节键在将其卡入下轨);安装挡水条与磁条;安装活动门玻上的拉手。
注意事项一:保证滑轮运行轨道的顺畅,推拉不畅时可加些润滑油或花生油。
注意事项二:当轨道式淋浴房的滑轮处于松动或脱落状态时,要及时找维修人员调整保证滑轮对活动门的有效承载,再用纸巾沾花生油清洁轨
道内的异物,保证顺畅滑动;避免用力撞击活动门,以免造成活动门脱落。
注意事项三:不得用尖锐硬物撞击玻璃,特别是四边四角。
弗兰卡6481-1 安装使用说明书首先感谢您使用尚高淋浴房,为了保证安全正确地安装产品,避免对您造成伤害及财物损失,也为防止对安装者造成伤害。
安装前,请认真阅读本说明书,理解其内容后正确安装。
并根据基本步骤进行安装,如有任何疑问可致电当地经销商协助解决。
产品请以实物为准,此说明书仅作安装指导钢化玻璃不能进行切割、钻孔或硬物敲击;在搬移或安装过程中,小心确保玻璃边、角部位不受撞击,以防爆裂伤人。
建议:将本产品安装在尚高淋浴底盆或石基上,开始淋浴房安装前,请 拿出、排列并确认所有的零部件。
1.墙挡水胶条 2支2.侧固定玻璃 1片3.门缝磁条 2支4.活动玻璃 1片5.轮子 2套6.防弹跳固定件 2套7.导轨及配件 共1套8.侧挡水胶条 1支9.固定玻璃 1片10.限位件 1套11.靠墙方夹 4套12.拉手 1套13.导向件 1个14.不锈钢挡水条 1支15.石基 1条16.加梗转角连接件 1个12358912131614415711610安装步骤:è①石基放置在指定的安装位置,用卷尺测量两边是否符合尺寸,使石基两端与墙壁垂直,用水泥或玻璃胶将其固定密封(如图1)。
Arrayè②è③移开侧固定玻璃,在已画好记号的地方钻孔,打入膨胀胶粒,用锤子将其打入墙体内,然后再次把侧固定玻璃放置在石基(或底盆)上,用St4*35的自攻螺丝将侧固定玻璃固定在墙壁上,暂不必盖装饰盖,待整个房体安装结束后再盖。
(如图3)图3è④按照步骤②③先将两固定铰安装在侧固定玻璃上,然后将另一片固定玻璃固定在两固定铰上。
(如图4)è⑤将套入导轨装饰套筒的导轨用偏心轮组件固定在两片固定玻璃上,导轨之间依次用PVC 垫片和铝垫片隔开(注意此时先不要将装饰盖盖上,以免调节房体时不易取下,可在完成房体的安装后再盖上),在靠近侧固定玻璃处用导轨连接件将导轨与侧固定玻璃连接,然后将导轨另一端用墙角固定件固定在墙壁上,最后再将导向件与挡水条安装在石基上。
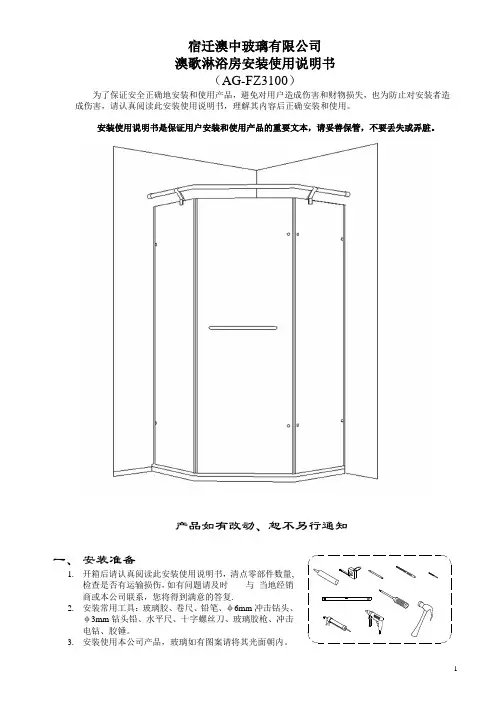
宿迁澳中玻璃有限公司澳歌淋浴房安装使用说明书(AG-FZ3100)为了保证安全正确地安装和使用产品,避免对用户造成伤害和财物损失,也为防止对安装者造成伤害,请认真阅读此安装使用说明书,理解其内容后正确安装和使用。
安装使用说明书是保证用户安装和使用产品的重要文本,请妥善保管,不要丢失或弄脏。
产品如有改动、恕不另行通知一、安装准备1.开箱后请认真阅读此安装使用说明书,清点零部件数量,检查是否有运输损伤,如有问题请及时与当地经销商或本公司联系,您将得到满意的答复.2.安装常用工具:玻璃胶、卷尺、铅笔、φ6mm冲击钻头、φ3mm钻头铅、水平尺、十字螺丝刀、玻璃胶枪、冲击电钻、胶锤。
3.安装使用本公司产品,玻璃如有图案请将其光面朝内。
二、配件总装示意图配件名称三、安装步骤1、 选择要安装的位置,首先将石基安装好。
2、 根据总装尺寸,贴墙测水平、划线、打孔,安装两边靠墙固玻,固玻靠墙两边要安装气泡胶条,同时01 气泡胶条 3根 08 吊耳 2个 02 角码 4个 09 围杆 1根 03 固玻 2片 10 围杆封头 2个 04 磁条 2根 11 铰链 2个 05 拉手 1套 12 门玻 1片 06 底轨 1根 13 挡水胶条 1根 07石基 1个在底部安装下挡水条。
(暂不收紧待门玻调整完成后再紧固)3、根据固玻高度及总装尺寸,调整围杆高度及水平,划线打孔并安装围杆。
(吊耳螺丝暂不收紧,待门玻调整完成后再紧固)4、安装门玻下挡水扁铝。
(暂不收紧,带门玻调整完成后再紧固)5、按图示及总装尺寸,将门玻和固玻用合页安装并调整好,连接门玻的固玻一侧安装气泡胶条。
6、门玻和固玻的门开合边安装斜45度挡水磁条,并调整好。
7、按照总装图在门玻上安装拉手。
8、将各位置螺丝全部紧固好,各五金件外盖盖好。
9、调整完毕打密封胶。
10、安装完毕后,清理现场,将现场打扫干净。
四、安装淋浴房应注意一下几点:1、淋浴房尺寸的预埋孔位应在卫生间未装修前就设计好。
Cabin Installation1. Choose the location where you will be installing the tray, mark the location of the traybecause you may need to move it out from the position for better assembling procedure.Check on the drain if it is fastened tight enough to make sure it won’t leak after complete tray installation.2. Also сheck all the hose connections to prevent leakage. Your plumber may want toreplace the drain flex hose to hard PVC pipes which is also possible (instructions are provided in the manual).3. For installation of the drain in the floor please refer to the Legs and frame position(top view) fig 1 (actual position of the drain and frame on the tray).4. Secure the two vertical profiles and the bottom guide rail with ST4.2×30 round head selftapping screws (fig 2);5. Fasten the top guide rail to the vertical profiles with ST4.2×30 round head self tappingscrews.6. Insert the stationary glass panels into the frame of the vertical profiles and the guiderails. Use the stationary glass holders to secure the glass in the frame. Tap in the single side strip to make the connection waterproof (fig 3);7. Place the tray in the required position. You may need to take off the front skirting panelfor easy access. Adjust the legs to level the tray in case the surface is uneven. Fasten the counter nuts on the legs to secure the height (fig 4);8. Move the tray out. Clean the surface of the tray threshold and apply a layer of siliconeon to the edge; put the back panel onto the tray and fix them with M6×20 bolt sets (fig5 & 6);9. Clean the front threshold of the tray and apply a layer of silicone. Put the glassenclosure assembly onto the tray and adjust the position. Use M6×16 bolt sets to connect the vertical profiles and back panel (fig 7);10. This step applies to those units that came with the roof kit:Clean the top surface of the built enclosure assembly and apply a layer of silicone. Put the roof on the fixed shower enclosure and using M6×20 bolt sets connect it to the back panel; (fig 8);If your unit came without roof kit, please, make sure there is a block nut secured on the top valve on the back of the wall.11. Your unit can be shipped to you with the wheel assembles installed on the doors. If not,please refer to diagram (fig 9) how to install it. Attach the top and bottom wheels to the glass doors. The wheel that goes on the top has an adjustable screw and nut to adjust the door level. Note that the lock nut of upper wheel should face up. The bottom wheel has a press button to fix the wheel on the bottom guide rail; that button should face up (fig 9);12. Secure the handles to the doors. Slide the top door wheels into the top guide rail andpush the bottom wheels in the bottom guide rail by pressing down the button. Attach the magnetic strips to the glass doors. Use the Phillips screwdriver #2 (do not use power screwdriver) to adjust the upper wheels, make sure they move smoothly and the doors close tight. Then attach the anti-water strips (fig 10);13. Seal with silicone on all the connections between the vertical profiles and the backpanel, bottom rail and tray, tray and back panel. Let it dry for 24 hours before moving the cabin;14. Connect the flexible hose to the hand shower. Secure this item in place on the backpanel. Secure the top shower head on the roof. Make sure all the water connections are water tight;15. Connect hot water to the red mark water inlet and cold water to the blue mark waterinlet (fig 11). Connect the drain flexible pipe (1 ½” outlet) to the drain opening in the floor;16. Do not move the cabin into the place until you check all the components for anyleakage or problems; open each valve to see how it works, check thermostatic valvefor hot and cold water. You may need to tight some connections (during storage and transportation connections may get loose). If you do not see any leakage, then you can move it to the permanent position, attach the front skirting panel and finish your project.One of the ways on how to change flex hose to hard PVC pipes:Disconnect the flex hose from the shower drain unit. Fasten the 1 ½” hard PVC pipe to the drain. Using the trap adaptor with washer and plastic nut fasten the PVC pipe to the adaptor from 1 ½” to 2”.Fig 1 Legs and frame position (top view)Bath Authority™ LLC / DreamLine™Shower Enclosure, Jetted/Steam Shower and Shower ColumnsLimited WarrantyCONSUMER RESPONSIBILITIESYour DreamLine™ Shower Products will remain beautiful for many years if you take care of them. Some of the waterproofing plastic strips and other seals will need to be replaced when they show signs of wear, yellowing, or are not watertight. Refer to the parts list of your manual for all seals. Water conditions in various parts of the country will determine any extra cleaning attention you may have to give your new shower enclosure or jetted shower. DreamLine™ does not recommend the use of harsh abrasive cleansers on any of its products. Harsh cleansers will damage the metal or glass finish on your shower enclosure or jetted shower. REQUESTING SERVICEHere’s what you need to do if you require service:1. Contact the dealer who sold and/or installed the product. They should be able to solve any problems you may have.2. If your dealer or contractor cannot solve the problem, they will contact or supply you with the name of the local DreamLine™ Distributor or a DreamLine™ Direct Technical Specialist3. If you are unable to obtain warranty service through either your contractor or DreamLine™ distributor, please write us directly atBath Authority™ LLC / DreamLine™909 Louis DriveWarminster, PA 18974ATTN: Customer Service Department4. Include all pertinent information regarding your claim, including a complete description of the product,model numbers, colors, finishes, and the date the product was installed. Include a description of the problem and a photocopy of your invoice and purchase receipt(s) for the products involved. Also please provide information on the name and contact telephone numbers of the contractor and distributor.Please note that under any circumstances, DreamLine™ products should not be returned to your dealer, distributor or directly to DreamLine™ without a written Return Merchandise Authorization (RMA).LIMITED ONE-YEAR WARRANTYThis warrantee extends only to the original owner/end-user for personal household use only. For commercial uses, additional limitations may apply.DreamLine™ warrants acrylic surface against blistering or cracking and chipping resulting from defect in the acrylic surface material when used under normal condition and service for a period of one (1) year from the purchase date.DreamLine™ warrants mirrors, shower doors, shower massage systems, faucet finishes and fittings to be free from defects in workmanship and materials under normal use and service for a period of one (1) year. DreamLine™ further warrants the structure of the acrylic shell against loss of water through the fiberglass laminate of the acrylic body as a result of defect in materials and workmanship for a period of five (5) years from the purchase date.DreamLine™ will, at its election, repair, replace, or make appropriate credit adjustment where DreamLine™ optional inspection discloses any such defects occurring in normal usage within the warrantee periods. Please note that DreamLine™ is not responsible for any installation or removal costs.Improper modification of any enclosure, jetted shower or shower column components may void the warrantee - so please install the product as directed in the manual. This warrantee does not cover any claim arising from abuse, misuse, negligence, accident, improper installation or operations on the part of the purchaser. This warrantee is void if the DreamLine™ product is subject to alterations, or if repairs are attempted by anyone other than an authorized agent of DreamLine™. This warrantee does not extend to any plumbing or components installed by dealers, installers or by any party other then DreamLine™.Implied warranties, including that of merchantability or fitness for a particular purpose, are expressly limited in duration to the duration of this warranty. DreamLine™ disclaims any liability for special, incidental, or consequential damages.Some states do not allow limitations on how long an implied warranty lasts or the exclusion or limitation of special, incidental, or consequential damages, so these limitations and exclusions may not apply to you. This warranty gives you specific legal rights. You may also have other rights which vary from state to state. This limited warranty provides specific legal rights as they apply within the USA, and other rights may be available, but may vary from country to country.This is our exclusive written warranty for DreamLine™ Shower Enclosure, Jetted/Steam Shower and Shower Column purchases made after May 2004. DreamLine™ reserves the right to modify this warranty at any time, and the consumer understands that such modification will not alter the warranty conditions applicable at the time of the sale of the product.10。
INSTALLATION MANUALS U M M U M O N EENI N D E XIndex (2)Sedal Connect... (3)Safety information (3)Standards & Certifications (5)Main devices description (6)Components list (7)Dimensions (9)Technical specifications (10)Installation considerations (11)Connection schematic (12)Factory settings (12)Installation guidelines (13)Clean up before start-up (17)Set up. Start-up program (18)Final checking (19)Basic operating modes (19)Alarm description and troubleshooting table (20)Maintenance (21)S E D A L C O N N E C TThis installation manual cointains essential information to make a full installation of the system. This manual includes a description of the system functions and capa-bilities, contingencies and alternate modes of operation, and step-by-step procedu-res. Please read it carefully.The shower installation must be carried out by a qualified professional following the sequence of this instruction book.Care taken during the installation will provide a long, trouble-free life for your shower.Products manufactured by Sedal are safe and without risk provided they are insta-lled, used and maintained in good working order in accordance with these instruc-tions and recommendations.S A F E T Y I N F O R M A T I O NGENERAL• Read all of these instructions and retain them for later use.• Never open the cover of the product• DO NOT take risks with plumbing or electrical equipment.• Isolate electrical and water supplies before proceeding with the installation.• The Interface must be mounted onto the finished wall surface (on top of the ti-les). DO NOT tile up to or seal around ANY PART of the unit using silicone sealer after fixing to the wall. Please read the installation manual before install on the wall.• If it is intended to operate the shower in areas of hard water (above 200 ppm temporary hardness), a scale inhibitor shall to be fitted.• This product is not suitable for mounting into steam rooms or steam cubicles.• This device can be used by children over 8 years and people with reduced phy-sical, sensory or mental capacities or without experience and knowledge, under supervision or if they have been properly trained regarding a safe use of the de-vice and if they understand the dangers involved. Children should not play with the device. Cleaning and maintenance carried out by the user should never be done by children without supervision.S A F E T Y I N F O R M A T I O NPLUMBING• This device has been designed to be permanently connected to water supply.• The plumbing installation must comply with Water Regulations, Building Regulations or any particular regulations as specified by Local Water Company or Water Undertakers and should be in accordance with the local standards and regulations.• The supply pipe must be flushed to clear debris before connecting to the shower unit.• DO NOT solder pipes or fittings within 300mm of the shower unit, as heat can transfer along the pipework and damage components.• DO NOT fit any form of outlet flow control.• DO NOT use excessive force when making connections to the flexible hose or showerhead • All plumbing connections must be completed before making the electrical connections. ELECTRICAL• The installation must comply with the building regulations or any particular regulations as specified by the local Electrical Supply Company.• The parts that contain active parts, except the ones supplied with very low safety voltage that does not exceed 12V, should be inaccessible to a person inside the shower or bath.• This appliance is intended to be permanently connected to the fixed wiring of the electrical mains system.• Make sure all electrical connections are tight to prevent overheating.• A 30mA residual current device (RCD) may be required depending on the local regulations.• This may be part of the consumer unit or a separate unit.• Switch off immediately at isolating switch if water ceases to flow during use.• Other electrical equipment must not be connected to the circuits within the unit.• Switch off at isolating switch when not in use for prolonged life. This is a safety procedure recommended with all electrical appliances.• As with all electrical appliances it is recommended to have the shower and installation checked.YOU CAN ALSO ACCESS THIS INSTALLATION MANUAL AT:/pdfs/installation_manual_summum_one.pdfS T A N D A R D S&C E R T I F I C A T I O N S ELECTRIC STANDARDSCE• EN-55014-1• EN-55014-2HYDRAULIC STANDARDS• QB2806-2017• EN-817• EN-1111• ASME #112.18.1• ASSE #1016-T, -PSANITARY STANDARDS• ACS• KTW/W270• WRAS• NSF61M A I N D E V I C E S D E S C R I P T I O NCPU_iSCU_th descriptionSmart electronic device with digital reading and ac-curate thermostatic regulation of water temperatureand the flow rate at the consumption terminals. De-signed to be integrated in showers, columns, cabinsor bath areas. Can be fitted with an external diverterusing solenoid valves as a diverterReference detail:27EV000015 (CPU_iSCU_th_S One outlet)27EV000016 (CPU_iSCU_th_SW One outlet WiFi)27EV000022 (CPU_iSCU_th_S_2O Two outlet)27EV000024 (CPU_iSCU_th_SW_2O Two outlet WiFi)27EV000023 (CPU_iSCU_th_S_3O Three outlet)27EV000025(CPU_iSCU_th_SW_3O Three outlet WiFi)iTOUCH PLUS descriptionInterface designed to be installed in the shower areawith our thermostatic electronic mixers CPU_iSCU_th.lt shows the temperature and flow rate controls, tem-perature figures (Cº) , flow figures (L/min), safety tem-perature (38°C), cold water shower, active outlet, alar-ms and errors. All pre-set parameters in the interfacecan be customized.The interface executes CPU’s smart programs such asthe start-up program.Reference detail:27EI000001 (iTOUCH PLUS 3 outlets)C O M P O N E N T S L I S T CPU_iSCU_th RANGE & ACCESSORIES27EV000015CPU_iSCU_th_S One outlet27EV000016CPU_iSCU_th_SW One outlet WiFi27EV000023CPU_iSCU_th_S_3O Three outlet27EV000025CPU_iSCU_th_SW_3O Three outlet WiFiPower supply 320009Only for: 27EV00002227EV00002427EV00002327EV000025 27EV000022CPU_iSCU_th_S_2O Two outlet)27EV000024CPU_iSCU_th_SW_2O Two outlet WiFiPower supply 3200031Only for: 27EV00001527EV000016C O M P O N E N T S L I S TTOUCHPAD COMPONENTS LIST SUGGESTED ACCESSORIES (not included)310007Touchpad shielded cable 3m.120204Filters(x1)D I ME N S I O N SCPU_iSCU_thTOUCHPAD (in mm)T E C H N I C A L S P E C I F I C A T I O N SCPU_iSCU thTOUCHPADENVIROMENTAL WORKING CONDITIONS - Ambient temperature: from +5° C to +60° C - Relative humidity: from 30% to 95%NETWORK LEVELStandard communication protocol Modbus RTU (RS485).Total control using mapped memory registers:- Temperature and flow settings.- Temperature, flow and maximum use time.- Global and independent cold and hot water consumption readings.- lndependent and mixed cold and hot water temperature readings.- Maintenance alarms.WiFi Bluetooth module for APP and other appliances.AC/DC Power Adaptor (power supply)I N S T A L L A T I O N C O N S I D E R A T I O N SThe CPU must be installed in an accessible location for servi-cing and maintenance. Provide an access panel to allow future maintenance of the CPU. No warranty claim can be considered or liability accepted by Sedal Connect if lack of accessibility has prevented maintenance.The CPU must not be installed with either of its sides facing downwards. The cover does not need to be dismounted.The power supply must be separately switchable.The CPU and the touchpad operate from a very low voltage sour-ce (12 Vdc.)The system can work with unbalanced inlet pressures of up to 5 bar. Pressure stabilizers are not required to compensate pres-sure variations between cold and hot water inlets.Filters and check valves must be installed at the water inlets. Flush pipes thoroughly before and after installation.Not flushing the water supply pipes or not installing filters may cause damage to the valves by debris, which will cause the system to malfunction. Debris damage is not covered by the warranty.lt is recommended installing isolating valves upstream of the CPU to facilitate servicing.Cables that are chased into walls must also be protected by a conduit or sheathing to allow removal far service and mainte-nance.The CPU must not be installed in situations where either the am-bient temperature is likely to exceed 65 °C or where freezing may occur.The touchpad must not be installed in situations where the am-bient temperature is likely to fall below 5 ºC or rise above 65 ºC.When the installation is finished it is highly recommended to check that all connections are watertight.CAUTION1. Mounting on a vertical or horizontal surface with inlets pointing up or down / front or back.2. lnstall the CPU on the ceiling or fix it at the roof with the appropriate screws.3. Do not install the CPU on the wall with either of its sides facing downwards or diagonally.4. The touchpad must be fixed vertically on the wall with the control buttons on top .5. Do not install the touchpad in horizontal or inclined position.C O N N E C T I O N S C H E M A T I CF A C T O R Y S E T T I NG SGENERAL • Auto shut-off: 10 min.• Pause timer: 2 min.TEMPERATURE • Factory default temperature: 38 º C.• Temperature range: +4º C to +44º C (1)• Temperature steps: 1 º C.• Simple or sustained button push control.• Thermostatic safety measures when temperature >38º C.• Simple button push control.• Red led light indicator.• Blue led light indicator shows that the shower works only withcold water.• Display always shows the set point temperature.(1) lf the hot water temperature is below 48ºC the maximum mixed water temperature would be hot water -4° CFLOW RATE • Factory default flow rate: 12L/min.• Flow rate steps: 2L/min.• Simple or sustained button push control.• Display shows selected flow rate and automatically changesto water set point temperature.OUTLETS • From 1 to 3 outlets.• Factory default: Outlet 1.Default factory settings enable only one outlet. Start-up Program must be run once the system is completely installed to enable additional outlets. (see page 16).COMPONENTS LIST1. CPU2. TOUCHPAD3. Touchpad cable4. Power supply5. Wall mounting supportPRESCRIBED ACCESSORIES6. Filters (x2) ½’’SUGESTED ACCESSORIES7. Hydraulic connectionsINDICATIONS8. Interface connector 9. Power supply connectorI N S T A L L A T I O N G U I D E L I N E SRemove filters and terminal elements such as showers.Connect cold water supply directly to the first shower feed pipe. Flush for at least 5 minutes. Repeat the procedure for the hot water supply and the entire shower feed pipes.Fix the CPU to the wall or ceiling using the appropriate screws.lnstall outlet elements and connect them to the box.lnstall fitler elements and check valves. Connect the water inlets. Open hot and cold water supply and check that inlet connections are watertight.NOTE: The installation technician must follow the installation guidelines, respecting the areas and making sure about the equipotential union of the device.I N S T A L L A T I O N G U I D E L I N E S Prepare the wall for installation, refer to the dimensionaldrawing. Insert a litle tube on the left side of the wall for the system cable.Fix the mounting touchpad template inside the mounting hole.Use the mounting touchpad template to finish the wall and ensure the final hole dimensions.I N S T A L L A T I O N G U I D E L I N E SRemove the mounting touchpad template.With the aid of a cable retractor, feed the keypad cable 310007 through the conduit.Pierce the mounting box and feed the cable through the moun-ting box. Fix the mounting box to the finished wall. Seal the wallaround the mounting box using waterproof sealant.Connect the interface cable to the interface. Fit the interface 27EI000001 to the mounting box.I N S T A L L A T I O N G U I D E L I N E SConnect the interface cable to the interface. Fit the interface27EI000001 to the mounting box.Press the top part and fasten the bottom with the provided screws.Connect the power wire to the CPU, using the connector.Switch on the voltage supply and check that the interface redbutton is lighted up on STANDBY mode. Execute an Start-up (page 18)IMPORTANT:Connect the power cable wires 310011 to the power supply (not included).lt is highly recommended to protect this connection against water using an appropriate connector or junction (not included).310011 POWER WIRES • White: 12Vdc • White & black: GNDC L E A N U P B E F O R E S T A R T U PBefore starting up the system, make sure that installation pi-pipes are clean by doing an automatic clean-up in the system. While interface is in STAND BY mode push more than 3 sec. on MULTIFUNCTIONAL 02 button.While you hold the button an automatic 5 seconds count-down will be done before the process starts.The setup will start and the MULTIFUNCIONAL ON/OFF but-ton will continuously flash during the process while T button will be illuminated. The outlet temperature will be displayed.When the process finishes the MULTIFUNCIONAL ON/OFF button will stop flashing and the touchpad will return to the STAND BY mode.Repeat the process so many times as necessary until water flushes in a stable way.NOTE:To cancel during the clean-up procedure push MULTIFUNCTIONAL ON/OFF button.2Automatic clean-upFLASHES1S E T U P. S T A R T -U P P R O G R A M. 12While the interface is in STAND BY mode push more than 5seconds on the MULTIFUNCIONAL 01 button.While you are holding the button an automatic 5 seconds countdown is activated before the process starts.During the process the MULTIFUNCIONAL ON/OFF button will flash and different outlets will be enabled.When the process has finished, switch on the shower and check that the touchpad has the correct number of outlets enabled.IMPORTANT:1. Start-up program incorporales a smart recognition of the number of available outlets associated to the CPU_iSCU_th.2. Do not push any button if it stops flashing.3. Simple push on the MULTIFUNCTIONAL ON/OFF button to cancel the process during the setup simple.4. Refer to the “Touchpad user guide” to get more information about usability.F I N A L C H E C K I N GIn order to check that the installation has been a success startand stop the shower more than once. While interface is in STAND BY mode, simple push on MULTIFUNCTIONAL ON/OFF button to start the shower.Stop the shower pushing the same button and wait until the shower finishes the PAUSE mode.STAND BY WORKINGPAUSEB A S IC O P E R A T I N G M OD ESA L A R M D E S C R I P T I O N&T R O UB L E S H O O T I NG21I N S T A L L A T I O N & M A I N T E N A N C ECPU_iSCU_thTOUCHPAD•Avoid installing the system into enclosed locations with extreme environmental conditions.•lnstall cleaning filters and check valves. lnspect them temporarily and replace them if necessary.•Activate, using the touchpad, the Automatic internal cleaning program once a month to remove internal impurities. (refer to the ”Touchpad user guide”).• Thermal disinfection can be directly activated using the touchpad (no changes in the installation or the de -vice are required to run this program). lt is highly recommended to be performed at least once a year. The thermal disinfection process will flush full hot water through all the outlets during 5 minutes. (refer to the ”Touchpad user guide’”).• Review the temperature of the boiler or/and the home water facility if any warning / error is displayed on the touchpad.•Indoor use only.•Simple or sustained pulse on the buttons with the index finger. Touchpad handling with any external object could damage the device.•Do not press the touchpad sharply. lt could damage the proper operation.•Never use cleaning materials which contain hydrochloric acid, formic acid, chlorine pale lye or acetate acid, as they cause considerable damage.•Phosphorus acidic cleaners are only conditionally applicable. Do not mix cleaning agents.•Never use cleaning materials or appliances with an abrasive effect, such as unsuitable cleaning powders, sponge pads or microfiber cloths.•Always follow the instructions on the cleaning agent package with respect to specified cleaner dosage and contact time.•The building up of calcifications has to be removed by cleaning regularly.•When using spray cleaners, spray first onto soft cloth or sponge never directly onto the product.•After cleaning, rinse thoroughly with clean water to remove any cleaner residue.•The use of steam cleaners is not permitted. The high temperatures can damage the products.•Indoor use only.IMPORTANT:•Residues of liquid soaps, shampoos and shower foams can cause damage, so rinse with water after use.• Damage caused by improper treatment is not covered by product’s warranty.。
淋浴房安装步骤说明一、NZ31—JY:1、参照总装图所示将贴墙铝材靠墙测水平划线钻孔装入墙胶粒;2、用大扁ST4*25自攻螺丝将墙材锁墙紧固,分别把左右固定玻璃与墙材铜固定件用M8*20圆头机丝固定装配好;(暂不收紧待活动门调整完成后再紧固)3、左右固玻置物架孔安装玻璃夹子,将精品架玻璃靠墙角确定上墙玻璃夹固定位置,划线钻孔装入墙胶粒,用沉头ST4*25自攻螺丝锁墙安装玻璃夹子,再将层架玻璃安装好;4、安装活玻下挡水扁铝;(暂不收紧待活动门调整完成后再紧固)5、按图示把合页分别安装在固定门与活动门并调整好;把活动门安装在活动边合页上,紧固以上连接件,装配墙材外盖;6、参照图示把合门磁条、侧挡水、下挡水分别装在固定门与活动门并调整好;7、参照图示在活玻上安装好拉手;8、调整完毕打密封胶.二、SZ31:1、参照总装图所示将贴墙铝材靠墙测水平划线钻孔装入墙胶粒;2、用大扁ST4*25自攻螺丝紧固墙材,分别将左右固玻卡入墙材装配;(暂不装单边密封条,待活动门调整完成后再卡入)3、安装上下挡水扁铝;(暂不收紧待活动门调整完成后再紧固)4、参照图示把合页分别安装在固定门与活动门并调整好;把活动门安装在活动边合页上,紧固挡水扁铝;将单边胶条卡入玻璃与墙材槽缝内;5、参照图示把磁条、侧挡水、下挡水分别装在固定门与活动门并调整好;安装合页装饰盖;6、参照图示在活玻上安装好拉手;7、调整完毕打密封胶。
三、SZ42-XJ:1、参照总装图所示将合页玻璃上卡入半圆胶条后装配靠墙固定夹、精品活玻装配上墙合页离地高12MM,靠墙测水平划线钻孔装入墙胶粒;2、将合页固玻、精品活玻用大扁ST4*25自攻螺丝锁墙固定,将精品固玻放底座上与合页玻连接上下拉杆扁铝;(暂不收紧待活动门调整完成后再紧固)3、精品固玻装配玻璃夹子,将层架玻璃靠墙角确定上墙玻璃夹固定位置,划线钻孔装入墙胶粒,用沉头ST4*25自攻螺丝锁墙安装玻璃夹子,再将层架玻璃安装好;4、参照图示把合页分别安装在固定门与活动门并调整好,紧固上下拉杆扁铝扁铝;5、参照图示把磁条、侧挡水、下挡水分别装在固定门与活动门并调整好;把活动门安装在活动边合页上,安装合页装饰盖;6、参照图示分别安装活玻H型拉手、精品活玻大小头拉手;7、调整完毕打密封胶.四、SF31:1、参照总装图所示将贴墙铝材靠墙测水平划线钻孔装入墙胶粒;2、用大扁ST4*25自攻螺丝紧固墙材,将合页玻、磁条玻分别卡入墙材装配;3、分别安装F型上下扁铝;(暂不收紧待活动门调整完成后再紧固)4、参照图示把合页分别安装在固定门与活动门并调整好;把活动门安装在活动边合页上,紧固挡水扁铝,将单边胶条卡入玻璃与铝材槽缝内紧固;5、参照图示把磁条、连体挡水胶条、下挡水分别装在固定门与活动门并调整好;安装合页装饰盖;6、参照图示活玻安装H型拉手;7、调整完毕打密封胶.五、PSX32—XJ:1、参照总装图所示将上横梁铝材测量高度尺寸,两端靠墙测水平确定固定位置划线钻孔装入墙胶粒;2、用大扁ST4*25自攻螺丝通过螺丝底座紧固上横梁,分别将活玻装配外开合页、置物活玻装配内开合页,离地高12MM靠墙划线钻孔装入墙胶粒;3、分别将活玻、置物活玻用大扁ST4*25自攻螺丝锁墙紧固;4、把置物固玻卡入上横梁,底部用铝材夹固定在底座上;5、固玻置物架孔装配玻璃夹子,将层架玻璃靠墙角确定上墙玻璃夹固定位置,划线钻孔装入墙胶粒,用沉头ST4*25自攻螺丝锁墙安装玻璃夹子,再将层架玻璃安装;6、参照图示把磁条、单边密封条、下挡水、活玻侧挡水胶条分别装在固定门与活动门并调整好;安装合页装饰盖;7、参照图示分别安装活玻H型拉手、精品活玻大小头拉手;8、调整完毕打密封胶。
Model #sSHEN-2134340-##SHEN-2136360-##SHEN-2138380-##SHEN-2140400-#### = Finish01= Chrome04= Brushed Nickel06=Oil Rubbed Bronze09=Satin Black IMPORTANT!DreamLine® reserves the right to alter, modify or redesign products at any time without prior notice for the purpose of product improvement and customer experience. Please refer to the model’s web page on for the latest technical drawings, installation manuals, warranty information or additional product details.Parts ListInstallation Steps Adjustable Wall Profile System Table of ContentsSection title Page #Detailed Diagram of Shower Door Components ToolsPreparation Vinyl Seals Product MaintenanceHandle543214131268-13Left-hand door installation shown Right-hand door installation shownNOTE: This model is reversible for Left or Right-hand door installation. This manual will show the !Preparation1. Prior to installation, examine all boxes and packages for shipping damage and compare the piece count with the packing slip. After opening all boxes and packages read this introduction carefully. Check that all of the necessary parts are included in the package by checking off the components on the “Detailed Diagram of Shower Door Components”. If the unit has been damaged, has a finishing defect, or has missing parts, please contact our customer support department within 3 business days of the delivery date. Please note that DreamLine ® will not replace any damaged products or missing parts free of charge after 3 business days or if the product has been installed. Contact DreamLine ® if you have any questions, and please provide an order number, job name or other proof of purchase to help identify the original order.2. Please note that you should consult your local building codes with questions on installation compliance standards. Building and plumbing codes may vary by location, and DreamLine ® is not responsible for code compliance standards for your project and will not accept any returns.3. If this unit is going to be installed in a new construction, please install all of the required plumbing and drainage before installing the shower. Use a competent and licensed (if required by local code) plumber for all plumbing installation4. Make sure that prior to beginning the installation, the surfaces are leveled and solid and will be able to support the total weight of the unit. Also make sure the walls are at right angles. Irregularinstallation surface level, radius corners or improper angle of side walls will result in serious problems for your installation. Note that some adjustments and drilling will be necessary during the installation process.5. Protect all primary surfaces of the product during installation. Never set the glass down directly onto a tile floor. Leave corner protectors in place until necessary to remove them. Always use a piece of wood or cardboard to protect the bottom edge and corners of the glass prior to and during installation.6. This unit must be installed upon a level finished threshold and against finished walls.7. This model has 3/8” of adjustment for out-of-plumb wall conditions using the adjustable wall profiles Make sure that the walls are within this range before proceeding with the installation.8. Professional installation recommended.NOTE: DO NOT attach the handle to the door glass or the towel bar to the panel glass until instructed.DO NOT use the handle or towel bar to lift the glass during installation. This may result in damage to the glass and/or serious injury. Always use an assistant or a professional grade !a m L i n e . A l l R i g h t s R e s e r v e da m L i n e . A l l R i g h t s R e s e r v e da m L i n e . A l l R i g h t s R e s e r v e da m L i n e . A l l R i g h t s R e s e r v e dParts Lista m L i n e . A l l R i g h t s R e s e r v e d DESCRIPTIONQTYITEM #050607080910111213141516171819010203042pcs 2pcs 2pcs 1pc 1pc 2pcs 1pair 8pcs 4pcs 4pcs 8pcs 1pair 1pc 1pc 4pcs4pcs 4pcs 4pcs 1pcHex WrenchDecorative Washer Hex Socket Bolt M8x25Hex Socket Bolt M8x12Vinyl Gasket (for Pivot Bar)Hinge-Side Vinyl Seal Sweep Vinyl Seal Magnetic Strike Vinyl Truss Head Screw ST4.2x40Pan Head Screw ST4.2x10Decorative CoverWall Anchor Pivot Assembly Handle Pivot Bar Door Glass Panel Glass Wall Profile Glass Profilea m L i n e . A l l R i g h t s R e s e r v e da m L i n e . A l l R i g h t s R e s e r v e da m L i n e . A l l R i g h t s R e s e r v e da m L i n e . A l l R i g h t s R e s e r v e da m L i n e . A l l R i g h t s R e s e r v e da m L i n e . A l l R i g h t s R e s e r v e da m L i n e . A l l R i g h t s R e s e r v e dProduct MaintenanceBASES and BACKWALLS: To ensure long-lasting life for your acrylic back walls, wipe them offafter each use with a soft cloth. To clean the acrylic back walls use non-abrasive sprays or cream based cleaners. Avoid the use of aerosol spray cleaners. Never use abrasive cleansers, metal brushes or scrapers that could scratch or dull the surface.GLASS: To ensure long-lasting life for your glass shower products, wipe them off after each usewith a soft cloth. Rinse and wipe off the glass using either a soft cloth or a squeegee to prevent soap buildup and water spots (Hard water can etch the surface of the glass over time if left to dry). To prevent scratching the surface: never use abrasive cleaners or cleaning products that contain scouring agents. Never use bristle brushes or abrasive sponges that may scratch the surface.HARDWARE: To ensure a long-lasting finish, wipe off the metal parts after each use with a softcloth. Do not use abrasive cleaners or cleaning products containing ammonia, bleach or acid. If accidentally used, rinse the surface as soon as possible to prevent damage to the finish (peeling or corrosion). After cleaning the polished finishes, rinse thoroughly and wipe dry with a soft cloth. Clean stainless steel surfaces at least once a week. When applying stainless steel cleaner or polish to stainless steel hardware, work with (not across) the grain. Never use an abrasive sponge or cloth, steel wool or wired brush as these may permanently scratch the surfaces.NOTE: To maximize the life of your door, it is important to regularly inspect the glass and all hardware for misalignment, proper attachment, and/or damage. Contact DreamLine ® with any questions or concerns.DreamLine ® shower doors and enclosures are designed not to leak when installed properly and the flow of water is not pointed directly at the pivots or vinyl seals.a m L i n e . A l l R i g h t s R e s e r v e d。
淋浴房玻璃门的安装说明淋浴房玻璃门的安装说明一、准备工作在进行淋浴房玻璃门的安装之前,首先需要进行一些准备工作。
首先,需要将淋浴房的地面清理干净,确保没有杂物和灰尘。
其次,要测量好淋浴房门的尺寸,并购买合适尺寸的玻璃门,确保门与淋浴房的尺寸完全匹配。
另外,还需要准备好安装玻璃门所需的工具和辅助材料,如螺丝刀、封条、胶水等。
二、安装步骤1. 清洁淋浴房门框在安装玻璃门之前,先用湿布擦拭淋浴房的门框,确保门框表面干净无尘。
这样可以保证玻璃门与门框完全贴合,不会有杂物影响开关门的顺畅。
2. 安装门框将玻璃门的门框放置在淋浴房门的上部和两侧,使用螺丝刀将门框固定在墙上。
在安装过程中,要注意门框的水平和垂直度,确保门框安装牢固。
3. 安装玻璃门将购买好的玻璃门放置在门框的槽内,确保玻璃门与门框完全贴合。
可以使用木块或泡沫垫片来调整玻璃门的位置,使其水平和垂直度与门框保持一致。
4. 固定玻璃门使用螺丝刀将玻璃门固定在门框上,确保门与门框之间有足够的紧密度。
在固定玻璃门的同时,要注意不要使用过大的力量,以免导致玻璃破裂或者损坏。
5. 安装门把手和五金配件根据玻璃门的设计,选择合适的门把手和五金配件,按照说明书的要求进行安装。
在安装过程中,要确保门把手和五金配件与玻璃门的固定牢固,并且易于开关门。
6. 进行最后的调整和检查安装完毕后,要对玻璃门进行最后的调整和检查。
首先,要检查门的开关是否顺畅,并进行多次开关测试,确保没有任何卡阻情况。
其次,要检查门与门框之间是否密封,如果有漏水的情况,可以使用封条或胶水进行处理。
最后,还需检查门把手和五金配件的固定情况,确保它们牢固可靠。
三、注意事项1. 在安装过程中,要特别注意安全,避免因操作不当导致意外伤害的发生。
2. 安装玻璃门时,要避免过大的力量和冲击,以免造成玻璃破裂。
3. 安装完成后,要定期检查玻璃门的固定情况,及时进行维护和修理,以延长玻璃门的使用寿命。
4. 若在安装过程中遇到问题无法解决,建议立即联系专业人士进行咨询和帮助。
恋木淋浴房LB2001安装说明书
作者:恋木淋浴房首席设计师------高阳
1、安装前,首先检查现场是否符合安装条件,墙面及地面是否已贴好瓷砖,地面走水状况是否良好,水平状况是否符合要求,建议在淋浴房安装范围内的水平倾斜不超过1厘米。
2、在确认包装完好后打开包装,将浴房配件依次取出并清点整齐,建议使用剪刀剪去包装胶纸,切忌使用刀片,以防划伤浴房配件。
3、先将石基安装于所需位置,并调整好水平,如果条件允许,最好将石基在贴地砖时嵌在地面,但要注意保证底座的尺寸,不要把底座嵌在墙砖内。
4、将包装箱置于地上,在箱内将浴房配件进行初步组装
5、根据装配好的浴房及相关尺寸,在墙上划线,找出安装螺丝孔的位置。
6、在墙上钻安装孔,建议采用可调速电钻及合金钻头,防止打爆墙砖。
7、安装淋浴房主体
8、安装淋浴房玻璃并调整开关效果达到设计要求。
9、安装淋浴房拉手,并调整防水效果
10、在需要的地方打上适量的玻璃胶,为保证玻璃胶的功能,建议在48小时内不要使用浴房
11、清理现场,完成安装。
卫浴有限公司
淋浴房安装使用说明书
为了保证安全正确地安装和使用产品,避免对用户造成伤害和财物损失,也为防止对安装者造成伤害,请认真阅读此安装使用说明书,理解其内容后正确安装和使用。
安装使用说明书是保证用户安装和使用产品的重要文本,请妥善保管,不要丢失或弄脏。
产品如有改动、恕不另行通知
一、安装准备
1.开箱后请认真阅读此安装使用说明书,清点零部件数量,检查是否有运输损伤,如有问题请及时
与当地经销商或本公司联系,您将得到满意的答复.
2.安装常用工具:玻璃胶、卷尺、铅笔、φ6mm冲击钻头、φ3mm钻头铅、水平尺、十字螺丝刀、
玻璃胶枪、冲击电钻、胶锤。
3.安装使用本公司产品,玻璃如有图案请将其光面朝内。
二、配件包装清单
三、安装步骤
1、选择要安装的位置,测量底盆去水孔位置,打底盆去水下水道,去水孔位置要偏离实际
测量尺寸100mm为好;图1
2、抬底盆(12)到安装位置,把去水管插入下水道内,用水平尺测量,调整底盆地脚使底盆水
平;如图2
3、用90°接头(4)把两扇固定门(2)连接好,用ST4.2×10的大扁头螺丝(6)固定;如
图3,图4
4、把两个滑轮(11)放在固定门的上导轨槽内,取一扇活动门,如图所示,用M5×8的
大扁头螺丝(10)固定,同样,装好导轨下滑轮;图5
5、同上步骤一样,安装好另一扇活动门;图6
6、按照图示所标尺寸,用水平尺测量,用铅笔标出螺丝固定位置,用冲击钻打孔,打入塑
料膨胀套(9),用ST4.2×30的大扁头螺丝(5)把墙槽(1)固定在墙壁上;如图7,图8
7、把房体抬到底盆上,并插入墙槽;图9,图10
8、用螺丝批调节活动门滑轮固定螺丝,使其顺畅往返滑动,磁条吸合良好;图11 ;图12
9、调整房体,用冲击电钻打孔,用ST4.2×10的圆头螺丝(7)、装饰盖(8)固定房体;
图12
10、在导轨和底盆、墙槽和墙壁相结合的部位打中性玻璃胶密封;
图 1 图2
图 3 图4
图 5
图6
图7 图8
图9 图10
图11 图12
四、保养:
1、钢化玻璃的保养:用中性用浸过中性洗涤剂的软布能完全擦净玻璃上面的
污垢或灰尘,切勿使用强性的洗涤剂或光亮剂,酒精、丙酮等溶液。
如遇到较严重的污垢,可使用低浓度的醋酸溶液,但必须冲洗干净。
2、铝合金保养:用浸过中性洗涤剂的软布能完全擦净铝合金表面上的污垢或灰尘,
切勿使用强性的洗涤剂或光亮剂,酒精、丙酮等溶液。
如遇到较严重的污垢,可使用低浓度的醋酸溶液,但必须冲洗干净。
3、滑轮的保养:
a、如果采用的是塑胶滑轮方式,在日常使用中需加少许润滑油,既可保证轻松使用,
又起到了保养作用。
b、采用的是金属滑轮方式,除在日常使用中加油外,在寒冷季节使用次数较少时,或
公共场所的使用淡季,可将滑轮部分的水气吹干抹少许黄油进行保养。
c、定期调整滑轮的调节螺丝,保证滑轮对活动门的有效承载和良好滑动。
产品规格: A:800×800×1850mm
B:900×900×1850mm
C:1000×1000×1850mm
D:800×1000×1850mm
E:800×1200×1850mm。