Windows_Embedded_Standard_7安装及使用指南南
- 格式:docx
- 大小:6.57 MB
- 文档页数:61
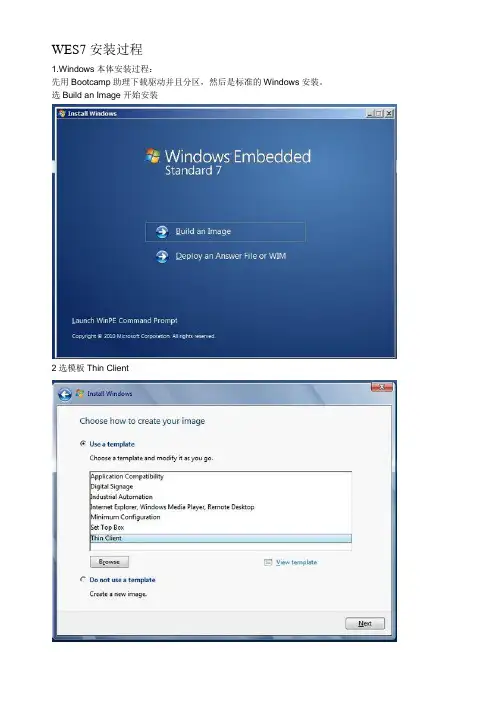
W i n d o w s E m b e d d e d S t a n d a r d7安装教程-CAL-FENGHAI-(2020YEAR-YICAI)_JINGBIANWES7安装过程1.Windows本体安装过程:2.先用Bootcamp助理下载驱动并且分区,然后是标准的Windows安装。
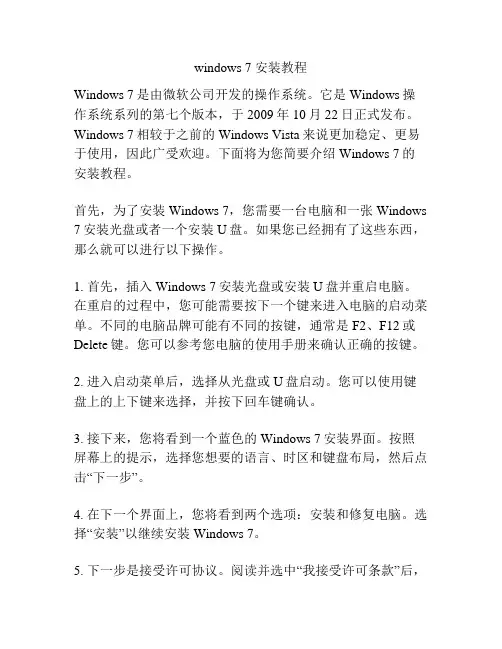
3.选Build an Image开始安装2选模板Thin Client区域选择,也可以以后改注意,在下面Modify Features打钩,手动添加部分组件包推荐组件包1:简体中文字体,避免乱码推荐组件包2:国际语言包支持,以后可以在控制面板添加语言包推荐组件包3:Windows Defender。
不装这个也可以,但是以后windows会提醒你打开windows defender。
然后你点它,它就弱智的把system32目录打开。
推荐组件包4:windows search。
搜索功能。
其他组件包可以自己选,选完之后点Resolve Dependencies,会自动选上依赖包好了,下面是大家关心的序列号(1)永久激活(必须在OOBE阶段):在第一次提示输入序列号的时候,使用 XGY72-BRBBT-FF8MH-2GG8H-W7KCW(2)Dreamspark一年试用版,可以rearm 5次(即可用6年),登陆界面会显示Evaluation Copy,其他几乎一样:在第一次提示输入序列号的时候,使用 TJHCC-9DKQT-RB9PJ-YCQPV-3KDJG其他安装,看个人需要驱动安装IE9安装Windows Update如果需要中文语言包,可以在64bit语言包页面,找Chinese(Simplified)/download/en/details.aspx?id=26216下载下来的lp.cab,放到C盘根目录,在管理员权限的cmd窗口,运行下面命令并且重启:Dism /Online /Add-Package /PackagePath:C:\lp.cab8、WES7 控制面板推荐设置:9、(1)System -- System -- 虚拟内存,参考后面10、-- Power Options -- 关闭休眠,建议用命令行:以管理员身份运行cmd,然后运行powercfg -h off11、(2)Network -- IE Options: 主页 / 默认浏览器提醒12、-- Advanced sharing settings -- Turn on network discovery13、(3)Hardware -- Mouse: 鼠标加速度14、-- NVIDIA: 垂直同步15、(4)User Account -- Change Picture 更改用户头像16、(5)Appearance -- Personalization -- Aero主题17、-- Taskbar & SM -- Notification Area / Highlight New Programs18、(6)Regional -- Keyboard: 只留下CH美国键盘,其他删掉19、-- Administrative -- Copy Settings 让登陆界面和其他用户使用相同的设置WES7 对于SSD的优化:0) 如果你的主板是Intel芯片组,理论上可以骗过系统开启AHCI。
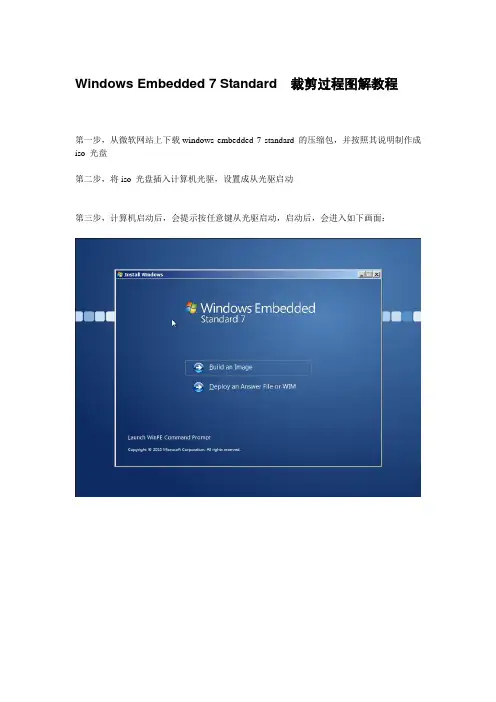
Windows Embedded 7 Standard 裁剪过程图解教程第一步,从微软网站上下载windows embedded 7 standard 的压缩包,并按照其说明制作成iso 光盘第二步,将iso 光盘插入计算机光驱,设置成从光驱启动第三步,计算机启动后,会提示按任意键从光驱启动,启动后,会进入如下画面:第四步,选择"Build an Image". 出现license 声明,勾选"I accept the license terms"后,点击"Next"第五步,选择安装方式,然后点击"Next"第六步,Choose a language and other preferences.第七步,根据实际情况,勾选"Modify Drivers" 或"Modify Features" 复选框。
第八步,Select the packages to include in your image第九步,去掉复选框"Resolve optional dependencies"和"Include applicable updates"前面的√第十步,勾选如下项目:.NET FrameworkApplication SupportWindows Boot EnvironmentBrowsersData Access and StorageShardow Copy Volume InterfaceDevice FrameworkDevice User ExperienceDriver FrameworksPrinting Utilities and ManagementStandard Windows USB StackDiagnosticsWindows Embedded Standard Startup ScreensTrueType FontsWestern FontsMicrosoft DTV-DVD Audio Decoder(MPEG-2,AAC)(license required) Microsoft DTV-DVD Video Decoder(MPEG-2,H.264)(license required) MPEG Layer-3 Audio Codes (MP3)(license required)MPEG-2 Audio and Video Encoder(license required)MPEG-4 Decoders(license required)Audio and Video Engines and Media FoundationDriectX and Windows Device ExperienceGraphics PlatformImage Mastering API V2Internet Information Services-IISSystem ManagementWindows Update Standalone InstallerParental ControlPower ManagementWindows Application CompatibilityWindows PowerShell 2.0BaseDomain ServicesIRDA and UNIMODEMNetwork DiagnosticsTelephony API ClientCredentials and Certificate ManagementApplication SecuritySecurity BaseCore File SystemFile Compression UtilityRemote Procedure CallWindows InstallerEmbedded Core Help ContentHelp and Support EngineWindows ShellAccessibilityNatural Language 6Search IndexingWindows Searchen-US勾选完毕后,点击"Next", 得到如下图所示的画面,继续点击"Next"第十一步,选择要安装到那个硬盘及分区(此时可以根据需要,创建多个分区)第十二步,安装程序已经获取到足够的信息,将进行安装过程,接下来按照系统提示进行操作即可。
1. WES7 安装源文件可从微软官方网站下载180天(本文后面会讲到如何激活)评估版/en-us/download/details.aspx?id=118872. 中文语言包从微软网站下载语言包文件(注意只下载SP1\Chinese (Simplified) Language Pack即可)32位:/en-us/download/details.aspx?id=2621564位:/en-us/download/details.aspx?id=26216建议在安装时使用微软官方的密钥(GJVTR-C4WQ6-BKRH3-DRFFH-J83DM),可以有180天的试用期,通过重置设置,可以使用长达N年。
3. 一个4G以上容量的U盘,用来制作可启动的WES7引导盘,如果使用虚拟机,可不必使用。
我掌握在windows 7 PE下从硬盘安装WES7,竟然无法定制组件,没找到解决办法。
将下载的文件解压缩得到一个2.9G左中的ISO文件,将这个文件用ultraISO刻录到U盘中(将ISO刻录到U盘中用来生成U盘引导功能)安装WES7的主要流程是:1. 安装系统时选择组件2. 安装完成之后,再安装中文包3. 调整区域选项如果本文的图片丢失或有疑惑,可向笔者发送电子邮件索取或讨论 zhangxugg#下面我们逐个介绍这几个重要步骤一、系统安装1. 启动安装使用刻录的U盘或光盘启动计算机,引导到如下界面选择 Build an Image, 表示我们将在本机上安装一个windows系统。
在接下来的对话框中接受许可协议,点击下一步。
接下来让我们选择安装模板,WES7已经内容了一些安装模板,用于简化我们的工作,对一般的PC日常应用而言,建议选择Internet Explorer, windows media player,remote desktop。
为了达到较好的定制效果,我们不使用模板,而手工指定要安装的组件,这样的好处就是让我们达到最大程度上的个性化定制目的。
win7安装版安装教程Windows 7是微软推出的操作系统,相比于其前任Windows Vista,Windows 7更加稳定、高效,并且采用了全新的用户界面设计。
下面将为大家介绍Windows 7安装版的安装教程。
1. 准备工作:在进行安装之前,需要确保您的电脑满足Windows 7的最低系统要求。
包括:1GHz的处理器、1GB的内存(32位系统)或2GB的内存(64位系统)、16GB的硬盘空间和DirectX 9图形设备。
2. 下载Windows 7安装文件:您可以从Microsoft官方网站上下载Windows 7的安装文件,选择适合您的系统架构和语言版本。
将下载的ISO文件保存至本地磁盘。
3. 制作安装盘:您可以使用U盘或者DVD光盘来制作Windows 7的安装盘。
如果使用U盘,您需要确保其容量足够,并使用第三方软件制作启动盘。
如果使用DVD光盘,您需要一个可刻录DVD的光驱,并使用刻录软件将ISO文件刻录至光盘上。
4. 安装准备:在进行安装之前,建议您备份重要的文件和数据,以免发生不可预测的事故。
另外,您还需要关闭所有的安全软件和防火墙,以免对安装过程产生干扰。
5. 启动安装:将安装盘插入电脑,并重新启动电脑。
在开机过程中,按下相应的按键(通常是F2、F12或者ESC键)进入BIOS设置。
在BIOS中将启动选项设置为从U盘或者光盘启动。
6. 安装过程:一旦成功进入安装程序,您将看到一系列选项。
您可以选择语言、时区、键盘布局等参数。
接下来,您需要接受许可协议,并选择“自定义安装”选项。
7. 分区:在自定义安装过程中,您需要对硬盘进行分区。
您可以选择将Windows 7安装在现有的分区上,或者创建新的分区。
根据您的需求进行选择,并且确保至少有一个分区具有足够的空间供Windows 7使用。
8. 安装:在确认分区设置后,您只需点击“下一步”按钮,安装程序将自动开始安装Windows 7。
WES7安装过程1.Windows本体安装过程:先用Bootcamp助理下载驱动并且分区,然后是标准的Windows安装。
选Build an Image开始安装2选模板Thin Client区域选择,也可以以后改注意,在下面Modify Features打钩,手动添加部分组件包推荐组件包1:简体中文字体,避免乱码推荐组件包2:国际语言包支持,以后可以在控制面板添加语言包推荐组件包3:Windows Defender。
不装这个也可以,但是以后windows会提醒你打开windows defender。
然后你点它,它就弱智的把system32目录打开。
推荐组件包4:windows search。
搜索功能。
其他组件包可以自己选,选完之后点Resolve Dependencies,会自动选上依赖包好了,下面是大家关心的序列号(1)永久激活(必须在OOBE阶段):在第一次提示输入序列号的时候,使用XGY72-BRBBT-FF8MH-2GG8H-W7KCW(2)Dreamspark一年试用版,可以rearm 5次(即可用6年),登陆界面会显示Evaluation Copy,其他几乎一样:在第一次提示输入序列号的时候,使用TJHCC-9DKQT-RB9PJ-YCQPV-3KDJG其他安装,看个人需要驱动安装IE9安装Windows Update如果需要中文语言包,可以在64bit语言包页面,找Chinese(Simplified)/download/en/details.aspx?id=26216下载下来的lp.cab,放到C盘根目录,在管理员权限的cmd窗口,运行下面命令并且重启:Dism /Online /Add-Package /PackagePath:C:\lp.cab8、WES7 控制面板推荐设置:(1)System -- System -- 虚拟内存,参考后面-- Power Options -- 关闭休眠,建议用命令行:以管理员身份运行cmd,然后运行powercfg -h off (2)Network -- IE Options: 主页/ 默认浏览器提醒-- Advanced sharing settings -- Turn on network discovery(3)Hardware -- Mouse: 鼠标加速度-- NVIDIA: 垂直同步(4)User Account -- Change Picture 更改用户头像(5)Appearance -- Personalization -- Aero主题-- Taskbar & SM -- Notification Area / Highlight New Programs(6)Regional -- Keyboard: 只留下CH美国键盘,其他删掉-- Administrative -- Copy Settings 让登陆界面和其他用户使用相同的设置WES7 对于SSD的优化:0) 如果你的主板是Intel芯片组,理论上可以骗过系统开启AHCI。
windows 7 安装教程Windows 7是由微软公司开发的操作系统。
它是Windows操作系统系列的第七个版本,于2009年10月22日正式发布。
Windows 7相较于之前的Windows Vista来说更加稳定、更易于使用,因此广受欢迎。
下面将为您简要介绍Windows 7的安装教程。
首先,为了安装Windows 7,您需要一台电脑和一张Windows 7安装光盘或者一个安装U盘。
如果您已经拥有了这些东西,那么就可以进行以下操作。
1. 首先,插入Windows 7安装光盘或安装U盘并重启电脑。
在重启的过程中,您可能需要按下一个键来进入电脑的启动菜单。
不同的电脑品牌可能有不同的按键,通常是F2、F12或Delete键。
您可以参考您电脑的使用手册来确认正确的按键。
2. 进入启动菜单后,选择从光盘或U盘启动。
您可以使用键盘上的上下键来选择,并按下回车键确认。
3. 接下来,您将看到一个蓝色的Windows 7安装界面。
按照屏幕上的提示,选择您想要的语言、时区和键盘布局,然后点击“下一步”。
4. 在下一个界面上,您将看到两个选项:安装和修复电脑。
选择“安装”以继续安装Windows 7。
5. 下一步是接受许可协议。
阅读并选中“我接受许可条款”后,点击“下一步”。
6. 在接下来的界面上,您将看到两个选项:升级和自定义。
如果您想要将Windows 7安装在目前的操作系统上,选择“升级”。
如果您想要进行全新安装,选择“自定义”。
7. 在自定义安装选项中,您需要选择安装Windows 7的目标硬盘或分区。
如果您只有一个硬盘并希望将Windows 7安装在上面,选择默认选项即可。
如果您有多个硬盘或分区,可以选择其中一个来安装。
8. 点击“下一步”后,Windows 7开始安装。
整个过程可能需要一些时间,这取决于您的电脑性能和硬盘速度。
9. 在安装期间,您需要进行一些设置,如选择您的电脑名称、密码等。
按照屏幕上的提示进行设置即可。
Using Application Dependency Analysis to Enable Your Application on Windows Embedded Standard 7White PaperPublished April 2010Revised March 2012For the latest information, please see Table of ContentsUsing Application Dependency Analysis to Enable Your Application on Windows Embedded Standard 7 (1)Overview (3)Creating a Target Image (3)Reference Platform for Dependency Analysis (3)Understanding Application Dependencies (3)Types of Dependencies (4)Capturing the Dependencies (4)Using Package Mapper (5)Trimming the Answer File (6)Creating a Windows Embedded Standard 7 Image (6)Summary (7)Appendix A – Procmon (8)Introduction to Procmon (8)Specifying a Backing File (8)Process Tree Feature (8)Appendix B – Package Mapper (11)Introduction to Package Mapper (11)Prerequisites (11)Input Configuration File (12)Orphan Files (12)Files Mapped to Multiple Packages (12)Output Files (12)Additional Resources (13)OverviewThe design goal for an embedded system is typically very different from the design goal of a fully functional, general-purpose system. A general-purpose system with a full complement of features enables its users to enjoy the most free form, creative experience possible, and also to utilize the capabilities of its hardware platform to the fullest. An embedded system, by contrast, strives to lock down the functionality to enable only the function of the embedded application. Windows Embedded Standard 7 has achieved this goal, and it thus requires embedded systems developers to know the techniques and tools to determine the exact dependencies of the embedded application for inclusion in the operating system image. The purpose of this white paper is to educate the reader about those techniques and tools.Creating a Target ImageTo create a Target image, follow these three steps:1.Identify the dependencies of your Target applications with Process Monitor, a WindowsSysinternals tool.2.Feed the output of Step 1 to Package Mapper (a Windows Embedded Standard 7 application) tocreate a Windows Embedded Standard 7 Answer file.3.Create an embedded image with the Windows Embedded Standard 7 Answer file.Reference Platform for Dependency AnalysisIt is recommended to have one of the following operating systems for dependency analysis:∙Windows 7.∙Maxboot Image of Windows Embedded Standard 7 (Windows Embedded Standard 7 image with all of the packages included).It is always good to have a clean reference platform with an absolute minimum of applications and services running. This helps ensure that fewer events occur during dependency analysis. To keep the reference platform clean during dependency analysis, follow these suggestions:1.Do not install any extra applications.2.Do not enable Windows Update.3.Disable Prefetching.Understanding Application DependenciesEach application has a list of implicit dependencies that are mandatory for launching an application successfully.In addition to implicit dependencies, each application can have runtime dependencies that are loaded on demand. These are loaded only when a particular functionality within an application is exercised. Procmon (a Sysinternals application) is capable of capturing both of these dependencies together.Types of DependenciesFor each application, two types of dependencies must be identified:1.Installer dependencies, which are required for an application to be installed successfully (if theapplication has an installer).2. Application dependencies, which are needed for an application to run successfully.Capturing the Dependenciesunch Procmon (refer to Appendix A).2.Configure the settings (refer to Appendix A).3.Reset the events that are captured already (Edit->Clear Display).4.Enable Capture Events (File->Capture Events).5.To capture the Installer dependencies, launch the installer and install the Target application. Tocapture the Applications dependencies, launch the application and run through the list of test cases, exercising all of the functionalities that the application should satisfy (Procmon captures all of the events that happen during this activity).6.Disable Capture Events, as we are not interested in any further events.unch Process Tree in Procmon (Tools->Process Tree).8.Identify the Process IDs corresponding to the application (refer to Appendix A).9.There are two types of events that are important in this situation:a.Load Image activity, which gives the list of binaries loaded in the Target applicationaddress space.b.File Read activity, which provides the list of files read by the Target application.The steps that follow illustrate how these dependencies can be extracted by setting the rightfilters.Figure 1- Process Monitor Filter.unch Filter dialog (Filter->Filter…). Click the Reset button to reset any filters that are currentlyin effect. After clicking Reset, there will be still some entries in the Filter list. These excludesystem activity and Procmon’s own activity. It is permissible to have these events). Now addthe following filters:a.Add Include Filters for the Process IDs identified in Step 8.b.Add Include Filter for the Operation Load Image.c.Add Include Filter for the Result Success.unch Tools->Count Occurrences. Choose Path from the combo box adjacent to the label“Column” (see Figure 2 below) and click the Count Button. Click the Save button to save theoutput.Figure 2- Process Monitor Count Occurrences Dialog.unch Filter dialog (Filter->Filter…). Change the following filters:a.Remove the Include Filter for Operation Load Image (this Filter was added in Step 10).b.Add Include Filter for the Operation ReadFile.unch Tools->Count Occurrences. Choose Path from the combo box adjacent to the label“Column” and click on the button “Count”. Click on the “Save” button to save the output.14.Building an OS image in Windows Embedded Standard 7 involves identifying a set of packages.Each package encapsulates an OS feature and contains all of the binaries that contribute to that feature. After identifying the set of binaries from the steps above, the binaries must be mapped to the packages with Package Mapper.Using Package MapperPackage Mapper is a Windows application located in the Value-Add Folder in the media. Refer to Appendix B for more details on Package Mapper.Package Mapper application maps binary files to packages. Package Mapper is also capable of processing the Procmon Output file.To use the Procmon Output file with Package Mapper, follow these two steps:1.Open the Procmon Output file (captured in the previous section) in Excel and delete the Countcolumn. Also delete the header line in the first column.2.Feed this file as input to Package Mapper (refer to the Package Mapper manual for the inputparameters).The output of Package Mapper is a Windows Embedded Standard 7 Answer file, which lists the packages that are necessary for the Target application to run successfully on an Embedded OS.Package Mapper accepts any number of Input files; it can also be used to pass in both of the Output files (Installer dependencies and Application dependencies). The output of Package Mapper is a Windows Embedded Standard Answer file that will support the entire Target application.Package Mapper also outputs a Mapping file. This file lists the packages in the Answer file and the binary files that are contained in those packages.Trimming the Answer File1.Open the Answer file in Image Configuration Editor and review the packages in Answer file.2.Open the Mapping file (one of the Output files of Package Mapper) to see why each package hasbeen brought in. If there are very few binary dependencies for any package, it is worthwhile to investigate to see if the package can be removed. If a package looks totally irrelevant,investigate to see if it can be removed.3.Make a careful judgment whether or not this package can be removed by understanding thefunctionality provided by the package in Windows Embedded Standard 7. If you decide toremove the package, you can do so safely within Image Configuration Editor.4.Resolve the required package dependencies within Image Configuration Editor and save the finalAnswer file.Creating a Windows Embedded Standard 7 Imageunch Windows Embedded Standard 7 Setup.2.Choose “Build an Image” in the first screen and continue through the Wizard.3.In the Wizard step “Choose How to create your Image,” click “Use a Template” then browse tothe path that contains your Answer file. Continue through the Wizard.4.In the Wizard step “Summary of Drivers and Features”check “Modify Drivers” and “ModifyFeatures.” Continue through the Wizard.5.In the Wizard step “Find and Select Device D rivers,” choose “Automatically Detect Devices.” Ifyou have a PMQ file, choose the second Option. Continue through the Wizard.6.In the Wizard step “Select the P ackages to Include in Your Image,” uncheck “Resolve OptionalDependencies.” Review the packages on this screen. Add/Remove packages as needed. Click“Resolve” to resolve the dependencies. Continue through the Wizard.SummaryYou have now successfully created a Windows Embedded Standard 7 image that should support all of the Target applications. Install the Target application and run through all of its test cases to ensure that it is running 100% successfully on the new Windows Embedded Standard 7 image.Appendix A – ProcmonIntroduction to ProcmonProcmon is a Sysinternals tool that monitors file system activity, network activity, registry activity and process and thread activity. You can download and learn more about Procmon here.Specifying a Backing FileBy default, Procmon saves the Capture data in the Paging file. In Windows Embedded Standard 7, the Page file is disabled by default. This means that Procmon would continue to consume the system RAM for events tracing and would gradually slow down the system. Using a Backing file improves performance. Backing files can be specified as follows:unch File->Backing Files.Figure 3- Process Monitor Backing File specification.2.Click on the Radio button “Use File Named” and specify a B acking file on a drive that hassufficient space.There is also an option to provide a Backing file while launching Procmon from the Command line. The syntax is as follows:Command:Procmon.exe /BackingFile “c:\backFile.pml”Process Tree FeatureEach application has a list of binary dependencies. In addition, there may be dependencies between applications. An application might, for example, create a Child Process and depend on it. An applicationcan also depend on some Windows Services. It is essential to identify these inter-process dependencies, and the Process Tree can be very helpful in doing so.By using Process Tree, for instance, you can easily identify the Child Process that your application is creating.Figure 4- Process Tree feature.The Process Tree has six features that are helpful for analysis:1.List of all processes running at the time an event is captured. The Process Tree helps in easilyidentifying an application's Parent Process and Child Process.2.Full Path of the Executable file for each process in the Tree.mand line parameter of each process.4.Start Time and End Time of all processes.5.Life Time graph (third column in the figure above).6.Process ID of each process.The following steps help to identify the list of dependencies of these processes:1.Any Child Process that is created by the Target application is a dependency.2.Any process that is running from the application installation directory/sub-directory is adependency.3.Any process that is created after the Target application is created is a good candidate for being adependency. Look for its Command-line parameters to see if this process might be adependency. The Life Time column has a graph to easily identify the list of processes that is created after the creation of the Target application.Appendix B – Package MapperIntroduction to Package MapperPackage Mapper is a Windows Embedded Standard 7 application that helps to map binaries to packages. The output of Package Mapper is a Windows Embedded Standard 7 Answer file. You can find the most recent version of Package Mapper and the manual on the Application Compatibility Web site here. Prerequisites∙.NET 3.5 Framework is a requirement for this application to work.∙ICE (Image Configuration Editor) should be installed.∙Register the COM DLL EmbeddedDSI.dll present in the ICE installation folder(regsvr32 EmbeddedDSI.dll).Figure 5- Package Mapper.Input Configuration FilePackage Mapper application takes a Configuration file as input. A sample Configuration file is listed below:This Configuration file has three types of entries:∙[InputFile] — Full path to the input CSV/TXT file. The CSV/TXT file has only one column, which isa list of binary names. The file names can be absolute/relative. If you have multiple CSV Files,you can specify one [InputFile] entry for each.∙[DSPath] – Full path to the Distribution Share. This can be 32-bit or a 64-bit Distribution Share.∙[ICEPath] – Full path to the ICE (Image Configuration Editor) installation path.Orphan FilesThe Orphan files section contains binaries that are not OS binaries. Only OS binaries are encapsulated inside packages. Orphan files might contain binaries installed from some out-of-box applications. Review the list to identify the out-of-box application that must be installed.Files Mapped to Multiple PackagesThere are some files that are found in more than one package. Review this list and resolve the packages to be included in the Answer file. It is optional to resolve the packages. You can still continue to save the Answer file without resolving some/all of the entries in this list.Output FilesPackage Mapper has two Output files:1.Windows Embedded Standard 7 Answer file. This file contains a list of packages thatencapsulates the binaries specified in the Input files.2.Mapping file. This file lists the packages in the Answer file and the Binary files that arecontained in each package.Additional ResourcesMicrosoft Windows Embedded Web site:/windowsembeddedThe information contained in this document represents the current view of Microsoft Corporation on the issues discussed as of the date of publication. Because Microsoft must respond to changing market conditions, it should not be interpreted to be a commitment on the part of Microsoft, and Microsoft cannot guarantee the accuracy of any information presented after the date of publication.This white paper is for informational purposes only. MICROSOFT MAKES NO WARRANTIES, EXPRESS OR IMPLIED, IN THISDOCUMENT.Complying with all applicable copyright laws is the responsibility of the user. Without limiting the rights under copyright, no part of this document may be reproduced, stored in, or introduced into a retrieval system, or transmitted in any form or by any means (electronic, mechanical, photocopying, recording, or otherwise), or for any purpose, without the express written permission of Microsoft Corporation.Microsoft may have patents, patent applications, trademarks, copyrights, or other intellectual property rights covering subject matter in this document. Except as expressly provided in any written license agreement from Microsoft, the furnishing of this document does not give you any license to these patents, trademarks, copyrights, or other intellectual property.© 2010 Microsoft Corporation. All rights reserved.Microsoft, MS-DOS, Windows, Windows Server, Windows Vista, Excel, Groove, InfoPath, OneNote, Outlook, PowerPoint, Visual Studio Windows, Fluent, and Windows Server are either registered trademarks or trademarks of Microsoft Corporation in the United States and/or other countries.。
Windows Embedded Standard 7安装及使用指南第一章概述1.1Windows Embedded Standard 7概述Windows Embedded Standard 7 以组件化形式提供Windows 7 操作系统的功能、熟悉度和稳定性,能开发人员创建运行成千上万种现有Windows 应用程序和驱动程序的高级商务设备和消费类设备。
使用适合现有客户基础结构的坚实平台,在Windows Embedded Standard 7 中释放Windows 7 技术的强大功能。
技术参数:处理器体系结构支持多处理器体系结构:- x86- x64工具改进的开发人员体验,可满足整个开发周期的要求:- 使用映像构建器向导(IBW) 的向导体验,可快速建立原型- 使用映像配置编辑器(ICE) 的高级配置最新的桌面技术创新- Internet Explorer 8- Windows Media Player 12- 远程桌面协议7- Silverlight 3- .net Framework 3.5 SP1适当级别的组件化适用于构建专用设备的粒度级别:- 150 多个基于Windows 7 的最新创新的直观功能包- 用于满足嵌入式特定要求的嵌入式功能,例如增强型写入筛选器、基于文件的写入筛选器、注册表筛选器、休眠一次恢复多次(HORM)、USB 启动、对话框筛选器和自定义外壳程序- 450 多个用于实现与不断增长的设备硬件和外设集的兼容性的驱动程序集应用程序兼容性用于Windows 7 的应用程序和驱动程序可以在Windows Embedded Standard 7 上运行,而无需困难、昂贵且耗时的端口设定工作企业连接性和可管理性- 支持Active Directory、域加入、组策略、网络访问保护和IPv6,以实现连接性丰富的沉浸式用户体验通过Windows Aero 和Windows 触控,提供丰富的交互式用户体验。
V2426 Windows Embedded Standard 7User’s ManualFirst Edition, December 2013/product© 2013 Moxa Inc. All rights reserved.V2426 Windows Embedded Standard 7User’s ManualThe software described in this manual is furnished under a license agreement and may be used only in accordance withthe terms of that agreement.Copyright Notice© 2013 Moxa Inc. All rights reserved.TrademarksThe MOXA logo is a registered trademark of Moxa Inc.All other trademarks or registered marks in this manual belong to their respective manufacturers.DisclaimerInformation in this document is subject to change without notice and does not represent a commitment on the part of Moxa.Moxa provides this document as is, without warranty of any kind, either expressed or implied, including, but not limited to, its particular purpose. Moxa reserves the right to make improvements and/or changes to this manual, or to the products and/or the programs described in this manual, at any time.Information provided in this manual is intended to be accurate and reliable. However, Moxa assumes no responsibility for its use, or for any infringements on the rights of third parties that may result from its use.This product might include unintentional technical or typographical errors. Changes are periodically made to the information herein to correct such errors, and these changes are incorporated into new editions of the publication.Technical Support Contact Information/supportMoxa AmericasToll-free: 1-888-669-2872 Tel: +1-714-528-6777 Fax: +1-714-528-6778Moxa China (Shanghai office) Toll-free: 800-820-5036Tel: +86-21-5258-9955 Fax: +86-21-5258-5505Moxa EuropeTel: +49-89-3 70 03 99-0 Fax: +49-89-3 70 03 99-99Moxa Asia-PacificTel: +886-2-8919-1230 Fax: +886-2-8919-1231Moxa IndiaTel: +91-80-4172-9088 Fax: +91-80-4132-1045Table of Contents1.Introduction ...................................................................................................................................... 1-1Software Components ......................................................................................................................... 1-2 2.System Initialization ......................................................................................................................... 2-1Overview ........................................................................................................................................... 2-2 Initializing User Settings .............................................................................................................. 2-2 3.Enabling Embedded Filters ................................................................................................................ 3-1Enhanced Write Filter .......................................................................................................................... 3-2 Overview .................................................................................................................................... 3-2Enabling Enhanced Write Filter ...................................................................................................... 3-3 File-Based Write Filter ......................................................................................................................... 3-6 Overview .................................................................................................................................... 3-6Configure File-Based Write Filter ................................................................................................... 3-6 4.Examples ........................................................................................................................................... 4-1Watchdog .......................................................................................................................................... 4-2 Enabling Watchdog Function ......................................................................................................... 4-2 5.System Recovery ............................................................................................................................... 5-1Overview: Setting Up the Recovery Environment .................................................................................... 5-2 Step 1: Prepare the USB drive .............................................................................................................. 5-2 Step 2: Setting the BIOS to Boot via USB .............................................................................................. 5-4 Step 3 (opt.): Create a Custom System Image ....................................................................................... 5-5 Step 4: Reset BIOS to Original State ..................................................................................................... 5-8 Step 5: Perform a Test Restoration ....................................................................................................... 5-91Introduction Thank you for buying Moxa’s V2426 train computer. It comes with the Windows 7 Embedded software platform,providing a simple and familiar development environment for on-board train applications.Software ComponentsSoftware ComponentsRefer to the following content for the software components of the Windows Embedded Standard 7 pre-installed on the V2426 computers.Core OS:• 32-bit support• Remote Client• Remote Procedure CallApplications and Services Development:• .Net Framework 3.5• Remote Desktop Protocol 7.1• COM OLE Application Support• COM+ Application Support• MSMQInternet Services:• Internet Explorer 8.0• IIS 7.0File Systems and Data Store:• Windows Data Access Components• Windows Backup and RestoreDiagnostics:• Common Diagnostic Tools• Problem Reports and SolutionsFonts: Chinese (Trad. and Simp.), Japanese, Korean, Western, Middle Eastern, South East Asian, and South Asian FontsGraphics and Multimedia:• MPEG DTV-DVD Audio Decoder (MPEG-2, AAC)• MPEG Layer-3 Audio Codecs(MP3)• MPEG4 Decoders• Windows Media Video VC-1 (WMV) Codecs• DirectX and Windows Device Experience• Windows Media Player 12International:• IME Simplified Chinese Support• IME Traditional Chinese SupportManagement:• Group Policy Management• Windows Management Instrument (WMI)• Windows UpdateNetworking:• Extensible Authentication Protocol (EAP)• Internet Authentication Service• Telnet Server• Bluetooth• Domain Services• Network Access Protection• Network and Sharing Center• Quality of Service• Remote Access Service (RAS)• Telephony API Client• Windows Firewall• Wireless NetworkingSecurity:• Credential Roaming Service• Credentials and Certificate Management• Windows Authorization Manager (AZMAN)• Windows Security Center• Active Directory Rights Management• Security Base• Encrypted File System (EFS)Embedded Features:• Enhanced Write Filter (EWF)• File-Based Write Filter (FBWF)• Message Box Default Reply• Registry Filter• WSDAPI for .NETEmbedded Self-Health Diagnostic Software: SNMP-based remote scripting layer for monitoring, reporting, and control2System Initialization This chapter describes how to initialize the system settings on V2426 computer when you boot up the computerat first time.The following topics are covered in this chapter:❒OverviewInitializing User SettingsOverviewLike most laptop computer, you need to type a user name to create your user account to enable the embedded computer to work, follow the steps below:Initializing User Settings1.When you boot the embedded computer for the first time, you need to enter a user name for thiscomputer.2.Type the password, retype the password. In addition, you may also type a password hint in case youforget your password. If you do not want to set the password, leave it blank and click Next.3.Select the windows update option.4.Select the time zone and daylight saving time option and click Next.5.Select computer’s current location. Windows will automatically apply the correct network settings basedo the network’s location.6.Now you can start to use V2426 embedded computer.3Enabling Embedded FiltersThis chapter describes how to operate the embedded enabling features on the V2426 computer.The following topics are covered in this chapter:❒Enhanced Writer Filter❒File-Based Write FilterEnhanced Write FilterOverviewEnhanced Write Filter (EWF) provides a means for protecting a volume from writes. This allows the operating system (OS) to boot from write-protected hard disks. All writes to an EWF-protected volume. (The Hard Disk in Figure 1) are redirected to an overlay(EWF Volume in Figure 1). Because EWF does not write data to hard disk directly, so it can protect the hard disk from sudden power loose. These writes are cached in the overlay and made available as part of the volume. This gives the appearance that the volume is writeable. The overlay is an independent storage location which exists in random access memory (RAM). If desired, the data stored in the overlay may be committed to the protected volume. Refer to the following figure for the overview of the EWF structure.Enabling Enhanced Write FilterFollow these steps to enable the Enhanced Write Filter1.First open right-click the lock icon in the left side.2.Select volume in Volume Information and then select Configure.3.Select Enable in Pending command.4.Reboot the system.5.Check if the icon has been changed to locked status.6.Select Configure.7.Select volume and select the Pending command for your need.File-Based Write FilterOverviewAccording to Microsoft:File-Based Write Filter (FBWF) allows the Windows Embedded platform to maintain theappearance of read and write access on write-sensitive or read-only storage. FBWFmakes read and write access transparent to applications.Writing to storage media may be undesirable or impossible in embedded devices. FBWFredirects all writes targeted for protected volumes to a RAM cache called an overlay. Usedin this context, an overlay is similar to a transparency overlay on an overhead projector.Any change made to the overlay affects the picture as seen in the aggregate, but if theoverlay is removed, the underlying picture remains unchanged.FBWF provides the advanced feature than EWF to let user specify the directory to write the data to disk drive directly, in our default setting, the default directory is under c:\temp, which means you can read/write the data into disk without commit action.Configure File-Based Write FilterTo enable file-based write filtering, do the following:1.Right-click the lock icon on the right side2. Select Configure .3. In the configuration tab, check Filter state enabled and Cache pre-allocation enabled .And then select C:, and then select Protect and Apply.4. Reboot the system.5.Right-click the icon.6.Click Configure.7.Change to Exclusion List and select browse button.8.Select the file to exclude the protection.9.Click + button.10.Check if the file path has been added.V2426-W7E Series Moxa Software Package11.Change to Cache Content tab.12.Select the file to you want to save to physical disk and select commit13. Reboot system to take effect4ExamplesThis chapter describes how to use various examples on the V2426 computers for different functions.The following topics are covered in this chapter:❒WatchdogEnabling Watchdog FunctionV2426-W7E Series ExamplesWatchdogThe V2426 computers provide example for users to enable the watchdog function. The Watchdog example is under <Software DVD>\examples\project\WatchDog\ and the executable file Watchdog.exe is under <Software DVD>\examples\TC6000Release.You can follow the steps below to test the watchdog function with executable file.Enabling Watchdog Function1.Create c:\programs\example folder and copy the Watchdog.exe into the folder.2.Execute Watchdog.exe.3.You will see the *pdwPortVal = 0x80 which means the watchdog function is enabled, and then you needto press Enter in every 10 seconds or the system will reboot.4.To stop the watchdog function, press q to exit the program, and you will see the *pdwPortVal = 0xc0which means the watchdog function is disabled.5System Recovery The V2426 ready-to-run embedded computers are a Windows Embedded Standard 7 platform. This chapterdescribes the recovery process in the event of system instability.The following topics are covered in this chapter:❒Overview: Setting Up the Recovery Environment❒Step 1: Prepare the USB drive❒Step 2: Setting the BIOS to Boot via USB❒Step 3 (opt.): Create a Custom System Image❒Step 4: Reset BIOS to Original State❒Step 5: Perform a Test RestorationOverview: Setting Up the Recovery EnvironmentA V2426 computer, a 4 GB (min.) USB drive, and a copy of the recovery suite are all required to set up theV2426’s system recovery environment.The recovery procedure itself requires only a V2426 computer and a bootable USB drive.The following procedure describes the basic process of setting up the system recovery environment.1.First, the recovery programs and system image file will be copied over to the USB drive, and the drive willbe set up to provide a system boot process by copying an ISO image of the boot environment to the USB.2.The system will be re-booted, and BIOS will be manually configured to boot the system from the USB port.3.An image of the current software system will be created on the USB drive, for the recovery environment touse when restoring the system.4.The system will be re-booted again, and the BIOS returned to its original state.Step 1: Prepare the USB drive1.Load the software DVD that came with your V2426 computer and execute tuxboot-windows-23.exefrom the software DVD\recovery\V2426W7E folder, select Pre-Downloaded, and click the buttonmarked with an ellipsis (…) to browse the file system and find the location of the boot environment’s ISOimage.2.Navigate to\recovery\on the software DVD and select the boot environment’s ISO image.3.Set the device Type (lower left-hand corner) as USB Drive, then set the Drive dialog to the letter underwhich the USB is currently mounted.4.Click OK, and the boot environment t and bootloader will be copied to your USB drive.5.Because of the file system naming conventions used, for any given computer only a single recovery imagemay be used on any given USB drive. Consequently, at this point, users need to make a decision about which sort of system recovery is preferred:A. a basic recovery of the root OS, orB. a recovery image of the fully configured OS, with all user-installed software applications andscripts.a.To configure the recovery environment to boot into a fully configured system, users should clickReboot Now to close the installation environment and restart the computer. They should then proceed to the next section, Step 2: Setting the BIOS to Boot via USB and continue the installation of the recovery environment by continuing to Step 3 (opt.): Creating a Custom System Image.b.To configure the recovery environment to boot into a clean OS image with no applications, users shouldinstead click Exit here to complete the installation and return to the OS. From within the desktopenvironment, the user should then manually copy the directory containing the base OS from thesoftware DVD over to the USB drive. To do this, copy #:\<SoftwareDVD>\recovery\os_image over to the partition image directory, F:\home\partimag\. At this point, Step 1 has been completed, and you should proceed to Step 2: Setting the BIOS to Boot via USB.Step 2: Setting the BIOS to Boot via USB At this stage, users will reset the BIOS so that the system boots directly from the USB. This must be donebefore the rest of the system recovery environment may be configured1.Turn on the computer and, during the POST process, press F2 until you hear a long beep. You should thenenter the BIOS setup menu.e the arrow keys to navigate to the Boot tab, and then press Enter.3.Select Boot Type Order to open the dialog that will allow you to set the boot priority for the system drives.e the arrow keys to highlight USB and then press the plus key (+) to move it to the first position, orselect the other options above it and use the dash key(–) to move them down.5.Press F10 and then press Enter to save and exit the BIOS configuration interface. This should initiate thenext reboot, during which your system should now boot from the USB drive.Step 3 (opt.): Create a Custom System ImageThe instructions which follow are only to be used if you decided in Step 1of this process to create a full copy of an already-configured system. If you have not yet installed any software on your system, then return to section 5b of Step 1: Preparing the USB Drive and follow the instructions to create a clean OS image.Using this procedure, you will save to the USB drive a copy of the entire system as it is currently configured to be used as a full system recovery image should the system crash. All files under F:\home\partimag\ will be overwritten. Additionally, you should have already changed the BIOS settings to make the USB drivethe first boot priority. If you have not yet reset the boot priority, first return to Step 2: Setting the BIOS to Boot via USB, just above, and follow the directions there.1.Once the system has launched and the V2426 has booted the recovery environment from the USB drive,navigate to the entry ClonezillaLive Save Disk, and select it by pressing Enter. This will take you into the recovery image creation environment, allowing you to copy your full system setup to the USB drive.2.The V2426 will now boot into the image creation environment. Wait for the boot process to finish.3.Once the image creation environment has completed booting up, you will be given a warning and asked ifyou wish to continue. Please keep in mind that if you create the recovery image, then any residual files currently copied to the /home/partimag directory will be deleted. If there are any files remaining in the USB partition image directory and you wish to save them, you must exit the recovery environment and copy these files to another disk. If you wish to continue with the image creation, press Y (case insensitive) to continue.4. At this point, the recovery environment will copy of the entire hard drive to your USB drive. This will likelytake several minutes, and perhaps as long as half an hour. Do not remove the USB drive during this time; wait patiently for the process to finish. Depending on the speed of your USB drive, this may be a good time to get a cup of coffee, or take a nap.5.At this point you may choose to power down the computer (press 0), reboot (press 1), enter a consoleterminal (access a console TTY -- press 2), or re-initiate the entire procedure (press 3). Do not removethe USB drive until you have rebooted or powered down the system.6.Once you have powered down the system and removed the USB drive, you have finished configuring therecovery environment. The USB drive should be clearly labeled and stored in a safe place. You may nowcontinue to the next section, where you will return the BIOS to its original state (Step 4) and test therecovery procedure for successful configuration (Step 5).Step 4: Reset BIOS to Original StateNow you will need to return the boot priority to its original configuration so that the system will boot from the original disk. This is done for two reasons; the first is security, so that the machine may not be rebooted from unauthorized USB drives The second, however, is functional: currently, if the V2426 is set to boot from the USB drive, then the V2426 will hang any time a USB data drive (i.e.: non-bootable image) is inserted in the machine at boot time. The V2426 does not currently have the capacity to distinguish between simple USB data drives and boot-capable OS drives.1.Reboot the system, and press F2 to enter the BIOS setup menu.2.Select Hard Disk and shift it to the top boot priority by using the + key, then press Enter. Make sure thehard disk has first boot priority.3.Press F10 and then press Enter to save and exit the BIOS settings dialog.Step 5: Perform a Test RestorationConnect the USB drive to any of the V2426’s USB ports and then reboot the computer. The system will boot from the USB into the Clonezilla boot loader.1.Select ClonezillaLive Restore Disk to boot into the system restoration environment.2.Wait for the boot process to finish.3.At this point, the system will remind you that you are about to overwrite your entire operating system witha new drive image, and ask you if you want to continue. When prompted, enter Y (case insensitive) fromthe keyboard to start the system restoration process. Any other letter or Ctrl-C will cancel it and exitClonezilla.on the partition listed (sda1, in the example below). If you wish to continue, enter Y (case insensitive).5.Wait for the process to finish.6.At this point, complete the restoration by selecting (0) Power off. This will shut down the computer;however, if the Power Switch remains inserted in the front panel of the computer and is left in the ON position, then the system fail to shutdown and will immediately initiate a soft reboot, instead. To avoid this, users may use the switch to cut power to the computer immediately following the shutdown, or may simply remove the power switch from the front panel and then use the console to shut down the computer by pressing 0.7.After the computer has powered down, remove the USB drive and store it in a safe place.。

用户指南© Copyright 2014 Hewlett-Packard Development Company, L.P. Bluetooth 是其所有者的商标,Hewlett-Packard Company 经授权得以使用。
SD 徽标是其所有者的商标。
Java 是 Sun Microsystems, Inc. 在美国的商标。
Microsoft 和 Windows 是 Microsoft 集团公司在美国的注册商标。
本文档中包含的信息如有更改,恕不另行通知。
随 HP 产品和服务附带的明确有限保修声明中阐明了此类产品和服务的全部保修服务。
本文档中的任何内容均不应理解为构成任何额外保证。
HP 对本文档中出现的技术错误、编辑错误或遗漏之处不承担责任。
第一版:2014 年 9 月文档部件号:779567-AA1产品通告本用户指南介绍了大多数机型的常用功能。
您的笔记本计算机上可能未提供某些功能。
要访问最新用户指南,请访问/support,然后选择您的国家/地区。
选择驱动程序和下载,然后按照屏幕上的说明进行操作。
软件条款如果安装、复制、下载或以其他方式使用此笔记本计算机上预安装的任何软件产品,即表明您同意受 HP 最终用户许可协议 (EULA) 条款的约束。
如果您不接受这些许可条款,唯一的补救办法是在 14 天内将全部产品(硬件和软件)原封不动地退回经销商处,并依据经销商的退款政策获得全额退款。
如需详细信息或要求获得笔记本计算机全额退款,请联系您的经销商。
安全警告通告物体(例如枕头、毛毯或衣物)阻挡空气流通。
在使用期间,也不要让交流电源适配器接触皮肤或柔软物体,比如枕头、毛毯或衣物。
此款计算机和交流电源适配器符合信息技术设备安全性国际标准(IEC 60950-1) 中规定的用户可接触的表面温度限制。
iiiiv 安全警告通告目录1 欢迎使用 (1)查找信息 (2)2 了解笔记本计算机 (4)右侧 (4)左侧 (5)显示屏 (6)顶部 (7)触摸板 (7)指示灯 (8)按钮和扬声器 (9)按键 (10)底部 (11)前部 (12)3 连接到网络 (13)使用 HP Cloud Connection Manager 进行连接 (13)连接到无线网络 (13)使用无线控制 (13)打开或关闭无线设备 (13)使用 HP Connection Manager(仅限某些机型) (14)使用无线按钮 (14)使用操作系统控制 (14)使用 WLAN (14)使用 Internet 服务提供商 (15)设置 WLAN (16)配置无线路由器 (16)保护 WLAN (16)连接到 WLAN (16)使用 HP 移动宽带(仅限部分机型) (17)插入和取出 SIM 卡 (17)使用 Bluetooth 无线设备 (18)连接有线网络 (18)连接到局域网 (LAN) (19)v4 使用键盘、触摸手势和指点设备进行导航 (20)使用指点设备 (20)设置指点设备首选项 (20)使用指点杆 (20)使用触摸板和手势 (20)关闭和打开触摸板 (21)点击 (21)滚动 (22)双指收缩缩放 (22)双指点击 (23)使用键盘 (23)识别热键 (24)使用小键盘 (25)使用嵌入式数字小键盘 (25)打开和关闭嵌入式数字小键盘 (26)切换嵌入式数字小键盘上的按键功能 (26)使用可选的外接数字小键盘 (26)5 多媒体 (27)使用介质活动控件 (27)音频 (27)连接扬声器 (27)调节音量 (27)连接耳机和麦克风 (28)检查笔记本计算机上的音频功能 (28)网络摄像头 (29)视频 (29)VGA (30)DisplayPort (31)6 电源管理 (32)关闭笔记本计算机 (32)设置电源选项 (32)使用节能状态 (32)启动和退出睡眠模式 (32)使用电源计量器和电源设置 (33)设置唤醒时的密码保护 (33)使用电池电源 (33)显示电池的剩余电量 (34)最大程度延长电池放电时间 (34)vi管理电池电量不足的情况 (34)识别电池电量不足的情况 (34)解决电池电量不足的情况 (34)装入或取出电池 (35)装入电池 (35)取出电池 (35)节约电池电源 (36)存放可由用户更换的电池 (36)处理可由用户更换的电池 (36)更换可由用户更换的电池 (37)使用外接交流电源 (37)测试交流电源适配器 (38)7 外接介质卡和设备 (39)使用内存卡读卡器 (39)插入存储卡 (39)取出存储卡 (39)使用智能卡 (40)插入智能卡 (40)取出智能卡 (40)使用 USB 设备 (41)连接 USB 设备 (42)移除 USB 设备 (42)使用可选的外接设备 (43)使用可选外接驱动器 (43)8 驱动器 (44)取放驱动器 (44)使用硬盘驱动器 (44)卸下或重新装上底盖 (44)卸下底盖 (44)重新装上底盖 (45)更换或升级硬盘驱动器 (46)取出硬盘驱动器 (47)安装硬盘驱动器 (48)9 安全保护 (49)保护笔记本计算机 (49)使用密码 (49)在 Windows 中设置密码 (50)vii在 Computer Setup(计算机设置)中设置密码 (50)管理 BIOS 管理员密码 (50)输入 BIOS 管理员密码 (51)使用防火墙软件 (51)安装安全保护缆锁选件 (52)10 维护 (53)添加或更换内存模块 (53)清洁您的笔记本计算机 (55)清洁步骤 (56)清洁显示屏(一体机或笔记本计算机) (56)清洁侧面和机盖 (56)清洁触摸板、键盘和鼠标 (56)更新程序和驱动程序 (56)11 Computer Setup(计算机设置) (BIOS)、Multiboot 和 HP PC Hardware Diagnostics (UEFI) (57)使用 Computer Setup(计算机设置) (57)启动 Computer Setup(计算机设置) (57)在 Computer Setup(计算机设置)中进行浏览和选择 (57)恢复 Computer Setup(计算机设置)的出厂设置 (58)更新 BIOS (58)确定 BIOS 版本 (58)下载 BIOS 更新 (59)使用 MultiBoot (60)关于引导设备顺序 (60)选择 MultiBoot 首选项 (60)在 Computer Setup(计算机设置)中设置新的引导顺序 (60)使用 f9 提示动态选择引导设备 (60)设置 MultiBoot Express 提示 (61)进入 MultiBoot Express 首选项 (61)使用 HP PC Hardware Diagnostics (UEFI)(仅限某些机型) (61)将 HP PC Hardware Diagnostics (UEFI) 下载到 USB 设备 (62)12 支持 (63)联系支持部门 (63)标签 (64)13 规格 (65)输入功率 (65)工作环境 (65)viii附录 A 携带笔记本计算机出行或运送笔记本计算机 (66)附录 B 故障排除 (67)故障排除资源 (67)解决问题 (67)笔记本计算机无法启动 (67)笔记本计算机屏幕黑屏 (67)软件运行异常 (68)笔记本计算机已开机,但是没有响应 (68)笔记本计算机过热 (68)外接设备不工作 (68)无线网络连接不工作 (68)无法播放光盘 (69)在外接显示器上无法观看影片 (69)光盘刻录不能开始,或在完成之前停止 (69)附录 C 静电放电 (70)索引 (71)ixx1欢迎使用在设置并注册笔记本计算机后,请务必执行以下步骤:●连接到 Internet — 设置有线或无线网络,以便可以连接到 Internet。
windows7安装后正常使用的安装方法以下是Windows 7的正常安装步骤:1. 首先,确保您有一台运行Windows 7的计算机或笔记本电脑。
2. 确认您的计算机符合Windows 7的最低系统要求,包括处理器速度、内存和硬盘空间等。
您可以在微软官方网站上查看这些系统要求。
3. 确保您有一张Windows 7安装光盘或USB安装介质。
您可以从微软官方网站购买或下载Windows 7安装镜像文件,并使用合适的工具制作启动U盘或刻录光盘。
4. 插入Windows 7安装光盘或启动U盘,并重新启动计算机。
确保在计算机启动时按下正确的键,以进入BIOS设置界面或选择从光盘或U盘启动。
5. 在BIOS设置界面中,将启动顺序更改为优先从光盘或U盘启动。
保存更改并退出BIOS设置。
6. 计算机重新启动后,将进入Windows 7安装界面。
根据屏幕提示选择所需的语言和其他首选项。
7. 单击“安装”按钮并遵循屏幕上的指示进行安装。
您需要接受许可协议、选择安装类型(通常选择“自定义(高级)”选项)和选择要安装Windows 7的磁盘分区。
8. 在安装过程中,系统会提示您输入产品密钥。
您可以在购买Windows 7时获得该密钥,在安装介质或电子邮件中找到。
9. 完成安装后,计算机将重新启动。
您需要设置一些基本配置,例如时区、用户名和密码等。
10. 完成所有设置后,您将进入Windows 7的桌面界面,表示安装已经成功完成。
请注意,此安装方法适用于正版Windows 7安装。
如果您使用的是非正版Windows 7,您可能需要寻求其他安装方法。
与非正版操作系统相关的问题我们无法提供支持。
windows7 安装教程Windows 7安装教程Windows 7是一款非常受欢迎的操作系统,如果你想在你的电脑上安装Windows 7系统,可以按照以下步骤进行操作:第一步:准备工作在开始安装Windows 7之前,需要确保你已经备份了所有重要的文件和数据。
因为在安装过程中,可能会对硬盘进行格式化,这将导致所有数据丢失。
另外,还需要保证你拥有Windows 7的安装光盘或者USB安装盘以及相应的产品密钥。
第二步:设置BIOS接下来,你需要进入计算机的BIOS设置界面。
不同电脑的进入方式可能不一样,在开机启动的瞬间,你需要按下相应的按键(比如Del、F2或者F12)来进入BIOS设置界面。
在BIOS设置界面中,你需要将启动项设置为从CD或USB启动,这样才能从安装光盘或者USB启动安装程序。
第三步:开始安装当你设置好BIOS后,重新启动电脑。
在电脑重启的时候,你会看到一个“按任意键启动光盘或USB”的提示,这时候你需要按下任意键来启动安装程序。
接着,屏幕上会弹出Windows安装程序的界面。
第四步:选择语言和地区设置在安装程序界面上,你需要选择合适的语言和地区设置,并点击“下一步”按钮。
第五步:点击“安装”按钮在接下来的界面上,你将看到一个安装Windows的大按钮,点击该按钮来开始安装程序。
第六步:接受协议和许可在安装程序的下一个界面上,你需要阅读并接受Windows 7的许可协议,然后点击“下一步”按钮。
第七步:选择安装方式在接下来的界面上,你需要选择你的安装方式。
如果你是首次安装Windows 7系统,选择“自定义(高级)”选项。
如果你已经在电脑上有其他操作系统,并且想要升级到Windows 7,选择“升级”选项。
第八步:选择安装位置在自定义安装方式下,你需要选择Windows 7的安装位置。
你可以选择已有的分区进行安装,或者创建新的分区。
点击“下一步”按钮继续安装。
第九步:等待安装接下来,你需要耐心等待Windows 7的安装过程。
Windows Embedded Standard 7(WES7)安装 汉化 激活Windows Embedded Standard 7(安装 汉化 激活)现在超级本使用非常普遍,基本都是配置了SSD固态磁盘,厂家一般都预装了windows 7系统。
近期笔者入手一款超级本,自带24G SSD, windows 7 64位系统。
1. 使用一些网友制作的精简版win 7, 但这些精简的系统其实体积并不小,内置太多插件和广告,为了安全和自由意志,我拒绝使用类似系统2. 使用windows thin pc, 这是微软官方出品的精简版win7,安装后只占3G空间(非常苗条),但安装后需要手工安装汉化包、搜索功能不可用、无图片查看器、无.NET Framework框架。
我尝试按网上的介绍的方法安装thin pc, 总遇到安装扩展功能包后thin pc无法正常启动或是扩展功能不可用。
折腾了几天,并没有完全解决好。
后来就放弃使用它。
3. 使用Windows Embedded Standard 7(简称wes7) ,后来事实证明使用wes7的效果非常好。
它是一个组件化的系统,基于windows 7, 能在win7上安装的驱动和程序,都能在wes7上运行。
它允许我们在安装时根据需要指定功能,这就就避免了安装不必要功能,节省了磁盘空间,提升整体性能和使用体验。
.NET framework, windows media player, photo viewer, search,主题、桌面特效等功能完全安装上,占用的空间并不超过3G。
通过一段时间的使用,这个系统的功能、兼容性、性能方面一点问题也没有,比自带的正版win7好用多了。
要准备的工作如下:1. WES7 安装源文件可从微软官方网站下载180天(本文后面会讲到如何激活)评估版/en-us/download/details.aspx?id=118872. 中文语言包从微软网站下载语言包文件(注意只下载SP1\Chinese (Simplified) Language Pack即可)32位:/en-us/download/details.aspx?id=2621564位:/en-us/download/details.aspx?id=26216建议在安装时使用微软官方的密钥(GJVTR-C4WQ6-BKRH3-DRFFH-J83DM),可以有180天的试用期,通过重置设置,可以使用长达N年。
【操作系统】Wes7组件功能说明-嵌入式Win7-WindowsEmbeddedStandard7关于Firefox的技巧的文档:侧边栏视图、缩略图视图,by江3如此多娇//黄色是必备的,绿色是可选的,但有些还是会因为依赖性被迫的,比如一些网络协议//我查阅了所有WES7的官方文档,一项一项看的,也安装多次,下面的解释是从网上下载的,但是很多解释和说明是我自己写的//如果你觉得解释的不够详细,可以参阅Google搜索的结果,__.NET Framework 2.0 Client Profile__.NET Framework 2.0的客户端配置文件__.NET Framework 3.0__.NET框架3.0__.NET Framework 3.0 Client Profile__.NET框架3.0客户端配置文件__.NET Framework 3.5__.NET框架3.5__.NET Framework 3.5 Client Profile__.NET框架3.5客户端配置文件_Application Support_应用程序支持__COM OLE Application Support__COM OLE应用程序支持__COM +应用支持__COM+ Application Support需要COM OLE Application Support Core File System__MSMQ 消息队列需要IIS__MSMQ__Win32 Application Runtimes and Libraries__Win32应用程序运行和库需要com+ IE8 Windows Data Access Components_Boot Environments_启动环境__Enhanced Write Filter Boot Environment(带"影子系统"功能的启动环境)__增强型写入过滤器引导环境__Windows Boot Environment(windows默认启动环境)__Windows引导环境_Browsers_浏览器__Internet Explorer 8__Internet Explorer 8___ Internet Explorer 8 Browser___Internet Explorer 8浏览器___Internet Explorer 8 Engine and Display___Internet Explorer 8的引擎和显示___Internet Explorer 8 Foundation(网页渲染,编辑,调试,脚本支持)___Internet Explorer 8的基础_Data Access and Storage_Data访问和存储__Windows data Access Components__Windows数据访问组件__Windows data Access Components SQL__Windows数据访问组件SQL_Data integrity_Data完整性__Shadow Copy Volume Interface__Shadow副本卷接口__Shadow Copy Volume Service__Shadow副本卷服务__Windows Backup And Restore__Windows备份和恢复__Windows Side By Side(废弃的功能,已被集成到内核中)__Windows并排_Devices and Printers_设备和打印机__Device Framework__设备框架(basic input and output devices)__Device User Experience 必备,设备管理器__设备用户体验(Devices and Printers)__Driver Frameworks__驱动框架(notify the user when new devices are installed or discovered)__Fax and Scan__传真和扫描__Printing Utilities and management(LPD 和WIA,一般用不到)__打印实用程序和管理__Sensor and Location Platform__传感器和定位平台__Standard Windows USB Stack__标准Windows USB协议栈_Diagnostics_Diagnostics__Common Diagnostic Tools(user需要依赖)__常用的诊断工具__性能监控__Performance Monitoring(troubleshooting wizards)__Problem Reports and Solutions(Windows Error Reporting 无用)__问题报告和解决方案__User(必备,任务管理器之类工具)__用户_Embedded Enabling Features_嵌入式启用特点__Edition Branding__可编辑商标___unbranded startup Screens___无商标的启动画面___Windows Embedded Standard Startup Screens___Windows嵌入式标准启动画面__Bootable Windows USB Stack__可启动的Windows USB协议栈__Custom Logon Desktup Background Images__自定义登录桌面背景图片__Dialog Box Filter__对话框过滤器__Enhanced Write Filter With HORM__增强型写入滤波器HORM__File Based Writer Filter(FBWF)__基于文件的过滤器(FBWF)__Hide Boot Screens__隐藏启动画面__Message Box Default Reply__消息框的默认回复__RAM Disk Controller__RAM磁盘控制器__Registry Filter__注册表过滤器__SD Boot__SD启动__WSDAPI for .NET__WSDAPI的.NET_Fonts_字体__Bitmap Fonts__位图字体__Simplified Chinese Fonts__简体中文字体__True Type Fonts__True Type字体__西方字体__Western FontsWestern Supplemental Fonts_Graphics and Multimedia_图形和多媒体__Premium Codecs(不需要)__高级编解码器__Audio and Video Engines and Media Foundation__音频和视频引擎及媒体基础__DriectX and Windows Device Experience__DriectX和Windows设备体验__Graphics Platform(必备必备)__图形平台__Image Mastering API V2(CD刻录,用不到)__V2的图像控制API__Windows Media Player 12(42m,无依赖包)__Windows媒体播放器12_International_International__IME__IME___IME Base Components(输入法必备必备)___IME基本组件___IME japanese Support___IME日本的支持___IME Korean Support___IME韩国支持___IME Simplified Chinese Support___IME简体中文支持___IME Traditional Chinese Support___IME繁体中文支持__International Components and Language Services(需要)__国际组件及语言服务__Language Pack Setup(必备必备)__语言包安装_Internet Information Services-IIS_Internet信息服务中的IIS __IIS 7.0__IIS 7.0___IIS 7.0 提供网络服务用的___IIS 7.0__Windows Process Activation Service(服务器用的,有个组件依赖这个组件,只能安装)__Windows进程激活服务_Management_管理__System Management__系统管理___Group Policy Management___组策略管理___Microsoft managements Console(MMC)___Microsoft管理层控制台(MMC)___System Management Administrative Tools___系统管理系统管理工具___System Management Utilities___系统管理实用程序___Windows Management Instrumentation(WMI)___Windows管理规范(WMI)__Windows update__Windows更新___Windows Update Standalone Installer___Windows更新独立安装程序___Windows Update User Interface___Windows更新用户界面__Parental Control__家长控制__Power Management__电源管理__Windows Application Compatibility(鸡肋功能)__Windows应用程序兼容性__Windows PowerShell 2.0(9m)__Windows的PowerShell 2.0_MediaCenter(132m,没必要装入系统分区中)_媒体中心__Media Center__媒体中心_Networking_网络__Base__基础___Extensible Authentication Protocol(EAP)___可扩展身份验证协议(EAP)___Internet Authentication Service___Internet验证服务___Networking Base___网络基础___Networking Foundation___联网基础__TelnetServer__TelnetServer___Telnet Server___Telnet服务器__BITS__BITS__Bluetooth__蓝牙__Domain Services(网络与共享中心的依赖包)__域服务__IRDA and UNIMODEM(同上)__红外线和调制解调器__Network Access Protection__网络访问保护__Network and Sharing Center(一堆依赖包自然会被选中)__网络和共享中心__Network Diagnostics__网络诊断__Peer Networking(网络与共享中心的依赖包)__点对点网络__Quality of Service__服务质量__Remote Access Service(RAS)(网络与共享中心的依赖包)__远程访问服务(RAS)__Small Networking Services(ping等工具)__小网络服务__Telephony API Client(网络与共享中心的依赖包)__客户电话服务接口__Windows Firewall__Windows防火墙__Wireless Networking(2个依赖包)__无线网络_Remote Connections_远程连接__Remote Desktop Connection__远程桌面连接_Security_安全__Security Credentials(PC用不到)__安全证书___Credential Roaming Service___凭据漫游服务___Credentials and Certificate management___凭据和证书管理___Windows Authorization Manager(AZMAN)___Windows授权管理器(AZMAN)__System Security Management__系统安全管理___Windows Security Center(安全中心,没啥用)___Windows安全中心__Active Directory Rights Management(单机没用)__激活目录权限管理__AntiMalware(Windows Defender,没用)__反恶意软件__Application Security(UAC,鸡肋)__应用安全__Bitlocker Secure Startup(没啥用)__Bitlocker安全启动__Encrypted File System(EFS)(317K,依赖不多,但没啥用)__文件加密系统(EFS)__Security Base(底层安全基础支持,需要)__安全基地__Trusted Platform Module (TPM) Management(858K,功能不明)__可信平台模块(TPM)管理_SKU(限制组件功能的,不要安装)_SKU__WS7C__WS7C__WS7E__WS7E__WS7P__WS7P_System Services_系统服务__File System__文件系统___Advanced File System___高级文件系统___Core File System___核心文件系统___File and Folder Synchronization___文件和文件夹同步___File Compression Utility(858K,有点儿用)___文件压缩工具___Remote Client___远程客户端___Simplified message Block (SMB)(4.28m,NFS支持,没啥用)___简单的消息块(SMB)__Remote Procedure Call(必备)__远程过程调用__Windows Installer(必备)__Windows安装程序_User Interface_用户界面__Help__帮助___Embedded Core Help Content(100多K)___嵌入式核心帮助内容___Help and Support Engine(4m)___帮助和支持引擎___Remote Assistance(没用)___远程协助__Microsoft Speech API__Microsoft语音接口___Speech and Text___语音和文本___Speech Chinese Simplified(没用)___简体中文语音__Windows Shell__Windows外壳___Accessories(小工具)___附件___Application User Experience(程序的设置,必备)___应用程序用户体验___Shell Controls and UI Support Functions(必备)___外壳控制和用户界面支持功能___Shell Foundation(必备)___外壳基础___System Control Panel(必备)___系统控制面板___Windows Exporer Shell(图形界面,与自定义命令提示符二选一,故必选)___Windows资源管理器壳___Windows Exporer Shell Resources(必备)___Windows资源管理器外壳资源__Accessibility,无障碍,正常人用不到__辅助功能__命令提示符壳的自定义外壳支持__Command Prompt Shell With Custom Shell Support(与Windows Explorer Shell 二选一,故绝对不选)__DVD Maker__DVD Maker__Mobility Center and SideShow(4m,依赖关系不多)__移动中心和SideShow__Natural Language 6(318m,win搜索的依赖包)__自然语言6__Photo Viewer(需要依赖Printing Utilities and Management)__照片查看器__Search Indexing(win搜索的依赖包,官方建议禁止)__搜索索引__Tablet PC Support__平板电脑支持__Text Services Framework__文本服务框架__Windows Search(28m)__Windows搜索Language Packages语言包_en-US_en-US__English (US) Language Pack(必备)__English(US)语言包。
Windows Embedded Standard 2011 CTP2 Lab ManualWindows Embedded Standard 2011 – CTP2 Lab ManualTable of Contents1 Preparing to Use Windows Embedded Standard 2011 ........................................................................ 5 1.1 1.2 1.3 1.4 1.5 1.6 Introduction .................................................................................................................................. 5 Related Windows 7 Documentation ............................................................................................. 5 Minimum Device Hardware Requirements .................................................................................. 5 Release Notes................................................................................................................................ 6 Install Windows Embedded Standard 2011 Toolkit ...................................................................... 6 1.5.1 1.6.1 1.6.2 1.7 1.7.1 1.7.2 2 2.1 Open Windows Embedded Standard 2011 Toolkit Help .................................................. 6 Make Your Utility Disk Bootable ....................................................................................... 7 Add Image Builder Wizard to Your Utility Disk ................................................................. 7 Create a Windows PE Utility Disk with Image Configuration Editor ................................. 8 Create a Custom Windows PE Image ................................................................................ 8 Create a Utility Drive ..................................................................................................................... 7Create a Windows Preinstallation Environment Utility Drive (Optional) ..................................... 8Build Windows Embedded Standard 2011 Images ............................................................................... 9 Build a Windows Embedded Standard 2011 Image with Image Builder Wizard .......................... 9 2.1.1 2.1.2 2.2 2.2.1 2.2.2 2.2.3 2.2.4 2.2.5 2.2.6 2.2.7 Build a Thin Client Image with Embedded Enabling Features .......................................... 9 Build an Image with Embedded Core Only ..................................................................... 11 Build a Thin Client Image with Custom Settings ............................................................. 11 Add Update Packages to a Distribution Share (Optional) ............................................... 14 Add Third-Party Software (Optional) .............................................................................. 15 Run a Custom Script (Optional)....................................................................................... 16 Add Third-Party Drivers (Optional) ................................................................................. 17 Make Your Install Fully Unattended (Optional) .............................................................. 17 Create Image Builder Wizard Disk from Answer File (optional) ..................................... 24Build a Windows Embedded Standard 2011 Image Using Image Configuration Editor ............. 113Deploy an Image ................................................................................................................................. 25 3.1 Prepare and Capture an Image for Deployment......................................................................... 25 3.1.1 3.1.2 3.2 Sysprep the Image........................................................................................................... 25 Capture the Image Into a Windows Image (.wim) File ................................................... 25Deploy an Image Using ImageX................................................................................................... 26© 2009 Microsoft. All Rights Reserved. Page 2Windows Embedded Standard 2011 – CTP2 Lab Manual3.2.1 3.2.2 3.2.3 3.3 3.3.1 3.3.2 4 4.1Prepare your Destination Device .................................................................................... 26 Apply an Image to Your Device’s Hard Drive .................................................................. 27 Shut Down the Destination Device ................................................................................. 27 Start Image Builder Wizard with your Image .................................................................. 28 Customize a Captured Image .......................................................................................... 29Deploy an Image Using Image Builder Wizard ............................................................................ 27Service an Image ................................................................................................................................. 31 Service an Image with Image Configuration Editor and DISM .................................................... 31 4.1.1 4.1.2 4.1.3 4.2 4.2.1 4.2.2 4.2.3 4.2.4 4.2.5 4.2.6 4.3 4.4 Create a Configuration Set using Image Configuration Editor ........................................ 31 Install using your Configuration Set ................................................................................ 32 Test your image............................................................................................................... 34 Mount your image .......................................................................................................... 34 Add sample packages ...................................................................................................... 34 Adding a Package Using DISM ......................................................................................... 35 Unmount and Commit Changes ...................................................................................... 35 Redeploy and Verify ........................................................................................................ 35 Add a Language Pack (optional) ...................................................................................... 35Service an Image with DISM ....................................................................................................... 34Install Updates with WUSA ......................................................................................................... 36 Service an Image with Package Scanner ..................................................................................... 36 4.4.1 4.4.2 4.4.3 Package Enumeration ..................................................................................................... 37 Find Applicable Updates ................................................................................................. 37 Scavenging ...................................................................................................................... 375Additional Windows Embedded Standard 2011 Labs ......................................................................... 39 5.1 Suppress OOBE............................................................................................................................ 39 5.1.1 5.1.2 5.2 5.2.1 5.2.2 5.2.3 5.2.4 5.2.5 5.3 5.3.1 Create an Answer File ..................................................................................................... 39 Using your answer file with Image Builder Wizard ......................................................... 39 Hide boot screens ........................................................................................................... 40 Use Shell Launcher .......................................................................................................... 40 Remove Windows branding ............................................................................................ 41 Replace the startup screen background image .............................................................. 41 Add Message Blockers .................................................................................................... 42 Install from Image Builder Wizard directly to UFD : ....................................................... 44Page 3Using a Custom Shell and Custom Branding ............................................................................... 40Build a USB bootable Windows Embedded 2011 image ............................................................ 44© 2009 Microsoft. All Rights Reserved.Windows Embedded Standard 2011 – CTP2 Lab Manual5.3.2 5.4 5.4.1 5.4.2Install from Image Builder Wizard to Hard Drive, ImageX to UFD: ................................. 44 Creating Templates ......................................................................................................... 46 Using Custom Templates in IBW ..................................................................................... 46Create Custom Templates for IBW ............................................................................................. 46© 2009 Microsoft. All Rights Reserved.Page 4Windows Embedded Standard 2011 – CTP2 Lab Manual1 Preparing to Use Windows Embedded Standard 20111.1 IntroductionWelcome to Windows Embedded Standard 2011. This lab manual is a guide to help you use and evaluate Windows Embedded Standard 2011. In addition to preparation steps, such as toolkit installation, this manual includes labs for key scenarios such as building an image, deploying an image and servicing an image. The labs are most easily followed in the order presented. You can also chose labs individually based on your interests and previous experience with Windows Embedded, but please note that several lab scenarios assume you have the output of an earlier lab scenario.1.2 Related Windows 7 DocumentationWindows Embedded Standard 2011 is based on Windows 7; therefore much of the Windows 7 documentation can be used as reference material. Windows 7 Automated Installation Kit (Windows AIK) online documentation /downloads/details.aspx?FamilyID=f1bae135-4190-4d7c-b19319123141edaa&displaylang=en Windows 7 Technical Library on Microsoft TechNet /enus/library/dd349342.aspx Windows Developer Center for Windows 7 /enus/windows/dd433113.aspx 1.3 Minimum Device Hardware RequirementsYou must have the following minimum hardware to be able to build a Windows Embedded Standard 2011 image on your device: 1 GHz x86 or amd64 processor 1 GB of flash or hard drive space (4 GB recommended) 512 MB of RAM (1 GB recommended for amd64 devices) 900 MHz CPU or equivalent At least one of the following bootable media types: Bootable DVD-ROM drive Bootable USB 2.0 port and a USB Flash Drive (UFD) with 4 GB free space, or access to a local networkBIOS supporting Windows Preinstallation Environment (Windows PE) 3.0 Minimum hardware requirements, particularly RAM requirements, may be greater depending on the size and type of feature packages selected.© 2009 Microsoft. All Rights Reserved.Page 5Windows Embedded Standard 2011 – CTP2 Lab Manual1.4 Release NotesAlthough every attempt has been made to provide workarounds and additional usage notes for scenarios that are affected by known issues in the pre-release versions of Windows Embedded Standard 2011, we strongly recommend that you refer to the release notes provided with this release before beginning any of the labs described in this manual.1.5 Install Windows Embedded Standard 2011 ToolkitYou can install Windows Embedded Standard 2011 Toolkit on your development computer from a DVD or from setup files downloaded from Microsoft Connect. 1. Run Setup.exe If you have the Windows Embedded Standard 2011 Toolkit DVD, installation should begin when you insert the DVD into the DVD drive. If it doesn’t start automatically , the Setup.exe file can be found at: <DVD Drive>:\WindowsEmbeddedStudio.msi. 2. On the Setup Type page, do one of the following: To install the tools and distribution share to the default location, select Complete. The default locations are: 32-bit operating system: [System Drive]:\Program Files\Windows Embedded Standard 2011 64-bit operating system: [System Drive]:\Program Files(x86)\Windows Embedded Standard 2011 3. To install the tools and distribution share to a different location, select Custom.Follow the instructions in the installation wizard to complete the installation process.1.5.1 Open Windows Embedded Standard 2011 Toolkit HelpThe Windows Embedded Standard 2011 Toolkit Help contains more detailed information on many of the topics and steps contained in this manual. To access the Windows Embedded Standard 2011 Toolkit Help: 1. Start Image Configuration Editor on your development computer From the Start menu, click Programs, click Windows Embedded Standard 2011, and then click Image Configuration Editor. 2. On the toolbar, click the Help icon to launch Help.© 2009 Microsoft. All Rights Reserved.Page 6Windows Embedded Standard 2011 – CTP2 Lab Manual1.6 Create a Utility DriveIf your device is able to boot from a DVD, you can use the Windows Embedded Standard 2011 DVD appropriate to your device’s architecture to install the OS image directly to your device. Otherwise you can create a bootable USB drive by using the DiskPart tool and then loading the USB Drive with Image Builder Wizard (IBW) or WindowsPreinstallation Environment (WinPE). Diskpart supports the partitioning and formatting of a USB Flash Device (UFD) as a bootable device. A USB drive with a minimum of 4 GB is recommended for a utility drive loaded with Image Builder Wizard.1.6.1 Make Your Utility Disk Bootable1. 2. Attach your USB drive to your development computer. From a Windows Vista, Windows 7 or Windows Preinstallation (Windows PE) 3.0 environment, run the DiskPart tool by typing the following at a command prompt: diskpart Note: The version of the DiskPart tool provided by Windows Vista, Windows 7 and Windows PE 2.0, 2.1 and 3.0 supports the partitioning and formatting of a UFD as a bootable device. Previous versions of the DiskPart tool, including the version provided by Windows XP, do not fully support partitioning and formatting a UFD to be bootable and should not be used. 3. Use the DiskPart tool to determine the disk number and device size to be used for the next step by typing the following at the DiskPart prompt: list disk 4. Use the DiskPart tool to partition and format the drive and make it bootable. At the DiskPart prompt, type the following, replacing <disk_number> with the disk number of the USB drive: select clean create select active format assign exit disk <disk_number> part pri part 1 fs=ntfs quickYour USB drive is now bootable.1.6.2 Add Image Builder Wizard to Your Utility DiskThe Image Builder Wizard disks provide the ability to quickly generate a new IBW disk in the event IBW has been serviced or new packages have been added to the distribution share. To generate an Image Builder Wizard Disk: © 2009 Microsoft. All Rights Reserved. Page 7Windows Embedded Standard 2011 – CTP2 Lab Manual1.Start Image Configuration Editor on your development computer From the Start menu, selectPrograms, selectWindows Embedded Standard 2011, then selectImage Configuration Editor.2. 3. 4. 5. 6.On the Tools menu, select Media Creation, then select Create IBW Disk Enter the desired distribution share to be copied. Select your USB drive as the target folder. Select the desired disk architecture. Click OK.1.7 Create a Windows Preinstallation Environment Utility Drive (Optional)In some instances, you may want to create a utility disk that includes the Windows Preinstallation Environment (Windows PE). Windows PE is a lightweight version of Windows used mainly for deployment. You may prefer to use Windows PE instead of Image Builder Wizard if your USB drive is smaller than 2 GB, if you have space limitations on your device or if your device requires custom drivers that you will install on a custom version of Windows PE.1.7.1 Create a Windows PE Utility Disk with Image Configuration EditorThe Windows PE Utility Disk feature of the Media Creation tool in Image Configuration Editor provides the ability to quickly generate a Windows PE disk for gathering information about your target device or for deploying an image using Image Builder Wizard. The generated disk includes TAP.exe, ImageX and Package Scanner. To generate a Windows PE utility disk: 1. 2. Create a bootable utility disk (section 1.6.1 above). Start Image Configuration Editor on your development computer From the Start menu, selectPrograms, selectWindows Embedded Standard 2011, then selectImage Configuration Editor. 3. 4. 5. 6. 7. On the Toolsmenu, selectMedia Creation, then selectCreate PE Image. Enter a target folder on your development computer to which the binaries will be copied. Select the desired disk architecture. Click OK. Copy the contents of the ISO sub-folder from the target folder on your development computer to the root directory of your bootable utility disk.1.7.2 Create a Custom Windows PE ImageSee the topic “Create a Custom Windows PE Image” in the Windows Embedded Standard 2011 Toolkit Help for more information about creating a custom Windows PE Image and gathering other files to add to the bootable USB drive you created in section 1.6.1.© 2009 Microsoft. All Rights Reserved.Page 8Windows Embedded Standard 2011 – CTP2 Lab Manual2 Build Windows Embedded Standard 2011 Images2.1 Build a Windows Embedded Standard 2011 Image with Image Builder WizardImage Builder Wizard (IBW) is a tool you can use to create, configure and install Windows Embedded Standard 2011 on your device. The wizard runs directly on your device and guides you through a set of configuration choices. After you make your selections, the wizard creates and installs Windows Embedded Standard 2011 onto the device. You can further customize the installation or you can capture it to an image file and deploy it to other devices. In this lab, you will use IBW on your device to create different Windows Embedded Standard 2011 images. You can follow the steps provided in this lab to create the following variations: An image that can be used for a thin client device. A “minboot” image that contains only the base packages (referred to as Embedded Core).2.1.1 Build a Thin Client Image with Embedded Enabling FeaturesTo build a thin client image using IBW: 1. Start Image Builder Wizard on your device by either: Start the wizard from your Windows Embedded Standard 2011 DVD, your ISO image, or the USB drive prepared in section 1.6 Boot your device into Windows PE and run setup.exe from another location (USB drive, network share, etc.). Note: Image Builder Wizard will setup and install Windows Embedded Standard 2011. It’s important to make sure you are running the wizard on your device itself and not on your development computer. 2. On the first page, select Build an Image This option starts IBW and allows you to choose packages, drivers and languages to include in your image. You can optionally start from a template. 3. 4. Accept the End User License Agreement (EULA). The Choose the way you want to build your image page allows you to start from a template or from a blank configuration. In this exercise, select the Thin Client template and click Next. Select a language, time and currency format and keyboard or input method to install on the final image. These selections are for the primary language of your image. You can add additional languages later. Click Next to continue. The Summary of Drivers and Features page shows a summary of the drivers to be installed, detected devices and feature packages in your template. Check the Modify Drivers and Modify Features checkboxes and click Next.5.6.© 2009 Microsoft. All Rights Reserved.Page 9Windows Embedded Standard 2011 – CTP2 Lab Manual7.On the Find and Select Drivers page, choose one of the following options and click Next to continue: The Automatically detect devices option detects the drivers on your device and attempts to find drivers for them. The Choose a PMQ option makes it possible for you to import a device list from a previously generated PMQ file. As with Windows Embedded XP, TAP.exe is used to generate this PMQ file. The Do not select additional drivers option includes only the drivers in Embedded Core. Your image will still be bootable but drivers for non-boot-critical devices may not be installed.8.The Confirm drivers to be installed page shows drivers that will be installed as well as the devices that were detected on your computer for which we do not have drivers. Click Browse if you want to add custom drivers. Click Next to continue. On the Please select Feature Packagesto include in your image page you can add additional features to your configuration. Because you started from the Thin Client template, several packages have been preselected for you. Choose any additional packages you wish to include.9.10. Determine which type of write filters you want to use for your thin client and select the appropriate feature packages. To use File Based Write Filter (FBWF) and Registry Filter, select: Embedded Enabling Features\File Based Write Filter (FBWF) Embedded Enabling Features\Registry Filter OR To use Enhanced Write Filter (EWF), Hibernate Once Resume Many (HORM) and Registry Filter, select: Embedded Enabling Features\Enhanced Write Filter with HORM Embedded Enabling Features\Registry Filter Boot Environments\Enhanced Write Filter Boot Environment Note: Although EWF can be used without HORM, using HORM requires EWF. Adding EWF in IBW (without an answer file) will configure all existing volumes to be protected in RAM-REG mode; however EWF will be disabled for all of them. 11. Click the Resolve Dependencies button. If a pop-up window asks you to choose between multiple packages, make the following selections: a. If you are installing HORM, select Embedded Windows 7 Boot Environment, otherwise select the Windows 7 Boot Environment. Select Windows Embedded Standard Startup Screens. Select Windows Explorer.© 2009 Microsoft. All Rights Reserved.Page 10Windows Embedded Standard 2011 – CTP2 Lab Manual Select Standard Windows USB Stack.b. Resolve all other dependencies, then click Done. Click Next to continue. 12. The Summary of Drivers and Features page gives you a final overview of packages and drivers to be installed. If you are satisfied with your selections, click Next. 13. Select the disk or partition where you would like to install the image, then click Next to begin installation and set up of the customized Windows Embedded Standard 2011 image on your device. 14. To enable Embedded Enabling Features after installation is complete, open a command prompt on your device and run the following commands: For FBWF and Registry Filter: fbwfmgr /enable fbwfmrg /addvolume c: For EWF, HORM and Registry Filter: ewfmgr c: -enable ewfmgr c: -activatehorm 15. Once HORM has been activated, it should be tested: a. Reboot so that EWF is enabled. b. Start Internet Explorer c. Enable hibernation by typing the following at a command prompt: powercfg –h on d. Reboot and device should resume from hibernation. e. Make changes and reboot your device again f. Verify your device state returns to that of step d above and that the changes made in step e were not retained.2.1.2 Build an Image with Embedded Core OnlyA Windows Embedded Standard 2011 image that contains just the Embedded Core package is described as a “minboot” image. To build an Embedded Core (eCore) image using Image Builder Wizard, follow the steps in section 2.1.1 Build a Thin Client Image with Embedded Enabling Features with the following changes: 1. 2. At step 4, choose the Minimum Configuration template Complete steps 10 and 15 only if you want to enable write filters.2.2 Build a Windows Embedded Standard 2011 Image Using Image Configuration Editor2.2.1 Build a Thin Client Image with Custom Settings1. Start Image Configuration Editor on your development computer. From the Start menu, selectPrograms, selectWindows Embedded Standard 2011, then selectImage Configuration Editor. © 2009 Microsoft. All Rights Reserved. Page 11Windows Embedded Standard 2011 – CTP2 Lab Manual2.On the File menu, select Distribution Share, then navigate to the desired distribution share. The default distribution share locations are: On a development computer running a 32-bit operating system: x86 distribution share: C:\Program Files\Windows Embedded Standard 2011\DS amd64 distribution share: C:\Program Files\Windows Embedded Standard 2011\DS64 On a development computer running a 64-bit operating system: 3. 4. x86 distribution share: C:\Program Files(x86)\Windows Embedded Standard 2011\DS amd64 distribution share: C:\Program Files(x86)\Windows Embedded Standard 2011\DS64On the File menu, click New Answer File. By default, the Embedded Edition package is added to this new answer file. This is the Embedded Core package. Add Driver Packages a. On the File menu, click Import then select Import PMQ to add device drivers using a PMQ file. In the Messages pane, in the Import PMQ tab, you can review the results of mapping the devices in a PMQ file to driver packages. Successfully mapped devices will be listed. To view the package in the answer file that the device was mapped to, double-click the device name. The warning icons denote devices that were not mapped to driver packages. If you need support for these devices, see section 2.2.3 Note: For more information on how to generate a PMQ file, refer to the Windows Embedded Standard 2011 Help topic “How to Generate a .PMQFile Using Target Analyzer”. b. In the Distribution Share pane, under Packages/Driver, you can add additional driver packages. Double-click any driver package (leaf node in the tree) to add it to your answer file.5.Add Feature Packages a. In the Distribution Share pane, expand the Packages/FeaturePack node. b. Expand the Browsers/Internet Explorer 8 node, right-click on Internet Explorer 8 Browser and select Add to Answer File. c. Expand the Graphics and Multimedia node, right-click on Windows Media Player 12 and selectAdd to Answer File. d. Expand the Remote Connections node, right-click on Remote Desktop Connectionand select Add to Answer File.6.Determine which type of write filters you want to use for your thin client. In the Distribution Share pane, under Packages/FeaturesPack, right-click on the appropriate feature packages and select Add to Answer File. To use File Based Write Filter (FBWF) and Registry Filter, select:© 2009 Microsoft. All Rights Reserved.Page 12Windows Embedded Standard 2011 – CTP2 Lab Manual Embedded Enabling Features\File Based Write Filter (FBWF) Embedded Enabling Features\Registry Filter OR To use Enhanced Write Filter (EWF), Hibernate Once Resume Many (HORM) and Registry Filter, select: Embedded Enabling Features\Enhanced Write Filter with HORM Embedded Enabling Features\Registry Filter Boot Environments\Enhanced Write Filter Boot Environment Note: Although EWF can be used without HORM, using HORM requires EWF. Adding EWF in IBW (without an answer file) will configure all existing volumes to be protected in RAM-REG mode; however EWF will be disabled for all of them. 7. To add language packs, in the Distribution Share pane, expand the Packages/LanguagePack/en-US node. Right-click the English (US) Language Pack package and select Add to Answer File. Add additional language packs the same way. To change Internet Explorer 8 settings: a. In theAnswer File pane, click on theInternet Explorer 8 Browser package. b. In the Settings pane, change Filter View to “4 Specialize”. c. In the Settings pane, click on the Value column to update the value for each of the following settings: d. Set Home_Page to /embedded e. SetIEWelcomeMsg to false f. Save your answer file. You have now changed the way Internet Explorer behaves by using Image Configuration Editor’s settings UI. You can change additional settings in your answer file the same way. 9. To resolve dependencies, from the Validate menu, select Add Required Packages. a. If there are any errors listed in the Validation tab of the Messages pane that state “Dependencies of the source package are not satisfied,” double-click the error message and use the Resolve Dependencies dialogue box to satisfy all required package dependencies. If you are asked to choose between two USB stacks, choose “Bootable Windows USB Stack” only if you are using the USB Boot Embedded Enabling Feature and enabling a USB bootable image (see section 5.3). Otherwise choose “Standard Windows USB Stack.” If you are asked to choose between two boot environment packages, choose “Enhanced Write Filter Boot Environment” if you are installing HORM with EWF. Otherwise choose “Windows Boot Environment”.8.b. Warnings that state “Optional Dependencies exist for the source package” are acceptable and may be ignored. © 2009 Microsoft. All Rights Reserved. Page 13。
Windows Embedded Standard 7使用指南Windows Embedded Standard 7使用指南1、引言- 介绍Windows Embedded Standard 7操作系统的基本信息和用途- 概述本文档的目的和范围2、系统要求- 列出安装和运行Windows Embedded Standard 7所需的最低系统要求- 提供支持的处理器和内存要求的详细信息- 提供硬盘空间要求和其他必需条件3、安装Windows Embedded Standard 73.1 准备安装媒体- 制备安装光盘或USB驱动器3.2 启动安装程序- 说明如何启动安装程序3.3 安装过程- 按照屏幕提示进行安装3.4 安装后配置- 提供有关完成安装后系统配置的说明4、系统设置4.1 初次登录- 解释首次登录时需要进行的设置步骤4.2 硬件设备驱动程序- 详细说明如何安装和配置硬件设备驱动程序 4.3 网络设置- 提供网络设置的步骤和详细信息4.4 系统更新- 解释如何进行系统更新和安装最新的补丁程序5、系统管理5.1 用户管理- 说明如何创建、修改和删除用户账户5.2 文件管理- 提供文件管理的基本操作指南5.3 权限管理- 解释如何设置文件和文件夹的权限5.4 远程管理- 详细说明如何通过远程管理工具管理系统6、应用程序安装6.1 Windows Embedded Standard 7应用程序市场- 介绍Windows Embedded Standard 7应用程序市场的使用方法6.2 应用程序安装方法- 提供应用程序安装的不同方法和步骤7、故障排除7.1 常见问题解答- 列出一些常见问题和解决方案7.2 系统日志- 解释如何查看系统日志并分析错误信息7.3 联系支持- 提供获得进一步技术支持的联系方式8、附件- 列出本文档所涉及的附件,并提供或相关文档的位置法律名词及注释:- 法律名词1:解释1- 法律名词2:解释2- 法律名词3:解释3。
Windows Embedded Standard 2011 CTP2 Lab ManualWindows Embedded Standard 2011 – CTP2 Lab ManualTable of Contents1 Preparing to Use Windows Embedded Standard 2011 ...................................................................... 5 1.1 1.2 1.3 1.4 1.5 1.6 Introduction .............................................................................................................................. 5 Related Windows 7 Documentation .......................................................................................... 5 Minimum Device Hardware Requirements ................................................................................ 5 Release Notes ........................................................................................................................... 5 Install Windows Embedded Standard 2011 Toolkit .................................................................... 6 1.5.1 1.6.1 1.6.2 1.7 1.7.1 1.7.2 2 2.1 Open Windows Embedded Standard 2011 Toolkit Help .................................................. 6 Make Your Utility Disk Bootable ..................................................................................... 7 Add Image Builder Wizard to Your Utility Disk ................................................................ 7 Create a Windows PE Utility Disk with Image Configuration Editor ................................. 8 Create a Custom Windows PE Image .............................................................................. 8 Create a Utility Drive ................................................................................................................. 7Create a Windows Preinstallation Environment Utility Drive (Optional) ..................................... 8Build Windows Embedded Standard 2011 Images ............................................................................ 9 Build a Windows Embedded Standard 2011 Image with Image Builder Wizard .......................... 9 2.1.1 2.1.2 2.2 2.2.1 2.2.2 2.2.3 2.2.4 2.2.5 2.2.6 2.2.7 Build a Thin Client Image with Embedded Enabling Features .......................................... 9 Build an Image with Embedded Core Only .................................................................... 11 Build a Thin Client Image with Custom Settings ............................................................ 11 Add Update Packages to a Distribution Share (Optional) .............................................. 14 Add Third-Party Software (Optional) ............................................................................ 15 Run a Custom Script (Optional) .................................................................................... 16 Add Third-Party Drivers (Optional) ............................................................................... 17 Make Your Install Fully Unattended (Optional) ............................................................. 17 Create Image Builder Wizard Disk from Answer File (optional) ..................................... 24Build a Windows Embedded Standard 2011 Image Using Image Configuration Editor ............. 113Deploy an Image ............................................................................................................................ 25 3.1 Prepare and Capture an Image for Deployment ...................................................................... 25 3.1.1 3.1.2 3.2 3.2.1 3.2.2 Sysprep the Image........................................................................................................ 25 Capture the Image Into a Windows Image (.wim) File................................................... 25 Prepare your Destination Device .................................................................................. 26 Apply an Image to Your Device’s Hard Drive ................................................................. 27Page 2Deploy an Image Using ImageX ............................................................................................... 26©2009 Microsoft. All Rights Reserved.Windows Embedded Standard 2011 – CTP2 Lab Manual3.2.3 3.3 3.3.1 3.3.2 4 4.1Shut Down the Destination Device ............................................................................... 27 Start Image Builder Wizard with your Image ................................................................ 28 Customize a Captured Image ........................................................................................ 29Deploy an Image Using Image Builder Wizard.......................................................................... 27Service an Image ............................................................................................................................ 31 Service an Image with Image Configuration Editor and DISM................................................... 31 4.1.1 4.1.2 4.1.3 4.2 4.2.1 4.2.2 4.2.3 4.2.4 4.2.5 4.2.6 4.3 4.4 Create a Configuration Set using Image Configuration Editor........................................ 31 Install using your Configuration Set .............................................................................. 32 Test your image ........................................................................................................... 34 Mount your image ....................................................................................................... 34 Add sample packages ................................................................................................... 34 Adding a Package Using DISM ...................................................................................... 35 Unmount and Commit Changes .................................................................................... 35 Redeploy and Verify ..................................................................................................... 35 Add a Language Pack (optional).................................................................................... 35Service an Image with DISM .................................................................................................... 34Install Updates with WUSA...................................................................................................... 36 Service an Image with Package Scanner .................................................................................. 36 4.4.1 4.4.2 4.4.3 Package Enumeration................................................................................................... 37 Find Applicable Updates ............................................................................................... 37 Scavenging ................................................................................................................... 375Additional Windows Embedded Standard 2011 Labs ...................................................................... 39 5.1 Suppress OOBE ....................................................................................................................... 39 5.1.1 5.1.2 5.2 5.2.1 5.2.2 5.2.3 5.2.4 5.2.5 5.3 5.3.1 5.3.2 5.4 Create an Answer File .................................................................................................. 39 Using your answer file with Image Builder Wizard ........................................................ 39 Hide boot screens ........................................................................................................ 40 Use Shell Launcher ....................................................................................................... 40 Remove Windows branding ......................................................................................... 41 Replace the startup screen background image ............................................................. 41 Add Message Blockers.................................................................................................. 42 Install from Image Builder Wizard directly to UFD : ...................................................... 44 Install from Image Builder Wizard to Hard Drive, ImageX to UFD: ................................. 44Using a Custom Shell and Custom Branding............................................................................. 40Build a USB bootable Windows Embedded 2011 image ........................................................... 44Create Custom Templates for IBW .......................................................................................... 46©2009 Microsoft. All Rights Reserved. Page 3Windows Embedded Standard 2011 – CTP2 Lab Manual5.4.1 5.4.2Creating Templates ...................................................................................................... 46 Using Custom Templates in IBW ................................................................................... 46©2009 Microsoft. All Rights Reserved.Page 4Windows Embedded Standard 2011 – CTP2 Lab Manual1 Preparing to Use Windows Embedded Standard 20111.1 IntroductionWelcome to Windows Embedded Standard 2011. This lab manual is a guide to help you use and evaluate Windows Embedded Standard 2011. In addition to preparation steps, such as toolkit installation, this manual includes labs for key scenarios such as building an image, deploying an image and servicing an image. The labs are most easily followed in the order presented. You can also chose labs individually based on your interests and previous experience with Windows Embedded, but please note that several lab scenarios assume you have the output of an earlier lab scenario.1.2 Related Windows 7 DocumentationWindows Embedded Standard 2011 is based on Windows 7; therefore much of the Windows 7 documentation can be used as reference material. • Windows 7 Automated Installation Kit (Windows AIK) online documentation /downloads/details.aspx?FamilyID=f1bae135-4190-4d7c-b19319123141edaa&displaylang=en Windows 7 Technical Library on Microsoft TechNet /enus/library/dd349342.aspx Windows Developer Center for Windows 7 /enus/windows/dd433113.aspx• •1.3 Minimum Device Hardware RequirementsYou must have the following minimum hardware to be able to build a Windows Embedded Standard 2011 image on your device: • • • • • 1 GHz x86 or amd64 processor 1 GB of flash or hard drive space (4 GB recommended) 512 MB of RAM (1 GB recommended for amd64 devices) 900 MHz CPU or equivalent At least one of the following bootable media types: • • • • Bootable DVD-ROM drive Bootable USB 2.0 port and a USB Flash Drive (UFD) with 4 GB free space, or access to a local networkBIOS supporting Windows Preinstallation Environment (Windows PE) 3.0 Minimum hardware requirements, particularly RAM requirements, may be greater depending on the size and type of feature packages selected.1.4 Release NotesAlthough every attempt has been made to provide workarounds and additional usage notes for scenarios that are affected by known issues in the pre-release versions of Windows Embedded Standard 2011, we strongly recommend that you refer to the release notes provided with this release before beginning any of the labs described in this manual. ©2009 Microsoft. All Rights Reserved. Page 5Windows Embedded Standard 2011 – CTP2 Lab Manual1.5 Install Windows Embedded Standard 2011 ToolkitYou can install Windows Embedded Standard 2011 Toolkit on your development computer from a DVD or from setup files downloaded from Microsoft Connect. 1. Run Setup.exe • If you have the Windows Embedded Standard 2011 Toolkit DVD, installation should begin when you insert the DVD into the DVD drive. If it doesn’t start automatically, the Setup.exe file can be found at: <DVD Drive>:\WindowsEmbeddedStudio.msi. 2. On the Setup Type page, do one of the following: • To install the tools and distribution share to the default location, select Complete. The default locations are: • • • 3. 32-bit operating system: [System Drive]:\Program Files\Windows Embedded Standard 2011 64-bit operating system: [System Drive]:\Program Files(x86)\Windows Embedded Standard 2011To install the tools and distribution share to a different location, select Custom.Follow the instructions in the installation wizard to complete the installation process.1.5.1 Open Windows Embedded Standard 2011 Toolkit HelpThe Windows Embedded Standard 2011 Toolkit Help contains more detailed information on many of the topics and steps contained in this manual. To access the Windows Embedded Standard 2011 Toolkit Help: 1. Start Image Configuration Editor on your development computer • 2. From the Start menu, click Programs, click Windows Embedded Standard 2011, and then click Image Configuration Editor.On the toolbar, click the Help icon to launch Help.©2009 Microsoft. All Rights Reserved.Page 6Windows Embedded Standard 2011 – CTP2 Lab Manual1.6 Create a Utility DriveIf your device is able to boot from a DVD, you can use the Windows Embedded Standard 2011 DVD appropriate to your device’s architecture to install the OS image directly to your device. Otherwise you can create a bootable USB drive by using the DiskPart tool and then loading the USB Drive with Image Builder Wizard (IBW) or WindowsPreinstallation Environment (WinPE). Diskpart supports the partitioning and formatting of a USB Flash Device (UFD) as a bootable device. A USB drive with a minimum of 4 GB is recommended for a utility drive loaded with Image Builder Wizard.1.6.1 Make Your Utility Disk Bootable1. 2. Attach your USB drive to your development computer. From a Windows Vista, Windows 7 or Windows Preinstallation (Windows PE) 3.0 environment, run the DiskPart tool by typing the following at a command prompt: diskpart Note: The version of the DiskPart tool provided by Windows Vista, Windows 7 and Windows PE 2.0, 2.1 and 3.0 supports the partitioning and formatting of a UFD as a bootable device. Previous versions of the DiskPart tool, including the version provided by Windows XP, do not fully support partitioning and formatting a UFD to be bootable and should not be used. 3. Use the DiskPart tool to determine the disk number and device size to be used for the next step by typing the following at the DiskPart prompt: list disk 4. Use the DiskPart tool to partition and format the drive and make it bootable. At the DiskPart prompt, type the following, replacing <disk_number> with the disk number of the USB drive: select clean create select active format assign exit disk <disk_number> part pri part 1 fs=ntfs quickYour USB drive is now bootable.1.6.2 Add Image Builder Wizard to Your Utility DiskThe Image Builder Wizard disks provide the ability to quickly generate a new IBW disk in the event IBW has been serviced or new packages have been added to the distribution share. To generate an Image Builder Wizard Disk:©2009 Microsoft. All Rights Reserved.Page 7Windows Embedded Standard 2011 – CTP2 Lab Manual 1. Start Image Configuration Editor on your development computer • 2. 3. 4. 5. 6. From the Start menu, selectPrograms, selectWindows Embedded Standard 2011, then selectImage Configuration Editor.On the Tools menu, select Media Creation, then select Create IBW Disk Enter the desired distribution share to be copied. Select your USB drive as the target folder. Select the desired disk architecture. Click OK.1.7 Create a Windows Preinstallation Environment Utility Drive (Optional)In some instances, you may want to create a utility disk that includes the Windows Preinstallation Environment (Windows PE). Windows PE is a lightweight version of Windows used mainly for deployment. You may prefer to use Windows PE instead of Image Builder Wizard if your USB drive is smaller than 2 GB, if you have space limitations on your device or if your device requires custom drivers that you will install on a custom version of Windows PE.1.7.1 Create a Windows PE Utility Disk with Image Configuration EditorThe Windows PE Utility Disk feature of the Media Creation tool in Image Configuration Editor provides the ability to quickly generate a Windows PE disk for gathering information about your target device or for deploying an image using Image Builder Wizard. The generated disk includes TAP.exe, ImageX and Package Scanner. To generate a Windows PE utility disk: 1. 2. Create a bootable utility disk (section 1.6.1 above). Start Image Configuration Editor on your development computer • 3. 4. 5. 6. 7. From the Start menu, selectPrograms, selectWindows Embedded Standard 2011, then selectImage Configuration Editor.On the Toolsmenu, selectMedia Creation, then selectCreate PE Image. Enter a target folder on your development computer to which the binaries will be copied. Select the desired disk architecture. Click OK. Copy the contents of the ISO sub-folder from the target folder on your development computer to the root directory of your bootable utility disk.1.7.2 Create a Custom Windows PE ImageSee the topic “Create a Custom Windows PE Image” in the Windows Embedded Standard 2011 Toolkit Help for more information about creating a custom Windows PE Image and gathering other files to add to the bootable USB drive you created in section 1.6.1.©2009 Microsoft. All Rights Reserved.Page 8Windows Embedded Standard 2011 – CTP2 Lab Manual2 Build Windows Embedded Standard 2011 Images2.1 Build a Windows Embedded Standard 2011 Image with Image Builder WizardImage Builder Wizard (IBW) is a tool you can use to create, configure and install Windows Embedded Standard 2011 on your device. The wizard runs directly on your device and guides you through a set of configuration choices. After you make your selections, the wizard creates and installs Windows Embedded Standard 2011 onto the device. You can further customize the installation or you can capture it to an image file and deploy it to other devices. In this lab, you will use IBW on your device to create different Windows Embedded Standard 2011 images. You can follow the steps provided in this lab to create the following variations: • • An image that can be used for a thin client device. A “minboot” image that contains only the base packages (referred to as Embedded Core).2.1.1 Build a Thin Client Image with Embedded Enabling FeaturesTo build a thin client image using IBW: 1. Start Image Builder Wizard on your device by either: • • Start the wizard from your Windows Embedded Standard 2011 DVD, your ISO image, or the USB drive prepared in section 1.6 Boot your device into Windows PE and run setup.exe from another location (USB drive, network share, etc.). Note: Image Builder Wizard will setup and install Windows Embedded Standard 2011. It’s important to make sure you are running the wizard on your device itself and not on your development computer. 2. On the first page, select Build an Image This option starts IBW and allows you to choose packages, drivers and languages to include in your image. You can optionally start from a template. 3. 4. Accept the End User License Agreement (EULA). The Choose the way you want to build your image page allows you to start from a template or from a blank configuration. In this exercise, select the Thin Client template and click Next. Select a language, time and currency format and keyboard or input method to install on the final image. These selections are for the primary language of your image. You can add additional languages later. Click Next to continue. The Summary of Drivers and Features page shows a summary of the drivers to be installed, detected devices and feature packages in your template. Check the Modify Drivers and Modify Features checkboxes and click Next.5.6.©2009 Microsoft. All Rights Reserved.Page 9Windows Embedded Standard 2011 – CTP2 Lab Manual 7. On the Find and Select Drivers page, choose one of the following options and click Next to continue: • • The Automatically detect devices option detects the drivers on your device and attempts to find drivers for them. The Choose a PMQ option makes it possible for you to import a device list from a previously generated PMQ file. As with Windows Embedded XP, TAP.exe is used to generate this PMQ file. The Do not select additional drivers option includes only the drivers in Embedded Core. Your image will still be bootable but drivers for non-boot-critical devices may not be installed.•8.The Confirm drivers to be installed page shows drivers that will be installed as well as the devices that were detected on your computer for which we do not have drivers. Click Browse if you want to add custom drivers. Click Next to continue. On the Please select Feature Packagesto include in your image page you can add additional features to your configuration. Because you started from the Thin Client template, several packages have been preselected for you. Choose any additional packages you wish to include.9.10. Determine which type of write filters you want to use for your thin client and select the appropriate feature packages. To use File Based Write Filter (FBWF) and Registry Filter, select: • • OR To use Enhanced Write Filter (EWF), Hibernate Once Resume Many (HORM) and Registry Filter, select: • • • Embedded Enabling Features\Enhanced Write Filter with HORM Embedded Enabling Features\Registry Filter Boot Environments\Enhanced Write Filter Boot Environment Note: Although EWF can be used without HORM, using HORM requires EWF. Adding EWF in IBW (without an answer file) will configure all existing volumes to be protected in RAM-REG mode; however EWF will be disabled for all of them. 11. Click the Resolve Dependencies button. If a pop-up window asks you to choose between multiple packages, make the following selections: a. If you are installing HORM, select Embedded Windows 7 Boot Environment, otherwise select the Windows 7 Boot Environment. • • • Select Windows Embedded Standard Startup Screens. Select Windows Explorer. Select Standard Windows USB Stack. Embedded Enabling Features\File Based Write Filter (FBWF) Embedded Enabling Features\Registry Filter©2009 Microsoft. All Rights Reserved.Page 10Windows Embedded Standard 2011 – CTP2 Lab Manual b. Resolve all other dependencies, then click Done. Click Next to continue.12. The Summary of Drivers and Features page gives you a final overview of packages and drivers to be installed. If you are satisfied with your selections, click Next. 13. Select the disk or partition where you would like to install the image, then click Next to begin installation and set up of the customized Windows Embedded Standard 2011 image on your device. 14. To enable Embedded Enabling Features after installation is complete, open a command prompt on your device and run the following commands: • For FBWF and Registry Filter: fbwfmgr /enable fbwfmrg /addvolume c: • For EWF, HORM and Registry Filter: ewfmgr c: -enable ewfmgr c: -activatehorm 15. Once HORM has been activated, it should be tested: a. b. c. d. e. f. Reboot so that EWF is enabled. Start Internet Explorer Enable hibernation by typing the following at a command prompt: powercfg –h on Reboot and device should resume from hibernation. Make changes and reboot your device again Verify your device state returns to that of step d above and that the changes made in step e were not retained.2.1.2 Build an Image with Embedded Core OnlyA Windows Embedded Standard 2011 image that contains just the Embedded Core package is described as a “minboot” image. To build an Embedded Core (eCore) image using Image Builder Wizard, follow the steps in section 2.1.1 Build a Thin Client Image with Embedded Enabling Features with the following changes: 1. 2. At step 4, choose the Minimum Configuration template Complete steps 10 and 15 only if you want to enable write filters.2.2 Build a Windows Embedded Standard 2011 Image Using Image Configuration Editor2.2.1 Build a Thin Client Image with Custom Settings1. Start Image Configuration Editor on your development computer. • From the Start menu, selectPrograms, selectWindows Embedded Standard 2011, then selectImage Configuration Editor.©2009 Microsoft. All Rights Reserved.Page 11Windows Embedded Standard 2011 – CTP2 Lab Manual 2. On the File menu, select Distribution Share, then navigate to the desired distribution share. The default distribution share locations are: • On a development computer running a 32-bit operating system: • • • x86 distribution share: C:\Program Files\Windows Embedded Standard 2011\DS amd64 distribution share: C:\Program Files\Windows Embedded Standard 2011\DS64On a development computer running a 64-bit operating system: • • x86 distribution share: C:\Program Files(x86)\Windows Embedded Standard 2011\DS amd64 distribution share: C:\Program Files(x86)\Windows Embedded Standard 2011\DS643. 4.On the File menu, click New Answer File. By default, the Embedded Edition package is added to this new answer file. This is the Embedded Core package. Add Driver Packages a. On the File menu, click Import then select Import PMQ to add device drivers using a PMQ file. In the Messages pane, in the Import PMQ tab, you can review the results of mapping the devices in a PMQ file to driver packages. • • Successfully mapped devices will be listed. To view the package in the answer file that the device was mapped to, double-click the device name. The warning icons denote devices that were not mapped to driver packages. If you need support for these devices, see section 2.2.3 Note: For more information on how to generate a PMQ file, refer to the Windows Embedded Standard 2011 Help topic “How to Generate a .PMQFile Using Target Analyzer”. b. In the Distribution Share pane, under Packages/Driver, you can add additional driver packages. Double-click any driver package (leaf node in the tree) to add it to your answer file. In the Distribution Share pane, expand the Packages/FeaturePack node. Expand the Browsers/Internet Explorer 8 node, right-click on Internet Explorer 8 Browser and select Add to Answer File. Expand the Graphics and Multimedia node, right-click on Windows Media Player 12 and selectAdd to Answer File. Expand the Remote Connections node, right-click on Remote Desktop Connectionand select Add to Answer File.5.Add Feature Packages a. b. c. d.6.Determine which type of write filters you want to use for your thin client. In the Distribution Share pane, under Packages/FeaturesPack, right-click on the appropriate feature packages and select Add to Answer File. To use File Based Write Filter (FBWF) and Registry Filter, select:©2009 Microsoft. All Rights Reserved.Page 12Windows Embedded Standard 2011 – CTP2 Lab Manual • • OR To use Enhanced Write Filter (EWF), Hibernate Once Resume Many (HORM) and Registry Filter, select: • • • Embedded Enabling Features\Enhanced Write Filter with HORM Embedded Enabling Features\Registry Filter Boot Environments\Enhanced Write Filter Boot Environment Note: Although EWF can be used without HORM, using HORM requires EWF. Adding EWF in IBW (without an answer file) will configure all existing volumes to be protected in RAM-REG mode; however EWF will be disabled for all of them. 7. To add language packs, in the Distribution Share pane, expand the Packages/LanguagePack/en-US node. Right-click the English (US) Language Pack package and select Add to Answer File. Add additional language packs the same way. To change Internet Explorer 8 settings: a. b. c. d. e. f. In theAnswer File pane, click on theInternet Explorer 8 Browser package. In the Settings pane, change Filter View to “4 Specialize”. In the Settings pane, click on the Value column to update the value for each of the following settings: Set Home_Page to /embedded SetIEWelcomeMsg to false Save your answer file. Embedded Enabling Features\File Based Write Filter (FBWF) Embedded Enabling Features\Registry Filter8.You have now changed the way Internet Explorer behaves by using Image Configuration Editor’s settings UI. You can change additional settings in your answer file the same way. 9. To resolve dependencies, from the Validate menu, select Add Required Packages. a. If there are any errors listed in the Validation tab of the Messages pane that state “Dependencies of the source package are not satisfied,” double-click the error message and use the Resolve Dependencies dialogue box to satisfy all required package dependencies. • If you are asked to choose between two USB stacks, choose “Bootable Windows USB Stack” only if you are using the USB Boot Embedded Enabling Feature and enabling a USB bootable image (see section 5.3). Otherwise choose “Standard Windows USB Stack.” If you are asked to choose between two boot environment packages, choose “Enhanced Write Filter Boot Environment” if you are installing HORM with EWF. Otherwise choose “Windows Boot Environment”.•b.Warnings that state “Optional Dependencies exist for the source package” are acceptable and may be ignored. Page 13©2009 Microsoft. All Rights Reserved.。
Windows Embedded Standard 7安装及使用指南第一章概述1.1Windows Embedded Standard 7概述Windows Embedded Standard 7 以组件化形式提供Windows 7 操作系统的功能、熟悉度和稳定性,能开发人员创建运行成千上万种现有Windows 应用程序和驱动程序的高级商务设备和消费类设备。
使用适合现有客户基础结构的坚实平台,在Windows Embedded Standard 7 中释放Windows 7 技术的强大功能。
技术参数:处理器体系结构支持多处理器体系结构:- x86- x64工具改进的开发人员体验,可满足整个开发周期的要求:- 使用映像构建器向导(IBW) 的向导体验,可快速建立原型- 使用映像配置编辑器(ICE) 的高级配置最新的桌面技术创新- Internet Explorer 8- Windows Media Player 12- 远程桌面协议7- Silverlight 3- .net Framework 3.5 SP1适当级别的组件化适用于构建专用设备的粒度级别:- 150 多个基于Windows 7 的最新创新的直观功能包- 用于满足嵌入式特定要求的嵌入式功能,例如增强型写入筛选器、基于文件的写入筛选器、注册表筛选器、休眠一次恢复多次(HORM)、USB 启动、对话框筛选器和自定义外壳程序- 450 多个用于实现与不断增长的设备硬件和外设集的兼容性的驱动程序集应用程序兼容性用于Windows 7 的应用程序和驱动程序可以在Windows Embedded Standard 7 上运行,而无需困难、昂贵且耗时的端口设定工作企业连接性和可管理性- 支持Active Directory、域加入、组策略、网络访问保护和IPv6,以实现连接性丰富的沉浸式用户体验通过Windows Aero 和Windows 触控,提供丰富的交互式用户体验。
用于构建创新体验的稳定框架Windows Presentation Foundation改进的电源管理通过使用智能电源管理API,可以构建改进CPU 空闲时间的应用程序。
开发人员可以使用Windows Embedded Standard 7 创建各种智能、互连、面向服务的高级商用设备和消费类设备。
这些设备可以运行成千上万种现有Windows 应用程序和驱动程序,范围从瘦客户端到多功能打印机,其中包括:o高级机顶盒o加油机o功能齐全的服务点o游戏设备o家庭自动化网关o工业控制o智能装置o多媒体Internet 设备o网亭o数字标牌o移动服务点o监控设备o多功能打印机o联网式媒体设备o瘦客户端1.2 Windows Embedded Standard 7 与上一代开发工具的不同之处简单来说Windows Embedded Standard (WES) 7是Windows 7的组件化和添加了一些嵌入式特性的适合嵌入式应用领域的Windows 7,与Windows XP Embedded(Windows Embedded Standard 2009)不同的是组件化的颗粒度更粗,减少了组件的数量。
颠覆了嵌入式系统的开发方式和部署。
要特别注意WES 7的Runtime 系统镜像需要进行产品激活!详细内容见表1-1。
表1-1 Windows Embedded Standard 7与Windows XP Embedded的技术参数对比1.3Windows Embedded Standard 7的优势Windows Embedded Standard 7 的优势体现在:o通过利用熟悉的工具集,缩短了产品上市时间。
利用您掌握的Visual Studio 知识,使用包括Microsoft Silverlight、Internet Explorer、Windows Media Player 和.NETFramework 在内的综合技术进行开发,创建应用程序和驱动程序。
o通过只选择所需组件,优化了设备上操作系统的空间占用量。
通过只选择所需的驱动程序、服务和应用程序,您可以缩短开发时间,优化操作系统大小并降低硬件成本。
o经济划算,因为其运行时许可证费用由交付单位决定。
o与许多常见行业标准和各种Microsoft 桌面及服务器技术连接,可降低应用程序开发、操作系统部署、服务以及维护成本。
o新功能可实现下一代媒体体验、功能丰富的交互式应用程序和引人注目的用户界面。
o由Windows Embedded Standard 专家组成的整个合作体系可帮助确保设备制造商能够灵活地访问开发下一代设备所需的技能。
1.4Windows Embedded Standard 7开发流程Windows Embedded Standard 7开发套件一共包含三张光盘。
见图1-1,一张Toolkit、一张x86的Bootable IBW、一张x64的Bootable IBW。
两张Bootable IBW是可启动光盘。
目标设备从Bootable IBW光盘启动之后会加载Image Builder Wizard(IBW),用户可以一步一步的操作IBW,来给目标设备安装一个系统。
这个过程和安装普通的Win7很像不过有了更多的选择项目。
Image Builder Wizard(IBW)是运行在Windows PE上的,不需要去安装其他工具直接使用Bootable IBW光盘就可以构建Runtime 镜像(目标系统镜像),这颠覆了传统嵌入式开发的方式。
目前已经可以从/windowsembedded/zh-cn/downloads/default.mspx下载WES 7的评估版。
图1-1 Windows Embedded Standsrd 7 的评估版光盘见图1-2、1-3,整个开发流程包含5个阶段:1.配置,该阶段分为两种方式:直接使用IBW构建系统镜像或者使用Image Configuration Editor(ICE)编写一个应答文件,然后IBW根据应答文件来操作。
2.构建,Image Builder Engune(IBE)根据配置阶段的信息,在目标设备中完成镜像的构建。
大约需要30-90分钟完成目标系统镜像构建(这部分不需要人为干预,但最后OOBE阶段除外)。
3.定制,目标系统镜像构建完成后,开发人员可以在运行的目标嵌入式镜像上进行一些定制(例如:修改注册表、安装应用软件等)。
4.捕获,将已经完成定制的目标系统镜像,通过ImageX捕获成*.wim个格式的镜像文件。
5.部署,将捕获成*.wim个格式的镜像文件,通过网络、USB存储设备、光盘等介质批来部署到同型号的其他目标设备中。
图1-2 开发流程-1图1-3 开发流程-21.5正版识别可以访问以下网站:/windowsembedded/zh-cn/local/genuine-advantage.mspx要购买产品授权可以访问以下网站查询分销商/windowsembedded/zh-cn/partners/distributors/search.mspx?Countr yID=46第二章 Image Builder Wizard (IBW)2.1 Image Builder Wizard (IBW)概述Image Builder Wizard (IBW,镜像构建向导)是一个工具,您可以用它来创建,配置,安装一个Windows Embedded Standard 7嵌入式系统镜像到您的嵌入式设备上。
Image Builder Wizard可以直接运行在您的嵌入式设备上(IBW是运行在Windows PE 3.0上的),通过这个向导指导您完成一个Windows Embedded Standard 7嵌入式系统镜像的配置。
然后,您可以并将镜像安装到您的设备中,或者您可以部署一个已经捕获好的WIM(Windows Imaging Format)镜像文件(*.wim格式的文件)或Answer File(应答文件,*.xml格式的文件)。
2.2 Hello! Windows Embedded Standard 7据不完全统计(主要是我自己的估计)大多数程序员写的第一个程序是”Hello”、”Hello World”、”Hello,My name is……”;我相信本文的读者大多数都是第一次接触Windows Embedded Standard 7(WES 7),在本节中我们要对WES 7说一声”Hello”,我们要使用Image Builder Wizard (IBW)构建一个目标系统镜像。
放心这很容易,不需要写一行代码。
注意:正如本节所演示的,请在虚拟机中完成这系统镜像的构建,因为部分操作会将您硬盘的数据完全摸掉!• 步骤 1:“Standard_7_32bit.iso”载入虚拟机的光盘驱动器,然后配置虚拟机从光盘驱动器引导。
如果是实体机,请将“Standard_7_32bit.iso”烧录光盘,然后修改BIOS的启动项设置将“CDROM”配置成第一启动设备,然后插入刚才烧录的光盘。
最后启动实体机,让实体机从光盘引导。
虚拟机(实体机)启动后确认进度条,见图 2-1。
耐心等待几分钟直到出现如“图 2-2”的欢迎画面。
图2-1 进度条• 步骤 2:这里一共有三个选项:“BUild an Image(构建一个镜像)”、“Deploy an Answer File or WIM(部署一个应答文件或WIM文件)”和“Launch WinPE Command Prompt(加载WinPE 命令提示符,CMD)。
”我们选择:“Build an Image”来启动IBW。
图2-2 欢迎界面• 步骤 3:选中“I accept the license terms”代表接受许可协议(见图2-3),然后单击“Next”按钮继续。
图2-3 许可协议•步骤 4:选中“Use a template(使用一个模板)”,选中“Thin Client”(见图2-4),然后单击“Next”按钮。
在这里我们选择的是使用“Thin Client(瘦客户机)”模板。
模板类似于WES 2009的宏组件带有是一组组件和配置的集合。
默认WES 7带有以下模板:“Application Compatibility”,应用程序兼容性,用来解决应用程序因缺少组件而无法正常工作的问题。
“Digital Signage”,数字标牌,包含数字广告投放领域需要的组件。
“Industrial Automation”,工业自动化,包含工业自动化领域需要的组件。
“Internet Explorer, Windows Media Player, Remote Desktop”,包含完整的IE 浏览器、WMP播放器、远程桌面组件。