TS-8M 八路智能会议混音器
- 格式:pdf
- 大小:172.34 KB
- 文档页数:10
安全使用事项在使用本装置之前,请仔细阅读说明书,并遵守有关操作和使用的警言,本说明书要妥善保管以备日后查用。
◆电源:本装置只能使用说明书所标注的电源种类。
◆电源线保护:要注意避免电源线被重物压挤,特别要注意电源线的插头、装置上的出线处及方便插座处,切忌拉、抽电源线。
◆水口湿气:不能放在离水源较近的地方使用,例如:浴缸、洗漱池、厨房水槽、洗手盆潮湿的地下室、游泳池附近等处,否则会有遭受电击的可能。
◆温度:本装置必须远离热源。
例如:散热器、加热电阻、各种炉子及其它发热装置(包括放大器)。
◆电击:必须注意防止物品或水流掉进内芯。
如果掉进金属或其它导电物品,会使装置内部产生电击短路的危险。
◆火灾:不能将花瓶或其它盛有液体的容器摆放在机器上面,否则液体有可能流进机器内部产生短路而引起火灾。
◆盖板拆卸:因机内存有高压,非电子专业技术人员,切勿拆卸机壳,如果内部电子零件被非正常接触,可能发生严重电击事故。
此事件本公司概不负责。
◆清洁:不要使用挥发性溶液。
如:酒精、涂料稀释剂、汽油、挥发油等擦拭外壳,使用清洁的干布就行。
◆异常气味:当发现异常气味或浓烟时,应立即切断电源并拔出插头,与供货商或最近的维修部门联系,寻求维修服务。
◆长期闲置时:A.为安全起见,请切断电源开关,拔掉电源插头,以防发生火灾。
B.防止水、金属、易燃品或其它异物掉进机内,以免发生触电及火灾事故。
若发生此类事故时,请立即切断电源,停止使用。
并与本公司服务中心或所在购买商店联系,寻求维修服务。
◆注意:A.不要把电源插头压在机器下面或夹在其他物品中间;不要把电源连接装置设置在人员来往频繁的地方,以免造成因插头破损而发生触电或火灾事故。
B.本设备与电网断开装置为电源插头,插座必须安装在方便操作位置,确保使用安全。
◆使用:请按合理次序开关机;开机:先开前级,再开功放;关机:先关功放,后关前级。
◆接地装置Ⅰ类设备,电源插头必须连接到带接地保护的电源输出插座上。
SCM820 Digital IntelliMix® Automatic MixerSEAMLESS MIXING. ADVANCED CONTROL.SCM820Digital IntelliMix ®Automatic MixerThe SCM820 is the flagship Shure digital automatic mixer for seamless, natural-sounding speech in multiple microphone applications. This innovative 8-channel microphone mixer provides advanced new IntelliMix mixing capabilities along with convenient Ethernet connectivity and versatile configuration options.Remote ControlConvenient browser-based softwareDante ™ Digital AudioMultichannel audio over EthernetDual Mixer OperationOne or two independent mixesIntelliMix ® ModesPreset, manual & custom modesModel VariationsMultiple I/O configurationsIntelliMix ® TechnologySeamless, powerful automixingMore Control. Greater Capacity. One Box.Front Panel 3.5 mm Aux Input7-pin Block Connector with LogicDual Mixer ButtonPer Channel Direct OutputsMix A & Mix B OutputsRear Panel Aux InputMode SelectorSelect function of channel knobs Assignable Channel Knob Adjust settings and status for each inputSmart, Simple ControlsWith an intuitive hardware interface and informative LED metering, the SCM820 packs an extensive range of control and visibility into a single streamlined rack unit.Channel Control KnobsMake quick adjustments to gain, low cut and high shelf EQ, and solo/mute functions.LED Meter RingsChannel and master meter rings vibrantly display input audio or IntelliMix gain levels.Dual Mixer ModeRoute two entirely different and independent automixes to mix A and B outputs.Output Mix ControlFront-panel master gain and limiter control section with output signal meter strip.Hardware/Software ControlAdjust settings directly on the front and back panels or through the browser-based control software.Analog & Digital ConnectionsThe SCM820 provides enhanced I/O support to engineers— in both application flexibility and digital connectivity—to make setting up, configuring and managing systems easier and more efficient.DB25 or Logic-enabled Block Connector ModelsEight channel inputs on the back panel connect to mic or line level audio sources.Direct OutputsPer-channel direct outputs allow the SCM820 to be used as an insert processor or for recording.Dante ™ Digital Audio NetworkingDante-equipped models provide multichannel digital audio I/O over Ethernet and enable linking to additional SCM820 units.Mix A and B OutputsConnect line or mic level mix outputs to a sound reinforcement system, mixing console or recording device.Aux InputsRoute a mono signal straight to the mix outputs from front and back panel auxiliary inputs, bypassing the IntelliMix bus.¼" (6.5 mm) Stereo Headphone Output For channel and mix monitoring.SCM820-DAN rear panel shownAdditional models shown on back pageChannel SelectAdjust input level and phantom powerLockout and ResetMix Select ButtonSelect mix A or BAudio Output Meters and Limiter LEDsIntelliMix ModeToggle between mixer modes Dante™ Network Interface PortsNetworked SolutionsNetworking options available with the SCM820 enable advancedcontrol and signal routing. Link multiple units together on anetwork, then control their settings and signal path remotelyfrom a PC or Mac.Standard Ethernet or Dante Digital AudioChoose the best networking option for the application.Dante Upgrade CardUpgrade standard Ethernet modelsto add Dante digital audio.Dante Virtual SoundcardLicense included with Dante-equipped models and upgrade cardallows a computer to connect to a Dante network for use withplayback, recording, and internet calling software.Linking MixersDante-equipped SCM820 mixers can be linked to form largeautomixes of up to 12 units (96 channels of audio).Control System CompatibleConnects to AMX and Crestron controllers.IntelliMix® ModesIntelliMix® TechnologyRemote Set-up and ControlSCM820 Control Software provides convenient management,monitoring, and configuration support for all key systemsettings. It features a rich, browser-based graphical userinterface and is accessible from any networked computer.Control tabsInputsManage parameters and monitor audio levels foreach input channelIntelliMixConfigure IntelliMix modes and route channels to mix outputsOutputsManage parameters and monitor audio levels for each directoutput channel and mix outputsLink GroupCreate and manage larger automixes through linkingmultiple devicesPreferencesManage global device settingsShure Discovery ApplicationThe Discovery Application finds Shure devices on thenetwork automatically and provides access to each device’scontrol software.•A utomatic discovery of enabled Shure devices•S imply click on an enabled device in the list once it appearsto open its control software•W indows XP (32 and 64 bit), Windows Vista and Windows 7•A pple Mac OS X 10.5.8 and higherInput TabOutput TabIntelliMix ModesShure Discovery ApplicationSCM820Control SoftwareSelected Specifications©2013 Shure Incorporated AL21355 2.5K 01/13Asia, Pacific:Shure Asia Limited 22/F , 625 King’s Road North Point, Island East Hong KongPhone: 852-2893-4290Fax: 852-2893-4055Email:**************.hkUnited States, Canada, Latin America, Caribbean:Shure Incorporated5800 West Touhy Avenue Niles, IL 60714-4608 USA Phone: 847-600-2000Fax: 847-600-1212 (USA)Fax: 847-600-6446Email:**************Europe, Middle East, Africa:Shure Europe GmbHJakob-Dieffenbacher-Str. 12,75031 Eppingen, Germany Phone: 49-7262-92490Fax: 49-7262-9249114Email:*************GeneralAudio Frequency Response20 Hz to 20 kHz (±1 dB)Dynamic RangeAnalog-to-Analog: 110 dB20 Hz to 20 kHz, A-weighted, typical Analog-to-Dante, Dante-to-Analog: 113 dBDimensions 44 mm x 483 mm x 366 mm (1.7 in. x 19.0 in. x 14.4 in.), H x W x D Weight5.5 kg (12.0 lbs)Power Requirements100 to 240 V AC, 50-60 Hz, 1 A Operating Temperature Range −18°C (0°F) to 63°C (145°F)Analog ConnectionsConfiguration Channel input, Mix output: Active balancedAux input: Stereo unbalanced: Direct output: Impedance balancedClipping level Channel Inputs: [Line (+0): +20 dBV, Mic (+26): -6 dBV, Mic (+46): -26 dBV] Aux Input: +10 dBVPhantom Power 48 V DC, selectable per channel, 14 mA max.Max Output LevelLine (+0): +20 dBV, Line (-20): 0 dBV, Mic (-46): -26 dBVDigital Signal ProcessingAD/DA Converter 24-bit, 48 kHz, 113 dB dynamic range typical Latency Analog to Analog: 0.51 msAnalog to Dante: 0.29 msGain Adjustment Range Channel Input, Mix Output: −110 dB to +18 dB Input Processing Low cut, high shelf Output Processing 8 band PEQ, limiterNetworking Interface SCM820: Single Port, 10/100 Mbps EthernetSCM820-DAN: Dual Port, Gigabit Ethernet, Dante digital audioAvailable SKUSSCM820 8 Channel Digital Automatic Mixer, block connectorsSCM820-DAN 8 Channel Digital Automatic Mixer, block connectors, Dante Digital Audio SCM820-DB25 8 Channel Digital Automatic Mixer, DB25 connectorsSCM820-DAN-DB25 8 Channel Digital Automatic Mixer, DB25 connectors, Dante Digital Audio A820-NIC-DANTE Dante Digital Audio Upgrade Card for SCM820 Standard Ethernet Versions DB25 Accessory CablesDB25 to 8 XLR Male, DB25 to 8 XLR Female, DB25(x2) to 8 TRSNote: All specifications are subject to change.Dante is a trademark of Audinate Pty Ltd.。
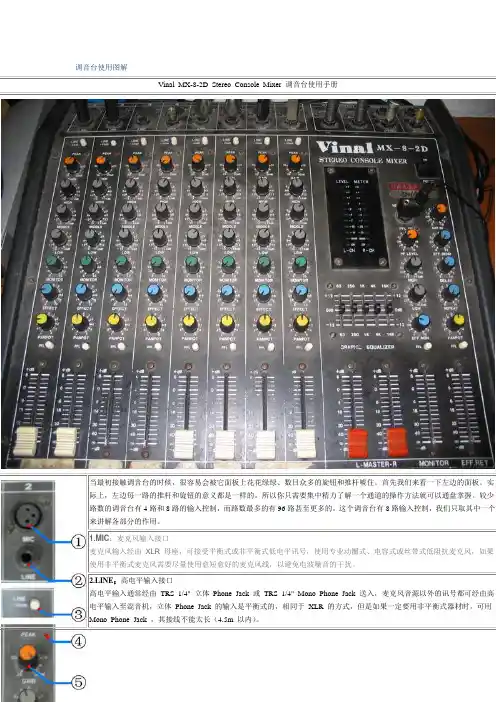
调音台使用图解
Vinal MX-8-2D Stereo Console Mixer 调音台使用手册
11.FADER:衰减器(音量推子)
决定该通道信号发送给总线输出的音量大小。
音量推子实际上是一个衰减器,用于对该通道的输出信号进行衰减。
当推子位
于最下端(或音量旋钮位于最左端)时,信号被无穷衰减。
这时,该通道没有信号输出。
调节范围-∞ ~+6 分贝,一般
以推到0 处适宜,超过0 则会使声音产生一定程度的失真。
如果一定要提高电平讯号,一般采用适当提高Gain的办法,而
不会将衰减器提升超过0 。
由于音乐输入为连续,而人声输入为间断,故在操作上有一定区别。
在对音乐的输入轨道操作时,一般使用“淡入”、“淡出”效
果。
即操作时先缓缓推拉衰减器,再慢慢加快操作速度,切忌匀速推拉或者瞬间大幅度的操作,这样会使听众感觉很不舒服。
而在对人声输入通道进行操作时,一般采用“一步到位”操作。
即在需要人声的时候,将推子一下推到大概合适的位置,再根
据监听和电平表显示进行细微调节。
而不需要人声时,要马上把推子拉到最底部,以避免不必要的声音被输入进去。
接下来,我们再看看调音台右面的控制面板。
之前左面的面板是用来调节输入信号的,而右面的则主要负责调节输出信号。
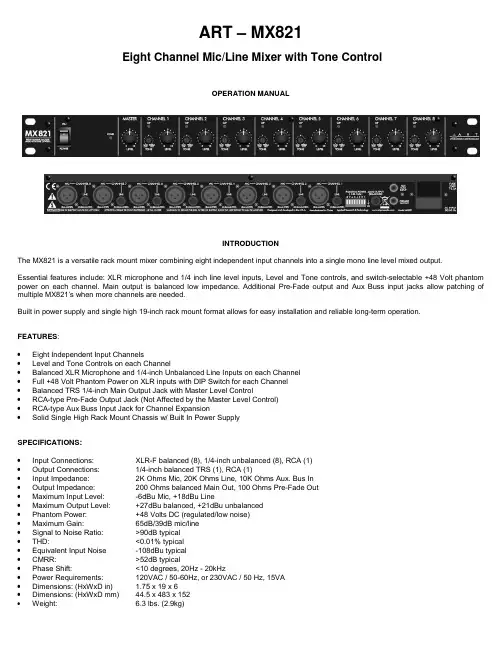
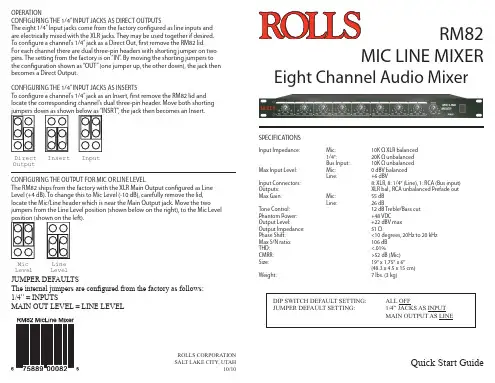
ART – MX821Eight Channel Mic/Line Mixer with Tone ControlOPERATION MANUALINTRODUCTIONThe MX821 is a versatile rack mount mixer combining eight independent input channels into a single mono line level mixed output.Essential features include: XLR microphone and 1/4 inch line level inputs, Level and Tone controls, and switch-selectable +48 Volt phantom power on each channel. Main output is balanced low impedance. Additional Pre-Fade output and Aux Buss input jacks allow patching of multiple MX821’s when more channels are needed.Built in power supply and single high 19-inch rack mount format allows for easy installation and reliable long-term operation.FEATURES:•Eight Independent Input Channels•Level and Tone Controls on each Channel•Balanced XLR Microphone and 1/4-inch Unbalanced Line Inputs on each Channel•Full +48 Volt Phantom Power on XLR inputs with DIP Switch for each Channel•Balanced TRS 1/4-inch Main Output Jack with Master Level Control•RCA-type Pre-Fade Output Jack (Not Affected by the Master Level Control)•RCA-type Aux Buss Input Jack for Channel Expansion•Solid Single High Rack Mount Chassis w/ Built In Power SupplySPECIFICATIONS:•Input Connections: XLR-F balanced (8), 1/4-inch unbalanced (8), RCA (1)•Output Connections: 1/4-inch balanced TRS (1), RCA (1)•Input Impedance: 2K Ohms Mic, 20K Ohms Line, 10K Ohms Aux. Bus In•Output Impedance: 200 Ohms balanced Main Out, 100 Ohms Pre-Fade Out•Maximum Input Level: -6dBu Mic, +18dBu Line•Maximum Output Level: +27dBu balanced, +21dBu unbalanced•Phantom Power: +48 Volts DC (regulated/low noise)•Maximum Gain: 65dB/39dB mic/line•Signal to Noise Ratio: >90dB typical•THD: <0.01% typical•Equivalent Input Noise -108dBu typical•CMRR: >52dB typical•Phase Shift: <10 degrees, 20Hz - 20kHz•Power Requirements: 120VAC / 50-60Hz, or 230VAC / 50 Hz, 15VA•Dimensions: (HxWxD in) 1.75 x 19 x 6•Dimensions: (HxWxD mm) 44.5 x 483 x 152•Weight: 6.3 lbs. (2.9kg)OPERATIONa) Verify proper voltage selection on the IEC style power connector for your location. Connect the AC cord to a grounded AC outlet.b) Connect low-impedance microphones to the XLR sockets.c) Connect shielded unbalanced line inputs to the ¼” inch jacks.d) For microphone channels requiring phantom power (for condenser microphones) set the appropriate PHANTOM POWER DIP switches in the down position. Do not engage phantom power on a channel unless it is for a condenser microphone.e) Switch on the power and set the MASTER LEVEL to the ½ way setting, then adjust the channel LEVEL controls as required for the best mix and level. Adjust the channel TONE controls for the desired balance of lows and highs. Center setting is neutral.f) Re-adjust the MASTER LEVEL as required for best overall signal level.g) To patch two MX821’s for 16 channel input operation, run a shielded, unbalanced RCA type patch cable from the PREFADE OUT jack on mixer A to the AUX BUS INPUT jack on mixer B. Note that only the MASTER LEVEL on mixer B will now function.h) To convert the ¼” line input on any channel to a direct line output for that channel, unplug the MX821’s AC cord from the wall and remove the top cover. Inside you will see a row of jumpers. Move the jumper for the desired channel to the left, when viewed from the front. Now that channel’s line input is converted to a direct line output and may be connected to the input of another mixer. Any converted channel is still included in the main output mix as well. Do not connect the output of a mixer or any other signal source to the ¼” jack on this channel now or the channel may sustain damage. Be sure to replace the lid before plugging the unit back into the AC socket.WARNINGSAll operating instructions should be read before using this equipment.To prevent the risk of electrical shock, do not remove the cover.There are no user-serviceable parts inside. Please refer servicing to a qualified service technician.Do not expose this unit to rain or moisture or to heat sources such as radiators, stoves, or other items that generate excessive heat.This unit should be cleaned only with a damp cloth. Do not get moisture inside the unit.When moving this equipment, it should be placed in its original carton and packing, to reduce the risk of damage in transit.WARRANTY INFORMATIONLimited WarrantyApplied Research and Technology will provide warranty and service for this unit in accordance with the following warrants:Applied Research and Technology, (ART) warrants to the original purchaser that this product and the components thereof will be free from defects in workmanship and materials for a period of three years from the date of purchase. Applied Research and Technology will, without charge, repair or replace, at its option, defective product or component parts upon prepaid delivery to the factory service department or authorized service center, accompanied by proof of purchase date in the form of a valid sales receipt.Exclusions:This warranty does not apply in the event of misuse or abuse of the product or as a result of unauthorized alterations or repairs. This warranty is void if the serial number is altered, defaced, or removed.ART reserves the right to make changes in design or make additions to or improvements upon this product without any obligation to install the same on products previously manufactured.ART shall not be liable for any consequential damages, including without limitation damages resulting from loss of use. Some states do not allow limitations of incidental or consequential damages, so the above limitation or exclusion may not apply to you. This warranty gives you specific rights and you may have other rights, which vary from state to state.For units purchased outside the United States, an authorized distributor of Applied Research and Technology will provide service.SERVICEThe following information is provided in the unlikely event that your unit requires service.1) Be sure that the unit is the cause of the problem. Check to make sure the unit has power, all cables are connected correctly, and the cables themselves are in working condition. You may want to consult with your dealer for assistance in troubleshooting or testing your particular configuration.2) If you believe the ART unit is at fault, go to . You may contact Customer Service for more assistance, or directly request a Return Authorization for service in the “resources” area of the website.3) If you are returning the unit for service, pack the unit in its original carton or a reasonable substitute. The original packaging may not be suitable as a shipping carton, so consider putting the packaged unit in another box for shipping. Print the RA number clearly on the outside of the shipping box.4) Include, with your unit, a note with the RA number and your contact information including a daytime phone number, preferably attached to the top of the unit. Copyright 2010 Applied Research & Technology MX821。
SCM810八頻道話筒混音器Shure SCM810 eight-channel microphone mixer user guide Version: 5.1 (2020-K)Table of ContentsSCM810 八頻道話筒混音器3重要安全事項! 3簡要說明3系統功能 4操作原則4前面板功能4後面板功能 5 DIP 開關 6在機架安裝混音器7 SCM810/E 連接 8輸出限制器設定 8等化器功能8透過自動混音器使用等化器/回饋控制器9基本混音器操作9連網多個混音器10全域/本機功能10連結纜線 11備件 11規格12服務聲明14認證14進階功能14 14邏輯連接規格 14建議的邏輯應用15內部修改20 201.2.3.4.5.6.7.8.9.10.11.12.13.14.15.16.17.18.19.20.21.SCM810八頻道話筒混音器重要安全事項!必須閱讀這些注意事項。
必須保留這些注意事項。
必須注意所有警告內容。
必須遵循所有注意事項。
不要在靠近水的地方使用本設備。
只能用幹布擦拭設備。
不要堵塞任何通風口。
留出足夠的距離,確保充分通風,並安裝在符合製造商要求的位置。
不要將本設備安裝在任何熱源(如明火、散熱器、調溫器、火爐或包括功率放大器在可的其它可能產生熱量的裝置附近。
不要將任何明火火源放置在產品上。
不要破壞帶極性或接地類型插頭的安全功能。
極性插頭帶有兩個插片,其中一個比另一個寬。
接地類型插頭帶有兩個插片和第三個接地插腳。
較寬的插片或第三個插腳是為安全目的設定的。
如果提供的插頭無法插入插座,請向電工諮詢如何更換合適的插座。
保護電源線防止被腳踩踏或被夾緊,尤其是在插頭、方便插座和機身電源線的引出處。
只能使用製造商指定的連接部件/附件。
只能使用製造商指定的或隨設備售出的手推車、支座、三角架、托架或支撐台。
如果使用手推車,在移動裝有設備的手推車時應注意安全,避免設備翻落。
在雷電天氣或長時間不使用時,應拔下設備的插頭。

安度专业混音器ART-880安装与操作说明目 录包装配置105技术参数95开启与调试85系统连接图74后板接口说明64面板功能简介53产品适用范围43产品介绍33主机安装要求22安全注意事项与服务12亲爱的顾客:感谢您对本公司的支持并使用本公司研制生产的ART -880八路智能混音器。
保您对本产品的正确使用,请仔细阅读本说明书,并妥善保管,以备参考。
为确1条1套1份1张1本检查设备安装无误后,即可进行调试操作,将所有的旋钮都调至最小位置,然后把优先设置开关全部打至“OFF ”位置(出厂默认设置),打开电源开关,电源指示灯(红色)亮起,混音器即通电,对着其中一支话筒(如input1)说话,逐渐调大与其对应的旋钮(如gain 1)使音频输入指示灯逐渐亮起(绿色)直至打开第1~2个红色指示灯的位置为至,即为较合适的门限电平,然后调大总输出旋钮,达到了您所需求的输出音量,依据此方法逐支调试,即设置完毕。
但由于话筒的型号、品牌不同,相应的灵敏度也不一样,环境也有所不同,所以门限电平的调节可根据实际情况适当增大后减小,使语言正常,顺畅为准。
(仅供参考,实际指标以实物为准,如有变动,恕不另行通知。
)内容 数量ART -880电源适配器串机线 安装配件产品合格证产品保修卡产品指导手册 8、开启和调试9、技术参数10、包装配置1台1只(1)、严禁非专业人员打开机盖维修,否则免费保修服务将终止。
如产品有问题,请与经销商或我司技术支持 及售后服务中心联系,具体细节,参见保修卡。
(2)、在使用本机连接电源插头时,请确认所连接的电源电压是否和本机标示的电压一致。
在连接系统时,请 关闭本机电源。
插入或拨出电源线时,务必握住电源线的插头,不要直接拉扯电 源线。
为了避免不可预 料的情况,在长时间不使用本机时,将电源插头拨出。
(3)、请将机器安装在通风良好的地方和位置,不要在机器附近放置会大量发热的设备,以免影响本机的正常 工作。
T4S/T8S ToneMatch®数字混音台用户指南重要安全说明请阅读并保留所有安全和使用说明。
1. 请阅读这些说明。
2. 请保留这些说明。
3. 请注意所有警告。
4. 请遵守所有说明。
5. 请勿在近水区域使用本设备。
6. 只能使用干布进行清洁。
7. 请勿堵塞任何通风口。
请按照制造商的说明进行安装。
8. 防止踩踏或挤压电源线,尤其是插头、电源插座以及设备上的出口位置。
9./配件。
10. 只能使用制造商指定的或随本设备一起销售的推车、支架、三角架、托架或工作台。
如果使用推车,则在移动推车和设备时应格外小心,以免因倾倒而造成伤害。
11. 在雷雨天气或长时间不用时,请拔下本设备插头。
12. 任何维修事宜均请向专业人员咨询。
如果设备有任何损坏,均需进行维修,例如电源线或插头受损、液体溅入或物体落入设备内、设备受淋或受潮、不能正常工作或跌落。
本产品含有磁性材料。
有关这是否会影响到您的植入式医疗器械,请咨询您的医生。
• 此产品不适合在室内涉水设施区域安装或使用(包括但不限于室内游泳馆、室内水上乐园、有热水浴缸的房间、桑拿房、蒸汽浴室以及室内溜冰场)。
• 为降低失火或电击风险,请勿使本产品受雨淋、水溅或受潮。
不适用于 IPX4-9 产品。
• 请将本产品放置到远离火源和热源的地方。
请勿将明火火源(如点燃的蜡烛)置于本产品上或本产品附近。
• 未经授权切勿改装本产品。
• 请勿将本产品与逆变器配合使用。
• 请勿在汽车或船舶上使用本产品。
• 产品仅使用随附的电源。
• 请勿将支架或产品放置或安装在任何热源旁边,比如火炉、暖气片、热调节装置或其他可产生热量的设备(包括功放)。
• 请勿在不稳定的三脚架/支架上使用 T oneMatch® T4S/T8S数字混音台。
混音台设计为仅可在 1/4 英寸(6 毫米)的螺钉上使用,并且三脚架/支架必须能够支撑重量最低为 1.9 千克(4.1 磅),整体尺寸为 214 x 311 x 83 毫米(8.4 x 12.25 x 3.25 英寸)的设备。

Stage & Studio DJ Speaker & Mixer Bundle Kit(2) 8’’ Bluetooth PA Loud-Speakers, 8-Ch. Audio Mixer,Speaker Stands, Wired Microphone (300 Watt)PPHP28AMXWARNING!CAUTION: TO REDUCE THE RISK OF ELECTRIC SHOCK,DO NOT REMOVE THE COVER OF THIS UNIT.THERE ARE NO USER - SERVICEABLE PARTS INSIDE.REFER ALL SERVICING TO A QUALIFIED TECHNICIAN.The lighting ash with arrow head symbol within an equilateral triangle is intended to alert the user to the presence of “dangerous” voltage within the product’s enclosure that may be of su cient magnitude to constitute a risk of Electric shock to humans. Users should exhibit extra safety when thissymbol appears in this instruction manual and follow all precautions as they are stated.The exclamation point within an equilateral triangle is intended to alert the user to the presence of important operating and maintenance (servicing)instructions in this manual.SAFETY INSTRUCTION1. Please read the user manual carefully before use and retain for future reference.2. The power supply must match the demand of the device with reliable ground wire.3. All covering signal should be complied with the demand of device.4. The device should be located far away from high temperature, moisture andpowerful electromagnetic eld.5. Max operating temperature is 113°F.6. No naked ame sources, such as lighted candles, shall be placed on the product.7. Clean only with dry cloth – The appliance should be cleaned only asrecommended by the manufacturer.8. When not in use, unplug the unit from the mains.9. To establish a safe level:• Start your volume control at a low setting.• Slowly increase the sound until you can hear it comfortably and clearly, and without distortion.10. Only use suitable means of transportation if you want to move the speaker. Note:• Once the BLUETOOTH devices are paired, there is no need to pair them again.• If the speaker is connected via Bluetooth device but does not play with sound, please turn o nearby devices and only leave one device to re-connect with the speaker.• When inserting the USB/SD Card , make sure the direction you selected is correct. Never insert violently to avoid damaging the USB/SD Card or the unit. If it doesn't work, please check if the direction is correct.• Turn off and pull out the USB/SD before turning off the speaker.CONTROL PANELS1.MP3 Player ButtonA. MODE: Short press:Press to switch between USB/ SD/BLUETOOTH.B. : Short press: Switch Previous Song, Long press Voice DOWNC. : Short press: Switch next Song, Long press Voice UPD. REPEAT: Repeat between RA (Repeat all)/RO (Repeat One)/RR (Repeat randomly)Play/Pause long press to FOLDER tracking.2. Blue LED Display3. USB port4. SD port5. Channel 1-4 XLR Connector:Connect Microphone and Line input using the XLR cables.6. Mic / Line Input Selector Channels: When connecting a microphone set the selector to MIC. When connecting a Line input set this selector to Line.7. Treble Knob: Channels 1-4 have individual treble controls per channel.Use this knob to adjust the treble levels for the selected channel.8. Bass Knob: Channels 1-4 have individual bass controls per channel.Use this knob to adjust the bass levels for the selected channel.9. E ects Knob: Channels 1-4 have individual e ects controls per channel.Use this knob to adjust the reverb e ect levels for the selected channel.10. Volume Knob: Channels 1-4 have individual volume controls per channel.Use this knob to adjust the volume levels for the selected channel.11. 1/4” Line Input: Connect your sound source to this 1/4” input. The line volume will be controlled by channel 5/6 volume control and master volume Knob.Only passive signals should be the connected input.12. RCA Line Input: Connect your sound source to this RCA input (6/7 Channel). Only passive signals should be the connected input.13. RCA Line Output: Use this connector to connect other ampli er.DO NOT connect directly to a passive speaker.14. Line/MP3 Selector: When you use USB SD Bluetooth signal push down, When you use Mic/Line input signal push the selector up.15. Signal input Volume Knob:Adjust the volume for MP3 or MIC/Line signal input.16. Master Volume Knob: Adjust all the output signal for the powered mixer.17. Indicator: Displays the signal volume for output.18. Phantom Power: Press this button to activate the 15V phantom powernecessary for a condenser (capacitance) Microphone which might require 15V power supply from the mixer Channel 1-4 input.19. 5 Band Graphic Equalizer: Adjusts the frequency of output signal.20. Depth Knob:Adjust the depth e ects level of 1-4 Channel for Microphone input.21. ECHO Volume Knob: Adjusts the ECHO Level for MIC input.PPHP28AMXStage & Studio DJ Speaker & Mixer Bundle Kit - (2) 8’’ Bluetooth PA Loud-Speak-ers, 8-Ch. Audio Mixer, Speaker Stands, Wired Microphone (300 Watt) Features:Bluetooth Wireless Streaming:• Instantly Receives Wireless MusicStreaming Audio• Works with All of Your Favorite Devices (iPhone, Android, Smartphones, iPad, Tablet, MP3 Player, etc.)• Bluetooth Version: 3.0• Bluetooth Network Name: 'PyleUSA’• Bluetooth Wireless Range: Up to 65' ft. Technical Specs:• Speaker Power Output: 300 Watt MAX • Tweeter Type: 1"Titanium Horn Driver (x2)• Subwoofer Type: 8’’ Long Throw (x2)• Subwoofer Frequency:48Hz-4500Hz (±10dB)• Speaker Magnet: 30 oz (x2)• Impedance: 4 Ohm• Speaker Sensitivity: 90dB• Power Mixer Sensitivity: -14dB• S/N Ratio: 75dB• T.H.D.: 9.2%• Frequency Response:48-18Khz (±10dB)What's in the Box:• Ampli er Mixer Console • (2) 8’’ PA Speakers• (2) Tripod Speaker Stands • (2) 1/4’’ Connection Cables • Wired Handheld Mic • Power Cable• All-in-One DJ Audio Loud-Speaker Kit • 8-Channel Powered Ampli er Audio Mixer• Dual Molded Cabinet PA Speakers • Sound System: (2) 8’’ Speakers, (2) 1’’ Tweeters• Bluetooth Wireless Music Streaming Ability• Active 2-Way, Full Range Stereo Sound • MP3 Digital Audio File Support• USB Flash & SD Memory Card Readers • +48V Phantom Power• (4) XLR 3-Pin Connectors• (2) 1/4'' Microphone / Guitar Inputs • Independent Adjustable ChannelControls• Treble, Bass, Effect VolumeCon guration • 5-Band Graphic EQ• Digital Echo Effects Control• RCA (L/R) Audio Line Input/OutputJacks• Universal Speaker Stand MountSupport, 35mm• Rugged & Heavy-Duty Molded Cabinet Housing• Ability to Connect AdditionalMicrophones, Instruments,DJ Equipment• Convenient System Design Assembles & Disassembles for Quick Setup• Perfect for On-Stage Performances, Crowd Control, Public Gathering Events• Maximum USB/SD Card Support:Up to 32GB• Digital Audio File Support: MP3, WMA, MP3Pro• +48V Phantom Power: ON/OFF• Power Supply: 100-240V, 60/50HZ• Single Speaker Dimensions (L x W x H): 11.22’’ x 9.84’’ x 17.72’’ -Inches (Each)• Amplifier Mixer Dimensions (L x W x H): 11.61’’ x 7.09’’ x 18.11’’-Inches• Sold as: 1。
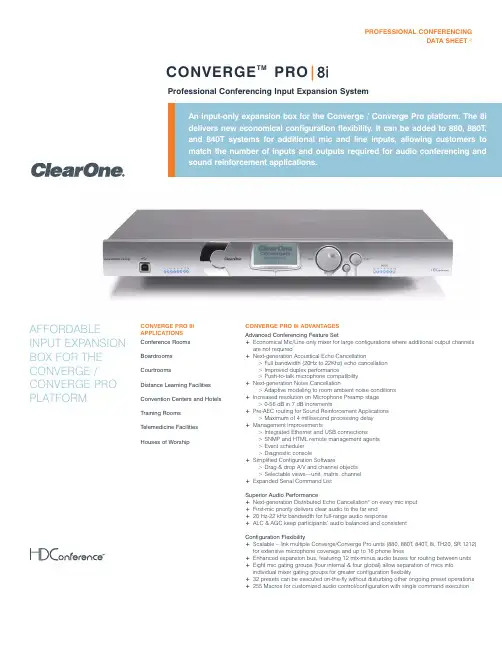
AFFORDABLE INPUT EXPANSION BOX FOR THE CONVERGE / CONVERGE PRO PLATFORM CONVERGE PRO 8iAPPLICATIONSConference RoomsBoardroomsCourtroomsDistance Learning FacilitiesConvention Centers and HotelsTraining RoomsTelemedicine FacilitiesHouses of WorshipCONVERGE PRO 8i ADVANTAGESAdvanced Conferencing Feature Set+Economical Mic/Line only mixer for large configurations where additional output channelsare not required+Next-generation Acoustical Echo Cancellation> Full bandwidth (20Hz to 22Khz) echo cancellation> Improved duplex performance> Push-to-talk microphone compatibility+Next-generation Noise Cancellation> Adaptive modeling to room ambient noise conditions+Increased resolution on Microphone Preamp stage> 0-56 dB in 7 dB increments+Pre-AEC routing for Sound Reinforcement Applications> Maximum of 4 millisecond processing delay+Management Improvements> Integrated Ethernet and USB connections> SNMP and HTML remote management agents> Event scheduler> Diagnostic console+Simplified Configuration Software> Drag & drop A/V and channel objects> Selectable views—unit, matrix, channel+Expanded Serial Command ListSuperior Audio Performance+Next-generation Distributed Echo Cancellation®on every mic input+First-mic priority delivers clear audio to the far end+20 Hz-22 kHz bandwidth for full-range audio response+ALC & AGC keep participants’ audio balanced and consistentConfiguration Flexibility+Scalable – link multiple Converge/Converge Pro units (880, 880T, 840T, 8i, TH20, SR 1212)for extensive microphone coverage and up to 16 phone lines+Enhanced expansion bus, featuring 12 mix-minus audio buses for routing between units+Eight mic gating groups (four internal & four global) allow separation of mics intoindividual mixer gating groups for greater configuration flexibility+32 presets can be executed on-the-fly without disturbing other ongoing preset operations+255 Macros for customized audio control/configuration with single command execution Professional Conferencing Input Expansion SystemPROFESSIONAL CONFERENCINGDATA SHEET < CONVERGE TM PRO|8i>SPECIFICATIONSCONVERGE PRO 8i DATA SHEET <>CLEARONE LOCATIONS>CONVERGE PRO 8i BACK PANELAudio PerformanceConditions: Unless otherwise specified, all measurements are performed with a 20 Hz to 22 kHz BW limit (no weighting)Frequency Response: 20 Hz to 22 kHz ±1dBNoise (EIN): -126 dBu, 20 kHz BW, max gain,Rs=150 ΩTHD+N: <0.02%Dynamic Range: 100 dB (non A-weighted)Crosstalk <-91 dB re 20 dBu @ 20 kHz channel to channel Auto Mixer ParametersNumber of Open Microphones (NOM)PA Adaptive Mode First Mic Priority Mode Last Mic ModeMaximum # of Mics Mode Ambient LevelGate Threshold Adjust Off Attenuation Adjust Hold Time Decay RateMatrix Mixing Parameters 36x24 matrix 12 analog in/out12 expansion bus in/out8 assignable processing blocks in/out 4 assignable fader blocks in/out Assignable Processing Blocks Filters:All pass Low pass High pass Low shelving High shelving Parametric EQ Notch CD Horn Crossovers:BesselButterworth Linkwitz-Riley CompressorDelay; adjustable up to 250 msAssignable Fader Blocks Gain/MuteMicrophone Input Configuration Input Gain Adjust Mic or Line LevelPhantom Power on/off Echo Cancellation on/off Noise Cancellation on/off Filters:All Pass Low Pass High Pass Notch PEQMute on/offChairman Override on/off AGC on/offAutomatic Level Control on/off Auto Gate/Manual gate Adaptive Ambient on/off Pre AEC channelMic/Line Inputs 1-8Push-on mini-terminal block, balanced,bridgingImpedance: < 5 KΩNominal Level: adjustable -56 dBu to 0 dBu (7 dB step coarse gain adjustment)Maximum Level: -65 dBu to +20 dBuEcho Cancellation: 130 ms tail time (works with 12 dB of room gain)Noise Cancellation: 6–15 dB attenuation Phantom Power: 24 V , selectable Line Inputs 9-12Push-on mini-terminal block, balanced,bridgingImpedance: < 5 KΩNominal Level: 0 dBu Maximum Level: 20 dBuExpansion Bus In/Out Proprietary Network RJ-45 (2), 1.9 MbpsCategory 5 twisted-pair cable 200’ maximum cable length between any two Converge Pro products EthernetAutoswitching with Quality of Connection (QoC)10/100 Mbps Ethernet Network Port 10/100 Mbps Ethernet PC Port RJ-45 ConnectorsRS-232Serial Command Protocol Only (Console software not supported on RS-232 port)DB-9 female9,600/19,200/38,400/57,600/115,200 baud rate; 8 bits, 1 stop, no parityHardware flow control on (default)/off USBVersion 2.0 compatible T ype B connectorControl/StatusDB-25 female A/B (2)Inputs A/B: active low (pull to ground)Outputs A/B: open collector, 40 VDC max, 40 mA each+3.3 VDC pins (2) (300 mA over-current protected)Configuration & Administration Software Converge ConsolePower Input Range Auto-adjusting100–240 VAC; 50/60 Hz Power Consumption 30 W T ypicalDimensions (L x D x H)17.25" x 10.25" x 1.75"43.8 x 26 x 4.5 cmWeight7.5 lbs/3.3375 kg unit weight 12 lbs/5.4kg shipping weightOperating T emperature14° F/-10° C to 122° F/50° C ambient unit temperature Approvals & ComplianceAES48 compliant (audio equip grounding)U.S.A. & Canada CSA safety listed EU CountriesRoHS compliant WEEE compliantSee product manual for additional details Optional Accessories Converge Pro 880Converge Pro 880T Converge Pro 840T Converge Pro TH20Converge SR 1212T abletop ControllerButton Microphone – Omni-Directional Button Microphone – Uni-Directional Delta MicrophoneT abletop Microphone – Uni-Directional JBL Wall-Mount SpeakersPart Number910-151-810 Converge Pro 8i – 8-channel AEC Microphone Mixer (no outputs)Headquarters:Salt Lake City, UT USA 5225 Wiley Post Way Suite 500Salt Lake City, UT 84116 Tel:801-975-7200T oll Free: 800-945-7730 Fax:801-977-0087******************Latin America Tel:801-974-3621*******************EMEATel: 44 (0) 1189 036 053*******************APACTel:801-303-3388 *******************Other product names may be registered trademarks of their respective owners who do not necessarily endorse ClearOne or ClearOne’s products. All rights reserved. Information in this document subject to change without notice . © 2007 ClearOne Communications Inc. 802-151-810 Revision 1.7 January 2008.。
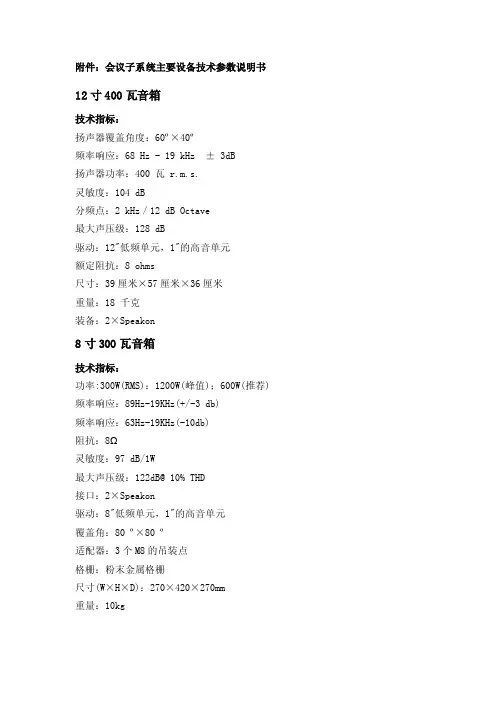
附件:会议子系统主要设备技术参数说明书12寸400瓦音箱技术指标:扬声器覆盖角度:60º×40º频率响应:68 Hz - 19 kHz ± 3dB扬声器功率:400 瓦 r.m.s.灵敏度:104 dB分频点:2 kHz/12 dB Octave最大声压级:128 dB驱动:12"低频单元,1"的高音单元额定阻抗:8 ohms尺寸:39厘米×57厘米×36厘米重量:18 千克装备:2×Speakon8寸300瓦音箱技术指标:功率:300W(RMS):1200W(峰值);600W(推荐) 频率响应:89Hz-19KHz(+/-3 db)频率响应:63Hz-19KHz(-10db)阻抗:8Ω灵敏度:97 dB/1W最大声压级:122dB@ 10% THD接口:2×Speakon驱动:8"低频单元,1"的高音单元覆盖角:80 º×80 º适配器:3个M8的吊装点格栅:粉末金属格栅尺寸(W×H×D):270×420×270mm重量:10kg技术指标:功率:40W(RMS);80W(峰值);120W(节目) 频率响应:70Hz-20KHZ(+/-3db)频率响应:60Hz-20KHZ(-10db)阻抗:8Ω灵敏度:89db/1W最大声压级:106dB@ 10% THD最大声压级:104dB@ 3% THD中低频驱动:6.5"高频驱动:1"分频点:2.5KHZ尺寸(W×H×D):215×290×172mm重量:3.4kg变压器功率: 1/2/4/8/16 W8寸60瓦音箱技术指标:功率:60W(RMS);120W(峰值);180W(节目) 频率响应:60Hz-20KHZ(+/-3db)频率响应:50Hz-20KHZ(-10db)阻抗:8Ω灵敏度:89db/1W最大声压级:109dB@ 10% THD最大声压级:107dB@ 3% THD中低频驱动:8"高频驱动:1"分频点:2.5KHZ尺寸(W×H×D):270×370×220mm重量:5.4kg变压器功率:1/2/4/8/16 W技术指标:频率响应:120 Hz - 18 kHz ± 3dB扬声器功率:100 瓦 r.m.s.灵敏度:103 dB分频点:6kHz/12 db Octave灵敏度:103dB最大声压级:125 dB指向角:100度X 90度额定阻抗:16 ohms斜面角度:45度尺寸:23.5厘米×35厘米×23厘米重量:5.5 千克6.5寸天花吸顶音箱技术指标:额定功率(RMS):40 W节目功率(program):80 W瞬时功率(peak,10 ms):120 W100V变压器输出选项:1,2,4,8,15 W,Off 阻抗:8 ohms频率响应(+-3 dB):70 Hz to 20 kHz频率响应(-10 dB):60 Hz to 20 kHz轴向灵敏度(1W/1m,half-space):89 dB最大声压级(3 % THD,half-space):104 dB 最大声压级(10% THD,half-space):106 dB 低音单元:6.5”woofer高音单元:3/4”tweeter无源分频器分频点:3 kHz接线端子:1 terminal strip外壳材料:金属颜色:白色前网罩:金属网罩安装条件:可安装在 10 - 40 mm 后的天花板上重量:1.7 kg安装开孔尺寸:18 cm安装深度:12.7 cm监听扬声器技术指标:扬声器覆盖角度:60º×40º频率响应:70 Hz - 19 kHz ± 3dB扬声器功率:400 瓦 r.m.s.灵敏度:104 dB分频点:2 kHz/12 dB Octave最大声压级:128 dB额定阻抗:8 ohms尺寸:39厘米×55.5厘米×38厘米重量:16 千克装备:2×Speakon线阵列中高频单元技术指标扬声器功率:平均功率500W/节目功率1000W/峰值功率1500W 频率响应:95Hz-19kHz/±3dB指向性:水平100º垂直2x4.5º灵敏度:105dB/1W/1M最大声压级:134dB额定阻抗:8 ohms中低频单元:2x8”高频单元:4x1”喉管/2”振膜高频驱动器分频点:2kHz,12 dB/Octave尺寸:51 x 52.5 x 34.6 cm重量:29 千克线阵列低频单元技术指标:18英寸低频低频功率:1000 瓦 r.m.s.频率响应:42 Hz –分频点灵敏度:101 dB最大声压级:130 dB分频点:控制器设定重量:59 公斤尺寸(宽×高×深):51×73×71厘米配件:托盘,护盖超低音扬声器技术指标:500W(RMS):1500W(峰值);1000W(推荐) 频率响应:48Hz-150Hz(+/-3 db)频率响应:38Hz-150Hz(-10db)阻抗:4Ω最大声压级:126dB@ 10% THD灵敏度:101dB/1W驱动:2×10"低频单元接口:2×Speakon分频点:150Hz/12dB Octave格栅:粉末金属格栅尺寸(W×H×D):360×610×530mm重量:25.9kg参数有源监听音单元类型:10cm锥形低频:2.2cm高频扬声器,箱体:低音反射,输入灵感度:1.10db/10KΩ,2.+4db/10KΩ,输出功率:20W,全频率响应范围:65HZ-22KHZ,最大声压级:98db(1M),功耗:30W。
用户指南FA0145-04八通道麦克风前置放大器和可选 A-D 卡,支持 DanteISA 828MkII目录关于本用户指南 . . . . . . . . . . . . . . . . . . . . . . . . . . . . . . . . . . . . . . . . . . . . . . . . . . . . . . . . . . . . . . . . . . . . . . . . . . . .3简介 . . . . . . . . . . . . . . . . . . . . . . . . . . . . . . . . . . . . . . . . . . . . . . . . . . . . . . . . . . . . . . . . . . . . . . . . . . . . . . . . . . . . . . . . . .4 ISA 828 MKII 控件和功能 . . . . . . . . . . . . . . . . . . . . . . . . . . . . . . . . . . . . . . . . . . . . . . . . . . . . . . . . . . . . . . . . . . . . .5前面板 . . . . . . . . . . . . . . . . . . . . . . . . . . . . . . . . . . . . . . . . . . . . . . . . . . . . . . . . . . . . . . . . . . . . . . . . . . . . . . . . . . . . .5通道控件 . . . . . . . . . . . . . . . . . . . . . . . . . . . . . . . . . . . . . . . . . . . . . . . . . . . . . . . . . . . . . . . . . . . . . . . . . . . . . . . . . . .5输入选择 . . . . . . . . . . . . . . . . . . . . . . . . . . . . . . . . . . . . . . . . . . . . . . . . . . . . . . . . . . . . . . . . . . . . . . . . . . . . . . .5麦克风输入 . . . . . . . . . . . . . . . . . . . . . . . . . . . . . . . . . . . . . . . . . . . . . . . . . . . . . . . . . . . . . . . . . . . . . . . . . . . . .5线性输入 . . . . . . . . . . . . . . . . . . . . . . . . . . . . . . . . . . . . . . . . . . . . . . . . . . . . . . . . . . . . . . . . . . . . . . . . . . . . . . .6乐器输入 . . . . . . . . . . . . . . . . . . . . . . . . . . . . . . . . . . . . . . . . . . . . . . . . . . . . . . . . . . . . . . . . . . . . . . . . . . . . . . .6 Z In(输入阻抗) . . . . . . . . . . . . . . . . . . . . . . . . . . . . . . . . . . . . . . . . . . . . . . . . . . . . . . . . . . . . . . . . . . . . . . . . .6 + 48V . . . . . . . . . . . . . . . . . . . . . . . . . . . . . . . . . . . . . . . . . . . . . . . . . . . . . . . . . . . . . . . . . . . . . . . . . . . . . . . . . .6相位 . . . . . . . . . . . . . . . . . . . . . . . . . . . . . . . . . . . . . . . . . . . . . . . . . . . . . . . . . . . . . . . . . . . . . . . . . . . . . . . . . . .6 HPF(高通滤波器) . . . . . . . . . . . . . . . . . . . . . . . . . . . . . . . . . . . . . . . . . . . . . . . . . . . . . . . . . . . . . . . . . . . . . . .6插入 . . . . . . . . . . . . . . . . . . . . . . . . . . . . . . . . . . . . . . . . . . . . . . . . . . . . . . . . . . . . . . . . . . . . . . . . . . . . . . . . . . .6通道仪表 . . . . . . . . . . . . . . . . . . . . . . . . . . . . . . . . . . . . . . . . . . . . . . . . . . . . . . . . . . . . . . . . . . . . . . . . . . . . . . . . . . .7仪表校准 . . . . . . . . . . . . . . . . . . . . . . . . . . . . . . . . . . . . . . . . . . . . . . . . . . . . . . . . . . . . . . . . . . . . . . . . . . . . . . .7后面板 . . . . . . . . . . . . . . . . . . . . . . . . . . . . . . . . . . . . . . . . . . . . . . . . . . . . . . . . . . . . . . . . . . . . . . . . . . . . . . . . . . . . .8交流电源插座 . . . . . . . . . . . . . . . . . . . . . . . . . . . . . . . . . . . . . . . . . . . . . . . . . . . . . . . . . . . . . . . . . . . . . . . . . . .8麦克风输入 . . . . . . . . . . . . . . . . . . . . . . . . . . . . . . . . . . . . . . . . . . . . . . . . . . . . . . . . . . . . . . . . . . . . . . . . . . . . .8线性输入 . . . . . . . . . . . . . . . . . . . . . . . . . . . . . . . . . . . . . . . . . . . . . . . . . . . . . . . . . . . . . . . . . . . . . . . . . . . . . . .8模拟音频输出 . . . . . . . . . . . . . . . . . . . . . . . . . . . . . . . . . . . . . . . . . . . . . . . . . . . . . . . . . . . . . . . . . . . . . . . . . . .8 A-D 输入 . . . . . . . . . . . . . . . . . . . . . . . . . . . . . . . . . . . . . . . . . . . . . . . . . . . . . . . . . . . . . . . . . . . . . . . . . . . . . . . .8仪表微调 . . . . . . . . . . . . . . . . . . . . . . . . . . . . . . . . . . . . . . . . . . . . . . . . . . . . . . . . . . . . . . . . . . . . . . . . . . . . . . .8 A-D 选件卡插槽 . . . . . . . . . . . . . . . . . . . . . . . . . . . . . . . . . . . . . . . . . . . . . . . . . . . . . . . . . . . . . . . . . . . . . . . . .8 A-D 选件卡 . . . . . . . . . . . . . . . . . . . . . . . . . . . . . . . . . . . . . . . . . . . . . . . . . . . . . . . . . . . . . . . . . . . . . . . . . . . . . . . . .9 A-D 卡时钟和同步开关 . . . . . . . . . . . . . . . . . . . . . . . . . . . . . . . . . . . . . . . . . . . . . . . . . . . . . . . . . . . . . . . . . .10物理特性 . . . . . . . . . . . . . . . . . . . . . . . . . . . . . . . . . . . . . . . . . . . . . . . . . . . . . . . . . . . . . . . . . . . . . . . . . . . . . . . . . . . .11电源要求 . . . . . . . . . . . . . . . . . . . . . . . . . . . . . . . . . . . . . . . . . . . . . . . . . . . . . . . . . . . . . . . . . . . . . . . . . . . . . . . . . .11附录 . . . . . . . . . . . . . . . . . . . . . . . . . . . . . . . . . . . . . . . . . . . . . . . . . . . . . . . . . . . . . . . . . . . . . . . . . . . . . . . . . . . . . . . . .121. 连接器插脚引线 . . . . . . . . . . . . . . . . . . . . . . . . . . . . . . . . . . . . . . . . . . . . . . . . . . . . . . . . . . . . . . . . . . . . . . . .122. 前置放大器输入阻抗 . . . . . . . . . . . . . . . . . . . . . . . . . . . . . . . . . . . . . . . . . . . . . . . . . . . . . . . . . . . . . . . . . . .143. Pro Tools 界面 . . . . . . . . . . . . . . . . . . . . . . . . . . . . . . . . . . . . . . . . . . . . . . . . . . . . . . . . . . . . . . . . . . . . . . . . .16性能和规格 . . . . . . . . . . . . . . . . . . . . . . . . . . . . . . . . . . . . . . . . . . . . . . . . . . . . . . . . . . . . . . . . . . . . . . . . . . . . . . . . . .17 Focusrite RedNet 保修与服务 . . . . . . . . . . . . . . . . . . . . . . . . . . . . . . . . . . . . . . . . . . . . . . . . . . . . . . . . . . . .192关于本用户指南本用户指南适用于 ISA 828 MkII 麦克风前置,提供安装和使用此设备的信息,并包含如何将其连接到您系统的方式。
多功能会议厅音响设备清单:序号设备名称品牌型号设备参数数量1 L1全功能音乐系统BOSE LIBose®Spatial Dispersion®空间扩散扬声器技术使整个扩声区域的声音分布更加均匀—即使在两侧角落也毫无遗漏,在可容纳100位听众的场地中,实现高品质扩声效果两个带ToneMatch®预设的输入通道,专为手持话筒和原声吉他进行声音优化有源底座中集成低音扬声器多种安装方法:落地摆放、桌面摆放、固定安装适于各种通用扩声和现场演出场合22 一拖四无线会议话筒BYECHURBY-48081、一拖四会议系统,每个主机可单独带4个会议底座,同一场地,可以同时使用多达15台主机,60支会议话筒2、电路采用微电脑CPU控制,迅速,准确,功能强大3、使用音码导航锁定静噪控制技术和杂讯锁定静噪控制技术,只有本发射机发射的信号,接收机才能接收4、采用技术成熟UHF PLL锁相环合成式多频点无线技术,预设32频点可调,受到外来频率干扰的可能性降低到最小5、灯环指示,各发言单元无需申请,可以通过前面的开关来打开和关闭发言,避免繁琐的操作工作范围 60米,在标准条件下 AAA电池电池寿命 >8小时23 音频处理器3G-AudioDCM-2X双核DSP处理,为高质量音频算法及多功能处理提供充裕的动力引擎;模拟数字混合处理技术;输入输出RF保护,轻松抗静电和干扰,保证设备运行稳定可靠;反馈抑制功能提升传输增益,歌唱更轻松;智能动态处理器以达到最佳系统传声增益;三种混响效果模式(其中两种为立体效果),在应用现场可根据需要实时切换使用;专有的输入增益调节辅助器,过载指示,使输入动态和信噪比达到最佳平衡点;超低音通道Hi/K模式自1动切换;七段房间参量均衡器,充分弥补房间建声条件缺陷; Easy&FulL 模式,充分满足不同诉求之间的矛盾;话筒2*1+5段,音乐5段参量均衡,充分匹配各种音源;话筒5路输入前3后2;8路出4 8路智能混音器Tiansot天梭TM808八声道麦克风每声道的输入及总输出均可个别选择为麦克风电平或LINE电平,每声道可个别设定优先顺序,在优先设定声道发言时,其他声道的发言将自动衰减智慧會議混音器全新微電腦CPU處理器自動判斷環境噪音設置開啓電平,可連接電腦,擴展串聯,最多可串接到16台,擴充爲128支话筒的會議系統 8信道自动话筒 / 线路输入, NOMA电路实现自动增益调利用RS232C接口可使用外部控制.15 电源时序器β3贝塔斯瑞PX128一路主电源输入,八路受控电源输出内部微处理器控制,可多台级联使用数码管电源电压指示设独立控制开关延时通断时间:1秒输入功率:16KW 输出功率:2KW16 机柜国产16U 1 多功能会议厅数子化建设设备清单:序号设备名称品牌型号设备参数数量1 投影仪索尼VPL-401H/W光学部分显示系统3LCD系统显示元件有效的显示尺寸:0.76"(19.3mm)x3,BrightEra 无机配向膜液晶板,纵横比:16:10,有效像素:6,912,000(1920x1200x3)像素投影镜头变焦:手动(大约1.6倍) 聚焦:手动镜头位移:手动,纵向:向上60%-向下10%/横向:向右32%-向左32%光源275瓦高压汞灯泡建议灯泡更换时间*13000小时(灯泡模式:高)/4000小时(灯泡模式:标准)过滤网清洁周期*1最长15000小时,建议与灯泡同一时间屏幕尺寸40到600英寸光通量(亮度)*24300流明色彩光通量(色彩度)*4300流明对比度。
山东省齐州监狱视频会议设备
一、项目概述
本项目为满足山东省齐州监狱日常管理中可视化指挥、视频调度、视频巡检及召开日常视频会议等需求建设。
二、技术要求
三、其他要求
1、交货周期10天;
2、中标人必须在规定期限内提供所有设备,采购人可能对设备进行随机抽检,对抽检不符合招标要求的设备,中标人重新提供相关产品并赔偿损失(包括涉及的产品检测等相关费用)。
3、中标人签订合同前提供全频会议音箱、数字功放、反馈抑制器、电源时序器、专业调音台、智能混音台、无线一拖四会议话筒(U段可调频)等主要设备加盖设备生产厂家原厂公章的检测报告、厂家针对本项目的授权书、质保承诺函,且检测报告中所列参数与投标文件中一致。
4、质保期:质保期一年,质保期自货物验收合格之日起计算。
5、本项目所有设备参数不接受负偏离,否则视为无效报价。
ASM-822 八路智能混音器产品介绍:力卡推出最新产品8路智能混音器,带来外观优雅,功能强大,性能稳定的全新会议讨论设备。
设备特点:1、8路信号输入,8路信号使用独立的工作电路,互不影响,即使有其中1路信号输入出现问题,也不会影响其它7路信号的工作。
2、声音闸门动作电平自动控制,以新开发的微处理器计算环境噪音来自动设定。
3、NOMA(Number of Open Microphone Attenuated)可自动计算已开启的通道数目,避免因混音器通道增加而导致输出电平过大。
4、自带48V幻象供电电路,可选择线路或话筒输出。
5、LED显示工作状态和音量大小。
6、具备两个S端子,可把最多16台ASM-822混音器串接起来使用。
7、带有RS-232端口,可连接摄像跟踪设备,实现视像会议。
8、可连接智能中控设备,实现外部中控。
技术指标:供电: 100V-240V AC输入端口(平衡):快速连接器 1:GND 2:+ 3:-输出端口(平衡):卡侬母座 1:GND 2:+ 3:-快速连接器 1:GND 2:+ 3:-总放大增益(1KHz、600Ω):话筒〉55dB线路〉40dB最大输入电平(1KHz,T.H.D=1%):-40dB输入阻抗(1KHz):话筒 7200Ω线路 11000Ω标准输入电平:-52dBu标准输出电平:+2dBm噪声检测量: -110dBV以下输出总谐波失真:〈0.2%频率响应:平直 30Hz-18KHz高通滤波(-12dB/oct) 180Hz幻象供电: 48V DC尺寸: 426*88*252(mm)重量:2.3kg①通道1至通道8功能编码开关:短按和旋转此旋钮可以选择该通道所需要的功能,包括信号输入音量调节、话筒/线路输入选择、高通滤波选择、闸门选择。
a.音频输入音量调节:编码开关配合15段LED位置显示,左右旋转开关可调节音量大小。
b.Line:话筒/线路输入选择。
红灯亮起时,表示选择了线路输入,输入端会作15dB衰减,而48V幻象供电会自动关闭;灯不亮时,表示选择话筒输入,48V幻象供电开启。
EMH-08全功能切换台用户手册_V1.1成都卓元科技有限公司声明未经本公司书面许可,任何个人和单位不得摘抄或者复制本手册内容的部分或者全部,并不得以任何形式进行传播。
由于产品版本升级或其它原因,本手册内容会不定期更新,恕不另行通知。
本手册仅作为使用指导,本手册中的内容不构成任何明示或暗示的担保。
本手册所包含的商标都属各自所有人所有。
关于本手册本手册适用于,并作为全功能切换台(EMH-08)用户配置该产品的标准指导手册。
更新日期:2019.6.4安全操作指南为确保导播主机正常使用及人员的安全,在安装,使用和维护时,请仔细阅读并遵守以下事项:∙系统必须在接地状态下工作。
否则,在工作中不仅对信号造成干扰、对导播主机本身也可能造成损坏,而且还容易漏电引起意外事故。
∙禁止对本产品的机械和电器设计更改或增添任何部件。
否则生产厂家对由此所带来的危害性结果不负责任。
∙请勿使用两芯插头,确保导播主机的输入电源为220V 50Hz的交流电。
∙请勿将导播主机置于过冷、过热或过于潮湿的地方。
∙导播主机在工作时会发热,因此请保持工作环境的良好通风性,以免温度过高而损坏机器。
∙本产品严禁带电插拔输入信号线缆、输出信号线缆。
∙在进行下列操作之前,必须将导播主机的电源线从交流供电电源拔下:∙取下或重装导播主机的任何部件;∙断开或重接导播主机的任何电器插头或其它连接。
∙未经许可,请勿擅自拆开导播主机机箱进行维修等操作,导播主机内有220V交流高压部件,以免发生意外事故或加重导播主机的损坏程度。
目录第1章、产品概述 (1)第2章、按键、接口说明 (2)2.1、操作按键 (2)2.2、后面板接口 (5)2.3、前面板接口 (6)2.4、显示界面 (6)第3章、快速连接 (7)3.1、输入信号连接 (7)3.2、输出信号连接 (7)3.3、网络连接 (7)第4章、常规使用 (8)4.1、功能使用 (8)4.2、音频使用 (9)4.3、导播切换 (9)4.4、转场特技 (10)4.5、字幕叠加 (11)第5章、使用配置 (12)5.1、进入web页面 (12)5.1、显示界面配置 (12)5.2、主机状态显示 (13)5.3、输入信号类型配置 (14)5.1、通道T ally设置 (16)5.2、输出声画同步配置 (16)5.3、输出延时配置 (16)5.4、推流设置 (17)5.5、台标设置 (18)5.6、录制设置 (19)5.7、字幕来源设置 (20)5.8、特技时间设置 (21)5.9、系统配置 (21)5.10、系统更新 (23)第6章、Tally信号定义 (24)第1章、产品概述全功能切换台(EMH-08)是我公司最新研发的产品,主要针对非广电行业的小型网络直播应用。
SCM800SCM800/SCM800E Microphone MixerSpecification SheetTL1030 (Rev. 3)©2009 Shure IncorporatedSCM800/SCM800E EIGHT-CHANNEL MICROPHONE MIXERSYSTEM OVERVIEWThe Shure Model SCM800 is a full-featured, eight-channel micro-phone mixer for sound reinforcement, general audio recording, and audio-visual systems. Any low-impedance, balanced dynamic or con-denser microphone, including a wireless microphone system, can be used with the SCM800 mixer.Each SCM800 accepts up to eight microphone- or line-level inputs and one aux-level input (two input jacks feed the same channel). Up to four SCM800 mixers can be linked to provide up to 32 input chan-nels. Each input channel has a two-band equalizer, switchable micro-phone- or line-level operation, switchable 48 V phantom power, and a 1/4-inch send/receive insert jack.The SCM800 operates on 120 Vac power; the SCM800E operates 230 Vac power. Both models are supplied with rack-mounting hard-ware, link cable and removable block terminal connectors. An acces-sory rack panel adapter (Model RKC800, available separately)converts the removable block input and output connectors to XLR connectors, and the Aux connectors to phono jacks.FEATURES•Compatible with Shure SCM810 and FP410 automatic mi-crophone mixers•Adjustable EQ per channel: low-frequency rolloff and high-frequency shelving•48 V phantom power selectable for each input•Active balanced microphone- and line-level inputs and line-level output•Highly RF-resistant chassis and circuitry •LED indication of channel clipping•Linking capability for systems up to 32 microphones •Two Aux-level input jacks that feed one channel •Insert jack on each channel •Manual mixing of input channels•Front-panel headphones output with level control•Peak-responding output limiter with selectable thresholdsand LED indicatorSHURE Incorporated United States, Canada, Latin America, Caribbean:5800 W. Touhy Avenue, Niles, IL 60714-4608, U.S.A.Phone: 847-600-2000 U.S. Fax: 847-600-1212 Intl Fax: 847-600-6446Europe, Middle East, Africa:Shure Europe GmbH, Phone: 49-7131-72140 Fax: 49-7131-721414Asia, Pacific:Shure Asia Limited, Phone: 852-2893-4290 Fax: 852-2893-4055SCM800/SCM800E MICROPHONE MIXER SPECIFICATION SHEETSPECIFICATIONSMeasurement Conditions (unless otherwise specified):Line voltage 120 Vac, 60 Hz (SCM800) or 230 Vac, 50 Hz (SCM800E); full gain; 1 kHz.Source impedances: Mic 150 Ω, Line 150 Ω.Terminations: Line 10 k Ω, Phones 300 Ω (tip-sleeve and ring-sleeve), Direct Out 10 k Ω.Equalization controls adjusted for flat response, Channel 1 gain control full clockwise, other gain controls full counterclockwise Frequency Response (Ref .1 kHz, channel controls centered)50 Hz to 20 kHz ±2 dB; -3 dB corner at 25 Hz Voltage Gain (typical, controls full clockwise)InputsOutputsTotal Harmonic Distortion<0.1% at +18 dBV output level, 50 Hz to 20 kHz (through 20 Hz-20 kHz filter; Input 1 and Master at 5, all other controls full counterclockwise)Hum and NoiseEquivalent Input Noise: –125 dBV (150 Ω source; through 400 Hz—20 kHz filter)Equivalent Input Hum and Noise: (150 Ω source; through 20Hz—20 kHz filter)–123 dBV Output Hum and Noise (through 20 Hz—20 kHz filter; channel controls full counterclockwise):Master full counterclockwise: -90 dBV Master full clockwise: -62 dBVCommon Mode Rejection>70 dB at 1 kHzPolarityMic/Line, Send inputs to all outputs are non-inverting; Aux input to all outputs is inverting Overload and Shorting ProtectionShorting outputs, even for prolonged periods, causes no dam-age. Microphone inputs are not damaged by signals up to 3 V; Line and Monitor inputs by signals up to 20 V EqualizationLow-frequency: 6 dB/octave cut, adjustable corner from 25 to 320 HzHigh-frequency: ±6 dB at 5 kHz, ±8 dB at 10 kHz, shelving LimiterType: PeakThreshold: Switchable: off, +4, +8, +16 (dBm at output)Attack Time: 2 msRecovery Time: 300 msIndicator: Lights red when limiting occurs Input LEDsLight at 6 dB below clippingPhantom Power46 Vdc open-circuit through 6.8 k Ω series resistance per DIN 45 596Operating VoltageSCM800: 120 Vac rated nominal (see Voltage Selection for 230 Vac operation), 50/60 Hz, 200 mASCM800E: 230 Vac rated nominal (see Voltage Selection for 120 Vac operation), 50/60 Hz, 100 mA Temperature RangeOperating: 0︒ to 60︒ C (32︒ to 140︒ F )Storage: -30︒ to 70︒ C (-22︒ to 158︒ F)Overall Dimensions44.5 mm H x 483 mm W x 317 mm D (13/4 x 19 x 121/2 in.)Net Weight4.3 kg (9 lb 9 oz)CertificationsSCM800: UL LISTED (U.S.) and cUL Certified (Canada)SCM800E: Conforms to European Union directives; eligible to bear CE marking.REPLACEMENT PARTSKnob, Channel Gain & Phones (white)........................95A8238Knob, Master (blue).....................................................95B8238Line (Power) Cord (SCM800).....................................95B8389*Line (Power) Cord (SCM800E)...................................95C8247*Link Cable....................................................................95B8889Three -Terminal Block Connector................................95B8580Output InputLine HeadphonesDirect Out Low-impedance mic(150 Ω)80 dB 88 dB 34 dB Line 40 dB 48 dB –6 dB Aux 44 dB 52 dB -Send/Return20 dB28 dB-ImpedanceInput Designed for use with Actual (typical)InputClipping LevelMic 19-600 Ω10 k Ω–15 dBV Line ≤2 k Ω10 k Ω+22 dBV Aux ≤2 k Ω10 k Ω+22 dBV Send/Return≤2 k Ω10 k Ω+18 dBVImpedanceOutput Designed for use with Actual (typical)Output Clipping Level Line >600 Ω60 Ω+18 dBV Headphones8-200 Ω,60 Ω recommended300 Ω+12 dBVDirect Out >2 k Ω 1 k Ω+18 dBV Send/Return>2 k Ω1 k Ω+18 dBVSCM800。
TS-8M 八路智能会议混音器① 声道增益调整钮 ② 输出电平指示灯 ③ 音频增益调整钮 ④ 主声音闸门调整钮 ⑤ 电源开关⑥ 声道选择指示灯 ⑦ 优先声道设定开关 ⑧ 后级电平调整钮 ⑨ 锁定指示灯① 电源插入插座② 控制电压输出端子 ③ RS485接口 ④ 平衡输出端子 ⑤ 麦克风输入端子 ⑥ 辅助输入/输出端口 ⑦ 串机输入/输出端子⑥⑤TS-8M概述TS-8M八路智能混音器具有极高的信噪比,音质清晰自然,其内置的大容量微电脑使会议的过程控制更加流畅,通过简单的连接和设置后,即可实现高质有序的会议控制,由于其有良好的扩展性,用户可根据麦克风需要采取多台主机串联的方式,并且每台的功能设置不变。
★平衡八通道麦克风或线路输入,每路声道优先权可分别设置在优先设定声道发言时(供会议主持者),其它声道输入电平信号将自动关闭,多个通道同时设定优先时则按顺序发言,即“一个接一个”。
另设一路辅助线路输入,可以会议间隙插放背景音乐。
间隔时间可通过电脑设定。
★一路麦克风平衡输出,可连入调音台、功放等系统设备,一路辅助线路输出,可连入录音设备,进行会议记录。
★为配合宽频段电容麦克风使用,提供48V幻像供电。
★具备Control Voltage输出端子,可控摄像机、指示灯等应用器材的开关。
★自动混音功能切换手动模式,可令其作一般混音器使用。
★TS-8M可通过RS485端口转由电脑来进行控制和设定,附有简洁方便的操作界面,可实现主持话筒优先后,列席话筒亦可设置为顺序发言模式,即由一般混音器的二级模式升级为三级模式。
四种应用模式:一、 主持发言模式〈1〉单台使用其中任一路话筒选定在“DOWN(下)”位置,其余话筒设置在“UP(上)”位置时,设置在“DOWN(下)”位置话筒将有优先权的主席功能,其讲话同时,其余声道被切断,其它声道发言时,主持位话筒可予以打断。
〈2〉多台串接使用其中任一路话筒选定在“DOWN(下)”位置,其余话筒设置在“UP(上)”位置时,设置在“DOWN(下)”位置话筒将有优先权的主席功能,其讲话同时,其余声道被切断,其它声道发言时,主持位话筒可予以打断。
一般在第一台混音器作此设置。
二、顺序发言模式所有声道拔至“DOWN(下)”位置,同一时间内,只能允许一路处于发言状态,智能混音器的锁闭线路“Lockout”功能启动,直到当前发言人出现停顿后,锁闭功能自动解除,其它某个发言通道则可进入发言状态。
即一个接一个的发言。
Priority Pre-select1 2 3 4 5 6 7 8(图1-1)Priority Pre-select(图2)Priority Pre-select1 2 3 4 5 6 7 8(图1-2)三、自由发言模式所有声道拔至“UP(上)”位,锁闭功能失效,所有声道可同时发言。
四、电脑控制模式(TS-8M)此种模式下,手动设置将失效,混音器模式设定功能由电脑完成,可设定主持话筒后,列席话筒可设置为顺序发言模式。
安装及调试步骤:1、按安装要求连接线路。
2、把“Master Threshold”顺时针旋转到底,预选开关“Priority Pre-select” 全部拔至下方,所有声道增益旋钮逆时针调至最小。
3、开启智能混音器电源开关,此时会看到各话筒通道的LED 灯顺序开启及关闭,自动进行检测。
4、任选一路,调整增益旋钮,使其刻度在九点钟位置,依正常讲话距离对话筒讲话,同时配合LED 指示,调试增益至合适的电平输出。
5、逆时针调校阀锁“Master Threshold”旋钮,逐渐减弱电平直至在正常讲话音量时,闭锁“Lockout”的LED 指示灯闪亮。
6、相继接上其他话筒,并如步骤4调整话筒电平增益至适当的电平输出,但不用再调整阀锁电平控制。
7、依据会议所需模式,拔动预选开关“Priority Pre-select”的左下方的隐蔽主电平控制“Master Level”为混音器的最后级电平调节,根据需要用螺丝批调节。
Priority Pre-select1 2 3 4 5 6 7 8(图3)8、关闭阀锁“Master Threshold”旋钮,阀锁功能关闭,此时智能混音器可作一般混音器使用。
9、多台联机时,Link连接以如下方式:以连接至调音台的这台混音器(A)为基准。
技术指标MicLineLinkAuxUnbalanced 输入阻抗4000 ohms 30000 ohms 20000 ohms 30000 ohms输出阻抗Balanced100 ohms 400 ohms 300 ohms 200 ohms最高输入电平 -24dBV +30dBV +17 dBV最大增益 >73dB 频率响应30Hz - 28kHz 当量输入噪音 -124dBV 话筒线路输入衰减 50dB幻像供电 +48VDC 控制电压输出 +4VDC 电源供应15V/500mA 计算机控制接口 RS485 附件内容连接线, 机架安装片, 变压器.System InstallationLink Out Link In ………Link In(A)TS-8M EIGHT-CHANNEL AUTOMATICMICROPHONE MIXER⑥①Input Gain Control②Output Level LED Meter③Volume Control④Master Threshold Control⑤Power Switch⑥Selected Channel LED Indicators⑦Priority Pre-selected Switches⑧Master Level Control⑨Lockout LED Indicator⑤①Power Input②Control Voltage Output③RS485 Port④Balanced Output⑤Mic Input⑥Aux In/Out⑦Link In/Link OutTS-8MIntroductionTakstar TS-8M is a microprocessor controlled, eight-channel mixer, which features extremely high S/N Ratio, and clear and nature sound quality. The orderly and high-class process control of conference could be easily achieved after the simple installation and setup. Furthermore, the large capacity built-in microprocessor the device adopts will ensure the process control proceed much more smoothly. Any number of mixers can be linked to create a system for large multi-mic installations due to its excellent extensibility.★ There are eight-channel Mic/Line balanced inputs with a pre-selected priority option for each channel in two versions: ‘the chairperson mode’ with one pre-selected channel prior to all others and ‘the one after another mode’ with a few priority channels working in a row.The Aux input is an RCA jack accepting auxiliary-level input used for broadcasting background music during the conference break set by computer.★ Mic/Line balanced output: connects with sound mixer and amplifier; Aux output: connects with recording equipment for conference tracking record.★ Powered by 48V Phantom Power Supply for adopting condenser microphone with wide frequency range★ Control Voltage Output: provides 0-+4VDC(active high) to trigger external devices such as camera switch and light indicator.★ Switchable manual mode overrides automatic functions turning the device to working like a conventional mixer.★ Possibility of being controlled and set up by computer through RS485 ports. Furthermore, the compact and convenient operating interface is available to help set a single mic to work on the prior channel as a chairperson, while setting the mode of speaking orderly for other mics left.Four Operating Mode :二、 “The Chairperson”mode〈1〉Single MixerOnly one Priority Pre-select Switch is on “DOWN” position while theothers are all “UP”. The mic on “DOWN” position which is selected as priority can come on at any time and override any other mic that is “UP”. 〈2〉Multiple MixersOne of any Priority Pre-select Switch is on “DOWN” position while theothers are all “UP”. The mic on “DOWN” position which is selected as priority here can come on at any time and override any other mic that is “DOWN”. Usually this setting is operated on the first mixer.二、Orderly Speaking ModeAll Priority Pre-select switches are on “DOWN” position. In this mode only one mic at a time could be “on”. As soon as the first speaker pauses, the lockout bus goes inactive and any other mic can come on. This mode is known as “First-come-first-served”.Priority Pre-select(Figure1-1)Priority Pre-select(Figure2)Priority Pre-select1 2 3 4 5 6 7 8(Figure1-2)三、Free-Talk ModeAll Priority Pre-select switches are on “UP” position. The lockout will go in active in this mode and all mic could speak at the same time.四、Microprocessor Controlled Mode (TS-8M )The manual setting will go inactive in this mode. All the operation modesare set by microprocessor: set a single mic to work on the prior channel as a chairperson, while setting the mode of speaking orderly for other mics left.Installation and Setup :1. Connect as per setup instruction.2. Turn the“Master Threshold” clockwise to the minimum position; set all the “Priority Pre-select Switches” to “DOWN” position; turn all gain controls fully counterclockwise to the minimum position.3. Turn power switch “ON”. The mixer will perform a self-test and turn each microphone “ON” or “OFF” consecutively.4. Connect a microphone to a random Input and turn its Gain Control to the “nice o’clock” position. Adjust the Gain Control for proper output level according to the meter indication when speaks into microphone.5. Turn the “Master Threshold” counterclockwise to reduce the output level till it is on the position of speaking in a normal volume, then the “Lockout” LED will be lighting sustained.6. Plug in up to the rest microphones and adjust each respective Gain Control for proper output level as per the above mentioned Item 4. It should not be necessary to readjust the threshold level.Priority Pre-select1 2 3 4 5 6 7 8(Figure3)7. According to the requirement of the selected mode, the Master Levelrecessed control under the left side of “Priority Pre-selected Switches” maybe adjusted with a small screwdriver. This control is at the last stage in themixer.8. Turn off the“Master Threshold” switch which makes the “Lockout” goinactive, then the unit will behave like conventional mixer.9. The multiple mixers should be connected as indicated below: take Mixer Awhich is connected with the sound mixer for example.SpecificationMicLineLinkAuxUnbalanced Input Impedance 4000 ohms 30000 ohms 20000 ohms30000 ohmsOutput Impedance Balanced100 ohms 400 ohms 300 ohms 200 ohmsMaximum InputLevel-24dBV +30dBV +17 dBVMaximum Gain >73dB Frequency Response 30Hz - 28kHz Equivalent InputNoise-124dBV Mic/Line Input Pads 50dBPhantom Power +48VDC Control Voltage Out. +4VDCPower Supply 15V/500mA Computer Control Port RS485AccessoriesIncludedLink Cable, Rack Mount, Power Adaptor.System InstallationLink Out Link In ………Link In(A)。