斯丹德DF-660闪光灯使用手册
- 格式:pdf
- 大小:1.13 MB
- 文档页数:12

光•风暴LS 600c Pro使用者指南前言感谢您购买 Aputure® “Light Storm”系列全彩点光源影视灯 - LS 600c Pro。
LS 600c Pro 是采用可调节色温 (2300K ~ 10000K)的大功率全彩点光源,支持CCT 、HSI、XY、RGB、GEL、SOURCE多种调光模式,并搭载专业级Sidus Link、DMX512/ RDM 、Lumenradio、 以太网多种控制模式,LS 600c Pro将为你带来更全面、更专业的灯光解决方案,融合智能供电,电影级控制,让您的创造力无限延伸。
重要的安全说明使用此摄影灯时,应始终遵循基本的安全预防措施,包括:1. 使用前阅读并理解所有说明。
2. 当儿童靠近设备或使用设备时,必须进行密切监督。
在使用设备时,请勿将设备置于无人看管状态。
3. 必须小心接触高温部件防止被烫伤。
4. 请勿操作电源线损坏的设备以及掉落或损坏的设备,直到合格的维修人员检查过。
5. 请归置好电源线,防止被电源线绊倒或拉扯电源线导致设备断电,且电源线不可接触灼热表面。
6. 如果需要延长线,应使用额定电流至少等于设备额定电流的延长线。
额定电流小于设备的电线可能过热。
7. 在清洁和维修之前以及不使用时,务必从电源插座上拔下电器插头。
切勿拉扯电线从插座拔出插头,应抓住插头并拉动来拔出。
8. 在存放前让设备完全冷却。
存放时,请将电源线从设备上拔出,待冷却后归置在手提包对应位置。
9. 为降低电击风险,请勿将本产品浸入水中或其他液体中。
10.为降低电击风险,请勿拆卸本产品,在需要维修时将其交给合格的维修人员。
不正确的重装可能会在随后使用设备时引起电击。
11.使用非制造商推荐的配件可能会引起火灾、电击或人身伤害。
12.请将本产品连接到接地插座。
13.使用前请将保护罩取下。
14.使用标准罩前将EVA内托取下。
15.本产品工作时,请勿遮挡散热孔,勿直视灯珠;任何情况下勿触摸灯珠。
单反配件闪光灯DF800易懂说明前话:很想吐槽一下很多摄友只看到别人用闪光拍出来的照片有多好多牛X,然后自己入手一台,发现很难用,怎么难用?不会用所以难用!关键不会看说明书,说明书垃圾?其实说明书只是太正规化了而已呵呵,本人也是看说明书,然后自己一项项试验,才会的,鉴于你们这群懒得去一一验证试验的摄友,我写这篇说解让你们看完就基本知道闪灯怎么设置,设置有啥效果会出现什么问题。
当然也会写的通俗易懂一点。
然后摄友们可以慢慢练习,剩下就是涨经验和熟练升级自己的问题了!1)这个灯没有先后步骤,我就按我自己用的800开机后的状态一一说过去。
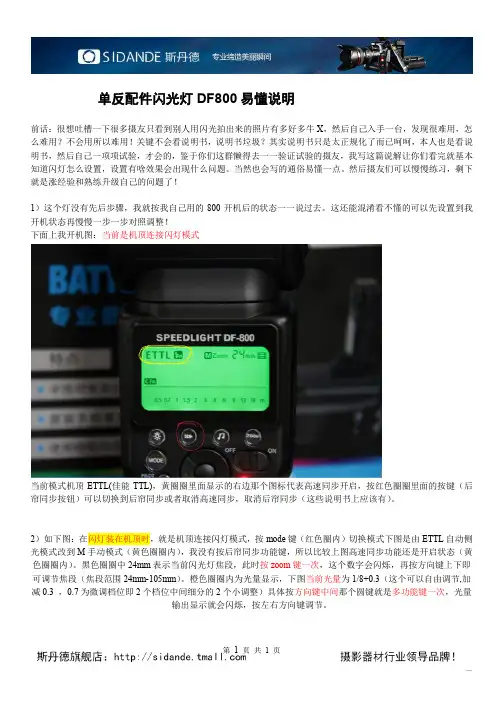
这还能混淆看不懂的可以先设置到我开机状态再慢慢一步一步对照调整!下面上我开机图:当前是机顶连接闪灯模式当前模式机顶ETTL(佳能TTL),黄圈圈里面显示的右边那个图标代表高速同步开启,按红色圈圈里面的按键(后帘同步按钮)可以切换到后帘同步或者取消高速同步,取消后帘同步(这些说明书上应该有)。
2)如下图:在闪灯装在机顶时,就是机顶连接闪灯模式,按mode键(红色圈内)切换模式下图是由ETTL自动侧光模式改到M手动模式(黄色圈圈内),我没有按后帘同步功能键,所以比较上图高速同步功能还是开启状态(黄色圈圈内)。
黑色圈圈中24mm表示当前闪光灯焦段,此时按zoom键一次,这个数字会闪烁,再按方向键上下即可调节焦段(焦段范围24mm-105mm)。
橙色圈圈内为光量显示,下图当前光量为1/8+0.3(这个可以自由调节,加减0.3 ,0.7为微调档位即2个档位中间细分的2个小调整)具体按方向键中间那个圆键就是多功能键一次,光量输出显示就会闪烁,按左右方向键调节。
3)如下图按下第一次后帘同步键(红圈内)即可由高速同步切换到后帘同步(黄圈圈内显示即为后帘同步功能开启)再次按下后帘同步键即可关闭后帘同步功能(即高速同步关闭,后帘同步也关闭),第三次按下后帘同步键又回到高速同步功能,如此循环。

userguide • benutzer handbuch • guide d’utilisateur • guía del usario • manuale d’uso • bruksanvisninge n g l i s hd e u t s c hf r a n c a i sINHALTSVERZEICHNISTABLE DES MATIERESe s p a ño li t a l i a n on o r s kINDICEINNHOLDSFORTEGNELSEe n g l i s hd e u t s c hf r a n c a i sEINLEITUNGINTRODUCTIONe s p a ño li t a l i a n on o r s kINTRODUZIONEINTRODUKSJONe n g l i s hd e u t s c hf r a n c a i sSICHERHEIT UND WARNHINWEISESÉCURITÉ & MISES EN GARDe s p a ño li t a l i a n on o r s kSIKKERHET OG ADVARSLERSICUREZZA E AVVERTENZEe n g l i s hd e u t s c hf r a n c a i sSICHERHEIT UND WARNHINWEISESÉCURITÉ & MISES EN GARDe s p a ño li t a l i a n on o r s kSIKKERHET OG ADVARSLERSICUREZZA E AVVERTENZEe n g l i s hd e u t s c hf r a n c a i se s p a ño lSICHERHEIT UND WARNHINWEISESÉCURITÉ & MISES EN GARDSEGURIDAD Y ADVERTENCIASi t a l i a n on o r s kSIKKERHET OG ADVARSLERe n g l i s hd e u t s c hf r a n c a i se s p a ño lSICHERHEIT UND WARNHINWEISESÉCURITÉ & MISES EN GARDSEGURIDAD Y ADVERTENCIASi t a l i a n on o r s kSIKKERHET OG ADVARSLERe n g l i s hd e u t s c hf r a n c a i se s p a ño lLIEFERUMFANGMATERIEL FOURNISMATERIAL ENTREGADOi t a l i a n on o r s kLEVERT UTSTYRDVI VGA A-VUSBAudioe n g l i s hd e u t s c hf r a n c a i se s p a ño lÜBERSICHTVUE D’ENSEMBLEDESCRIPCIÓN GENERALi t a l i a n on o r s kOVERSIKTA BC E BG C FIKJ BC C CH D De n g l i s hd e u t s c hf r a n c a i sTASTENFELDCLAVIERe s p a ño li t a l i a n on o r s kTASTIERINOTASTATURe n g l i s hd e u t s c hf r a n c a i se s p a ño lLEUCHTANZEIGENINDICATEURSINDICADORESi t a l i a n on o r s kINDIKATORERPOWER STATUS POWERSTATUSe n g l i s hd e u t s c hf r a n c a i se s p a ño lFERNBEDIENUNGTELECOMMANDEMANDO A DISTANCIAi t a l i a n on o r s kFJERNKONTROLLe n g l i s hd e u t s c hf r a n c a i se s p a ño lFERNBEDIENUNGTELECOMMANDEMANDO A DISTANCIAi t a l i a n on o r s kFJERNKONTROLLe n g l i s hd e u t s c hf r a n c a i se s p a ño lANSCHLUSSBEREICHPANNEAU DE RACCORDEMENTPANEL DE CONEXIONESi t a l i a n on o r s kI KONTAKTPANELJD F B G A EK C He n g l i s hd e u t s c hf r a n c a i se s p a ño lINSTALACIÓNINSTALLATIONEINRICHTUNGi t a l i a n on o r s kOPPSETTe n g l i s hd e u t s c hf r a n c a i se s p a ño lBILDEINSTELLUNGENREGLAGES DE L’IMAGEAJUSTES DE IMAGENi t a l i a n on o r s kBILDEINNSTILLINGERAB EDCe n g l i s hd e u t s c hf r a n c a i se s p a ño lDECKENMONTAGEMONTAGE AU PLAFONDMONTAJE EN EL TECHOi t a l i a n on o r s kTAKMONTASJEe n g l i s hd e u t s c hf r a n c a i sEINSATZ DES PROJEKTORSUTILISATION DU PROJECTEURe s p a ño li t a l i a n on o r s kUTILIZZO DEL PROIETTOREBRUK AV PROJEKTORENe n g l i s hd e u t s c hf r a n c a i se s p a ño lEINSATZ DES PROJEKTORSUTILISATION DU PROJECTEURUTILIZACIÓN DEL PROYECTORi t a l i a n on o r s kBRUK AV PROJEKTORENe n g l i s hd e u t s c hf r a n c a i sEINSATZ DES PROJEKTORSUTILISATION DU PROJECTEURe s p a ño li t a l i a n on o r s kUTILIZZO DEL PROIETTOREBRUK AV PROJEKTORENe n g l i s hd e u t s c hf r a n c a i se s p a ño lMENÜSYSTEMSYSTEME MENUSISTEMA DE MENÚSi t a l i a n on o r s kMENYSYSTEMe n g l i s hd e u t s c hf r a n c a i se s p a ño lMENÜSYSTEMSYSTEME MENUSISTEMA DE MENÚSi t a l i a n on o r s kMENYSYSTEMe n g l i s hd e u t s c hf r a n c a i se s p a ño lMENÜSYSTEMSYSTEME MENUSISTEMA DE MENÚSi t a l i a n on o r s kMENYSYSTEMe n g l i s hd e u t s c hf r a n c a i se s p a ño lMENÜSYSTEMSYSTEME MENUSISTEMA DE MENÚSi t a l i a n on o r s kMENYSYSTEMe n g l i s hd e u t s c hf r a n c a i se s p a ño lMENÜSYSTEMSYSTEME MENUSISTEMA DE MENÚSi t a l i a n on o r s kMENYSYSTEMe n g l i s hd e u t s c hf r a n c a i se s p a ño lMENÜSYSTEMSYSTEME MENUSISTEMA DE MENÚS。
82.A0D00000-00 VA说明手册Instruction ManualD200/200/D300/300/D400/400/D500/500/D600/600/D800/800/D1000/1000D /数码先锋系列专业影室闪光灯Professional Studio Flash中英文双语Chinese English Bilingual DTo prevent damage to your product or injury to you or to others, read the following safety precautions in their entirety before using this equipment. Keep these safety instructions where all those who use this equipment will read them.Body1.Light Sensor2.Charging Indicator Lamp3.Power Fuse4.Test Button5.Sync Cord Jack6.Buzz Switch7.Modeling Lamp Auto Selecting Switch Upwards: Auto On; Downwards: Auto Off 8.AC Power Socket 9.Modeling Lamp Switch 10.Power Switch 11.Power Indicator Lamp 12.Flash Output Controller 13.Mounting BracketThe flash can be used at full power for 5 minutes continuous, and then it should be cooled down for 2 to 3 minutes. Overheating will occur if it is used continuously without cooling down.Do not disassemble or modifyIt has got high voltage storage capacitor inside. Failure to observe this precaution could result in electric shock or product malfunction. Should theproduct break open as the result of a fall or other accident, remove the batteriesand take the product to authorized maintenance center for inspection.03Keep dryDo not handle with wet hands. Also, the product should not be immersed in or exposed to water or rain. Failure to observe this precaution could result in fire or electric shock.Keep out of the reach of childrenThis device contains small parts that may pose a choking hazard. Consult a physician immediately if a child swallows any part of this device.Do not expose to high temperatureDo not leave the device in a closed vehicle under the sun or in other areas subject to extremely high temperature. Failure to observe this precautioncould result in fire or damage to the casing or internal parts.Do not exceed 150 Watts for modeling lamp. The excess heat can damage the unit.Do not keep long time in using the modeling light, otherwise the modeling lamp will be deformed, and the flammable accessories such as soft box willget burnt.Do not touch the lamp bulb or tube with your bare hands. Oil residue fromyour fingers can cause the surface of the lamp to heat unevenly and explode.Do not flash directly towards naked eyes (especially those of babies), otherwise it may lead to visual impairment.When not in use, disconnect from the power supply.Avoid sudden impacts as this can damage the flash tube and/or modeling lamp.0414352678910111213When using a snoot, do not keep long time the modeling lamp on, or over frequent flashlight (not over six times for one minute). Overheating will resultin damages for strobe casing and studio light.Do not touch the lampcap when the flash or lamp is working, as it will give out heat, leading to high surface temperature.1.Sync Cord(optional accessory) 2.Power Cord 3.Fuse Tube4.Modeling Lamp5.Reflecting Lamp Shademp Cover7.Instruction ManualAccessoriesFlash Preparation1.Take down the lamp cover. Install the reflecting lamp shade and modeling lamp.2. Mount the flash unit on an appropriate light stand and adjust the mounting bracket (13). Make sure it's tightened and fixed.Flash Output ControlFlash output controller (12) controls the power radio to satisfy requirements of light under different environment. (Note: When adjusting the power from full power to a lower setting, press the test button to release the power in the capacitor, so when recharged, the flash output will be in the corresponding setting.)0506563241 Power ConnectionUse the power cord to connect the flash to an AC power source and turn on the power switch (10), power indicator lamp (11) lit. The charging indicator lamp (2) is off when it is charging, no flash at this moment. The unit is ready to fire until the charging indicator lamp (2) is on, meaning it is fully charged. Set the power switch to OFF position when it is not in use.Modeling Lamp1. Modeling lamp switch (9) decides whether the modeling lamp is on or off:Downwards (OFF position), it's off; upwards (MODE position), it's on.2. Modeling lamp auto selecting switch (7) decides whether it's auto or not: Downwards (DIM position), auto on; upwards (AUTO position), auto off. The modeling lamp will turn off automatically when flash works.Do not keep long time in using the modeling lamp. It's better to be cooled down for 2 minutes after 5 minutes continuous use.Test ButtonTo fire the flash without taking a picture, push the test button (4). It can also adjust the brightness when combined with the flash output controller (12).Sync TriggeringA sync cord (5) isprovided with your flash unit, and the input is a Φ6.35m m mini plug. synchronously.Slave Trigger ModelThe flash will be fired synchronously with one external flash. This model can act as an auxiliary lamp, offering various effects of light and shadow. * The slave trigger model is shut down when the sync cord is in use.Buzz FunctionThe device is equipped with buzz function. It is turned on when the buzz switch (6) is set downwards, and then a “BI” sound will be heard when it is fully charged.Shut down the device immediately when it works abnormally and find out thereason.Maintenance0708Avoid sudden impacts and the lamp should be dedusted usually.It's normal for lamp being warm when in use. Avoid continuous flashes when it is not necessary.Maintenance of all the flashes is up to our authorized maintenance department which can provide original accessories.One year warranty period will be canceled when any unauthorized maintenance is found.Disconnect the power when doing maintenance work or cleaning.It has one year free warranty (flash tube excluded).If the product had failures or is wetted, it can be continuously used only after it is repaired by professionals.感谢您使用D/数码先锋系列专业影室闪光灯,闪光灯在款式设计、使用强度、操作性能以及价格上均达到您的要求。

目录前言 (1)1、仪器各部件名称及其功能 (3)1.1 各部件名称 (3)1.2 显示屏 (5)1.3 操作键 (5)1.4 功能键(软键) (6)1.5星键(★键)模式 (8)1.6 自动关机 (11)2、初始设置 (12)2.1 仪器常数设置 (12)2.2 日期和时间的调整 (12)2.3 液晶对比度的调整 (14)2.4 棱镜常数的设置 (14)2.5 大气改正的设置 (15)2.5.1 大气改正的计算 (15)2.5.2 直接设置大气改正值的方法 (16)2.6 大气折光和地球曲率改正 (17)3、测量前的准备 (19)3.1 仪器开箱和存放 (19)3.2 安置仪器 (19)3.3 打开电源开关 (21)3.4 电池电量图标 (21)3.5 反射棱镜 (22)3.6 基座的装卸 (23)3.7 望远镜目镜调整和目标照准 (24)3.8 主菜单 (24)3.9 垂直角和水平角的倾斜改正 (26)3.10仪器系统误差的补偿 (27)3.11输入数字和字母的方法 (27)4、测量模式 (29)4.1 角度测量 (29)4.1.1 水平角(右角)和垂直角测量 (29)4.1.2 水平角测量模式(右角/左角)的转换 (30)4.1.3 水平度盘读数的设置 (31)4.1.4 垂直百分度模式 (32)4.2 距离测量 (32)4.2.1 大气改正的设置 (32)4.2.2 棱镜常数的设置 (33)4.2.3 距离测量(连续测量) (33)4.2.4 距离测量(单次/N次测量) (34)4.2.5 精测/跟踪模式 (35)4.2.6 放样 (36)4.3 坐标测量 (37)4.3.1 设置测站点坐标 (37)4.3.2 设置仪器高/棱镜高 (39)4.3.3 坐标测量的操作 (39)4.4 数据输出 (41)4.5 通过软键输出数据(记录) (42)5、程序模式(应用测量程序部分) (44)5.1 设置水平方向定向角 (44)5.2 导线测量(保存坐标) (46)5.3 悬高测量 (48)5.4 对边测量 (51)5.5 角度复测 (54)5.6 放样 (56)5.6.1 选项 (57)5.6.2 坐标数据 (68)5.6.3 查询数据 (69)5.6.4 确定新点 (71)5.6.5 格网因子 (77)5.6.6 设置方向角和放样坐标点 (79)5.6.7 定向功能 (84)5.7 线高测量 (85)5.8 偏心测量模式 (88)5.8.1 角度偏心测量模式 (88)5.8.2 距离偏心测量模式 (90)5.8.3 平面偏心测量模式 (93)5.8.4 圆柱偏心测量模式 (95)6、存储管理模式 (98)6.1 查阅内存状态 (98)6.2 文件的保护 (99)6.3 文件的更名 (100)6.4 文件的删除 (101)6.5 内存的格式化 (101)7、数据通信模式 (102)7.1 通信参数的设置 (102)7.2 数据文件的输入 (103)7.3 数据文件的输出 (104)8、参数设置模式 (105)8.1 参数设置项目 (105)8.1.1 测量与显示参数 (105)8.1.2 数据通讯参数 (106)8.2 参数设置的方法 (107)8.2.1 测量与显示参数 (107)8.2.2 数据通信参数 (108)8.2.3 密码的设置 (108)标准测量程序部分9、标准测量程序的特点 (111)10、概述 (114)10.1专用键 (114)10.2 菜单选择 (114)10.3 键盘输入 (114)10.4 系统选项屏幕 (115)10.5 水平角输入 (115)11、启动标准测量软件 (116)12、设置菜单 (117)12.1 作业 (117)12.2 系统选择 (120)12.3 作业选择 (121)12.4 格网因子 (121)12.5 温度、气压输入 (122)13、记录菜单 (123)13.1 设置测站点 (123)13.1.1 后方交会 (124)13.1.2 测量测站点高程 (128)13.2 设置后视点 (129)13.3 后视测量 (131)13.4 前视测量 (131)13.5 侧视测量 (133)13.5.1 偏心([F3]键) (133)13.5.2 平面([F4]键) (137)13.5.3 点线(用于点到直线的测量)([F5]键) (139)13.6 横断面测量 (141)14、编辑菜单 (143)14.1 原始数据 (143)14.2 坐标点数据 (144)14.3 固定点读数 (145)14.4 编码数据 (145)14.5 填/挖数据 (148)15、传输菜单 (149)15.1 发送数据(将文件传输到计算机) (149)15.1.1 发送原始数据 (150)15.1.2 发送坐标 (151)15.1.3 发送填挖数据 (151)15.1.4 发送横断面数据 (151)15.2 接收数据(从计算机装入文件) (151)15.2.1 装入放样坐标(坐标数据) (152)15.2.2 装入固定点文件 (153)15.2.3 装入编码库文件 (153)15.2.4 装入水平定线数据 (153)15.2.5 装入垂直定线数据 (153)15.2.6 装入横断面设计数据文件 (154)15.3 通讯参数 (154)16、程序菜单 (155)16.1 放样菜单 (155)16.1.1/2 设置测站点和后视点 (156)16.1.3 点放样 (157)16.1.4 串放样 (160)16.1.5 定线放样 (161)16.1.6 横断面放样 (165)16.1.6-1 斜坡放样 (166)16.2 道路设计 (168)16.2.1 定义水平定线(最多100个数据) (168)16.2.2 编辑水平定线 (172)16.2.3 定义垂直定线(最多100个数据) (173)16.2.4 编辑垂直定线........................................................ .. (174)16.3 导线平差 (175)16.4 坐标解析计算 (179)16.4.1 前方交会计算 (179)16.4.2 4点前方交会 (180)16.4.3 坐标反算 (182)16.4.4 面积计算 (183)16.4.4-1 用具体的点号计算面积 (183)16.4.4-2 用编码计算面积 (185)16.4.5 极坐标计算 (186)16.4.6 对边测量计算 (187)16.5 龙门板标定 (188)16.5.1 方法一:测量龙门板两端 (191)16.5.2 方法二:测量龙门板一端 (193)16.6 钢尺联测 (195)17、检验与校正 (199)17.1 管水准器 (199)17.2 圆水准器 (199)17.3 望远镜分划板 (200)17.4 视准轴与横轴的垂直度(2C) (200)17.5 竖盘指标零点自动补偿 (201)17.6 竖盘指标差( i 角)和竖盘指标零点设置 (201)17.7 光学对中器 (203)17.8 仪器常数(K) (203)17.9 视准轴与发射电光轴的平行度 (205)17.10 基座脚螺旋 (205)17.11 反射镜有关组合件 (205)18、技术指标 (207)19、附件 (209)【附录A】 (210)1、原始数据格式 (210)2、坐标数据格式 (210)3、横断面数据格式 (211)4、点编码格式 (211)5、水平定线 (212)6、垂直定线 (213)【附录B】计算道路定线元素 (213)1、道路定线元素 (213)2、计算道路定线元素 (215)【附录C】 (220)1、NTS系列全站仪的数据输出格式 (220)2、控制指令及其格式 (221)3、南方全站仪与计算机的实时通讯过程 (222)3.1 单次测量模式和重复测量模式下启动并接收测量数据的过程 (222)3.2 改变测量模式的通讯过程 (223)。

【摄影器材】单反相机《外接热靴闪光灯》功能按键讲解,设置思路,模式选择1、安装⽅法1、安装电池,见下图闪存2、按照下图的箭头位置将闪光灯推⼊相机热靴,然后转动热脚锁环拧紧。
闪存2、功能按键图解闪存1、MODE:模式切换按钮,按⼀次,闪光灯就会在ETTI、M和MULTI间循环切换。
若是在⽆线从属单元下,每按⼀次则会在ETTL、S1和S2之间循环切换。
TTL⾃动变焦:24,28,35.50,70,80,105mm闪存2、声⾳提⽰按钮按⼀下,可开启或关闭声⾳提⽰。
按响两下次,表⽰声⾳开,按响四次,表⽰声⾳关。
3、液晶显⽰屏照明/⾃定义功能设置按钮:按⼀次,可以开启或关闭背光灯,长按3秒钟可以进⼊⾃定义功能菜单。
再次按下MODE按钮就会退出⾃定义设置。
闪存4、ZOOM:短按此按钮,闪光灯就会进⼊电动变焦状态,通过⽅向按钮设置闪光灯覆盖范围,长按此按钮,闪光灯就会进⼊⽆线闪光从属单元状态,这个时候每按⼀次就会在ZOOM、CH、SLAVE之间循环切换,通过上下左右按钮可以设置灯头变焦范围,中间确认键确认设置。
5、快门帘幕同步/Canon/nikon⽆线TTL切换:按⼀次闪光灯就会在后帘同步和前帘同步之间切换,若是在⽆线ETTL下,按⼀次就会在Canon-ETTL)和Nikon-TTL n⽆线间循环切换。
通过相机上的测光系统⾃动控制闪光输出强度以得到最适合的闪光曝光6、将相机拍摄模式设为(全⾃动)、(P)、(TV)、(AV)、(M)等曝光模式中的任意⼀项,你就可以使⽤ETTL进⾏全⾃动闪光控制了。
7、MULTI模式(频闪及多次闪光)使⽤频闪闪光,可以发出⼀系列快速的闪光。
它可以在⼀张照⽚上拍摄移动物体的多个图像。
闪光灯将按照你设置的输出功率,闪光次数及频率闪光。
通过<左><右>或<上><下>及<确定>按钮可以设置输出功率、闪光次数与闪光频率。
闪存不纠结于单反还是⽆反采⽤相同规格CMOS的单反、⽆反(微单),在画质上并没有显著差别。
User’s ManualVIV-DF-3000Vivitar One year WarrantyThis warranty covers the original consumer purchaser only and is not transferable.This warranty covers products that fail to function properly UNDER NORMAL USAGE, due to defects in material or workmanship. Your product will be repaired or replaced at no charge for parts or labor for a period of one year.What Is Not Covered by WarrantyDamages or malfunctions not resulting from defects in material or workmanship and damages or malfunctions from other than normal use, including but limited to, repair by unauthorized parties, tampering, modification or accident.To obtain Warranty Service and Troubleshooting information:Call 1-800-592-9541 in the U.S. or 0-800-917-4831 in the UK or Visit our website at .To receive Warranty service along with the name and address of an authorized product service center, the original consumer purchaser must contact us for problem determination and service procedures. Proof of purchase in the form of a bill of sale or receipted invoice, evidencing that the Product is within the applicable Warranty period(s), MUST be presented in order to obtain the requested service. It is your responsibility to properly package and send any defective products along with a dated copy of proof of purchase, a written explanation of the problem, and a valid return address to the authorized service center at your expense. Do not include any other items or accessories with the defective product. Any products received by the authorized service center that are not covered by warranty will be returned unrepaired.-1-Vivitar One year Warranty (continued)NO WARRANTIES, WHETHER EXPRESS OR IMPLIED, INCLUDING, BUT NOT LIMITED TO, ANY IMPLIED WARRANTIES OF MERCHANTABILITY OR FITNESS FOR A PARTICULAR PURPOSE, OTHER THAN THOSE EXPRESSLY DESCRIBED ABOVE SHALL APPLY. DISTRIBUTOR FURTHER DISCLAIMS ALL WARRANTIES AFTER THE EXPRESS WARRANTY PERIOD STATED ABOVE. NO OTHER EXPRESS WARRANTY OR GUARANTY GIVEN BY ANY PERSON, FIRM OR ENTITY WITH RESPECT TO THE PRODUCT SHALL BE BINDING ON DISTRIBUTOR. REPAIR, REPLACEMENT, OR REFUND OF THE ORIGINAL PURCHASE PRICE - AT DISTRIBUTOR’S SOLE DISCRETION -ARE THE EXCLUSIVE REMEDIES OF THE CONSUMER. IN NO EVENT WILL DISTRIBUTOR, ITS MANUFACTURERS, OR SAKAR INT. BE LIABLE FOR ANY INCIDENTAL, DIRECT, INDIRECT, SPECIAL, PUNITIVE OR CONSEQUENTIAL DAMAGES (SUCH AS, BUT NOT LIMITED TO, DAMAGES FOR LOSS OF PROFITS, BUSINESS, SAVINGS, DATA OR RECORDS) CAUSED BY THE USE, MISUSE OR INABILITY TO USE THE PRODUCT. EXCEPT AS STATED HEREIN, NO OTHER WARRANTIES SHALL APPLY. NOTWITHSTANDING THE FOREGOING, CONSUMER’S RECOVERY AGAINST DISTRIBUTOR SHALL NOT EXCEED THE PURCHASE PRICE OF THE PRODUCT SOLD BY DISTRIBUTOR. THIS WARRANTY SHALL NOT EXTEND TO ANYONE OTHER THAN THE ORIGINAL CONSUMER WHO PURCHASED THE PRODUCT AND IS NOT TRANSFERABLE.Some countries, states or provinces do not allow the exclusion or limitation of incidental or consequen-tial damages or allow limitations on warranties, so limitation or exclusions may not apply to you. This warranty gives you specific legal rights, and you may have other rights that vary from state to state or province to province. Contact your authorized retailer to determine if another warranty applies. This product is manufactured, distributed and sold by SAKAR International, Inc. All other trademarks are the property of the respective owner, who has not sponsored, endorsed or approved this product.-2--3- IntroductionCompatibilityCongratulations on your purchase of the Vivitar VIV-DF-3000 flash unit. This electronic flash is innovatively designed for digital cameras, with advanced technology used to control the correct amount of light output. Please kindly take a few minutes to read this instruction manual before using.The VIV-DF-3000 flash comes in different varieties, each compatible with differentcameras. Check to make sure the flash that you have is compatible with your camera.VIV-DF-3000-CAN - Compatible with Canon Digital E-TTL camerasVIV-DF-3000-NIK - Compatible with Nikon Digital I-TTL camerasImportant Notes for Flash Photography and Maintenance1. After taking a picture, wait for at least 4-5 seconds for the flash to be fully chargedbefore taking the next shot even though the ready light is on. This will help prolong the lifespan of the flash tube and also to attain the full charging capacity of the flash capacitorfor precise flash photography.2. For precise flash output, it is best to wait until an intermittent humming sound is heard before pushing the shutter button.3. Maintain at least 2m between your flash and the subject you are photographing.4. Always set the flash zoom head position so that it corresponds to the zoom position of your camera’s lens.5. In the event that the flash exposure is incorrect (over or under exposed or if the green auto check light does not light up), you may take either one or more of the corrective actions: (1) move closer to the object (2) re-adjust your bounce angle (3) adjust flash zoom head (4) increase ISO* setting.*Note: In digital photography, the ISO number notes how sensitive the image sensor is to the amount of light present. The higher the ISO number, the more sensitive the image sensor is to light and therefore the possibility to take pictures in low light situations increases.-4-Important Notes for Flash Photography and Maintenance (cont.) 6. Bounce should only be used on lighter color ceilings or white walls with the zoom head set at the 35mm position. Note that when using this feature, 2-3 f/stops of light will be lost due to reflection.7. Always use a fresh set of 4 batteries of the same brand and type when old batteries are depleted and need to be replaced. Mixing and matching batteries of different types and brands will greatly deteriorate the flash’s performance.8. When the flash is not being used for extended periods of time (>2 weeks), remove the batteries to prevent battery leakage. After the batteries are removed, do not expose the flash unit and batteries to excessive heat such as fire or excessive sun light.9. Charge up and test fire the flash unit at least once per month to maintain the optimal performance of the flash tube and charging capacitor.-5--6-Installing BatteriesIn order to power on your flash, you will first need to install batteries. To do so, first ensure that the ON/OFF switch is in the OFF position. Next, open the battery compartment, and insert 4 new AA batteries with the correct polarity (+,-) as indicated inside the batterycompartment.Battery Compartment DoorSlide open the batterycompartment door toaccess the batterycompartment.over your flash in order to soften the light emitted.Mounting the Flash Onto Your CameraOnce batteries are inserted into your flash, you can proceed to mount it onto your camera. To do so, first ensure that the ON/OFF swtch is in the OFF position. Next, slide the flash’s hotshoe base onto the camera’s hot shoe then rotate the lock ring until it is fastened securely. Slide the ON/OFF Switch to the ON position. When the Ready Light illuminates, the flash is ready to fire. Pressing the Test Button will test fire the unit.hot shoe base-7-Auto Check LightThe Green Auto Check Light (OK) located on the back of the flash is used to confirm that your subject is within the effective TTL range of the flash unit. If your subject is within the effective TTL flash range after shooting, the green Auto Check Light will illuminate for approximately 2 seconds.Power Saving FunctionIn order to save battery life, your flash will automatically turn off if left idle for more than one minute.-8-PROGRAM TTL (P) / AUTO MODEThis flash unit provides automatic Through-The-Lens (TTL) control of the flash exposure when used with dedicated digital cameras. When using this mode, the flash unit will automatically emit the flash output for a balanced illumination of the subject and background. The inbuilt AF infra-red assistance beam will turn on automatically to assist the camera to focus in low lighting conditions.-9-TTL AV, TV AND M MODESWhen this flash unit is used with your camera set to AV, TV or M modes, the flash exposure will be automatically controlled by the camera based on the combination of shutter speed and aperture value.*For TV mode, do not exceed the camera’s maximum flash synchronization speed. In AV mode, setting at a slow speed will usually result in blurry pictures caused by the shaking of one’s hand. In such situations, the use of tripod is recommended.-10-SECOND/REAR CURTAIN SYNCHRONIZATIONThis mode permits you to fire the flash just before your camera’s shutter closes during slow shutter speed shooting. This will create a trail of lighting that will be appear behind the main subject when a slow shutter speed is being used.*For more information on rear curtain synchronization settings, refer to your camera’s instruction manual.-11-RED EYE REDUCTIONWhen red eye reduction is activated on the DSLR body, the flash unit will activate a series of preflashes before the main flash to reduce the possibility of red eye occurrence during shooting.-12-USING THE BOUNCE HEADVarious combinations of bounce angles can be used to cut off unwanted shadows or for special soft effect purposes.Direct Flash Indirect FlashUSING THE ZOOM HEADFor proper angle coverage, set the flash zoom head position so that it corresponds with the zoom position of the camera’s lens.-13-SPECIFICATIONS AND FEATURES • Guide Number 59m at 85 zoom position• Auto Focus / TTL Metering• Focus Beam to Assist in• Automatic Shutter Speed SettingLow Light Conditions• 6 Way Flash• Bounce Up/Down• Zoom In/Out• Swivel 270°; left 180°/ right 90°• Built-In Slave Function• Red Eye reduction• Power Saving Functions• Flash Readiness Indication in Viewfinder• Recycle Time: 0.3-10 Sec.• Uses 4x AA Batteries (Not Included)• Package Contents: Speedlite DSLR AF Flash,Flash Diffuser, One Year Warranty Card-14-。


APT-PAK-DS29 Rev 1.2✧ 目录✧ 产品特点 ................................................................................................................................................................... 1 ✧ 产品介绍 ................................................................................................................................................................... 1 ✧ 订购信息 ................................................................................................................................................................... 2 ✧ 性能参数 ................................................................................................................................................................... 2 ✧ 不同电流对应的光电参数(Ta = 25°C) .................................................................................................................... 3 ✧ 极限参数(Ta = 25°C) ................................................................................................................................................ 3 ✧ 外形尺寸说明 ........................................................................................................................................................... 4 ✧ 封装材料说明 ........................................................................................................................................................... 4 ✧ 产品编码说明 .. (5)✧ 分档规格 ................................................................................................................................................................... 5 ✧ 光电性能特征曲线 ................................................................................................................................................... 6 ✧ 包装说明 . (8)易闪系列EFG 闪光灯LED✧ 产品介绍 易闪E-Flash 是最新一代无金线陶瓷贴片封装Flash LED 光源,具有结构紧凑、高光通量、高光效、耐大电流冲击、良好热传导等优势,广泛用作手机、数码相机、掌上电脑等便携产品闪光灯。

ULTRAVIOLET FLAME DETECTOROmniguard ® model 660The Omniguard® model 660 UV flame detector is designed to detect unwanted fires, and output appropriate alarm information. The model 660 senses ultraviolet radiation in the appropriate wavelength for extremely fast fire detection. The model 660 will sense both hydrocarbon and non-hydrocarbon fires, a technology which has proven itself over decades of reliable service.The model 660 is available in two versions,one for standard industrial applications where a maximum operating temperature of 85°C is the norm, and a second which is capable ofoperating at a maximum sustained temperature of 125°C. This version is especially well suited for turbine enclosure and high temperature industrial applications. Both versions are available with an automatic self-test function to monitor the detector’s ability to sense fires and report a fault condition when impaired.SpecificationsPerformance ratingsResponsive to hydrocarbon (gasoline, propane, methane, alcohol, etc) and non-hydrocarbon (hydrogen, silane, hydrazine, magnesium, etc) flames.Third-party performance certified to detect saturating signal source in 15 milliseconds,1 square foot gasoline flame at 50 feet in 1 second. Horizontal performance envelope of 120°.Environmental ratings Rated:Class I, Division 1, Groups B, C &D (explosion proof) Class II, Division 1, Groups E, F & G (dust ignition proof) NEMA 4X weatherproof, dust-tight, watertight CE0081 II 2 G/DEx d IIB + H 2 T5 Gb for gas on 660-0XXXXEx tb IIIC T100°C Db IP6X for dust on 660-0XXXX Ex d IIB + H 2 T4 Gb for gas on 660-1XXXXEx tb IIIC T135°C Db IP6X for dust on 660-1XXXXStandard housing is copper-free aluminium conversion coated to MIL-C-5541C, Class 3 (white). Optional stainless steel housing available with passive finish per MIL-5-5002C, Type 1.Standard operating temperature range: -40° to +85°C (-40° to +185°F).Special high temperature version: -40° to +125°C (-40° to +257°F).Typical applications: turbine enclosures,generator rooms, munitions facilities, batteryrooms, and gas cabinets.©Firefly AB (2016)Ordering informationTo order, please specify Type Omniguard® model 660Designation Ultraviolet flame detectorOrdering number660 - X X X X XFire type0 Industrial temperature fire detector 1 High temperature fire detector Housing material/conduit entry 0 aluminum, 3/4-14 NPT (white) 2 stainless steel, 3/4-14 NPT 3 aluminum, M20-1.5 (white) 5 stainless steel, M20-1.5Test feature 0 no self-test 1 auto self-test Fire relay configurationAgency approvals0 - FM, SIL2, CSA, Russian Fire Certificate, IECEx, ATEX, EMC, LVD, CSFMOmniguard ® model 660Specifications (continued)Spectral responseUltraviolet peak sensitivity of 0,22 µm.Detector inputs Inputs• nominal voltage 24 VDC (ripple voltage <240mV) • range20 to 30 VDC Power consumption • standby 90 mA • alarm 110 mA • auto and manual test 250 mADetector outputs Relay • relays (2) fire, trouble, dry contacts, hermetically sealed• rated 2 A at 28 VDC. User selects NO or NC • fire relayuser selects latching or non-latchingCurrent loop (standard version) 0 to 20 mA output • 20 mA = fire • 4 mA = ready • 0 mA = 20Programmable RS-485 serial output Mechanical considerations Weight 2.4 kg (5 lbs) (aluminum)6.3 kg (13 lbs) (stainless steel)Height x width x depth 114 x 140 x 153 mm (4.5 x 5.5 x 6.0 in)Conduit entry3/4-14 NPTF or M20-1.5Optional accessories Swivel mount No 20856 (used with aluminum) No 70991 (used with stainless steel)Portable test unit 43808-2Air shield kit No 8001023Rain shieldNo 23546©Firefly AB (2016)FIREFLYStockholm, SwedenPhone: +46 (0)8 449 25 00E-mail:*************************www.omniguardbyfirefly.seOmniguard 660DS - Ver 1.3 | EN。

KF-6605575W 摇头灯使用手册感谢您购买KF-6605 16通道575W染色灯!安全指示1. 操作前注意事项注意:不当使用可能会危及生命!引发火灾!造成短路!初次使用本产品前,请注意以下事项:- 认真阅读本《使用手册》;- 仔细核对每一项指示;- 确保本产的安装、操作、搬运、仓存等各类人员为合格上岗人员。
- 观察产品是否存在运输毁损。
如有任何毁损,请立即联系您的供货商,切勿通电使用。
2. 使用环境注意:不当使用可能会危及生命!引发火灾!造成短路!本产品仅适用于 AC 230V,50Hz 电源环境。
雷电时,请勿使用本产品。
本产品的保存与使用场所必须保持干燥,45°C 时,相对湿度不得超过50% 。
使用温度范围为:-5 °C 至45 °C。
注意防尘。
本产品与灯光被投射的物体需距离1.5米以上。
3.安装注意:不当操作可能会危及生命!机箱底部安装示意I. 灯钩(可选配件)II. 吊挂件III. 吊挂螺丝孔IV. 安全绳(可选配件)V. 机箱VI. 安全绳孔VII. 安全绳扣(可选配件)VIII. 已上紧的吊挂件注意:安全绳必须能承受12倍于产品的重量,且下延长度不得超过20厘米.4. 操作注意:不当使用,可能会危害人体!本产品可通过3针DMX连接线连接DMX控台及其它DMX产品。
首次运行本产品时,可能会产生烟雾及有焦灼气味,此属正常现像。
请勿频繁快速开关电源。
关机后,务必冷却15分钟以上,方可再次通电。
产品通电后,即会整机复位;复位完毕,即可进行操作。
先按一下拨盘,液晶屏上将会显示地址码设置菜单,再转动,在液晶屏上将会显示各项菜单,当你要对某一项菜单的内容进行设置,再次按下拨盘,然后转动进行调节,便可看到菜单项下的内容随之变化。
当转动拨盘调到你需要的设置参数后,再次按下拨盘进行保存。
然后转动拨盘到菜单项“exit”,按下拨盘退出。
液晶显示屏的菜单选项如下:按一下编码盘,进入主菜单:1.版本,进入此项,里面包括品牌,型号,软件版本,编号,灯泡使用时间,灯具使用时间等信息。
外置闪光灯使用技巧一、闪灯基础观念:光圈、距离与GN值的关系1.GN值=光圈×距离例如:当闪灯GN值=20(以米为单位计算),光圈设为F4,此时有效闪灯距离为5米。
当闪灯GN值=20(以米为单位计算之下),与被摄物体距离10米时,此时光圈需设为F2才能有效曝光。
2.在光圈不变及闪灯出光量不变之下,快门的速度并不影响闪灯补光,但会影响环境光的曝光多寡。
闪灯的闪光输出通常在1/1000秒至1/10000秒内完成,比快门最高同步的速度快太多了。
我们假设闪灯的闪光输出在1-1000秒内完成,当快门速度为1/30秒时闪灯曝光量的吸收时间仅为1/1000秒,改为1/60秒时闪灯曝光量的吸收时间依然为1/1000 秒。
其中快门速度不同的差异,我们可以想成是两张不同图片的叠加(或者说是多重曝光),当快门为1/30秒时,相机的曝光为1/30秒环境光,再加上1/1000秒的闪光;快门为1/60秒时,相机曝光为1/60秒的环境光,再加上1/1000秒的闪光,所以快门为1/30 秒时,虽然在闪光部分的曝光量是一致的,环境光的曝光量但不同效果也不同,因此针对快门速度的调整,对于室内摄影大场景的拍摄就可以得到快门变化产成的不同效果。
3.当闪灯GN值不够使用时,可以利用不同感光度的底片来达到增大GN值的效果。
当底片为100度时GN值为24,改为200度底片时,GN值为36,改为400度底片时,GN值为48,以此类推。
因此,当GN值不够大,或光圈不够大时,可以利用底片来解决此问题。
二、闪灯模式1.M模式,在此模式之下,每一次的拍摄都需要依当时情况,利用GN值=光圈×距离的公式作相关的调整。
通常此模式之下,闪灯为全输出,除非闪灯具有1/4或1/2等输出模式选择。
优点:完全依照摄影者的设定输出光量。
缺点:需每次作计算及调整,可能缓不济急。
2.Auto模式,在此模式之下,当我们固定好闪灯及镜头光圈大小之后(需一致),在闪灯功率的有效范围之内,闪灯会依照自身的感光系统计算补光充足与否,自动控制闪灯输出的大小,达到准确曝光。
6. S1/S2 ModePress the [MODE] button, then the flash will enter S1/S2 mode.These modes are applicable for slave flash in order to create manylight effects. They are respectively applicable for manual flashenvironment and TLT flash environment.When the flash is in S1 mode, it will work with the first work ofthe master flash synchronously, with the result consistent with theuse of radio slave. To use this mode correctly, the master flashshould be set at manual flash and the TTL flash system withpreflight function and the red-reduction function with multipleflashes should not be used.S2 mode is similar to S1 mode, but it can support the master flashin TTL mode. In particular, if S1 mode cannot have correct andsynchronous flash with the inbuilt flash, you can try to use S2mode.7. Menu Access of Camera (only compatible with CanonETTL camera system)On the Canon camerasupporting ETTL, you canswitch flash mode via thecamera menu. With thesetting function of theexternal flash function in theflash control menu, you canswitch between the TTLmode and the manual flash mode; in addition, on such menu, youmay also set front and rear curtain synchronization, and setmanual flash output with 1/3ev step length.8. Test FlashWhether in any mode, you can press PILOT button to test if theflash light flashes normally.In M/S1/S2 mode, press the PILOT button and the flash light willsend light with different luminance as per levels of output powerselected.9. Power-saving FunctionIn TTL/M/MULTI mode, if idle for about 30min, the flash willpower off automatically.In S1/S2mode,if idle for 60min, the flash will power offautomatically.VI. SpecificationsGuide number 33Circuit design Insulated Gate Bipolar Transistor (IGBT)Flash mode TTL, M, Multi, S1, S2Zoom range Auto, 24, 28, 35, 50, 70, 85 mmVertical rotation angle -7~90 degreesHorizontal rotation angle 0~270 degreesPower Supply 4×AAsize batteries (Alkaline or Ni-MHare usable)Lighting times 100~1500 times (AA alkaline cell used)Recycle time less than 3s (AA alkaline cell used)Color temperature 5600kFlash time 1/800s~1/20000sFlash control TTL auto flash or manual Level 8 lightquantity output control with 0.3 stopincrementAdditional featuresFEB, FEC, FEL, Automatic zooming,Rear-curtain Sync.Dimensions 60×72×172 mm(extended state)Net weight 300gAccessories Flash light (1), protecting bag (1), andmini stand(1) and manual (1)VII. Possible problems during use and solutions1. The AF LED is not on? Check if this camera needs flash lightassist AF or if it supports the function; some cameras requiresfocucal points to be in the center, focus method to adopt AF-S andrequires dark environment; check if some settings in the cameraare forbidden.2. Photos are under exposure or over exposure? Check if the setshutter, aperture and ISO are too near the flash limit or if somesettings including exposure compensation in relation to flash areproper.3. Vignetting appears in photos or only part of the subject isilluminated? This product has a designed light head zoom rangeof 24-85 mm, and is currently not compatible with full framecamera system. You may pull out the wide-angle diffuser to widenthe flash range.4. Because of differences among various models of cameras anddifferent personal preferences, the use of this product may causebrightness with the [Output control knob] within the range of ±3ev,Please Note that this compensationexposure compensation setting on thephotos by making flash light headaimed at wall or ceiling and using the light reflected back from theceiling or wall to light the desired object, so that the shade behindthe object can be decreased to getIf the wall or ceiling is too far, theweak towall orwhitein order to get efficient reflection;notwhite, color cast may appear in photo.9. Use Reflection Board to Take PhotosWith the reflection board flash, draw the reflection board and theout from the light head at the sametime and then push the wide-anglediffusion board back. In such case,if this product is being used to takeaeyes ofthe subject and thus make the eyesThiseffectwhen the flasher head is up 90°.diffusion board,board andfigure; in suchextent to 18mm and the flash effect will be softer andused in incompatible iTTL/ETTLcamera, Functions 2, 3, 4, 5, 6 and 7 are not available.物对焦后按下相机快门,闪光灯就会根据相机的指示闪出合适的光,就可以得到您所需要的相片。
600 Series CameraUser GuideIMPORTANT SAFEGUARDSNote:This product is listed by Underwriters Laboratories, Inc. (UL). As a condition of listing, UL requires that basic safety information be provided.As with any battery-operated equipment, observe these basic safety precautions:1.Follow all of these instructions.2.Do not use the camera if it has been damaged, until it has been examined atan authorized Polaroid Service Center.3.Do not disassemble the camera. To reduce the risk of an electronic shock,service or repair work must be done only by an authorized Polaroid ServiceCenter. Incorrect reassembly can cause electrical shock when the camera isused again. Do not immerse the camera in water or other fluids.PLEASE KEEP THESE INSTRUCTIONSPlease read this book cover to coverWe recommend that you take the time to read through this entire book so you are completely familiar with your camera system. It is especially important to know howto handle Polaroid film and pictures to ensure high quality results.Table of ContentsImportant Safeguards (2)Important camera features (4)See the world in a new light (4)The camera system (5)The film (7)The electronic flash (7)Fixed focus lens (7)Electronic flash range (7)Split-second automatic focusing (8)Lighten/darken control (8)Autofocus by-pass and non-flash buttons (8)Using the camera (9)Raising and lowering the electronic flash unit (9)Loading the camera (9)Removing empty film pack from camera (9)Holding the camera (10)T aking the picture (10)Composing the picture while the flash is charging (11)Taking a picture through glass or a window (12)Use the electronic flash for every picture - outdoors and indoors (13)Trouble-free picture taking (14)Full one-year warranty (14)Important camera featuresThe built-in electronic flash lifts up forpicture-taking, folds down for carrying ease.The flash is designed to be used for every picture – outdoors and indoors.The red button both charges the flash and takes the picture.1.Press the red button halfway to charge the flash. A red light in the viewfinder means the flash is charging.Note:It is not necessary to hold thecamera to your eye while the red light is on. In about 5 seconds the flash is charged, the red light goes off and you can take a picture. Or, you can release the red button and the flash will stay charged for several minutes.2.Press the red button all the way to take a picture.See the world in a new lightFew picture-taking situations provide just the right lighting to take the best photographs.So Polaroid designed a unique new photographic system (Sun 600 series cameras) that makes it possible to take great pictures any time – in any light.Under the direction of a tiny electronic computer, the system – a camera with a built-in electronic flash and Polaroid 600film – measures light with just the right amount of flash to create an ideal photographic light for taking beautiful pictures – outdoors and indoors.In addition, the Model 660 AutoFocuscamera has an automatic focusing system which consists of a fixed front lens and an internal rotating disk with four lenses. Using sound waves to measure the distancebetween the camera lens and your subject,the computer selects the correct lens that will put your subject in sharp focus.For the first time, the high-energy battery built into every film pack powers both the camera and the electronic flash, which means you need never purchase other batteries.Polaroid 600 color film – the mostlight-sensitive instant color film made – was developed just for this camera system.Other Polaroid films will not fit into or workwith this camera.Electronic FlashRed Button600 Series CameraThe camera systemA -Built-in electronic flash; 1/3000 to1/20,000 of a second.B -Fixed focus, 106mm lens.C -Aperture shutter system (apertures fromf/14.6 to f/45; shutter speeds from 1/3to 1/200 of a second).D -Red shutter button (pressed halfway, itcharges the flash; pressed all the way,it takes the picture).E -Flash override button (used to take apicture through glass – see page 12).F -Film door latch.G -Film door.H -Film shade (shields each picture fromlight as it exits the camera; it rolls out with the picture, then snaps back).Sun 600Front ViewBack ViewABCDE F GIJLMHK NOPI -Film exit slot.J -Lighten/darken control (see page 8).K -Photocell (silicon photo-diode –measures light from the scene and flash, outdoors and indoors).L -Viewfinder.M -Adjustable neckstrap.N -Thumbrest.O -Picture counter (indicates how manypictures remain).P -Flash ready light (red light means theflash is charging; green light means the flash is ready to fire).Sun 660 AFFront View Back ViewA1B1C1DEFC2GHIJLMNO KK1A1-Built-in electronic flash; (1/3000 of a secondB1-Automatic focusing system (a fixed front lens and an internal rotating disk withfour lenses).C1-Automatic variable speed/aperture shutter system (speeds range from1/3 to 1/200 of a second; aperturesfrom f/14.6 to f/45).C2-Transducer (sends the sound waves and receives the echo).D-Red shutter button (pressed halfway, it charges the flash; pressed all the way,it takes the picture).E-Flash override button (used to take a picture through glass - see page 12).F-Film door latch.G-Film door.H-Film shade (shields each picture from light as it exits the camera; it rolls outwith the picture, then snaps back).I-Film exit slot.J-Lighten/darken control (see page 8).K-Photocell (silicon photo-diode –measures light from the scene andflash, outdoors and indoors).K1-Autofocus override button (see page 11). L-Viewfinder.M-Adjustable neckstrap.N-Thumbrest.O-Picture counter (indicates how many pictures remain).The Electronic flashBoth the electronic flash and the camera are powered by the high-energy battery built into every film pack.The battery supplies all the power you need to fire the flash for every picture - outdoors and indoors.The flash fully charges in about 5 seconds. It will stay charged for several minutes, allowing you to take a spontaneous picture (see page 4).A red light in the viewfinder indicates when the flash is charging. The camera will not operate until the flash is fully charged and the red light goes off. Since you cannot take a picture while the flash is charging, you never waste film.The FilmPolaroid 600 color film was developed specifically for your camera system. Other Polaroid films will not fit into or work with this camera. Each film pack provides 10 color pictures.This new film is the most light-sensitive instant color film made. It is one of theworld’s fastest developing color film. In just seconds, the image begins to appear.Fixed focus lensStand at least 4 feet from your subject. In the picture, everything beyond 4 feet will be in focus.Electronic flash rangeBe sure to use the flash for every picture –outdoors and indoors .Sun 600For best results indoors, your subjectshould be from 4 to 10 feet away and near a light colored background.Sun 660 AFFor best results indoors, your subjectshould be from 2 to 14 feet away and near a light colored background.Split-second focusing (Sun 660 AF only) When you take a picture, your camera sends sound waves, at frequencies beyond our range of hearing, to the central part of the scene (approximate area circled in white).At the same time, an internal disk with four lenses (behind the fixed front lens) starts to turn.In a split second, a tiny electronic computer measures the time it takes for the sound to reach your subject and the echo to return, and calculates the distance between the camera lens and your subject. The lens then will put your subject into sharp focus at that distance and lock into place.Lighten/darken controlUse this control only when you want to reshoot a picture to make it lighter or darker. To take a lighter picture, slide the control past the white arrow.Autofocus by-pass and non-flashbuttonsSun 640 - To avoid a flash reflectionwhen photographing through glass indaylight press the non-flash button totake your picture.Sun 660 AF - To photograph a daylightscene (more than 12 ft./3m away) throughglass, press and hold in the autofocusby-pass button, then press the non-flashbutton to take your picture.To take a darker picture, slide the control past the black arrow.Return the control to center position when you have finished reshooting. A white double arrow appears in the bottom of the viewfinder as a reminder that the control is not in its centerposition.Autofocus OverrideButtonFlash OverrideButtonUsing the cameraLoading the cameraUse only Polaroid 600 color film.1.Push the latch forward. The film door will open.2.Hold the film pack by its edges only, as shown (printed side up), and slide it all the way into the camera.3.Close the film door.When you close the film door:•film cover will eject.•picture counter will set to 10.Removing empty film pack from camera When the picture counter is blank, open the film door and pull the colored tab to remove the film pack.Raising and lowering the electronic flash unit1.Grip the sides of the flash unit.2.Swing the flash unit up to snap it in place.3.The flash will fully charge, automatically ,in about 3 seconds every time you:•Load film into the camera when the flash unit is raised.•Raise the flash unit when there is film already in the camera.•Take a picture.•T ouch the shutter button.Note:The flash is designed to be usedfor every picture – outdoors or indoors.When you are not using thecamera, lower the flash unit. It will protect the lens and lock the redbutton.LatchHolding the camera1.Grip the camera so it rests firmly in the palm of your left hand.2.Place your right thumb on the thumbrest,your index finger on the red button, and curl your other fingers into your palm.3.Or, if it is more comfortable, place the fingers of your left hand over the top of the viewfinder and your thumb under the camera – holding your right hand asdescribed above.Taking the picture Sun 6001.When you see the green ready light,press the shutter button all the way to take a picture.2.After you have taken a picture, the flash will recharge and the green ready light will come on again in about 3 seconds.3.When you want to take a picture and the green ready light has gone off,lightly touch the shutter button and release it as soon as the red light comes on. Then take the picture when you see the green ready light.Sun 660 AF1.Stand at least 2 feet from your subject.2.Press the red button until you feelresistance. Hold it there.Red ButtonFlash Ready (Green)andCharging (Red) Lights3. A red light in the viewfinder indicates that the flash is charging. In about 5seconds, when the flash is fullycharged, the red light goes out. The camera will not operate while the red light is on.4.To take the picture, hold the camera steady and press the red button the rest of the way. The camera will then automatically eject the developing picture.Note:Always use the thumbrest and gently press the red button;jabbing the button will jar the camera and blur the picture.Red Button5.Hold the developing picture by its wide white border. While it isdeveloping, keep the picture out of direct sunlight.Note:When the temperature is below 55o F(13o C), keep the camera and film warm.6.Immediately place the developing picture in a warm pocket for at least a minute.Composing the picture while the flash is charging1.Press the red button part way so the flash will charge while you are composing the picture.2.Look through the viewfinder.3.In addition to your subject, notice the foreground and the background as they appear in the viewfinder.4.Frame your picture, changing your position or the camera angle until you see the best composition.5.Move in close so that the important elements of your picture fill the frame.Sun 600Indoors –subject should be 4 - 10 feet(1.2 - 3m) away and near a light colored background.Outdoors –subject should be at least 4feet (1.2m) away.Sun 640–subject should be at least 4feet (1.2m) away.Sun 660 AF –subject should be at least2 feet (60cm) away.Taking a picture through glass or a window Sun 600Photographing a daylight scene through glass is a special situation which requires that you stop the electronic flash from firing, to avoid a flash reflection.T ake the picture by pressing only the flashoverride button.Autofocus OverrideButtonFlash OverrideButtonFlash OverrideButtonSun 660 AFPhotographing a daylight scene (more than 12 feet away) through a window is a special situation which requires that you take these precautions.To avoid focusing on the window, hold in the autofocus override button. T o avoid a flash reflection, stop the flash from firing and take the picture by pressing the flash override button.Use the electronic flash for every picture – outdoors and indoorsThe human eye adjusts to light differently than the camera’s eye, which makes it difficult to judge how light from the scene will affect your picture.Everyone who takes pictures has had the experience of looking at a subject or scene,photographing it, and being disappointed with the picture because it looks differentthan what he or she saw in the viewfinder.Polaroid’s new photographic system gives you the beautiful picture you expect to see. By blending light from the scene with just enough flash, the system creates a new photographic light that more accurately reproduces, on film,what appeared in the viewfinder.Taking trouble-free picturesHold the developing picture by its wide white borderWhile it is developing, keep the picture out of direct sunlight.When the temperature is below 55o F (13o C),keep the camera and film warm. Immediately place the developing picture in a warm pocket for at least a minute.Keep the developer rollers cleanDirty rollers can cause a repeated spot or bar pattern to appear in the picture.The developer rollers are located inside the film door. If there is film in the camera, open the door in dim light.What to look for if the camera does not operateCheck the picture counter. When the film pack is empty, you can charge the flash but you cannot take a picture.Look through the viewfinder. When the red light is on, the flash is charging and you cannot take a picture.Be sure the sound waves have a clear path to your subject (Sun 660 AF only)The sound waves travel to the central part of the scene (see page 8). If an object in the foreground prevents the sound from reaching your subject, the internal lens disk will focus on the foreground object, causing your subject to be out of focus. If this happens when you are using flash indoors, your subject will also betoo dark.Dirty RollersDeveloper RollersFull one-year warrantyU.S. and CanadaIf your camera proves to be defective within the warranty period, we will, without charge, either repair it or, at our option, replace it with a fully reconditioned or new camera. The warranty period is one year from the original date of purchase. To verify the warranty period, you should keep the sales slip or other proof of the purchase date. Without this information, the warranty will be determined by the manufacturing date on the camera.The repair or replacement of your camera is guaranteed for the remaining warranty period on your original camera.The warranty does not cover damage caused by accident, misuse or tampering with the camera and a charge will be made for such repairs.For warranty service or information, call our toll-free number listed below. If your camera is not working, our representatives will verify the problem and can ship a replacement camera to you quickly (within approximately two or three Polaroid business days in the U.S.).U.S. only: This warranty gives you specific legal rights, and you may also have other rights, which vary from state to state.This warranty excludes all consequential damages. Some states do not allow the exclusion of consequential damages, so the foregoing exclusion may not apply to you.Canada only: The warranty and provisions do not affect your statutory rights.For more information: From within the U.S., please call us toll-free at 1-800-343-5000, Monday through Friday, 8 am to 8 pm (Eastern time).In Canada, call toll-free: 1-800-268-6970; in Toronto, call 675-3680.Americas Business CenterIf you have any questions about your camera or pictures, you believe your camera needs repair, or you need additional information, call us toll-free: 1-800-343-5000 from anywhere in the U.S.Our representatives can be reached every weekday from 8 am to 8 pm, Eastern time. In Canada, call toll-free: 1 800-268-6970. In Toronto, call 675-3680.Or, if you prefer, write to us. The address is: Americas Business Center, 201 Burlington Rd., Bedford, Massachusetts 01730. Please include a sample picture of the problem you are having with your camera.Polaroid instant color film is sold in the U.S., Canada, and Latin America. Before traveling to countries outside the U.S. and Canada, call us toll-free to learn where film for your camera is being sold.。
斯丹德DF-950、DF-955、AG-951固件更新详细教程(教程版本:JC20161221)说明:为避免不必要的麻烦和对闪光灯产生影响,请严格按照本教程步骤说明进行操作。
1.下载驱动软件与固件版本可登陆相对应网站下载对应您使用的产品所适配的软件与更新固件!下载完成后打开DfuSe_Demo_V3.0.5_Setup进行安装一直点击Next(下一步)最后点击Install安装,安装结束后点击Finish以完成安装。
2.打开闪光灯的固件更新模式按住闪光灯确认按钮以显示进入Statua Select菜单。
转动拨盘,选中System upgrade,按确认按钮确认后进入固件更新模式。
用micro数据线把闪光灯连接到电脑。
3.安装闪光灯驱动注意:连接闪光灯到电脑后,电脑会自动为闪光灯进行驱动程序安装。
自动安装耗时比较久,而且容易失败,我们可以通过手动的方式进行闪光灯驱动的安装。
1)取消系统正在进行的自动安装驱动任务。
点击驱动安装图标点击跳过从Windows Update获得驱动程序软件系统弹出警告询问是否跳过,选择是。
2)手动安装闪光灯驱动。
打开控制面板找到设备管理器点击进入点击其他设备中的DFU in FS Mode在出现的新窗口上方选择驱动程序点击更新驱动程序在新窗口中选择浏览计算机以查到驱动程序软件在新窗口中点击浏览并找到DfuSe v3.0.5文件夹注意:该文件夹在安装驱动软件后默认位置C:\Program Files (x86)\STMicroelectronics\Software\DfuSe v3.0.5选好驱动文件夹后直接点击下一步进行驱动更新。
闪光灯驱动在安装好之后可在连接中的设备里面看到已连接中的设备STM Device in DFU Mode 。
4.进行固件更新首先打开我们一开始安装的软件DfuSeDemo(找不到软件的可在任务栏左边系统中选择所有程序中查找新安装的软件就能轻易找到它了,并且可以右键点击该软件选择发送桌面快捷方式方便下次使用。
闪光灯使用知识三篇篇一:闪光灯使用知识“闪光灯”这个名词,大家都已经耳熟能详了,但是对闪光灯能深入了解的人却是少之又少,本文将就闪光灯的原理、类型及常见的闪光模式给大家做一个简要性的介绍,希望能够对大家的进一步研究起一个向导性的作用。
用好闪光灯是每个摄影爱好者的必备技能,也是走向专业的必经之道。
1、闪光灯的定义闪光灯的英文名为FLASH LIGHT,中文全称为“电子闪光灯”,又称高速闪光灯。
电子闪光灯通过电容器存储高压电,脉冲触发使闪光管放电,完成瞬间闪光。
通常的电子闪光灯的色温约为5500K,接近白天阳光下的色温,发光性质属于冷光型,适合拍摄怕热的物体。
2、闪光指数(GN)根据美国国家地理出版的摄影手册里的解释,闪光指数表示闪光灯制造商为每部闪光灯所设定的发光强度,通常是以ISO 100为基准来设定。
闪光指数通常用GN来表示,为Guild No. 的缩写。
其表示方式根据采用的单位是米或英尺而分为两种,GN的计算可以用“GN=光圈F值 * 拍摄距离”的公式来计算。
一般135单反相机的内置闪光灯指数约为12(米制),如果用光圈F4来拍摄,也就是说有效闪光距离为12÷4=3米。
在购买外置闪光灯的时候,除非在拍摄时多以ISO400 来拍摄,或大多拍特写照片,否则最好购买GN在25(以米作为单位,GN/M=25)或80(以英尺最为单位,GN/F=80)以上的闪光灯。
如果经常要用到反射式闪光法来拍照,那么就需要强力的闪光灯,不妨购买GN值40(米制)或130(英尺制)左右的闪光灯。
3、闪光灯的分类1)内置闪光灯:一般的135单反相机、APS相机、傻瓜式相机都配有内置闪光灯,根据相机的不同GN有所不同,135单反的GN约为12左右。
在一些顶级的135单反相机中则没有内置闪光灯,例如尼康的D2X,佳能的1DS MAKR 2等。
内置闪光灯因为其指数较小,所以使用范围不是很广,笔者最常用到它的地方就是在人像拍摄的时候进行闪光补光。
闪光灯的专业使用方法一般而言,使用闪光灯拍摄照片是一种无奈的选择,不是在不得已的情况下,大多数人都不愿意使用闪光灯拍摄(特别是机身自带的弹起式闪光灯)。
但是,如果你拥有一款专用闪光灯设备(如尼康SB-800或佳能580EXⅡ),并能很好地运用它,你就可以获得同样专业品质的摄影效果。
下面我们就来探讨一下闪光灯的专业使用方法。
第一,让闪光灯脱离相机,改变光线的方向。
固定在相机上的闪光灯直打在被摄体上的光是没有立体感的,这也是人们讨厌使用闪光灯的原因之一。
但是,如果你能把闪光灯从相机上移开,创建一个你认为满意的方向性光源,就可以获得更惹人喜爱、更专业的效果,从而提升你的图片的立体感和深度。
分离相机和闪光灯的方法之一就是使用闪光灯同步线,用同步线把相机和闪光灯连起来,你就可以用左手手持闪光灯高高举起,向下朝向被摄体,这样就有了像太阳光一样打在被摄物体上的定向侧光,进而获得专业品质的理想效果。
如果你使用的是尼康或佳能的单反相机,那么它们具有的无线闪光功能,会为你创造方向性光源提供更加方便的条件,你只需在相机上作一些设定,就可以在无线状态下,随意使用闪光灯。
至于怎样设定无线闪光功能,我会在以后的文章中介绍(你也可查阅或下载相关说明书进行了解)。
第二,使用慢速快门,提升背景清晰度。
室内使用闪光灯,往往是主体看起来很刺眼,而背景却非常黑暗,因而照片看起来很丑陋。
如果能使闪光灯与室内可用光线混合,被摄体后面的背景就会变得非常自然。
这种技巧就叫做“慢速快门”。
首先,相机设置为程序模式(P),然后对准被摄体半按快门,查看取景器,读取光圈和快门速度数值并记住它。
之后,再将相机切换到手动模式(M),并拨到刚才记住的那两个数值,如果相机显示快门速度是1∕60秒,那么,使用慢速快门就把它降到1∕15秒后拍摄。
你不必担心被摄体会模糊,因为闪光灯启动时会锁定被摄体,而被摄体的背景会因为长时间曝光而得到与主体相一致的混合效果。
第三,为闪光灯增加柔光罩,使光线变得柔和。
DF-660闪光灯用户手册一、DF-660特点DF-660是具有TTL功能的大指数闪光灯(58 ISO100 105mm)•自动兼容E-TTLⅡ、E-TTL和TTL自动闪光,对应CANON闪光灯机型。
•自动兼容i-TTL、和TTL自动闪光,对应NIKON闪光灯机型。
•支持曝光补偿、曝光包围、前后帘同步、曝光锁定、光圈预览造影闪。
•支持AF辅助对焦功能。
•全面支持CANON和NIKON无线TTL闪光,同时支持S1和S2无线触发闪光。
•电动变焦功能可以自动和手动调节变焦灯头的位置,以配合镜头的焦距(24mm至105mm)。
•智能的声音提醒系统,让您更易操作。
•镜片过热保护功能,防止快速闪光导致的高温烫伤人,延长闪光灯使用寿命。
•高灵敏的无线感应器,可以让相机在很远的距离触发闪光灯闪光。
•佳能∕尼康标准的外置电源接口,满足你快速闪光的需求。
•标准的PC同步插孔。
•快速的回电时间,全闪情况下仅需2.8秒就可以让闪光灯充满电。
•C.Fn自定义功能,您可以按照自己的拍摄喜好自定义闪光灯的功能。
•休眠自动关机功能,让闪光灯更省电。
•自动保存功能,能自动保存闪光灯的当前设置。
•LCD屏显示。
•金属热靴。
二、闪光灯部件1.反光片2.广角扩散片3.镜片4.无线感应器5.热脚锁环6.电池盖7.闪光灯头8.外接电池接口9.PC同步端子10.接口盖1.液晶显示器2.快门帘幕同步/Canon、Nikon无线TTL切换按钮3.声音提示按钮4.液晶显示器照明/自定义功能设置按钮5.<ZOOM>变焦按钮/无线选择按钮/无线设置按钮6.<MODE>模式切换按钮7.测试闪光按钮<PILOT>8.电源开关9.充电指示灯10.多功能组合按钮11.热脚三、产品安装1、按装电池•按箭头所示的方向滑动<电池舱盖>将其打开•按图示中的<+>和<->标志插入电池,确保电池的正负极接点朝向正确•如箭头所示方向滑动<电池舱盖>将其关闭。
2.将闪光灯安装到相机上◆按箭头所示的方向转动<热脚锁环>到最高点◆将闪光灯<热靴座>完全推入相机热靴◆如箭头所示方向转动<热脚锁环>拧紧◆要取下闪光灯,请松开<热脚锁环>然后从相机热靴中推出四、基本功能1.基本操作■按钮的操作2.开启及关闭电源<电源开关>可打开或关闭闪光灯电源。
推荐通过该开关关闭闪光灯电源后再取出电池。
打开闪光灯电源后,闪光灯将读取上次关机前保存的设置状态并开始充电,充电时<充电指示灯>亮绿灯,当<充电指示灯>亮红灯,表示可以进行闪光。
当充电超过20秒仍未充满,液晶屏会显示<LO>,表示电池电量过低,3秒钟后闪光灯将自动关机,此时需要更换电池。
你可以通过按<PILOT>来检测闪光灯闪光是否正常。
使用完毕后,电源开关拨到O FF位置即可关闭电源。
3.E-TTL/E-TTLⅡ模式(Canon)D F-660具备Canon E-TTL/E-TTLⅡ闪光控制系统,通过相机上的测光系统自动控制闪光输出强度以得到最适合的闪光曝光。
将相机拍摄模式设为(全自动)、(P)、(T V)、(AV)、(M)等曝光模式中的任意一项,你就可以使用ETTL进行全自动闪光控制了。
在E-TTL模式下,D F-660闪光灯还支持曝光补偿、曝光包围、前后帘同步、曝光锁定、光圈预览造影闪光以及Canon相机菜单访问等功能。
4.i-TTL/TTL模式(Nikon)D F-660闪光灯具备Nikon的i-TTL/TTL闪光控制系统,通过相机上的测光系统自动控制闪光输出强度以得到最适合的闪光曝光。
将相机拍摄模式设为(全自动)、(P)、(S)、(A)、(M)等曝光模式中的任意一项,你就可以使用i-TTL进行全自动闪光控制了。
在i-TTL模式下,D F-660闪光灯还支持曝光补偿、曝光包围、前后帘同步、曝光锁定、等功能。
5.M模式该M模式下,你可以根据自己的喜好设定闪光强度,通过(左)(右)(上)(下)及中间(确定)按钮可以对闪光两度进行调节,闪光亮度的调整范围是1/128—1/1,亮度共分8档每一档可有5级微调,以0.3E V为调节增量。
按<MODE>按钮,使屏幕上显示(M)模式。
按一下<确定>按钮,再通过<左><右><上><下>调整输出光量,再按<确定>保存当前设置。
6.M U LTI模式(频闪及多次闪光)使用频闪闪光,可以发出一系列快速的闪光。
它可以在一张照片上拍摄移动物体的多个图像。
闪光灯将按照你设置的输出功率,闪光次数及频率闪光。
通过<左><右>或<上><下>及<确定>按钮可以设置输出功率、闪光次数与闪光频率。
调节方法:按(MODE)按钮,使屏幕上显示(MODE)模式。
按<确定>按钮选择设置项目(闪烁),通过(左)(右)或(上)(下)调节参数,设置完后再按(确定)钮已确定设置。
闪光输出强度:手动输出控制共有六级可调,闪光强度从4/1到1/128。
频率:从1到90赫兹可任意设置。
闪光次数:从1到90可以任意设置。
在频闪闪光过程中,到闪光停止为止相机快门应保持开启状态,计算公式如下:闪光次数/闪光频率=开门速度例:10赫兹的频率获得20次的闪光→20÷10=2相机的快门速度即是2秒或更长。
注意:不要连续重复进行超过10次的多重闪光操作。
连续进行数次多重闪光后请间隔10到15分钟再进行拍摄,否则灯管会过热可能导致对闪光灯的严重损坏。
7.测试闪光无论出于哪种形式,你都可以通过按(POILT)按钮来测试闪光灯是否正常,测试闪光时,闪光灯会根据选择的输出功率的等级发出相应亮度的闪光。
8.节电模式DF-660闪光灯具有两种自动关闭电源的节电功能。
•闪光灯会随相机休眠自动进入休眠状态,液晶显示屏会只显示“SE”字样,要再启动DF-660请半按相机的快门键或按闪光灯的(PILOT)按钮。
•5分钟内没有对DF-660进行任何操作时,闪光灯会自动关闭电源,要再启动闪光灯请先把(电源开关)拨到“OFF”位置然后再拨到“ON”位置。
使用DF-660的离机无线TTL模式时,建议取消自动关机或把休眠时间设置为60分钟,取消自动关机或定时时在用户自定义里设置,重新启动闪光灯时,闪灯的模式和各种数据与关机前的设置是一致的。
9.过热保护连续拍摄过于频繁时,将触发闪光灯的过热保护机制,此时会锁定闪光灯,液晶屏会显示“A L”字样,请将闪光灯静置约3分钟,等保护状态解除后继续拍摄。
为避免影像摄影,快速拍摄时,请尽量使用1/4及以下的光量。
10.ZOOM设置闪光覆盖可以设置闪光覆盖范围以匹配24-105mm的镜头焦距,可以自动或手动设置设置闪光覆盖范围,同样,使用内置广角扩散片,闪光覆盖范围可以扩展为16mm,广角镜头(马达在24mm位置时)。
按下(ZOOM)按钮,然后再按(上)(下)或(左)(右)即可改变闪光范围,当不显示时,闪光灯将根据镜头焦距自动设置闪光覆盖范围。
将闪光灯安装到兼容的相机时,闪光灯将会显示设置用户自定义(Cfn-09)可以使自动变焦关闭和启动。
11.声音提示开启声音提示功能,闪光灯将发生不同的声音,提示其工作状态,声音提示可通过(声音提示按钮)打开或关闭,声响方式的含义如下表所示:12.造影闪光操作相机光圈预览按钮,闪光灯将进行1秒钟的连续闪光,即造影闪光。
注意:请尽量将连续造影闪光次数控制在10次以下,连续造影闪光操作后,需要将闪光灯闲置10至15分钟,以免闪光灯灯头因过热而损坏。
13.P C同步端口D F-660闪光灯设有同步端口用于连接闪光灯离机连接线,可以进行离机闪光,请注意D F-660的P C同步接口只接受同步信号输入,不支持同步信号输出。
14.自动保存功能闪光灯关机时,会自动保存闪光灯当前的设置,方便你下次开机使用。
五.无线闪光系统DF-660支持无线闪光功能,可以接受Canon 580EX Ⅱ、Nikon SB-900/800/700以及相机机顶内置闪光灯的无线闪光信号,实现离机TTL及手动闪光。
ETTL:表示只能接收Canon无线闪光信号。
TTL n:表示只接收Nikon无线闪光信号。
1/Canon无线TTL2/Nikon无线TTL主控闪光灯设定的任何闪光曝光补偿、闪光曝光包围、闪光锁定、频闪闪光等设置都会被自动传输至D F-660闪光灯,即使有多个D F-660闪光灯,也将以同样方式接收来自主控闪光灯的无线闪光信号。
1.主控闪光灯设置主控闪光灯可采用Canon 580E X Ⅱ、Nikon SB-910/900/800/700,或使用机顶的内置闪光灯作为引闪的主控闪光灯,相关设置请参考主控闪光灯的使用说明。
2.从属闪光灯设置从属闪光灯可以是多支的。
打开D F-660电源开关,长按(ZOOM)按钮3秒钟或更长,使液晶屏上显示“S L AV E”字样,表示已进入无线从属闪光设置状态,通过(MODE)按钮切换到“TTL”模式,再按(快门帘幕同步)按钮可以在“ETTL”(Canon无线)或“TTL n”(Nikon无线)之间自由切换。
短按(ZOOM)按钮,将在“Z oom XX mm”闪光覆盖范围→“CH”频道设置(1.2.3.4)→从属分组(A.B.C)之间循环切换,切换过程中相应的字符会闪烁,此时通过(上)(下)或(左)(右)可以进行设置,设置好后按(确认)按钮确认设置,所有设置完成后长按(ZOOM)按钮3秒可退出从属设置。
3.多台闪光灯无线闪光配置你可以创建两个或三个从属闪光灯组以完成多方位的拍摄要求,并由主控闪光灯设置ETTL自动闪光拍摄的闪光光比、手动闪光输出、频闪等。
(1)D F-660组建两个从属闪光灯组的无线闪光◆设置无线方向:共有Canon和Nikon可供选择◆设置通信频道:1.2.3.4◆设置分组:将两台D F-660分别设置为A.B组◆设置主控闪光灯:设置对应的无线频道闪光光比设置为A:B或A:B C,即可进行闪光拍摄(2) D F-660组成三个从属闪光灯组的无线闪光◆设置无线方向:共有Canon和Nikon可供选择◆设置通信频道:1.2.3.4◆设置分组:将三台D F-660分别设置为A.B.C组◆设置主控闪光灯:设置对应的无线频道闪光光比设置为A:B或A:B C,即可进行闪光拍摄按下主控单元的闪光测试按钮,测试闪光是否正常,如从属单元不闪光,请检查闪光灯对着主控单元的角度及到主控单元的距离。
4.无线手动闪光和频闪无线“M”手动闪光和“M U LTI”频闪只要在主控闪光灯或相机上设置好后,并对D F-660(已设置对应的无线频道和分组)闪一次光,D F-660会自动切换到“M”手动闪光或“M U LTI”频闪。