磁带机备份软件使用手册
- 格式:doc
- 大小:775.00 KB
- 文档页数:26

磁带备份软件使用手册目录STEP 1 增加备份客户端 (1)STEP 2 增加备份作业 (7)STEP 3 更换磁带 (14)STEP 4 释放磁带空间 (20)版本日期制作者描述1.0 2005-8-1 首稿Step 1 增加备份客户端1.打开Veritas Backup软件。
2.点击‘工具’菜单,选择‘序列号和安装’选项。
3.在弹出的窗口中点击‘下一步’按钮。
4.勾选‘远程安装’选项后,点击‘下一步’按钮。
5.在’Windows Agent/Option计算机’图标上点击鼠标右键。
选择‘添加远程计算机’。
6.选择要添加的计算机名称。
7.输入欲添加的计算机上的管理员账号和密码后,点击‘确定’按钮。
8.在弹出对话框中点击‘是’按钮。
9.点击‘下一步’按钮继续。
10.点击‘安装’按钮以进行安装。
安装成功后对方计算机会自动重启,至此安装结束。
Step 2 增加备份计划1. 打开Veritas Backup软件,定位到‘作业设置’,之后点击‘新建作业’新建备份作业。
2.输入备份列表的列表名(可选)。
点击下方的‘+’号。
定位到要备份的计算机3.勾选需要备份的文件夹。
4.在‘属性’窗口中选择‘计划’。
在计划选项中选择需要的项目。
通常备份都是按计划运行的。
点选‘根据计划运行’选项。
5.点击‘详细编辑计划’按钮。
6.点选’时间窗口’选项,在右面的选择适合的时间段。
7.选择‘月份日期’选项。
在右面点击‘全部设置’按钮以选择整个月份。
最后点击‘确定’按钮退出此窗口。
8.可以点击‘浏览计划概括’按钮观看刚才编辑的计划。
9.最后点击‘递交’按钮递交作业。
在弹出的窗口中点击‘确定’按钮完成递交。
注:当作业到达设定的时间时会自动执行。
可在作业监护器中观察到。
运行后的效果(如图)Step 3 更换磁带1.打开Veritas Backup软件。
定位到‘设备’,在下方的DELL1驱动器上单击鼠标右键,选择‘弹出(J)’选项弹出磁带(此例演试的是将星期日的磁带更换为星期一的磁带)。
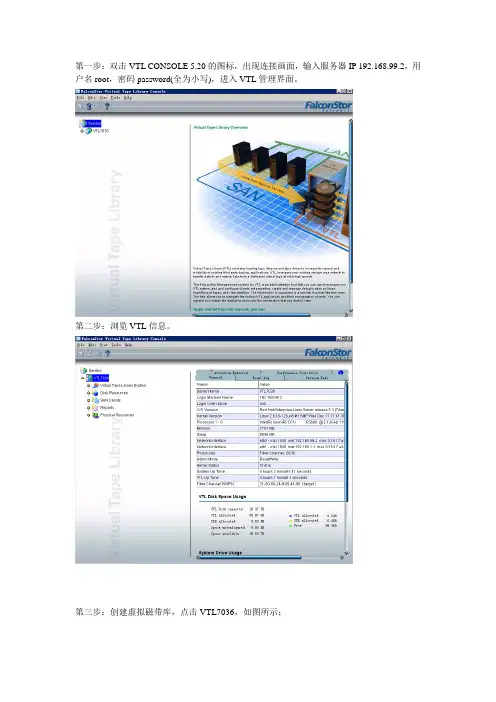
第一步:双击VTL CONSOLE 5.20的图标,出现连接画面,输入服务器IP 192.168.99.2,用户名root,密码password(全为小写),进入VTL管理界面。
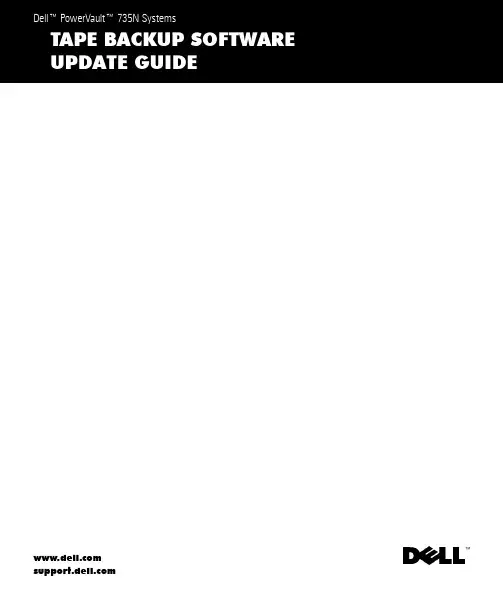
第二步:浏览VTL信息。
第三步:创建虚拟磁带库,点击VTL7036,如图所示;第四步:选中virtual tape library system,右键弹出向导:第五步:运行configuration wizard.,弹出如图所示菜单第六步:点击NEXT第八步:选择FALCON VTL设备第十步:选中HP Ultrium 2-SCSI设备第十一步:将TOTAL VIRTUAL DRIVES的数量改成4,再点NEXT第十二步:将enable automated tape caching勾上,点NEXT第十三步:使用默认设置,点NEXT第十四步:不勾选enable tape duplication,点NEXT第十五步:不修改虚拟磁带信息,使用默认值。
第十六步:修改磁带容量为200G,点NEXT第十七步:完成磁带库创建,点FINISH。
第十八步:查看创建信息。
第十九步:弹出信息,点NO。
第二十步:弹出信息询问是否还需要创建磁带库,点NO。
第二十一步:设置SAN客户端第二十二步:点NEXT,输入备份服务器IP第二十三步:勾上fibre channel,点NEXT第二十四步:勾上WWPN,点NEXT第二十五步:勾上第一个选项第二十六步:查看创建信息,点FINISH。
第二十七步:询问是否还需要创建SAN CLIENT,选NO。
第二十八步:分配虚拟磁带库第二十九步:选FIBRE CHANNEL第三十步:选中192.168.31.2第三十一步:选finish第三十二步:在备份服务器的硬件管理里扫描硬件改动,即可扫描到虚拟磁带机。
至此,虚拟磁带库的创建工作全部完成,在备份软件中使用这些虚拟磁带机进行备份即可。

Linux环境下磁带机的直接备份操作Working with “mt” Commands: reading and writing to tape.The following assumes the tape device is “/dev/st0″STEP 1 ( rewind the tape)# mt -f /dev/st0 rewindSTEP 2 (check to see if you are at block 0)# mt -f /dev/st0 tellAt block 0.STEP 3 (Backup “tar compress” directories “one” and “two”)# tar -czf /dev/st0 one twoSTEP 4 (Check to see what block you are at)# mt -f /dev/st0 tellY ou should get something like block 2 at this point.STEP 5 (Rewind the tape)# mt -f /dev/st0 rewindSTEP 6 (List the files)# tar -tzf /dev/st0one/one/testtwo/STEP 7 (Restore directory “one” into directory “junk”). Note, you have to first rewind the tape, since the last operation moved ahead 2 blocks. Check this with “mt -f /dev/st0″.# cd junk# mt -f /dev/st0 rewind# mt -f /dev/st0 tellAt block 0.# tar -xzf /dev/st0 oneSTEP 8 (Next, take a look to see what block the tape is at)# mt -f /dev/st0 tellAt block 2.STEP 9 (Now backup directories three and four)# tar -czf /dev/st0 three fourAfter backing up the files, the tape should be past block 2. Check this.# mt -f /dev/st0 tellAt block 4.Currently the following exist:At block 1:one/one/testtwo/At block 2:three/three/sampleherefour/At block 4:(* This is empty *)A few notes. Y ou can set the blocking factor and a labelwith tar. For example:$ tar ?label=”temp label” ?create ?blocking-factor=128 ?file=/dev/st0 Notes But note if you try to read it with the default, incorrect blockingfactor, then, you will get the following error:$ tar -t ?file=/dev/st0tar: /dev/st0: Cannot read: Cannot allocate memorytar: At beginning of tape, quitting nowtar: Error is not recoverable: exiting nowHowever this is easily fixed with the correct blocking factor$ mt -f /dev/st0 rewind$ tar -t ?blocking-factor=128 ?file=/dev/st0temp labelNotesT ake advantage of the label command.$ MYCOMMENTS=”Big_important_tape”$ tar ?label=”$(date +%F)”+”${MYCOMMENTS}”Writing to tape on a remote 192.168.1.155 computer$ tar cvzf - ./tmp | ssh -l chirico 192.168.1.155 …(mt -f /dev/st0 rewind; dd of=/dev/st0 )‟Restoring the contents from tape on a remote computer$ ssh -l chirico 192.168.1.155 …(mt -f /dev/st0 rewind; dd if=/dev/st0 )‟|tar xzf - Getting data off of tape with dd command with odd blocking factor. Just set ibs very high$ mt -f /dev/st0 rewind$ tar ?label=”Contenets of Notes” ?create ?blocking-factor=128 ?file=/dev/st0 Notes$ mt -f /dev/st0 rewind$ dd ibs=1048576 if=/dev/st0 of=notes.tarThe above will probably work with ibs=64k as wellLinux下使用磁带机的方式有多种,主要有通过Amanda、T ar等软件进行操作。
Notes, Notices, Cautions, and WarningsNOTE: A NOTE indicates important information that helps you make better use of your computer.NOTICE: A NOTICE indicates either potential damage to hardware or loss of data and tells you how to avoid the problem.CAUTION: A CAUTION indicates a potentially hazardous situation which, if not avoided, may result in minor or moderate injury.WARNING: A WARNING indicates a potentially hazardoussituation which, if not avoided, may result in severe injury.____________________Information in this document is subject to change without notice.©2001Dell Computer Corporation.All rights reserved.Reproduction in any manner whatsoever without the written permission of Dell Computer Corporation is strictly forbidden.Trademarks used in this text: Dell, the DELL logo, Dell ActiveArchive, and PowerVault are trademarks of Dell Computer Corporation; VERITAS is a registered trademark and Backup Exec is a trademark of VERITAS Software Corporation; Computer Associates and ARCserve are registered trademarks of Computer Associates International, Inc; Microsoft and Windows are registered trademarks of Microsoft Corporation.Other trademarks and trade names may be used in this document to refer to either the entities claiming the marks and names or their products. Dell Computer Corporation disclaims any proprietary interest in trademarks and trade names other than its own.March 2001P/N 7D902Rev. A00Loc al Ba ck up 1-1About This GuideThis document provides information about installing VERITAS ®Backup Exec™ 8.0 and Computer Associates ® ARCserve ® 2000, and using this software to manage local backups. NOTE:Before installing the backup software, check for the latest driver updates for your software. Y ou may need to install these updates after completing the proceduresbelow. NOTE: When backing up a data volume, Dell recommends that you deselect the ActiveArchive subdirectory that is contained within each volume. If you do not deselect this subdirectory, your backup software will back up all the snapshots on your system. This action creates multiple copies of your data, which causes you to use more tapes than necessary.Installing VERITAS Backup Exec 8.0Y ou must first install VERITAS Backup Exec on the Dell™ PowerVault™ 735N NAS appliance, and then install VERITAS Remote Administrator on a remote system.Installing VERITAS Backup Exec on the NAS ApplianceNOTE: Y ou do not need to attach a keyboard, mouse, or monitor to the NAS appliance before you install VERITAS Backup Exec. VERITAS Backup Exec supports installation using Terminal Services, and management using VERITAS Remote Administrator.1Insert the VERITAS Backup Exec CD in the CD-ROM drive of the NAS appliance.2From the NAS appliance web interface, click Maintenance and then click Terminal Services Advanced Client .3Log into the NAS appliance.4Right-click My Appliance and then click Open on the menu that displays.5Double-click the CD-ROM drive, and then double-click setup.bat in the root directory.6On the VERITAS screen that displays, click Contents .The VERITAS initial screen displays. The left-hand frame displays a file listing.7Click Backup Exec and then click Software Installation .The right-hand frame displays information about installation.8Click Install .The Welcome window displays.1-2LocalBa ck up www.dell.com|support.dell.co m9Click Next .10Click Yes to accept the software license agreement.The VERITAS Backup Exec Information window displays the system requirements and virtual memory recommendations.11Click Next .The Installing VERITAS Backup Exec window displays buttons that allow you to install Backup Exec or Remote Administrator.12Click the button to install VERITAS Backup Exec .The VERITAS Backup Exec Serial Numbers window displays.13Enter the serial number, which is supplied with the software to enable purchased features, and then click Add .If there are additional serial numbers, repeat this step.14When you are finished entering serial numbers, click Next .The VERITAS Backup Exec Install Options window displays.15Select the following options:–Backup Exec –T ape Device Drivers –Online Documentation (optional)–Enable Autoloader support (optional)Only select the Enable Autoloader support option if you use an autoloader and if you have purchased this option. NOTICE:To prevent snapshot loss and system failure, do not install the Open File Option . This option interferes with Dell ActiveArchive™.16Click Next .The Device and Media Manager Window displays.17Make sure that the first option, which disables the use of devices by Removable Storage , is selected.18Click Next .The Start Copying Files window displays what will be installed and where it will be installed.19Click Next.The VERITAS Backup Exec Setup window shows files being copied. After the fileshave been copied, the Service Account window displays.20In the User name and Password fields, enter the user name and password for the account that you want the system services to use. The user must have administratorprivileges.21When the Previous Backup Exec Installation window displays, click OK.The VERITAS Windows NT/2000 Device Driver Installs Welcome screen displays.22Click Next.The Choosing Tape Drives window displays.23Make sure that Use VERITAS tape drivers for all tape devices is selected and then click Next.The Scanning Hardware window displays the devices and drivers found by the scan.24Click Next.The Installing VERITAS Windows NT/2000 Device Drivers window displays.25Click Next.The Completing the VERITAS Windows NT/2000 Device Driver Installationwindow displays.26Click Finish to complete the installation of the device drivers.The Select T ype of Program Group window displays.27Select Common Program Group or Private Program Group and then click Next.A Question screen displays that asks whether you want to install Agent Accelerator onremote systems.28Click No.If you want to install Agent Accelerator, see the VERITAS Backup Exec onlinedocumentation for assistance.The Setup Complete window displays.Loc al Ba ck up1-31-4LocalBa ck up www.dell.com|support.dell.co m29Click Finish .30Remove the VERITAS Backup Exec CD from the CD-ROM drive.31Restart your NAS appliance.Installing VERITAS Backup Exec Remote Administrator on the Remote System 1Insert the VERITAS Backup Exec CD in the CD-ROM drive of the remote system.The CD should autoplay . If it does not, open Microsoft ® Windows ® Explorer and right-click the CD-ROM drive that contains the VERITAS software. Select Autoplay from the menu.2On the VERITAS screen that displays, click Contents .The VERITAS initial screen displays. The left-hand frame displays a file listing.3Click Backup Exec and then click Software Installation .The right-hand frame displays information about installation.4Click Install .The Welcome window displays.5Click Next .6Click Yes to accept the software license agreement.The VERITAS Backup Exec Information window displays the system requirements and virtual memory recommendations.7Click Next .The Installing VERITAS Backup Exec window displays buttons that allow you to install Backup Exec or Remote Administrator.8Click the button to install VERITAS Remote Administrator.The VERITAS Backup Exec Install Options window displays.9Select the following options:–Remote Administrator –Online Documentation (optional)10Click Next.The Start Copying Files window displays what will be installed and where it will beinstalled.11Click Next.The Select T ype of Program Group window displays.12Select Common Program Group or Private Program Group and then click Next.The Setup Complete window displays.13Click Finish.14Remove the VERITAS Backup Exec CD from the CD-ROM drive.Using VERITAS Backup Exec 8.0 Remote Administrator1On the remote system, click the Start button and point to Programs→ VERITAS Backup Exec→ VERITAS Backup Exec.The Connect to Server window displays.2Enter the name of the NAS appliance in the Server field.3Enter login information in the Login Information fields and then click OK.The Backup Exec Assistant window, which displays in front of the Backup Execwindow, provides wizards for many common backup tasks. Y ou can also use the Toolsmenu on the Backup Exec window to display the Backup Exec Assistant.Use Remote Administrator to manage all your backup jobs just as you would from thelocal application. See the VERITAS Backup Exec documentation for moreinformation on how to use the software.Installing ARCserve 2000To use ARCserve 2000 to back up your system, you must first install ARCserve 2000 on theNAS appliance, and then install ARCserve Manager on a remote system.Loc al Ba ck up1-51-6LocalBa ck up www.dell.com|support.dell.co mInstalling ARCserve 2000 on the NAS ApplianceNOTE: Y ou must first attach a keyboard, mouse, and monitor to the system before you install ARCserve 2000. ARCserve 2000 cannot be installed or managed using Terminal Services.1Insert the ARCserve 2000 CD in the CD-ROM drive of the NAS appliance.The CD should autoplay . If it does not, open Windows Explorer and right-click the CD-ROM drive that contains the ARCserve 2000 software. Select Autoplay from the menu.The ARCserve 2000 Product Explorer window displays.2Expand the ARCserve 2000 Advanced Edition tree and select Standard Setup .3Click Install .The ARCserve 2000 Welcome window displays.4Click Next .5Click Yes to accept the software license agreement.The Customer Information window displays.6Enter your name and organization and then click Next .The Setup T ypes window displays.7Select Complete and then click Next .The Select Destination Folder window displays.8Click Next .The Select Database window displays.9Select ARCserve Standard Database or Microsoft SQL Database and then click Next .The Ready to Install the Program window displays.Select Microsoft SQL Database only if you use Microsoft SQL to store your backup database.10Click Install .The Installing ARCserve 2000 window displays. When installation is complete, the System Account window displays.11Enter information in all the fields and then click Next .The ARCserve 2000 Installer Information window displays.12Click OK.The ARCserve 2000 Setup Completed window displays.13Click Finish.Y ou are prompted to restart your system.14Click No. Y ou will restart your system after completely installing the software.15In the ARCserve 2000 Product Explorer, expand the Service Pack 1for ARCserve 2000 tree, click Update ARCserve 2000 Workstation/Advanced Edition, and thenclick Install.Follow the instructions to complete installation.16In the ARCserve 2000 Product Explorer, expand the Latest Updates tree, click Install Latest Updates, and then click Install.Follow the instructions to complete installation.17Exit ARCserve 2000 Product Explorer.18Remove the ARCserve 2000 CD from the CD-ROM drive.19Restart your NAS appliance.Installing ARCserve Manager on the Remote System1Insert the ARCserve 2000 CD in the CD-ROM drive of the remote system.The CD should autoplay. If it does not, open Windows Explorer and right-click theCD-ROM drive that contains the ARCserve 2000 software. Select Autoplay from themenu.The ARCserve 2000 Product Explorer window displays.2Expand the ARCserve 2000 Advanced Edition tree and select Standard Setup.3Click Install.The ARCserve 2000 Welcome window displays.4Click Next.5Click Yes to accept the software license agreement.The Customer Information window displays.Loc al Ba ck up1-71-8Local Ba ck up ww w .d e l l .c o m | s u p p o r t .d e l l .c o m 6Enter your name and organization and then click Next .The Setup T ypes window displays.7Select Custom and then click Next .The Select Database window displays.8Select ARCserve Standard Database or Microsoft SQL Database and then click Next .The Ready to Install the Program window displays.Select Microsoft SQL Database only if you use Microsoft SQL to store your backup database.9Click Install .The Installing ARCserve 2000 window displays. When installation is complete, the System Account window displays.10Complete all the fields and then click Next .The ARCserve 2000 Installer Information window displays.11Click OK .The ARCserve 2000 Setup Completed window displays.12Click Finish .Y ou are prompted to restart your system.13Click No . Y ou will restart your system after completely installing the software.14In the ARCserve 2000 Product Explorer , expand the Service Pack 1 for ARCserve 2000 tree, click Update ARCserve 2000 Workstation/Advanced Edition , and then click Install.Follow the instructions to complete installation.15In the ARCserve 2000 Product Explorer , expand the Latest Updates tree, click Install Latest Updates , and then click Install.Follow the instructions to complete installation.16Exit ARCserve 2000 Product Explorer .17Remove the ARCserve 2000 CD from the CD-ROM drive.18Restart your remote system.Using ARCserve 2000 Remote Manager1On the remote system, click the Start button and point to Programs→ ARCserve→ARCserve Manager.The ARCserve Quick Access window displays.The ARCserve Quick Access window provides wizards for many common backuptasks. Y ou can use these wizards or go through the standard menus to perform yourbackup tasks.2Enter the name of the NAS appliance in the Server field at the top of the screen to manage the backup software on the NAS appliance.Y ou can manage all your backup jobs from this application, just as you would managethem from the local application. See the ARCserve 2000 documentation for moreinformation on how to use the software.Backing Up SnapshotsBacking up snapshots eliminates the possibility of files changing during the backup job.Snapshots always contain the data that existed when the snapshot was taken.NOTE: When backing up a snapshot, Dell recommends that you deselect the ActiveArchivesubdirectory that is contained within each snapshot. If you do not deselect this subdirectory, yourbackup software will back up all the snapshots on your system. This action creates multiplecopies of your data, which causes you to use more tapes than necessary.To back up a snapshot:1Use the PowerVault NAS Manager to create a snapshot.2Select the snapshot in your backup software.3Deselect the ActiveArchive subdirectory.4Back up the snapshot just as you would a standard file system.Limitations on Backing Up Snapshots•Y ou cannot do incremental or differential backups of snapshots.•Y ou cannot use GFS rotation schemes when backing up snapshots.Loc al Ba ck up1-91-10Local Ba ck up ww w .d e l l .c o m | s u p p o r t .d e l l .c o m •Y ou cannot schedule a backup of a snapshot.Y ou must do a manual backup of snapshot files because each snapshot file name is unique in that it includes the date and time (hour-minute-second) that the snapshot was taken.•When you restore a snapshot, you must redirect the restore to a location other than the original snapshot location. A restore to the original location will not be successful.。
电流(c u r r e n t):单位时间的电荷量。
电流以安培计量。
电源接口(p o w e r c o n n e c t o r):外壳的内部电源线连接到的接口,位于磁带机背面。
电源线(p o w e r c o r d):将设备连接到电源的连接线。
读(r e a d):从存储设备、数据介质或其它源获取或转译数据。
端口(p o r t):(1)系统或网络访问点,用于数据进出。
(2)设备上的接口,其它设备(例如,显示器和打印机)的电缆连接到该接口上。
(3)对硬件的物理连接的表示。
端口有时指适配器,但在一个适配器上可以有多个端口。
终结器(t e r m i n a t o r):(1)用于结束 SCSI 总线的部件。
(2)一种单端口、75 欧姆的设备,用于从传输线吸收能量。
通过吸收无线电频率信号,终结器防止能量反射回电缆线路。
终结器通常是被屏蔽的,这可防止不想要的信号进入电缆系统或有效的信号离开电缆系统。
F发光二极管(l i g h t-e m i t t i n g d i o d e):一种半导体管,当受到施加的电压时发光,用在电子显示器中。
伏特(v o l t):电位差和电动势的 SI(国际)单位。
正式定义是:当在带一安培恒定电流的导体上的两点之间耗散的功率等于一瓦特时,这两点间的电位差。
服务器(s e r v e r):通过网络为一个或多个客户机提供服务的功能性设备。
其示例包括文件服务器、打印服务器或邮件服务器。
IBM pSeries、IBM iSeries、HP 和 Sun都是服务器。
与“主机”(host)同义。
复位(r e s e t):将设备或电路返回为清除状态。
G固件(f i r m w a r e):通常作为操作系统一部分交付的专有代码。
固件比从可替换介质装入的软件更高效,并且比纯硬件电路更适应于更改。
固件的一个示例是 PC 主板上的只读内存(ROM)中的基本输入/输出系统(BIOS)。
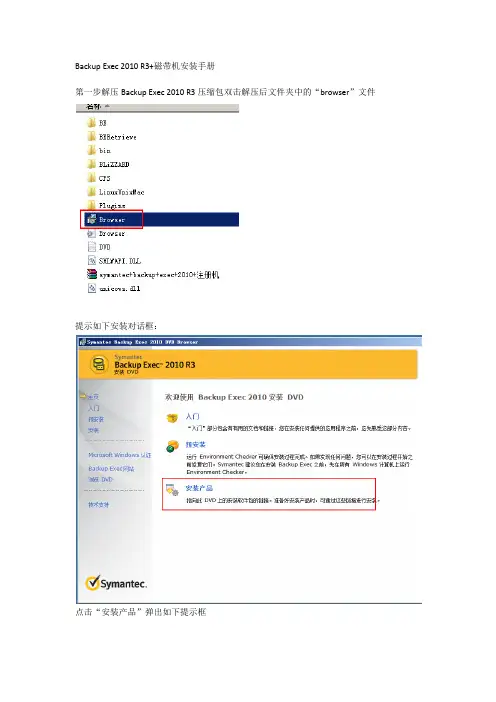
Backup Exec 2010 R3+磁带机安装手册
第一步解压Backup Exec 2010 R3压缩包双击解压后文件夹中的“browser”文件
提示如下安装对话框:
点击“安装产品”弹出如下提示框
双击“Backup Exec”开始安装,弹出如下对话框,选中“同意软件许可协议”点击下一步继续安装
备注:Backup Exec Remote Agent 是安装代理,这一个是在需要备份的服务器上安装Backup Exec Retrieve 是检索功能
在安装类型对话框中我们选中“典型安装”然后使用默认设置安装,直至软件安装完成。
在服务帐号对话框中我们选中的是使用域管理员帐号作为备份帐号因此需要在“用户名、密码、域”中输入相应的用户名,密码和域信息。
然后继续点击“下一步”完成安装
在系统弹出“安装想到已经完成,单机“完成”退出向导”对话框是,我们将“加入backup exec产品改进计划”“查看自述文件”等前面的勾去掉,如图:
点击“下一步”完成安装。
配置BE
双击桌面上的快捷方式“”运行BE软件进入配置页面
首先点击“创建登录帐号”设置备份帐号和密码
然后点击“下一步”
继续下一步
输入相应的用户名和密码,然后保持默认选项一直点点一步完成登录账户的创建。
配置完登录帐号后接下来配置“配置设备”如图
点击“配置设备”----磁带设备,选择相应的磁带设备,具体操作如图
完成设备配置之后,我们再创建一个“介质集”具体操作如图
以上配置完成后我们可以开始备份作业的设置了
选中主页面的“作业设置”—新建作业具体操作如图。

ESXI上虚拟机连接磁带机备份操作步骤:
1.vsphere Client上,连接配置→高级设置→VMDirectPath配置→编辑,打开虚拟机直通配置
列表:
2.直通配置列表中,选择SAS 3G HBA卡:
3.确定后会提示直通配置需要重启主机后才生效,重启主机。
4.关闭虚拟机,在虚拟机右键打开编辑配置,添加PCI设备,并选择SAS 3G HBA卡:
5.开启虚拟机,查看设备管理器,此时会搜索到一个未知SCSI控制器设备,安装SAS 3G HBA
卡驱动,再安装磁带机驱动,测试备份还原成功。
BTW:在此配置时,留意好警告信息和提醒事项:
1.可能会导致主机无法正常引导:
2.牺牲部分功能及浪费资源:。

Linux 磁带机备份完全攻略/safe/752965.html一、确定数据备份策略首先必须确定在备份过程中操作哪些文件。
在商业环境中,这是非常困难的一个决定,而且会产生严重的影响。
如果备份了太多数据,会导致备份系统的成本过于庞大,会削减其他方面的开支。
如果没有备份足够的数据,那么重要的数据就可能会丢失。
备份整个系统非常简单(请确保不要备份NFS挂载的一些目录和诸如/proc/之类的特殊文件系统),但是通常这样备份的内容都太多了。
如果整个系统盘上的数据都丢失了,那么在恢复任何数据之前,很可能不得不重新安装基本的操作系统。
将这些系统文件保存在备份磁带上不是毫无意义的。
因此,为了减少备份系统的成本(包括硬件、网络、系统负载和备份时间),通常应该只备份重要的文件。
共享程序:可以在多个系统中使用的公共程序。
/usr/local或/opt目录常在多个系统之间共享,这些目录包含没有随操作系统提供的其他操作系统。
用户数据:包含所有用户数据和私人文件的用户主目录。
应用程序数据:在分布式计算环境中,应用程序的数据通常在多个系统之间共享。
例如,Web服务器群集通常需要共享相同的内容。
系统信息:系统信息包括账户信息(用户、组和密码)、邮件别名、主机列表等。
只有您才知道自己的数据保存在什么地方,在建立自己的备份系统之前,至少要好好想一想这个问题。
虽然我不可能列出需要备份的每一份数据,但可以提供一些指导,包括:重要的系统数据:不要忘记重要的系统数据,如/etc/目录中的文件,有时是/var/目录中的文件。
如果这些文件都是自动生成的,那么可能只需要在主系统上备份这些文件。
后来添加的软件:包括系统中安装的任何非原操作系统所提供的软件。
您可能已经将这些软件安装到/opt/或/usr/local/目录中了,这样可以简化这些软件的备份过程。
或者,您也可能将所有这些程序都安装到一个集中的文件服务器上,这样会使备份过程更加简单。
如果系统中安装了一些软件包,要确保保存这些已经安装好的包,并在备份过程中包含这些软件包。

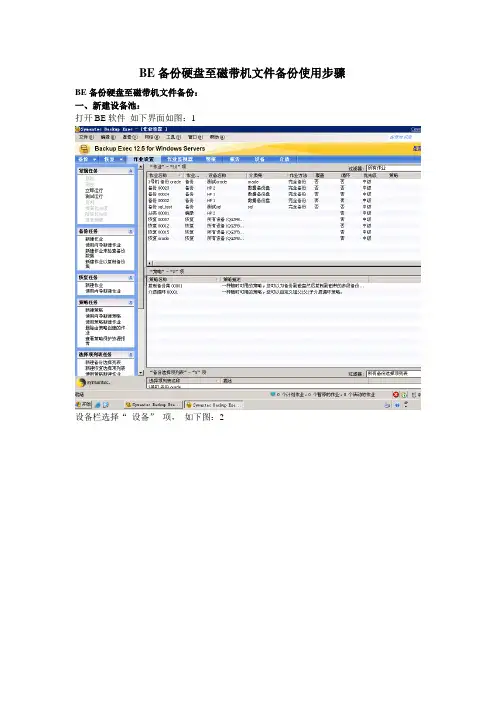
BE备份硬盘至磁带机文件备份使用步骤BE备份硬盘至磁带机文件备份:一、新建设备池:打开BE软件如下界面如图:1设备栏选择“设备”项,如下图:2点击:“自动化介质库”点击:“HP2 ”右键,如下图: 3点击:“配置分区”项,如下图: 4单击每个新分区应从中开始的插槽,以便选择每个分区要包含的自动化介质库插槽。
无论您单击何处,都会插入一个分区分隔栏,其中列出分区中包含的插槽范围。
例如,如果您想在带有 10 个插槽的自动化介质库上创建两个 5 插槽分区,请单击插槽 1 和插槽 6。
在本例中,插槽 1-5 将包括在第一分区中,而插槽 6-10 将包括在第二分区中。
分区可以包含任意数目的自动化介质库插槽;但是,如果存在其他分区,则不能移动或删除第一个分区。
注意: 第一个插槽的编号可能为 1 或 0,具体取决于自动化介质库的配置。
如果自动化介质库使用从零开始编号的插槽配置,而您指定第一个分区从插槽 1 开始,则分区实用程序实际上会将插槽 0 用作分区 1 的第一个插槽,并相应地调整其他所有分区的起始插槽。
如下图: 5划区:如下图: 6点击:“是”分区就划分好了。
如果觉得这样分区不好,可以点击“删除分区”或“全部删除”来重新划分。
如下图:7设备池建完成。
二、介质集的创建点击:任务栏---选“介质集”项,如下图:8在“介质集”点右键属性,选新建介质集,如下图:9在名称栏中输入名称,如:Bebackup1 Bebackup2 两个介质集,如上图,点确认如下图:10设备池新建完成,接下来将介质与介质集关联。
如下图:11在导航栏上,单击介质--展开全部介质显示介质列表,选择要与某个介质集关联的介质。
将介质拖到介质集。
如下图:12全选托到介质集BEbackup1 查看如下图:13如上图,介质集已经关联。
注:上图创建了两个介质集,BEbackup1 BEbackup2 现把所磁带都关联到BEbackup2。
介质集可以创建多个,一个介质集可放一带或多带。
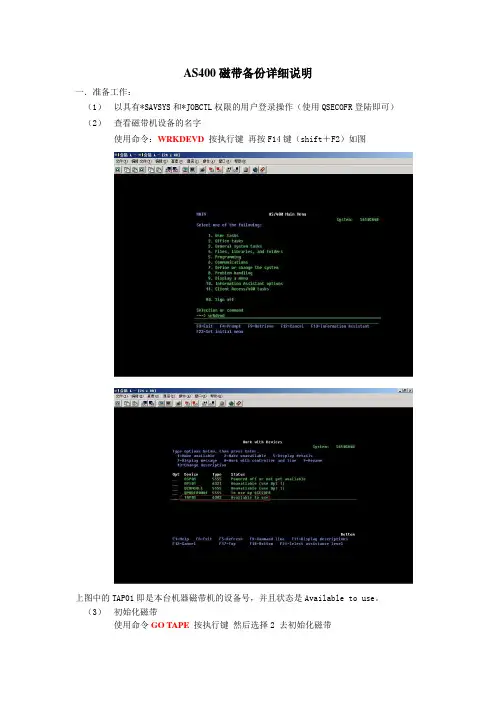
AS400磁带备份详细说明一.准备工作:(1)以具有*SAVSYS和*JOBCTL权限的用户登录操作(使用QSECOFR登陆即可)(2)查看磁带机设备的名字使用命令:WRKDEVD按执行键再按F14键(shift+F2)如图上图中的TAP01即是本台机器磁带机的设备号,并且状态是Available to use。
(3)初始化磁带使用命令GO TAPE按执行键然后选择2 去初始化磁带Note:上图红圈中的参数是需要填写和修改的,其中Device 就是上一步我们查看到的设备名(这里是tap01)。
参数New volume identifier 就是指定磁带卷标,可以设定一个统一的格式(是必填不的)。
参数New owner identifier 所有者的标识,可以填写一些关于这个磁带所要备份内容的一个说明如备份的日期。
参数Check for active files 改成*NO 可以加快磁带格式化的速度。
根据数据量实际情况把要用到的磁带都先格式化好,在备份过程中如果一盒磁带装不下,它只会提示换磁带不会提示格式化磁带。
(4)用ENDDOMSVR+服务器名停止DOMINO服务器二.备份(1)全系统备份建议:在做全系统备份前先重起一次服务器执行一次 rclstg的命令在备份前使用endsbs *all *immed 的命令来结束子系统然后使用wrksbs 来查看子系统结束的情况,最后应该就剩下QBASE一个子系统。
使用命令GO SA VE 进入SA VE 菜单,选择21 回车上图显示系统全备份会执行那些操作。
确认后按回车键上图中红色框标记的是需要修改的参数。
参数Prompt for commands 意思是是否需要命令提示,如果选择Y,系统在执行前一图中的每一步操作时都需要你进行确认后才执行,如果选择N,系统会自动完成所有操作,不需要人为干涉。
参数Check for active files 意思是在备份前检查有没有在使用的文件(也就是说有没有目标被锁定)如果在备份前重起过服务器那么这个参数就不是那么重要了。
医学影像存档与传输系统(PACS系统)之(eWorld Power Archive)V1.8操作手册宁波市科技园区明天医网科技有限公司目录第1章概述 (4)1.1eWorldPACS备份工作站概述 (4)1.2eWorldPACS备份工作站运行环境 (4)1.3本手册的预期读者与目标 (4)1.3.1预期读者 (4)1.3.2预期目标 (4)1.4其他相关参考手册 (5)第2章系统参数设置 (6)2.1基本设置 (7)2.2备份策略 (8)2.3数据管理 (10)第3章操作说明 (12)3.1数据镜像 (12)3.2自动备份 (12)3.3手工刻录 (14)3.4数据远程管理 (15)3.5数据修正 (16)3.6数据重建 (17)3.7磁带备份卷标更新 (18)3.8光盘柜 (18)3.9数据库备份文件刻录 (19)3.10影像浏览 (19)第4章eWorldView (20)4.1卷标信息 (20)4.2数据备份 (21)4.3影像浏览 (22)4.4文件管理 (23)4.5影像发送 (23)4.6数据查询 (24)第5章更新说明 (25)5.1新增/改进功能 (25)5.2错误修正 (26)第6章疑难解答 (27)第1章概述1.1 eWorldPACS备份工作站概述eWorldPACS备份工作站是专为管理员进行影像数据备份使用的,是管理员对PACS系统进行日常维护的重要工作之一。
及时的数据备份将在系统发生灾难性故障时具有极其重要的意思。
eWorldPACS备份工作站可根据管理员设定的执行条件,使用全自动工作模式,最大程度减轻管理员的工作量。
管理员只需要更换刻录盘,标记盘标。
备份工作站另支持手工刻录,允许管理员刻录指定检查的影像。
其它特点:支持CD/DVD, 支持压缩刻录,光盘自带浏览器等。
1.2 eWorldPACS备份工作站运行环境操作系统:WINDOWS2000/XP/2003数据库:SQL SERVER2000其他辅助软件:Nero6.61.3 本手册的预期读者与目标1.3.1预期读者eWorldPACS系统安装工程师和最终用户的系统管理员1.3.2预期目标了解eWorldPACS备份工作站中的系统设置,并根据医院的实际情况可对参数进行相应的调整。
一.启动Win2003自带的备份程序。
二.插入VXA磁带。
此时磁带机的Action绿灯会闪烁,Ready灯会常亮。
等磁带就位后,A ction绿灯熄灭,Ready灯仍常亮。
2.1 若插入的磁带,已经包含了以前的备份编录信息,但备份工具中没有此条编录信息的记录,则会有如下显示:选择“允许备份工具使用这个媒体”即可。
备份程序会识别磁带上以前的备份编录信息,并添加到Ecrix VXA-1下面,即可用于备份。
如下图:2.2 若插入的磁带上,已经包含了以前的备份编录信息,且备份工具中,已经有此条编录信息的记录,则在“还原和管理媒体”中,“媒体位置”的状态会从“脱机”变成“IBM VXA-2 SCSI T ape Drive”:2.3.1 若插入的磁带上,有不能识别的备份编录信息,则会有如下提示,选择否,数据会被清除:2.3.2在“还原和管理媒体”中,右键单击“无法识别”中的媒体,然后选择“标为可用”。
三.在“备份”中,选择要备份的目录,备份目的地选为Ecrix VXA-1。
在备份媒体或文件名处:3.1 若是已经包含了以前的备份编录信息的磁带,则选择识别好的编录。
3.2 若磁带中有不能识别的备份编录信息,且已经按照2.3将磁带“标为可用”,则选择新建。
在第4步点击备份之后,可能还会有“正在等上一个媒体操作结束…”的提示。
四.备份时,可以选择“将备份附加到媒体”或者“用备份替换媒体上的数据”。
前者用于将备份追加到旧的备份编录信息上,而后者用于创建新的备份编录信息(会删除以前的)。
选择“用备份替换媒体上的数据”,与在“备份媒体或文件名”处选择新建,是等效的。
点击备份之后,先后出现“正在装载媒体”、“正在倒带,请稍后…”、“准备用卷影复制进行备份…”等等,最终完成。
此过程中,磁带机的Action绿灯会闪烁,Ready灯为常亮。
正在装载媒体正在倒带,请稍后…准备用卷影复制进行备份…从计算机备份文件正在倒带,请稍后…完成五.备份完成后,在“还原和管理媒体”中,右键单击磁带机中磁带所对应的编录,然后选择“从驱动器弹出”。
磁带备份软件使用手册
目录
STEP 1 增加备份客户端 (1)
STEP 2 增加备份作业 (7)
STEP 3 更换磁带 (14)
STEP 4 释放磁带空间 (20)
版本日期制作者描述
1.02005-8-1首稿
Step 1 增加备份客户端
1.打开Veritas Backup软件。
2.点击‘工具’菜单,选择‘序列号和安装’选项。
3.在弹出的窗口中点击‘下一步’按钮。
4.勾选‘远程安装’选项后,点击‘下一步’按钮。
5.在’Windows Agent/Option计算机’图标上点击鼠标右键。
选择‘添加远程计算机’。
6.选择要添加的计算机名称。
7.输入欲添加的计算机上的管理员账号和密码后,点击‘确定’按钮。
8.在弹出对话框中点击‘是’按钮。
9.点击‘下一步’按钮继续。
10.点击‘安装’按钮以进行安装。
安装成功后对方计算机会自动重启,至此安装结束。
Step 2 增加备份计划
1. 打开Veritas Backup软件,定位到‘作业设置’,之后点击‘新建作业’新建备份作业。
2.输入备份列表的列表名(可选)。
点击下方的‘+’号。
定位到要备份的计算机
3.勾选需要备份的文件夹。
4.在‘属性’窗口中选择‘计划’。
在计划选项中选择需要的项目。
通常备份都是按计划运行的。
点选‘根据计划运行’选项。
5.点击‘详细编辑计划’按钮。
6.点选’时间窗口’选项,在右面的选择适合的时间段。
7.选择‘月份日期’选项。
在右面点击‘全部设置’按钮以选择整个月份。
最后点击‘确定’按钮退出此窗口。
8.可以点击‘浏览计划概括’按钮观看刚才编辑的计划。
9.最后点击‘递交’按钮递交作业。
在弹出的窗口中点击‘确定’按钮完成递交。
注:当作业到达设定的时间时会自动执行。
可在作业监护器中观察到。
运行后的效果(如图)
Step 3 更换磁带
1.打开Veritas Backup软件。
定位到‘设备’,在下方的DELL1驱动器上单击鼠标右键,选择‘弹出(J)’选项弹出磁带(此例演试的是将星期日的磁带更换为星期一的磁带)。
2.在弹出的窗口中点击‘确定’按钮。
已无磁带信息
磁带弹出后的画面子.
3.更换磁带后必须刷新驱动器。
操作如下:在下方的DELL1驱动器上单击鼠标右键,选择‘列清单’选项弹出磁带。
4.在弹出的窗口中点击‘确定’按钮。
5.列清单完毕后该磁带是存放在‘暂存介质’中的,必须将磁带转到‘介质集1’中方能执行备份操作。
操作如下:定位到‘介质’界面,点击‘介质集1’,将会看到之前的磁带名(SUNDAY)。
6.把旧的磁带移到暂存介质中,操作如下:右键点击SUNDAY,在弹出的菜单中选择‘移动介质’。
7.在弹出的对话框中的‘将此介质移动至’一栏选为暂存介质。
之后点击‘确定’按钮,完成旧磁带的转移。
8.之后转到‘暂存介质‘选项,找到新更换的磁带名(MONDAY)后,按鼠标右键。
9.在弹出的菜单中选择’移动介质’。
10.在弹出的对话框中的‘将此介质移动至’一栏选为介质集1。
之后点击‘确定’按钮,完成旧磁带的转移。
11之后定位到‘设备’界面,将会在右面的磁带信息栏中看到磁带的位置已变为‘介质集1’。
STEP 4 释放磁带空间
1.如果某一盒磁带的可用空间不能满足备份作业所需的空间,必须释放磁带已使用的空间。
操作如下:定位到‘设备’界面。
在‘DELL1’上单击右键,选择‘快清除’选项。
2.在弹出的对话框点击‘确定’按钮。
3.点击‘是’按钮以执行清除磁带操作。
END。