php生成缩略图
- 格式:docx
- 大小:16.08 KB
- 文档页数:3
phpcmsv9教程:thumb(缩略图)函数说明打开phcmsc/libs/functions/global.func.php⽂件,找到如下代码:/*** ⽣成缩略图函数* @param $imgurl 图⽚路径* @param $width 缩略图宽度* @param $height 缩略图⾼度* @param $autocut 是否⾃动裁剪默认裁剪,当⾼度或宽度有⼀个数值为0是,⾃动关闭* @param $smallpic ⽆图⽚是默认图⽚路径*/function thumb($imgurl, $width = 100, $height = 100 ,$autocut = 1, $smallpic = 'nopic.gif') {global $image;$upload_url = pc_base::load_config('system','upload_url');$upload_path = pc_base::load_config('system','upload_path');if(empty($imgurl)) return IMG_PATH.$smallpic;$imgurl_replace= str_replace($upload_url, '', $imgurl);if(!extension_loaded('gd') || strpos($imgurl_replace, '://')) return $imgurl;if(!file_exists($upload_path.$imgurl_replace)) return IMG_PATH.$smallpic;list($width_t, $height_t, $type, $attr) = getimagesize($upload_path.$imgurl_replace);if($width>=$width_t || $height>=$height_t) return $imgurl;$newimgurl = dirname($imgurl_replace).'/thumb_'.$width.'_'.$height.'_'.basename($imgurl_replace);if(file_exists($upload_path.$newimgurl)) return $upload_url.$newimgurl;if(!is_object($image)) {pc_base::load_sys_class('image','','0');$image = new image(1,0);}return $image->thumb($upload_path.$imgurl_replace, $upload_path.$newimgurl, $width, $height, '', $autocut) ? $upload_url.$newimgurl : $imgurl;}此函数类似php⼿册的表现形式为:string thumb( string $imgurl, [int $width = 100], [int $height = 100], [int $autocut = 1], [string $smallpic = 'images/nopic_small.gif'] )功能:调⽤缩略图参数:string $imgurl:图⽚地址int $width:图⽚宽度,可选参数,默认为100int $height:图⽚⾼度,可选参数,默认为100int $autocut:是否⾃动裁切,可选参数,默认为1,为0时,将只等⽐压缩,可能出现图⽚变形string $smallpic:⽆图⽚时显⽰的⼩图⽚地址,可选参数,默认为 images/nopic_small.gif⽰例:{thumb($r[thumb], 160, 100,0)}解析:调⽤缩略图:{thumb(图⽚路径,宽为160,⾼为100,0为等⽐压缩)}---------------------作者:buzhang1314来源:CSDN原⽂:https:///buzhang1314/article/details/50675119版权声明:本⽂为博主原创⽂章,转载请附上博⽂链接!。
php生成图片缩略图的方法php生成图片缩略图的方法虽然在HTML中可以通过指定图片的宽度和高度来随意缩放图片,但是这种方法不会减少图片的像素数目。
图形文件的尺寸没有改变,当然也不会加快图片下载的速度了。
当然也可以手动通过图形软件生成图片的缩略图,但对于大量的图片展示来说,这个工作量将十分巨大。
为此微缩图的自动生成程序就被设计出来了。
PHP中提供的imagecopyresized函数就可以用来生成真正的缩赂图片。
该函数的标推语法如下:语法:int imagecopyresized(int dst_im,int src_im,int dstX,int dstY,int srcX,int srcY,int dstW,int dstH,int srcW,int srcH);返回值:整数函数种类:图形处理内容说明:本函数可复制新图,并重新调整图片的大小尺寸。
参数都是目的在前,来源在后。
参数dst im及src_im为图片的handle。
参数dstX、dstY、srcX、srcY分别为目的及来源的坐标。
参数dstW、dstH、srcW、srcH分别为来源及目的的宽及高,欲调整的新图的尺寸就在这儿配置。
下面举个例子来说明这个函数的用法,对应的程序thumb.php如程序清单12—5所示。
程序清单12—5 thumb.php复制代码代码如下:<?// 本函数从源文件取出图像,设定成指定大小,并输出到目的文件// 源文件格式:gif,jpg,png// 目的文件格式:gif// $srcFile:源文件// $dstFile: 目标文件// $dstW:目标图片宽度// $dstH:目标文件高度function makethumb($srcFile,$dstFile,$dstW,$dstH){$data = GetImageSize($srcFile,&$info);switch ($data[2]){case 1:$imgsrc = @ImageCreateFromGIF($srcFile);break;case 2:$imgsrc = @ImageCreateFromJPEG($srcFile);break;case 3:$imgsrc = @ImageCreateFromPNG($srcFile);break;}$srcW = ImageSX($imgsrc);$srcH = ImageSY($imgsrc);$ni = ImageCreate($dstW,$dstH);ImageCopyResized($ni,$imgsrc,0,0,0,0,$dstW,$dstH,$srcW,$ srcH);Imagegif($ni,$dstFile);// 如果需要输出到浏览器,那么将上一句改为 ImageJpeg($ni);// 如果需要其他格式的图片,改动最后一句就可以了}>在这个例子中,首先通过getimagesize()函数获得源图片的`情况,再用 imagecreatefromgif()、imagecreatefromjpeg()或imagecreatefrompng()创建一个源位图$imgsrc,然后用imagecreate()函数创建一个目标位图,其长、宽各是源位图的一半。
使用PHP扩展php_imagick对图片改变大小、旋转、锐化、减色或增加特效php_imagick是PHP对图片处理的一个扩展包,可以完成对图片改变大小、旋转、锐化、减色或增加特效等操作。
一、windows下安装Imagick扩展:1、下载 ImageMagick并安装http://image_/image_magick/binaries/ImageMagick-6.6.2-10-Q16-windows -dll.exe2、下载php_imagick.dll/outside-blog-content/imagick-windows-builds/php53/imagick-2.3.0-dev/ vc9_nts/php_imagick.dll如果你用的是线程安全的php,请下载/outside-blog-content/imagick-windows-builds/php53/imagick-2.3.0-dev/vc9_zts/php_imagick.dll3、设置在php.ini中添加extension=php_imagick.dll ,重启web server二、linux下安装Imagick扩展:1.yum安装ImageMagickyum install ImageMagick ImageMagick-devel2.测试是否安装成功convert -version3.安装imagick扩展wget /get/imagick-3.1.0RC2.tgztar xzvf imagick-3.1.0RC2.tgzcd imagick-3.1.0RC2phpize./configuremakemake install4.编辑php.ini文件,在文件末尾添加如下代码extension=imagick.so5. 重新启动apache服务器service httpd restart三、案例1. 边框处理//by header('Content-type: image/jpeg');$image = new Imagick('test.jpg');$color=new ImagickPixel();$color->setColor("rgb(220,220,220)");$image->borderImage($color,5,4);$image->blurImage(5,5,imagick::CHANNEL_GREEN);echo $image;(PS:php Q扣峮:276167802,验证:wk)2.生成缩略图//by header('Content-type: image/jpeg');$image = new Imagick('test.jpg');$image->thumbnailImage(50, 0);echo $image;来源:清源教育。
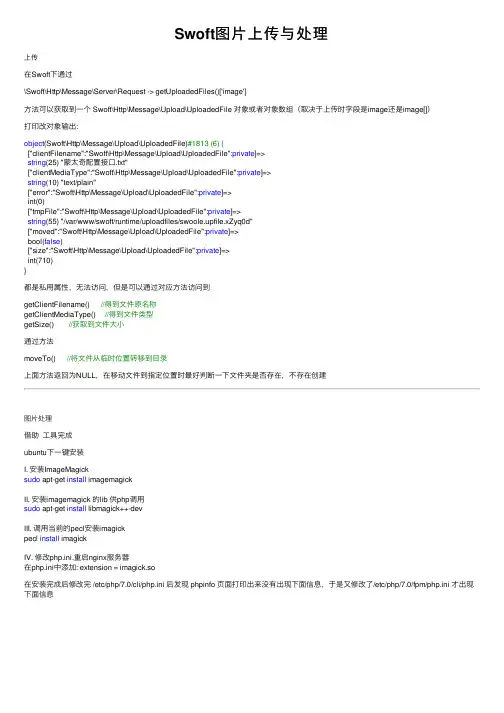
Swoft图⽚上传与处理上传在Swoft下通过\Swoft\Http\Message\Server\Request -> getUploadedFiles()['image']⽅法可以获取到⼀个 Swoft\Http\Message\Upload\UploadedFile 对象或者对象数组(取决于上传时字段是image还是image[])打印改对象输出:object(Swoft\Http\Message\Upload\UploadedFile)#1813 (6) {["clientFilename":"Swoft\Http\Message\Upload\UploadedFile":private]=>string(25) "蒙太奇配置接⼝.txt"["clientMediaType":"Swoft\Http\Message\Upload\UploadedFile":private]=>string(10) "text/plain"["error":"Swoft\Http\Message\Upload\UploadedFile":private]=>int(0)["tmpFile":"Swoft\Http\Message\Upload\UploadedFile":private]=>string(55) "/var/www/swoft/runtime/uploadfiles/swoole.upfile.xZyq0d"["moved":"Swoft\Http\Message\Upload\UploadedFile":private]=>bool(false)["size":"Swoft\Http\Message\Upload\UploadedFile":private]=>int(710)}都是私⽤属性,⽆法访问,但是可以通过对应⽅法访问到getClientFilename() //得到⽂件原名称getClientMediaType() //得到⽂件类型getSize() //获取到⽂件⼤⼩通过⽅法moveTo() //将⽂件从临时位置转移到⽬录上⾯⽅法返回为NULL,在移动⽂件到指定位置时最好判断⼀下⽂件夹是否存在,不存在创建图⽚处理借助⼯具完成ubuntu下⼀键安装I. 安装ImageMagicksudo apt-get install imagemagickII. 安装imagemagick 的lib 供php调⽤sudo apt-get install libmagick++-devIII. 调⽤当前的pecl安装imagickpecl install imagickIV. 修改php.ini.重启nginx服务器在php.ini中添加: extension = imagick.so在安装完成后修改完 /etc/php/7.0/cli/php.ini 后发现 phpinfo 页⾯打印出来没有出现下⾯信息,于是⼜修改了/etc/php/7.0/fpm/php.ini 才出现下⾯信息安装 Intervention Imagecomposer require intervention/image安装完成后可以直接在页⾯useuse Intervention\Image\ImageManager;$manager = new ImageManager(array('driver' => 'imagick'));//宽缩⼩到300px,⾼⾃适应$thumb = $manager->make($path)->resize(300, null, function ($constraint) { $constraint->aspectRatio();});$thumb->save($path);完整代码namespace App\Controllers\Api;use Intervention\Image\ImageManager;use Swoft\Http\Message\Server\Request;use Swoft\Http\Message\Upload\UploadedFile;use Swoft\Http\Server\Exception\NotAcceptableException;use Swoft\Http\Server\Bean\Annotation\Controller;use Swoft\Http\Server\Bean\Annotation\RequestMapping;use Swoft\Http\Server\Bean\Annotation\RequestMethod;class FileController{//图⽚可接受的mime类型private static$img_mime = ['image/jpeg','image/jpg','image/png','image/gif']; /*** ⽂件上传* @RequestMapping(route="image",method=RequestMethod::POST)*/public static function imgUpload(Request $request){$files = $request->getUploadedFiles()['image'];if(!$files){throw new NotAcceptableException('image字段为空');}if(is_array($files)){$result = array();foreach ($files as$file){self::checkImgFile($file);$result[] = self::saveImg($file);}}else{self::checkImgFile($files);return self::saveImg($files);}}/*** 保存图⽚* @param UploadedFile $file*/protected static function saveImg(UploadedFile $file){$dir = alias('@upload') . '/' . date('Ymd');if(!is_dir($dir)){@mkdir($dir,0777,true);}$ext_name = substr($file->getClientFilename(), strrpos($file->getClientFilename(),'.'));$file_name = time().rand(1,999999);$path = $dir . '/' . $file_name . $ext_name;$file->moveTo($path);//修改移动后⽂件访问权限,⽂件默认没有访问权限@chmod($path,0775);//⽣成缩略图$manager = new ImageManager(array('driver' => 'imagick'));$thumb = $manager->make($path)->resize(300, null, function ($constraint) {$constraint->aspectRatio();});$thumb_path = $dir. '/' . $file_name . '_thumb' .$ext_name;$thumb->save($dir. '/' . $file_name . '_thumb' .$ext_name);@chmod($thumb_path,0775);return ['url' => explode(alias('@public'),$path)[1],'thumb_url' => explode(alias('@public'),$thumb_path)[1]];}/*** 图⽚⽂件校验* @param UploadedFile $file* @return bool*/protected static function checkImgFile(UploadedFile $file){if($file->getSize() > 1024*1000*2){throw new NotAcceptableException($file->getClientFilename().'⽂件⼤⼩超过2M'); }if(!in_array($file->getClientMediaType(), self::$img_mime)){throw new NotAcceptableException($file->getClientFilename().'类型不符');}return true;}}使⽤FileController::imgUpload($request);说明当前保存⽂件路径为 alias("@upload"),需要在 /config/define.php ⼿动填上该路径$aliases = ['@root' => BASE_PATH,'@env' => '@root','@app' => '@root/app','@res' => '@root/resources','@runtime' => '@root/runtime','@configs' => '@root/config','@resources' => '@root/resources','@beans' => '@configs/beans','@properties' => '@configs/properties','@console' => '@beans/console.php','@commands' => '@app/command','@vendor' => '@root/vendor','@public' => '@root/public', //public⽬录,也是nginx设置站点根⽬录 '@upload' => '@public/upload' //上传⽬录];Swoft 不提供静态资源访问,可以使⽤nginx托管配置nginxvim /etc/nginx/sites-avaiable/defaultserver {listen 80 default_server;listen [::]:80 default_server;# 域名设置server_name ;#设置nginx根⽬录root /var/www/html/swoft/public;# 将所有⾮静态请求转发给 Swoft 处理location / {proxy_set_header X-Real-IP $remote_addr;proxy_set_header Host $host;proxy_set_header X-Forwarded-For $proxy_add_x_forwarded_for; proxy_set_header Connection "keep-alive";proxy_pass http://127.0.0.1:9501;}location ~ \.php$ {proxy_pass http://127.0.0.1:9501;}# 静态资源使⽤nginx托管location ~* \.(js|map|css|png|jpg|jpeg|gif|ico|ttf|woff2|woff)$ {expires max;}}。

c#⽣成图⽚缩略图的类(2种实现思路)复制代码代码如下:/**//// <summary>/// ⽣成缩略图/// </summary>/// <param name="originalImagePath">源图路径(物理路径)</param>/// <param name="thumbnailPath">缩略图路径(物理路径)</param>/// <param name="width">缩略图宽度</param>/// <param name="height">缩略图⾼度</param>/// <param name="mode">⽣成缩略图的⽅式</param>public static void MakeThumbnail(string originalImagePath, string thumbnailPath, int width, int height, string mode) {Image originalImage = Image.FromFile(originalImagePath);int towidth = width;int toheight = height;int x = 0;int y = 0;int ow = originalImage.Width;int oh = originalImage.Height;switch (mode){case "HW"://指定⾼宽缩放(可能变形)break;case "W"://指定宽,⾼按⽐例toheight = originalImage.Height * width/originalImage.Width;break;case "H"://指定⾼,宽按⽐例towidth = originalImage.Width * height/originalImage.Height;break;case "Cut"://指定⾼宽裁减(不变形)if((double)originalImage.Width/(double)originalImage.Height > (double)towidth/(double)toheight){oh = originalImage.Height;ow = originalImage.Height*towidth/toheight;y = 0;x = (originalImage.Width - ow)/2;}else{ow = originalImage.Width;oh = originalImage.Width*height/towidth;x = 0;y = (originalImage.Height - oh)/2;}break;default :break;}//新建⼀个bmp图⽚Image bitmap = new System.Drawing.Bitmap(towidth,toheight);//新建⼀个画板Graphics g = System.Drawing.Graphics.FromImage(bitmap);//设置⾼质量插值法g.InterpolationMode = System.Drawing.Drawing2D.InterpolationMode.High;//设置⾼质量,低速度呈现平滑程度g.SmoothingMode = System.Drawing.Drawing2D.SmoothingMode.HighQuality;//清空画布并以透明背景⾊填充g.Clear(Color.Transparent);//在指定位置并且按指定⼤⼩绘制原图⽚的指定部分g.DrawImage(originalImage, new Rectangle(0, 0, towidth, toheight),new Rectangle(x, y, ow,oh),GraphicsUnit.Pixel);try{//以jpg格式保存缩略图bitmap.Save(thumbnailPath, System.Drawing.Imaging.ImageFormat.Jpeg);}catch(System.Exception e){throw e;}finally{originalImage.Dispose();bitmap.Dispose();g.Dispose();}}关键⽅法Graphics.DrawImage见ms-help://FrameworkSDKv1.1.CHS/cpref/html/frlrfsystemdrawinggraphicsclassdrawimagetopic11.htm 4个重载⽅法,有直接返回Image对象的,有⽣成缩略图,并且保存到指定⽬录的!复制代码代码如下:using System.IO;using System.Drawing;using System.Drawing.Imaging;/// <summary>/// 图⽚处理类/// 1、⽣成缩略图⽚或按照⽐例改变图⽚的⼤⼩和画质/// 2、将⽣成的缩略图放到指定的⽬录下/// </summary>public class ImageClass{public Image ResourceImage;private int ImageWidth;private int ImageHeight;public string ErrMessage;/// <summary>/// 类的构造函数/// </summary>/// <param name="ImageFileName">图⽚⽂件的全路径名称</param>public ImageClass(string ImageFileName){ResourceImage=Image.FromFile(ImageFileName);ErrMessage="";}public bool ThumbnailCallback(){return false;}/// <summary>/// ⽣成缩略图重载⽅法1,返回缩略图的Image对象/// </summary>/// <param name="Width">缩略图的宽度</param>/// <param name="Height">缩略图的⾼度</param>/// <returns>缩略图的Image对象</returns>public Image GetReducedImage(int Width,int Height){try{Image ReducedImage;Image.GetThumbnailImageAbort callb=new Image.GetThumbnailImageAbort(ThumbnailCallback); ReducedImage=ResourceImage.GetThumbnailImage(Width,Height,callb,IntPtr.Zero);return ReducedImage;}catch(Exception e){ErrMessage=e.Message;return null;}}/// <summary>/// ⽣成缩略图重载⽅法2,将缩略图⽂件保存到指定的路径/// </summary>/// <param name="Width">缩略图的宽度</param>/// <param name="Height">缩略图的⾼度</param>/// <param name="targetFilePath">缩略图保存的全⽂件名,(带路径),参数格式:D:Images ilename.jpg</param> /// <returns>成功返回true,否则返回false</returns>public bool GetReducedImage(int Width,int Height,string targetFilePath){try{Image ReducedImage;Image.GetThumbnailImageAbort callb=new Image.GetThumbnailImageAbort(ThumbnailCallback); ReducedImage=ResourceImage.GetThumbnailImage(Width,Height,callb,IntPtr.Zero);ReducedImage.Save(@targetFilePath,ImageFormat.Jpeg);ReducedImage.Dispose();return true;}catch(Exception e){ErrMessage=e.Message;return false;}}/// <summary>/// ⽣成缩略图重载⽅法3,返回缩略图的Image对象/// </summary>/// <param name="Percent">缩略图的宽度百分⽐如:需要百分之80,就填0.8</param>/// <returns>缩略图的Image对象</returns>public Image GetReducedImage(double Percent){try{Image ReducedImage;Image.GetThumbnailImageAbort callb=new Image.GetThumbnailImageAbort(ThumbnailCallback); ImageWidth=Convert.ToInt32(ResourceImage.Width*Percent);ImageHeight=Convert.ToInt32(ResourceImage.Width*Percent);ReducedImage=ResourceImage.GetThumbnailImage(ImageWidth,ImageHeight,callb,IntPtr.Zero);return ReducedImage;}catch(Exception e){ErrMessage=e.Message;return null;}}/// <summary>/// ⽣成缩略图重载⽅法4,返回缩略图的Image对象/// </summary>/// <param name="Percent">缩略图的宽度百分⽐如:需要百分之80,就填0.8</param>/// <param name="targetFilePath">缩略图保存的全⽂件名,(带路径),参数格式:D:Images ilename.jpg</param> /// <returns>成功返回true,否则返回false</returns>public bool GetReducedImage(double Percent,string targetFilePath){try{Image ReducedImage;Image.GetThumbnailImageAbort callb=new Image.GetThumbnailImageAbort(ThumbnailCallback); ImageWidth=Convert.ToInt32(ResourceImage.Width*Percent);ImageHeight=Convert.ToInt32(ResourceImage.Width*Percent);ReducedImage=ResourceImage.GetThumbnailImage(ImageWidth,ImageHeight,callb,IntPtr.Zero); ReducedImage.Save(@targetFilePath,ImageFormat.Jpeg);ReducedImage.Dispose();return true;}catch(Exception e){ErrMessage=e.Message;return false;}}}。

php自动生成sitemap地图代码php自动生成sitemap地图代码如何生成sitemap地图呢?本文分享一例php代码,用于自动动态生成最新的sitemap地图文件,并通知google网站地图的更新,感兴趣的`朋友参考下吧。
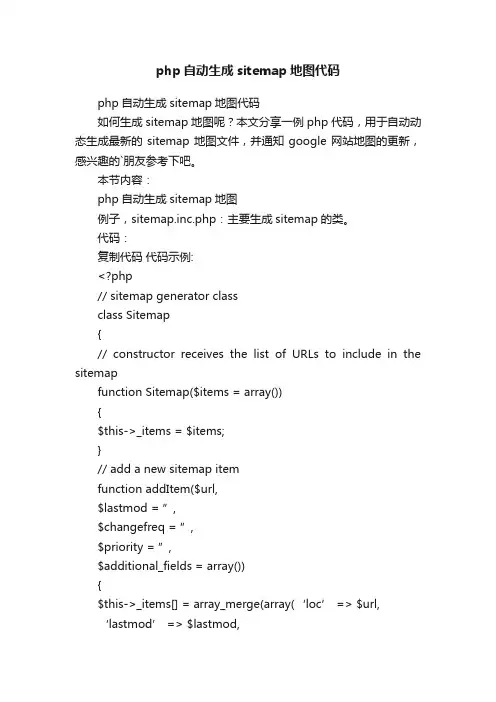
本节内容:php自动生成sitemap地图例子,sitemap.inc.php:主要生成sitemap的类。
代码:复制代码代码示例:<?php// sitemap generator classclass Sitemap{// constructor receives the list of URLs to include in the sitemapfunction Sitemap($items = array()){$this->_items = $items;}// add a new sitemap itemfunction addItem($url,$lastmod = ”,$changefreq = ”,$priority = ”,$additional_fields = array()){$this->_items[] = array_merge(array(‘loc’ => $url,‘lastmod’ => $lastmod,‘changefreq’ => $changefreq,‘priority’ => $priority),$additional_fields);}// get Google sitemapfunction getGoogle(){ob_start();header(‘Content-type: text/xml’);echo ‘<?xml version=”1.0″ encoding=”UTF-8″?>’;echo ‘<urlset xmlns=”/schemas/sitemap/0.9″xmlns:xsi=”/2001/XMLSchema-instance”xsi:schemaLocation=”http://www.sitemap /schemas/si temap/0.9/schemas/sitemap/0.9/sitemap.xsd ”>’;foreach ($this->_items as $i){echo ‘<url>’;foreach ($i as $index => $_i){if (!$_i) continue;echo “<$index>” . $this->_escapeXML($_i) . “</$index>”;}echo ‘</url>’;}echo ‘</urlset>’;return ob_get_clean();}// escape string characters for inclusion in XML structurefunction _escapeXML($str){$translation = get_html_translation_table(HTML_ENTITIES, ENT_QUOTES);foreach ($translation as $key => $value){$translati on[$key] = ‘&#’ . ord($key) . ‘;’;}$translation[chr(38)] = ‘&’;return preg_replace(“/&(?![A-Za-z]{0,4}\w{2,3};|#[0-9]{2,3};)/”,”&” ,strtr($str, $translation));}}>sitemap.php:调用sitemap.inc.php,具体实现sitemap。
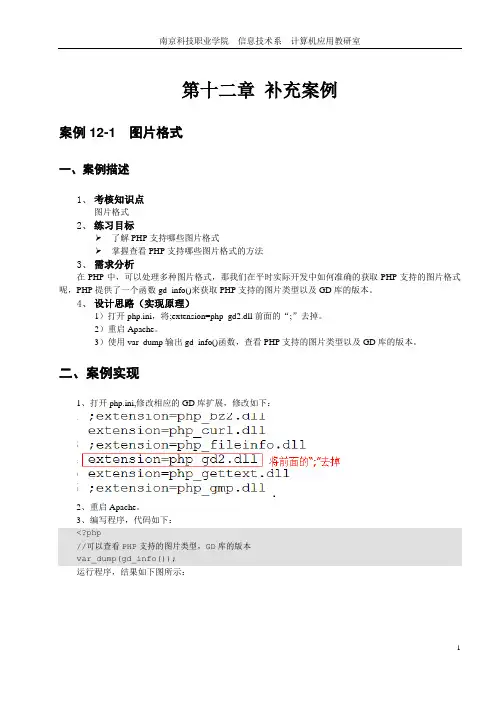
第十二章补充案例案例12-1 图片格式一、案例描述1、考核知识点图片格式2、练习目标了解PHP支持哪些图片格式掌握查看PHP支持哪些图片格式的方法3、需求分析在PHP中,可以处理多种图片格式,那我们在平时实际开发中如何准确的获取PHP支持的图片格式呢,PHP提供了一个函数gd_info()来获取PHP支持的图片类型以及GD库的版本。
4、设计思路(实现原理)1)打开php.ini,将;extension=php_gd2.dll前面的“;”去掉。
2)重启Apache。
3)使用var_dump输出gd_info()函数,查看PHP支持的图片类型以及GD库的版本。
二、案例实现1、打开php.ini,修改相应的GD库扩展,修改如下:2、重启Apache。
3、编写程序,代码如下:<?php//可以查看PHP支持的图片类型,GD库的版本var_dump(gd_info());运行程序,结果如下图所示:三、案例总结1、从上面的程序运行结果中,我们可以看到PHP支持多种图片格式,其中常用的格式有:GIF、JPEG、PNG、WBMP、XBM.。
2、当我们要使用GD库的使用,一定要先打开php.ini中的相应的扩展,并且一定要重启Apache。
案例12-2 创建画布的几种不同方式一、案例描述1、考核知识点创建画布的几种不同方式2、练习目标掌握创建画布的相关函数熟练使用相关函数创建画布3、需求分析GD函数在图形图像绘制方面非常强大,开发人员既可以在已有的图片上绘制,也可以在没有任何素材的基础上绘制。
正如绘画需要画纸一样,在没有任何素材基础上绘画时,首先要创建画布,所有的绘画都需要在画布上进行。
下面我们用PHP提供的GD函数创建画布:imagecreate()、imagecreatefromgif()、imagecreatefromjpeg()、imagecreatefrompng()、imagecreatetruecolor()等。

php版阿⾥云OSS图⽚上传类详解本⽂实例讲述了php版阿⾥云OSS图⽚上传类。
分享给⼤家供⼤家参考,具体如下:1.阿⾥云基本函数/*** 把本地变量的内容到⽂件* 简单上传,上传指定变量的内存值作为object的内容*/public function putObject($imgPath,$object){$content = file_get_contents($imgPath); // 把当前⽂件的内容获取到传⼊⽂件中$options = array();try {$this->ossClient->putObject($this->bucket, $object, $content, $options);} catch (OssException $e) {return $e->getMessage();}return TRUE;}/*** 上传指定的本地⽂件内容*/public function uploadFile($imgPath,$object) //$_FILES['img']['tmp_name']{$filePath = $imgPath;$options = array();try {$this->ossClient->uploadFile($this->bucket, $object, $filePath, $options);} catch (OssException $e) {return $e->getMessage();}return TRUE;}// 删除对象public function deleteObject($object) {try {$this->ossClient->deleteObject($this->bucket, $object);} catch (OssException $e) {return $e->getMessage();}return TRUE;}// 判断对象是否存在public function doesObjectExist($object) {try {$result = $this->ossClient->doesObjectExist($this->bucket, $object);} catch (OssException $e) {return $e->getMessage();}return $result;}// 批量删除对象public function deleteObjects($objects) {try {$this->ossClient->deleteObjects($this->bucket, $objects);} catch (OssException $e) {return $e->getMessage();}return TRUE;}/*** 获取object的内容** @param OssClient $ossClient OssClient实例* @param string $bucket 存储空间名称* @return null*/public function getObject($object){$options = array();try {$content = $this->ossClient->getObject($this->bucket, $object, $options);} catch (OssException $e) {return $e->getMessage();}// file_get_contentsreturn $content;}2.基本配置与辅助函数public $ossClient,$bucket;private $configinfo = array('maxSize' => -1, // 上传⽂件的最⼤值'supportMulti' => true, // 是否⽀持多⽂件上传'allowExts' => array(), // 允许上传的⽂件后缀留空不作后缀检查'allowTypes' => array(), // 允许上传的⽂件类型留空不做检查'thumb' => false, // 使⽤对上传图⽚进⾏缩略图处理'imageClassPath' => 'ORG.Util.Image', // 图库类包路径'thumbMaxWidth' => '',// 缩略图最⼤宽度'thumbMaxHeight' => '',// 缩略图最⼤⾼度'thumbPrefix' => 'thumb_',// 缩略图前缀'thumbSuffix' => '','thumbPath' => '',// 缩略图保存路径'thumbFile' => '',// 缩略图⽂件名'thumbExt' => '',// 缩略图扩展名'thumbRemoveOrigin' => false,// 是否移除原图'zipImages' => false,// 压缩图⽚⽂件上传'autoSub' => false,// 启⽤⼦⽬录保存⽂件'subType' => 'hash',// ⼦⽬录创建⽅式可以使⽤hash date custom'subDir' => '', // ⼦⽬录名称 subType为custom⽅式后有效'dateFormat' => 'Ymd','hashLevel' => 1, // hash的⽬录层次'savePath' => '',// 上传⽂件保存路径'autoCheck' => true, // 是否⾃动检查附件'uploadReplace' => false,// 存在同名是否覆盖'saveRule' => 'uniqid',// 上传⽂件命名规则'hashType' => 'md5_file',// 上传⽂件Hash规则函数名);// 错误信息private $error = '';// 上传成功的⽂件信息private $uploadFileInfo ;public function __get($name){if(isset($this->configinfo[$name])) {return $this->configinfo[$name];}return null;}public function __set($name,$value){if(isset($this->configinfo[$name])) {$this->configinfo[$name] = $value;}}public function __isset($name){return isset($this->configinfo[$name]);}/*** 架构函数* @access public* @param array $config 上传参数*/public function __construct($config=array()) {if(is_array($config)) {$this->config = array_merge($this->config,$config);}$this->bucket = C('OSS_TEST_BUCKET');$this->ossClient = new OssClient(C('OSS_ACCESS_ID'), C('OSS_ACCESS_KEY'), C('OSS_ENDPOINT'), false); }3.主函数/*** 上传所有⽂件* @access public* @param string $savePath 上传⽂件保存路径* @return string*/public function upload($savePath ='') {//如果不指定保存⽂件名,则由系统默认if(empty($savePath)) {$savePath = $this->savePath;}$fileInfo = array();$isUpload = false;// 获取上传的⽂件信息// 对$_FILES数组信息处理$files = $this->dealFiles($_FILES);foreach($files as $key => $file) {//过滤⽆效的上传if(!empty($file['name'])) {//登记上传⽂件的扩展信息if(!isset($file['key'])) $file['key'] = $key;$file['extension'] = $this->getExt($file['name']);$file['savepath'] = $savePath;$file['savename'] = $this->getSaveName($file);// ⾃动检查附件if($this->autoCheck) {if(!$this->check($file))return false;}//保存上传⽂件if(!$this->save($file)) return false;if(function_exists($this->hashType)) {$fun = $this->hashType;$file['hash'] = $fun($this->autoCharset($file['savepath'].$file['savename'],'utf-8','gbk')); }//上传成功后保存⽂件信息,供其他地⽅调⽤unset($file['tmp_name'],$file['error']);$fileInfo[] = $file;$isUpload = true;}}if($isUpload) {$this->uploadFileInfo = $fileInfo;return true;}else {$this->error = '没有选择上传⽂件';return false;}}4.核⼼处理函数/*** 上传⼀个⽂件* @access public* @param mixed $name 数据* @param string $value 数据表名* @return string*/private function save($file) {$filename = $file['savepath'].$file['savename'];if(!$this->uploadReplace && $this->doesObjectExist($filename)) {// 不覆盖同名⽂件$this->error = '⽂件已经存在!'.$filename;return false;}// 如果是图像⽂件检测⽂件格式if( in_array(strtolower($file['extension']),array('gif','jpg','jpeg','bmp','png','swf'))) {$info = getimagesize($file['tmp_name']);if(false === $info || ('gif' == strtolower($file['extension']) && empty($info['bits']))){$this->error = '⾮法图像⽂件';return false;}}if(!$this->putObject($file['tmp_name'], $this->autoCharset($filename,'utf-8','gbk'))) {$this->error = '⽂件上传保存错误!';return false;}if($this->thumb && in_array(strtolower($file['extension']),array('gif','jpg','jpeg','bmp','png'))) {$image = getimagesize(C('OSS_IMG_URL').'/'.$filename);if(false !== $image) {//是图像⽂件⽣成缩略图$thumbWidth = explode(',',$this->thumbMaxWidth);$thumbHeight = explode(',',$this->thumbMaxHeight);$thumbPrefix = explode(',',$this->thumbPrefix);$thumbSuffix = explode(',',$this->thumbSuffix);$thumbFile = explode(',',$this->thumbFile);$thumbPath = $this->thumbPath?$this->thumbPath:dirname($filename).'/';$thumbExt = $this->thumbExt ? $this->thumbExt : $file['extension']; //⾃定义缩略图扩展名// ⽣成图像缩略图import($this->imageClassPath);for($i=0,$len=count($thumbWidth); $i<$len; $i++) {if(!empty($thumbFile[$i])) {$thumbname = $thumbFile[$i];}else{$prefix = isset($thumbPrefix[$i])?$thumbPrefix[$i]:$thumbPrefix[0];$suffix = isset($thumbSuffix[$i])?$thumbSuffix[$i]:$thumbSuffix[0];$thumbname = $prefix.basename($filename,'.'.$file['extension']).$suffix;}$this->thumb(C('OSS_IMG_URL').'/'.$filename,$thumbPath.$thumbname.'.'.$thumbExt,'',$thumbWidth[$i],$thumbHeight[$i],true); }if($this->thumbRemoveOrigin) {// ⽣成缩略图之后删除原图$this->deleteObject($filename);}}}if($this->zipImags) {// TODO 对图⽚压缩包在线解压}return true;}/*** ⽣成缩略图* @static* @access public* @param string $image 原图* @param string $type 图像格式* @param string $thumbname 缩略图⽂件名* @param string $maxWidth 宽度* @param string $maxHeight ⾼度* @param string $position 缩略图保存⽬录* @param boolean $interlace 启⽤隔⾏扫描* @return void*/public function thumb($image, $thumbname, $type='', $maxWidth=200, $maxHeight=50, $interlace=true) {// 获取原图信息$info = Image::getImageInfo($image);if ($info !== false) {$srcWidth = $info['width'];$srcHeight = $info['height'];$type = empty($type) ? $info['type'] : $type;$type = strtolower($type);$interlace = $interlace ? 1 : 0;unset($info);$scale = min($maxWidth / $srcWidth, $maxHeight / $srcHeight); // 计算缩放⽐例if ($scale >= 1) {// 超过原图⼤⼩不再缩略$width = $srcWidth;$height = $srcHeight;} else {// 缩略图尺⼨$width = (int) ($srcWidth * $scale);$height = (int) ($srcHeight * $scale);}// 载⼊原图$createFun = 'ImageCreateFrom' . ($type == 'jpg' ? 'jpeg' : $type);if(!function_exists($createFun)) {return false;}$srcImg = $createFun($image);//创建缩略图if ($type != 'gif' && function_exists('imagecreatetruecolor'))$thumbImg = imagecreatetruecolor($width, $height);else$thumbImg = imagecreate($width, $height);//png和gif的透明处理 by luofei614if('png'==$type){imagealphablending($thumbImg, false);//取消默认的混⾊模式(为解决阴影为绿⾊的问题)imagesavealpha($thumbImg,true);//设定保存完整的 alpha 通道信息(为解决阴影为绿⾊的问题)}elseif('gif'==$type){$trnprt_indx = imagecolortransparent($srcImg);if ($trnprt_indx >= 0) {//its transparent$trnprt_color = imagecolorsforindex($srcImg , $trnprt_indx);$trnprt_indx = imagecolorallocate($thumbImg, $trnprt_color['red'], $trnprt_color['green'], $trnprt_color['blue']); imagefill($thumbImg, 0, 0, $trnprt_indx);imagecolortransparent($thumbImg, $trnprt_indx);}}// 复制图⽚if (function_exists("ImageCopyResampled"))imagecopyresampled($thumbImg, $srcImg, 0, 0, 0, 0, $width, $height, $srcWidth, $srcHeight);elseimagecopyresized($thumbImg, $srcImg, 0, 0, 0, 0, $width, $height, $srcWidth, $srcHeight);// 对jpeg图形设置隔⾏扫描if ('jpg' == $type || 'jpeg' == $type)imageinterlace($thumbImg, $interlace);imagePNG($thumbImg,'Uploads/file.png'); // 中转站// ⽣成图⽚$this->putObject('Uploads/file.png',$thumbname);imagedestroy($thumbImg);imagedestroy($srcImg);return $thumbname;}return false;}5.辅助函数/*** 转换上传⽂件数组变量为正确的⽅式* @access private* @param array $files 上传的⽂件变量* @return array*/private function dealFiles($files) {$fileArray = array();$n = 0;foreach ($files as $key=>$file){if(is_array($file['name'])) {$keys = array_keys($file);$count = count($file['name']);for ($i=0; $i<$count; $i++) {$fileArray[$n]['key'] = $key;foreach ($keys as $_key){$fileArray[$n][$_key] = $file[$_key][$i];}$n++;}}else{$fileArray[$key] = $file;}}return $fileArray;}/*** 检查上传的⽂件* @access private* @param array $file ⽂件信息* @return boolean*/private function check($file) {if($file['error']!== 0) {//⽂件上传失败//捕获错误代码$this->error($file['error']);return false;}//⽂件上传成功,进⾏⾃定义规则检查//检查⽂件⼤⼩if(!$this->checkSize($file['size'])) {$this->error = '上传⽂件⼤⼩不符!';return false;}//检查⽂件Mime类型if(!$this->checkType($file['type'])) {$this->error = '上传⽂件MIME类型不允许!';return false;}//检查⽂件类型if(!$this->checkExt($file['extension'])) {$this->error ='上传⽂件类型不允许';return false;}//检查是否合法上传if(!$this->checkUpload($file['tmp_name'])) {$this->error = '⾮法上传⽂件!';return false;}return true;}// ⾃动转换字符集⽀持数组转换private function autoCharset($fContents, $from='gbk', $to='utf-8') {$from = strtoupper($from) == 'UTF8' ? 'utf-8' : $from;$to = strtoupper($to) == 'UTF8' ? 'utf-8' : $to;if (strtoupper($from) === strtoupper($to) || empty($fContents) || (is_scalar($fContents) && !is_string($fContents))) { //如果编码相同或者⾮字符串标量则不转换return $fContents;}if (function_exists('mb_convert_encoding')) {return mb_convert_encoding($fContents, $to, $from);} elseif (function_exists('iconv')) {return iconv($from, $to, $fContents);} else {return $fContents;}}/*** 检查上传的⽂件类型是否合法* @access private* @param string $type 数据* @return boolean*/private function checkType($type) {if(!empty($this->allowTypes))return in_array(strtolower($type),$this->allowTypes);return true;}/*** 检查上传的⽂件后缀是否合法* @access private* @param string $ext 后缀名* @return boolean*/private function checkExt($ext) {if(!empty($this->allowExts))return in_array(strtolower($ext),$this->allowExts,true);return true;}/*** 检查⽂件⼤⼩是否合法* @access private* @param integer $size 数据* @return boolean*/private function checkSize($size) {return !($size > $this->maxSize) || (-1 == $this->maxSize);}/*** 检查⽂件是否⾮法提交* @access private* @param string $filename ⽂件名* @return boolean*/private function checkUpload($filename) {return is_uploaded_file($filename);}/*** 取得上传⽂件的后缀* @access private* @param string $filename ⽂件名* @return boolean*/private function getExt($filename) {$pathinfo = pathinfo($filename);return $pathinfo['extension'];}/*** 取得上传⽂件的信息* @access public* @return array*/public function getUploadFileInfo() {return $this->uploadFileInfo;}/*** 取得最后⼀次错误信息* @access public* @return string*/public function getErrorMsg() {return $this->error;}总结:与普通上传的区别在于,它是全部通过阿⾥云的oss接⼝来处理⽂件保存的。
《PHP网站开发实例教程》课程教学大纲(课程英文名称)课程编号: 18学分: 5学分学时: 53学时(其中:讲课学时:36 上机学时:17)先修课程:计算机导论、HTML、CSS、JavaScript、MySQL后续课程:适用专业:信息技术及其计算机相关专业开课部门:计算机系一、课程的性质与目标《PHP网站开发实例教程》是面向信息技术及计算机相关专业的一门Web网站开发课程,涉及PHP语法基础、数据库操作、表单与会话技术、文件与图像技术、面向对象编程以及ThinkPHP框架等内容。
通过本课程的学习,学生能够掌握PHP网站开发技术,能够独立开发电商网站等项目。
二、课程的主要内容及基本要求第一章 PHP开篇(4学时)[知识点]什么是PHP常用编辑工具开发环境搭建MySQL的介绍与使用配置虚拟主机项目部署[重点]开发环境搭建MySQL的介绍与使用配置虚拟主机[难点]开发环境搭建MySQL的介绍与使用配置虚拟主机[基本要求]熟悉PHP语言的特点,了解常用的编辑工具掌握PHP开发环境的搭建,学会安装Apache、PHP和MySQL软件掌握MySQL的基本使用,学会使用SQL语句操作数据库掌握PHP成熟项目的部署,学会搭建虚拟主机网站[实践与练习]安排上机,练习Apache、PHP、MySQL的安装,练习虚拟主机的配置和成熟项目的部署,考核MySQL中常用SQL语句的编写。
第二章 PHP语法基础(7学时)[知识点]基本语法变量与常量运算符与表达式数据类型流程控制语句函数数组常用内置函数包含语句[重点]运算符与表达式数据类型流程控制语句函数数组PHP内置函数[难点]运算符与表达式数据类型流程控制语句PHP内置函数[基本要求]了解PHP的标记风格、注释、关键字及标识符定义规则熟悉常量和变量在程序中的定义、使用与区别熟悉PHP中的数据类型分类、运算符与其优先级的运用掌握选择结构语句、循环结构语句以及标签语法的使用掌握函数、数组以及包含语句在开发中的使用[实践与练习]建议以测试题的方式考核PHP的基本语法、运算符、数据类型、流程控制语句、函数、数组等知识,并安排上机,练习PHP的编程基础。
九个PHP很有用的功能PHP是一种广泛应用于网页开发的脚本语言,具有强大的功能和灵活性。
以下是九个非常有用的PHP功能:1.动态网页生成:PHP允许开发人员根据用户的需求动态生成网页内容。
通过嵌入PHP代码,可以根据数据库查询结果、用户输入或其他变量来生成网页。
2.数据库连接与查询:PHP提供了简便的数据库连接和查询功能。
开发人员可以使用MySQLi或PDO等扩展来连接到各种数据库,并执行插入、更新、删除和查询等操作。
3.表单处理:PHP提供了简单而强大的表单处理功能。
通过在HTML表单中使用PHP代码,可以验证和过滤用户输入,确保数据的安全性和完整性。
5.图像处理:PHP提供了丰富的图像处理功能,包括创建缩略图、裁剪图像、添加水印等。
这使得开发人员可以在网页上实现各种图像操作,提升用户体验。
6.用户认证与授权:PHP是一种非常适合实现用户认证和授权的语言。
通过PHP,开发人员可以轻松地创建登录系统、用户注册和访问控制,确保只有授权用户能够访问受限资源。
7.邮件发送:PHP提供了发送电子邮件的功能。
开发人员可以使用PHP发送电子邮件通知、验证用户信息和与用户进行沟通。
这对于网站的管理和用户交互非常重要。
8.定时任务与计划:PHP允许开发人员设置定时任务和计划,自动执行特定的代码。
这对于自动化处理数据、生成报告和发送定期更新非常有用。
9.API开发与集成:PHP可以用于开发和集成各种API(应用程序接口)。
开发人员可以使用PHP编写API,使得不同系统之间可以通过API 进行交互和数据传输。
综上所述,以上九个PHP功能展示了PHP在网页开发中的强大功能和广泛应用。
PHP不仅可以动态生成网页、处理表单和操作文件,还能实现用户认证、发送邮件、处理图像,并且具备定时任务与计划的能力,以及API开发和集成。
PHP的这些功能使得开发人员能够创建出功能强大且灵活的网站和应用程序。
自动生成缩略图(质量没有损失)最近做一摄影作品管理程序,用到自动生成缩略图的方法。
开始方法较简单,用GDI+中默认方法,但生成图片质量不佳,并且压缩质量为中等。
潜心研究了一下,找到以下方法,主要分二布,第一步为画布描绘时的质量设置,第二步为保存图片时JPEG压缩的设置。
代码如下:private Size NewSize(int maxWidth, int maxHeight, int width, int height){double w = 0.0;double h = 0.0;double sw = Convert.ToDouble(width);double sh = Convert.ToDouble(height);double mw = Convert.ToDouble(maxWidth);double mh = Convert.ToDouble(maxHeight);if ( sw < mw && sh < mh ){w = sw;h = sh;}else if ( (sw/sh) > (mw/mh) ){w = maxWidth;h = (w * sh)/sw;}else{h = maxHeight;w = (h * sw)/sh;}return new Size(Convert.T oInt32(w), Convert.ToInt32(h));}private void SendSmallImage(string fileName, int maxWidth, int maxHeight){System.Drawing.Image img = System.Drawing.Image.FromFile(Server.MapPath(fileName));System.Drawing.Imaging.ImageFormat thisFormat = img.RawFormat;Size newSize = NewSize(maxWidth, maxHeight, img.Width, img.Height);Bitmap outBmp = new Bitmap(newSize.Width, newSize.Height);Graphics g = Graphics.FromImage(outBmp);// 设置画布的描绘质量positingQuality = CompositingQuality.HighQuality;g.SmoothingMode = SmoothingMode.HighQuality;g.InterpolationMode = InterpolationMode.HighQualityBicubic;g.DrawImage(img, new Rectangle(0, 0, newSize.Width, newSize.Height),0, 0, img.Width, img.Height, GraphicsUnit.Pixel);g.Dispose();if (thisFormat.Equals(ImageFormat.Gif)){Response.ContentType = "image/gif";}else{Response.ContentType = "image/jpeg";}// 以下代码为保存图片时,设置压缩质量EncoderParameters encoderParams = new EncoderParameters();long[] quality = new long[1];quality[0] = 100;EncoderParameter encoderParam = new EncoderParameter(System.Drawing.Imaging.Encoder.Quality, quality);encoderParams.Param[0] = encoderParam;//获得包含有关内置图像编码解码器的信息的ImageCodecInfo 对象。
PHP令我们惊喜的就是在图形图象处理方面要忧于ASP,用GD库PHP就可以轻松的实现缩略图。
这一篇文章我们的目的就是用GD来生成缩略图,PHP可以把缩略图直接生成输送到浏览器也可以以文件的形式把其存储到硬盘当中。
在生成缩略图的过程当中我们需要用到GD库当中的几个函数:
getimagesize(string filename [,array var])),取得图像的信息,返回值是一人array,包括几项信息$var[0]----返回图像的width,$var[1]----返回 height,[2]返回图像文件的type,[4]返回的是与<img src="">当中的wdith,height有关的width="",height=""信息。
imageX(resource image)
imageY(resource image) 返回图像的宽和高
imagecopyresized(des img,src img,int des_x,int des_y,int src_x,int src_y,int des_w,int des_h,int src_w,int src_y) 复制并截取区域图像
imagecreatetruecolor(int width,int height) 创建一个真彩图imagejpeg(resource image)
下面就是Code:
<?php
# Constants
define(IMAGE_BASE, '/var/www/html/mbailey/images'); define(MAX_WIDTH, 150);
define(MAX_HEIGHT, 150);
# Get image location
$image_file = str_replace('..', '',
$_SERVER['QUERY_STRING']);
$image_path = IMAGE_BASE . "/$image_file";
# Load image
$img = null;
$ext = strtolower(end(explode('.', $image_path)));
if ($ext == 'jpg' || $ext == 'jpeg') {
$img = @imagecreatefromjpeg($image_path);
} else if ($ext == 'png') {
$img = @imagecreatefrompng($image_path);
# Only if your version of GD includes GIF support
} else if ($ext == 'gif') {
$img = @imagecreatefrompng($image_path);
}
# If an image was successfully loaded, test the image for size
if ($img) {
# Get image size and scale ratio
$width = imagesx($img);
$height = imagesy($img);
$scale = min(MAX_WIDTH/$width, MAX_HEIGHT/$height);
# If the image is larger than the max shrink it
if ($scale < 1) {
$new_width = floor($scale*$width);
$new_height = floor($scale*$height);
# Create a new temporary image
$tmp_img = imagecreatetruecolor($new_width, $new_height);
# Copy and resize old image into new image
imagecopyresized($tmp_img, $img, 0, 0, 0,
0,$new_width, $new_height, $width, $height);
imagedestroy($img);
$img = $tmp_img;
}
}
# Create error image if necessary
if (!$img) {
$img = imagecreate(MAX_WIDTH, MAX_HEIGHT);
imagecolorallocate($img,0,0,0);
$c = imagecolorallocate($img,70,70,70);
imageline($img,0,0,MAX_WIDTH,MAX_HEIGHT,$c2);
imageline($img,MAX_WIDTH,0,0,MAX_HEIGHT,$c2);
}
# Display the image
header("Content-type: image/jpeg");
imagejpeg($img);
?>
我们把上面的Code存储为test.php,然后通过test.php?image name的形式来访问,结果会让你惊喜的,因为在这里你看到了PHP的优点,它可以让ASP相形见绌。
上面的这段代码当中我们通过end(explode(".",$image_path)来取得文件的扩展名,但是我感觉还是不理想。
这样是能够取得文件的类型的,因为end()函数会跳到本array的最后一个单元,但是如果我们采用getimagesize()会取得更为强大的专门针对于图像文件的类型。
本程序显示的缩略图是限制宽高都在150内,然后用min()函数来取得它们比值的最小值来计算缩略图的宽和高,并且通过一系列的GD库函数来取得相应的信息,并且呈现给浏览器,当然你也可以写到你所使用的硬盘当中。
好了,这就是PHP的缩略图功能,大家觉得有什么好的意见可以多多拍砖!。