BIS VISTA 使用指导
- 格式:ppt
- 大小:3.63 MB
- 文档页数:31

新版-VISTA120简易操作手册VISTA—120简易编程操作手册防区编程一、设置6139编程键盘地址为01开机同时按1 3键5秒,键盘显示Addr=31或Addr=xx,输入01按*键盘绿灯亮,显示***DISARMED***READT TO ARM键盘地址为00时,完成编程后可能会出现键盘不能操作,6148键盘不能编程二、设置每个防区按防区接入类型区分共有6种:电路板上接线(Hardwire)001—009防区可以使用,编号01;受监控无线(RF Xmitter)编号03;不受监控无线(Unsupevsd)编号04;无线按钮类型(Button RF)编号05;序号式总线(Serial Poll)使用4193SN和4293SN,编号06;双向开关式总线(Dip SW Poll)使用4208U 编号07;(一)设置电路板上接线(Hardwire)防区,以001防区为例先将随机配的2K电阻按接线图接在VISTA—120的端子上进入编程模式输入4140 8000 (4140为出厂设置的安装员密码)进入编程模式,键盘显示:Program Mode*Fill # View按*93 键盘显示ZONE PROG1=TES 0=NO按1进入防区编程键盘显示SET TO CONFIRM?1=YES 0=NO输入1,按*键盘显示ENTER ZONE NO.000=QUIT 001输入01(以001防区为例),按*键盘显示001 ZT P RC IN :L09 1 ———目前显示的是001防区的信息,按*键盘显示001ZONE RESPONSEFire 09目前001防区为火警防区,请根据具体情况输入防区类型的编号编号01—出入口防区1型,布防时有延时,进入时有延时,延时时间由*09和*10设定;编号02—出入口防区2型,布防时有延时,进入时有延时,延时时间由*11和*12设定;编号03—周边防区,布防时有效,撤防时无效;编号04—内部防区,留守布防时无效,外出布防时有效,撤防时无效;编号06—24小时无声防区;编号07—24小时有声防区;编号09—火警防区;编号00—无用防区。

Windows VistaReceive a $10 rebate on this book! Visit /promo for rebate deals and form.Valid for U.S. and Canadian residents on the first printing of this book For complete terms and details, see /promo.Windows Vista Jonathan Hassell and Tony CampbellWindows Vista: Beyond the ManualCopyright © 2007 by Jonathan Hassell and Tony CampbellAll rights reserved. No part of this work may be reproduced or transmitted in any form or by any means, electronic or mechanical, including photocopying, recording, or by any information storage or retrieval system, without the prior written permission of the copyright owner and the publisher.ISBN-13 (pbk): 978-159059-771-2ISBN-10 (pbk): 1-59059-771-0Printed and bound in the United States of America 9 8 7 6 5 4 3 2 1Trademarked names may appear in this book. Rather than use a trademark symbol with every occurrence of a trademarked name, we use the names only in an editorial fashion and to the benefit of the trademark owner, with no intention of infringement of the trademark.Lead Editor: Jim SumserTechnical Reviewer: Judith MyersonEditorial Board: Steve Anglin, Ewan Buckingham, Gary Cornell, Jason Gilmore, Jonathan Gennick, Jonathan Hassell, James Huddleston, Chris Mills, Matthew Moodie, Dominic Shakeshaft, Jim Sumser, Keir Thomas, Matt WadeProject Manager: Sofia MarchantCopy Edit Manager: Nicole FloresCopy Editor: Kim WimpsettAssistant Production Director: Kari Brooks-CoponyProduction Editor: Laura CheuCompositor: Susan GlinertProofreader: April EddyIndexer: Brenda MillerArtist: April MilneCover Designer: Kurt KramesManufacturing Director: Tom DebolskiDistributed to the book trade worldwide by Springer-Verlag New York, Inc., 233 Spring Street,6th Floor, New York, NY 10013. Phone 1-800-SPRINGER, fax 201-348-4505, e-mail**************************, or visit .For information on translations, please contact Apress directly at 2560 Ninth Street, Suite 219, Berkeley, CA 94710. Phone 510-549-5930, fax 510-549-5939, e-mail ***************, or visit .The information in this book is distributed on an “as is” basis, without warranty. Although every precaution has been taken in the preparation of this work, neither the author(s) nor Apress shall have any liability to any person or entity with respect to any loss or damage caused or alleged to be caused directly or indirectly by the information contained in this work.The source code for this book is available to readers at in the Source Code/ Download section. You will need to answer questions pertaining to this book in order to successfully download the code.For Lara.—Tony For Lisa.—JonviiCHAPTER 1Introducing Windows Vista . . . . . . . . . . . . . . . . . . . . . . . . . . . 1CHAPTER 2Meeting the Hardware Requirements . . . . . . . . . . . . . . . 19CHAPTER 3Installing and Setting Up Vista . . . . . . . . . . . . . . . . . . . . . . 31CHAPTER 4Finding Your Way Around the Desktop . . . . . . . . . . . . . 55CHAPTER 5Customizing Windows Vista . . . . . . . . . . . . . . . . . . . . . . . . . 69CHAPTER 6Working with User Tools . . . . . . . . . . . . . . . . . . . . . . . . . . . . 89CHAPTER 7Administering Windows Vista . . . . . . . . . . . . . . . . . . . . . . 113CHAPTER 8Working with the Command Line . . . . . . . . . . . . . . . . . . . 133CHAPTER 9Understanding the New Folder Structures and Elements . . . . . . . . . . . . . . . . . . . . . . . . . . . . . . . . . . . . 149CHAPTER 10Working with the File System . . . . . . . . . . . . . . . . . . . . . . 157CHAPTER 11Using BitLocker . . . . . . . . . . . . . . . . . . . . . . . . . . . . . . . . . . . . . 167CHAPTER 12Hooking Up Wired and Wireless Networks . . . . . . . . . 177CHAPTER 13Understanding TCP/IP . . . . . . . . . . . . . . . . . . . . . . . . . . . . . . 187CHAPTER 14Connecting to the Internet . . . . . . . . . . . . . . . . . . . . . . . . . 199CHAPTER 15Using the Remote Desktop Connection . . . . . . . . . . . . 205CHAPTER 16Setting Up a Network Presentation . . . . . . . . . . . . . . . . 213CHAPTER 17Using Windows Internet Explorer 7 . . . . . . . . . . . . . . . . 217CHAPTER 18Setting Up Windows Mail . . . . . . . . . . . . . . . . . . . . . . . . . . 235CHAPTER 22Working with Windows Movie Maker . . . . . . . . . . . . . . 299 CHAPTER 23Working with Windows Photo Gallery. . . . . . . . . . . . . . 323 CHAPTER 24Working with Windows DVD Maker. . . . . . . . . . . . . . . . 345 CHAPTER 25Working with Windows Media Center. . . . . . . . . . . . . . 363 CHAPTER 26Managing General Windows Vista Security . . . . . . . . 379 CHAPTER 27Implementing the Windows Firewall . . . . . . . . . . . . . . . 389 CHAPTER 28Using Windows Defender . . . . . . . . . . . . . . . . . . . . . . . . . . 405 CHAPTER 29Best Practices: A Six-Step Guideto Better Security . . . . . . . . . . . . . . . . . . . . . . . . . . . . . . . 417 CHAPTER 30Maintaining the Windows Registry . . . . . . . . . . . . . . . . . 431 CHAPTER 31Troubleshooting. . . . . . . . . . . . . . . . . . . . . . . . . . . . . . . . . . . . 439 CHAPTER 32Recovering from Serious Issues . . . . . . . . . . . . . . . . . . . . 449 Index . . . . . . . . . . . . . . . . . . . . . . . . . . . . . . . . . . . . . . . . . . . . . . . . . . . . . . . . . . . . . . . . 461CHAPTER 1Introducing Windows Vista . . . . . . . . . . . . . . . . . . . . . . . . . . . . . . . . . . . . . . . . . . 1 Vista Editions . . . . . . . . . . . . . . . . . . . . . . . . . . . . . . . . . . . . . . . . . . . . . . . . . . . . . . . 2 Home Basic . . . . . . . . . . . . . . . . . . . . . . . . . . . . . . . . . . . . . . . . . . . . . . . . . . . .3Home Premium . . . . . . . . . . . . . . . . . . . . . . . . . . . . . . . . . . . . . . . . . . . . . . . . . .3Business . . . . . . . . . . . . . . . . . . . . . . . . . . . . . . . . . . . . . . . . . . . . . . . . . . . . . . .4Enterprise . . . . . . . . . . . . . . . . . . . . . . . . . . . . . . . . . . . . . . . . . . . . . . . . . . . . . .4Ultimate . . . . . . . . . . . . . . . . . . . . . . . . . . . . . . . . . . . . . . . . . . . . . . . . . . . . . . .4Upgrading Vista Versions . . . . . . . . . . . . . . . . . . . . . . . . . . . . . . . . . . . . . . . . . . .4 New and Improved in Vista. . . . . . . . . . . . . . . . . . . . . . . . . . . . . . . . . . . . . . . . . . . . . 5 The Interface . . . . . . . . . . . . . . . . . . . . . . . . . . . . . . . . . . . . . . . . . . . . . . . . . . .5Instant Search . . . . . . . . . . . . . . . . . . . . . . . . . . . . . . . . . . . . . . . . . . . . . . . . . . .8Pervasive Metadata . . . . . . . . . . . . . . . . . . . . . . . . . . . . . . . . . . . . . . . . . . . . . . .9Communications . . . . . . . . . . . . . . . . . . . . . . . . . . . . . . . . . . . . . . . . . . . . . . . . .9Digital Media and Gaming . . . . . . . . . . . . . . . . . . . . . . . . . . . . . . . . . . . . . . . . .10Mobility . . . . . . . . . . . . . . . . . . . . . . . . . . . . . . . . . . . . . . . . . . . . . . . . . . . . . .12Security . . . . . . . . . . . . . . . . . . . . . . . . . . . . . . . . . . . . . . . . . . . . . . . . . . . . . .13Deployment . . . . . . . . . . . . . . . . . . . . . . . . . . . . . . . . . . . . . . . . . . . . . . . . . . .15Performance and Stability . . . . . . . . . . . . . . . . . . . . . . . . . . . . . . . . . . . . . . . . .16For Developers . . . . . . . . . . . . . . . . . . . . . . . . . . . . . . . . . . . . . . . . . . . . . . . . .17ixx CONTENTSCHAPTER 2Meeting the Hardware Requirements. . . . . . . . . . . . . . . . . . . . . . . . . . . . . . . 19 Using the Windows Vista Upgrade Advisor. . . . . . . . . . . . . . . . . . . . . . . . . . . . . . . . . 20Buying the Right PC . . . . . . . . . . . . . . . . . . . . . . . . . . . . . . . . . . . . . . . . . . . . . . . . . 24 Upgrading from Windows XP . . . . . . . . . . . . . . . . . . . . . . . . . . . . . . . . . . . . . . .25Buying a New System . . . . . . . . . . . . . . . . . . . . . . . . . . . . . . . . . . . . . . . . . . . .26 Understanding the Windows Experience Index . . . . . . . . . . . . . . . . . . . . . . . . . . . . . . 27CHAPTER 3Installing and Setting Up Vista. . . . . . . . . . . . . . . . . . . . . . . . . . . . . . . . . . . . . . 31 Obtaining the Software License . . . . . . . . . . . . . . . . . . . . . . . . . . . . . . . . . . . . . . . . . 31 Licensing Vista in the Home . . . . . . . . . . . . . . . . . . . . . . . . . . . . . . . . . . . . . . . .32Licensing Vista in Business . . . . . . . . . . . . . . . . . . . . . . . . . . . . . . . . . . . . . . . . .32 Installing Vista on a Single Computer. . . . . . . . . . . . . . . . . . . . . . . . . . . . . . . . . . . . . 33Deploying Vista . . . . . . . . . . . . . . . . . . . . . . . . . . . . . . . . . . . . . . . . . . . . . . . . . . . . 35A Brief Word on Modularization . . . . . . . . . . . . . . . . . . . . . . . . . . . . . . . . . . . . .37Creating Unattended Answer Files . . . . . . . . . . . . . . . . . . . . . . . . . . . . . . . . . . .37Setting Up Your Master Computer . . . . . . . . . . . . . . . . . . . . . . . . . . . . . . . . . . .41Generalizing Your Master Computer Using Sysprep . . . . . . . . . . . . . . . . . . . . . . .42Using WinPE and ImageX to Create the Image . . . . . . . . . . . . . . . . . . . . . . . . . .42Using WinPE and ImageX to Deploy the Image . . . . . . . . . . . . . . . . . . . . . . . . . .44More on ImageX . . . . . . . . . . . . . . . . . . . . . . . . . . . . . . . . . . . . . . . . . . . . . . . .45More on WinPE . . . . . . . . . . . . . . . . . . . . . . . . . . . . . . . . . . . . . . . . . . . . . . . . .45 Using Microsoft Solution Accelerator for Business Desktop Deployment. . . . . . . . . . . . 47Using Windows Easy Transfer. . . . . . . . . . . . . . . . . . . . . . . . . . . . . . . . . . . . . . . . . . . 47Using the User State Migration Tool. . . . . . . . . . . . . . . . . . . . . . . . . . . . . . . . . . . . . . 53CHAPTER 4Finding Your Way Around the Desktop. . . . . . . . . . . . . . . . . . . . . . . . . . . . . 55 Logging In to Vista . . . . . . . . . . . . . . . . . . . . . . . . . . . . . . . . . . . . . . . . . . . . . . . . . . 55Exploring the Vista Desktop. . . . . . . . . . . . . . . . . . . . . . . . . . . . . . . . . . . . . . . . . . . . 56 Personalizing the Desktop . . . . . . . . . . . . . . . . . . . . . . . . . . . . . . . . . . . . . . . . .57Using the Windows Sidebar . . . . . . . . . . . . . . . . . . . . . . . . . . . . . . . . . . . . . . . .61 Customizing the Start Menu and Taskbar . . . . . . . . . . . . . . . . . . . . . . . . . . . . . . . . . . 63Switching Through Windows . . . . . . . . . . . . . . . . . . . . . . . . . . . . . . . . . . . . . . . . . . . 66 Using Flip . . . . . . . . . . . . . . . . . . . . . . . . . . . . . . . . . . . . . . . . . . . . . . . . . . . . .67Using Flip 3D . . . . . . . . . . . . . . . . . . . . . . . . . . . . . . . . . . . . . . . . . . . . . . . . . .68CONTENTS xiCHAPTER 5Customizing Windows Vista . . . . . . . . . . . . . . . . . . . . . . . . . . . . . . . . . . . . . . . . 69 Customizing Display Settings. . . . . . . . . . . . . . . . . . . . . . . . . . . . . . . . . . . . . . . . . . . 69Customizing Windows Sidebar . . . . . . . . . . . . . . . . . . . . . . . . . . . . . . . . . . . . . . . . . 76Customizing Windows SideShow. . . . . . . . . . . . . . . . . . . . . . . . . . . . . . . . . . . . . . . . 78Customizing with the Local Computer Policy . . . . . . . . . . . . . . . . . . . . . . . . . . . . . . . 79 How the Local Computer Policy Relates to the Registry . . . . . . . . . . . . . . . . . . . .79Local Policy vs. Domain Policy . . . . . . . . . . . . . . . . . . . . . . . . . . . . . . . . . . . . . .82How to Use the MMC . . . . . . . . . . . . . . . . . . . . . . . . . . . . . . . . . . . . . . . . . . . .82How to Use the Local Computer Policy . . . . . . . . . . . . . . . . . . . . . . . . . . . . . . . .84 CHAPTER 6Working with User Tools. . . . . . . . . . . . . . . . . . . . . . . . . . . . . . . . . . . . . . . . . . . . 89 Exploring the Welcome Center . . . . . . . . . . . . . . . . . . . . . . . . . . . . . . . . . . . . . . . . . 89Understanding the Start Menu. . . . . . . . . . . . . . . . . . . . . . . . . . . . . . . . . . . . . . . . . . 91Customizing the Start Menu . . . . . . . . . . . . . . . . . . . . . . . . . . . . . . . . . . . . . . . . . . . 96Working with Windows Explorer . . . . . . . . . . . . . . . . . . . . . . . . . . . . . . . . . . . . . . . . 99 Following the Breadcrumb Navigation . . . . . . . . . . . . . . . . . . . . . . . . . . . . . . .100Using the Task Pane . . . . . . . . . . . . . . . . . . . . . . . . . . . . . . . . . . . . . . . . . . . .101Searching in Windows Explorer . . . . . . . . . . . . . . . . . . . . . . . . . . . . . . . . . . . .104Increasing the Scope of Your Index . . . . . . . . . . . . . . . . . . . . . . . . . . . . . . . . .106 Using Groups, Stacks, and Filters. . . . . . . . . . . . . . . . . . . . . . . . . . . . . . . . . . . . . . . 108CHAPTER 7Administering Windows Vista. . . . . . . . . . . . . . . . . . . . . . . . . . . . . . . . . . . . . . 113 Using the Control Panel . . . . . . . . . . . . . . . . . . . . . . . . . . . . . . . . . . . . . . . . . . . . . 113Using System Administration Tools . . . . . . . . . . . . . . . . . . . . . . . . . . . . . . . . . . . . . 118 Backing Up Your Files . . . . . . . . . . . . . . . . . . . . . . . . . . . . . . . . . . . . . . . . . . .118Restoring Files, Folders, and System Images . . . . . . . . . . . . . . . . . . . . . . . . . . .121Starting and Stopping Vista Services . . . . . . . . . . . . . . . . . . . . . . . . . . . . . . . .122Using the System Applet . . . . . . . . . . . . . . . . . . . . . . . . . . . . . . . . . . . . . . . . .125Adding or Removing User Accounts . . . . . . . . . . . . . . . . . . . . . . . . . . . . . . . . .125 Using System Restore. . . . . . . . . . . . . . . . . . . . . . . . . . . . . . . . . . . . . . . . . . . . . . . 127Using User Account Control . . . . . . . . . . . . . . . . . . . . . . . . . . . . . . . . . . . . . . . . . . 129xii CONTENTSCHAPTER 8Working with the Command Line . . . . . . . . . . . . . . . . . . . . . . . . . . . . . . . . . . 133 Customizing the Command Shell. . . . . . . . . . . . . . . . . . . . . . . . . . . . . . . . . . . . . . . 134Understanding Commands . . . . . . . . . . . . . . . . . . . . . . . . . . . . . . . . . . . . . . . . . . . 136Working with Batch Files . . . . . . . . . . . . . . . . . . . . . . . . . . . . . . . . . . . . . . . . . . . . . 139 Starting Out with a Simple Example . . . . . . . . . . . . . . . . . . . . . . . . . . . . . . . . .139Creating Advanced Batch Files . . . . . . . . . . . . . . . . . . . . . . . . . . . . . . . . . . . . .140 Commands to Add to Your Admin Arsenal . . . . . . . . . . . . . . . . . . . . . . . . . . . . . . . . 143 BCDedit . . . . . . . . . . . . . . . . . . . . . . . . . . . . . . . . . . . . . . . . . . . . . . . . . . . . .144ipconfig . . . . . . . . . . . . . . . . . . . . . . . . . . . . . . . . . . . . . . . . . . . . . . . . . . . . .144ping . . . . . . . . . . . . . . . . . . . . . . . . . . . . . . . . . . . . . . . . . . . . . . . . . . . . . . . .145pathping . . . . . . . . . . . . . . . . . . . . . . . . . . . . . . . . . . . . . . . . . . . . . . . . . . . . .145systeminfo . . . . . . . . . . . . . . . . . . . . . . . . . . . . . . . . . . . . . . . . . . . . . . . . . . .145net . . . . . . . . . . . . . . . . . . . . . . . . . . . . . . . . . . . . . . . . . . . . . . . . . . . . . . . . .146ImageX . . . . . . . . . . . . . . . . . . . . . . . . . . . . . . . . . . . . . . . . . . . . . . . . . . . . . .147robocopy . . . . . . . . . . . . . . . . . . . . . . . . . . . . . . . . . . . . . . . . . . . . . . . . . . . .147shutdown . . . . . . . . . . . . . . . . . . . . . . . . . . . . . . . . . . . . . . . . . . . . . . . . . . . .147diskpart . . . . . . . . . . . . . . . . . . . . . . . . . . . . . . . . . . . . . . . . . . . . . . . . . . . . .148 CHAPTER 9Understanding the New Folder Structures and Elements. . . . . . . . . . 149 Introducing Search Folders . . . . . . . . . . . . . . . . . . . . . . . . . . . . . . . . . . . . . . . . . . . 149Introducing Symbolic Links . . . . . . . . . . . . . . . . . . . . . . . . . . . . . . . . . . . . . . . . . . . 151Using the Preview Pane. . . . . . . . . . . . . . . . . . . . . . . . . . . . . . . . . . . . . . . . . . . . . . 153 CHAPTER 10Working with the File System. . . . . . . . . . . . . . . . . . . . . . . . . . . . . . . . . . . . . . 157 Setting Permissions. . . . . . . . . . . . . . . . . . . . . . . . . . . . . . . . . . . . . . . . . . . . . . . . . 157 Introducing Standard and Special Permissions . . . . . . . . . . . . . . . . . . . . . . . . . .157Setting Permissions . . . . . . . . . . . . . . . . . . . . . . . . . . . . . . . . . . . . . . . . . . . . .160Introducing Inheritance and Ownership . . . . . . . . . . . . . . . . . . . . . . . . . . . . . .161Determining Effective Permissions . . . . . . . . . . . . . . . . . . . . . . . . . . . . . . . . . .163 Using Previous Versions. . . . . . . . . . . . . . . . . . . . . . . . . . . . . . . . . . . . . . . . . . . . . . 164CONTENTS xiiiCHAPTER 11Using BitLocker . . . . . . . . . . . . . . . . . . . . . . . . . . . . . . . . . . . . . . . . . . . . . . . . . . . . 167 Understanding the BitLocker Essentials . . . . . . . . . . . . . . . . . . . . . . . . . . . . . . . . . . 167 Under the Hood: BitLocker . . . . . . . . . . . . . . . . . . . . . . . . . . . . . . . . . . . . . . .168 Partitioning Your Volume. . . . . . . . . . . . . . . . . . . . . . . . . . . . . . . . . . . . . . . . . . . . . 169Initializing the Trusted Platform Module. . . . . . . . . . . . . . . . . . . . . . . . . . . . . . . . . . 170Turning On BitLocker . . . . . . . . . . . . . . . . . . . . . . . . . . . . . . . . . . . . . . . . . . . . . . . 171 Using a PIN with TPM-Enabled BitLocker . . . . . . . . . . . . . . . . . . . . . . . . . . . . .173 Using BitLocker Without the Trusted Platform Module . . . . . . . . . . . . . . . . . . . . . . . 173Recovering BitLocker-Protected Data. . . . . . . . . . . . . . . . . . . . . . . . . . . . . . . . . . . . 174Disabling BitLocker. . . . . . . . . . . . . . . . . . . . . . . . . . . . . . . . . . . . . . . . . . . . . . . . . 175 CHAPTER 12Hooking Up Wired and Wireless Networks . . . . . . . . . . . . . . . . . . . . . . . . 177 Going Wireless. . . . . . . . . . . . . . . . . . . . . . . . . . . . . . . . . . . . . . . . . . . . . . . . . . . . 178Getting Connected. . . . . . . . . . . . . . . . . . . . . . . . . . . . . . . . . . . . . . . . . . . . . . . . . 178Working with Networks. . . . . . . . . . . . . . . . . . . . . . . . . . . . . . . . . . . . . . . . . . . . . . 179 The Network and Sharing Center . . . . . . . . . . . . . . . . . . . . . . . . . . . . . . . . . . .179Network Map . . . . . . . . . . . . . . . . . . . . . . . . . . . . . . . . . . . . . . . . . . . . . . . . .185Network Connections . . . . . . . . . . . . . . . . . . . . . . . . . . . . . . . . . . . . . . . . . . .185 CHAPTER 13Understanding TCP/IP . . . . . . . . . . . . . . . . . . . . . . . . . . . . . . . . . . . . . . . . . . . . . 187 Conquering the Jargon. . . . . . . . . . . . . . . . . . . . . . . . . . . . . . . . . . . . . . . . . . . . . . 188Understanding the IP Address. . . . . . . . . . . . . . . . . . . . . . . . . . . . . . . . . . . . . . . . . 190Configuring IP Addresses in Vista. . . . . . . . . . . . . . . . . . . . . . . . . . . . . . . . . . . . . . . 191Understanding DNS . . . . . . . . . . . . . . . . . . . . . . . . . . . . . . . . . . . . . . . . . . . . . . . . 192Understanding DHCP and Static Addressing . . . . . . . . . . . . . . . . . . . . . . . . . . . . . . 193Gathering TCP/IP Information . . . . . . . . . . . . . . . . . . . . . . . . . . . . . . . . . . . . . . . . . 194Introducing TCP/IP Version 6. . . . . . . . . . . . . . . . . . . . . . . . . . . . . . . . . . . . . . . . . . 195 Who Needs More IP Addresses? . . . . . . . . . . . . . . . . . . . . . . . . . . . . . . . . . . .196CHAPTER 14Connecting to the Internet . . . . . . . . . . . . . . . . . . . . . . . . . . . . . . . . . . . . . . . . 199 Gathering the ISP Account Details. . . . . . . . . . . . . . . . . . . . . . . . . . . . . . . . . . . . . . 200Creating the Connection in Vista . . . . . . . . . . . . . . . . . . . . . . . . . . . . . . . . . . . . . . . 201Setting Up Internet Connection Sharing. . . . . . . . . . . . . . . . . . . . . . . . . . . . . . . . . . 203xiv CONTENTSCHAPTER 15Using the Remote Desktop Connection. . . . . . . . . . . . . . . . . . . . . . . . . . . . 205 Switching On Remote Access. . . . . . . . . . . . . . . . . . . . . . . . . . . . . . . . . . . . . . . . . . 205Using the RDC Client. . . . . . . . . . . . . . . . . . . . . . . . . . . . . . . . . . . . . . . . . . . . . . . . 209Setting the Remote Desktop Connection Options. . . . . . . . . . . . . . . . . . . . . . . . . . . 210CHAPTER 16Setting Up a Network Presentation. . . . . . . . . . . . . . . . . . . . . . . . . . . . . . . . 213 Connecting the Projector. . . . . . . . . . . . . . . . . . . . . . . . . . . . . . . . . . . . . . . . . . . . . 213CHAPTER 17Using Windows Internet Explorer 7. . . . . . . . . . . . . . . . . . . . . . . . . . . . . . . . 217 Looking at the Major Areas of Improvement. . . . . . . . . . . . . . . . . . . . . . . . . . . . . . . 217 Security . . . . . . . . . . . . . . . . . . . . . . . . . . . . . . . . . . . . . . . . . . . . . . . . . . . . .217User Experience . . . . . . . . . . . . . . . . . . . . . . . . . . . . . . . . . . . . . . . . . . . . . . .218Internet Explorer Platform . . . . . . . . . . . . . . . . . . . . . . . . . . . . . . . . . . . . . . . .218Standards Compliance . . . . . . . . . . . . . . . . . . . . . . . . . . . . . . . . . . . . . . . . . . .218 Examining the New Internet Explorer Features . . . . . . . . . . . . . . . . . . . . . . . . . . . . . 219 Tabbed Browsing . . . . . . . . . . . . . . . . . . . . . . . . . . . . . . . . . . . . . . . . . . . . . .219Phishing Filter . . . . . . . . . . . . . . . . . . . . . . . . . . . . . . . . . . . . . . . . . . . . . . . . .221 Implementing RSS Feeds. . . . . . . . . . . . . . . . . . . . . . . . . . . . . . . . . . . . . . . . . . . . . 223Customizing Internet Explorer 7. . . . . . . . . . . . . . . . . . . . . . . . . . . . . . . . . . . . . . . . 224Hardening Internet Explorer 7 . . . . . . . . . . . . . . . . . . . . . . . . . . . . . . . . . . . . . . . . . 231 The MHTML Hole . . . . . . . . . . . . . . . . . . . . . . . . . . . . . . . . . . . . . . . . . . . . . .231Protected Mode and the Phishing Filter . . . . . . . . . . . . . . . . . . . . . . . . . . . . . .232Settings Checklist . . . . . . . . . . . . . . . . . . . . . . . . . . . . . . . . . . . . . . . . . . . . . .232CHAPTER 18Setting Up Windows Mail . . . . . . . . . . . . . . . . . . . . . . . . . . . . . . . . . . . . . . . . . . 235 Setting Up Accounts . . . . . . . . . . . . . . . . . . . . . . . . . . . . . . . . . . . . . . . . . . . . . . . . 235 Setting Up a Mail Account . . . . . . . . . . . . . . . . . . . . . . . . . . . . . . . . . . . . . . . .235Setting Up a News Account . . . . . . . . . . . . . . . . . . . . . . . . . . . . . . . . . . . . . . .236Setting Up a Directory Service Account . . . . . . . . . . . . . . . . . . . . . . . . . . . . . . .236 Working Within Windows Mail. . . . . . . . . . . . . . . . . . . . . . . . . . . . . . . . . . . . . . . . . 237 Personalizing Windows Mail . . . . . . . . . . . . . . . . . . . . . . . . . . . . . . . . . . . . . . .238CONTENTS xvUsing Newsgroups . . . . . . . . . . . . . . . . . . . . . . . . . . . . . . . . . . . . . . . . . . . . . . . . . 239 Strategies for Managing Newsgroup Reading . . . . . . . . . . . . . . . . . . . . . . . . . .240 Creating Message Rules . . . . . . . . . . . . . . . . . . . . . . . . . . . . . . . . . . . . . . . . . . . . . 241Protecting Against Unwanted Email and Attachments. . . . . . . . . . . . . . . . . . . . . . . . 243 Changing the Junk Email Protection Level . . . . . . . . . . . . . . . . . . . . . . . . . . . .243Adding and Removing Senders to the Blocked Sendersand Safe Senders Lists . . . . . . . . . . . . . . . . . . . . . . . . . . . . . . . . . . . . . . . . . .244Managing International Messages . . . . . . . . . . . . . . . . . . . . . . . . . . . . . . . . . .246Guarding Against Phishing . . . . . . . . . . . . . . . . . . . . . . . . . . . . . . . . . . . . . . .247Blocking Potentially Problematic Attachments . . . . . . . . . . . . . . . . . . . . . . . . . .248 Performing Windows Mail Maintenance . . . . . . . . . . . . . . . . . . . . . . . . . . . . . . . . . . 249CHAPTER 19Collaborating with Windows Meeting Space . . . . . . . . . . . . . . . . . . . . . . 251 What Is Windows Meeting Space?. . . . . . . . . . . . . . . . . . . . . . . . . . . . . . . . . . . . . . 251Using Windows Meeting Space. . . . . . . . . . . . . . . . . . . . . . . . . . . . . . . . . . . . . . . . 252 CHAPTER 20Using Windows Fax and Scan. . . . . . . . . . . . . . . . . . . . . . . . . . . . . . . . . . . . . . 257 Faxing . . . . . . . . . . . . . . . . . . . . . . . . . . . . . . . . . . . . . . . . . . . . . . . . . . . . . . . . . . 257 Sending and Receiving Faxes Using a Modem . . . . . . . . . . . . . . . . . . . . . . . . .257Sending and Receiving Faxes Using a Network Fax Server . . . . . . . . . . . . . . . . .260Sending Faxes Through Other Applications . . . . . . . . . . . . . . . . . . . . . . . . . . .261 Scanning . . . . . . . . . . . . . . . . . . . . . . . . . . . . . . . . . . . . . . . . . . . . . . . . . . . . . . . . 262 Tips for Advanced Scanning . . . . . . . . . . . . . . . . . . . . . . . . . . . . . . . . . . . . . .263CHAPTER 21Working with Windows Media Player 11 . . . . . . . . . . . . . . . . . . . . . . . . . . 265 Setting Up Media Player for the First Time . . . . . . . . . . . . . . . . . . . . . . . . . . . . . . . . 265 Understanding Privacy . . . . . . . . . . . . . . . . . . . . . . . . . . . . . . . . . . . . . . . . . . .267Selecting the Default Music and Video Player . . . . . . . . . . . . . . . . . . . . . . . . . .269 What’s Playing? . . . . . . . . . . . . . . . . . . . . . . . . . . . . . . . . . . . . . . . . . . . . . . . . . . . 272Introducing the Media Library . . . . . . . . . . . . . . . . . . . . . . . . . . . . . . . . . . . . . . . . . 274 Working with Different Types of Content . . . . . . . . . . . . . . . . . . . . . . . . . . . . .277Creating and Using Playlists . . . . . . . . . . . . . . . . . . . . . . . . . . . . . . . . . . . . . . .277Adding Content to the Library . . . . . . . . . . . . . . . . . . . . . . . . . . . . . . . . . . . . .280Sharing Your Library . . . . . . . . . . . . . . . . . . . . . . . . . . . . . . . . . . . . . . . . . . . .281Getting Album Art and Media Information . . . . . . . . . . . . . . . . . . . . . . . . . . . .282Using the Advanced Library Options . . . . . . . . . . . . . . . . . . . . . . . . . . . . . . . .282。
vista使用技巧Vista一路走来已经较之前作出了许多改进,其中有一些是令人喜欢的,也有一些的确十分恼人,但是无论怎样,Vista是值得我们一试的。
如果你已经准备好进行一次Vista的体验,下面,我们将提供给大家新的10条Vista的技巧和设置,它们也许能帮助你根据自己的偏好更好的使用Vista。
1、关闭恼人的IE安全提示如果你已经对Internet Explorer持续不断地提示你已经弱化了你的安全设置,或者说你是一个非偏执狂的熟练操作者,那么你可以在“运行”命令中或是开始菜单的搜索框中输入“gpedit.msc”打开它,接着进行如下操作:Local Computer Policy(本地计算机策略)/ Computer Configuration(计算机设置)/ Administrative Templates(管理模版)/ Windows Components (Windows组件)/ Internet Explorer。
在最右边的窗格中,双击“关闭安全设置检查特性”,就可以不必再为此烦恼。
2、禁用IE的信息栏如果Internet Explorer的信息栏也让你感到不悦,你也可以在组策略对象编辑器(gpedit.msc)中将它关闭,如下操作:Local Computer Policy(本地计算机策略)/ Computer Configuration(计算机设置)/ Administrative Templates (管理模版)/ Windows Components(Windows组件)/ Internet Explorer/Security Features(安全特性)。
在最右边的窗格中,双击“Internet Explorer进程”就可以将其禁用。
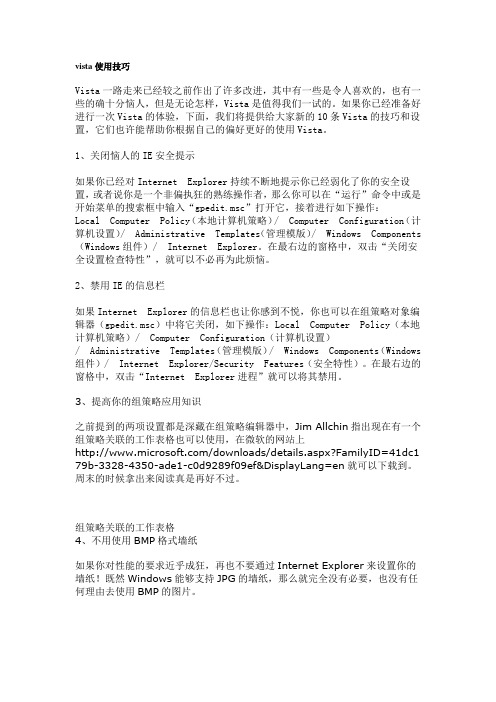
3、提高你的组策略应用知识之前提到的两项设置都是深藏在组策略编辑器中,Jim Allchin指出现在有一个组策略关联的工作表格也可以使用,在微软的网站上/downloads/details.aspx?FamilyID=41dc1 79b-3328-4350-ade1-c0d9289f09ef&DisplayLang=en就可以下载到。

简易操作手册—简易编程操作手册一、设置编程键盘地址为开机同时按键秒,键盘显示或,输入按键盘绿灯亮,显示******键盘地址为时,完成编程后可能会出现键盘不能操作,键盘不能编程二、设置每个防区按防区接入类型区分共有种:电路板上接线()—防区可以使用,编号;受监控无线()编号;不受监控无线()编号;无线按钮类型()编号;序号式总线()使用和,编号;双向开关式总线()使用编号;(一)设置电路板上接线()防区,以防区为例先将随机配的电阻按接线图接在—的端子上进入编程模式输入(为出厂设置的安装员密码)进入编程模式,键盘显示:* 按* 键盘显示按进入防区编程键盘显示?输入键盘显示.输入(以防区为例),按*键盘显示:———目前显示的是防区的信息,按*键盘显示目前防区为火警防区,请根据具体情况输入防区类型的编号编号—出入口防区型,布防时有延时,进入时有延时,延时时间由*和*设定;编号—出入口防区型,布防时有延时,进入时有延时,延时时间由*和*设定;编号—周边防区,布防时有效,撤防时无效;编号—内部防区,留守布防时无效,外出布防时有效,撤防时无效;编号—小时无声防区;编号—小时有声防区;编号—火警防区;编号—无用防区。
其他防区类型的编号请参照英文手册。
输入键盘显示:定为设定周边防区按* 键盘显示:所属第一子系统(划分多个子系统时,输入该防区的子系统号)按* 键盘显示:此项设定防区通讯码,输入向第一报警中心发送报警信息输入向第二报警中心发送报警信息按* 键盘显示:此项设定防区的接入类型,请输入防区接入类型的编号:按* 键盘显示::——目前显示的是防区的信息,按* 键盘显示.输入下一个防区的信息,如果不输入下一个防区的信息,(—防区不用时应将防区类型输入)输入*返回键盘显示?输入返回键盘显示*输入*返回键盘绿灯亮,显示******主机开始自检,约两分钟后,键盘绿灯亮的情况下,可以布防,实验防区输入进入外出延时布防,键盘蜂鸣器响,将联接愤怒过去的电阻拆下,主机将报警,键盘显示:表示防区报警。


Vista发布一年多来,虽然用户对其并不感冒,但它任然在用户的诟病中“特立独行”,迎来了越来越多的用户。
其实,Vista并不象某些人所说的一无是处,只是很少有人能够真正深入下去,挖掘其中的细节。
下面列举几个笔者在Vista使用过程中总结出来的奇招妙计,希望对大家提升Vista的使用体验有所帮助。
1、活用链接,节约磁盘空间熟悉Linux/Unix系统的朋友对于其提供符号链接(Symbolic Link)特性应该深有体会吧。
通过符号链接命令(link)我们可以将需要的资源映射到目标位置,而不用将其整个拷贝过去。
这不仅节约了磁盘空间,同时方便了用户也不对系统性能造成一定负担。
其实在Vista中也有个类似的命令mklink,据笔者所知这不为大家所知,下面我就结合实例演示其具体应用。
(1).创建程序链接执行“开始→运行”输入cmd打开命令提示符,输入mklink并回车后会看到其参数,大家可以根据需要选择相应的参数完成某个链接任务。
假如在笔者电脑的E盘的fr文件夹中有个test.exe文件(即d:\fr\test.exe),要运行该文件需要进入d:\fr\目录,然后通过双击来运行(命令行下运行类似)。
但是,我们知道所有c:\windows\system32下的程序我们不要进入该目录,在命令行(或者通过“运行”)可以直接运行。
为了使得该命令可以直接运行我们需要将其拷贝到c:\windows\system32吗?不用,用mklink直接搞定。
在命令行下输入命令“mklink c:\windows\system32\test.exe d:\fr\test.exe”,如图1所示成功创建c:\windows\system32\test.exe <<===>> d:\fr\test.exe之间的符号链接。
然后我们直接在命令行下输入test.exe,可以看到直接运行。
(图1)图1 创建程序链接(2).创建文件夹链接除了可以创建程序连接外,还可以利用mklink命令创建文件夹连接。
IPM-Vista 接入Vista120/250主机编程指南由于Vista主机,尤其是Vista120和Vista250这类中大型主机,编程项比较复杂,IPM-Vista在接入过程中需要做一些编程配置,才能起作用,这里以Vista-120为例,介绍一下IPM-Vista接入的方法Step1:配置IPM-Vista, 有2个参数和主机接入有关系,分别是虚拟键盘地址和LRR地址。
Vista-IPM出厂时,默认的键盘地址是17,LRR地址是3,建议这两个参数不要改动,尤其LRR地址。
下文的介绍基于这两个参数为默认值。
Step2:连接IPM-Vista和主机,IPM-Vista当作键盘来接。
这里注意主机的数据输出端(黄线)要接在IPM-Vista的KCLK端口,主机数据输入端(绿线)接IPM-Vista的KDAT端口。
Step3:启动主机,通过物理键盘先配置好主机。
按41408000进入编程。
输入*93 ,选择DEVICE PROG,将03地址设备设置为06 类型(LR RADIO MODULE),将17地址设备设置为01类型(ALPHA CONSOLE)。
设置完毕后,退出Device PROG。
选择REPORT CODEPROG。
选择SYSTEM GROUP #1 , SYSTEM GROUP #2,SYSTEM GROUP #3,SYSTEM GROUP#4中需要上报的报告类型。
设置完毕后,退出REPORT CODE PROG.*56, *57, *58, *59全部设置1。
以上配置后,一般的报告类型就可以收发了。
[Vista-120 布撤防报告]进入编程,选择*39, 设置为1,然后选择*93,选择REPORT CODE PROG, 选择SYSTEM GROUP1,分别选择CLOSE 和OPEN,将其1st部分均设置为01。
退出编程,使用4140密码进行布撤防,可以收到布撤防报告。
[Vista-120防区/故障报告]进入编程,以防区8为例,选择*93,选择REPORT CODE PROG, 选择RSTR,SUPV. CODE,ENTER ZN FOR GRP 填入所需要设置的防区008(这种设置是每16个防区一组,只要设置其中之一即可),根据需要,分别设置ALARM RESTORE GRP 001-016, TROUBLE GRP 001-016, TROUBLE RESTORE GPR 001-016, BYPASS GRP 001-016, BYPASS RESTORE GRP 001-016设置为01,退出编程后,则相应防区的监控状态结果也会有报告上报。
Windows Vista使用教程之系统安装时间:2008-01-19 Vista天地-硬盘分区Windows Vista可以安装在主硬盘分区或扩展分区上,但需保证硬盘具有12-15GB的分区(对32位的x86平台)或10GB(对64位的x64平台)。
建议为Windows Vista准备25GB以上的硬盘分区,当然,分区越大越好。
Windows Vista必须安装到NTFS分区。
在之前的Windows Vista测试版本中,曾有人发现当将Windows Vista安装到扩展分区而启动分区(主分区)使用FAT32格式时,系统有时会出现不可预知的错误,不过,Windows Vista RTM已经修正了大多数问题,至少在Vista天地的安装测试中未发现同样的故障。
但是,为了充分享受Windows Vista带来的功能增强,特别是提高的安全性,强烈建议所有的硬盘分区均使用NTFS格式。
注意:Windows Vista中的NTFS文件系统使用了更新的版本,因此,使用第三方工具软件如Partitions Magic建立的NTFS分区可能会导致Windows Vista出现严重错误,因此,为硬盘分区时不要使用这些未通过Windows Vista兼容性测试的第三方软件,可通过Windows XP 中的磁盘管理器或在安装过程中由Windows Vista安装程序来创建分区。
驱动程序Window Vista能够支持绝大多数的SATA硬盘驱动器,因此,如果您使用SATA硬盘,在安装Windows Vista时不必再象之前安装Windows XP那样,必须在安装过程中使用软盘来安装SATA驱动了。
如果您使用RAID(阵列)配置,那么也许仍需在安装过程中添加驱动。
同Windows XP安装过程中按“F6”类似,Windows Vista在安装过程中提供了一个名为“加载驱动程序”的选项,所不同的是,不再限定只能通过软盘安装,相应的驱动程序可以使用包括软盘在内的多种载体,如CD/DVD、U盘、外置硬盘甚至记忆棒等。