Labview串口
- 格式:doc
- 大小:341.00 KB
- 文档页数:32
LabVIEW中的串口通信和硬件控制LabVIEW是一种强大的编程环境和开发平台,广泛应用于控制系统、仪器测量、数据采集等领域。
在LabVIEW中,串口通信是一种常见且重要的功能,它能够实现计算机与外部硬件设备之间的数据传输和控制。
一、串口通信的基本原理串口通信是通过计算机的串行接口与外部设备进行数据交换。
LabVIEW中的串口通信主要通过VISA(Virtual Instrument Software Architecture)接口实现。
VISA是一套通用的I/O接口标准,可以方便地与各种硬件设备进行通信。
在进行串口通信时,首先需要配置串口的参数,包括波特率、数据位、停止位、校验位等。
LabVIEW提供了相应的函数和工具箱,可以方便地设置这些参数。
然后,通过VISA函数进行打开串口、读取数据、写入数据等操作,实现与外部设备的数据交互。
二、LabVIEW中的串口通信实例下面以一个简单的LabVIEW串口通信实例来介绍其基本操作步骤。
首先,在LabVIEW中创建一个新的VI(Virtual Instrument)文件。
然后,在Block Diagram中拖放VISA函数,并进行相应的配置,打开串口。
接下来,通过循环结构实现数据的读取和写入。
在循环中,可以使用VISA函数读取外部设备发送的数据,并将其显示在界面上;同时,也可以通过用户输入的数据,使用VISA函数发送给外部设备。
最后,关闭串口并释放资源。
通过VISA函数,可以方便地实现串口的关闭操作。
三、LabVIEW中的硬件控制除了串口通信,LabVIEW还可以结合硬件模块进行实时的硬件控制。
LabVIEW提供了丰富的工具箱和函数库,可以支持各种硬件设备的控制和监测。
在LabVIEW中,硬件控制主要通过DAQ(Data Acquisition)模块实现。
DAQ模块可以连接各种传感器和执行器,并将其与LabVIEW 程序进行连接。
通过LabVIEW提供的函数和工具箱,可以方便地读取传感器数据,控制执行器输出,并实现实时的硬件控制。
基于LABVIEW的串口通信实验一、实验目的1.了解LabVIEW串口通信基本方法2.通过LabVIEW串口获取数字温度传感器的数据二、实验器材1.计算机一台2.LabVIEW8.20软件一套3.串口线一根4.虚拟仪器实验平台一台5.分布式温度采集模块一块6.传感器控制模块一块三、实验原理串行通信是工业现场仪器或设备常用的通信方式,它是将一条信号的各位数据按顺序逐位传送。
计算机串行通信(简称串口)采用RS232协议,允许一个发送设备连接到一个接收设备以传送数据,最大速率为115200bps。
计算机串行口采用Intel8250异步串行通信组件构成,通常以COM1~COM4来表示。
bView串口节点LabView中提供了已封装好的串口通信节点,它们位于函数->数据通信->协议->串口。
这里主要介绍程序中使用到的串口配置、串口读取、串口写入和串口关闭,其他串口相关的节点使用方法查询LabView帮助。
(1)串口配置在进行串口通信时,首先要对串口进行初始化和配置。
这可以由VISA配置串口节点来完成,串口配置节点如下图所示。
使用该节点可以设置串口的VISA资源名称、波特率、数据位、校验位、超时时间、终止符以及流控制等参数。
VISA资源名称控件用于规定对VISA会话句柄开放的资源,并维持会话句柄和类。
VISA 会话句柄是VISA使用的唯一逻辑标识符,用于与资源进行通信。
VISA会话句柄由VISA 资源名称输入控件保持,用户不可见。
VISA资源名称输出是VISA函数中输出的VISA资源名称的副本。
通过将资源名称输出或输入函数和VI,并链接函数和VI,从而简化数据流编程。
这与文件I/O函数使用的文件引用句柄输出相似。
(2)串口写入串口写入是将写入缓冲区的数据写入VISA资源名称指定的设备或接口,可以选择同步或异步。
该操作仅当传输结束后才返回。
VISA写入的节点图标及端口定义如下图所示。
其中写入缓冲区包含要写入设备的数据。
labview串口设计原理LabVIEW(Laboratory Virtual Instrument Engineering Workbench)是一款由美国国家仪器公司(National Instruments)开发的图形化编程环境,主要用于数据采集、信号处理、仪器控制和虚拟仪器等领域。
LabVIEW具有强大的功能和易于使用的特点,尤其在串口设计方面具有很高的应用价值。
串口是一种常见的通信接口,用于在电脑和外部设备之间进行数据传输。
LabVIEW通过其丰富的串口通信函数库,使得串口设计变得简单而高效。
在LabVIEW中,串口通信主要包括串口配置、数据发送和数据接收三个方面。
LabVIEW提供了丰富的串口配置函数,用户可以根据实际需求对串口进行参数设置。
例如,可以选择串口的波特率、数据位数、停止位数和校验位等。
这些参数的正确配置对于串口通信的稳定和可靠非常重要。
LabVIEW还支持多串口通信,用户可以根据需要配置多个串口进行数据传输。
LabVIEW提供了数据发送函数,用户可以通过简单的图形化编程实现数据的发送。
在LabVIEW中,数据发送可以采用连续发送或分段发送的方式。
连续发送适用于数据量较大且不需要实时响应的情况,而分段发送适用于数据量较小且需要实时响应的情况。
LabVIEW还支持数据的转换和打包,用户可以将数据进行格式化处理后再发送,以满足外部设备的要求。
LabVIEW提供了数据接收函数,用户可以轻松地实现对串口接收数据的处理。
LabVIEW可以根据用户设定的数据格式进行数据解析,并将解析后的数据显示或保存。
此外,LabVIEW还支持数据的实时监测和错误处理,以确保数据的完整性和正确性。
除了基本的串口通信功能,LabVIEW还提供了丰富的工具和函数,使得串口设计更加灵活和强大。
例如,LabVIEW可以实现多线程编程,使得数据的发送和接收可以同时进行,提高了数据传输的效率。
LabVIEW还支持与其他编程语言(如C++、Python等)的交互,用户可以通过LabVIEW与其他系统进行数据交换和通信。
使用LabVIEW进行串口通信LabVIEW是一种流行的集成开发环境(IDE),用于编写和执行控制、测量和数据采集应用程序。
它可以非常方便地与硬件设备进行通信,其中包括通过串口进行通信。
本文将介绍如何使用LabVIEW进行串口通信。
一、LabVIEW介绍LabVIEW是一款图形化编程语言,以可视化编程为特点。
用户可以使用LabVIEW快速开发有效的控制和数据采集系统,而无需深入理解底层的编程语言。
二、串口通信原理串口是一种用于将数据传输到计算机或其他设备的接口。
在串口通信中,数据以字节的形式通过传输线路进行传输,其中利用的是一对称为TX和RX的引脚。
发送数据时,数据通过TX引脚发送到接收方;接收数据时,数据则通过RX引脚接收。
三、配置串口通信在LabVIEW中,可以使用VISA(Virtual Instrument Software Architecture)函数库来实现串口通信。
通过配置相关参数,可以指定通信的波特率、数据位数、校验位等。
首先,在LabVIEW中创建一个新的VI文件。
然后,在Front Panel界面中,双击空白处,打开Block Diagram界面。
在Block Diagram界面中,拖拽VISA Serial和VISA Close VIs到界面上。
接下来,双击VISA Serial VIs,打开参数设置面板。
在面板上,可以设置串口号、波特率、数据位数、校验位等。
根据具体需求进行配置。
四、数据的发送和接收在LabVIEW中,使用串口进行数据发送和接收非常简单。
可以使用VISA Write和VISA Read VIs来分别执行发送和接收操作。
在Block Diagram界面中,从VISA Serial VIs中拖拽VISA Write VI,将其连接到VISA Serial VIs和VISA Close VIs之间。
然后,从VISA Serial VIs中拖拽VISA Read VI,将其连接到VISA Write VI的右侧。
LabVIEW中的串口通信和硬件连接概述:LabVIEW是一款功能强大的图形化编程软件,广泛用于各种科学实验和工程应用中。
本文将讨论LabVIEW中的串口通信和硬件连接,包括串口通信的原理、LabVIEW中串口通信的配置方法以及如何通过硬件连接实现串口通信。
一、串口通信原理串口通信是一种通过串行数据传输来实现设备之间通信的方式。
它将数据按照位的顺序逐位传输,并利用起始位、停止位、数据位和校验位等信息来保证数据的可靠传输。
常见的串口通信协议有RS232、RS485等。
二、LabVIEW中的串口通信配置在LabVIEW中,使用VISA(Virtual Instrument Software Architecture)库来实现串口通信。
下面是配置串口通信的步骤:1. 打开LabVIEW软件,创建一个新的VI(Virtual Instrument)。
2. 在VI中添加VISA组件,可在工具栏中选择"Functions",然后在弹出的菜单中选择"Measurement I/O",再选择"VISA"。
3. 在VISA组件中,选择"Configurations",然后点击鼠标右键,选择"Create New VISA Resource"。
4. 在弹出的对话框中,选择要使用的串口资源,如COM1。
点击"OK"完成串口资源的配置。
5. 在VISA组件中选择"VISA Resource Name",将刚才配置的串口资源名称输入。
6. 现在可以通过VISA组件的其他函数实现对串口的读写操作,如"VISA Read"和"VISA Write"。
三、通过硬件连接实现串口通信除了LabVIEW软件中的配置,还需要通过硬件连接来实现串口通信。
一般情况下,需要使用串口转USB转接器、串口线等硬件设备来连接计算机和目标设备。
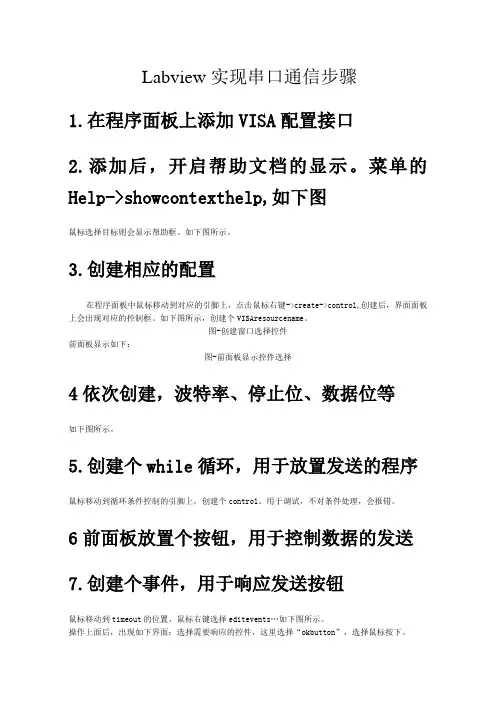
Labview实现串口通信步骤1.在程序面板上添加VISA配置接口2.添加后,开启帮助文档的显示。
菜单的Help->showcontexthelp,如下图鼠标选择目标则会显示帮助框。
如下图所示。
3.创建相应的配置在程序面板中鼠标移动到对应的引脚上,点击鼠标右键->create->control,创建后,界面面板上会出现对应的控制框。
如下图所示,创建个VISAresourcename。
图-创建窗口选择控件前面板显示如下:图-前面板显示控件选择4依次创建,波特率、停止位、数据位等如下图所示。
5.创建个while循环,用于放置发送的程序鼠标移动到循环条件控制的引脚上,创建个control。
用于调试,不对条件处理,会报错。
6前面板放置个按钮,用于控制数据的发送7.创建个事件,用于响应发送按钮鼠标移动到timeout的位置,鼠标右键选择editevents…如下图所示。
操作上面后,出现如下界面:选择需要响应的控件,这里选择“okbutton”,选择鼠标按下。
点击ok后,事件的名称也变化了。
如下图所示。
如果鼠标点击按键,则会进入事件处理。
8创建VISA写函数9连接端口和写函数10添加个关闭函数11.创建字符串控件,传递给写函数,用于发送选中VISAWrite的writebuffer,右键create->control,12界面如下所示13.安装虚拟串口,提供一个下载地址用虚拟串口配置两个端口,配置好后,这两个串口之间是自动连接上,模拟硬件上两个串口对接上的。
如上图,指定好端口,点击Addpair。
14运行串口工具,提供一个下载地址15.运行串口工具,打开串口,运行VI,发送数据我的电脑配置的是COM12和COM13,vi选择COM12.运行VI,在writebuffer里面填写test,点击OK发送。
每点击一次,发送一次。
16.建立接收模块添加个while循环,创建while循环,用于接收。
13、串口的使用串行通讯终端与计算机之间或者计算机与计算机之间进行交换信息时,除了采用并行通讯方式之外,还经常采用串行通讯方式。
并行通讯是指数据的各位同时进行传送,其有点是传送数据速度快,缺点是有多少位数据就需要多少根传输线,这在数据位数较多,传送距离较远时就不宜采用。
串行通讯是指数据一位一位地按顺序传送,其突出优点是只需一根传输线,特别适应于远距离传输,缺点是传送速度较慢。
在微机测量,控制系统中,目前串行数据的传输大多采用异步通讯的方式。
1.同步通讯和异步通讯串行通讯分为同步传送和异步传送两种方式。
●同步传送方式要求通信双方以相同的速率进行,而且要准确地协调。
它通过共享一个单个时钟或定时脉冲源以保证发送方和接受方准确同步。
其特点是允许连续发送一组字符序列(而非单个字符),每个字符数据位数相同,没有起始位和停止位,效率高。
●异步传送方式不要求通信双方同步,发送方和接受方可以有各自的时钟源。
为了能够实现通信,双方必须都遵循异步通信协议。
在异步通信中,通信双方必须规定两件事:一是字符格式,即规定字符各部分所占的位数,是否采用奇偶校验,以及校验的方式;二是采用的波特率,以及时钟率与波特率之间的比例关系。
由此可见,异步通信方式的传输效率比同步通信方式低,但它对通信双方的同步要求大大降低,因而成本也比同步通信方式低。
2.DTE和DCE在串行通讯中,用于发送和接收数据的设备称为数据终端设备(Data Terminal Equipment 简写为DTE)。
DTE既可以是一台计算机,也可以是一台只接收数据的打印机。
用于连接DTE与数据通信网络的设备称为数据通信设备(Data Communications Equipment 简写为DCE),或称为数据电路终接设备。
DCE既可以是一个调制解调器,也可以是简单的线路驱动器。
3.波特率在串行通讯中还有一个重要的指标——波特率(又称调制速率)。
波特率定义为每秒钟传送二进制数码的位数,以位/秒(bit/s)为单位,亦称“波特”。

串口通信的基本概念问题: 我从那里能够学到串口通信的基本知识解答: 串口通信的基本概念1,什么是串口?2,什么是RS-232?3,什么是RS-422?4,什么是RS-485?5,什么是握手?1,什么是串口?串口是计算机上一种非常通用设备通信的协议(不要与通用串行总线Universal Serial Bus或者USB混淆)。
大多数计算机包含两个基于RS232的串口。
串口同时也是仪器仪表设备通用的通信协议;很多GPIB兼容的设备也带有RS-232口。
同时,串口通信协议也可以用于获取远程采集设备的数据。
串口通信的概念非常简单,串口按位(bit)发送和接收字节。
尽管比按字节(byte)的并行通信慢,但是串口可以在使用一根线发送数据的同时用另一根线接收数据。
它很简单并且能够实现远距离通信。
比如IEEE488定义并行通行状态时,规定设备线总常不得超过20米,并且任意两个设备间的长度不得超过2米;而对于串口而言,长度可达1200米。
典型地,串口用于ASCII码字符的传输。
通信使用3根线完成:(1)地线,(2)发送,(3)接收。
由于串口通信是异步的,端口能够在一根线上发送数据同时在另一根线上接收数据。
其他线用于握手,但是不是必须的。
串口通信最重要的参数是波特率、数据位、停止位和奇偶校验。
对于两个进行通行的端口,这些参数必须匹配:a,波特率:这是一个衡量通信速度的参数。
它表示每秒钟传送的bit的个数。
例如300波特表示每秒钟发送300个bit。
当我们提到时钟周期时,我们就是指波特率例如如果协议需要4800波特率,那么时钟是4800Hz。
这意味着串口通信在数据线上的采样率为4800Hz。
通常电话线的波特率为14400,28800和36600。
波特率可以远远大于这些值,但是波特率和距离成反比。
高波特率常常用于放置的很近的仪器间的通信,典型的例子就是GPIB设备的通信。
b,数据位:这是衡量通信中实际数据位的参数。
当计算机发送一个信息包,实际的数据不会是8位的,标准的值是5、7和8位。
labview串口调试其实labview 传送的只是二进制的数,只是默认以ASCII 码显示而已。
除你楼主的方法,还有一种就是利用字符串到字节数组转换工具,将传送的数据按每8 位,保存为一个数组元素。
再用索引数组索引出需要的二进制数即可。
bview 对串口进行调试时,首先需要安装visa 驱动,可在NI 的官方网站上下载,不过速度好像不是很快。
2.最简模式下进行串口程序接收。
如图:然后在最右边接一个字符串接受区就可以接受到串口发送的数据了。
注意:通过串口发送的是ascii 码,因此如果单片机那边发送的是比如0x20 之类的数据,那么在接受端你用”Normal”模式将看不到任何东西,因为Normal 是以ascii 模式查看,而0x20 的ascii 表示空格,解决的方法为右键点击接受区(字符串指示器),然后选择16 进制模式便可以正常查看。
那如果要在单片机那么发送一个具体的数字,怎么才能正确的将这个数提取出来呢?这才是难点所在。
有种方法可以解决:在下位机(发送端)发送的就是表示该数的ascii 码,比如你要发送12,那么就发送49,50(ascii 比实际的数大48),因此在下位机专门写个函数将欲发送的数转换成ascii 码就可以正常发送了。
函数很简单,就是将其拆开然后加48。
此方法是专门用于labview,因为要从接收到的字符串中提取数字就必须用这种方法,当然其他的软件,比如说VB 之类的在这方面就简单一些,因为它可以在上位机对接受到的ascii 码进行处理还原。
3.得到字符串后,将有用的信息提取出来:比如收到如下信息: b0001b002b0003b0004b0005 如果字符串是上述固定格式,可以scan from string 函数直接将数字提取出来,但我遇到的问题是上面的格式在每次发送的时候却不是固定的(串口都这样)上述字符串有可能以如下方式收到001b0002b0003b0004b0005b00 此时scan from string 就会报错,因为它发现第一个不是字母等等。
串口可以说是我们最容易见到,也最容易接触到的一种总线,台式机上一般都有二个,而现在很多下位机、仪器等很多都还是使用串口通信的。
论坛上很多朋友都经常会使用到串口,并遇到一些问题,这里有必要做一个详细的说明,以方便广大会员朋友方便使用。
首先补充一个比较重要的问题,就是在LabVIEW中使用串口的话一定要先安装VISA这个驱动,然后生成的EXE运行时也需要在目标机上安装VISA Runtime Engine,可以在打包时一起打包。
1.串口扩展的问题:先说一下串口的扩展问题,一般的台式机或工控机上都至少有二个串口,一般都是够用的,但是现在市场上已经很难找到带串口的笔记本了,而有时候在外出调试时需要在笔记本中使用到串口的,这时一般是使用USB-RS232的转接线,价格从十几到一百多都有,很多朋友反应在使用价格低的转接线时会出现乱七八糟的问题,而贵一点的线就很少听说有其它问题的,所以大家在使用便宜的USB-RS232转接线时要特别注意线的质量,遇到一些奇怪的问题时先考虑换一根好一点的线。
PCI-RS232扩展卡也同理,便宜的卡也容易出问题,尽量买好一点的,以免因小失大。
PCI-RS232一般至少能扩展2个串口,有些BT一点的可以扩展到8-16个,一堆线和接头。
转接线和扩展卡一般是要装驱动的。
2.串口功能的确认:在使用串口之前,最好先确认一下串口是否正常,特别是使用转换接或扩展卡的。
检查的方法很简单,就是将串口的2、3脚短接起来,3脚是发送数据,2脚接收数据,就是这个串口自发自收。
电脑上的串口软件一般是用串口调试助手,很出名的,也好用。
如下图所示:图1串口调试助手打开软件,选择已经短接好的串口号,点击“手动发送”,如果串口是好的,2、3脚又短接起来了,马上就可以在上面的接收框里看到接收的数据就是发送的数据。
稍微要注意一下的是有些电脑的COM1和COM2的位置是反过来的,所以要确定好串口调试助手左上角的串口上择的是已经短接的那一个,如果COM1没接收到,可以再先COM2再发一次看一下。
LabVIEW 串口接收串口发送一次数据的步骤为:打开串口-->发送数据-->关闭串口。
参照串口发送的思路,串口接收一次数据的步骤为:打开串口-->接收数据-->关闭串口。
但是这里有一个问题,数据的接收方是不知道数据会在什么时刻发送过来的,这是一个被动接收的过程。
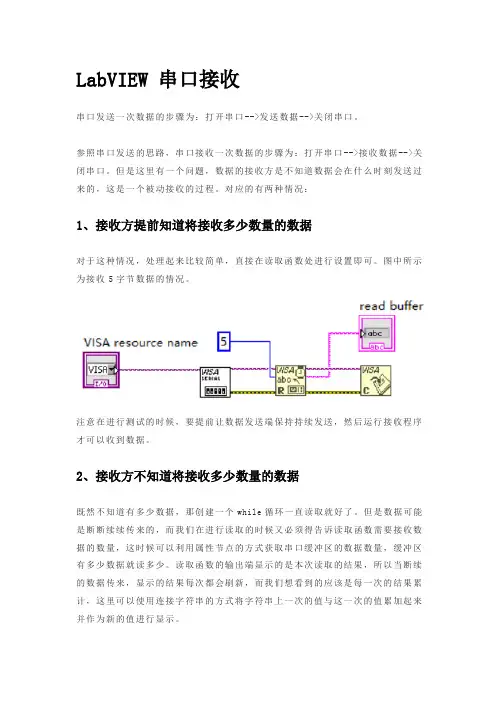
对应的有两种情况:1、接收方提前知道将接收多少数量的数据对于这种情况,处理起来比较简单,直接在读取函数处进行设置即可。
图中所示为接收5字节数据的情况。
注意在进行测试的时候,要提前让数据发送端保持持续发送,然后运行接收程序才可以收到数据。
2、接收方不知道将接收多少数量的数据既然不知道有多少数据,那创建一个while循环一直读取就好了。
但是数据可能是断断续续传来的,而我们在进行读取的时候又必须得告诉读取函数需要接收数据的数量,这时候可以利用属性节点的方式获取串口缓冲区的数据数量,缓冲区有多少数据就读多少。
读取函数的输出端显示的是本次读取的结果,所以当断续的数据传来,显示的结果每次都会刷新,而我们想看到的应该是每一次的结果累计,这里可以使用连接字符串的方式将字符串上一次的值与这一次的值累加起来并作为新的值进行显示。
在获取到串口缓冲区的字节数之后,还进行了一个判断,当缓冲区不为空的时候再进行数据读取。
上面这个程序,可以说是一个最简单的串口接收程序了,里面用到的函数组件都是进行串口数据接收所必不可少的。
但是很多时候,用LabVIEW编写串口程序是拿来跟下位机进行交互的,下位机有可能是单片机,也有可能是别的什么设备。
在调试这些下位机串口设备的时候,用的最多的调试工具就是串口助手了。
作为一个调试工具,XCOM已经做的很好了,没有必要重复造轮子。
但从另一个方面来说,XCOM是拥有很多个性化的功能的,比如自动发送、多条发送等,这些功能可以为调试带来极大的便捷。
当我们想要更多,当现有的工具无法满足我们的需求,最快的方式就是自己去编写一些调试工具,或者说根据自己当前的需求快速定制化一个调试工具。
先是英文资料,后面有详细的中文资料。
/devzone/cda/tut/p/id/2897Serial Instrument Control Tutorial目录1.Overview of Serial Bus2.Connecting and Setting up a Serial Instrument Control System3.How to Create a VISA Resource for the Instrument in MAX4.Instrument Control Software Articles and Related LinksOverview of Serial BusSerial is a common device communication protocol for instrument control because most computers and many remote instruments include at least one serial port. Single applications can be used across a variety of instruments with few modifications, reducingprogramming and test time.For more information on the serial protocol, including information on transfer speeds and important parameters, please refer to Serial Communication Overview.Connecting and Setting up a Serial Instrument Control SystemEngineers typically use serial to transmit American Standard Code for Information Interchange (ASCII) data. All data types are converted to strings of ASCII characters and then transmitted bit by bit across the serial bus. For two ports to communicate, both the instrument and the controlling computer must have the same baud rate, data bit size, stopbits, and parity.A basic serial instrument control system consists of four parts:1. PC2. Serial cable3. Serial instrumentAs mentioned, most computers include a serial port. The only hardware setup required is connecting the serial cable to the serial port on the PC and the serial port on the instrument.The serial instrument may include some hardware drivers or software utilities for communication, and should include documentation on the baud rate, packet size, stop bits, and parity bits that the instrument will use. Additionally, check the National Instruments Instrument Driver Network to see if LabVIEW drivers already exist for yout instrument, as well has tutorials on how to use them.To confirm that the serial port on your computer is working properly, refer to Serial Communication Starting Point, to see how to perform a serial loop back test.How to Create a VISA Resource for the Instrument in MAXWith NI-VISA, communicating with your serial instrument is easy. To confirm that you are able to communicate with your instrument, open Measurement & Automation Explorer (MAX) found at Start>>Programs>>National Instruments>>Measurement & Automation.Figure 1. MAX Main MenuExpand the “Devices and Interfaces” subdirectory below “My System,” then expand “Serial & Parallel.” Below it you should see all the serial and parallel ports on your computer. In this example the computer has one serial port (“COM1”) and one parallel port (“LPT1”). Figure 2 shows the directory path to the serial port and the configuration window whenCOM1 is selected.Figure 2. Serial Port Configuration WindowFrom this configuration window you can change the VISA Resource Name for easier identification and you can also “Open VISA Test Panel” to send and receive communication from your serial instrument. Your instrument should have specific commands for collecting and transmitting data, and sending those commands to the instrument from the VISA Test Panel will confirm that you have a connection.Using NI-VISA to Communicate with Your Serial InstrumentNI-VISA makes serial instrument programming fast and easy. VISA Open, VISA Read, VISAWrite, and VISA Close are the basic VISA functions in LabVIEW used in the example VI in Figure 3. This example opens a VISA session to a serial device. A command is written to the device, and the response is read back. In this example the specific command being sent is the ID query for the device. Check with your device manufacturer for your device command set. After all communication is complete, the VISA session is closed.Figure 3. LabVIEW Serial Program Using NI-VISA/public.nsf/allkb/9F439B3D68D9072F4825703000383197串口通信的基本概念问题:我从那里能够学到串口通信的基本知识解答:串口通信的基本概念1,什么是串口?2,什么是RS-232?3,什么是RS-422?4,什么是RS-485?5,什么是握手?1,什么是串口?串口是计算机上一种非常通用设备通信的协议(不要与通用串行总线Universal Serial Bus或者USB混淆)。
第一部分使用LabVIEW系统VI1.1、串口VI介绍LabVIEW的串口通讯VI位于Instrument I/O Platte的Serial中,包括:VISA Configure Serial Port:初始化VISA resource name指定的串口通讯参数VI SA Write:将输出缓冲区中的数据发送到VISA resource name指定的串口VISA Read:将VISA resource name指定的串口接收缓冲区中的数据读取指定字节数的数据到计算机内存中VISA Serial Break:向VISA resource name指定的串口发送一个暂停信号VISA Bytes at Serial Port:查询VISA resource name指定的串口接收缓冲区中的数据字节数VISA Close:结束与VISA resource name指定的串口资源之间的会话VISA Set I/O Buffer Size:设置VISA resource name指定的串口的输入输出缓冲区大小VISA Flush I/O Buffer:清空VISA resource name指定的串口的输入输出缓冲区1.2、使用说明在LabVIEW环境中使用串口与在其它开发环境中开发过程类似,基本的流程框图如下。
图1、串口操作数据流图首先需要调用VISA Configure Serial Port完成串口参数的设置,包括串口资源分配、波特率、数据位、停止位、校验位和流控等等。
图2、初始化串口如果初始化没有问题,就可以使用这个串口进行数据收发。
发送数据使用VISA Write,接收数据使用VISA Read。
在接收数据之前需要使用VISA Bytes at Ser ial Port查询当前串口接收缓冲区中的数据字节数,如果VISA Read要读取的字节数大于缓冲区中的数据字节数,VISA Read操作将一直等待,直至Timeout或者缓冲区中的数据字节数达到要求的字节数。
在LabVIEW中使用串口第一部分使用LabVIEW系统VI一、串口VI介绍LabVIEW的串口通讯VI位于Instrument I/O Platte的Serial中,包括:二、使用说明在LabVIEW环境中使用串口与在其它开发环境中开发过程类似,基本的流程框图如下。
图1、串口操作数据流图首先需要调用VISA Configure Serial Port完成串口参数的设置,包括串口资源分配、波特率、数据位、停止位、校验位和流控等等。
图2、初始化串口如果初始化没有问题,就可以使用这个串口进行数据收发。
发送数据使用VISA Write,接收数据使用VISA Read。
在接收数据之前需要使用VISA Bytes at Serial Port查询当前串口接收缓冲区中的数据字节数,如果VISA Read要读取的字节数大于缓冲区中的数据字节数,VISA Read操作将一直等待,直至Timeout或者缓冲区中的数据字节数达到要求的字节数。
当然也可以分批读取接收缓冲区或者只从中读取一定字节的数据。
图3、从串口发送数据图4、从串口接收数据在某些特殊情况下,需要设置串口接收/发送缓冲区的大小,此时可以使用VISA Set I/O Buffer Size;而使用VISA Flush I/O Buffer则可以清空接收与发送缓冲区。
在串口使用结束后,使用VISA Close结束与VISA resource name指定的串口之间的会话。
图5、设置缓冲区大小图6、清空缓冲区图7、结束会话/线程具体的例子可以参考:examples\instr\smplserl.llb。
第二部分使用MSCOMM控件在LabVIEW中使用MSCOMM控件,与在VC、VB中使用一样。
同样可以使用中断方式进行接收。
图8、使用控件的串口收发程序图9、程序数据流图首先通过LabVIEW的工具菜单“T ools >> Advanced >> Import ActiveX Controls”将Microsoft的串口控件-“Microsoft Communications Control,version 6.0”添加到LabVIEW环境中,存放在缺省路径即可,这样在User Controls Palette里面可以找到这个控件。
LabVIEW中的串口通信和数据解析一、引言在LabVIEW中,串口通信是一种常见的用于与外部设备进行数据交互的方式。
通过串口通信,我们可以与各类传感器、仪器、控制器等设备进行数据的传输与控制。
本文将介绍LabVIEW中如何进行串口通信和数据解析的方法和技巧。
二、LabVIEW中的串口通信1. 准备工作在进行串口通信之前,首先需要准备好相应的硬件设备和驱动程序。
一般来说,我们需要一台计算机、一个串口转USB转接器以及相关的串口设备。
另外,还需要安装相应的串口驱动程序,以便在LabVIEW中进行串口通信。
2. 配置串口通信在LabVIEW中,配置串口通信需要使用到“VISA”(Virtual Instrument Software Architecture)工具。
通过VISA,我们可以对串口进行打开、设置波特率、校验位、数据位等参数,并进行数据的发送和接收。
3. 打开串口在LabVIEW的程序中,使用“VISA Open”函数来打开串口。
我们需要指定对应的串口号以及串口的配置参数。
通过这一步,LabVIEW就可以与串口建立通信连接。
4. 配置串口参数在串口打开之后,需要进行串口参数的配置,包括波特率、校验位、数据位等。
这些参数需要与外部设备的参数保持一致,才能正确地进行数据的传输和解析。
5. 读取和发送数据在LabVIEW中,可以使用“VISA Read”和“VISA Write”函数来进行数据的读取和发送。
通过这两个函数,我们可以实现与外部设备的数据交互。
读取到的数据可以在LabVIEW中进行进一步处理和解析。
三、LabVIEW中的数据解析1. 数据格式在进行数据解析之前,首先需要了解数据的格式。
不同的外部设备会使用不同的数据格式进行数据的传输。
常见的数据格式包括二进制、十六进制、ASCII等。
根据实际情况,选择合适的数据格式进行解析。
2. 数据解析方法在LabVIEW中,可以使用字符串相关的函数来进行数据的解析。
【串⼝通信】labview实现串⼝通信学习labview有⼀段时间了,发现了其中功能的强⼤和编程的简洁性,⾼效性现在初步实现了串⼝的通信,把其中的体会和实现过程写出来,权当抛砖引⽟其中的串⼝采⽤的是Rs-232,D型⼝,共九跟针,其中能⽤的就是三跟针脚,2,3,5,⼀个是发送⼀个是接受,⼀个是接地,如果做⼀个串⼝线延长线的话,只需连接这三根针脚即可,就是2连3,3连2,5连5。
在labview中采⽤的visa,⾸先是进⾏串⼝设置,设置串⼝号,波特率,在这⾥⾯只要设置这两个就可以了,其余的采⽤默认,其中特别注意的是要安装visa驱动包,只有安装了这个驱动包,你的串⼝才可以选择,⼀般现在的电脑上只有⼀个串⼝,那么为了调试⽅便,这⾥有两个⼯具可以推荐,⼀个叫做串⼝虚拟软件,我⽤的是VSPDXP5,就是⼀个虚拟串⼝的软件,让你的电脑能够多虚拟两个串⼝,你要设置成让他们互联,另⼀个就是串⼝调试⼯具,叫sscom32.exe,⽤来调试串⼝通信的,可以验证通信时候成功。
visa驱动包在ni⽹站上有,具体什么地址你可以到搜索⼀下.再就是visa read作⽤是从串⼝读取数据,这⾥⾯有个read buffer,从串⼝读取的数据visawrite向串⼝写⼊数据或者是命令还有visa close结束串⼝读取数据,⽬的是读完数据后,释放串⼝资源我的例⼦前⾯板图程序图labview也可以调⽤mscomm控件来实现串⼝通信,但是编程相对来讲⽐较复杂,⼀般不推荐,直接⽤labview中⾃带的visa是最⽅便的,在调试过程中的注意事项,⼀、串⼝通讯的波特率设置要精确,⽐如要求9600的波特率,则晶振应选择11.0593MHz或其倍数。
⼆、由于通常情况下LabVIEW串⼝VI接收或发送的都是字符串(Normal),这⾥是指串⼝通信中,如果不是在串⼝通信,我们可以做个⼩⼩的验证,在前⾯板中,字符串在正常显⽰的情况下,你输⼊00,跟字符串00也会匹配,指⽰灯也会亮的,但是在串⼝通信中,⼀定注意,所以如果需要发送或接收⼗六进制数值(Hex),请在发送或接收之前进⾏必要的转换。
LabVIEW串口通信1.串口扩展的问题:先说一下串口的扩展问题,一般的台式机或工控机上都至少有二个串口,一般都是够用的,但是现在市场上已经很难找到带串口的笔记本了,而有时候在外出调试时需要在笔记本中使用到串口的,这时一般是使用USB-RS232的转接线,价格从十几到一百多都有,很多朋友反应在使用价格低的转接线时会出现乱七八糟的问题,而贵一点的线就很少听说有其它问题的,所以大家在使用便宜的USB-RS232转接线时要特别注意线的质量,遇到一些奇怪的问题时先考虑换一根好一点的线。
PCI-RS232扩展卡也同理,便宜的卡也容易出问题,尽量买好一点的,以免因小失大。
PCI-RS232一般至少能扩展2个串口,有些BT一点的可以扩展到8-16个,一堆线和接头。
转接线和扩展卡一般是要装驱动的。
2.串口功能的确认:在使用串口之前,最好先确认一下串口是否正常,特别是使用转换接或扩展卡的。
检查的方法很简单,就是将串口的2、3脚短接起来,3脚是发送数据,2脚接收数据,就是这个串口自发自收。
电脑上的串口软件一般是用串口调试助手,很出名的,也好用。
如下图所示:图1 串口调试助手打开软件,选择已经短接好的串口号,点击“手动发送”,如果串口是好的,2、3脚又短接起来了,马上就可以在上面的接收框里看到接收的数据就是发送的数据。
稍微要注意一下的是有些电脑的COM1和COM2的位置是反过来的,所以要确定好串口调试助手左上角的串口上择的是已经短接的那一个,如果COM1没接收到,可以再先COM2再发一次看一下。
3.串口线的检查:检查好串口后,一般也要注意一下使用的串口线,标准的串口线是9根线都是用上的,但有一些是只使用了三根线的:2、3、5。
第3个脚管是发送,第2个管脚接收,另一个5是地线,这里叫它简化的串口线,简化的串口线能用上的地方,标准的串口线也肯定能用上,因为标准线的9根线已经包括了简化串口线中的3根线,但标准串口线能用上的地方,简化串口线就不一定能用上,所以在使用串口线之间一定要确定好串口线的类型,一般买的串口线都是标准线,但自制的串口线因为应用场合不同就要先确定一下。
先是英文资料,后面有详细的中文资料。
/devzone/cda/tut/p/id/2897Serial Instrument Control Tutorial目录1.Overview of Serial Bus2.Connecting and Setting up a Serial Instrument Control System3.How to Create a VISA Resource for the Instrument in MAX4.Instrument Control Software Articles and Related LinksOverview of Serial BusSerial is a common device communication protocol for instrument control because most computers and many remote instruments include at least one serial port. Single applications can be used across a variety of instruments with few modifications, reducingprogramming and test time.For more information on the serial protocol, including information on transfer speeds and important parameters, please refer toSerial Communication Overview.Connecting and Setting up a Serial Instrument Control SystemEngineers typically use serial to transmit American Standard Code for Information Interchange (ASCII) data. All data types are converted to strings of ASCII characters and then transmitted bit by bit across the serial bus. For two ports to communicate, both the instrument and the controlling computer must have the same baud rate, data bit size, stop bits, and parity.A basic serial instrument control system consists of four parts:1. PC2. Serial cable3. Serial instrumentAs mentioned, most computers include a serial port. The only hardware setup required is connecting the serial cable to the serial port on the PC and the serial port on the instrument. The serial instrument may include some hardware drivers or software utilities for communication, and should include documentation on the baud rate, packet size, stop bits, and parity bits that the instrumentwill use. Additionally, check the National Instruments Instrument Driver Network to see if LabVIEW drivers already exist for youtinstrument, as well has tutorials on how to use them.To confirm that the serial port on your computer is working properly, refer to Serial Communication Starting Point, to see how toperform a serial loop back test.How to Create a VISA Resource for the Instrument in MAXWith NI-VISA, communicating with your serial instrument is easy. To confirm that you are able to communicate with your instrument, open Measurement & Automation Explorer (MAX) found at Start>>Programs>>NationalInstruments>>Measurement & Automation.Figure 1. MAX Main MenuExpand the “Devices and Interfaces” subdirectory below “My System,” then expand “Serial & Parallel.” Below it you should see all the serial and parallel ports o n your computer. In this example the computer has one serial port (“COM1”) and one parallel port (“LPT1”). Figure 2 shows the directory path to the serial port and the configuration window when COM1 is selected.Figure 2. Serial Port Configuration WindowFrom this configuration window you can change the VISA Resource Name for easier identification and you can also “Open VISATest Panel” to send and receiv e communication from your serial instrument. Your instrument should have specific commands for collecting and transmitting data, and sending those commands to the instrument from the VISA Test Panel will confirm that youhave a connection.Using NI-VISA to Communicate with Your Serial InstrumentNI-VISA makes serial instrument programming fast and easy. VISA Open, VISA Read, VISA Write, and VISA Close are the basic VISA functions in LabVIEW used in the example VI in Figure 3. This example opens a VISA session to a serial device. A command is written to the device, and the response is read back. In this example the specific command being sent is the ID query for the device. Check with your device manufacturer for your device command set. After all communication is complete, the VISA sessionis closed.Figure 3. LabVIEW Serial Program Using NI-VISA/public.nsf/allkb/9F439B3D68D9072F4825703000383197串口通信的基本概念问题:我从那里能够学到串口通信的基本知识解答:串口通信的基本概念1,什么是串口?2,什么是RS-232?3,什么是RS-422?4,什么是RS-485?5,什么是握手?1,什么是串口?串口是计算机上一种非常通用设备通信的协议(不要与通用串行总线Universal Serial Bus 或者USB混淆)。
大多数计算机包含两个基于RS232的串口。
串口同时也是仪器仪表设备通用的通信协议;很多GPIB兼容的设备也带有RS-232口。
同时,串口通信协议也可以用于获取远程采集设备的数据。
串口通信的概念非常简单,串口按位(bit)发送和接收字节。
尽管比按字节(byte)的并行通信慢,但是串口可以在使用一根线发送数据的同时用另一根线接收数据。
它很简单并且能够实现远距离通信。
比如IEEE488定义并行通行状态时,规定设备线总常不得超过20米,并且任意两个设备间的长度不得超过2米;而对于串口而言,长度可达1200米。
典型地,串口用于ASCII码字符的传输。
通信使用3根线完成:(1)地线,(2)发送,(3)接收。
由于串口通信是异步的,端口能够在一根线上发送数据同时在另一根线上接收数据。
其他线用于握手,但是不是必须的。
串口通信最重要的参数是波特率、数据位、停止位和奇偶校验。
对于两个进行通行的端口,这些参数必须匹配:a,波特率:这是一个衡量通信速度的参数。