Hytera 对讲机
- 格式:doc
- 大小:120.50 KB
- 文档页数:2

DIGITAL PORTABLE RADIO数字手持终端OWNER’S MANUAL使用说明书Instructional IconsIndicates functions that are available on digital channel only.Indicates functions that are available on analog channel only.Functions marked with neither the above icons are available on both analog and digital channels.DisclaimerHytera Communications Co., Ltd. (the Company) endeavors to achieve the accuracy and completeness of this manual, but no warranty of accuracy or reliability is given. All the specifications and designs are subject to change without notice due to continuous technology development. No part of this manual may be copied, modified, translated, or distributed in any manner without the express written permission of us.We do not guarantee, for any particular purpose, the accuracy, validity, timeliness, legitimacy or completeness of the Third Party products and contents involved in this manual.If you have any suggestions or would like to learn more details, please visit our website at: .RF Radiation InformationThis product must be restricted to operations in an occupational/controlled RF exposure environment. Users must be fully aware of the hazards of the exposure and able to exercise control over their RF exposure to qualify for the higher exposure limits.RF Radiation ProfileRadio Frequency (RF) is a frequency of electromagnetic radiation in the range at which radio signals are transmitted. RF technology is widely used in communication, medicine, food processing and other fields. It may generate radiation during use.RF Radiation SafetyIn order to ensure user health, experts from relevant industries including science, engineering, medicine and health work with international organizations to develop standards for safe exposure to RF radiation. These standards consist of:●United States Federal Communications Commission, Code of Federal Regulations; 47CFR part 2 sub-part J;●American National Standards Institute (ANSI)/Institute of Electrical and Electronic Engineers (IEEE) C95. 1-1992;●Institute of Electrical and Electronic Engineers (IEEE) C95.1-1999;●International Commission on Non-Ionizing Radiation Protection (ICNIRP) 1998.FCC RegulationsFederal Communication Commission (FCC) requires that all radio communication products should meet the requirements set forth in the above standards before they can be marketed in the U.S, and the manufacturer shall post a RF label on the product to inform users of operational instructions, so as to enhance their occupational health against exposure to RF energy.Operational Instructions and Training GuidelinesTo ensure optimal performance and compliance with the occupational/controlled environment RF energy exposure limits in the above standards and guidelines, users should transmit not more than 50% of the time and always adhere to the following procedures:●RF energy will be generated only when the radio is transmitting.●The radio must be 2.5 centimeters away from human body when transmitting.EU Regulatory ConformanceAs certified by the qualified laboratory, the product is in compliance with the essential requirements and other relevant provisions of the Directive 1999/5/ EC.Please note that the above information is applicable to EU countries only.Contents1. Items in the Package ------------------------------------12. Product Overview -----------------------------------------2Product Controls ---------------------------------------------------2 Programmable Keys ----------------------------------------------3 3. Before Use --------------------------------------------------3Assembling the Radio --------------------------------------------3 Charging the Battery----------------------------------------------4 4. Status Indication ------------------------------------------5LCD Icon-------------------------------------------------------------5 LED Indicator -------------------------------------------------------65. Menu Navigation ------------------------------------------66. Basic Operations -----------------------------------------7Powering On/Off ---------------------------------------------------7 Adjusting the Volume ---------------------------------------------7 Selecting a Zone ---------------------------------------------------7 Selecting a Channel -----------------------------------------------7 Locking and Unlocking the Keypad --------------------------8 Contact -------------------------------------------------------------------8 Contact List -------------------------------------------------------------87. Call Services------------------------------------------------9Call on Digital Channel --------------------------------------------9Call on Analog Channel ------------------------------------------108. Message Service ------------------------------------------119. Feature Description --------------------------------------1110. Troubleshooting -----------------------------------------1311. Care and Cleaning --------------------------------------1412. Optional Accessories ----------------------------------15Assembling the Radio”Assemble DisassembleProgrammable KeysFor enhanced convenience, you may request your dealer to program the SK1, P1, P2, P3, P4 and P5 as shortcuts to certain functions. Please refer to the corresponding Feature Book for more details. fore Use●To remove the battery, turn off the radio first.●If not attached with battery specified by Hytera, the radio will give an alarm tone to remind you when powering on.Afterwards, the radio will operate properly but the icons of battery power and RSSI will remain unchanged during operation.Charging the Battery●Read the Safety Information Booklet in advance to getnecessary safety information.●To achieve optimal battery performance, please charge12Remove the screws Assemble the Belt ClipCautionCautionDo not hold the radio by its antenna, otherwise theperformance and lifespan of the antenna will be reduced.3.Attaching the Belt Clip4.Attaching the AccessoriesLCD IconIcon N ame IconRadio S tatusBattery Power IconMore bars indicate more battery power.TX Power Icon Low power for the current channel. High power for the current channel. Accessory IconAn accessory is connected. Operation Mode IconDMDirect Mode Operation: Under this mode, radios can communicate with each other directly.RMRepeater Mode Operation: Under this mode, radios communicate with each other via a repeater. Monitor Icon The Monitor feature is enabled. Roam Icon The radio is roaming.Scrambler/EncryptThe Scrambler/Encrypt feature is enabled.Scan IconThe radio is scanning.The radio stays on a non-priority channel.The radio stays on Priority Channel 1.The radio stays on Priority Channel 2.Icon6LED IndicatorDThe following menu structure shows all the customizable menu items, which can be programmed by your dealer as per your actual requirements.To select and confirm the options shown in the menu, press the OK/Menu key and then press the Up or Down key to select your needed option, finally press the OK/Menu key. This manual only provides a menu path when instructing menu operations, for example, to access the contact list, go to “Contact -> Contact List”.The radio supports menu reset function. When you do not operate the menu for a preset time period configured by the dealer, the radio will automatically return to the home screen. You may request the dealer to change the auto reset time or disable the feature.7Selecting a Zone Selecting a ChannelONOFFPowering On/OffSelecting a ZoneA zone is a group of channels exhibiting the same property, which is programmed by your dealer and can facilitate convenient managementover the channel. The radio support 32 zones, and each zone consists of up to 16 channels.●Via the menu: Go to “Menu -> Zone”, press the U p or Down key to select an appropriate zone, and then press the OK/Menu key to confirm it.●Via Programmable Keys: You can toggle to the appropriate zone by pressing the programmed Z one U p or Z one Down key preset by your Selecting a ChannelAfter the radio is powered on, you can rotate the Channel Selector Knob to select an appropriate channel. You can also switch to the designated channel directly by pressing the programmed Preset Channel key preset by your dealer.If the Channel Notify feature is enabled by your dealer or by you via the menu “Settings -> Radio Settings -> Tones”, the radio will announce the channel number upon channel switching.Locking and Unlocking the KeypadWhen the keypad is not in use, you can lock the keypad to avoid mishandling. You can lock or unlock the keypad through any of the following methods:●Default: Long press P3 key to lock/unlock the keypad.●Programmable Key: Press the programmed Keypad Lock key presetby your dealer.●Menu Navigation: Go to “Settings -> Radio Settings -> Keypad Lock”to enable or disable the feature.»Enable: The keypad will be locked automatically if there is no radio operation within the preset time.»Disable: The keypad will not be locked automatically. However, you can lock or unlock the keypad via the default way or KeypadContactYou can manage the contacts via the “Contact” menu.Contact ListThe Contact List is used to save Private Call/Group Call/All Call contacts information which is preset by the dealer. You can access the “Contact List” menu by going to “Contact -> Contact List” or by pressing the programmed Contact List key.In the “Contact List” menu, you can check the detailed contact information (such as Call ID). You can send to a private call contact the following commands: Alert Call, Radio Check, Remote Monitor (Optional), Radio Enable (Optional) or Radio Disable (Optional). Please refer to Feature Book for details.Favorite ContactThe Favorite Contact is used to save regular Private Call/Group Call/All Call contacts information which is configured by you. You can access the “Favorite Contact” menu by going to “Contact -> Favorite Contact” or by pressing the programmed Favorite Contact key.You can add, view or delete the Favorite Contact information in the “Favorite Contact” menu. You can send to a private call contact the following commands: Alert Call, Radio Check, Remote Monitor (Optional), Radio Enable (Optional) or Radio Disable (Optional). Please refer to Feature Book for details.8After the radio is powered on, you can make and receive calls. To ensure optimal volume of the receiving radio, keep the microphone about 2.5 to5 centimeters away from your mouth when transmitting.●Private call: It is a voice call between individual user and anotherindividual user.●Group call: It is a voice call between one individual user and apredefined group of users. All parties in the group can communicate with each other.●channel.Call on Digital ChannelYou can initiate a private call, group call or all call (programmed by your dealer) through the same operations on digital channel. When calling back, the radio will make a call to the calling party in private call and all call (your radio must be programmed to allow you to call back in an all call); but in group call, the radio will make a call to all parties involved when calling back.Here takes the private call between Radio A and Radio B as example:●Preset contact1. Radio A and Radio B select the same digital channel.You may ask your dealer to preset a regular private call/group call/all call contact for each digital channel.2.Radio A holds down the PTT key to initiate a call.By holding down the PTT key, Radio A can talk to the microphone when the LED indicator glows red and the radio displays theicon .3. Radio B can receive the call without any operation. When receiving,the LED indicator glows green and the radio displays the icon.Radio B can hold down the PTT key to talk when the LED indicator glows orange and the radio displays the icon .If Radio B does not respond it, the radio will display appropriate indications.4. Radio A can receive the call without any operation. When receiving,the LED indicator glows green and the radio displays the icon .Radio A can hold down the PTT key to talk when the LED indicator glows orange and the radio displays the icon.If Radio A does not respond it, the call will end.9●Contact List or Call Log1. Radio A and Radio B select the same digital channel.2. Radio A accesses the contact list via menu “Contact -> Contact List”,“Contact -> Favorite Contact” or “Call Log -> Outgoing/Incoming/ Missed”.3. Radio A presses the U p or Down key to select Radio B.4. Radio A holds down the PTT key to initiate a call.By holding down the PTT key, Radio A can talk to the microphonewhen the LED indicatorglows red and the radio displays the icon.5. Radio B can receive the call without any operation. When receiving,the LED indicator glows green and the radio displays the iconRadio B can hold down the PTT key to talk when the LED indicator glows orange and the radio displays the icon .If Radio B does not respond it, the radio will display appropriate indications.6. Radio A can receive the call without any operation. When receiving,the LED indicator glows green and the radio displays the iconRadio A can hold down the PTT key to talk when the LED indicator glows orange and the radio displays the icon .If Radio A does not respond it, the call will end.The Call Hang Time (the duration of LED indicator glowingorange) is preset by your dealer. Call on Analog Channel●On the analog channel without signaling, the calling operations arethe same as that on the digital channel. The difference is that thecalled parties are all the users on the channel, rather than the presetcontact for the channel.●Please refer to the corresponding Feature Book for operationdescription on how to make and receive calls on the analog channelwith signaling.10You can send the Quick Text message directly. In the inbox, you can reply, forward or delete the text message, and in the outbox you can also resend, forward or delete the message.Operation: Press the OK/Menu key and select the “Message” menu.Quick TextQuick Text are frequently used messages preset by your dealer. You can select a Quick Text message and send it directly.InboxThe radio saves the received messages into the Inbox and gives every message a corresponding icon to indicate its status.●: Read message●: Unread messageThe inbox can save up to 20 received messages. When the Inbox is full, the radio will display the icon , and the earliest message will be overwritten by the latest one automatically.OutboxThe radio saves the sent messages into the Outbox andgives everymessage a corresponding icon to indicate its status.●: The message is sent successfully.●: The message is not sent successfully. In this case, you canresend it.The Outbox can save up to 20 sent messages. When the Outbox is full, the earliest message will be overwritten by the latest one automatically. Available features of this radio are listed below. Please refer to the corresponding Feature Book for details.Feature Type Detailed FeatureRadio Features●Checking the Device Information●Radio settings: Power Level, Language,Backlight, Lightness, LED Indicator, Alert Toneand Covert Mode●Convenient functionality: Shortcuts, Call Log,One Touch Call and VOX●Rent●Audio Optimization: Mic AGC, Audio FeedbackSuppression and LQOConventionalCommon Features●Scan●Talk AroundDigital Features●Access management: Time-out-Timer (TOT)and Transmission Management●Basic voice services: Private Call and GroupCall●Auxiliary voice service: All Call●Data Service: Message●Security: Encryption●S upplementary Services: Alert Call, RadioCheck, Remote Monitor (Optional), RadioEnable (Optional) or Radio Disable (Optional)●Patented features: Pseudo Trunking and PriorityInterrupt (Optional)●Mobility management: Roam (Optional)11Feature Type Detailed FeatureAnalog Features Access management: Time-out-Timer (TOT), Transmission Management, Monitor, Squelch Off and Adjust Squelch LevelVoice servicesSecurity: ScramblerSignaling: HDC1200, 5-Tone and 2-Tone●When using the VOX feature, holding down the internalor external PTT key will disable the VOX feature for the current channel. In such case, you can enable the VOX feature by switching the channel, pressing the programmed VOX key or restarting the radio.●The VOX feature settings will remain the unchanged whenthe radio is powering on and off.●The VOX Gain Level includes Internal MIC VOX Gain Leveland External MIC VOX Gain Level, which can be configured by your dealer or via the menu.●The VOX MIC Selection can be set to Only External andExternal First, which is set to Only External by default and can be configured by your dealer.●To use the VOX feature with an external microphone, makesure the PTT/VOX switch is switched to “VOX” beforethe radio is powered on and the VOX feature is enabled.●No matter the VOX feature is enabled or disabled afterthe radio is powered on, if the PTT/VOX switch is switchedto “PTT”, you can talk by holding down the internal orexternal PTT key. In such case, switching the PTT/VOXswitch to “VOX” will keep the radio transmitting. Tomake the radio function properly, switch the PTT/VOXswitch to “PTT” or restart the radio.12To guarantee optimal performance as well as a long service life of the product, please follow the tips below.Product CareKeep the product far away from substances that cancorrode the circuit.Product Cleaning●Clean up the dust and fine particles on the product surface andcharging piece with a clean and dry lint-free cloth or a brush regularly.●Use neutral cleanser and a non-woven fabric to clean the keys,control knobs and front case after long-time use. Do not use chemical preparations such as stain removers, alcohol, sprays or oil preparations, so as to avoid surface case damage.●Make sure the product is completely dry before use.H M N O4Caution14PC63 Data Cable(USB Port)The following items are the main optional accessories for the radio. Formore information of other accessories, please consult your local dealer.Use the accessories specified by Hytera only. If not, theCompany shall not be liable for any losses or damagesarising out of use of unauthorized accessories.CautionMCA08 MCU Multi-unit Rapid-rate Charger (forLi-Ion/Ni-MH batteries),CH10A06 Dual-Pocket MCU Charger Kit(forLi-Ion/Ni-MH battery, including Dual-PocketCharger and Switching Power),PS7501 AC/DC Adaptor,MCA05 Battery Optimizing SystemBL2010 2000mAh Li-Ion batteryEAM15 3-Wire Earpiece with Transparent AcousticTube (Beige),ESM14 Remote Earbud,EAM17 Remote Earpiece with Transparent AcousticTube,EHM20 Remote Swivel Earset,NCN01 Nylon Carrying Case (Half-folded)(Non-swivel)(Black),LCBN13 Universal Chest Pack (Nylon)(Black)图标说明:表示数字信道独有的功能,只能在数字信道上使用。
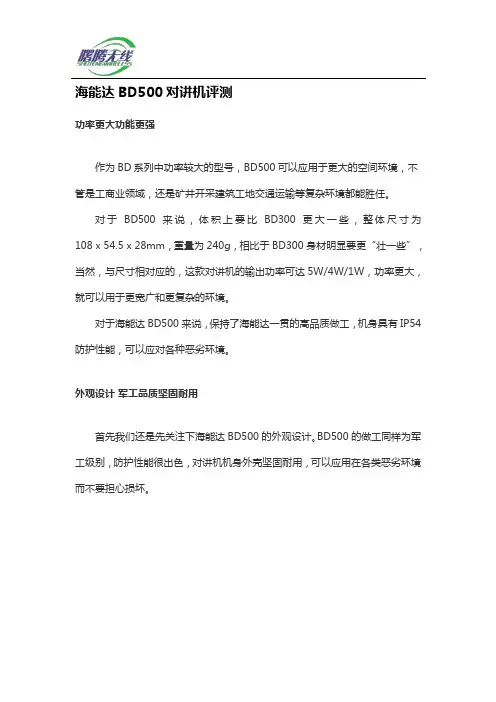
海能达BD500对讲机评测功率更大功能更强作为BD系列中功率较大的型号,BD500可以应用于更大的空间环境,不管是工商业领域,还是矿井开采建筑工地交通运输等复杂环境都能胜任。
对于BD500来说,体积上要比BD300更大一些,整体尺寸为108 x 54.5 x 28mm,重量为240g,相比于BD300身材明显要更“壮一些”,当然,与尺寸相对应的,这款对讲机的输出功率可达5W/4W/1W,功率更大,就可以用于更宽广和更复杂的环境。
对于海能达BD500来说,保持了海能达一贯的高品质做工,机身具有IP54防护性能,可以应对各种恶劣环境。
外观设计军工品质坚固耐用首先我们还是先关注下海能达BD500的外观设计。
BD500的做工同样为军工级别,防护性能很出色,对讲机机身外壳坚固耐用,可以应用在各类恶劣环境而不要担心损坏。
海能达BD500对讲机正面海能达BD500的IP54具有防滴溅功能实际使用中,BD500短时间内泡入水中也能正常使用机身设计方面,上部收声与外放采用了条纹设计,这样具有更好的防护性能;机身的外壳具有磨砂质感,下部具备自定义外观识别功能,这种设计不仅更易于携带,而且方便在上面手写编号等,更容易区分对讲机。
正面特写在顶部布局上,BD500具有双旋钮设计,天线为中置可拆卸天线。
旋钮分别为通信频道旋钮和电源开关/音量旋钮,天线一旁具有指示灯,可以显示各类使用状态,方便使用者随时查看。
顶部设计,天线中置,左右为旋钮在侧面按键上,海能达BD500具有较大的PTT键,而且多点按压都能顺畅出发,按键阻尼适中,容易使用但不会被误触。
侧面还有自定义功能按键,使用者可以按照自己需求进行设定,满足特定环境下的使用需求。
左侧的PTT按键在接口设计上,BD500具有VOX耳机接口,可以使用丰富的耳机和麦克风配件。
对于复杂操作的工作来说,BD500的丰富配件选择更有利于单手操作或者无手操作。
右侧接口设计接口具有麦克风和耳机接口最后,BD500的电力系统上,BD500采用了一枚7.4V 1500mAh的电池,电池容量大,可以满足长时间的通信需求,通讯时间可以达到模拟12小时,数字通信16小时。
图标说明本说明书中会使用以下图标,各图标含义如下所示:版权信息HYT、CRS 和 Hytera 为海能达通信股份有限公司(原深圳市好易通科技有限公司)在中华人民共和国和世界其它国家和/或地区的商标和/或注册商标。
我们仅对我司的商标及产品名称享有所有权,本说明书中可能提及的其它商标和产品名称为各自所有者所有。
本手册介绍的产品中可能包括存储于内存或其它媒介中的计算机程序。
海能达对此等程序享有的专有权利受中华人民共和国或其它国家及相关国际法的保护。
购买本产品并不意味着海能达以明示或暗示方式向购买者授予有关此等电脑程序的权益。
未经 海能达事先书面授权,任何企业、组织或个人不得对计算机程序进行任何形式的复制、更改、散发、反编译和反向工程。
免责声明本手册在编制过程中力求内容的准确性与完整性,但对于可能出现的错误或遗漏,海能达公司不承担任何责任。
海能达公司保留更改产品设计与规格的权利,由于技术的不断发展,产品设计与规格若有变更,恕不另行通知。
未经海能达公司书面授权,本手册不得被复制、修改、翻译、抄录、储存于可检索的系统中,或以任何形式通过任何途径被传输。
注意:表示可能会损坏对讲机的事项。
注:表示有助于您正确使用对讲机的事项。
为了您安全高效地使用本对讲机,请阅读以下安全信息。
◇ 对讲机的维修工作只能由专业技术人员进行,请勿自行拆装对讲机。
◇ 只可使用海能达指定的电池和充电器。
◇ 为避免电磁干扰和电磁兼容引起的问题,请在贴有“请关闭对讲机”标志的 场合关闭对讲机,例如医院和其他保健医疗场所。
搭乘飞机时,当机组人员要求关闭对讲机时,请关闭对讲机。
◇ 在带有安全气囊的汽车内,请勿将对讲机放在气囊展开可能涉及的区域范围 内。
◇ 在进入易燃、易爆环境前请关闭对讲机。
◇ 在易燃、易爆环境中请勿更换电池或对电池充电。
◇ 在靠近爆破区和雷管所在区前,请关闭对讲机。
◇ 请勿使用天线已损坏的对讲机,损坏了的天线接触皮肤可能导致轻微灼 伤。
1用户使用和安全信息------------------------------2产品检查----------------------------------------4熟悉本机----------------------------------------5电池信息----------------------------------------8天线信息---------------------------------------11拆卸与重新组装---------------------------------12基本操作---------------------------------------17可编程辅助功能---------------------------------19功能操作与设置---------------------------------20亚音频/亚音数码(CTCSS/CDCSS) ----------------20省电模式 ------------------------------------20功率切换 ------------------------------------20超时禁发 ------------------------------------20电量指示 ------------------------------------20监听/静噪打开 -------------------------------21扫描 ----------------------------------------22繁忙信道锁定 --------------------------------23低电量提示 ----------------------------------23声控(VOX) ---------------------------------2325保养和清洁-------------------------------------26质量保证和维修条款-----------------------------27选购附件---------------------------------------28频率表-----------------------------------------31亚音频(CTCSS)参数表 (38)-----------------------32亚音数码(CDCSS)参数表 (83)---------------------33词汇表-----------------------------------------34目录2为了您安全、高效地使用本对讲机,请阅读下面的信息。
致用户非常感谢您对我们产品的青睐!本手册旨在让您快速掌握本产品的使用,了解产品详细功能和操作。
为了避免因不当操作而给您带来身体伤害或财产损失,请于使用本产品前详细阅读《安全信息手册》。
本手册适用于以下机型:PNC380 公网对讲机目录版权信息 (1)免责声明 (1)前言 (2)标识符号 (2)界面元素 (2)按键操作 (2)1. 打开包装 (3)1.1 包装清单 (3)1.2 产品概览 (4)1.3 插卡 (4)1.4 安装电池 (5)1.5 安装背夹 (5)1.6 安装音频附件 (6)1.7 充电 (6)2. 使用入门 (7)2.1 开关机 (7)2.1.1 开机 (7)2.1.2 关机 (7)2.1.3 重启 (7)2.2 调节音量 (7)2.3 了解屏幕 (7)2.3.1 状态指示 (7)2.3.2 屏幕操作 (8)2.4 使用手电筒 (9)2.5 设置快捷键 (9)2.6 键盘输入 (9)2.7 查看产品信息 (9)3. 通讯 (10)3.1 PoC (10)3.2 电话 (10)3.2.1 拨打电话 (10)3.2.2 收到来电 (11)3.2.3 管理联系人 (11)3.3 短信 (11)3.3.1 发送短信 (11)3.3.2 收到短信 (12)3.3.3 转发/删除短信 (12)4. 网络与数据共享 (13)4.1 移动网络 (13)4.2 WLAN (13)4.3 蓝牙 (13)4.3.1 连接蓝牙设备 (13)4.3.2 取消配对 (14)4.3.3 蓝牙定位 (14)4.3.4 重命名 (14)4.4 共享网络 (14)4.5 飞行模式 (14)4.6 NFC (14)4.7 USB (15)5. 设备与系统 (16)5.1 设备 (16)5.1.1 显示 (16)5.1.2 声音 (16)5.1.3 存储 (17)5.1.4 电池 (17)5.2 系统 (17)5.2.1 定位 (17)5.2.2 语言 (18)5.2.3 恢复出厂设置 (18)5.2.4 日期和时间 (18)5.2.5 升级 (19)6. 应用程序 (20)6.1 安装 (20)6.2 卸载 (20)6.3 清除数据/缓存 (20)6.4 权限设置 (20)7. 相机 (21)7.1 拍照 (21)7.2 录像 (21)7.3 查看图片/视频 (21)8. 图库 (22)8.1 图片 (22)8.1.1 查看图片 (22)8.1.2 管理图片 (22)8.2 视频 (22)8.2.1 播放视频 (22)8.2.2 管理视频 (23)9. 录音机 (24)9.1 录音 (24)9.2 管理录音 (24)10. 故障处理 (25)11. 保修范围与期限 (27)12. 保养与清洁 (28)12.1 保养 (28)12.2 清洁 (28)13. 选购配件 (29)14. 缩略语 (30)版权信息Hytera为海能达通信股份有限公司(以下简称“我司”)在中华人民共和国和世界其他国家和/或地区的商标或注册商标。
解析海能达三防对讲机PD680强悍的三防对讲机提起诺基亚早期的手机,相信许多人第一个想到的就是其坚固的机身,不管是用来砸核桃还是防身,它都是一个不错的选择。
然而今天我们为大家介绍的这款通讯工具,在机身的坚固程度上,有着更强悍的表现,这就是海能达旗下的数字对讲机——PD680。
由于对讲机的使用环境,几乎都是各种条件恶劣的户外行业,除了潮湿闷热以外,还有可能是寒冷的高原地带,所以在机身坚固程度和防护设计上,对讲机比普通的手机需要更加严格的标准和规范。
而本篇文章为大家介绍的这款海能达PD680数字对讲机,就是一款防范等级符合IP67,同时品质严格符合美国军用标准MIL-STD-810G的产品。
相信不少人都对IP67防护等级有一定的了解,其中的6表示产品对固态颗粒,也就是尘土沙子等较小物体的防护级别,6代表可完全防止灰尘的进入,而后面的数字7代表可以在1米深的水中浸泡30分钟之内,产品可以正常工作的标准。
所以对于以户外为主要使用场景的对讲机而言,IP67几乎可以满足绝大多数的恶劣环境。
虽然对于一般产品而言,IP67防护等级基本可以代表不俗的防尘防水能力,但是这款PD680,为了具有更强悍的表现,还符合美国军用标准MIL-STD-810 G级别的最高标准。
简单来说,MIL-STD-810G标准是美国评判装备在湿热环境中表现的军标,对于耐高温低温、防水防摔性都提出了很高的要求,最后一个字母“G”意味着其已经达到了很高的等级。
所以从综合表现上来看,这款海能达PD680的表现还是非常强悍的,几乎可以在任何高温低温、潮湿恶劣的环境中正常工作。
金属超薄机身设计在多数人印象中,具有出色三防能力的产品相对而言都要有着非常臃肿的身材,无论是三防手机还是其他电子产品,总是比常规产品看起来更加笨重。
然而海能达PD680在机身设计上,却有着更为轻薄的表现。
虽然使用了全金属机身设计,但无论是厚度还是重量,甚至优于其他不具有三防特点的常规对讲机。
Time-out Timer ContentsUser Safety Information (1)Preparation (1)Supplied Accessories (2)Battery Information (2)Accessory Information (3)Attaching/Removing the Battery (3)Attaching the Antenna (4)Attaching/Removing the Belt Clip (4)Attaching Remote Speaker/Microphone (4)Rapid charger (4)General (4)Features (4)Operation (5)Notes (5)Additional Remarks (6)Getting Acquainted (6)Basic Operation (7)Auxiliary Feature (8)Time-out Timer (8)Battery Save (8)Low Battery Warning (9)Monitor (9)CTCSS & CDCSS (9)TTS (Two-Tone Signaling) (9)Channel Scan (10)Priority channel scan (10)Scan Revert channel (11)Busy Channel Lockout (11)Optional Accessories (11)Troubleshooting Guide (12)Care and Cleaning (13)Frequency Chart (14)INFORMATION ON SAFE AND USING YOUR PORTABLE RADIO.* Only qualified technicians are allowed to repair this product.* To avoid electromagnetic interference and/or compatibility conflicts, turn off your radio in any place where postednotices instruct you to do so. Hospitals or health care facilities may be using equipment that is sensitive to external RFtransmission.When on aircraft, turn off your radio when airline crewinstructs you to do so.* When in vehicles with an air bag, do not place a portable radio in the area over an airbag or in the airbag deployment area.* Turn off your radio prior to entering any area with apotentially explosive atmosphere. Do not remove, install, or charge batteries in such areas.* To avoid possible interference with blasting operations, turn off your radio when you are near electrical blasting caps.* Do not use any portable radio that has a damaged antenna.If a damaged antenna comes into contact with your skin, a minor burn may result.* Do not expose the radio in direct sunlight for a long time or place it close to a heating source.or has been damaged during shipment, file a claim to the carrier immediately.Supplied Accessories1* Antenna mark: TC-268(1) shamrock.TC-268(2) grass green.Charging the BatteryThe battery is not charged in factory, so charge it before use. When first charging the battery after purchase or extended storage (more than 2 months), user may find battery capacity is lower than its normal capacity. However,repeating the charge/discharge cycle two or three times, its capacity will recover to normal.Notes:● Do not continue charging the battery if it is already fully chargedand do take the battery away from the charger, otherwise, the battery life will be shortened or damage may be caused to it.● Turn the radio power OFF before charging. Using the radiowhile charging its battery will interfere with correct charging.● When the battery operation time decreases even though it is fully and correctly charged, that means the battery life is over, please replace it with a new battery.● Do not complete the battery terminals (short circuit ) or dispose of the battery by fire.● Never disassemble the batterycover.While placing the battery or the radiowith a battery into the charger.* Make sure the battery is wellconnected with the charger connectors.* When rapid charging starts, red LEDglows; when charging is complete,Attaching/Removing the BatteryTo attach the battery, match the fourgrooves on the battery with the corre-sponding guides on the radio. Slide the bat-tery along the guides of the radio until thebattery latch at the bottom of the radiolocks.To remove the battery, release the batterylatch and slide the battery away from theradio .◇请勿直接提住天线或外置麦克风;◇ 用不起毛的布拭擦对讲机上的灰尘、污质,防止接 触不良;◇ 当对讲机不使用时,请将附件插孔盖盖上;◇ 对讲机长期使用后,按键、控制旋钮和机壳很容易 变脏,可以使用中性洗涤剂(不要使用强腐蚀性化学 1)质量保证范围与期限海能达通信股份有限公司(原深圳市好易通科技有限 公司)承诺,凡海能达生产的对讲机自购买之日起, 在正常使用与维护条件下,出现材料或制造缺陷,可 享 受以下期限的免费维护:主机 18个月附件(天线,电池,充电器) 6个月2)申请维护程序要获得维护服务,您必须向海能达用户服务中心或海 能达授权维修站提供购买凭证(购买日期和产品序列 号),并将产品包装好,附上详细的故障说明和具体 的联系方式寄到该处。
海能达BD610对讲机评测海能达BD610是海能达BD系列的高端产品,这款对讲机在功能上继承了BD500的诸多优点,但是与BD500不同的是,BD610具有更高级别的防护性能达到了IP66,可以适用于更为恶劣的操作环境,即便遇到泥沙,严重跌落等等都不会有问题。
下面我们就来看一下这款产品的具体评测。
产品外观海能达BD610采用了双色外观设计,机身采用黄色/黑色,色彩鲜明,在复杂环境下如果遭遇跌落、遗失等也能很轻松的找到。
海能达BD610采用了双色外观,更显著机身外侧具有“防护外壳”,其实BD610的机身外具有很结实耐用的外壳设计,可以提供更好的防护性能,所以这款对讲机可以做到IP66的防护级别。
(IP66指产品完全防止外物侵入,且可完全防止灰尘进入,承受猛烈的海浪冲击或强烈喷水时,电器的进水量应不致达到有害的影响。
)海能达各部位都有防护外壳海能达BD610的耳机接口采用密封设计,并非直接开启的形式,这样在恶劣环境下可以更好的防止水和沙尘进入耳机孔,造成不必要的损失。
海能达的耳机接口具有密封设计海能达BD610具有出色的防护性海能达BD610的电池仍然在背部,但是具有了更好的防护性能。
实际使用中,BD610的续航可以达到通信10小时以上,足以满足一天的工作需求。
即便是高强度的施工作业,或者是户外穿越下,都能保证实时在线不会错过任何信息。
海能达BD610的电池设计海能达BD610最大的特点就是军工品质,各类恶劣环境下都能够正常工作,不用担心进水或者进沙。
这款对讲机拿在手里,感觉就非常厚重,给人以相当的安全感。
通信测试对于BD610来说,除了优秀的防护性能外,出色的通讯性能也是重要的指标。
这款对讲机机身内置15个通信频道,提供了更多的通信频道选择并且易于切换。
频道切换同样采用旋钮式,位于机身顶部,切换时会有语音提示,提示当前频道编号。
BD610的顶部布局依然具有海能达特色的天线中置,不仅可以拆卸,而且中置天线信号更好,跌落时天线也能对两侧旋钮形成保护作用。
DIGITAL PORTABLE RADIO数字手持终端BD552i OWNER’S MANUALBD552i使用说明书Welcome to the world of Hytera and thank you for purchasing this product.This manual includes a description of the functions and step-by-step procedures for use.It also includes a troubleshooting guide.To avoid bodily injury or property loss caused by incorrect operation,please carefully read the Safety Information Booklet before use.This manual is applicable to the following product:BD552i Digital Portable RadioCopyright InformationHytera is the trademark or registered trademark of Hytera Communications Corporation Limited(the Company)in the People's Republic of China(PRC) and/or other countries or areas.The Company retains the ownership of its trademarks and product names.All other trademarks and/or product names that may be used in this manual are properties of their respective owners.The product described in this manual may include the Company's computer programs stored in memory or other ws in PRC and/or other countries or areas protect the exclusive rights of the Company with respect to its computer programs.The purchase of this product shall not be deemed to grant,either directly or by implication,any rights to the purchaser regarding the Company's computer programs.The Company's computer programs may not be copied,modified,distributed,decompiled,or reverse-engineered in any manner without the prior written consent of the Company.DisclaimerThe Company endeavors to achieve the accuracy and completeness of this manual,but no warranty of accuracy or reliability is given.All the specifications and designs are subject to change without notice due to continuous technological development.No part of this manual may be copied,modified,translated,or distributed in any manner without the prior written consent of the Company.We do not guarantee,for any particular purpose,the accuracy,validity, timeliness,legitimacy or completeness of the third-party products and contents involved in this manual.If you have any suggestions or would like to receive more information, please visit our website at:.FCC StatementThis equipment has been tested and found to comply with the limits for a Class B digital device,pursuant to part15of FCC Rules.These limits are designed to provide reasonable protection against harmful interference in a residential installation.This equipment generates and can radiate radio frequency energy.If not installed and used in accordance with the instructions,it may cause harmful interference to radio communications. However,there is no guarantee that interference will not occur in a particular installation.Verification of harmful interference by this equipment to radio or television reception can be determined by turning it off and then on.The user is encouraged to try to correct the interference by one or more of the following measures:·Reorient or relocate the receiving antenna.Increase the separation between the equipment and receiver.·Connect the equipment into an outlet on a different circuit to that of the receiver's outlet.·Consult the dealer or an experienced radio/TV technician for help. Operation is subject to the following two conditions:·This device may not cause harmful interference.·This device must accept any interference received,including interference that may cause undesired operation.Note:Changes or modifications to this unit not expressly approved by the party responsible for compliance could void the user's authority to operate the equipment.Compliance with RF Exposure StandardsHytera's portable radio complies with the following RF energy exposure standards and guidelines:·United States Federal Communications Commission,Code of Federal Regulations;47CFR§1.1307,1.1310and2.1093.·American National Standards Institute(ANSI)/Institute of Electrical and Electronic Engineers(IEEE)C95.1:2005;Canada RSS102Issue5 March2015.·Institute of Electrical and Electronic Engineers(IEEE)C95.1:2005 EditionRF Exposure Compliance and Control Guidelines and Operating InstructionsTo control your exposure and ensure compliance with theoccupational/controlled environmental exposure limits,always adhere to the following procedures.Guidelines:·Do not remove the RF Exposure Label from the device.·User awareness instructions should accompany device when transferred to other users.·Do not use this device if the operational requirements described herein are not met.Operating Instructions:·Transmit no more than the rated duty factor of50%of the time.To transmit(talk),push the Push-To-Talk(PTT)button.To receive calls, release the PTT button.Transmitting50%of the time,or less,isimportant because the radio generates measurable RF energy only when transmitting(in terms of measuring for standards compliance).·Keep the radio unit at least2.5cm away from the face.Keeping the radio at the proper distance is important as RF exposure decreases with distance from the antenna.The antenna should be kept away from the face and eyes.·When worn on the body,always place the radio in a Hytera-approved holder,holster,case,or body harness or by use of the correct clip for this e of non-approved accessories may result in exposure levels which exceed the FCC's occupational/controlled environmental RF exposure limits.·Use of non-approved antennas,batteries,and accessories causes the radio to exceed the FCC RF exposure guidelines.·Contact your local dealer for the product's optional accessories.IC StatementThe device has been tested and complies with SAR limits,users can obtain Canadian information on RF exposure and complianceAprès examen de ce matériel aux conformitéaux limites DAS et/ou aux limites d’intensitéde champ RF,les utilisateurs peuvent sur l’exposition aux radiofréquences et la conformitéand compliance d’acquérir les informations correspondantesThis device complies with Industry Canada license-exempt RSS standard(s). Operation is subject to the following two conditions:·This device may not cause harmful interference.·This device must accept any interference received,including interference that may cause undesired operation.Le présent appareil est conforme aux CNR d'Industrie Canada applicables aux appareils radio exempts de licence.L'exploitation est autorisée aux deux conditions suivantes:(1)l'appareil ne doit pas produire de brouillage, et(2)l'utilisateur de l'appareil doit accepter tout brouillage radioélectrique subi,même si le brouillage est susceptible d'en compromettre le fonctionnementEU Regulatory ConformanceAs certified by the qualified laboratory,the product is in compliance with the essential requirements and other relevant provisions of the following directives:1999/5/EC or2014/53/EU,2006/66/EC,2011/65/EU,and 2012/19/EU.Please note that the above information is applicable to EU countries only.ContentsPacking List2 Product Overview3 Product Controls3 LCD Icons4 LED Indications4 Before Use4 Attaching the Antenna4 Attaching the Battery4 Attaching the Belt Clip5 Attaching the Audio Accessories5 Charging the Battery5 Checking the Battery Power5 Basic Operations6 Call Services6 Call on Digital Channel6 Call on Analog Channel(Without Signaling)6 Optional Features7 Troubleshooting9 Care and CleaningProduct Care11 Product Cleaning11 Optional Accessories1111 ContentsPlease unpack carefully and check that all items listed below are received.If any item is missing or damaged,please contact your dealer.Item Quantity(PCS)Item Quantity(PCS) Radio1Antenna1 Battery1Belt Clip1 Charger1Strap1 Power Adapter1Documentation Kit1Check whether the frequency band marked on the antenna label matches that on the radio label.If not,please contact your dealer.You can request your dealer to program your radio to use the SK as the shortcut to a radio featureProduct ControlsLCDIconsLED IndicationsLED Indicator Radio StatusFlashes green Being turned on.Glows green Receiving.Glows redTransmitting.Flashes orange slowlyScanning.Glows orangeCall hang time:No voice is being transmitted or received on the channel during a call.Within such a period,you can press and hold the PTT key and speak.Attaching the Antenna1.Place the antenna inits receptacle.2.Rotate the antenna clockwise until hand tight.Do not hold the radio by the antenna,as it may reduce the radio performance and life span of the antenna.Attaching the Battery1.Insert the top of the battery into the top of the battery slot.2.Press the bottom of the battery until the latch snaps into place.To remove the battery,make sure the radio is turned off,and then slide the battery latch upwards to unlock the battery.Attaching the Belt Clipe a Phillips screwdriver to turn the screws counterclockwise on the back of the radio and remove them.2.Align the screw holes on the belt clip with those on the back of the radio.3.Put the screws back in place,and use the Phillips screwdriver to turn them clockwise until hand tight.Attaching the Audio Accessories1.Open the accessory connector cover.2.Plug the accessory into the accessory connector.3.Turn the screw on the accessory plug clockwise until hand tight.Charging theBattery·Use the charger specified by Hytera to charge the battery.·Read the Safety Information Booklet before charging.The battery delivered with the radio is uncharged.To ensure optimum performance,fully charge the battery before initial use.It is recommended that your radio remain powered off during charging.To charge the battery,do as follows:1.Insert the output connector of the power adapter into the port on the backof the charger.2.Plug the power adapter into a power outlet.3.Place the battery or the radio with battery attached into the charger,andthen switch the power outlet on.To determine the charging status,check the light-emitting diode(LED) indicator on the charger according to the following table:LED Indicator Charging StatusGlows greenThe battery is fully charged or fails to make propercontact with the charger.Glows red The battery is charging.Glows orange The battery is charged to85%or above.If the LED indicator does not glow red after you place the battery or radio into the charger,take the battery or radio out of the charger,and thenreplace it into the charger while ensuring it makes proper contact with the charger.Checking the Battery PowerTo check the current battery power,press andhold the Battery Power Indicatorkey preprogrammed by your dealer.The following table lists battery powerindications.The icon indicates that the battery runs low. In this case,please recharge or replace the batteryLED Indicator Alert Tone Battery Power Glows green Three beepsGlows orange Two beepsGlows red One beepFlashes red Low battery toneIf you want to…Then...Turn on/off the radioRotate the On-Off/Volume Control knob clockwise/counterclockwise.Increase/Decrease the volume Rotate the On-Off/Volume Control knob clockwise/counterclockwise after turning on the radio.Select a channelRotate the Channel Selector knob.Call on Digital ChannelYou can initiate a call to or receive a call from theprivate or group contact preset fora digital channel.Initiating a Call1.Select the required channel.2.Hold the radio vertically 2.5to 5cm from your mouth.3.Press and hold thePTT key,and then speak into themicrophone.The radio displays for an outgoing group call andfor an outgoingprivate call.Receiving and Responding to a CallWhen receiving a call,you can listen to it without any operation.The radio displays for an incoming group call andfor an incoming privatecall.You can press and hold the PTT key and speak within the preset time period.Call on Analog Channel (Without Signaling)You can initial a call to or receive calls from all other users on an analogchannel.The operations are the same as those on a digital channel.The following features need to be programmed by your dealer.Please contact your dealer for detailed operations.Type Feature DescriptionGeneral Feature Zone Allows you to select a zone.The radio supports up to16zones,with a maximum of256channels per zone.Power Level Allows you to switch the transmit power level between high and low.Scan Allows the radio to scan all channels in the scan list preset for the current channel and stay on a channel with activities. Emergency Alarm Allows you to initiate an emergency alarm or call to ask for help in case of emergencies.Busy Channel Lockout Prevents the radio from transmitting on a busy channel.Time-out Timer(TOT)Terminates transmission when the preset time period expires.Keypad LockAllows the keypad to be locked automatically when the radio does not detect any activity or operation within the presetperiod.Battery SaveAllows the radio to automatically enter the battery save mode when it does not detect any activity or operation within thepreset period.Digital Feature All Call Allows you to initiate a call to all users on a digital channel.One Touch Call Allows you to press one key to call the predefined private or group contact. TDMA Direct Mode Allows the radio to operate on a channel with two time slots.Type Feature DescriptionAnalog Feature Squelch Off Allows the radio's speaker to always keep unmuted.Squelch Off Momentary Allows the radio's speaker to keep unmuted when you press and hold the preprogrammed key. Squelch Level Allows you to adjust the squelch threshold required for the radio to unmute.Monitor Allows the radio to monitor activities on the channel.Scrambler Allows you to encrypt the transmitted voice to prevent eavesdropping.CTCSS/CDCSS Allows you to prevent unwanted calls on the same frequency.Phenomena Analysis SolutionThe radio cannot be turned on.The battery may be installed improperly.Remove and reattach the battery.The battery power may run out.Recharge or replace the battery.The battery may suffer from poor contact caused by dirty ordamaged battery contacts.Clean the battery contacts or replace the battery.During reception,the voice is weak,intermittent or totally inactive.The battery voltage may be low.Recharge or replace the battery.The volume level may be low.Increase the volume.The antenna may be loose or may be installed incorrectly.Turn off the radio,and remove and reattach the antenna. The speaker may be blocked.Clean the surface of the speaker.You cannot communicate with other group members.The frequency or signal strength may be low in comparisonto other members.Verify your TX/RX frequency and signal strength are correct. The channel type(digital or analog)may be set incorrectly.Verify you are on the correct digital or analog channel.You may be too far away from other members.Move towards other members.Unknown voices or noise is heard on the channel.You may be interrupted by radios using the same frequency.Change the frequency,or adjust the squelch level.The radio in analog mode may be set with no signaling.Set signaling for all radios operating at the same frequency to avoidinterference.Phenomena Analysis SolutionYou are unable to hear anyone because of too much noise and hiss.You may be too far away from other members.Move towards other members.You may be located in an unfavorable position.Forexample,your communication may be blocked by highbuildings or blocked in an underground area.Move to an open and flat area,and restart the radio and trycontacting again.It could be the result of external disturbance(such aselectromagnetic interference).Stay away from equipment that may cause interference.The OLED does notdisplay any information.The OLED may fail to function temporarily.Restart the radio.If the above solutions cannot fix your problems, or you may have some other queries, please contact us or your local dealer for more technical support.To guarantee optimal performance as well as a long service life of the product,please follow these tips.Product Care·Do not pierce or scrape the product.·Keep the product far away from substances that can corrode the circuitry.·Do not hold the product by the antenna or earpiece cable.·Close the accessory connector cover when no accessory is in use.ProductCleaningTurn off the product and remove the battery before cleaning.·Clean up the dust and fine particles on the products surface and charging piece with a clean and dry lint-free cloth or a brush regularly ·Use neutral cleanser and a non-woven fabric to clean the keys,knobs and front case after long-time use.Do not use chemical preparationssuch as stain removers,alcohol,sprays or oil preparations,so as to avoid surface case damage.·Make sure the product is completely dry before use.Use the accessories specified by Hytera only;otherwise,the Company will not be liable for any loss or damage arising out of the use of anyunauthorised accessories.Contact your local dealer for the optional accessories used with the product.非常感谢您对我们产品的青睐!本手册旨在让您快速掌握终端的使用。
Hytera 对讲机、车载台简易操作说明
TC-780M、TC790M、TC-3600M集群对讲机:
通话操作:按#键或PTT键发起呼叫,按住PTT键呼叫对方,松开PTT键听取对方说话。
挂机操作:通话结束,即时按C键挂机,否则会一直占用信道。
模式切换:按OK+1键进行“常规\集群”两个模式的切换。
手动锁定:按左侧面SK2键锁定就近基站,锁定信号后方可通话。
查系统码:按OK键两次,查看当前锁定基站的系统码。
LED显示:
TC-380M集群对讲机:
通话操作:按DIAL键或PTT键发起呼叫,按住PTT键呼叫对方,松开PTT键听取对方说话。
挂机操作:通话结束,即时按A键挂机,否则会一直占用信道。
模式切换:按TA键进行“常规\集群”两个模式的切换。
手动锁定:按SCAN键锁定就近基站,锁定信号后方可通话。
查系统码:按#43#查看当前锁定基站的系统码。
查看电量:按#42#查看电量。
TM-800U集群车载台:
通话操作:按#键或PTT键发起呼叫,按住PTT键呼叫对方,松开PTT键听取对方说话。
挂机操作:通话结束,即时按A键挂机,否则会一直占用信道。
模式切换:按PF1键进行“常规\集群”两个模式的切换。
查系统码:按PF6键两次,查看当前锁定基站的系统码。
TC-890GM高端集群彩屏对讲机:
开关操作:按住2-3秒,即可开启或关闭对讲机。
通话操作:按#键或PTT键发起呼叫,按住PTT键呼叫对方,松开PTT键听取对方说话。
挂机操作:通话结束,即时按右边或键挂机,否则会一直占用信道。
模式切换1:按中间(左)与(右)进行“对讲机\警务信息\手机”三个模块的切换。
模式切换2:按⊙(确认键)+ (数字键)进行“常规\集群”两个模式的切换。
查系统码:按界面左下角‘菜单’进入‘系统信息’下查看当前锁定基站的系统码。
LED显示:
常规操作:旋转到指定信道,一对一通话,按PTT键呼叫对方,松开PTT键听取对方说话。
使用小常识:
1、接听时,音量大小适中;
2、呼叫时,头部与对讲机距离为10—15厘米;
3、天线保持垂直,切勿随意手提对讲机天线;
4、避免水渗入,如渗水,立即关机。
注:
大型警保卫任务活动,采用少单呼、多组呼方式,说话言简意赅,保持通信畅通。
若集群系统出现问题,方可采用保卫方案规定的常规信道通信。