海信冰箱产品知识--内部资料
- 格式:ppt
- 大小:1.66 MB
- 文档页数:45
冰箱行业知识点总结第一章冰箱的发展历程自从第一个电动制冰机出现,冰箱产业开始萌芽。
20世纪20年代,电冰箱技术出现,拉开了电冰箱时代的序幕。
冰箱的性能不断提高,外观设计也更加时尚。
现代冰箱从最初的单一功能,逐渐发展成拥有多种功能的高科技产品。
未来,冰箱发展将更加注重环保、节能、健康与智能化。
第二章冰箱的结构1. 冰箱的制冷系统:包括压缩机、冷凝器、膨胀阀和蒸发器。
2. 冰箱的保温层:保温层的厚度直接影响着冰箱的保温性能。
3. 冷藏室和冷冻室:冰箱内部的主要功能区域。
4. 电路控制系统:包括温控器、压缩机控制器等。
5. 外观结构:包括冰箱门、把手、显示屏等设计元素。
第三章冰箱的分类1. 家用冰箱:包括单门冰箱、双门冰箱、三门冰箱、对开门冰箱等。
2. 商用冰箱:包括商用展示柜、商用冷藏冰箱、商用冷冻冰箱等。
3. 特种冰箱:如药品冰箱、车载冰箱、登山冰箱等。
第四章冰箱的选购1. 容量选择:根据家庭成员数量和生活习惯来选择合适的冰箱容量。
2. 能耗等级:尽量选购能耗等级高的冰箱,以节约用电。
3. 冷冻方式:传统直冷式和无霜式冷冻方式的选择。
4. 品牌选择:选择知名品牌,保证产品质量和售后服务。
5. 用户口碑:通过网络评价和朋友推荐来选择适合的冰箱。
第五章冰箱的使用与维护1. 使用注意事项:如远离热源和阳光直射、定期清洗冰箱等。
2. 维护方法:如定期除霜、保持冰箱内的整洁、定期清洁冷凝器等。
3. 故障处理:处理常见的故障,如制冷不良、电路故障等。
第六章冰箱的发展趋势1. 环保节能:未来冰箱将更加注重节能和环保,采用新型制冷剂和高效压缩机。
2. 智能化:智能化冰箱将成为发展趋势,将加入语音控制、远程联网等功能。
3. 健康保鲜:新型冰箱将会使用更加先进的保鲜技术,提供更健康的存储环境。
4. 多功能化:未来冰箱将不再只是简单的存储食物,可能会增加更多的功能,如制冰、鲜榨果汁等。
结语冰箱作为家电产品的一种,一直是人们生活中必不可少的家居用品。
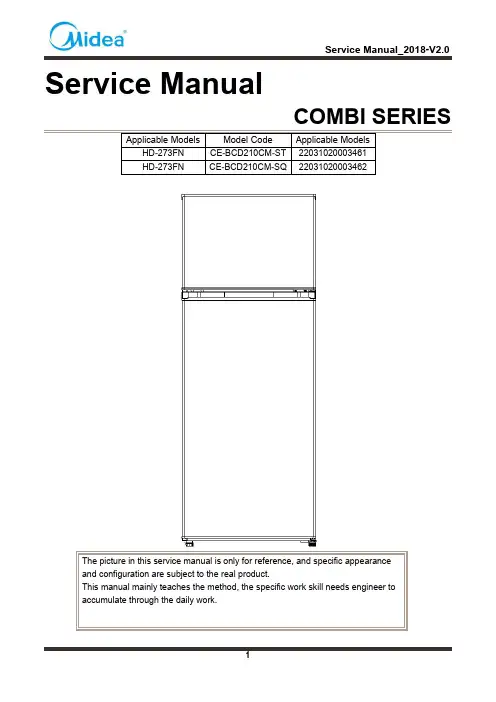
Service ManualWARNINGImportant Safety NoticeThere are special components used in this equipment which are important for safety. These parts are marked by in the Schematic Diagrams, Circuit Board Diagrams, Exploded Views and Replacement Parts List. It is essential that these critical parts should be replaced with manufacturer’s specified parts to prevent shock, fire or other hazards. Do not modify the original design without permission of manufacturer.WARNINGImportant Safety NoticeThe Maintenance Manual is only for the use of maintenance personnel with certain experience andbackground in electrical, electronic and mechanical field.Any attempt to repair main devices may lead to personal injury and property loss. Manufacturers or distributors are not responsible for the content of the Manual and interpretation thereof.C ontents1.SIGNIFICANT UPDATE NOTES(NONE) (5)2. SAFETY WARNING CODE (6)2.1W ARNING FOR OPERATION SAFETY (6)2.2S AFETY INSTRUCTION FOR REFRIGERANT (8)3. TRANSPORT (9)3.1C ONTAINER TRANSPORT (9)3.2H ANDLING (10)4. INSTALLATION AND COMMISSIONING (11)4.1D OOR D ISASSEMBLY AND A SSEMBLY (N ONE) (11)4.2I NSTALLATION LOCATION (11)4.3L EVELING OF THE REFRIGERATOR (11)4.4L EFT OR RIGHT OPEN DOOR REVERSAL (12)4.5I NSTALLATION OF HANDLE(N ONE) (13)4.6I NSTALLATION OF DOOR LOCK(N ONE) (13)5. PRODUCT CONFIGURATION AND DIMENSION (14)5.1M AIN PARTS AND THEIR NAMES (14)5.2E XTERNAL DIMENSION (15)5.3L OCATION OF S/N (16)6. PRODUCT SPECIFICATION (17)6.1E LECTRICAL PARAMETERS (17)6.2C OOLING TEMPERATURE SETTING RANGE (17)6.3C IRCUIT DIAGRAM (18)7.REFRIGERATING PIPING SYSTEM AND CIRCULATING ROUTE OF COOLING AIR (19)7.1R EFRIGERATING PIPING SYSTEM (19)7.2S PECIAL SOLDERING POSITION (20)8. DISMANTLING OF PARTS (21)8.1P ARTS ON THE DOOR (21)8.2P ARTS INSIDE THE REFRIGERATOR (21)8.3L IGHT SYSTEM (22)8.4C OMPRESSOR CASE (23)9. TEMPERATURE SENSING SYSTEM (28)10. FUNCTION AND OPERATION (29)10.1O PERATION PANEL(N ONE) (29)10.3O PEN DOOR ALARM(N ONE) (29)10.4D EFROSTING FUNCTION (29)10.5T EST MODE(N ONE) (29)10.6B ACKUP DATA FOR POWER FAIL(N ONE) (29)11. COMPRESSOR (30)12. TROUBLESHOOTING METHOD (31)12.1N OT COOLING (31)12.2N O WORKING OF COMPRESSOR (32)12.3T HERMOSTAT MALFUNCTION-U NDERCOOLING (32)12.4I NSIDE FROSTING, NO DEFROSTING (33)12.5I NSIDE FROSTING, NO DEFROSTING-M AINTENANCE GUIDELINES (33)12.6L IGHT IS NOT ON (34)12.7N OISE (35)13. FIGURES AND DETAILS OF REPAIR PARTS (36)1. Significant update notes(None)2. Safety Warning Code2.1 Warning for operation safetyImportant Safety InstructionsCAUTION RISK OF ELECTRIC SHOCKDO NOT OPENThis symbol indicates that dangerous voltageconstituting a risk of electric shock is present within your freezer.This symbol indicates that there are importantoperating and maintenance instructions in the literature accompanying your freezer.WARNING1) Read these instructions.2) Keep these instructions.3) Heed all warnings.4) Follow all instructions.5) Do not use this appliance near water.6) Clean only with a damp cloth.7) Do not block any ventilation openings.8) Install in accordance with the manufacturer’s instructions.9) Do not install near any heat sources, such as radiators, heat registers, stoves, or other apparatus that produce heat.10) Do not defeat the safety purpose of the polarized or grounding -type plug. Apolarized plug has two blades with one wider than the other. A grounding type plug has two blades and a third grounding prong. The wide blade or the third prong are provided for your safety. If the provided plug does not fit into your outlet, consult an electrician for replacement of the obsolete outlet.11) Protect the power cord from being walked on or pinched, particularly at plugs, convenience receptacles, and the point where they exit from the appliance.12) Do not attempt to modify or extend the power cord of this appliance.13) Unplug this appliance during lightning storms or when it will not be used for long periods of time.14) Make sure that the available AC power matches the voltage requirements of this appliance.CONNECTING ELECTRICITYPlug into a grounded 3-prong outlet.1) WARNINGclear of obstruction.2) WARNING–Do not touch the interior of the freezer with wet hands. This could result in frost bite.3) WARNING–Do not use mechanical devices or other means to accelerate the defrosting process, other than those recommended by the manufacturer.4) WARNING–Do not damage the refrigerant circuit.5)WARNING–Do not damage the refrigerant tubing when handling, moving, or using the freezer.6) WARNING–DANGER–Never allow children to play with, operate, or crawl inside the freezer. Risk of child entrapment. Before you throw away your old freezer:6-1) Take off the doors6-2) Leave the shelves in place so that children may not easily climb inside7) Unplug the freezer before carrying out user maintenance on it.8) This freezer can be used by children age eight years and older and persons with reduced physical or mental capabilities or lack of experience and knowledge if they are given supervision or instruction concerning the use of the freezer in a safe way and understand the hazards involved. Children should not play with the freezer. Cleaning and maintenance should not be performed by children without supervision.9) If a component part is damaged, it must be replaced by the manufacturer, its service agent, or similar qualified persons in order to avoid a hazard.10) Please dispose of the freezer according to local regulations as the freezer contains flammable gas and refrigerant.11) Follow local regulations regarding disposal of the freezer due to flammable refrigerant and gas. All refrigeration products contain refrigerants, which under the guidelines of federal law must be removed before disposal. It is the consumer's responsibility to comply with federal and local regulations when disposing of this product.12) This freezer is intended to be used in household and similar environments.13) Do not store or use gasoline or any flammable liquids inside or in the vicinity of this freezer.14) Do not use extension cords or ungrounded (two-prong) adapters with this freezer. If the power cord is too short, have a qualified electrician install an outlet near the freezer. Use of an extension cord can negatively affect the freezer’s performance.Grounding requirementThis freezer must be grounded. This freezer is equipped with a cord having a grounding wire with a grounding plug. The plug must be inserted into an outlet that is properly installed and grounded.Improper use of the grounding plug can result in a risk of electric shock. Consult a qualified electrician or service person if the grounding instructions are not completely understood, or if doubt exists as to whether the freezer is properly grounded.2.2 Safety instruction for refrigerantExplosion Hazard.Keep flammable materials and vapors, such as gasoline, away from freezer. Failure to do so3. Transport3.1 Container transportTotal 144 Container diagram3.2 Handling4. Installation and commissioning4.1Door Disassembly and Assembly (None)4.2 Installation locationtoits performance and4.3 Leveling of the refrigeratorthe4.4 Left or right open door reversalRemove the left cover plate and the right top hinge cover,the remove the hinge, then lift the refrigerator door up and away4.5 Installation of handle(None)4.6 Installation of door lock(None)5. Product configuration and dimension5.1 Main parts and their names(The picture is only for reference, and specific appearance and configuration are subject to the real product)1.Steel wire shelf8.Freezer door assembly5.2 External dimension(The picture is only for reference)5.3 Location of S/NSome products also have S/N on the lower part of the right side of the Cabinet.6. Product specification6.1 Electrical parametersApplicable Models HD-273FN HD-273FN Product Name CE-BCD210CM-ST CE-BCD210CM-SQRms=Rmc+Rsc Rms=Rmc+Rsc 6.2 Cooling temperature setting range6.3 Circuit diagramF: Freezer R: Refrigerator FD: Freezer Defrost C: Condensation A:Ambient temperature7.Refrigerating piping system and circulating route of cooling air 7.1 Refrigerating piping system7.2 Special soldering position8. Dismantling of parts8.1 Parts on the door8.2Parts inside the refrigerator1Lift it up and take it out from 8.3 Light systemThere is a light switch on the side wall of the refrigerating chamber.1)Loosen the hook with small normalscrewdriver and pull out the switch until the wire connector reveals.8.4Compressor caseRear cover (None)Compressor and the cooling system pipe1)Cut off the power, remove the goods in therefrigerator, with the tape to make the door fixed firmly and prevent the door dropping when the refrigerator dumping.2)Slowly tilt the refrigerator forward, relying on the wallor a solid enough object, leaving space to facilitate the operation. For safety, it should be carried by someone to prevent its falling.3)Cut off the compressor pipeline.-❶Cut off theprocess pipeline.-❷Cut off the low-pressuremuffler.-❸Cut off the high-pressure exhaust pipe.Welding1.Drain tray 6.left condenser(enter)9. temperature sensing system10. Function and operation10.1 Operation panel(None)10.2 Temperature setting Turn the temperature control knob to MAX, the internal temperature of the refrigerator becomes lower.Turn the temperature control knob to MIN, the internal temperature of the refrigerator becomes higher. NOTE: Please adjusting and using between "MAX" and "MIN"10.3 Open door alarm(None)When refrigerator door or freezer door is open, the display panel is light on.there is no notification tone when open door; if refrigerator door or freezer door is open last for 120s, there will be buzzer alarm, afterwards give alarm one time per second, press any buttons on control panel can cancel this buzzer alarm.Note: under the situation of the refrigerator compartment turn off, the door switch and internal lamp works properly.Note: When open the door, the display panel is light on; when the door is closed, the display panel will be light off after 30s if there is no any operation on display panel10.4 Defrosting functionManual defrost10.5 Test mode(None)10.6Backup data for power fail(None)1) The running state of the refrigerator is remembered after compressor running for 1 hour continuously.2) The running state of the refrigerator is remembered after change function settings and lock.When therefrigerator is out of power and recharged, the running state of the refrigerator is same as before.11. Compressor1.1 11.1Compressor on and off Control specifications When one of the following conditions ismet, the compressor stops:1) Tr ≤ Trt;2) The compressor runs continuously for more than 3 hours (Stop 5 minutes);1.2 When all the following conditions are met, the compressor starts up:1) Tr ≥Trk;2) Compressor downtime is more than 5min.★When 1.1 and 1.2 are not satisfied, the compressor maintains the original state12. Troubleshooting Method 12.1Not cooling12.2 No working of compressor12.3Thermostat malfunction-Undercooling12.4 Inside frosting, no defrosting12.5 Inside frosting, no defrosting-Maintenance guidelines12.6 Light is not on12.7 Noise13. Figures and details of repair parts See this section in the TSP.MIDEA appliances after sales websiteFor more information about Midea appliances after sales, please visit the For more information about the service manual, please visit the For more information about the EV and SBOM, please visit the 。
海信冰箱bcd310wvbp说明书篇一:海信冰箱BCD310WvBP说明书引言海信是一家中国知名的家电企业,其冰箱BCD310WvBP是一款高效节能的冰箱,具有出色的冷冻能力和智能控制系统。
本说明书是对该冰箱的详细介绍,旨在帮助用户更好地使用和维护该冰箱。
正文1. 产品概述海信冰箱BCD310WvBP是一款容量为310升,双门冰箱,采用LED照明技术,具有时尚的外观和明亮的照明效果。
该冰箱具有高效节能的特点,其冷冻能力出色,能够满足用户对冷冻需求的要求。
此外,该冰箱还具有智能控制系统,可以实现自动化调节温度、湿度和清洁等功能,提高用户使用的舒适度。
2. 冷冻系统海信冰箱BCD310WvBP的冷冻系统采用双循环制冷技术,能够有效地控制温度,保证食品的冷冻效果和口感。
冷冻室内部设有三个冷冻格,每个冷冻格可以储存两种不同的食品,如肉类、鱼类和蔬菜等。
此外,冷冻室还设有冰雕室,可以让食品更加完美冷冻和储存。
3. 冷藏系统海信冰箱BCD310WvBP的冷藏系统采用压缩机制冷技术,冷藏室内部设有三个冷藏格,每个冷藏格可以储存同一种食品,如饮料、水果和蔬菜等。
此外,冷藏室还设有一个储物盒,可以储存一些不常使用的食品和物品。
4. 控制系统海信冰箱BCD310WvBP的控制系统采用智能化技术,可以通过手机APP或者遥控器实现自动化控制。
用户可以通过APP查看冰箱内部的温度、湿度和食品的状态,实现远程操控和清洁等功能。
此外,该冰箱还设有智能除霜功能,能够自动检测冰箱内部霜点,并控制制冷循环,保证食品的安全和卫生。
5. 清洁和维护海信冰箱BCD310WvBP的清洁和维护非常简单,用户可以定期将冰箱内部的食品取出,清洁冰箱内部和冷藏室,保持冰箱的卫生和整洁。
此外,用户还可以定期清洗冰箱内部的蒸发器和冷凝器,保证冰箱的制冷效率和使用寿命。
6. 使用注意事项海信冰箱BCD310WvBP的使用注意事项如下:- 使用前,请检查冰箱内部的电缆和接口是否连接牢固。
海信冰箱bcd253wdga说明书摘要:1.海信冰箱BCD-253WDGA产品简介2.冰箱的摆放与安装3.冰箱的使用与操作4.冰箱的维护与清洁5.常见问题解答正文:一、海信冰箱BCD-253WDGA产品简介海信冰箱BCD-253WDGA是一款具有高性价比的家用冰箱,容量为253升,采用双门设计,分为冷藏室和冷冻室,满足家庭日常储藏需求。
本款冰箱采用智能温控系统,节能环保,噪音低,为家庭生活带来便利。
二、冰箱的摆放与安装1.在安装冰箱前,请确保摆放位置平整,远离热源,避免阳光直射。
2.拆开包装,将冰箱摆放在指定位置,保持水平,以确保冰箱平稳运行。
3.连接电源,按照说明书上的图示进行电路接线,确保电源线牢固可靠。
三、冰箱的使用与操作1.插上电源后,打开冰箱门,设置温度控制器至适当位置。
2.放入食物时,尽量保持整齐有序,避免阻塞空气流通。
3.定期检查冰箱内食物,将过期或变质的食物及时丢弃,以防滋生细菌。
四、冰箱的维护与清洁1.定期清洁冰箱,每年至少两次,清洁时先切断电源,用清水或食具洗洁精轻轻擦洗。
2.为防止损害箱外涂复层和箱内塑料零件,请勿用洗衣粉、去污粉、滑石粉、碱性洗涤剂等清洗冰箱。
3.保持冰箱内部干燥,避免水分凝结,防止滋生细菌。
五、常见问题解答1.为何冰箱耗电量与说明书不符?答:冰箱耗电量受多种因素影响,如环境温度、使用频率等。
如有疑问,请参照说明书进行检测。
2.冰箱出现故障如何处理?答:请联系售后服务热线,或有专业人员进行维修。
3.如何延长冰箱使用寿命?答:保持冰箱清洁,定期检查电路,合理摆放食物,避免过载使用。
通过以上内容,相信您对海信冰箱BCD-253WDGA的使用与维护有了更深入的了解。
海信冰箱bcd219d说明书
一、海信冰箱使用方法
1,检查连接线,接通电源。
2,进行温度设置与调节,一般有1-7个档位,根据环境温度选择合适的档位。
3,将食物放进冰箱(注意在首次使用前先通电,冰箱正常运转且箱内温度已经降低后再放入食物)。
4,根据食物特点分类存放,一些肉类需冷冻,新鲜蔬菜保鲜就好。
5,长期外出不在家时,需将冰箱食物取出,以免食物因停电变质产生不良气味。
二、冰箱清洁保养与选购
冰箱最好定时清洗,清洗时注意切断电源,拿出食物。
用酒精和柔软抹布轻轻全方位的擦拭,注意一些死角不要遗漏。
选购冰箱时,请仔细考虑各种因素,最后综合选择。
看品牌看价格就不说了。
注意冰箱外观有没有破损,箱门有没有不严盒。
检查箱内照明是否正常,运行有没有噪音等。
另外可咨询售后服务是否到位。
海信冰箱使用说明书如果丢失,有如下途径可以获得:
1.在百度文库有很多海信冰箱的说明书,型号相近的,说明书基本上可通用,要以上百度搜索。
2.直接上海信官网,在技术支持页面,有说明书下载专栏。
3.联络海信售后,请售后帮忙向厂家要说明书。
以上,就是海信冰箱使用说明书介绍。
海信冰箱使用起来也很简单,但是现在的海信冰箱的智能设计比较多,很多的冰箱采用的是自动控温和自动开关的设计,有些人不看说明书可能是不会使用的。
我们在使用冰箱之前,要先了解冰箱的存放层都是可以存放什么的,不要随便的乱放,这样会导致冰箱里面的味道非常的大。
另外,要定期的清理冰箱。
电冰箱的结构及工作原理电冰箱是现代家庭中不可或者缺的家电之一,它能够将食物和饮料保持在低温状态,延长其保鲜时间。
本文将详细介绍电冰箱的结构和工作原理。
一、电冰箱的结构1. 外壳:电冰箱的外壳通常由金属或者塑料制成,具有保护内部零部件和隔热的作用。
外壳上通常还会有控制面板和显示屏。
2. 内胆:内胆是电冰箱的主要储存空间,通常由金属或者塑料制成。
内胆内部配有可调节的储物架、抽屉和门架等,方便用户分类存放食物和饮料。
3. 门体:电冰箱的门体通常由两层玻璃制成,中间夹层充填有绝缘材料,起到隔热的作用。
门体上还配有密封胶条,确保门的密封性能。
4. 压缩机:压缩机是电冰箱的核心部件,负责压缩制冷剂,使其压力升高,温度升高。
5. 冷凝器:冷凝器位于电冰箱的背部或者底部,通过散热片的方式将制冷剂释放的热量散发出去,使制冷剂重新变为液态。
6. 蒸发器:蒸发器位于电冰箱的内部,通过吸热的方式将内部的热量带走,使食物和饮料的温度下降。
7. 膨胀阀:膨胀阀位于压缩机和蒸发器之间,起到控制制冷剂流动和减压的作用。
8. 温控器:温控器用于控制电冰箱的温度,根据用户设定的温度要求来控制压缩机的运行。
二、电冰箱的工作原理电冰箱的工作原理基于制冷循环,主要包括压缩、冷凝、膨胀和蒸发四个过程。
1. 压缩过程:压缩机将低温低压的制冷剂吸入,然后通过压缩使其温度和压力升高,变为高温高压的气体。
2. 冷凝过程:高温高压的气体进入冷凝器,通过散热片的散热作用,使气体的温度降低,变为高温高压的液体。
3. 膨胀过程:高温高压的液体通过膨胀阀进入蒸发器,膨胀阀使液体的压力和温度降低,变为低温低压的液体。
4. 蒸发过程:低温低压的液体进入蒸发器,通过吸热的方式将蒸发器内部的热量带走,使食物和饮料的温度下降,同时液体变为低温低压的气体。
通过以上四个过程的循环,电冰箱能够不断将热量从内部带走,使内部温度降低,从而实现食物和饮料的冷藏和保鲜。
三、电冰箱的使用注意事项1. 放置位置:电冰箱应放置在通风良好、避免阳光直射和热源附近的地方,以确保散热效果和节能。
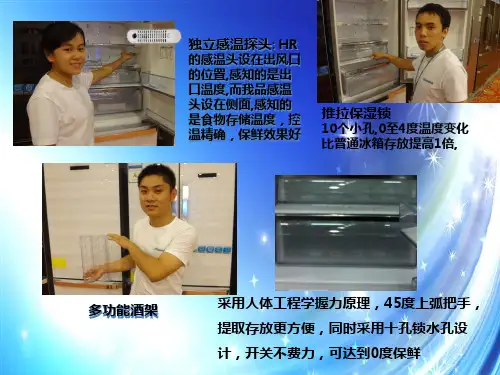
共 18页文件号:HZB-B08060130触摸按键三门电冰箱功能说明书基本型号: BCD-212TDe/ BCD-232TDe拟制:审核:批准:海信(北京)电器有限公司家电研究中心编制目 录 第一部分:电器接线图第二部分:维修备件明细第三部分:控制功能说明第四部分:系统原理和整机性能指标第五部分:爆炸图第六部分:特殊故障维修方法第七部分:使用说明书附件一:爆炸图附件二:使用说明书第一部分:电器接线图 一、 基本型号BCD-212TDe/ BCD-232TDe接线图:BCD-212TDe/ BCD-232TDe接线图第二部分:维修备件明细一、 基本型号BCD-212TDe/ BCD-232TDe备件明细:海信BCD-212TDe/ BCD-232TDe维修部件一览表文件编号:WX0011-HSNJ 制表时间:2006.6.27 修订状态:A/0序号 物 料 号 部件名称 备注1 B03230003 LED灯2 B05110105 LED照明灯支架3 B09020074 玻璃板4 B05160058 搁架前饰条5 B05160059 搁架后饰条6 B01140063 冷藏门封条组成 BCD-212TDe7 B01140064 冷藏门封条组成 BCD-232TDe8 B01140068 冷冻门封条组成9 B01130331 注塑的冷藏室门体 BCD-212TDe10 B01130332 注塑的冷藏室门体 BCD-232TDe11 B01130327 注塑的冷冻室门体12 / 冷藏室门体组成 BCD-212TDe13 / 冷藏室门体组成 BCD-232TDe14 / 冷冻室门体组成15 B01080040 下铰链组成16 B01080038 上铰链组成17 B01080039 中铰链组成18 B01100004 调节底脚组成19 B08198006 纸底组成20 B05090048 台面框21 B05210040 台面框螺钉扣22 B03100008 扇形门开关23 B02020081 接水盘24 B05210060 机器室保护罩25 B01290020 压缩机总成26 B02050017 干燥过滤器27 B03120046 电源线压机连接线28 B02070003 干燥过滤器工艺管29 B02070004 压缩机工艺管30 B01180032 长抽屉组成31 B01180033 长抽屉组成(带抽屉滚轮)海信BCD-212TDe/ BCD-232TDe维修部件一览表(续)文件编号:WX0011-HSNJ 制表时间:2006.7.27 修订状态:A/0序号 物 料 号 部件名称 备注32 B05110111 高瓶托33 B05110112 小瓶托34 B05088001 密封盒组成35 B01230005 果菜盒组成36 B01430036 显示板组件37 B05200020 传感器固定卡38 B03030102 主控板组件39 B02120013 双联电磁阀总成40 B08130027 包装内罩 BCD-212TDe41 B08130028 包装内罩 BCD-232TDe42 B08180226 包装箱 BCD-212TDe43 B08180229 包装箱 BCD-232TDe44 B08190092 顶垫板45 B05110113 蛋托46 B08190088 箱角防护垫(前)47 B08190089 箱角防护垫(后)48 B08190047 下门垫块49 B08190048 中门垫块50 B08060112 说明书51 B01140069 变温门封条组成52 B01130328 注塑的变温室门体53 / 变温室门体组成545556575859606162636465第三部分:控制功能说明一、 基本型号BCD-212TDe/ BCD-232TDe控制功能说明:设计文件名称:冷藏冷冻箱控制板技术条件设计文件编号:HZB-B01010283JT设计文件版本号:/设计文件适用型号:BCD-212TDe/ BCD-232TDe设计文件具体内容:冷藏冷冻箱控制板技术条件冷藏冷冻箱控制板技术条件:1 范围本技术条件规定了基本参数、外观和结构、功能要求等,适用于BCD-212TDe/ BCD-232TDe冷藏冷冻箱控制板(以下简称控制板)。
电冰箱的结构及工作原理引言概述:电冰箱是现代家庭中不可或缺的家电之一,它能够将食物、饮料等物品保持在低温状态,延长其保鲜时间。
本文将介绍电冰箱的结构及其工作原理,以便更好地理解其功能和使用。
一、外部结构1.1 机身外壳:电冰箱的外壳通常由金属或塑料制成,具有良好的耐用性和绝缘性能。
1.2 门体:电冰箱的门体由内外两层构成,中间填充有保温材料,以减少热量的传导。
1.3 门封条:门封条位于门体的边缘,能够有效地防止冷空气的泄漏,提高冷藏效果。
二、内部结构2.1 冷藏室:电冰箱的冷藏室是存放食物的主要空间,其内部通常设置有可调节的托盘、抽屉和架子,以方便物品的摆放和取用。
2.2 冷冻室:冷冻室位于电冰箱的顶部或底部,用于存放需要低温保存的食物和冰块,通常配备有冷冻室门和冷冻室温度控制器。
2.3 冷却系统:电冰箱的冷却系统由压缩机、冷凝器、蒸发器和节流阀等组成,通过循环制冷剂的流动来降低内部温度。
三、工作原理3.1 压缩机工作原理:压缩机是电冰箱中的核心部件,它将低温低压的制冷剂吸入,通过机械压缩使其温度和压力升高,然后将高温高压的制冷剂排出。
3.2 冷凝器工作原理:冷凝器位于电冰箱的背部或底部,通过散热片将高温高压的制冷剂散热,使其温度降低,变成高压液体。
3.3 蒸发器工作原理:蒸发器位于电冰箱的冷藏室内部,制冷剂在经过蒸发器时,受到外界热量的作用,从高压液体转变为低温低压的蒸汽,吸收冷藏室内的热量,降低温度。
四、温度控制4.1 温度控制器:电冰箱内部配备有温度控制器,可根据用户需求来调节冷藏室和冷冻室的温度。
4.2 传感器:温度控制器通过传感器来感知冷藏室和冷冻室的温度变化,从而控制压缩机和制冷系统的运行。
4.3 自动化系统:现代电冰箱通常配备有智能化的自动化系统,能够根据使用情况和环境温度自动调节制冷系统的运行,提高能效和节能效果。
五、保养和维护5.1 定期清洁:定期清洁电冰箱的内部和外部,保持卫生,避免异味和细菌滋生。
海信bcd198a说明书1. 概述本产品为海信bcd198a,公司遵循国家行业执行标准:GB7000.13-1999,确属本公司产品质量问题,自购置之日起保修期为3个(非正常使用而致使产品损坏,烧坏的,不属保修之列。
)2. 海信bcd198a技术特性本产品额定容量高达900mAH。
超长寿命电池,高达500次以上循环使用。
采用节能,高功率,超长寿命的LED灯泡。
充电保护:充电状态显示红灯,充电满显示绿灯。
3. 海信bcd198a工作原理LED灯由电池提供电源而发光,此电池充电后可重复使用。
4. 海信bcd198a结构特性:(略)6. 海信bcd198a使用和操作充电时灯头应朝下,将手电筒交流插头完全推出,直接插入AC110V/220V电源插座上,此时红灯亮起,表示手电筒处于充电状态;当充电充满时,绿灯亮起,表示充电已充满。
海信bcd198a使用时推动开关按键,前档为6个LED灯亮,中间档为3个LED灯亮,后档为关灯。
海信bcd198a充满电,3个LED灯可连续使用约26个小时,6个LED灯可连续使用16个小时7.海信bcd198a 故障分析与排除①使用过程中若发现灯不亮或者光线很暗,则有可能是电池电量不足,如果充电后灯变亮则说明手电筒功能正常,如果充电后仍然不亮,则有可能是线路故障,可以到本公司自费维修。
②使用几年后若发现充电后灯不亮,则极有可能是电池寿命已到,应及时到本公司自费更换。
8. 维修和保养在使用过程中,如LED灯泡亮度变暗时,电池处于完全放电状态,为保护电池,应停止使用,并及时充电(不应在LED灯泡无光时才充电,否则电池极易损坏失效。
)手电筒应该经常充电使用,请勿长期搁置,如不经常使用,请在存放2个月内补充电一次,否则会降低电池寿命9.海信bcd198a 注意事项请选择优质插座,并保持安全规范充电操作。
产品充电时切勿使用,以免烧坏LED灯泡或电源内部充电部件。
手电筒不要直射眼睛,以免影响视力。
(16)..................................................................................................................... 14............................................................................................................. 12............................................................................................................... 11........................................................................................................................ 9................................................................................................ 8................................................................................................ 5 ...... 3..................................................................................................................... 2Brief introduction Important safety instructions Installing your new appliance Description of the appliance Display controls Cleaning and care Helpful hints and tips Troubleshooting Disposal of the appliance ............................................................................................of the fridge to the wall, at least 1"2"(50mm) of clearance from the back WARNINGBefore using the appliance for the first time, you should be informed of the following tips.For proper installation, this refrigerator must be placed on a level surface of hard material that is the same height as the rest of the flooring. This surface should be strong enough to support a fully loaded refrigerator.The rollers, which are not casters, should be only used for forward or backward movement. Moving the refrigerator sideways may damage your floor and the rollers.Suggestion:It is advisable for there to be at least (25mm) of clearance from its top, at least 1"(25mm) from its side to the wall and a clear space in front to allow the doors to open 125°. As shown in the following diagrams.In order to improve efficiency of the cooling system and save energy, it is necessary to maintain good ventilation around the appliance for the dissipation of heat. For this reason, sufficient clear space should be available around the refrigerator.Ventilation of applianceStand your appliance in a dry place to avoid high moisture.Keep the appliance out of direct sunlight, rain or frost. Stand the appliance away from heat sources such as stoves, fires or heaters.Note:Leveling of applianceAdjustable bottom feet0.4" - 0.6"(10 -15mm)CAdjustable bottomfeetFront roller Rear roller For sufficient leveling and air circulating in the lower rear section of theappliance, the bottom feet may need to be adjusted.You can adjust themmanually by hand or by using a suitable spanner.To allow the doors to self-close, tilt the top backwards by 0.4" - 0.6"(10 -15mm).Note:If required you may lay the refrigerator on its back in order to gain access to the base, you should rest it on soft foam packaging or similar material to avoid damaging the backboard of the refrigerator.In case your home access door is too narrow for the refrigerator to passthrough, remove the refrigerator doors and drawers.Door RemovalTools you will need(Not provided):With the door closed, remove the 3 screws holding the top cover (1) with Philips (+) screwdriver, and then remove the top cover with the entireharness attached.Remove the screws (2) fixed on the hingeswith a wrench (5/16", 8mm) and 1 groundscrew (3) attached to the hinge withPhilips (+) screwdriver. Remove the upper left and right door hinges (4).1.e both hands to open the door more than 90°. Lift it up and take it off.1324Disassembling the freezer DoorThere are two doors in freezer compartment,and it provide with an upper drawer with a tray and also a lower drawer with a tray.You can follow below same steps todisassemble the drawers, trays and doors. 1.Open the freezer door; Pull up the adjusting block (5) of the slide guides,and pull out the freezer door drawer (6)to the final position.2.Take out the tray (7) by lifting it up in the direction of the arrow.3.Remove the freezer drawer (8) by lifting it up .568Re-assembling the freezer DoorTo reattach the doors after you moved the appliance to its final location,assemble the parts in reverse order.974.Remove the 2 screws attached to the supporting frame (9).5.Pull out the freezer door and lift it up inthe direction of the arrow.9Refrigerator Gasket Refrigerator Door Control Panel Door BinsGlass shelvesAir ChanelCrisper coverFruit & Vegetable Crisper Freezer Door Freezer Upper DawerUpper Tray Part Freezer Lower Drawer Lower Tray Part 1 2 3 4567 8 9 10 14151112 13N Note: To get the best energy ef ciency of this product, please place all shelves, drawers on their original position as the illustration above.ote:Your model may look different from this and other images in this manual,depending on your model’s features.Vertical Baffle PartFreezer DoorAdjustable bottom feet16Use your appliance according to the following control regulations, your appliance has thecorresponding functions and modes as the display panels showed in the pictures below. When the appliance is powered on for the first time, the backlighting of the icons on display panel starts working. If no buttons have been pressed and the doors are closed, the backlighting will turn off.Power Icon A Power Control B Fridge Compartment Temp IconC Freezer Compartment Temp IconD Zone ChoiceE Celsius and FahrenheitF TemperatureG Temp ControlHI Super Cool IconJ Super Freeze Icon K Mode ControlL Press POWER 3 seconds to turn the power on, and press 3 seconds to turn the power off and will display “OF”.When you set a temperature, you aresetting an average temperature for the entire compartment. The actualcompartment temperatures may vary from the temperatures displayed depending on the amount and placement of stored food, and the surrounding room temperature.1.Press ZONE repeatedly until the Fridge icon appears.1.Press ZONE repeatedly until the Freezer Choice appears.2.When Freezer is on, is illuminated and then press TEMP. repeatedly to cyclethrough the available temperature settings,temperature type to Celsius.NOTE: Each press of the button, the temperature drops one degree.3.Release the TEMP. Control when the desired temperature setting appears.3.Release the TEMP. Control when the desired temperature setting appears.2. When Fridge is on, is illuminated and then press TEMP. repeatedly to cyclethrough the available temperature settings, from 8°C to 2°C if you have set temperature NOTE: Each press of the button, the temperature drops one degree.Recommended Temperature SettingFreezer Compartment TemperatureRefrigerator (Fridge) Compartment TemperatureSetting Compartment Temperature8°C7°C 6°C 5°C 4°C3°C2°C-24°C-23°C-14°C-15°C.........Energy saving icon IndicatorTEMP.Switching Celsius and Fahrenheiton the display, press and hold the button for three seconds.39°F (4°C)0°F (-18°C)type to Celsius.If you have set temperature type to Fahrenheit, the temperature settings cycle from 46 °F to 36 °F.36°F37°F46°F45°F.........from -14°C to -24°C if you have set If you have set temperature type to Fahrenheit, the temperature settings cycle from 7°F to -11 °F..........-10°F-11°F7°F 6°FTo toggle between Celsius and FahrenheitIf the fridge door is opened for longer than 2 minutes, the control panel will display “dr”,and it will return to the previous setting temperature after 8 minutes.completely.NOTE: Super Cool will automatically turn off after 3 hours, and the refrigerator will revert to its previous temperature setting.This funtion makes the freezer worked in an energy saving mode which is useful for reducing energy consumption when you 1.Press The appliance automatically sets the MODE until .s r a e p p a n o c i g n i v a s y g r e n E following temperatures:e d o m g n i v a s y g r e n Ef f o n r u t o t s s e r P .2and the refrigerator temperature will revert to its previous temperature setting.The Super Freeze feature helps to keep thefood stored in the freezer as the setting temperature during periods of high usage, large grocery loads, or temporarily warm room temperatures.1.Press Freeze icon appears.MODE repeatedly until the Super 2.Press temperature to turn off Super Freeze TEMP. or adjust freezer compartment manually and return to the previous temperature setting.When selecting the Super Freeze funtion,ensure there are no bottltedib the freerer compartment. Bottles and cans may explode.Super FreezeNOTE: temperature display.NOTE:off after 52 hours, and the freezer will revert to its previous temperature setting.NOTE: The Demo Mode stays on even if the accelerate food waste. are away.43°F(6°C)1°F(-17°C)Door Open AlarmEnergy SavingThe Super Cool feature helps to keep food stored in the refrigerator at the settingtemperature during periods of high usage, large grocery loads, or temporarily warm room temperatures. The Super Cool feature lowers the temperature in the fridge compartment to 36°F(2°C) to cool food.Super Cool1.Press MODE repeatedly until the Super Cool icon appears.NOTE: When Super Cool is on, istemperature display.2.Press MODE or adjust fridge compartment temperature to turn off Super Cool manually and return to the previous temperature setting.TEMP.Demo Mode1.Demo Mode is for store displaying only.2.In this mode, the light and the displayoperation is normal, but the refrigerator is not cooling. W hen the refrigerator is in the Demo Mode, if consumers open the door or no keys ,d e n e p o r o o d e h t h t i w s d n o c e s 03 r o f n o i t a r e p othe temperature control panel will show as follow from A to F.3.To exit this mode, you could press the key and the key at the same time for 3 seconds, then you can see the whole control panel light up for 1 second.NOTE: refrigerator powers off. If the consumers enter the mode with unintentional operation, you should exit as soon as possible, since the refrigerator will not cool in this mode, which will cause the food going bad.illuminated and 36°F(2°C) appears in the The Super Freeze feature lowers thetemperature in the freezer compartment to -11°F(-24°C) to freeze the food faster.illuminated and -11°F(-24°C) appears in the When is on, isSuper Freeze Super Freeze will automatically turn High temperature setting will To turn off the alarm, close the fridge door POWER MODETo maintain good appearance of your appliance, you should clean it regularly.Spray water onto a cleaning cloth instead of spraying directly on the surface of the appliance. This helps ensure an even distribution of moistureto the surface.Clean the doors, handles and cabinet surfaces with a mild detergent and then wipe dry with a soft cloth.Exterior cleaningYou should clean the appliance interior regularly. It will be easier to clean when food stocks are low. Wipe the inside of the fridge and freezer with a weak solution of backing soda and water, and then rinse with warm water using a wrung-out sponge or cloth. Wipe completely dry before replacing the shelves and baskets. Thoroughly dry all surfaces and removable parts before putting them back into place.Interior cleaningFor hygienic reasons the appliance (including exterior and interior accessories) should be cleaned at least every two months.CAUTION!1.Don’t use sharp objects to clean with, as they are likely to scratch the surface.2.Don’t use thinner, car cleaner,bleach, oil, abrasive cleansers or organic solvent such as benzene for cleaning. They may damage the surface of the appliance and may cause fire.WARNING!To avoid electrical shock, the appliance must not be connected to the main power supply during cleaning. Before cleaning, switch the appliance off and remove the plug from the main socket.Although this appliance automatically defrosts, a layer of frost may occur on the freezer compartment’s interior walls if the freezer door is opened frequently or kept open too long. If the frost is too thick, choose a time when the freezer is nearly empty and proceed as follows:Remove existing food and accessory baskets, unplug the appliance from the main power and leave the doors open. Ventilate the room thoroughly to accelerate the process.When defrosting is completed, clean your freezer as described above.1.2.WARNING!Do not use sharp objects to remove frost from the freezer compartment. Only after the interior is completely dry should the appliance be switched back on and plugged back into the main socket.Replacing the LED lightTake care to keep door seals clean. Sticky food and drinks can cause seals to stick to the cabinet and tear when you open the door. Wash seal with a mild detergent and warm water. Rinse and dry it thoroughly after cleaning.Door seals cleaning CAUTION! Only after the door seals are completely dry should the appliance be powered on.WARNING!The LED light must be replaced by a competent person. If the LED light is damaged, follow the steps below :1.Unplug your appliance.2.Remove the light cover by lifting up and pulling out.3.Hold the LED light with one hand and pull it while pressing the connector latch with the other hand.4.Replace the LED light and snap it correctly in place and replace the light cover.WARNINGIf you experience a problem with your appliance or are concerned that the appliance is not functioing correctly, you can carry out some easy checks before calling for service, please see below.1. Don’t try to repair the appliance yourself. If the problem persists after you have made the checks mentioned below, contact a qualified electrician, authorized service technician or the shop where you purchased the product.2. A child entrapment warning statement is included below.DANGERRisk of child entrapment. Before you throw away your old refrigerator or freezer:- Take off the doors.- Leave the shelves in place so that children may not easily climb inside.DANGERWARNINGPackaging materials with the recycle symbol are recyclable. Dispose of the packaging into a suitable waste collection container to recycle it.1. Pull out the main plug from the main socket.2. Cut off the power cord and discard with the main plug.Refrigerators contain refrigerant and gases in the insulation. Refrigerant and gases must be disposed of professionally as they may cause eye injuries or ignition. Ensure that tubing of the refrigerant circuit is not damaged prior to proper disposal.It is prohibited to dispose of this appliance as household waste.Packaging materialsBefore disposal of the applianceCopyright Statement© 2021 Hisense Company Ltd. All Rights Reserved.All material in this User Manual is the property of Hisense Company Ltd. and its subsidiaries, and is protected under US, CANADA, MEXICO and International copyright and/or other intellectual property laws. Reproduction or transmission of the materials, in whole or in part, in any manner, electronic, print, or otherwise, without the prior written consent of Hisense Company Ltd. is a violation of Hisense Company Ltd. rights under the aforementioned laws.No part of this publication may be stored, reproduced, transmitted or distributed, in whole or in part, in any manner, electronic or otherwise, whether or not for a charge or other or no consideration, without the prior written permission of Hisense Company Ltd.Requests for permission to store, reproduce, transmit or distribute materials may be made to one of the following addresses:USA: CANADA: MEXICO: Hisense, and any and all other Hisense product names, logo’s, slogans or marks are registered trademarks of Hisense Company Ltd. and its subsidiaries. All other trademarks are the property of their respective holders.© 2021. All rights reserved. Hisense and the Hisense logo are registered trademarks of Hisense. Other brand and product names are registered trademarks of their respective owners.Hisense USA Corporation7310 McGinnis Ferry RoadSuwanee, GA 30024Hisense Canada Co., Ltd2283 Argentia Road, Unit 16Mississauga, ON, CanadaLSN 5Z2Hisense Mexico S. de R.L. de C.V.Blvd. Miguel de Cervantes Saavedra No 301Torre Norte Piso 2, Col. Ampliación GranadaMiguel Hidalgo, Ciudad de México, C.P. 11520Disclaimer:Images throughout this document are for illustrative purposes only and may differ from the actual product.0.4" - 0.6"(10 -15mm).0.4" - 0.6"(10 -15mm)。
共 18页文件号:HZB-B08060127高效节能三门电冰箱功能说明书基本型号: BCD-242TDe拟制:审核:批准:海信(北京)电器有限公司家电研究中心编制目 录 第一部分:电器接线图第二部分:维修备件明细第三部分:控制功能说明第四部分:系统原理和整机性能指标第五部分:爆炸图第六部分:特殊故障维修方法第七部分:使用说明书附件一:爆炸图附件二:使用说明书第一部分:电器接线图 一、 基本型号BCD-242TDe接线图:BCD-242TDe接线图第二部分:维修备件明细一、 基本型号BCD-242TDe备件明细:海信BCD-242TDe维修部件一览表文件编号:WX0174 制表时间:2005.9.27 修订状态:A/0序号 物 料 号 部件名称 备注1 B03080003 风机主体2 B03080004 风叶3 B05210042 变温室风机罩4 B05210043 冷藏室风机罩5 B05110100 风扇支架6 B09010001 风机橡胶垫7 B06100003 除臭触媒8 B05100111 风道档板9 B03030075 显示板组件10 B01430031 显示面板组件11 B09020053 玻璃板12 B05160039 玻璃搁架前饰条13 B05160040 玻璃搁架后饰条14 (B01135364) (冷藏室门体组成)15 B01140025 冷藏室门封条组成16 B04110016 限位块加强铁17 B04220002 上铰链18 B05220016 上铰链盖19 B05140005 上限位块20 (B01135365) (变温室门体组成)21 B01420001 变温室门封条组成22 (B01135366) (冷冻室门体组成)23 B01160013 冷冻室门封条组成24 B01080029 下铰链组成25 B04110017 箱下脚调平螺钉座26 B01100003 调节底脚27 B01090006 压缩机底板组成28 B05230001 后脚轮29 B04230001 脚轮轴30 B02120006 双联电磁阀总成31 B02120003 双联电磁阀总成文件编号:WX0174 制表时间:2005.9.27 修订状态:A/0序号 物 料 号 部件名称 备注32 B05160026 冷冻蒸发器饰条33 B05215019 冷藏室出水网堵34 B05135003 冷冻蒸发器垫板35 B08195053 纸底组成36 B05090021 台面框37 B05180001 台面框固定扣38 B05210046 台面框螺钉盖39 B01080030 中铰链组成40 B03030081 主控板组件41 B05110036 主控板支架42 (B04190001)(主控板盒盖)43 B03100010 扇形门开关44 B05125001 蒸发皿45 B03230003 LED灯46 B05210045 照明灯盒47 B05210044 照明灯罩48 B02050002 干燥过滤器49 B01290027 压缩机总成50 B05080080 感温盒51 B05080017 感温盒盖52 B09060005 搁架垫块53 B03120084 电源线组件54 B05230010 滚轮(一)55 B05210012 机器室保护罩56 B05085033 冰盒57 B01180028 变温室抽屉组成58 B01180029 小抽屉组成59 B01180023 短抽屉组成60 B01180022 长抽屉组成61 B05220029 托架盖62 B05110084 短托架63 B05110082 长托架64 B05110083 大托架65 B05110081 蛋架66 B04200003 瓶挡67 B04200004 酒水架68 B05080067 果菜盒文件编号:WX0174 制表时间:2005.9.27 修订状态:A/0序号 物 料 号 部件名称 备注69 B08060083 说明书70 B08130003 包装内罩71 B08180182 包装箱72 B08190022 顶垫板73 B08190023 箱角防护垫(前)74 B08190024 箱角保护垫(后)75 B08190027 防护垫(前)76 B08190025 下门垫块77 B08190018 抽屉卡紧块78 B08160152 当心火灾标志第三部分:控制功能说明一、 基本型号BCD-242TDe控制功能说明:设计文件名称:冷藏冷冻箱控制板技术条件设计文件编号:HZB-B01010283JT设计文件版本号:/设计文件适用型号:BCD-242TDe/262TDe/282TDe设计文件具体内容:冷藏冷冻箱控制板技术条件冷藏冷冻箱控制板技术条件:1 范围本技术条件规定了基本参数、外观和结构、功能要求等,适用于BCD-282TDe冷藏冷冻箱控制板(以下简称控制板)。