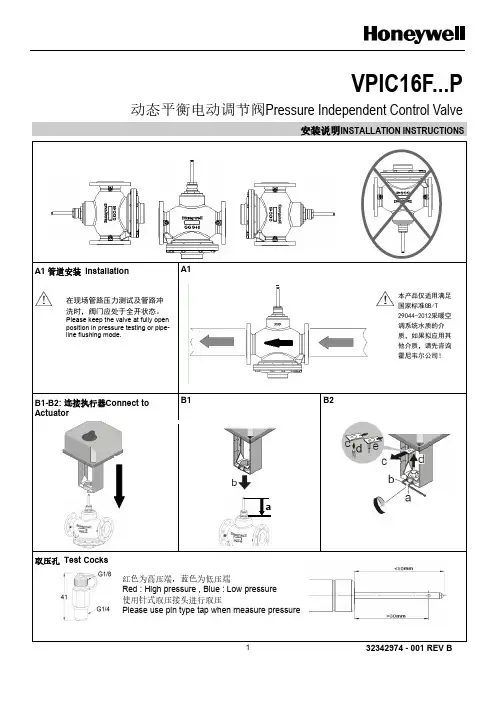
霍尼韦尔安装说明
- 格式:pdf
- 大小:459.36 KB
- 文档页数:78


霍尼韦尔238C说明书SYSTEM 238C 安装手册注意- 为预防火灾,所有保险管只能用同规格的保险管替换。
- 维修前要先断开所有交流电、电池和电话接头。
P/N 5-051-427-01 Rev C 16.0 VAC 25 - 40 VA 50 / 60 Hz 10.5-13.5 VDC 用F1: 3AG,2.5 A 保险管Mains Fuse: 400 mA 250 V Slow-Blow 3AG, 3A battery protection 12 VDC 6.5 AH 键盘-不能超过4个键盘或最大电源容量-保险管F:G.7Mains Input: 230 VAC 9.X PCF ・公共接地点- 只能用VD,6.H密封铅酸充电电池。
供电电源- 每-年用KD6电池来更新原电池。
- 带一个键盘的待机时间为,6小时。
- 附加供电、键盘和扬声器的供电总需求应不超过主机最大功率。
- 将变压器接在不带开关的电源座上面。
- 更换保险管前请关掉和电池供电。
- 电池充电最大电流:。
TB1 黑电池红看门狗直接连接紧急情况下电池容量可供应至少四小时注意:不正确的接线有可能会对主机造成损害。
红-电话线绿-电话线灰-电话机棕-电话机蓝-防拆开关橙-防拆开关电话插头主机信息・用6WG,绿色的导线将地线从盒盖处接至大地。
・所有的轮出均有功率限制。
・如果回路OL或监察回路,所有回路末端须接.K欧姆电阻。
・回路可作为标准回路使用,也可提供-.VD,给双线式探头使用。
该回路可支持多达个BRK4型双线式烟感探测器。
・回路电压:正常操作(UX=4.VD)-7回路 ̄.6VD=短路.6 ̄.VD=正常. ̄4.VD=开路回路 ̄.VD=短路. ̄.VD=正常. ̄4.VD=开路密封铅酸电池小心所有接至警号、带开关供电端和键盘供电端的总电流不可超过.。
可关断的电源警铃SYSTEM 238C-TL Installation Manual 2 内容System 238C接线图内容安装2 控制主机接线2 - 4 系统上电4 键盘设置4 键盘编址4 厂家缺省编程4 - 5 编程项目(字母序)5 主机编程5 - 6 使用LD键盘编程6 使用LPH键盘编程6 输入十六进制数 6 对LPH键盘编程 6 - 7 显示信息编程7 编程模板7 编程项目(数字顺序)8 - 19 键盘标签20 电话线路问题20 看门狗指示灯20 键盘操作命令概述21 常见问题解答22 - 23 如何减少误报24 - 25 系统限制26 保修事宜26 编程表格27 - 28 目录范围本手册主要介绍SYST安装与编程的基本方法。


霍尼韦尔报警零碎材料说明之杨若古兰创作一、接线图1、236 plusⅡ2、2316 plusⅡ接线备注:1.警号(二芯)分正负极,红色线为正极接“BELL+”,黑色线为负极接“GND”.2.探测器(四芯,例如:双鉴挪动探测器、红外幕帘、震撼探测器、等需接电源的探测设备)的供电正极接“不成关断的辅助电源”的“AUX”,负极接“不成关断的辅助电源”的“GND”;旌旗灯号端不分正负但接防区的“Z”端需串接一个电阻,另一端接防区的“GND”.3.编程键盘(三芯)的供电端“+”接“KEY+”, “_”接“GND”, 数据端“DAT”接“DATA”(数据端的负极实际是共用电源端的GDN).4.紧急按钮(二芯)需接常闭的两个触点,而非常开触点.不分正负但接防区的“Z”端最好串接一个电阻(以防设备短路而烧坏主机板电路),另一端接防区的“GND”.5.门磁(二芯)接法同紧急按钮.6.空余防区,可接电阻(电阻一端接防区的“Z”端,一端接“GND”端),也可不接电阻.7.挪动探测器的软胶面向下安装,对着要监视的防区空间(只需检测到有人挪动,LED灯就会亮,否则LED灯为灭的形态).8.主机箱的防拆开关引出的两根线不分正负但接防区的“Z”端最好串接一个电阻,另一端接防区的“GND”.二、编程1.加电后,筹办灯为绿色.2.进入编程命令:按“012345*0#”,此时“筹办”“设防”“服务”三灯亮,暗示进入编程形态.3.输入命令结束后按“#”结束当前项编程,继续下一项编程.4.退出编程形态:按“*”“#”即可退出编程形态.5.断电后在加电即可生效.6.编程过程中,不要管唆使灯的形态,只需提示音正常即可继续对下一项地址编程.三、恢复初始值(普通用于编程混乱后使用)断电后用跳线短接“DEFAULT”的两脚不放,然后加电,大约5秒后(此时键盘灯会有变更)松开短接触点即可恢复初始值.四、经常使用编程命令(以236 plusⅡ为例,其它型号请参考呼应说明书)3.用户密码编程(及设防和撤防时输入的密码)5.回路防区控制编程(主要)重点说明:1.某银行的探测器防区配置:1-5防区为墙面及自助机柜震撼探测器,6-7防区为自助机门磁,8防区为紧急按钮,9防区为防盗门的门磁,10防区当前为红外探测器,空余防区均接了电阻.2.财务室的探测器防区配置:1防区为挪动双鉴探测器,2防区为紧急按钮,3防区为主机箱防拆开关,空余防区均未接电阻.3.编程举例:财务室1防区为挪动双鉴探测器的编程为:1*3(回路1的地址码)1(回路呼应时间为500MS)1(回路接收机类型为:只要接收机1工作)1(回路恢复类型为:恢复到正常)0(回路设防类型为:即时设防)2(回路警声类型为:波动声)0(回路电路类型为EOL,短路和断路都报警),最初输入“#”终了.完好的代码为:1*3111020#主要备注:1.回路设防类型:即时设防的意思是当设防后触发才无效,撤防后触发无效.适用于有人时的工作场合中的红外探测器,主机防拆开关,门磁;24小时设防的意思是不管布不设防,当触发后都无效.适用于紧急按钮,震撼探测器.2.空余防区如果接入的有电阻(光大银行),则回路电路类型编为“EOL,短路和断路都报警”,如不接电阻(财务室)则编为“常开”.有探测器的防区最好接入电阻,不接电阻则编为“常闭”(根据设备是常闭型还是常开型而定)3.一项编程终了后按#号会有“嘀”的一声响,暗示命令无效,若命令输入过程中“嘀嘀嘀”的响则说明命令输入有误,从头完好的输入准确的命令即可.可对同一项地址反复输入命令,最初的编程命令将取代上次的编程命令.五、惯例使用1.设防:“用户密码”+“#”,默认为“1234#”,设防成功后设防灯为红色.2.撤防:当有报警时,检查缘由后解除设防.“用户密码”+“#”,默认为“1234#”,撤防成功后设防灯为灭.3.清除报警记录:当有防区报警时,呼应的防区灯为红色,输入“*”“1”“#”后可清除记录,此时防区灯灭,最初再设防即可.4.旁路设防:当某一防区有故障时,可使用旁路设防功能.输入:“密码”+“旁路键”+“防区号”+“#”即可旁路设防.5.设防时,“筹办”灯亮才干成功设防,若此时侦测到有人,可能不克不及成功设防.六、检修(备注:其它故障请征询厂家技术人员.)1、对于接有电阻的防区,可测量电阻前端的设备两脚根据设备是常开还是常闭来判断是设备坏还是主板坏.七、唆使灯/提示音的含义。

HoneywellVISTA-128BPT/VISTA-250BPT安装手册中安消技术有限公司李林目录一、设备认识 (3)Vista系列报警主机(以Vista 128BPT为例) (3)Vista系列报警主机控制键盘(6160) (7)4193SN/SNP单地址码两回路模块(已停产) (7)4293SN单防区扩充模块 (8)4101SN V-Plex单防区总线继电器模块 (9)4204ECP总线继电器模块 (9)4208SN V-Plex总线8防区扩充模块 (10)4297总线延伸器 (10)4232AP 32路继电器模组 (12)VPlex-VSI总线监测/隔离模块 (13)IP-2000 2.0网络接口模块 (14)二、主机编程 (17)防区编程: (17)删除防区: (21)子系统编程: (23)1.子系统数量划分: (23)2.子系统跳转功能设置: (23)3.防区子系统划分及布防延时更改 (24)继电器输出设备编程: (25)1.4101SN单防区继电器模块编程 (25)2.防区列表编程 (29)3.查看防区列表 (30)4.4232AP 32路继电器模块编程设置(VISTA 128BPT) (30)4100SN与IP2000模块编程: (31)IPM-VISTA SUPER II网络报警模块编程: (33)三、键盘日常使用操作 (37)1.布撤防操作 (37)2.子系统跳转 (37)四、主机常见问题解析 (38)五、键盘常见显示中英文对照表 (40)一、设备认识Vista系列报警主机(以Vista 128BPT为例)(图1)由原安定宝、C&K打底建立的Honeywell安防是全球最大的报警器材制造商,其制造的VISTA系列报警主机(图1)是业界最早、认可度最高的大型总线制报警主机,主要用来接收处理前端探测器发送回来的报警信号,是先进的多功能控制主机。
功能框图Vista - 128BPT常规接线方式Vista - 128BPT总线接线方式Vista - 128BPT无线接线方式Vista - 128BPT总线连接图表格(一):总线负载电流、线径与总线驱动距离的关系Vista系列报警主机控制键盘(6160)(图2)6160键盘(图2)用来给报警主机编程和防区布撤防相关操作4193SN/SNP单地址码两回路模块(已停产)4193SN用于总线扩充,可以扩展成2个回路:白色线与黄色线组成一个10K 电阻监测的回路或者黄色线与黑色线组成常闭回路;这两个回路任选其一,都是第一个防区;绿、黑线组成常闭形式的第二个防区,在编程时要注意防区回路选择。

whf v3 净水器霍尼韦尔安装手册
1、先按照包装盒内的操作说明书依次拆开各个零部件的外包装,然后将滤芯对准,依次插入到对应的滤壳内。
注意等滤芯安装完成后,要把滤芯外侧的密封圈挨个放正。
2、先把活性炭与过滤膜的接口拆开,并在空芯内部装入过滤滤芯,然后再重新把后置联接管组合好,用手将管道的接口拧紧即可。
3、先取出蓝色的叉子,然后把白色的管道向里按入,注意此时
只需对准螺纹的接口缓缓往里伸进就可以了,切记用力过猛。
等管子深入到最里面后,听到管道被锁住的声音后即可结束对水三通的安装。
4、先量好净水器的安装位置到水管之间的距离,然后按照同等
距离截取相应大小的PE管,接着利用工具器械将PE管的一端与水龙头进行固定,将两端的接口处拧紧即可。
5、先把PE管的另一端对准净水器的进水口进行螺旋上调,然后用螺丝对准龙头的插口进行螺旋拧紧,把龙头外部的白色套子串入接口固定住。
6、把专门用来排废水的管子接入到废水排放处,然后打开开关
按照操作说明书进行排污,等排出的废水慢慢干净且流动自然后,就可以关闭开关投入使用了。

霍僧韦我报警系统资料证明之阳早格格创做一、交线图1、236 plusⅡ2、2316 plusⅡ交线备注:1.警号(二芯)分正背极,白色线为正极交“BELL+”,乌色线为背极交“GND”.2.探测器(四芯,比方:单鉴移动探测器、白中幕帘、振动探测器、等需交电源的探测设备)的供电正极交“没有成关断的辅帮电源”的“AUX”,背极交“没有成关断的辅帮电源”的“GND”;旗号端没有分正背但是交防区的“Z”端需串交一个电阻,另一端交防区的“GND”.3.编程键盘(三芯)的供电端“+”交“KEY+”, “_”交“GND”, 数据端“DAT”交“DATA”(数据端的背极本质是共用电源端的GDN).4.慢迫按钮(二芯)需交常关的二个触面,而非常启触面.没有分正背但是交防区的“Z”端最佳串交一个电阻(以防设备短路而烧坏主机板电路),另一端交防区的“GND”.5.门磁(二芯)交法共慢迫按钮.6.空余防区,可交电阻(电阻一端交防区的“Z”端,一端交“GND”端),也可没有交电阻.7.移动探测器的硬胶里背下拆置,对付着要监视的防区空间(只消检测到有人移动,LED灯便会明,可则LED灯为灭的状态).8.主机箱的防拆启关引出的二根线没有分正背但是交防区的“Z”端最佳串交一个电阻,另一端交防区的“GND”.二、编程1.加电后,准备灯为绿色.2.加进编程下令:按“012345*0#”,此时“准备”“设防”“服务”三灯明,表示加进编程状态.3.输进下令中断后按“#”中断目前项编程,继承下一项编程.4.退出编程状态:按“*”“#”即可退出编程状态.5.断电后正在加电即可死效.6.编程历程中,没有要管指示灯的状态,只消提示音平常即可继承对付下一项天面编程.三、回复初初值(普遍用于编程纷治后使用)断电后用跳线短交“DEFAULT”的二足没有搁,而后加电,约莫5秒后(此时键盘灯会有变更)紧启短交触面即可回复初初值.四、时常使用编程下令(以236 plusⅡ为例,其余型号请参照相映证明书籍)3.用户暗号编程(及设防战设防时输进的暗号)5.回路防区统造编程(要害)沉面证明:1.某银止的探测器防区摆设:1-5防区为墙里及自帮机柜振动探测器,6-7防区为自帮机门磁,8防区为慢迫按钮,9防区为防匪门的门磁,10防区以去为白中探测器,空余防区均交了电阻.2.财务室的探测器防区摆设:1防区为移动单鉴探测器,2防区为慢迫按钮,3防区为主机箱防拆启关,空余防区均已交电阻.3.编程举例:财务室1防区为移动单鉴探测器的编程为:1*3(回路1的天面码)1(回路响当令间为500MS)1(回路交支机典型为:惟有交支机1处事)1(回路回复典型为:回复到平常)0(回路设防典型为:立即设防)2(回路警声典型为:宁静声)0(回路电路典型为EOL,短路战断路皆报警),末尾输进“#”完成.完备的代码为:1*3111020#要害备注:1.回路设防典型:立即设防的意义是当设防后触收才灵验,设防后触收无效.适用于有人时的处事场合中的白中探测器,主机防拆启关,门磁;24小时设防的意义是没有管布没有设防,当触收后皆灵验.适用于慢迫按钮,振动探测器.2.空余防区如果交进的有电阻(光大银止),则回路电路典型编为“EOL,短路战断路皆报警”,如没有交电阻(财务室)则编为“常启”.有探测器的防区最佳交进电阻,没有交电阻则编为“常关”(根据设备是常关型仍旧常启型而定)3.一项编程完成后按#号会有“嘀”的一声音,表示下令灵验,若下令输进历程中“嘀嘀嘀”的响则证明下令输进有误,沉新完备的输进精确的下令即可.可对付共一项天面沉复输进下令,末尾的编程下令将与代上次的编程下令.五、惯例使用1.设防:“用户暗号”+“#”,默认为“1234#”,设防乐成后设防灯为白色.2.设防:当有报警时,查看本果后排除设防.“用户暗号”+“#”,默认为“1234#”,设防乐成后设防灯为灭.3.与消报警记录:当有防区报警时,相映的防区灯为白色,输进“*”“1”“#”后可与消记录,此时防区灯灭,末尾再设防即可.4.旁路设防:当某一防区有障碍时,可使用旁路设防功能.输进:“暗号”+“旁路键”+“防区号”+“#”即可旁路设防.5.设防时,“准备”灯明才搞乐成设防,若此时侦测到有人,大概没有克没有及乐成设防.六、检建(备注:其余障碍请接洽厂家技能人员.)1、对付于交有电阻的防区,可丈量电阻前端的设备二足根据设备是常启仍旧常关去推断是设备坏仍旧主板坏.七、指示灯/提示音的含意。
霍尼韦尔Honeywell安防系统安装和设置指南霍尼韦尔(Honeywell)是全球领先的安防系统供应商之一,他们提供一系列的安全产品和解决方案,包括监控摄像头、入侵报警系统、无线安防系统等。
在本指南中,我们将为您介绍如何安装和设置霍尼韦尔安防系统。
1.选购合适的产品在安装和设置之前,您需要根据您的需求选择合适的霍尼韦尔安防产品。
您可以根据需要选择监控摄像头的数量和类型,入侵报警系统的传感器,以及无线安防系统的探测器等。
2.确定监控区域和安装位置在安装摄像头之前,您需要确定监控的区域和最佳安装位置。
根据您的需求,您可以选择将摄像头安装在室内或室外,并确保摄像头能够覆盖您想要监控的区域。
3.安装摄像头按照供应商提供的安装指南和说明书,将摄像头安装在您选择的位置上。
确保摄像头的固定牢固,并且摄像头的视野没有任何遮挡物,以确保最佳的监控效果。
4.连接摄像头和监控系统将摄像头与监控系统连接。
根据型号的不同,摄像头可以通过有线或无线的方式连接到监控系统。
对于有线连接,您需要将摄像头与监控系统的主控器使用电缆进行连接。
对于无线连接,您需要按照说明书中的指引进行无线连接。
5.设置监控系统一旦摄像头与监控系统成功连接,您可以开始设置监控系统。
首先,您需要确保监控系统的电源和网络连接正常。
然后,根据监控系统的操作指南,您可以设置摄像头的各种参数,比如分辨率、画面质量、录像时间等。
6.安装入侵报警系统对于入侵报警系统,您需要选择一个或多个传感器,将其安装在需要监控的区域。
传感器可以是门窗磁感应器、红外线传感器或玻璃破碎传感器等。
按照供应商提供的指南,将传感器安装在合适的位置上,并将其连接到报警主机。
7.设置入侵报警系统一旦传感器安装完毕,您可以开始设置入侵报警系统。
根据供应商提供的指南,您可以设置传感器的触发条件和报警方式。
您可以选择将报警信息发送到手机或电子邮件等方式,并根据需要设置报警延迟时间和报警停止条件。
8.安装无线安防系统对于无线安防系统,您需要选择一个或多个探测器,将其安装在需要监控的区域。
中央净水机安装指南产品图片PF12 PF20 PF30中央净水机安装指南•1. 中央净水机安装条件及注意事项•2. 净水机的安装-现场勘测-安装-调试更换滤料、、KDF)•3. 净水机的维护保养净水机的维护保养((更换滤料•安装环境要求1. 净水机的安装位置:别墅一般安装在车库、设备房。
公寓房一般安装在设备阳台、厨房等位置。
办公营业场所一般安装在自来水入口处。
安装的位置要有进出水管,配有下水道、地漏和电源插座,建议净水机应尽量安装在室内。
2. 净水机的安装空间面积为60厘米×60厘米,高度不低于180厘米。
地坪需平整,不应因装潢而变动。
装机的地坪重载要求在300公斤以上。
3. 进出水管的管径根据用户的用水量,使用6分或1寸。
用户家中提供的进出水管由下往上的管路,明、暗管最好开口向上,预留管高度按设备具体要求。
由上往下的管路,明、暗管最好开口向下,预留管高度按设备具体要求,且用内丝接头为宜。
鉴于进出水管距离各不相同,在与旁通阀连接时,,连接管应最好采用6分,在与旁通阀连接时:鉴于进出水管距离各不相同(重点提示重点提示:。
)或1寸不锈钢波纹软管寸不锈钢波纹软管。
)4.进出水口:所有用户在预留进出水管道时,进出水口以人面对墙面为准。
进出水口的方向根据具体设备型号而定,请仔细查看设备控制阀头进出水口处的箭头标示。
看现场时一定要把预留管道预留正确,以免出现不必要的错误。
5.电源为AC 220V/50HZ二、三眼插座,电源插座离地高度最好在1.5米左右,距离机器1米以内。
如果安装在室外须加装防水型插座。
(安装在室外时,冬季寒冷地区应配保温套)。
6.净水设备旁应该有地漏和排水管。
排水管管径为2寸,离地高度30厘米。
7.环境温度:1~39℃。
如果安装在室外时,需加装防护保温套。
进水管和出水管要进行管道保温。
8. 入水温度:2~38℃。
•安装注意事项1.净水机尽量安装在靠近排水口的地方。
排水口要开口向上使净水机的排污水管以最短距离直接排放污水,且管口应高出污水水面30厘米以上。
Pro-Watch 6000双读卡器模块PW6K1R2安装指南2008 年7 月14 日© 2008 霍尼韦尔。
版权所有。
800-01951 ,修订本BCopyright© 2008 Honeywell. 版权所有。
所有产品和商标名称是其相应所有人的服务标记、商标、注册商标或注册服务标记。
美国印制。
霍尼韦尔公司保留在未经事先通知的情况下于任意时间修改本文件内信息的权力。
Pro-Watch TM 是霍尼韦尔公司的商标。
订购信息相关订购信息请联系您的霍尼韦尔本地代表处,或者访问我们的网站反馈霍尼韦尔欢迎您对本手册提出宝贵意见。
如有意见,请访问我们的网站留言目录前言警告与注意事项 (v)否认声明 (vi)有限担保 (vii)机密性 (vii)拆包程序 (viii)装运须知 (viii)安装PW-6000 双读卡器模块说明 (1)规格 (2)设置 (3)LED 操作 (5)电源 (7)通信 (7)接线 (8)读卡器接线...................................................................................................8 警报触点接线...............................................................................................9 控制输出接线...............................................................................................9 安装选项............................................................................................................10 安装模块. (11)连接器1 至7 的接线图 (12)连接器1 和连接器7 至9 的接线图 (13)前言警告与注意事项警告:将设备与电源连接之前,应检查电源输出电压是否在电源规范内。
PlantCruise by Experion Software Installation User's GuideCVDOC-X136-en-1101AJanuary 2014 Release 110.1DisclaimerThis document contains Honeywell proprietary information. Information contained herein is to be used solelyfor the purpose submitted, and no part of this document or its contents shall be reproduced, published, ordisclosed to a third party without the express permission of Honeywell International Sàrl.While this information is presented in good faith and believed to be accurate, Honeywell disclaims the impliedwarranties of merchantability and fitness for a purpose and makes no express warranties except as may be statedin its written agreement with and for its customer.In no event is Honeywell liable to anyone for any direct, special, or consequential damages. The informationand specifications in this document are subject to change without notice.Copyright 2014 - Honeywell International SàrlContentsIntroduction to PlantCruise by Experion installation (5)Overview of PlantCruise by Experion systems (6)Overview of PlantCruise by Experion Software Installation Server (PSIS) (7)Overview of PlantCruise by Experion installation methods (8)Before you begin (9)Hardware and software requirements (10)Hardware requirements (10)Software requirements (11)Guidelines for naming PlantCruise by Experion Engineering Station (12)Installation considerations (13)Turning off the Windows automatic updates option (14)Setting up the screen resolution and color quality (15)Configuring visual effects for increased performance (16)Customizing the power options (17)Disabling automatic disk defragmentation (18)Turning off the Windows Defender (19)Disabling the fast user switching option (20)Disabling the antivirus services and applications (21)Setting up a PSIS repository (22)Engineering Station installation (25)Installing Engineering Station on an entry level system (26)Configure Network Interface Cards (26)Install the software protection key (27)Start the installation application (27)Continue installation on an entry level system (28)Installing Engineering Station on a high capacity system (30)Configure Network Interface Cards (30)Install the software protection key (31)Start the installation application (31)Continue installation on a high capacity system (32)Direct Station installation (35)Configuring Network Interface Cards (36)Start the installation application (38)Installing Direct Station (39)Simulation environment installation (41)Installing simulation environment on a system with Windows 7 operating system (42)Configure Network Interface Cards (42)Start the installation application (43)Continue installation on a system with Windows 7 operating system (43)Installing simulation environment on a system with Windows Server 2008 operating system (45)Configure Network Interface Cards (45)Start the installation application (46)Continue installation on a system with Windows Server 2008 operating system (46)3CONTENTSeServer installation and configuration (49)Configuring Network Interface Cards (50)Start the installation application (51)Installing eServer (52)Configuring eServer (53)Post installation tasks (55)Configuring the network (56)Determine the FTE adapters (56)Set IP Address and device index for FTE adapters (56)Configure the hosts file (57)Build redundancy link (58)Customizing the system (59)Disable operator password timeout (59)Configure dual display on Direct Station (59)Setting system preferences using Control Builder (61)Configure general properties (61)Configure properties for pins and wires (62)Change the base IP address for FTE nodes (62)Protecting against viruses (63)Configure antivirus software guidelines (63)Configure McAfee VirusScan (63)Supplementary installation tasks (65)Configuring PlantCruise by Experion in a domain (66)Add a node to a Windows domain (66)Run LinkDomainGroups.vbs script (66)Backing up your system (68)Starting and stopping PlantCruise servers (69)Starting and stopping PlantCruise by Experion Direct Station (70)Changing the Engineering Station configuration (71)Notices (73)Documentation feedback (74)How to report a security vulnerability (75)Introduction to PlantCruise by Experion installationRelated topics“Overview of PlantCruise by Experion systems” on page 6“Overview of PlantCruise by Experion Software Installation Server (PSIS)” on page 7“Overview of PlantCruise by Experion installation methods” on page 85INTRODUCTION TO PLANTCRUISE BY EXPERION INSTALLATIONOverview of PlantCruise by Experion systemsSupported system typesPlantCruise supports the following system types.•Entry level systems: Used for small scale systems. The PlantCruise nodes of entry level systems are hosted on Dell 3010/HP Compaq 6305 platforms.•High capacity systems: Used for large scale systems. The PlantCruise nodes of high capacity systems are hosted on Dell PowerEdge T110 II platforms.Supported nodesPlantCruise supports the following types of nodes.•Entry level Engineering Station•High capacity Engineering Station•Direct Station•Simulation Environments•eServerINTRODUCTION TO PLANTCRUISE BY EXPERION INSTALLATION Overview of PlantCruise by Experion Software Installation Server (PSIS) PlantCruise Software Installation Server (PSIS) can be set up only on a local hard drive, a portable USB harddrive, or a removable USB drive. Setting up PSIS includes installing all the PlantCruise software on a sharedfolder (the shared folder is created on local hard drive or USB drive) which can be accessed over a network toperform PlantCruise installation on one or more systems.PSIS provides a single repository for all PlantCruise software and can be used for installing PlantCruisesoftware on multiple systems simultaneously. PSIS can be updated for any media updates or new mediareleases.7Overview of PlantCruise by Experion installation methodsYou can install PlantCruise using one of the following methods.•Installation using PlantCruise Software Installation Server (PSIS)•Installation using DVDPSIS can be setup on a network share, USB drive, or a removable hard drive.During PlantCruise installation, an internal account, HPSInstall is created to continue with installation without requiring user interaction when restarts are required.This account is automatically created when the system restarts the first time during the installation. Log on to HPSInstall account using MNGR password.CAUTIONThe HPSInstall account is reserved for automatic login after every restart during the PlantCruise installation. Do not create this account manually for the purpose of an Administrator account.Attention•If the installation fails or is interrupted before completion, the system must be restarted. Log on to HPSInstallaccount using MNGR password. After logging in successfully, run the setup.exe from the ESIS location ,depending upon the mode of installation.•The HPSInstall account is only created when restarts are required to complete the installation.•The HPSInstall account is disabled automatically after the installation is complete.•To ensure that the security descriptor for the account is not lost, the account must not be deleted.INTRODUCTION TO PLANTCRUISE BY EXPERION INSTALLATIONBefore you beginRelated topics“Hardware and software requirements” on page 10“Guidelines for naming PlantCruise by Experion Engineering Station” on page 12“Installation considerations” on page 13“Turning off the Windows automatic updates option” on page 14“Setting up the screen resolution and color quality” on page 15“Configuring visual effects for increased performance” on page 16“Customizing the power options” on page 17“Disabling automatic disk defragmentation” on page 18“Turning off the Windows Defender” on page 19“Disabling the fast user switching option” on page 20“Disabling the antivirus services and applications” on page 21“Setting up a PSIS repository” on page 229BEFORE YOU BEGINHardware and software requirements Hardware requirementsSoftware requirementsGuidelines for naming PlantCruise by Experion Engineering StationCAUTIONYou cannot change the computer name of the PlantCruise Engineering Station after the installation. However, ifyou want to change the computer name, you must reinstall the Engineering Station software.All PlantCruise Engineering Station/Direct Station computers must have a unique fixed name and IP address.The following are the basic restrictions when naming the Engineering Station/Direct Station computers.•The computer name must be 14 characters, or less, in length.•The computer name must begin with an alphabetic character. For example a to z, or A to Z.•The computer name cannot contain spaces or other non-standard characters.•For non-redundant Engineering Station nodes, the computer name MUST NOT end with A or B.•For redundant Engineering Station nodes, the computer name MUST end with A or B.•The computer name must not end with "0" or "1". (Ending a name with 0 or 1 may result in communication failure if you have redundant networks, because 0 and 1 suffixes are appended to the computer names in hostfiles to identify redundant links.)Installation considerationsEnsure that the following tasks are performed before you begin installation.•You must use a user account with administrative privileges to install PlantCruise. Do not use the default Windows administrator account.•For redundant systems, the node hardware for Engineering StationB and Engineering StationA must be identical.•If User Account Control dialog box appears, click Continue or Allow as applicable to proceed with the task.•Verify the operating system installed on your system by performing the following:1.On the Start menu, right-click Computer and then click Properties.2.Verify the system information in the System Properties window.Turning off the Windows automatic updates optionIt is strongly recommended not to install any updates that are not qualified by Honeywell. Honeywell qualifiesMicrosoft security updates/patches to ensure that the update or patch works in conjunction with the PlantCruisesoftware. After qualifying any Microsoft patches/updates, the customers are notified and the updates are madeavailable through the Honeywell Process Solutions website.To turn off Window automatic updates option1Perform the following steps.Windows Server 2008 1.In the Windows Control Panel classic view, double-click Windows Update.2.In the left pane, click Change Settings.3.Click Never check for updates (not recommended).Windows 7 1.In the Windows Control Panel large or small icon view, double-click Windows Update.2.In the left pane, click Change Settings.3.Under Important updates, click Never check for updates (not recommended).2Under Recommended updates, clear the check box.3Click OK and close the Windows Update dialog box.Setting up the screen resolution and color qualityTo set up screen resolution and color quality for Microsoft Windows Server 2008 Standard operating system1Click Start > Control Panel.The Control Panel window is displayed.2Double-click Personalization.3Click Display Settings.4In the Monitor tab, move the slider to the required resolution. Ensure that the resolution is at least 1024x768 or above.5From the Colors drop-down list, select color as Highest (32 bit).6Click Apply and OK.7Close the Display window.To set up screen resolution and color quality for Microsoft Windows 7 Professional (32-bit) operating system1Click Start > Control Panel.The Control Panel window is displayed.2Click Display, and then click Adjust Resolution.3Select the resolution as 1280x1024 (recommended) from the drop-down list.OrMove the slider to the resolution required. Ensure that the resolution is at least 1024x768 or above.4Click Apply.5Click Keep changes to retain the new resolution.6Click Advanced Settings and click the Monitor tab.7From the Colors drop-down list, select the color as True Color (32 bit).8Click OK.9Click Yes to confirm the color quality change, and click OK.10Close the Display window.Configuring visual effects for increased performanceTo customize the performance settings1Perform the following steps.Windows Server 2008•In the Windows Control Panel classic view, double-click System.Windows 7•In the Windows Control Panel large or small icon view, click System.2In the left pane, click Advanced System Settings.The System Properties dialog box appears.3On the Advanced tab, click Settings under Performance.The Performance Options dialog box appears.4On the Visual Effects tab, click Adjust for best performance.5Click Apply and then click OK.6Click OK to close the System Properties dialog box, and then close the System window.Customizing the power optionsTo customize the power options1Perform the following :Windows Server 2008•In the Windows Control Panel classic view, double-click Power Options.•Click Change settings that are currently unavailable.•Under Preferred plans, click Power Saver and then click Change plan settings.•Click Change settings that are currently unavailable.Windows 7•In the Windows Control Panel large or small icon view, click Power Options.•Under Preferred plans, click Power Saver and then click Change plan settings.2In the Turn off the display list, click Never.If Put the computer to sleep option appears, click Never.3Click Save Changes.4Close the Power Options window.Disabling automatic disk defragmentationTo disable automatic disk defragmentation1Click Start > Computer.The Computer window appears.2Right-click Local Disc (C:) and click Properties.The Local Disc (C:) Properties window appears.3Click the Tools tab.4Under Defragmentation, click Defragment Now.The Disc Defragmenter dialog box appears.5Perform the following steps:Windows Server 2008•Clear the Run on a Schedule (recommended) checkbox and click OK.Windows 7 1.Click Configure schedule.The Disc Defragmenter: Modify Schedule dialog box appears.2.Click Select disks.The Disc Defragmenter: Select Disks For Schedule dialog box appears.3.Clear the Automatically defragment new disks checkbox and click OK.4.Clear the Run on a Schedule (recommended) checkbox and click OK.6Click Close to close Disc Defragmenter window.7Click OK to close Local Disc (C:) Properties window.8Close the Computer window.Turning off the Windows DefenderIf you have Windows Defender enabled in your system, perform the following steps to disable WindowsDefender for improved performance. Note that this procedure is applicable only for Windows 7 nodes.To turn off the Windows Defender1Click Start > All Programs.2Click Windows Defender.The Windows Defender dialog box appears.3Under Settings, click Tools and then click Options.4Under Administrator Options, clear the following check boxes.•Allow everyone to use Windows Defender•Use Windows Defender5Click Save.A dialog box with the message “Windows Defender is turned off” appears.6Click Close to close the Windows Defender dialog box.Disabling the fast user switching optionYou must disable fast user switching in order to prevent multiple users from logging on to the systemsimultaneously.To disable the fast user switching option1Click Start > Run and type gpedit.msc.The Local Group Policy Editor dialog box appears.2In the left side of the window, under Local Computer Policy expand Computer Configuration > Administrative Templates > System and click Logon.3Double-click Hide entry points for Fast User Switching.The Hide entry points for Fast User Switching dialog box appears.4Click Enabled, and then click OK.5Close the Local Group Policy Editor dialog box.BEFORE YOU BEGIN Disabling the antivirus services and applicationsTo ensure proper installation of the software, before you begin with PlantCruise installation, disable theantivirus services, if antivirus is already installed on the system.To disable the antivirus services and applications1Click Start > Run and type msconfig.The System configuration Utility dialog box appears.2In the Services tab, turn off all antivirus services and applications.3Enable and restart these services and applications after the installation is complete.AttentionEnsure that you restart the antivirus services after you have completed installation.BEFORE YOU BEGINSetting up a PSIS repositoryPSIS repository consists of a copy of the PlantCruise installation media , required for installation. You cancreate a PSIS repository on a local hard disk that can be accessed using a network share.AttentionThis section is applicable only if you want to install PlantCruise from PSIS repository.Prerequisites•Create a folder that functions as the PSIS repository, in the required location. The destination folder can be created only on local system drives.•Ensure that minimum space of 4 GB is available on the PSIS server for setting up the PSIS repository.•Ensure you have .Net 2.0 (minimum) installed on your system.•Disable On-Access Scan for your antivirus program prior to starting the PSIS setup. Ensure that you enable On-Access Scan for your antivirus program after you have completed the PSIS setup.To set up the PSIS1Insert the PlantCruise installation media then click Run PlantCruise by Experion Media Browser in the AutoPlay dialog box.The Honeywell – PlantCruise by Experion Installer – R100.1 page appears.2Click Setup Experion Software Installation Server.If the PSIS tool fails to start and an error message .Net2.0 or higher needs to be installed. appears, clickOK to exit. Go to <Install Media>\Packages\Microsoft\DotNet3.5\dotnetfx35SP1.exe and install .Netframework 3.5.If you are creating PSIS on Windows XP SP2 (Dell), an error You must install Windows Installer 3.1 tocomplete installation. Microsoft .Net 3.5 Framework requires that Windows Installer 3.1 be installedprior to the installation appears, click OK to exit.3If a dialog box with file security appears, click Yes.The Welcome to PSIS screen of PSIS Preparation Utility appears. The four options available on theWelcome dialog box are as follows:•Create a new PSIS Repository•Upgrade existing PSIS Repository•Resume a failed PSIS Repository creation•Remove existing PSIS RepositoryAttentionWhen the PSIS Preparation Utility is started on the computer for the first time, only the option Create a NewPSIS Repository is enabled by default; all the other options are disabled.4Click Create a New PSIS Repository, if not already selected and click Next.5On the Select a path screen, click Browse to select the destination folder for the PSIS repository.6Click Next.If you select local system drive, a message prompting to share the destination location appears.7Click OK.The Folder Properties dialog box appears.BEFORE YOU BEGINAttentionConsider the following before setting up permissions for the shared folder:•Provide only Read permissions to the share.•Provide share access permissions only to a single user account.•Do not provide share access permissions Everyone or groups.8To set the folder permissions, perform the following steps.a In the Folder Properties dialog box, click the Sharing tab and then click Advanced Sharing.b In the Advanced Sharing dialog box, select Share this folder check box.c Under Settings, type the Share name and click Permissions to assign permissions (Read permission orRead and Write permission) to this share.d Click OK to close the Permissions dialog box.e Click Apply and then OK to close the Advanced Sharing dialog box.f Close the Folder Properties dialog box.AttentionWhile sharing the folder on a Windows XP system, if a message appears to drag the PSIS folder to the SharedDocument..1.Click Start > Settings > Control Panel > Folder Options and click the View tab.2.Clear the Use simple file sharing (Recommended) check box.3.Log on to the system and restart the PSIS creation.9In the Select media page, select the check boxes against the names of the media to select the media for PSIS repository creation and click Start.A message to close all the Explorer windows appears.10Close all the windows and click OK to proceed.The Status Display screen appears.AttentionIf My Documents folder appears, close it.11After the media is copied, the Description is updated to PSIS Repository [<Name>] created successfully at <Destination Location>.12Click Finish.BEFORE YOU BEGINEngineering Station installationRelated topics“Installing Engineering Station on an entry level system” on page 26“Installing Engineering Station on a high capacity system” on page 30ENGINEERING STATION INSTALLATIONInstalling Engineering Station on an entry level systemRelated topics“Configure Network Interface Cards” on page 26“Install the software protection key” on page 27“Start the installation application” on page 27“Continue installation on an entry level system” on page 28Configure Network Interface CardsTurn-on SNMP1In the Windows Control Panel large or small icon view, click Programs and Features.2In the left pane, click Turn Windows features on or off.The Windows Features dialog box appears.3In the list of Windows features, expand Simple Network Management Protocol (SNMP).4Select the WMI SNMP Provider check box.5Click OK.6Close Programs and Features window.Install NIC drivers for Dell 30101Insert the PlantCruise by Experion Installation media in the DVD drive.2Click Browse my computer for the driver software, to update the adapter driver, on the Device Manager.3Browse to Drivers\Network Adapters\3010 NIC\Broadcom 5720.4Follow the on-screen instructions to complete the installation.5Browse to Drivers\Network Adapters\3010 NIC\Realtek and then double-click driver.exe.6If a dialog box appears prompting you to modify the driver installation, click Modify and then continue with the installation.7Follow the on-screen instructions to complete the installation.Install NIC drivers for HP Compaq 63051Insert the PlantCruise by Experion Installation media in the DVD drive.2Browse to Drivers\Network Adapters\HP 6305 NIC\BCM5761 and double-click sp57782.exe.3Follow the on-screen instructions to complete the installation.4Browse to Drivers\Network Adapters\HP 6305 NIC\intel 82576 and double-click PROWin32.exe .5If a dialog box appears prompting you to modify the driver installation, click Modify to continue with the installation.6Follow the on-screen instructions to complete the installation.Set the network connections1In the Windows Control Panel large or small icon view, double-click Network and Sharing Center.2In the left pane, click Change advanced sharing settings.By default, the Public (current profile) is expanded.3Under Network discovery, click Turn on network discovery.ENGINEERING STATION INSTALLATION4Under File and printer sharing, click Turn on file and printer sharing.5Click Save changes.6Close all the open windows.Configure the NIC parameters1In the Windows Control Panel large or small icon view, click Network and Sharing Center.2On the left side of the Network and Sharing Center window, click Change Adapter Settings.3Right-click the Local Area Connection for the first adapter in the FTE Array and click Properties.4Click Configure.5On the Advanced tab, change the speed and duplex of your adapter type to 100 Mb Full Duplex from AUTO.6Set the Large Send Offload (IPv4) and Receive Side Scaling to Disable.7Click OK.8Repeat steps 1 through 7 to configure the second adapter in the FTE Array.Install the software protection keyPrerequisites•Software protection key (dongle), if specified on the license certificate.To install the software protection key1If a software protection key (dongle) is specified on the license certificate, insert this key on the computers USB port.The Found New Hardware dialog box appears.2Wait for the Operating System to complete the USB driver installation.If any warning dialog box appears, ignore the message and proceed with the installation.Start the installation applicationPrerequisites•You have the required–PlantCruise Installation DVD.–Software license certificate.•Ensure that a common account does not exist between PSIS and the installation node.•The HPS Install account is deleted from the PSIS node (if it exists on the PSIS node).Attention–The network link speed on the node where installation is being performed using PSIS on network, must match the link speed on the switch to which the node is connected (Link speed is 100 Mbps Full Duplex for an FTE-based network).–Ensure that you enable Windows firewall before you begin installation.•Ensure that you have assigned the IP Address to the node in which you are installing the PlantCruise software.To start the installation application using PSIS1Click Start > Run.The Windows Run dialog box is displayed.ENGINEERING STATION INSTALLATION2Double-click setup.exe .You are prompted for user name and password. Perform one of the following:•Type the <Domain Name>\Username and Password if you belong to a domain.•Type the <PSISServer IP>\Username and Password if you belong to a workgroup.3To continue with the installation, proceed to the next section.To start the installation application using application DVD1Insert the PlantCruise by Experion Installation media in the DVD drive and using Windows Explorer, browse to the setup.exe.2Double-click the setup.exe.The PlantCruise by Experion – DialogManager page appears.3To continue with the installation, proceed to the next section.Continue installation on an entry level system1On the PlantCruise by Experion – DialogManager page, click Next.The Migration/Clean Install Selection page appears.2Click Install Clean, and then click Next.A warning message “You have chosen an option that will not Migrate data from a prior release.” appears.3Click Yes on the warning dialog box.The License Agreement page appears.4Click I accept the terms in the License agreement, and then click Next.The Setup type of Node to install page appears.5Select Engineering Station and click Next.For redundant and non-redundant Engineering Station, based on the computer name, a dialog box appearswith the message that the system is installing a redundant or non-redundant Engineering Station.6Click Yes to proceed with the installation.The User and License Information page appears.7In the User and License Information page, type the following information and click Next.•Under Customer Information, type Name and Company Name.•Under System Software, enter the License No, and Authorization.The FTE Bootp and NTP IP Address Configuration page appears.8Type the following information and click Next.•Base IP Address•Subnet Mask•Default Gateway•NTP First IP Address•NTP Second IP AddressThe Features and Options Selection page appears.9Select Typical to install the default features available for a node or select Custom to add the add-on features in addition to the Typical install.AttentionIf you want to configure simulation environment in the Engineering Station, select Custom and click theSimulation control environment check box. If you do not select the Simulation control environment check boxduring installation, you must reinstall the system to configure the simulation environment.。