TOD系列文本显示器操作手册
- 格式:pdf
- 大小:634.72 KB
- 文档页数:41
TD2220LCD 显示器使用手冊(简中) Model No. VS14833目录电磁相容信息 (1)重要的安全指示及回收处理提示 (2)电子电器产品有害物质限制使用标识要求 (3)版权信息 (4)产品注册 (4)开始包装内容 (5)注意事项 (5)快速安装 (6)触摸功能控制 (7)壁挂安装(可选) (8)使用LCD显示器设置分辨率 (9)菜单和电源按键锁定设置 (9)调整屏幕图像 (10)主菜单选项 (12)其它信息技术规格 (16)故障诊断 (17)客户支持 (18)如何清洁LCD显示器 (19)有限保修 (20)电磁相容信息FCC声明本设备符合 FCC 规则第 15 部分的规定。
其操作遵循下面两个条件:(1) 本设备不会导致有害干扰;(2) 本设备必须承受任何接收到的干扰,包括可能导致异常操作的干扰。
依 FCC 规则的第十五章,本设备经测试,符合 B 级数码设备的限制标准。
这些限制标准用于确认电气设备不会对居室中安装的其它设备产生有害干扰。
本设备会产生、使用和发射射频能量,因此若没有依照指示安装及使用,可能会对无线电通讯产生有害的干扰。
然而,这并不保证该设备在特定安装过程中不会发生这种干扰。
如果该设备对收音机或电视机产生有害的干扰(这可以通过设备的开、关来判定),用户可以尝试以下的方法消除干扰:•重新调整或放置接收天线。
•增加设备与无线接收设备之间的间距。
•将该设备连接到与无线设备不同的另一插座上。
•洽询销售商或具有无线电/电视经验的技术人员请求帮助。
警告:请注意,若未经符合性负责方的明确许可而进行任何变更或修改,可能会导致您失去操作本设备的资格。
在加拿大此 B 级数字设备符合加拿大 ICES-003 的要求。
Cet appareil numérique de la classe B est conforme à la norme NMB-003 du Canada.针对欧盟国家的 CE 符合性此设备符合电磁兼容指令2004/108/EC和低电压指令2006/95/EC的要求。

TD 200文本显示器的使用TD 200文本显示器TD 200是S7-200专用的文本显示器,可根据CPU内部的逻辑条件显示信息。
在信息中也可内嵌数据,数据既可以显示,也可以由操作人员进行设置。
也可以使用TD 200设置CPU实时时钟,访问CPU内存变量,或对开关量输入/输出进行强制。
TD 200可以设置密码,以限制对设备的操作。
密码可以防止未经允许改变TD 200系统设置,也可以防止未经许可的对生产数据的改变。
TD 200支持最多8个菜单,每个菜单中最多可以组态8个显示屏,总共64个菜单屏(新产品)。
用户可以使用面板上的箭头按键在各菜单屏之间切换。
TD 200还可以显示多达80条消息。
消息的显示与否由消息的使能位的状态决定,每次屏幕上最多显示一条或两条消息。
多条消息使能位同时置位时,各消息按照编号由小到大的顺序决定显示优先级。
一个S7-200 CPU通讯口最多可以连接3个TD 200;一个TD 200只能与一个S7-200CPU建立连接。
TD 200无图形显示功能。
新产品TD 200C可以显示一些预先定义好的简单图标。
TD 200的配置在Micro/Win 32 V3.2 SP4 中用TD 200向导(菜单“Tools > TD 200 Wizard”)编程。
组态信息将全部存在CPU中,不需对TD 200下装程序。
只需在TD 200中设置TD 200地址、所连接的CPU地址及通讯速率(注意要与CPU中的一致)。
在新的Micro/WIN V4.0版软件中,TD 200组态向导也做了改进,使其支持以上三种TD 200产品的组态。
具体组态与编程参见《TD 200 操作员界面用户手册》,上面有详细的例程。
常问问题TD 200/TD 200C的尺寸有多大?盘面开孔尺寸是多少?TD 200和TD 200C的尺寸为76mm x 148mm x 28mm(W x H x D)。
他们的开孔尺寸都是 138mm x 68mm。
目录第一章产品概述 (1)1.1 功能 (1)1.2 一般规格 (1)1.3 各部分名称 (2)1.4 外型尺寸及安装方法 (4)第二章编辑软件MD20 (5)2.1 MD20基本概述 (5)2.2 编辑用户画面 (5)2.3 保存工程 (29)2.4 下载画面 (30)2.5 导入旧工程 (30)第三章操作方法 (32)3.1 联机通讯 (32)3.2 切换画面 (32)3.3 系统口令 (32)3.4 修改数据 (33)3.5 开关量控制 (34)第四章与PLC 的连接方法 (35)4.1 三菱FX 系列 (35)4.2 西门子S7-200 系列 (36)4.3 欧姆龙C 系列 (36)4.4 OMRON CP1H 系列 (37)4.5 施耐德NEZA/TWIDO 系列 (39)4.6 台达DVP 系列 (40)4.7 松下FP 系列 (40)4.8 LG Master-K CNet 系列 (41)4.9 LG 系列Modbus 协议 (42)4.10 LG Master-K 120S 编程口通讯 (43)4.11 FACON 永宏系列 (43)4. 12 光洋S 系列 (44)4.13 ECOSTEP 系列 (45)4.14 AB Micrologix 系列 (46)4.15 MODBUS RTU/ASCII/EMERSON/RTU EXTEND (47)4.16 MODBUS SERVER (48)4.17 自由协议 (49)4.18 SAIA PCD S-BUS 协议 (50)4.19 VIGOR PLC (51)4.20 EMERSON EC20 系列PLC (51)4.21 KEYENCE KV 系列PLC (52)4.22 KEYENCE KV 系列PLC...................................................................... 错误!未定义书签。
Dell P2222H/P2422H/P2722H Monitor Dell Display ManagerUser’s GuideModel: P2222H/P2422H/P2722HRegulatory model : P2222Hb/P2222Ht/P2422Hb/P2422Hc/P2722Hb/P2722HtNOTE: A NOTE indicates important information that helps you makebetter use of your computer.CAUTION: A CAUTION indicates potential damage to hardware or loss ofdata if instructions are not followed.WARNING: A WARNING indicates a potential for property damage,personal injury, or death.Copyright © 2021 Dell Inc. or its subsidiaries. All rights reserved. Dell, EMC, and other trademarks are trademarks of Dell Inc. or its subsidiaries. Other trademarks may be trademarks of their respective owners.2021 – 05Rev. A00ContentsOverview (4)Using The Quick Settings Dialog (5)Setting Basic Display Functions (7)Assigning Preset Modes To Applications (9)Organizing Windows With Easy Arrange (10)Managing Multiple Video Inputs (13)Restoring Application Positions (14)Attach DDM to Active Window (Only Window 10) (17)Applying Energy Conservation Features (18)Other Shortcut Keys (19)Troubleshooting (20)Contents | 34 | OverviewOverviewDell Display Manager is a Windows application used to manage a monitor or a group of monitors. It enables manual adjustment of the displayed image, assignment of automatic settings, energy management, image rotation and other features on selected Dell models. After installation, Dell Display Manager will run each time the system starts and will place its icon in the notification tray. Information about monitors connected to the system is always available when hovering over the notification tray icon.Dell P2X22H - Standard2021/03/014:56 PMNOTE: Dell Display Manager uses DDC/CI channel to communicate withyour monitor. Ensure that DDC/CI is enabled in the menu as below.Using The Quick Settings DialogClicking Dell Display Manager’s notification tray icon opens the Quick Settings dialog box. When more than one supported Dell model is connected to the system, a specific target monitor can be selected using the menu provided. The Quick Settings dialog box enables convenient adjustment of the monitor’s brightness and contrast levels. You can select Manual Mode or Auto Mode, and the screen resolution can be changed.Dell P2X22H1920x1080The Quick Settings dialog box also provides access to Dell Display Manager’s advanced user interface which is used to adjust Basic functions, configure Auto Mode and access other features.Using The Quick Settings Dialog | 5NOTE:Feature Function DescriptionQuick DDM Access Quick key to call upDDM UI.Ctrl+Shift+DUse page up/down key or click on “>” to flip through all Easy Arrange layouts.Control individual monitor in multi-monitor setup From dropdown box to select monitor, selected monitor has Dell logo shown. Move DDM UI to the monitor to be controlled.Press Ctrl+Shift+D to bring up the miniUI under the mouse pointer.6| Using The Quick Settings DialogSetting Basic Display FunctionsYou can select Manual Mode that enables you to manually select a preset modeor select Auto Mode that applies a preset mode based on the active application. An on-screen message displays the current preset mode whenever it changes. The selected monitor’s Brightness and Contrast can also be directly adjusted from the Basic tab.Dell P2X22H1920x1080NOTE: When multiple Dell monitors are connected, select “Enabledisplay matrix control” to apply brightness, contrast and color presetscontrols to all monitors.Setting Basic Display Functions | 7Dell P2X22H1920x10808 | Setting Basic Display FunctionsAssigning Preset Modes To Applications The Auto Mode tab enables you to associate a specific Preset Mode with a specific application, and apply it automatically. When Auto Mode is enabled, Dell Display Manager will automatically switch to the corresponding Preset Mode whenever the associated application is activated. The Preset Mode assigned to a particular application may be the same on each connected monitor, or it can vary from one monitor to the next.Dell Display Manager is pre-configured for many popular applications. T o add a new application to the assignment list, simply drag the application from the desktop, Windows Start Menu or elsewhere, and drop it onto the current list.NOTE: Preset Mode assignments for batch files, scripts, loaders,You can also configure the Game preset mode to be used whenever a Direct3D application runs in full-screen mode. To prevent an application from using mode,assign a different preset mode to it.Dell P2X22HAssigning Preset Modes To Applications | 9Organizing Windows With Easy ArrangeOn supported Dell monitors, the Easy Arrange tab enables you to easily arrange the open windows in one of the predefined layouts by dragging them in the zones. Press “>” or use Page Up/Page Down key to find more layouts. T o create a custom layout, arrange the open windows and then click Save.T o get started with Easy Arrange, choose a target monitor and select one ofthe predefined layouts. The regions for that layout are displayed momentarily onthe monitor. Next, drag an open window across the monitor. While the window is being dragged, the current window layout is displayed and an active region gets highlighted as the window passes over it. At any time, drop the window into the active region to place the window in that region.Dell P2X22HT o create a custom window layout, size and position the windows on the desktop and then click the Save link in Easy Arrange. The size and position of the windows is saved as a custom layout and the custom layout icon is created.NOTE: This option does not save or remember the applications that areopen. Only the size and position of the windows is saved.10| Organizing Windows With Easy ArrangeOrganizing Windows With Easy Arrange |11T o use the custom layout, select the custom layout icon. T o delete the currently saved custom layout, close all windows on the desktop and then click the Save link in Easy Arrange .Dell P2X22HThere are other advanced ways for the usage of Easy Arrange. Please refer to table below.Feature Function DescriptionEnhanced Easy Arrange Custom layouts Save and name 5 customized EasyArrange patterns.Configure x*y patterns.5 MRU (most-recently-used)layoutsPress Ctrl+Shift+Home to cycle amongthe last 5 MRU layouts.On the fly partitionresizingHold down Ctrl while resizing currentEasy Arrange layout to adjust the sizeand numbers of cells in a layout.Newly formed Easy Arrange patternis saved into the Easy Arrange iconposition.Hold down Ctrl while clicking on amodified layout icon to restore it todefault layout.Easy Arrange layoutsfor portrait modePortrait mode Easy Arrange icons arepresented when monitor is rotated.NOTE: An application may require a minimum effective resolution for its application window. Such application may not fit in an Ease Arrangezone if the zone is smaller than the required window size.12| Organizing Windows With Easy ArrangeManaging Multiple Video Inputs |13Managing Multiple Video InputsThe Input Manager tab provides convenient ways for you to manage multiplevideo inputs connected to your Dell monitor. It makes it very easy to switch between inputs while you work with multiple computers.All video input ports available to your monitor are listed. You can give each input a name as you like. Please save your changes after editing.You can define a shortcut key to quickly switch to your favorite input and another shortcut key to quickly switch between two inputs if you often work between them.Dell P2X22HVGA VGADPHDMI HDMI DPNOTE: DDM communicates with your monitor even when the monitor is displaying video from another computer. You can install DDM on the PC you frequently use and control input switching from it. You may alsoinstall DDM on other PCs connected to the monitor.Restoring Application PositionsDDM can help you restore application windows into their positions when you reconnect your computer to the monitor(s). You can quickly access this feature by right-clicking on DDM icon in the notification tray.If you choose “Auto-restore window layout”, your application windows’ positions are tracked and remembered by DDM. DDM automatically puts the application windows into their original positions when you reconnect your PC to your monitor(s).14 | Restoring Application PositionsRestoring Application Positions |15If you want to go back to a favorite layout after you have moved the application windows around, you can first “Save current window layout ” and later “Restore saved window layout”.You may use monitors with different models or resolutions in your daily routine, and you may apply different window layouts on them. DDM is able to know the monitor you have reconnected and restore application positions accordingly. In case you need to replace a monitor in a monitor matrix configuration, you can save the window layout before replacement and restore the layout after a new monitor is installed.NOTE: You should keep your applications running in order to benefitfrom this feature. DDM does not launch applications.16 | Restoring Application PositionsAttach DDM to Active Window (Only Window 10)DDM icon can be attached to the active window you are working on. Click on the icon for easy access to below features.Feature Function DescriptionAttach DDM to Active Window (only Window 10)Change preset orsnap to differentpartitionsDDM icon attached to active windowand user can easily switch windowposition, change color preset mode, andassociate auto preset mode.Shortcut key trigger On a running app window, pressCtrl+Shift+Ins also triggers theattached DDM menu.Move app windowamong Easy ArrangecellsSend the app window to previous/nextEasy Arrange cell.Move app windowamong monitorsSend the app window to previous/nextmonitor.Attach Ddm to Active Window (Only Window 10) | 17Applying Energy Conservation Features On supported Dell models, an Options tab is available that provides PowerNap energy conservation options. You can choose to set the monitor’s brightness to the minimum level, or to put the monitor to sleep when the screensaver is activated.Dell P2X22H18 | Applying Energy Conservation FeaturesOther Shortcut KeysShortcut keys can be defined for below operations, you can define the shortcut keys for quick access to perform these operations:• Program shortcut key: to quickly open the Quick Settings dialog box.• Easy Arrange MRU shortcut key: to quickly apply the 5 recently used window layouts.• Application window shortcut key: to launch a quick menu for options under Auto Mode and Easy Arrange .Dell P2X22HOther Shortcut Keys | 19TroubleshootingIf DDM cannot work with your monitor, DDM will show below icon in your notification tray.10:17 AM2021/03/01Click on the icon, DDM shows a more detailed error message.10:17 AM2021/03/01Please note that DDM only works with Dell branded monitors. If you are using monitors from other manufacturers, DDM doesn’t support them.If DDM is unable to detect and/or communicate with a supported Dell monitor, please take below actions to troubleshoot:1. Make sure the video cable is properly connected to your monitor andyour PC,especially the connectors should be firmly inserted into position.2. Check the monitor OSD to ensure DDC/CI is enabled.3. Make sure you have the correct and latest display driver from the graphicsvendor (Intel, AMD, NVidia, etc.). Display driver is often the cause of DDM failure.20 | Troubleshooting4. Remove any docking stations or cable extenders or converters between themonitor and the graphics port. Some low-cost extenders, hubs or converters may not support DDC/CI properly and can fail DDM. Update the driver of such device if the latest version is available.5. Restart your system.DDM may not work with below monitors:• Dell monitor models earlier than year 2013 and D-series of Dell monitors. You can refer to Dell Product Support websites formore information • Gaming monitors using Nvidia-based G-sync technology• Virtual and wireless displays do not support DDC/CI• Some early models of DP 1.2 monitors, it may be necessary to disable MST/DP1.2 using the monitor OSDIf your PC is connected to the Internet, you will be prompted with a message when a newer version of DDM application is available. It is recommended to download and install the latest DDM application.You may also check for new version by right clicking on DDM icon while pressing and holding ‘shift’ key.Troubleshooting | 21。
使用者手册2201L 觸摸顯示器版權所有© 2011 T yco Electronics。
保留所有權利。
未經 Tyco Electronics 的書面許可,不得以任何形式或方法(包括但不限於電子、磁性、光學、化學方法或手册等)複製、傳輸或改編本出版物的任何部分,不得將其儲存到擷取系統,不得將其翻譯成任何語言或電腦語言。
免責告示本文件中的訊息有可能在未通知的情况下進行變更。
Tyco Electronics 對本出版物的內容不提供任何形式的陳述或擔保,並且特別宣告拒絕對有特定目的適銷性或適用性提供任何默示擔保。
Tyco Electronics 保留對本出版物進行修訂並對其內容不斷進行變更,而不將這樣的修訂和變更通知任何人的權利。
商標告示Elo TouchSystems、IntelliTouch、iTouch、Tyco Electronics 和 TE(標誌)是 Tyco Electronics 集團公司及其許可方的商標。
Windows 為 Microsoft 集團公司的商標。
本文件中出現的其他產品名稱可能是其各自公司的商標或注册商標。
Tyco Electronics 對除自有商標以外的其他商標不享有任何權益。
目錄第 1 章 – 簡介 (4)第 2 章 – 安裝 (5)第 3 章 – 安裝 (9)第 4 章 – 操作 (10)第 5 章 – 技術支援 (14)第 6 章 – 安全與維護 (15)第 7 章 – 法規訊息 (16)第 8 章 – 擔保訊息 (19)第 1 章 – 簡介產品說明新的觸摸顯示器集 Elo TouchSystems 的可靠效能和觸摸技術與顯示屏設計領域的最新進展於一身。
這種功能組合可在使用者與觸摸顯示屏之間提供自然的訊息流動。
此觸摸顯示器帶有一個 24 位彩色有源矩陣薄膜晶體管 LCD 面板,提供了優异的顯示效能。
其全 HD 解析度 1920x1080 適合顯示圖形和影像。
LOGO! TD( )usage of LOGO! TDIA&DT&BT Service & SupportPage 2-26LOGO TDLOGO TD Key Words LOGO! TD, installation, wiring, usageIA&DT&BT Service & SupportPage 3-26LOGO TD (4)1.1 LOGO TD ..........................................................4 1.2 LOGO TD LOGO ...........................................5 1.3 LOGO TD .. (5)2. LOGO TD (6)2.1 ....................................................6 2.1.1 ...................................................................6 2.1.2 .....................................................6 2.1.3 ................................................10 2.2 .. (17)3. LOGO TD (22)3.1 LOGO TD ..................................................22 3.2 LOGO TD ..............................................23 3.3 LOGO TD (24)4. (26)LOGO TD1.1 LOGO TDLOGO! TD1. 119.5 mm x 78.5 mm +0.5 mmLOGO!TD2. LOGO! TD3. LOGO! TD4. LOGO! TD5. 0.2 Nm LOGO! TDLOGO!TDIA&DT&BT Service & Support Page 4-26IA&DT&BT Service & SupportPage 5-261.2 LOGO TD LOGOLOGO! TD LOGO! 2.5Sub-D LOGO! TDLOGO!TD LOGO!1.3 LOGO TDLOGO! TD 12 V DC 24 V AC/DC LOGO! TDLOGO!TDIA&DT&BT Service & SupportPage 6-262. LOGO TD2.1 2.1.1LOGO! RUNLOGO! LOGO!Soft Comfort I/OLOGO!2.1.2IA&DT&BT Service & SupportPage 7-26AI I/OIA&DT&BT Service & SupportPage 8-2610111 LOGO!IA&DT&BT Service & SupportPage 9-261 1 2LOGO Soft Comfort LOGO ISO8859-1LOGOLOGO LOGO TD (GB-2312) Microsoft Windows Microsoft Windows Windows LOGO Soft ComfortWindows LOGO Soft Comfort LOGO Soft ComfortIA&DT&BT Service & SupportPage 10-26GBK12LOGO! !2.1.3IA&DT&BT Service & SupportPage 11-2613:14En=1 LOGO TD 0 = 127 = LOGO TDIA&DT&BT Service & SupportPage 12-26= En 1 0 = En 1 0 OK En = 115:16LOGO LOGO TD24IA&DT&BT Service & SupportPage 13-2617 1.10.1 LOGO LOGO TD18 1.20.1 LOGO LOGO TD19 1.320 2.10.1 LOGO LOGO TD21 2.21 10 x 0.122 2.3“IA&DT&BT Service & SupportPage 14-26AI2324IA&DT&BT Service & SupportPage 15-2625AI26 AIIA&DT&BT Service & SupportPage 16-262728IA&DT&BT Service & SupportPage 17-2629LOGO LOGO 2.2IA&DT&BT Service & SupportPage 18-2630IA&DT&BT Service & SupportPage 19-2631IA&DT&BT Service & SupportPage 20-2632LOGO LOGO TD LOGO TDIA&DT&BT Service & SupportPage 21-2633LOGO I1 LOGO TDIA&DT&BT Service & SupportPage 22-2634I1 LOGO TD “OK”3. LOGO TD3.1 LOGO TD35 LOGO! TDLOGO TDIA&DT&BT Service & SupportPage 23-2636 LOGO! TD37 LOGO! TD3.2 LOGO TDLOGO M26 M27 LOGO TD38 LOGO! TDM26=0 LOGO TD M26=1 LOGO TDIA&DT&BT Service & SupportPage 24-26M27=0 LOGO TD M27=1 LOGO TD3.3 LOGO TDLOGO TD SU 00:0039 LOGO! TDLOGO TD“ESC””—“ ”—“ ”LOGO TDIA&DT&BT Service & SupportPage 25-2640LOGO TD “ESC”41“OK” “ESC”A0582IA&DT&BT Service & SupportPage 26-264./ ( )© 2001-2011。
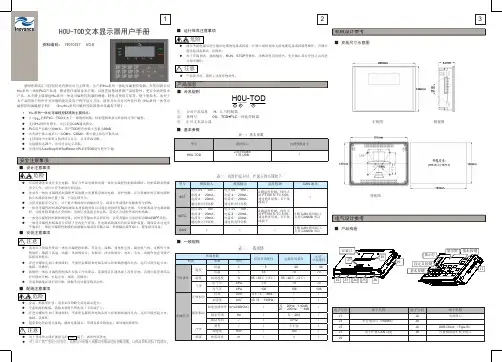
目录第一章关于HTodEditor编程软件的安装 (2)1.1 H0U和HTodEditor软件的简介 (2)1.2 安装HTodEditor编程软件 (3)1.2.1 软件来源 (3)1.2.2 计算机配置要求(建议配置) (3)1.2.3 安装步骤 (4)第二章制作一个简单的工程 (6)第三章按键 (8)第四章参数设置 (9)4.1 参数显示 (10)4.2 画面控制 (10)4.3 支持中英语言 (10)4.4 报告密码等级 (10)4.5 寄存器设定控制 (10)4.6 画面属性 (10)第五章控件 (11)5.1 静态文字 (11)5.2 动态文字 (13)5.3 功能键 (14)5.4 寄存器 (19)5.5 指示灯 (20)5.6 棒图 (21)5.7 趋势图 (22)5.8 图形 (23)5.9 菜单 (24)5.10 告警控件 (24)5.11 报警列表 (25)5.12 密码功能 (26)第六章画面 (27)6.1 新建画面 (27)6.2 复制画面 (27)6.3 删除画面 (28)6.4 保存工程 (28)6.5 下载画面 (28)6.6 实例闪灯 (29)第七章 PLC编程部分内容 (33)7.1 PLC功能 (33)7.2 软元件 (33)7.3 指示灯 (35)7.4 扩展功能 (33)第八章通讯功能 (36)8.1 下载功能 (36)8.2 RS485通讯功能 (36)8.3 CAN通讯功能 (36)第一章关于HTodEditor编程软件的安装1.1 H0U和HTodEditor软件的简介H0U的简介汇川H0U是集PLC、TOD文本于一体的控制器,控制逻辑和显示界面均可用户编程。
PLC程序存储空间达8K步;支持H1U的所有指令,并且支持CAN通讯指令;支持6路高速输入,2路高速脉冲输出(仅晶体管输出型);与H1U不同点在于输入输出部分没有指示灯,而且没有拨码开关上电后程序自动运行;两个通讯端口, COM1和COM2即可做主站又可做从站;目前采用RS485(COM0)通讯口对程序进行下载。

规格如有更改,恕不另行通知。
使用此设备之前请阅读说明书1303 Printed in China 所有品牌和产品名称均为注册商标、商标或服务标识、属其所有人拥有。
透明效果通过阿尔法混合技术实现。
Catalogue No. R-201c 全球2年保修Multi Touch Control · Wireless · TimeZero™ · Digital RevolutionTZtouch 的双指缩放以及其他的多点触控手势操作,能给予您最直观的导航体验定制的应用软件让您可以从任何iPhone,iPad 或者iPodTouch 无线地查看和控制TZtouch*. TZtouch 拥有无线连接,通过英特网能够下载有用的更新,例如实时气象数据。
*NavNet (航网) 远程应用软件仅适用于 iPad其它移动平台会在未来支持如今的NavNet在第一代多功能显示器的基础上已经走过了一段很长的路。
看一眼您就会知道有多先进。
非常大气的全平面9英寸 和 14.1英寸显示器,显得非常简洁和时尚。
LED背光照射让光线透过屏幕上每个像素点,具有卓越的亮度。
抗反射镀膜镜面使得在任何环境下都能看得很清楚。
显示器搭配多种传感器组成一个导航套件,以满足您的个性化需求。
几乎任何尺寸的宽屏或非宽屏的多点触控显示器都可以选择,和NavNet TZtouch TZTBB一起使用。
密封液晶显示屏 - 清晰易读TZT9和TZT14的密封液晶显示屏应用了一个无雾气的设计结构。
确保显示屏不会受到由液晶显示屏和前盖板的空气缝隙所产生的冷凝水影响。
偏光友好 - 卓越的清晰度当您佩戴偏光太阳眼镜时,NavNet TZtouch的液晶显示屏不会出现屏幕变黑的问题,为您提供几乎任何角度的清晰显示。
在一个巨大的进步14.1英寸多功能显示器分辨率: WXGA (1280 x 800 像素)亮度:900 cd/m 2 (典型)9英寸多功能显示器分辨率:WVGA (800 x 480 像素)亮度:900 cd/m 2 (典型)可见黑屏普通的多功能显示黑盒子支持宽屏和非宽屏分辨率:1280 x 720 (16:9), 1280 x 800 (16:10), 1280 x 960 (4:3), 1280 x 1024 (5:4)照片:多点触控航海显示* 与TZTBB处理器连接 (型号 MPU-002)* 本地供应型号型号型号网络卫星气象和无线电接收器BBWX2 船用娱乐系统MS700系列Sirius卫星气象目前仅覆盖美国和加拿大,需要签约服务。
产品概述KQK900系列柴油机消防泵控制柜是上海凯泉泵业集团电气设备公司开发、设计并生产的为全自动柴油机消防、生产、生活等给水设备配套的控制系统,本系列产品功能齐全,可靠易用,坚固美观。
KQK900系列柴油机消防泵控制柜是可编程控制器(PLC)或单片机控制的全自动柴油机泵组电子测控系统,控制屏与柴油机泵组一起构成一套高度自动化的消防泵组集中控制系统,其工作可靠,测量精度高、操作使用方便,可广泛应用于各企事业单位作为消防、生产、生活等应急柴油机泵组系统控制系统使用。
For personal use only in study and research; not for commercial useKQK900系列柴油机消防泵控制柜可以配套各种规格型号柴油机,按其核心控制器及其他特殊要求的不同,可分为经济型、标准型和特殊型3种等级。
经济型:用单片机开发的专用控制器来实现测控及参数显示、设置。
标准型:用PLC来实现测控功能,用文本显示器作人机界面。
For personal use only in study and research; not for commercial use特殊型:以标准型为基础,换用触摸屏、计算机等人机界面,以及其他特殊配置。
型号命名方法配置等级L -经济型M -标准型H -特殊型控制电压:12V / 24V调速方式:0-机械调速1-电子调速2-总线控制备用电池:0-无1-有控制对象:9 柴油机控制柜产品代号:KQK凯泉控制产品代号性能特点*自动运行:当系统接受到有效消防信号,或控制中心起动信号、或市政供电系统断电时、或供水管网压力过低时,机组能自动启动运行。
除指令控制用消除指令输入自动停机外,其余须手动停机。
(按下手动停机钮,待机组停机后松开。
注:不分手、自动位)*显示:柴油机油压,柴油机水温,柴油机转速,蓄电池电压、充电电流。
燃油缺少指示报警等*报警系统:多次启动失败报警,柴油机低油压报警,柴油机高水温报警,柴油机超速报警停机,蓄电池低电压、充电失效报警。
TD200文本显示器操作说明书中文文本液晶显示屏TD 200是SIEMENS公司最近推出的文本编辑显示设备,具有人体工程学设计的输入键,操作简便,不易出错;内置国际汉字库;背光LCD显示;不需额外电源;具有人工设置数字输入,便于现场修改。
硬件的特点及说明TD200部件 TD200是一个小巧紧凑的显示设备,配备有与SIEMENS S7-200CPU连接所需的全部部件,下图为TD200的主要部件:简要说明:1.文本显示区域:文本显示区域为一个背光液晶显示(LCD),可显示两行信息,每行20个字符或10个汉字。
它使你可以看到从S7-200接收来的信息及指令给S7-200的命令。
2.通讯端口TD/CPU电缆:通讯端口是一个9针D型连接器,通过TD/CPU电缆把TD200连接到S7-200 CPU。
3.键:TD200有9个键。
其中有5个键提供预定义的上、下文有关的命令键,4个自定义的功能键。
3.1命令键的说明:用此键写入新数据和确认信息。
:用此键转换页面显示方式和主菜单方式,或紧急停止一个编辑,如退出正在写入的数据、结果不置入。
:UP上箭头用于递增数据和卷动光标到下一个更高优先级的信息。
:DOWN下箭头用于递减数据和卷动光标到下一个较低优先级的信息。
:SHIFT键转换所有功能键的数值。
当按SHIFT键时,在TD200显示区域的右下方显示一个闪烁的S光标。
3.2功能键的说明:用此键F1/F5显示第一画面;如果按SHIFT键的同时(或预先按下SHIFT键)按下F1/F5键,则显示第五画面。
:用此键F2/F6显示第二画面;如果按SHIFT键的同时(或预先按下SHIFT键)按下F2/F6键,则显示第六画面。
:用此键F3/F7显示第三画面;如果按SHIFT键的同时(或预先按下SHIFT键)按下F3/F7键,则显示第七画面。
:用此键F4/F8显示第四画面;如果按SHIFT键的同时(或预先按下SHIFT键)按下F4/F8键,则显示第八画面。
D系列中文液晶显示模块使用说明书-------------------------------------------------------------------------------------------------系目录1. 简介 (4)2. 引脚说明 (5)3. 微控制器(MCU)的接口 (11)3.1 8080 系列的MCU 接口 (11)3.2 6800 系列的MCU 接口 (12)3.3 4Bit/8Bit 的MCU 接口 (14)4. 中文字型ROM (15)5. 功能应用介绍 (16)5.1 Wakeup 的程序 (16)5.2 文字模式设定 (16)5.2.1 文字显示 (16)5.2.2 粗体字之显示功能 (17)5.3 绘图模式设定 (18)5.4 闪烁与反白显示 (21)5.4.1 闪烁显示 (21)5.4.2 屏幕反白 (22)5.4.3 文字反白 (22)5.5 中/英文文字对齐 (23)5.6 LCD 屏幕显示On/Off 设定 (23)5.7 光标On/Off 设定 (23)5.8 光标位置与移位设定 (24)5.8.1 光标位置 (24)5.8.2 光标移位 (24)5.9 光标闪烁设定 (25)5.10 光标高度与宽度设定 (25)5.10.1 光标高度 (25)5.10.2 光标宽度 (25)5.11 工作及显示窗口大小设定 (25)5.12 行距设定 (27)5.13 自动填入资料到DDRAM (27)5.14 屏幕更新频率设定 (27)5.15 中断(Interrupt)与忙碌(Busy)设定 (28)5.16 省电模式 (29)5.17 如何读取Font ROM 字型 (29)5.18 字号放大设定 (30)5.19 图层显示功能设定 (31)5.19.1 灰阶显示 (32)5.20 Key Scan 应用 (33)5.21 屏幕水平移动及垂直卷动设定 (34)5.22 ASCII 区块选择设定 (35)5.22.1 ASCII 字形区块0 (36)5.22.2 ASCII 字形区块1 (37)5.22.3 ASCII 字形区块2 (38)5.22.4 ASCII 字形区块3 (39)5.23 自行造字 (39)6. 触摸式面板(Touch Panel)的界面 (41)6.1 电阻式触摸面板 (41)6.2 触摸面板的应用 (43)附录A. 指令时间 (47)附录B. 缓存器功能表 (48)附录C. 接线图与子程序 (54)附录D. 外形尺寸图 (59)1. 简介目前我公司生产的D 系列中文液晶显示模块有OCMJ4X15D(240x64 点阵)、OCMJ5X10D(160x80 点阵)、OCMJ8X10D(160x128 点阵)、OCMJ8X15D(240x128 点阵)、OCMJ15X20D(320x240 点阵)等5 款。