隐秘的世界 The Hidden World 通关攻略
- 格式:doc
- 大小:59.33 MB
- 文档页数:98
游戏中隐藏地图的探索技巧在许多游戏中,存在着一些隐藏地图,玩家需要通过一定的技巧和方法去探索这些神秘的区域。
探索隐藏地图不仅可以让玩家发现更多有趣的内容,还可以获得丰厚的奖励和提升游戏体验。
以下是一些探索隐藏地图的技巧,希望对各位玩家有所帮助。
首先,要充分利用游戏地图和线索。
在游戏中,通常会有一些线索或提示暗示着隐藏地图的存在,比如一些神秘的符号、不明觉厉的标记、或者NPC的谈话内容等。
玩家可以仔细研究游戏地图,观察周围的环境,并根据线索去寻找隐藏地图的入口或触发条件。
其次,要善于使用道具和技能。
有些隐藏地图可能需要特定的道具或技能才能进入,比如一把特殊的钥匙、一种独特的能力或者某种特殊的装备。
因此,玩家可以尝试不同的道具和技能,看看是否能够打开隐藏地图的大门。
另外,要勇敢尝试新的事物。
有时候,隐藏地图可能会隐藏在一些看似普通的地方,或者需要玩家进行一些不寻常的操作才能找到。
因此,玩家需要敢于尝试不同的方法,探索不同的可能性,也许就能发现隐藏地图的秘密。
同时,要善于借助社区和攻略。
如果自己无法找到隐藏地图,可以尝试向游戏社区或者查阅相关的攻略和指南。
其他玩家可能已经找到了隐藏地图,并分享了一些有用的技巧和经验,这对于自己的探索也会有所帮助。
最后,要有耐心和毅力。
探索隐藏地图并不是一件容易的事情,有时候需要耗费大量的时间和精力。
因此,玩家需要有足够的耐心和毅力,不要轻易放弃,相信自己一定能够找到隐藏地图,并获得丰厚的奖励。
总的来说,探索隐藏地图是一项有趣而挑战性的任务,需要玩家发挥自己的智慧和勇气,充分利用游戏中的资源和线索,同时也要借助社区和攻略的帮助,最终一定能够成功找到隐藏地图,并享受到探险的乐趣。
希望以上的技巧对于各位玩家在游戏中探索隐藏地图有所帮助。
如何找到游戏中的隐藏宝藏在游戏中,隐藏宝藏往往是玩家们追求的目标之一。
寻找隐藏宝藏可以让游戏体验更加丰富,增加探索的乐趣。
但是有些隐藏宝藏位置隐蔽,需要一定的技巧和耐心才能找到。
下面将介绍一些寻找游戏中隐藏宝藏的方法,希望能帮助到你。
首先,要仔细研究游戏地图。
在很多游戏中,隐藏宝藏的位置通常会在地图的一些角落或者隐蔽的地方,只有通过细心观察地图才能找到。
可以通过放大地图或者调整角度来寻找可能藏匿宝藏的地方。
有些游戏还会在地图上标注一些提示或者线索,可以帮助玩家更快地找到宝藏。
其次,要注意环境细节。
游戏中的隐藏宝藏通常会与环境融为一体,可能需要观察一些微小的细节才能找到。
比如某面墙壁上的一道裂缝、树木间的一束光线、角落里的一个装饰等等,这些都有可能隐藏着宝藏。
因此,在探索游戏世界的时候要保持警觉,注意环境中的一切细节。
此外,利用游戏物品和技能来辅助寻找宝藏也是一个不错的方法。
有些游戏中会提供一些特殊的道具或者技能,可以帮助玩家找到隐藏宝藏。
比如使用望远镜、使用探测器、使用飞行工具等等,这些都可以帮助玩家更快地找到宝藏。
另外,有些游戏还会设置一些谜题或者机关,只有通过解开谜题或者触发机关才能找到隐藏宝藏。
最后,要保持耐心和坚持。
有时候找到隐藏宝藏需要花费很长的时间和精力,不要轻易放弃。
可以尝试多次探索同一个地方,或者和其他玩家交流,也许会有新的发现。
要相信自己的直觉和决心,坚持下去就有可能找到隐藏宝藏。
总的来说,寻找游戏中的隐藏宝藏需要玩家综合运用观察地图、注意环境细节、利用游戏物品和技能以及保持耐心和坚持等方法。
希望以上的建议能够帮助你在游戏中找到更多隐藏宝藏,享受到探索的乐趣。
祝你好运!。
欺诈者之洞密室答案
1、恶魔眼泪的顶端的线索深埋,也许音乐能将谜底解开。
解析:恶魔眼泪是指岛上的大瀑布,玩家们能够前往瀑布顶上,在木板的右上角演奏音乐就能够解开谜题了。
2、关在笼子里的冒险者的星光微弱,向西北5步,找到宝藏下落
解析:玩家们需要在一个密道中找到被关在笼子里的骷髅,然后在骷髅旁边拿出指南针指向SW,数5步挖掘,就能找到宝藏了。
3、先找到去西南沙滩上的彩绘长矛的路,到了之后再看地图
解析:岛屿西南方向找到一幅壁画,上面画着两支彩色的长矛,这就是目的地了。
玩家到这里之后就能够获得下一条线索。
4、北的超大入口处处都有记号,揭开秘密全靠动听歌谣
解析:玩家们能够在山腰上找到一个被杂草遮挡住的洞穴,然后拿出乐器,弹奏音乐即可获得下一条线索。
4、可怕的海中传奇的晨曦已经初上,向东北偏东6步,就能发现宝藏
解析:可怕的海中传奇指的是克拉肯,玩家们需要在岛上寻找一个隐蔽山洞,进入后就能够看到克拉肯的壁画,然后朝东北偏东走6步开挖就行。
5、找到西小岛远端的岩石灯塔
解析:玩家们需要在西方向,找到一个花的雕像,然后再拿出你的灯笼,点燃后按住鼠标右键,将其举起。
这样就能获得下一步的线索了。
6、找到火药通道的秘密入口,注意观察,带上提灯才能出发
解析:玩家们需要从一条小路进岛,或者从洞里出来,洞里有两门火炮,这就是火药通道。
然后走到洞口下面举起提灯就行。
7、洞窟囚犯
解析:在山洞里找到囚犯骸骨,然后根据地图要求解密。
最后说什么山洞里营火星光微弱啥的,都是虚的就是以山洞的骸骨为起点按要求方向走几步就行了。
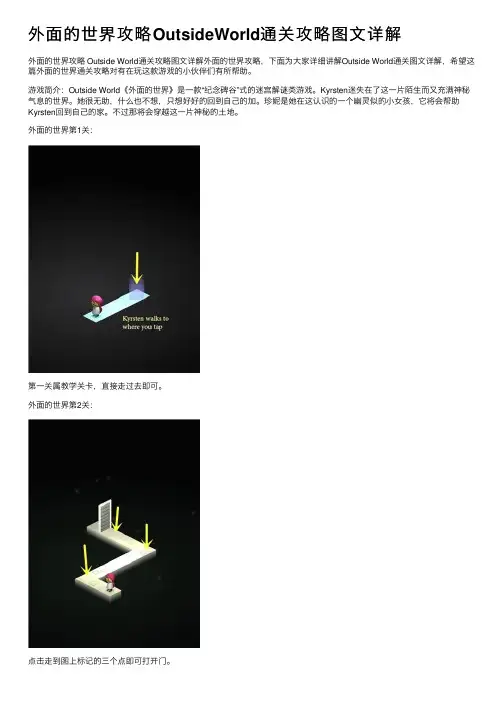
外⾯的世界攻略OutsideWorld通关攻略图⽂详解
外⾯的世界攻略 Outside World通关攻略图⽂详解外⾯的世界攻略,下⾯为⼤家详细讲解Outside World通关图⽂详解,希望这篇外⾯的世界通关攻略对有在玩这款游戏的⼩伙伴们有所帮助。
游戏简介:Outside World《外⾯的世界》是⼀款“纪念碑⾕”式的迷宫解谜类游戏。
Kyrsten迷失在了这⼀⽚陌⽣⽽⼜充满神秘⽓息的世界。
她很⽆助,什么也不想,只想好好的回到⾃⼰的加。
珍妮是她在这认识的⼀个幽灵似的⼩⼥孩,它将会帮助Kyrsten回到⾃⼰的家。
不过那将会穿越这⼀⽚神秘的⼟地。
外⾯的世界第1关:
第⼀关属教学关卡,直接⾛过去即可。
外⾯的世界第2关:
点击⾛到图上标记的三个点即可打开门。
外⾯的世界第3关:
先⾛到指南针上查看⽅向的颜⾊。
让⼩⼈⾛到光⾥切换所需要的颜⾊即可打开门。
外⾯的世界第4关:
这关我们可以得到⼀个帮助我们的⼩幽灵。
外⾯的世界第5关:
直接⾛到发光处即可。
本文部分内容来自网络整理,本司不为其真实性负责,如有异议或侵权请及时联系,本司将立即删除!== 本文为word格式,下载后可方便编辑和修改! ==世界修真攻略篇一:隐秘的世界 The Hidden World 通关攻略游戏原名:渥太华的冒险The Adventures of Mosaika1、进入中间的房间,记录地上盒子里面的图案提示。
然后走出房间,按照日记按下壁炉上面的方块,从打开的壁炉暗门进入神秘的渥太华村庄2、和青蛙说话获取提示,沿着楼梯走向天文馆3、来到天文馆,获取门口左手边盆景旁边的望远镜镜头(telescopic lens)篇二:再论修真仙侠小说世界设定的落后再论修真仙侠小说世界设定的落后落后的标准标准就是和现在社会相比较,或者可以预见的未来比较,甚至于和科幻小说比较。
比较先进与否的标准,先看两者能否达到,在都能达到的情况下,就比较两者的效率。
落后的根源古代的那些小说又不是科幻小说写未来的东西,其取材只能是从当时或者以前的时代中取。
所以不可避免的修真小说中构造出来的经济、政治、文化是以古代的封建社会或者奴隶社会为模板再加工的。
然后到了现在的网文,很可惜极少有人是以现代社会为模板来创造修真世界,绝大部分是以以前的那些小说为蓝本稍微糅合了一点现在的东西创造。
他们所创造的修真文明(姑且当他存在)也只能是落后的文明。
这种问题也不光是修真小说是这样,西方的魔法小说同样如此,一提到魔法小说,大部分人脑袋里冒出来的肯定是中世纪的背景。
然后就是一般的农民穷的要死,魔法师、战士之类的超能力者,一天不停的冒险,或者在城堡里面养尊处优。
甚至于西方的魔法小说还存在比中世界更落后的世界,比如《指环王?,比如《并与火之歌》。
落后的表现经济上1)没有明显的分工,经常见到主角炼器、炼药、制符、布阵、采药、打怪一人干完了,即使是路人NPC一人兼多种职业的也比比皆是。
分工对于技术的促进作用学经济的肯定知道。
只有没技术含量的才不需要分工,比如农民干的事情。
Crptics caverns隐秘的洞穴全攻略第一阶段:下船,把绳子系在树上。
向前走看到两条分叉的路,进入右边,看到小木屋,门口捡箱子得到5金币。
进入木屋,书架上有一本书,墙上挂了个圆盘样的装饰品,都是线索。
和屋中人对话,第三个对话选项lantern得到教堂钥匙(也可以以后再来拿)。
退出到岔路口,进入左边,看到木船,进入船舱,看到地上一个绿色符号,旁边架子上捡箱子,得到5金币。
上梯子到中层,看到门和箱子,这时都打不开。
上梯子到上层,看到船舵,旁边地上捡箱子,得到5金币。
退出到船舱外,继续向前走,看到小木屋,屋子边上捡箱子,得到5金币,进去后拿到墙上油画,拿到柜子顶上箱子,得到5金币。
看到地上箱子,从后门出去,看到一棵树,需要寻找斧子砍断。
回头,出小木屋继续向前走,右手边看到斧子,密码time,拿到斧子。
向前走,到山洞门口,山洞顶端看到蓝色符号,右边有带眼睛的石柱。
回到小木屋,从后门到河边,用斧子砍倒树过河,左手一个石像,向前走到白塔,塔门旁边拿到铁锹,塔门顶端红色符号,进入白塔,梯子下捡箱子,得到5金币。
点开左手柱子,上面有个大黄宝石,下面五个小宝石,颜色分别设臵成灰蓝红绿灰,机关打开获得黄宝石。
走上梯子,到塔顶和观察者对话,用30金币换得指环。
回到小木屋,点开地上箱子,把船舱、山洞顶端和白塔门上的三个符号点亮,得到长笛。
从小木屋后门过河,左手边点开石像,使用长笛,得到蓝色石像。
回到岔路口,进入右边小木屋,和屋中人对话,把油画给他得到钥匙。
到木船中层,用钥匙打开门,拿到桌上红色石像,看到桌上带手的盒子,墙上装饰盘,把大黄宝石放到中间,按照小木屋中书和墙上的提示,将装饰盘转到蓝色宝石在上的位臵,出门到上层,把船舵转到紫色宝石在上,下到中层打开箱子,拿到绿色石像。
把指环放到石像的手上,得到宝剑。
向前走到底到山洞口,用铁锹在带眼睛的石柱下挖,得到望远镜,回到小木屋从后门过河进入白塔,上楼与观察者对话,用望远镜换得紫色石像。
![发条人2之隐藏的世界[The Clockwork Man2:The Hidden World]图文攻略](https://uimg.taocdn.com/53aa482e0066f5335a812176.webp)
发条人2之隐藏的世界The Clockwork Man: The Hidden WorldWalkthroughA Tutorial is available at the start of the game. You may skip it, but when playing the game for the first time, we recommend that you take the tutorial. Since the lists of items to find changes every time you play the game, the objects marked in the screenshots below may differ from those in your game. PrologueABANDONED MINES – TUNNEL∙Pick up the crowbar.∙Take the crowbar from your inventory and place it on the lever. Click on the lever to light up the tunnel.∙Zoom in towards the back of the tunnel.ABANDONED MINES – RAIL TRACKS∙Take a closer look at the steam engine.∙Click on the furnace door to open it.∙Take the Bucket from inside the furnace.∙Click outside the steam engine to return to the mines.∙Find the items on the list.∙Some of them are in the inner mines; some are in the outer tunnel.∙Use the zoom controls to switch between the two areas.ABANDONED MINES – TUNNEL∙When completed, a Matchbox and a Pile of Coal will go into your inventory.∙Take the Bucket from your inventory and place it under the water pump.∙Click on the water pump handle to try filling the Bucket.∙Pick up the Bucket again.∙Click on the Map icon on the bottom right of the screen.∙Go to the Village Stream.VILLAGE STREAM∙Find the items on the list.∙When completed, an iron Rod and a Lantern will go into your inventory.∙Take the Bucket from your inventory and scoop up some water from the stream.∙Click on the Map icon and go back to the Abandoned Mines. ABANDONED MINES – RAIL TRACKS∙Go forward to the train tracks.∙You’ll need to clear the rail barriers, but a lever is missing from the control panel.∙Take the Rod from your inventory and insert it in the missing lever slot.∙Click the levers to find the correct positions that will clear all the barriers.Each lever controls 2 barriers.∙The solution is as follows: Left lever -middle position. Center lever - bottom position. Right lever - top position.∙Zoom in on the steam engine.∙Pour water from the Bucket into the water tank.∙Place the Coal inside the furnace.∙Next, pour some oil from the Lantern.∙Use the Matchbox on the oiled coals to light the furnace.∙Close the furnace door and release the brake.Chapter 1: London, England – Four days earlier PARENTS’ BEDROOM∙Find the items on the list.∙Lift up the carpet edge. You’ll need a tool to pry the floor planks open.∙Click on the Map icon and go to the Parents’ Attic.PARENTS’ ATTIC∙Find the items on the list.∙When completed, a Hammer will go into your inventory.∙G o back to the Parents’ Bedroom.PARENTS’ BEDROOM∙Take the hammer from your inventory and use it twice to remove both floor planks.∙Examine the floor safe. Try opening the chest lock.CEMETERY∙Click on the Map icon and go to Kensal Green Cemetery.∙Gather the flowers on the list.∙When completed, a bunch of Flowers will go into your inventory.∙Take the Flowers from your inventory and place them on the graves beneath the angel.∙Zoom in on Father’s grave.∙Click on the birthdate.∙Push down the pins in the right order so that all will remain pressed down.∙Click the center pin first. All the other pins will stay down after that.∙Click on the “9” to rotate it.∙ A heart-shaped socket will appear on the angel’s chest.∙Return to the Attic.PARENTS’ ATTIC∙Find the items on the list.∙When completed, a Heart-shaped Locket will go into your inventory.∙Return to the Kensal Green Cemetery.CEMETERY∙Zoom in on the stone angel.∙Take the Heart-shaped Locket from your inventory and insert it in the Heart-shaped Socket o n the angel’s chest.∙ A box pops out from beneath the grave cross. Pick up the Key inside.∙Go back to the Parents’ Bedroom.PARENTS’ BEDROOM∙Zoom in on the floor safe.∙Take the Key from your inventory and use it to open the chest lock.∙Take the Cylinder and the Handwritten Notes.∙Click on the Map icon and go to the Professor’s Office. PROFESSOR’S OFFICE∙Find the items on the list.∙Click on the broken vase on the floor.∙Assemble the pieces of the Valentine postcard.∙Double-click or use the mouse wheel to rotate a piece clockwise.∙When two pieces fit correctly, they will lock together.∙There is no Skip option for this puzzle. However, using a Hint will show two pieces that go together.∙The puzzle in the screenshot above is left undone to show where each piece belongs.∙When completed, the code and notes will be added to your journal.∙Zoom in on the wall safe.∙Click on the safe dial.∙Find the correct six symbols, referring to the postcard notes in your Journal.∙The code on the postcard is 832619.∙These correspond to the following books on the list: Moby Dick, The Origin of Species, the Bible, The Iliad, Alice in Wonderland, and The Raven.∙The symbols representing these books are: whale, monkey, cross, Trojan horse, rabbit, raven.∙Click on the symbols in the order listed above.∙Take all the items inside the safe. The 3 cylinders will go into your inventory.Chapter 2: Ballyscath, Ireland – Two days later VILLAGE SQUARE∙Click on the sleeping man.∙Click on the Map icon and go to the Farmhouse.FARMHOUSE∙Find the items on the list.∙When completed, a Cage, Trowel and Trumpet will go into your inventory.∙Take the Cage from your inventory and place it on the squirrel in the cottage window.∙Click on the Map icon and go to the Village Stream.VILLAGE STREAM∙Find the items on the list.∙When completed, a pile of Acorns will go into your inventory.∙Take the Trowel from your inventory and dig up the earth pile on the ground.∙Dig 4 times until a Bone is unearthed. Pick up the Bone.∙Click on the Map icon and return to the Village Square.VILLAGE SQUARE∙Take the Bone from your inventory and give it to the dog.∙ A ball of Yarn rolls forward. Pick up the Yarn.∙Take the Yarn and toss it at the cat, which runs away.∙ A Piece of Red String goes into your inventory.∙Pick up the Oak Stick from where the cat was standing.∙Click on the Map icon and return to the Farmhouse.FARMHOUSE∙Take the branch of Oak from your inventory and place it on the cage.∙Take the Piece of Red String from your inventory and tie it to the bottom of the stick.∙Place the Acorns inside the cage.∙Once the squirrel is inside the cage, pull the tied string.∙The squirrel will be added to your inventory.∙Find the food items on the list.∙After chatting with Martha, a Cup of Tea will go into your inventory.∙Click on the Map icon and go back to the Village Square.VILLAGE SQUARE∙Take the Trumpet from your inventory and use it on the sleeping man. ∙Once Patrick is awake, give him the Cup of Tea from your inventory.∙Borrow the fishing rod leaning on the bench beside Patrick.∙When completed, the Fishing Rod will go into your inventory.∙Use the Fishing Rod to reach the scarecrow on the tree branch.∙Pick up the Mini Scarecrow that has fallen to the ground.∙Click on the Map icon and go to the Farmhouse. FARMHOUSE∙Take the Mini Scarecrow from your inventory and place it on the crow.∙The crow drops the ring on the ground. Pick up the Ring.∙Also, pick up the Key from where the crow was perched.∙Take the Key from your inventory and use it to unlock the red drawer.∙Zoom into the open drawer.∙Find the items on the list.∙When completed, a Fishing Hook will go into your inventory.∙Click on the Map icon and go to the Village Stream.VILLAGE STREAM∙In your inventory, combine the Fishing Rod and the Fishing Hook.∙Use the repaired Fishing Rod to retrieve the tangled object from the stream.∙The 5th cylinder will go into your inventory.∙Click on the Map icon and go back to the Village Square.VILLAGE SQUARE∙Take the Ring from your inventory and give it to Patrick.∙Martha’s charm will go into your inventory.∙Click on the Map icon and return to the Farmhouse.FARMHOUSE∙Martha confirms that the cylinder is the object she threw into the stream.∙Take Martha’s Charm from your inventory and gi ve it to her. Chapter 3: The Submarine – Present timeNOTE: This chapter is available in the Premium and Ultimate Editions only. SUBMARINE EXTERIOR∙Zoom in on the entrance hatch.∙Lift the cap in front of the entrance hatch.∙Insert one of the Cylinders from your inventory into the circular opening.∙The hatch opens. Click on the ladder to descend.NAVIGATION ROOM∙On the left of the cockpit is another circular socket.∙Insert another Cylinder from your inventory into the socket.∙Pick up a Screwdriver, dirty Rag, and 5 Metallic Cards.∙Click on the Map icon and go to the Engine Room. ENGINE ROOM∙Pick up a bottle of sour Wine and 2 Metallic Cards.∙Zoom in on the wall panel on the left, above the lever.∙Use the Screwdriver from your inventory to remove all 4 screws.∙Click on the panel plate to remove it. The panel goes into your inventory.∙Pick up 1 Metallic Card.∙In your inventory, combine the sour Wine with the dirty Rag.∙Use the soaked rag to clean the rusty chain 4 times.∙Take the panel from your inventory and replace it on the wall.∙Exit the close-up view.∙Pull the large lever below the panel.∙Once the water is drained, take the last 2 Metallic Cards on the floor. ∙Zoom in on the pressure gauge system on the right wall.∙The gauges’ maximum capaciti es are 5, 8, and 6 from left to right.∙The numbers 3-4-6 scratched above indicate that the gauges should contain 3, 4, and 6 units of liquid, from left to right.∙The 2 top buttons below each gauge are used to fill and drain.∙The lower button transfers liquid to the gauge on its right. The rightmost gauge will transfer its contents equally between the other two.∙Solution: first, make sure all the gauges are empty. Then do the following:1. Fill up the center gauge.2. Transfer from the center.3. Drain the right gauge.4. Transfer from the center.5. Transfer from the right.6. Drain the left gauge.7. Fill up the right gauge.8. Transfer from the right.9. Fill up the right gauge.∙Return to the Navigation Room.NAVIGATION ROOM∙Zoom in on the glass panel.∙Set the coordinates for the Hidden World by choosing the 6 correct metallic cards and placing them in their proper positions.∙The coordinates for the Hidden World are on page 13 of the journal.∙As you place the cards on the slots, the markings of each row and column will be combined on the 5 black areas.∙These should look like the symbols on the 5 coordinates. The symbols on the black areas should go in this order: from top to bottom, and then from left to right.∙Pull the throttle to start the submarine.Chapter 4: The Cavern – Four days later CAVERN∙Use your Crowbar to open the locked trunk on the right side of the cavern.∙Zoom in on the open trunk.∙Find the items on the list.∙When completed, a Brush and a Pickaxe will go into your inventory.∙Use your Pickaxe on the frozen stone carving.∙Keep removing the ice until the whole carving is revealed.∙Pick up the 6 stone disks scattered around the cavern.∙One disk is inside the trunk.∙Zoom in on the mosaic on the floor.∙Use your Brush to remove the dust from the mosaic.∙Keep cleaning it until the mosaic is revealed.∙The moons will go into your inventory.∙Place the moons and stone disks in their proper slots.∙The moons form a pattern repeatedly around the carving: large, medium, small, large, medium, small and so forth.∙The face disk goes in the center, the jackals on top, the ivy on the sides, and the circular symbol at the bottom.∙Rotate the disks to complete the carving.PLATEAU∙Click on the wooden elevator to raise it up. Chapter 5: The Hidden WorldTUNDRA∙Find the items on the list.∙ A bone Knife and a Ladder will go into your inventory.∙Click on the Map icon and go to the Woodland. WOODLAND∙Find the items on the list, zooming in and out of the hut.∙ A pair of Tweezers will go into your inventory.∙Place the Ladder from your inventory on the tree. Take the slingshot. ∙Pick up some red Clay from the ground.∙Go into the hut and take some Pebbles from the hanging basket on the left.∙Click on the Map icon and go to the Desert.DESERT∙Find the items on the list.∙ A mortar and pestle will go into your inventory.∙Use the Tweezers to gather some cactus thorns from the large cactus.∙Click on the Map icon and go to the Rainforest.RAINFOREST∙Examine the tree door. A carnivorous plant snaps at you.∙Use the Slingshot and pebbles on the beehive.∙Shoot at the beehive to make it fall on the carnivorous plant.∙Zoom in on the door of the treehouse.RAINFOREST TREEHOUSE∙Find the items on the list.∙Two Bamboo sticks and a drinking Cup will go into your inventory.∙Use the bone Knife to cut the musky flower on the top right of the scene.∙In your inventory, combine the musky Flower with the mortar and pestle.∙Cut the Bamboo sticks with the bone Knife to make blowguns.∙Combine the Clay with the cactus needles to make darts.∙Go back to the Tundra.TUNDRA∙Snap off some Icicles hanging from the fence.∙In your inventory, place the Icicles in the drinking Cup.∙Switch to another location to make the Icicles melt.DESERT∙Mix the flower Paste with the cup of Water.∙Coat the Darts with the tranquilizing Liquid.∙Place the darts on the Blowguns.∙Return to the Tundra.Chapter 6: The Fall of Darkness DESERT∙Pick up the disk from the Obsidian pedestal. TUNDRARAINFORESTWOODLAND∙Pick up the disk from the Obsidian pedestal.∙Go to the Overlook Plateau.OVERLOOK PLATEAU∙Zoom in on the spindle on the large rock.∙From your inventory, place the 4 disks on the center spindle.∙Rotate the disks so that the lines connect matching symbols from the stone to the innermost disk.∙Start with the outermost disk and work your way inward, making sure the lines are connected.∙Clicking on the right side of a disk rotates it clockwise; clicking on the left rotates it counter-clockwise.∙Diagrams for the 4 element puzzles are added to your journal.∙Go to each of the 4 stations to activate them.RAINFOREST∙The symbol above this station is that of Air.∙Zoom in on the panel.∙Take the Cylinder from your inventory and place it into the round opening.∙Click on the contraption to solve the puzzle.∙Click on the white diamond button to blow air into the pipes, lifting the discs upwards.∙Refer to Air puzzle diagram in the journal to see the how high a disc should be in each pipe.∙The round button in between two pipes swaps their air strength levels.∙Take the Metallic Sphere and hexagonal artifact that appear.∙Go to the next station.WOODLAND∙The symbol above this station is that of Earth.∙Zoom in on the panel.∙Take the Cylinder from your inventory and place it into the round opening.∙Click on the contraption to solve the puzzle.∙Take the Metallic Sphere from your inventory and place it on the puzzle. ∙Refer to the Earth diagram puzzle in the journal.∙Move the balls between columns until you have the correct number of balls in each.∙Then, use the bars with magnets to raise or lower the balls according to the diagram.∙To make balls hover, place magnets on both ends of its column.∙Take the hexagonal artifact that appears.∙Go to the next station.DESERT∙The symbol above this station is that of Water.∙Zoom in on the panel.∙Take the Cylinder from your inventory and place it into the round opening.∙Click on the contraption to solve the puzzle.∙The buttons on the edges of the puzzle start and stop the flow of water.∙The valve junctions control the direction of the water.∙Refer to the Water diagram puzzle in the journal to see what the flow of water should look like.∙Not all the valve junctions will be used.∙Take the Glass Tile and hexagonal artifact that appear.∙Go to the next station.TUNDRA∙The symbol above this station is that of Fire.∙Zoom in on the panel.∙Take the Cylinder from your inventory and place it into the round opening.∙Click on the contraption to solve the puzzle.∙Take the Glass Tile from your inventory and place it on the puzzle. ∙Refer to the Fire diagram puzzle in the journal.∙Arrange the 5 glass tiles on the grid so that all the squares are lit up. ∙ A glass tile lights up th e squares it’s placed on, as well as the surrounding squares by half.∙Take the hexagonal artifact that appears.∙On the map, go to the Machine Entrance.MACHINE ENTRANCE∙Take the Ladder from your inventory and place it on the wall.∙Zoom in on the circular opening.∙Place the Cylinder in the circular socket.∙Place the 4 Hexagons on the slots.∙Arrange them according to the poem on page 14 of the journal.∙The poem mentions Earth first, then Wind, then Sun (Fire), and last is Water.∙The door to the Machine opens. Click on the entrance to find the Chief. ∙Click on the pillar structure to confront Ransom.。
解锁隐藏关卡技巧在许多游戏中,隐藏关卡往往都是玩家们渴望挑战的内容。
解锁隐藏关卡可以带来额外的乐趣和挑战,但有时候这也可能是一项艰巨的任务。
在这篇文章中,我们将探讨一些解锁隐藏关卡的技巧,帮助玩家们更轻松地挑战这些隐藏关卡。
首先,了解触发条件是解锁隐藏关卡的关键。
在许多游戏中,隐藏关卡通常需要特定的条件来触发,例如完成特定的任务、收集特定的物品或者按照特定的顺序完成关卡等。
因此,玩家们需要仔细研究游戏规则和提示,找到触发隐藏关卡的方法。
其次,利用游戏内的线索来寻找隐藏关卡的位置。
在一些游戏中,隐藏关卡可能会隐藏在一些不易察觉的地方,需要玩家们通过观察地图、对话或者环境等线索来找到。
因此,玩家们应该细心观察游戏中的细节,可能会发现隐藏关卡的藏匿之处。
另外,尝试与NPC对话或者完成特殊任务来解锁隐藏关卡。
有时候,游戏中的NPC会给出一些线索或者任务,完成这些任务可能会触发隐藏关卡的出现。
因此,玩家们可以尝试与NPC对话,了解游戏中的背景故事或者任务,可能会有意外的收获。
此外,多尝试不同的游戏玩法和探索不同的地图区域。
在一些游戏中,隐藏关卡可能需要玩家们在不同的地图区域中进行探索,并尝试不同的游戏玩法来触发。
因此,玩家们可以尝试在游戏中探索不同的地图区域,可能会有意想不到的收获。
最后,利用网络资源和游戏攻略来帮助解锁隐藏关卡。
如果玩家们遇到困难无法解锁隐藏关卡,可以尝试查阅网络资源和游戏攻略,可能会有其他玩家分享的心得和经验。
通过借鉴他人的经验,玩家们可能会更快地解锁隐藏关卡,享受游戏的更多乐趣。
总的来说,解锁隐藏关卡需要一定的耐心和技巧,玩家们可以通过了解触发条件、利用游戏内的线索、尝试与NPC对话和探索、多尝试不同的游戏玩法和区域以及利用网络资源和游戏攻略等方法来更轻松地挑战这些隐藏关卡。
希望以上技巧能够帮助玩家们解锁更多有趣的隐藏关卡,享受游戏的乐趣。
埃吉尔5位数解谜以下是游戏埃吉尔的五位数解谜关卡的攻略:1.来到埃吉尔大厅,“世界名画”,再次可以看到背后隐藏的保险箱,看来是需要寻找这些奇怪的字符的线索了,钢琴区域,鼓棒获取【鼓棒】,还可以隐隐约约看到一把钥匙。
2.右移来到沙发这面墙,沙发上的磁带,可以轻松获得【磁带1】,左侧的小冰柜,打开冰柜可以获得【一桶冰块】,沙发后面挂着的唱片可以查看。
3.这个场景中间的【磁带播放机】很显眼啊,查看,选中刚才获得的【磁带1】按下播放键。
右侧的抽屉可以获得【吉他拨片】和【聊天记录】,聊天记录也是重要信息哦。
拿到【吉他拨片】后回到音乐房,选中【拨片】吉他,可以获得【吉他弦】。
4.回到这面墙,下方带锁的抽屉,密码锁左边的人头就是提示哦。
五位数密码对应的就是沙发后,五张唱片中人头的数量,对应的密码是【24120】,解开后可以获得一瓶【白朗姆酒】。
5.来到吧台这边,露出的部分,可以轻松获得【橘子】【柠檬】【蔓越莓】【薄荷叶】,门后可以获得挂钩,根据白板上的提示将【吉他弦】【鼓棒】【钩子】放到上面,会自动合成钓鱼竿,右上角的海报,可以获得调酒配方和放置的顺序,中间的酒柜上可以获得调酒需要的【橙皮酒】【白兰地】【苏打水】等。
6.调酒区可以进入调酒台,看到提示需要调制出正确的酒。
所以需要调什么酒呢??还记得磁带中唱到的吗??没错!就是莫吉托。
依次选中【冰块】【苏打水】【白朗姆酒】【薄荷叶】放到调酒杯中,将会解锁【磁带2】,回到【磁带播放机】,放置【磁带2】,根据歌词可以看到接下来和【宠物蛇】有关。
7.来到这面墙。
这个箱子可以看到小绿养的蛇。
蛇似乎包裹着什么东西,但是无法获取。
通过查看【玩蛇】可以知道蛇矗喜欢吃什么,选中【柠檬】或者【橙子】蛇矗,他将会钻到洞中,然后使用【钓鱼竿】,将玻璃钢中的木头取出,利用上面的符号解开保险柜的,拿到【磁带3】。
8.拿到磁带3后,来到【磁带播放机】播放磁带3,能听到一段简谱【33361】。
scum地堡开门计算公式Scum地堡开门计算公式。
一、基础概念。
咱玩Scum的时候啊,地堡开门的计算公式可有点小复杂,但搞懂了就超级有趣。
地堡开门不是随随便便的,它跟好多因素有关呢。
这里面有个很重要的就是密码相关的东西。
你知道吗,密码就像是地堡的小秘密钥匙。
这个密码的组成不是瞎来的,它是根据游戏里的一些设定规则算出来的。
比如说啊,游戏里可能会有一些特定的数字线索,这些线索就藏在各个角落,像是那些小纸条啊,或者是一些特殊的标记旁边。
我们就得像个小侦探一样,到处去找这些线索。
二、数字线索来源。
那这些数字线索从哪来呢?有时候是在那些被打死的敌人身上。
你把敌人干掉了,然后搜搜他的身,说不定就会发现一张小纸条,上面写着几个神秘的数字。
还有的时候呢,是在一些建筑物的角落里。
比如说在某个破旧的房子里,墙上可能会有一些涂鸦,涂鸦里就夹杂着数字。
这就考验咱们的观察力啦。
我就有一次啊,在一个特别不起眼的小仓库里,在一个破箱子后面发现了一张纸条。
上面的数字看起来乱七八糟的,但是仔细一研究,发现这可能就是地堡开门密码的一部分呢。
当时那个兴奋劲儿啊,就感觉自己离打开地堡宝藏的大门又近了一步。
三、计算方式。
好啦,找到数字线索之后呢,就要开始计算密码啦。
这个计算方式可能会让你头大一会儿,不过没关系。
一般来说,它可能会涉及到简单的数学运算,像加法、减法或者是乘法。
比如说,你找到的纸条上有三个数字,分别是2、3、4,然后游戏里可能规定要用第一个数字乘以第二个数字,再加上第三个数字。
那按照这个规则,密码的这一部分就是2×3 + 4 = 10。
但是呢,这还只是一部分哦。
有时候密码可能是由好几组这样计算出来的数字组成的。
而且啊,游戏可能还会有一些小变化,比如在不同的地图区域,计算规则可能会有一点点不一样。
这就需要我们多去探索不同的地方,总结经验啦。
四、特殊情况。
在这个地堡开门计算公式里,还有特殊情况呢。
有时候啊,你按照正常的线索和计算方法算出了密码,但是门就是不开。
游戏隐藏关卡攻略隐藏关卡是许多游戏中的一种特殊关卡,通常需要玩家完成一系列特定任务或者达到一定条件才能解锁。
这些隐藏关卡往往具有更高的难度和挑战性,也可能提供额外的奖励或者故事背景。
在游戏中找到并攻略隐藏关卡可以让玩家感受到不同的游戏乐趣,同时也是一种挑战和成就感。
首先,要找到隐藏关卡通常需要一些耐心和技巧。
在游戏的普通关卡中,可能会有一些提示或者线索指向隐藏关卡的存在,玩家可以通过注意环境细节、与NPC交谈或者完成特定任务来获得这些线索。
有时候隐藏关卡也可能会隐藏在地图的某个角落或者需要特定的操作才能打开入口,因此探索地图并尝试各种操作是很重要的。
其次,攻略隐藏关卡需要一定的游戏技巧和经验。
隐藏关卡通常设计有更高的难度,可能需要玩家具备更快的反应能力、更精准的操作技巧或者更深入的游戏理解。
在攻略隐藏关卡的过程中,玩家可能需要多次尝试和失败,不过这也是游戏乐趣的一部分。
通过不断尝试和总结经验,玩家可以逐渐掌握隐藏关卡的攻略方法,最终取得胜利。
此外,攻略隐藏关卡还需要一些心理素质。
隐藏关卡的难度可能会让玩家出现挫折感或者焦虑情绪,而这时候保持冷静和耐心是非常重要的。
玩家可以适当休息一下,调整心态,或者寻求一些攻略和建议来帮助自己应对难关。
与其他玩家一起攻略隐藏关卡也是一种不错的选择,可以互相鼓励和分享经验,增加完成隐藏关卡的成功率。
最后,成功攻略隐藏关卡后,玩家可以获得游戏中独特的成就感和满足感。
隐藏关卡通常设计有一些额外的奖励或者故事背景,有时候甚至会影响到游戏的结局。
因此,攻略隐藏关卡不仅可以提升玩家的技能和游戏经验,还可以让玩家感受到游戏世界的更多乐趣和惊喜。
攻略隐藏关卡的过程也是一次挑战和探险的旅程,可以让玩家更深入地了解和享受游戏的乐趣。
总的来说,攻略隐藏关卡是许多游戏中的一种特殊体验,需要玩家具备一定的技巧、耐心和心理素质。
通过不断尝试和探索,玩家可以克服隐藏关卡的挑战,体验到游戏带来的更多乐趣和成就感。
隐秘的档案电梯惊魂通关攻略摘要:一、引言:介绍隐秘的档案电梯惊魂游戏二、游戏攻略:1.游戏的基本操作和规则2.如何开始游戏3.游戏中的障碍和困难4.如何解决游戏中的问题三、游戏心得:1.游戏的趣味性和挑战性2.游戏对于玩家的吸引力3.游戏对于玩家的启示四、结论:总结游戏攻略和心得正文:一、引言:隐秘的档案电梯惊魂是一款充满挑战和惊险刺激的游戏。
玩家需要在游戏中操控电梯,在不同的楼层中寻找线索,解开谜题,最终达成目标。
游戏的画面精致,音效逼真,让玩家仿佛置身于一个真实的电梯环境中。
二、游戏攻略:1.游戏的基本操作和规则:游戏的基本操作是通过方向键或者触摸屏进行电梯的上下移动。
玩家需要在每一层楼寻找线索,解开谜题,才能打开下一层的门。
同时,玩家还需要注意电梯的电量,电量耗尽则游戏失败。
2.如何开始游戏:玩家首先需要点击游戏的开始按钮,然后选择难度,即可开始游戏。
游戏有多个难度供玩家选择,玩家可以根据自己的能力选择合适的难度。
3.游戏中的障碍和困难:游戏中的障碍主要有两种,一种是电梯门的开启和关闭,玩家需要在电梯门打开的时候进入电梯,然后在电梯门关闭之前到达下一层。
另一种是电梯的电量,玩家需要在电量耗尽之前完成任务。
4.如何解决游戏中的问题:玩家需要在每一层楼寻找线索,解开谜题,才能打开下一层的门。
同时,玩家还需要注意收集电量,以保证电梯的正常运行。
三、游戏心得:1.游戏的趣味性和挑战性:隐秘的档案电梯惊魂不仅画面精致,音效逼真,而且游戏玩法多样,充满了挑战和惊险刺激。
玩家需要在游戏中不断寻找线索,解开谜题,才能完成任务。
2.游戏对于玩家的吸引力:这款游戏以其独特的玩法和精心设计的关卡吸引了大量的玩家。
玩家可以通过游戏提高自己的观察力和思维能力,同时也能在游戏中享受到挑战和成功的喜悦。
3.游戏对于玩家的启示:游戏让玩家明白,只有通过不断的努力和尝试,才能解开生活中的谜题,实现自己的目标。
四、结论:隐秘的档案电梯惊魂是一款充满挑战和惊险刺激的游戏。
四个相同的房间和四个不同的钥匙在一个神秘的庄园里,有四个相同的房间和四把不同的钥匙。
这个庄园据说隐藏着无尽的宝藏,但要找到宝藏,就需要解开房间和钥匙之间的谜题。
第一个房间位于庄园的北侧,门上贴着一张标签,上面写着:“只有最勇敢的人才能找到宝藏。
”进入房间后,只看到一张桌子和一本书。
然而,书上的每一页都是空白的。
仔细观察,你会发现书页上有一些微小的孔洞。
踩着石头,你走出房间,前往第二个房间。
第二个房间位于庄园的西侧,门上的标签说:“只有最聪明的人才能找到宝藏。
”推开门,你发现房间里有一张桌子和一个抽屉。
打开抽屉,里面有一只装满蜡烛的蜡烛台。
你点燃了其中一支蜡烛,却发现它没有烟。
你把这只蜡烛插在桌子上,并把门关上。
了解到这一点,你离开了第二个房间,继续前往下一个房间。
第三个房间位于庄园的南侧,门上的标签上写着:“只有最耐心的人才能找到宝藏。
”你推开门,眼前出现的是一块巨大的石头墙。
你尝试爬上石墙,但发现它太高了。
你开始细心地检查周围的一切,并在墙边找到一些石块。
你用石块堆砌起一个垫脚的台子,最终重新攀爬上石墙。
第四个房间位于庄园的东侧,门上的标签上写着:“只有最有信心的人才能找到宝藏。
”进入房间,你发现这里有一个大箱子,但是没有钥匙可以打开。
你开始周围搜寻,最终在桌子上找到一把锤子。
你用锤子砸开箱子,里面果然藏着宝藏。
这个故事告诉我们四个相同的房间和四个不同的钥匙之间的关系。
进入每个房间,你都需要运用不同的优势来解开谜题。
只有最勇敢、聪明、耐心和有信心的人才能成功找到宝藏。
这个故事也让我想到了生活中的一些困境和挑战。
有时候,我们可能会遇到看似相同或相似的问题,但每个问题都需要不同的解决方法和态度。
只有积极乐观、善于思考、耐心和有信心的人才能克服生活中的困难,并获得成功。
在追求梦想或解决问题时,我们需要学会利用自身的优势,去面对不同的挑战。
勇气、智慧、耐心和信心都是我们能够找到宝藏、达成目标的关键因素。
第十一大关主题公园II11-1这关目的是把过山车弄到右边的目的地,建造这样的桥即可,注意要连接左边钢架支出来的一点点,可以节省很多支撑材料,然后坡道注意要顺滑一点,就没问题了11-2这关考验传送器的使用,要把三个小猪气球安全送到上方,就要使用传送器把铁球全部扔出去,不要忘了最上面还有一个粘液形成的延时陷阱,也要一并清理,推荐使用弹弹筒,因为如果上面使用传送器的话会把气球也传到边上,容易卡住.11-3这一关很考验弹筒的摆放和角度,要把两个篮球穿过火圈同时要收集火花,在左边的球的右下方紧挨着放置弹筒,弹到最左边的弹筒后朝着火圈反弹一次收集到火花,穿越火圈后利用传送器吃到火圈上面的火花,它的任务就完成了,右边的球需要落到下面去吃火花,然后利用弹筒弹到比较高的高度,再用传送器穿过火圈.11-4这一关难度不大,把三个银币送到左边的售票机处即可,那就做一个推土机吧,然后如图所示做一个小桥,注意硬币很小,车子和桥都不要留空隙就行了.11-5积分关卡,自行发挥,不再赘述.11-6这一关是要把三个狮子气球刺破同时不伤害到小象气球,主要是考验对传送器的隐藏性能的把握----进入传送器的物品的速度越快,从传送器出去时的速度就越快,所以把铁刺球放在高处,然后传送器放在下面,一个抛物线就可以搞定三个狮子气球.11-7这一关要把烤架送到目的地,几乎没什么难度,只要造一个前端较长的车子就能把小车推过缺口11-8这一关要用橡皮鸭推倒至少一个罐子,还要顺路收集火花,由于橡皮鸭体积较小,需要准确把握弹跳角度,难度也不是很大11-9积分关卡,需要注意的是一定要把球撞进火圈11-10这一关比较难,要把气球送到左上方与其他气球汇合,方法是构建这样一个小车,要把气球框住,然后还要有足够的动力爬坡,看似很简单,其实要不断优化结构,因为框的自重很难顺利爬上斜坡.然后在落下的时候自然就让气球逃出来第十二大关家庭琐事II12-1这一关是要用磁铁控制铁刺球刺破洗衣机上所有的气球,图上为其中一种解法,稍微调试一下就可以了.12-2这一关是要让两个球都进到球门,图上的机关比较复杂而且华丽,其实只要用一个旋转的“球拍”把球拍过去就行了12-3这关要把球运到目的地,由于没有弹跳装置可用,只能利用球本身的初速度使用梯子进行反弹,如图,在反弹的同时收集火花.12-4积分关卡,自行发挥,弄到终点即可. 12-5这一关很考验机关的构建,要让割草机撞到狗窝,要点有两个,一是不能让割草机落在机关车上时发生翻车,一定要在落下时可以在机关车上部继续前进,二是要有一定的弧度,能让割草机驶过后飞到平台.12-6这一关主题是赛马,要让上方的木马比下方的更快到达终点,非常简单,两个爆弹叠加在一起增强威力,1秒钟直接把木马炸到终点,这时对手刚刚开始行动...12-7这一关主题是赛马,要让上方的木马比下方的更快到达终点,非常简单,两个爆弹叠加在一起增强威力,1秒钟直接把木马炸到终点,这时对手刚刚开始行动...12-7这一关是需要熟练使用按钮式风扇和热气球,使用一个气球作为按钮式风扇的触发器,然后把另一个气球吹到右边去就可以把足球推倒右边,然后在缺口处放一个气球作为垫脚石弹到球门处.12-8积分关卡,把烤架送到盘子处,自行发挥12-10本关可以在缺口处建立图上的小桥,使用旋转的主动轮组合上一个钢架就可以把橘色的小球拍到蓝色的大球处,完成挑战.第十三大关外层空间II13-1这一关要保护火箭顺利升空,如图,在最下面的的加农炮塔前面放置一个传送器,可以让炮台射出炮弹把它自己击倒,在倾倒的同时还搭上了左边中间的炮台,这样就解决了两个炮台,最上面的炮台只要用一个暗物质球就可以把压住按钮的石块撞偏.13-2这一关就是考验大家的诡雷摆放功底,如图所示可以在收集火花的同时让登月车撞到碟形发射天线13-3这一关需要构建一个小车穿过右上方的圆环,诀窍是撞到零重力发生器的同时改变运动轨迹,也就是说在失重的一瞬间要让小车朝着圆环方向运动,这个需要多次调试,参看途中的一种解法.13-4.积分关卡,需要注意的是场景有大量的陨石,如果感觉阻碍到运动轨迹的话果断使用漩涡或者诡雷予以排除.13-5这一关是要让登月车到达碟形天线顺路收集火花,这也是考察玩家的诡雷运用,注意上图中间位置有一个漩涡很碍事,可以使用零重力发生器把它抵消掉,另外需要注意使用诡雷有可能炸破登月车的轮胎,所以一旦被炸破就要全程使用诡雷.13-6这关要把两个球弹到目的地,摆放类似如图机关即可,不需要太复杂的设置.13-7这一关华丽丽的诡雷阵..我们的目标是把发射器发出的泡泡(奇异发球)运到漩涡中,且不引爆任何诡雷,这关的关键是在中心处使用一个延时机关,让第一个法球从被吹到左边,然后销毁左边的漩涡,然后当第二个法球出现时延时火箭触发启动按钮式风扇,让第二个法球被吹到上面,抵消掉第二个漩涡,注意仔细控制风扇方向,不要碰到诡雷。
地点推理题1. 密室逃脱你被困在一个密室中,需要找到线索并解开谜题才能逃脱。
线索包括一张地图、一把钥匙、一个密码和一本日记。
地图显示了密室的结构和出口,钥匙可以打开出口的门,密码可以解锁出口的锁,日记则提供了线索和提示。
你需要根据这些线索推理出正确的逃脱路线。
2. 寻找宝藏你得知了一个宝藏的线索,包括一张藏宝图、一张宝藏位置图和一本指南。
藏宝图显示了宝藏所在地的地理位置,宝藏位置图则标明了宝藏的具体位置,指南则提供了寻找宝藏的方法和技巧。
你需要根据这些线索推理出正确的寻找宝藏的路线。
3. 追踪罪犯你是一名侦探,需要追踪一名罪犯。
你得知了罪犯使用的毒药瓶的位置,以及罪犯使用的毒药瓶的颜色。
你需要根据这些线索推理出罪犯使用的毒药瓶的颜色,并追踪到罪犯的藏身之处。
4. 寻找失物你是一名寻宝猎人,需要寻找一件失物。
你得知了失物的名称、颜色和形状,以及失物的所在地的地理位置。
你需要根据这些线索推理出正确的寻找失物的路线。
5. 谜案破解你是一名侦探,需要破解一个谜案。
你得知了案发现场的状况、嫌疑人名单以及嫌疑人使用的毒药瓶的颜色。
你需要根据这些线索推理出正确的破解谜案的思路。
1. 密室逃脱:首先,仔细阅读地图,了解密室的结构和出口的位置。
使用钥匙打开出口的门,注意门上的密码锁,尝试使用已知的密码解锁。
根据日记中的线索,寻找可能隐藏的额外线索或密码。
综合以上线索,确定正确的逃脱路线。
2. 寻找宝藏:根据藏宝图上的指示,确定宝藏所在地的地理位置。
使用宝藏位置图,缩小宝藏的具体位置范围。
根据指南中的提示,使用正确的技巧和方法寻找宝藏。
3. 追踪罪犯:根据毒药瓶的位置和颜色,确定罪犯使用的毒药瓶的颜色。
结合其他线索,如罪犯使用的毒药瓶的瓶盖或其他特征,进一步确认罪犯的身份。
使用地图或GPS定位系统,追踪罪犯的移动轨迹,找到其藏身之处。
4. 寻找失物:根据失物的名称、颜色和形状,缩小搜索范围。
使用地图或GPS定位系统,确定失物的所在地的地理位置。
CHAPTER 2用2块圆形浮雕把北方森林的石门打开后,我们可以进去了——先检查前方柳树垂下的柳枝,用锯子把它锯下来,得到柳枝,这时候我们的捕梦器完成。
我们先往左边的木材厂方向走——先检查右边第一棵树上的小桶,找到球锁钥匙。
然后往前走——再往前走——检查树杈~看到鸟蛋,我们先退回去。
先退到刚刚那个书上挂小桶那~然后往左走——在左边小屋找东西,得到梯子。
然后往前走——又到了分岔路,右边是木材厂,左边是河流。
先往左走,虽然现在我们还做不了什么,但是熟悉下路还是可以的。
退出河流,往左走,去木材厂——先在车下找到原木。
然后往左走——这就是传说中的木材厂,但是屋前有成群的吃人乌鸦。
我们用稻草人,吓走它们——乌鸦都飞到天上去了,我们可以往前走了。
我们往前走,直接进入到了木材厂内+——我们先下楼,找东西,得到马鞭。
然后退出,我们去楼上——找到了第二个女孩,我们与她对话。
对话完后,退出。
一直退到石门那~~找东西得到吊钩。
我们退回到十字路口,向右走,一直走到小二楼那,在晾衣架那找东西,得到木质皮带轮。
然后往前走,在右边小屋找东西,得到马具。
在去左边的小屋,把梯子搭在阁楼边上,不太好搭,在差不多的位置多搭几次就好了——在上面找到了厚木板,收好。
再回到小木屋把捕梦器交给二楼的小女孩,捕梦器把噩梦全部带走了,在睡觉之前小女孩给了我们一把鱼骨钥匙,收好。
我们推到十字路口,往左走——先去左边小屋——药材商店——把球锁钥匙插进去,游戏,完成后进去——退出,继续向前走——看到一匹白马,先把马具按上,再用马鞭抽它一下,它给我们让路了,我们可以向前走了。
向前走——先向右走,去刑场——找东西得到绳索,在这个时候滑轮组建完成。
检查左边小屋的门,用铁火钳把铁链夹断,进去——在中间的书上做游戏= =!!答案就在下图,大家看看懂不懂哈~~这就是一个秘方——鹰蛋、椰子汁、切碎的向日葵花瓣、鱼头。
这个还挺难的,也挺有意思。
我们退出刑场,去左边的墓园——退出墓场,往前走——先检查中间的大炮——用剪子剪下导火索,我们收好。
本文部分内容来自网络整理,本司不为其真实性负责,如有异议或侵权请及时联系,本司将立即删除!== 本文为word格式,下载后可方便编辑和修改! ==thehome攻略篇一:隐秘的世界 The Hidden World 通关攻略游戏原名:渥太华的冒险The Adventures of Mosaika1、进入中间的房间,记录地上盒子里面的图案提示。
然后走出房间,按照日记按下壁炉上面的方块,从打开的壁炉暗门进入神秘的渥太华村庄2、和青蛙说话获取提示,沿着楼梯走向天文馆3、来到天文馆,获取门口左手边盆景旁边的望远镜镜头(telescopic lens)篇二:The room攻略第一章:神秘宝箱(章节名字都是我(来自:WWw. : thehome攻略 )自己胡乱起的,以后也这样,别指望什么翻译,没戏!)这章其实是一个简单的教学,仔细寻找的话,大家都能找到一些蛛丝马迹解开谜题,我就按部就班的说一下吧。
1、首先,桌上放了一个信封,我们双击它,按照提示,拉出信2、之后我们将得到Eyepiece,这个东西对于后面的游戏内容来说是非常重要的。
3、在标记着“FIRE”的桌脚按钮,此时我们需要点击这个按钮,之后将获得钥匙一把。
4、拿到钥匙后,将钥匙旋转(游戏会有相应的提示),需要说明一下,此钥匙能够打开所有的门,但需要调整好钥匙孔的方向。
5、之后我们来到有圆形罗盘的一面,扒开上方的小木块,找到钥匙孔,将钥匙插入,看到金色的圆盘。
6、之后转到两一面,将上面的木块移开,此时我们可以看到另一个钥匙孔,注意这个钥匙孔的方向。
7、把刚才拿到的钥匙插入空内,将柜子打开,之后我们将得到铁片。
8、之后转移到印有商标的一面,用刚才拿到的铁片放到商标右侧的蓝色按钮上。
9、将铁片放入后,旋转铁片,将面前的柜子打开,此时我们将拿到Lens。
10、之后我们使用刚进入游戏时得到的Eyepiece观察整个场景,找到一个黄色圆盘的拼图。
将介绍空房间The Room第二章攻略内容。
游戏原名:渥太华的冒险 The Adventures of Mosaika
1、进入中间的房间,记录地上盒子里面的图案提示。
然后走出房间,按照日记按下壁炉上面的方块,从打开的壁炉暗门进入神秘的渥太华村庄
2、和青蛙说话获取提示,沿着楼梯走向天文馆
3、来到天文馆,获取门口左手边盆景旁边的望远镜镜头(telescopic lens)
4、沿着左手边的小道走上去
5、在分岔路口向右走,来到铁钻馆。
解开铁钻馆门上面的谜题,进入铁钻馆,获取麻袋里面的鸟食(birdseed),走回分岔路口
6、在分岔路口向左走,来到小花园,获取左边草地上标志3的太阳雕像(sun statue),记录墙上的牵牛花图案,沿着左手边的楼梯走上去
7、来到热气球平台,然后沿着左手边的楼梯走上去
8、来到更高一层的平台,获取左手边花坛旁边的斧头(hatchet),将鸟食放在鹰雕石刻下面的盆子上,记录鸟群的排列
9、回到天文馆,按照日记里面牵牛花的记录用门上面的铁环敲门,左边两下,右边一下,左边两下,右边两下,门打开了,进入天文馆。
走到天平秤面前,将标志3的太阳砝码放在左边的秤盘上,然后留意下面圆盘上太阳和月亮的指针指数,太阳指针离中间12点方向有4格,月亮指针离中间12点方向有5格,要使得太阳和月亮指针都指向中间12点方向,必须移动秤盘上相应数量的太阳和月亮砝码。
首先将左边秤盘上标志4的太阳砝码与右边秤盘上标志5的月亮砝码互换,然后为了使得左边与右边太阳月亮的数目相等,再将左边标志1的月亮砝码与右边标志1的太阳砝码互换,这时候左右两边太阳和月亮的数目相等,打开了天平秤上面星图的机关。
在星图的背后的暗格里获取一块银锭(silver ingot)
10、回到铁钻馆,用斧头劈开树桩的木柴,获取木柴(chopped wood)。
进入铁钻馆,将木柴放进熔炉里,按照日记里面彩色鸟的记录相应地拨动熔炉上面的珠盘,使得珠盘上左右两边红蓝绿珠子的数量与彩色鸟左右两边对应颜色的数量相同,按下旁边的红色按钮点燃熔炉。
将银锭扔进熔炉里面,在旁边的箱子里获取铸造好形状的银锭铸件(silver casting)
11、回到小花园,把银锭铸件放在牵牛花右手边上图案对应的位置,暗门打开进入里面。
解开墙壁上面的水管谜题,然后用斧头砍断水管谜题右手边吊着砖墙的绳索,获取一把梯子,回到小花园,在水池那里获取黄铜钥匙
12、回到铁钻馆门前,用梯子爬上树洞那获取一颗星星(glowing star),进入铁钻馆,用黄铜钥匙打开箱子,在箱子里获取一件橙色旗帜(orange banner)
13、回到天文馆,将橙色旗帜挂在墙上,记录信息,进入天文馆,走到望远镜的下方,按照日记将转盘里的三个金色球体转到相应的位置,在打开的暗格中获取神秘的球体(mystical orb)
14、回到刚进入渥太华村庄有一只青蛙的入口那里,把神秘的球体放入右手边小亭子的对应位置
15、沿着出现的楼梯进入打开的门,记录楼梯右手边花盆上的图案,然后沿着楼梯往上走
16、在分岔路口向右走,沿着图书馆右手边的小道走到小船那里,在岸边的左下角树洞那里获取符号轮子(symbol wheel)
17、回到青蛙门进来的地方,将符号轮子放在馆门对应的位置,转动轮子到相应的位置,进入炼金馆内。
上去二楼,获取架子上的昆虫收集装备(insect collecting kit)
18、回到有大石环纪念碑的分岔路口,用昆虫收集装备采集萤火虫(fireflies)
19、回到青蛙那,将萤火虫奉献给青蛙,然后青蛙吐出一颗大珍珠
20、回到热气球那,把大珍珠放入钢铁门的对应位置,从打开的门进入。
获取左手边墙上挂着的宝石花扣
21、回到有保护罩罩着一朵大红花的地方,将宝石花扣放在玫瑰花下面柱子的对应位置,获取红花(red flower)
22、回到炼金馆,即有颜色容量瓶的地方,把红花放进研磨器研磨,获取红色粉末(red powder),将红色粉末放入旁边仪器对应的位置,打开仪器上面的开关,让空瓶子盛满颜色(filled jar),获取装满颜色的瓶子
将瓶子放在上面的柜子上,然后按颜色的数量组合瓶子,在打开的暗格里获取一块染色玻璃(stained glass)
上去二楼,将那块染色玻璃放回原来的位置,记录窗格上的图案
23、回到热气球控制室,按照日记解开控制台上的谜题,然后乘着热气球飞上天
24、在悬崖上获取撬杆,然后和猫头鹰说话获取提示,将望远镜镜头装在望远镜上,记录海上的提示信息,乘着热气球回到地面
25、回到图书馆,获取墙边的两只船桨(oars)
26、走到小船那,把两只船桨放在小船上,把小船划到对面的小岛上
27、按照日记里面三只海上旗帜的位置解开小岛石碑上的贝壳谜题,获取暗格里面的钢琴键(piano key),将小船划回原来的位置
28、回到图书馆,把钢琴键装上对应的位置,拨动下面的开关,记住颜色闪亮的顺序,然后依照顺序按下对应颜色键即可,需要进行三次操作,成功后在暗格中获取神秘的球体(mystical orb)。