SmartView软件使用讲解
- 格式:pdf
- 大小:1.25 MB
- 文档页数:13
Remote Viewer GuideNote: this document is only for Microsoft Windows Operating System1.ScopeThe ADISRA SmartView Remote Viewer Guide explains how remote access worksinternally and the steps to follow in order to deploy the remote access feature within ADISRA SmartView.2. SummaryRemote Viewer is a tool which allows the user to connect the Viewer to ADISRASmartView runtime on a local or remote computer. In order to execute the Remote Viewer, the user needs to run the full installation of ADISRA SmartView and thenexecute the Viewer.exeWhen the Remote Viewer connects to the remote runtime application, it requeststhe Graphics which will be opened. It is not necessary to manually copy theapplication to the machine where the Remote Viewer will be executed. This is animportant feature since the application will be only placed in the machine where the runtime is running. There will be no need to keep applications in different machines.Additionally, whenever a change is made on a Graphics layout (i.e. added an extralabel on engineering), this change will already be available to the Remote Viewer,the user needs to re-open the updated Graphics. When logic has been updated in a Service, Trigger, Driver or any module that is part of the runtime, the user mustrestart the runtime process and the Remote Viewer will be automaticallydisconnected/closed.3. Configuring the RuntimeEvery Remote Viewer needs to connect to a ADISRA SmartView runtime process. We will look at the runtime configuration first.To configure the project that is going to be executed, follow the steps below:On the Settings Ribbon, go to Viewer and select “SelfHosting”. Enter a port number, the default port is “9000” but it can be changed if it is already in use.3.1 Check the Ports Being UsedThis step is only needed if it is uncertain if the port is already in use. Stop the application if it is running.•Press “Windows+R” and type "cmd" and click OK to open the Command Prompt:•In the Command Prompt type ”netstat -an” and see the ports that are being used. Make sure the port to be configured is not listed. If it is, select adifferent port number that is not being used.3.2 Check the IP Address of the Executing MachineThe IP Address and the port number configured in the project will be used to create the connection between the Remote Viewer and the Runtime. Please follow the instructions below to obtain the correct IP Address for the machine where the runtime is being executed.•Press “Windows+R” and type "cmd" and click OK to open the Command Prompt:•In the Command Prompt type ”ipconfig” and check the IPv4 Address, this will be used later. In this example, it is “192.168.1.145”.4.Configure the Remote ViewerTo configure the Remote Viewer to connect to the executing Runtime from another machine, follow the steps below:•Open the Viewer. To open the Viewer, the user must navigate to the ADISRA SmartView installation bin folder and double click Viewer.exe.•Note: the red circle indicates the viewer is not connected to an executing Runtime;set the IP address and designate the port to be configured (as shown in the lastchapter), then test the connection.•If everything is configured correctly, this message will be displayed.Remember that the ADISRA SmartView Runtime must be running.•Then click the “Connect” button, the default graphic of the executing project will open; note, now the viewer has a green circle indicating it’s connected to the Runtime:5. Custom ResolutionIn this section, understand how to configure the custom resolution of the Remote Viewer.If the machine selected for the Remote Viewer has a different resolution than theinitial machine intended for the project, then the viewer’s resolution can bechanged. Click the “Custom Resolution” check box. Two options are offered:•First option, click the down arrow on the far right of the first resolution box and the box will descend displaying available resolutions. Select the desiredresolution.•Or, click the second box and type in the desired resolution:6. Possible Errors6.1 Connection FailedWhen testing the connection in the Remote Viewer and a connection failedmessage appears:•To resolve this problem, first make sure the runtime is running on the remote machine. Also, make sure the runtime IP Address and the port number arecorrect.•Next, check if the network is operating properly. Open the CMD (Command prompt) and ping the runtime IP Address.ADISRA SmartView Remote Viewer GuideADISRA · 3432 Greystone Drive, Suite 125 · Austin, TX 78731Phone: 1-833-5ADISRA (1-833-523-4772)-11-“ping 192.168.1.145“.• If the ping fails, there is a problem with the network.6.2 Application Does Not OpenThis might not be an error. To confirm the project has a Startup Graphicconfigured. Select “Settings” to display the Startup Graphic box. Page “Home” is the “Startup Graphic”. When the user runs the Remote Viewer, it will connect to Runtime and the Home page will be displayed for the user. If there is not a “Startup Graphic” configured, nothing will be displayed.Alternatively, a Graphic maybe opened from the windows notification area located on the screen’s bottom right near the system clock. Right click on the highlighted icon, click on the “Graphics” option and then click on the Graphics to be opened..。
Samsung Smart View通过“Samsung Smart View”应用程序,您可以在三星智能电视上播放移动设备和电脑中存储的多媒体内容。
通过Samsung Smart View,您可以在三星智能电视上享受存储在您手机和PC 上的内容,而且您还可以通过手机控制电视。
手机版本下载※ 请直接在三星应用商店搜索Samsung Smart View。
Windows 电脑版本下载“Samsung Smart View”的特色功能电视机遥控功能即使没有遥控器,您也可以使用Smart View 来操控你的三星智能电视。
播放移动设备的内容连接您的手机与电视,然后选择视频,图片,或者甚至音乐。
您的内容将在电视上即时播放。
创建播放列表创建个性化的播放列表,您就可以在一个地方访问所有您喜欢的视频,照片和音乐。
播放电脑中的内容您可将电脑中的文件或者是整个文件夹添加到Smart View 里,然后就可以一起播放这个列表上的所有内容。
※ 如果您同时添加了视频和字幕,您就可以使用字幕功能了。
观看三星智能电视上的内容您可以享受所有连接到电视上的设备里的内容,这些都可以作为源文件播放。
※ 2013和2014的三星智能电视, 您可以从“多媒体”访问所连接设备里面的内容,2015的三星智能电视, 从“我的内容”访问※ 应用程序可用性可能因地区而异。
※ Netflix 需具备会员资格。
Smart View操作说明在同一网络下连接移动设备/电脑和电视从应用商店或三星盖乐世社区应用商店下载“Samsung Smart View”应用程序。
启动“Samsung Smart View”应用程序,并根据向导完成安装。
※ 2011~2013三星智能电视, 在弹出窗口选择“允许”,以显示出附近的设备进行连接。
2014年~2015年三星智能电视,需要输入电视屏幕上显示的4位数字。
支持的设备智能电视2011LED D7000及以上,PDP D8000及以上。
SmartView软件操作手册欢迎使用 SmartView(TM)SmartView(TM) 是您的系统随附的光盘所提供的一款功能强大、使用方便的分析软件。
SmartView 与摄像机配合使用,就能:, 将热像图像传送到电脑并有效管理它们, 优化和分析红外线和可见光对照图像, 创建和打印包含重要图像数据的详细专业报告,理解系统要求在安装和操作 SmartView(TM) 之前,确保您的计算机满足下列系统要求:软件要求, Microsoft(TM) Windows(TM) 98SE/ME/2000/XP。
, 用于产品注册和查看“常见问答”的 Web 浏览器: Microsoft(TM) InternetExplorer 5.0 或更新版本或者 Netscape Browser(TM) 5.0 或更新版本。
硬件要求, CompactFlash(TM) 存储卡阅读器。
, 20 MB 可用磁盘空间,不包括 Web 浏览器和 Microsoft(TM) Word 所需的空间。
, 16-位色,800 x 600 或更高分辨率视频。
, 彩色打印机(用于打印图像)。
, 光驱(用于安装 SmartView 软件)安装 SmartView要安装 SmartView 软件:1. 关闭所有程序。
2. 将 SmartView 光盘插入系统的光驱中。
如果您的系统启用了“自动运行”功能,则安装会自动开始;请转至步骤 5。
3. 如果“自动运行”未启用,则从“开始”菜单中,选择运行。
4. 键入 <D:\setup>(如果您的光驱使用不同的盘符,请以您的光驱盘符来替换“D”)。
5. 遵照屏幕上的指示完成安装。
卸载 SmartView 软件要从您的计算机上卸载 SmartView 软件:1. 打开 Windows 控制面板。
2. 在 Windows 控制面板中,选择“添加或删除程序”。
3. 选中 SmartView,然后单击相应的按钮删除/卸载 SmartView 软件。
SmartView显示器使用快速操作手册注:此手册仅提供主要操作的过程,如需要详细操作说明请查看液位计的使用说明书的第四章。
一、 功能键介绍1、SmartView显示器一共有5个按钮,2、上下选择键,上下翻动来选择数值或者菜单。
3、左右选择键,左右翻动来选择数值或者菜单。
4、转到PV屏界面。
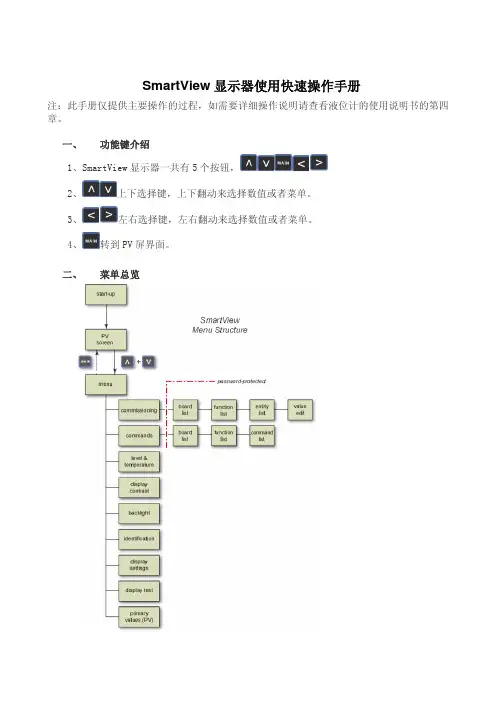
二、 菜单总览三、 开机及液位、温度值查询1、SmartView启动时显示:a、黑屏测试;b、白屏测试;c、Enraf徽标+软件版本+储藏罐识别号;d、PV屏幕2、待机时显示:STANDBY MODE3、按任意键进入启动界面,启动后会显示PV界面,通过键选择要查看的PV值(液位、温度等)。
四、 调试界面1、同时按键,进入调试界面:Commissioning 调试Commands 命令Level & temperature 显示液位和温度Display contrast 显示对比度Backlight 背景光Identification 识别Display settings 显示设置Display test 显示测试Primary values(PV) PV值显示(液位、温度显示)2、按键选择Commissioning菜单3、同时按键进入Commissioning菜单,显示Enter Password,密码为AAAAAA已经预置,再按键进入调试模式。
4、进入调试菜单后,可以看到液位的所安装的功能板:TII-XR 雷达液位测量板FII-RTD PT100点温度测量板HCI-BPM 现场总线通讯卡FII-SMV 显示器通讯卡5、按键选择TII-XR雷达液位测量板,按键进入菜单:TII-XR(0)BoardProduct level6、按键选择Product level,按键进入参数设置菜单:S-well diameter +2.032000E-01 导向管直径:8寸Tank botton pos +023.5320m 雷达液位计安装高度Max safe fill +022.0000m 最大安全液位…………7、按键选择Tank botton pos,按键进入参数设置:Tank bottom pos+023.5320Unit: mEnter Value+023.5320通过键来移动光标, 键来选择当前需要设置的值, 如果需要左移光标,则继续键, 如果选择键, 将退出当前设置菜单。


Smartview-11版本操作说明大唐联通项目组2010年10月一、海波龙Smartview介绍Smartview是海波龙公司开发的合并报表系统与OFFICE连接的软件。
安装Smartview后,可通过Smartview程序直接连接合并报表系统的数据库,根据使用者的用户权限将系统数据传出至EXCEL。
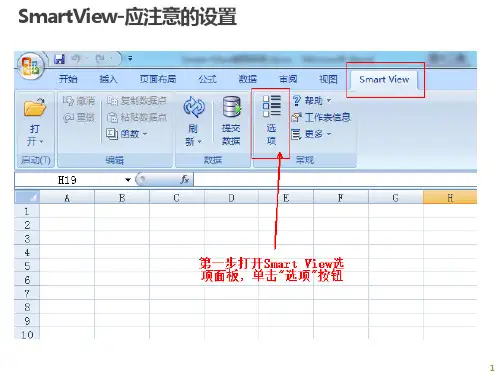
Smart View 面板通过 Smart View 面板,您可以管理数据源连接、访问数据和任务列表以及创建报表。
Smart View 面板从 Smart View 功能区打开,默认情况下显示在 Microsoft Office 应用程序的右侧。
您可以通过标题栏上的向下箭头对 Smart View 面板的位置和大小进行调整,或者关闭面板。
Smart View 面板包含下列窗格:•主页:包含一个面板,其中显示指向“共享连接”和“专用连接”的链接,以及最近使用项目的列表(如即席网格、数据表单和任务)。
您可以单击它们建立连接。
•共享连接:包含一个显示Oracle Hyperion® Shared Services 提供的可用连接的下拉菜单和一个显示当前选定连接的内容的树形视图。
•专用连接:包含一个显示本地计算机上保存的可用连接的下拉菜单和一个显示当前选定连接的内容的树形视图。
您还可以在此处输入 URL 直接连接到数据源。
•任务列表:任务的树列表,您可通过该列表管理任务。
只有当您从“共享连接”或“专用连接”中选择某个任务列表时,此窗格才会打开。
二、下载安装说明2.1、在IE浏览器中输入:http:// 10.192.137.19:19000/workspace/index.jsp打开登录页面。
2.2、输入用户名、密码。
登录进入以下页面。
2.3、点击“工具”按钮出现下拉框,找到“安装”再点击,出现下拉框,选择Smart view(s)点击。
2.4、点击Smart view(s)后,出现下载保存页面。

美创智能运营分析平台Smartview 组件使用手册杭州美创科技有限公司2015年09月安装准备.Net环境准备Smartview需要Microsoft .NET Framework 4环境来支持使用。
请先检查本地计算机.NET Framework版本是否足够。
.NET Framework 更高版本环境同样适用。
若本地计算机不满足条件则下载安装:Microsoft .NET Framework 4下载地址:/zh-cn/download/confirmation.aspx?id=1771 8按照提示安装即可。
Office套件准备Smartview需要Microsoft office套件来运行。
请先检查本地计算机Microsoft office套件是否已经安装。
推荐使用office 2003以上版本。
Smartview安装Smartview下载地址:/technetwork/middleware/epm/downloads/smart-view-1112x-2412371.html1.出现以下界面:2.下载完成后解压文件,打开文件所在目录,鼠标左键双击开始安装Smartview。
3.出现下图,选择你安装的目录:点击OK 。
等待即可安装完毕提示:在安装的时候请先关闭所有的Office 程序。
包括Word,Excel,PowerPoint 等。
使用方式启用组件Smartview安装后一般会自动出现在Office的菜单栏中。
若没有出现请按照以下步骤(以Office2010为例子):1.点击文件,选择选项。
2.选择加载项,并选择Smartview。
点击下部中间的转到按钮,勾选并确定就可以使用了。
配置组件1.点击菜单栏里面的Smartview,并点击面板按钮。
2.出现如下界面,点击创建新连接3.选择Oracle BI EE4.在URL栏目中输入http://172.16.80.30:7001/analytics/jbips,点击完成。
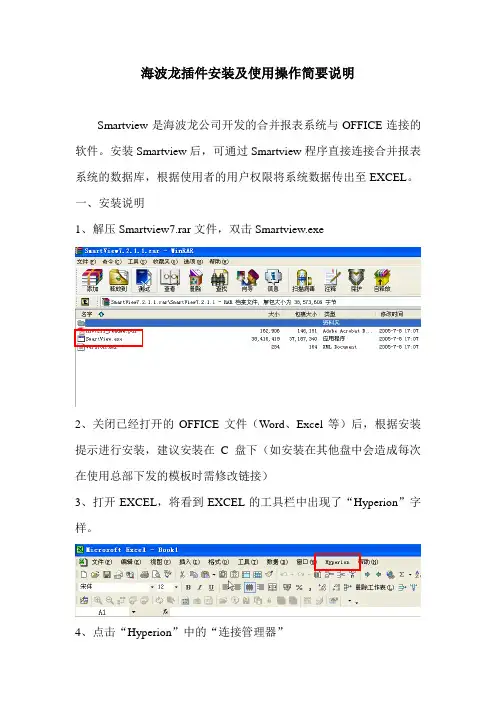
海波龙插件安装及使用操作简要说明Smartview是海波龙公司开发的合并报表系统与OFFICE连接的软件。
安装Smartview后,可通过Smartview程序直接连接合并报表系统的数据库,根据使用者的用户权限将系统数据传出至EXCEL。
一、安装说明1、解压Smartview7.rar文件,双击Smartview.exe2、关闭已经打开的OFFICE文件(Word、Excel等)后,根据安装提示进行安装,建议安装在C盘下(如安装在其他盘中会造成每次在使用总部下发的模板时需修改链接)3、打开EXCEL,将看到EXCEL的工具栏中出现了“Hyperion”字样。
4、点击“Hyperion”中的“连接管理器”5、点击“添加”,点击“URL 提供者”6、在“位置(L)”中输入http://10.192.137.19/hfmofficeprovider/hfmofficeprovider. aspx后点击“下一步”7、点击“Servers”,点击“Unicom”8、输入用户名及密码(请注意密码的大小写)后点击“连接”9、点击“Unicom/ Unicom”(注意一定要选择最末级的Unicom),点击“下一步”10、在名称栏中输入“UNICOM”后,点击“完成”二、操作说明1、总部根据目前合并报表系统的设置,利用Smartview编辑了整套报表的取数公式(合并报表系统取数0410)。
2、打开“合并报表系统取数0410”中的EXCEL文件,点击“Hyperion”,点击“连接管理器”后,输入用户名及密码。
3、选择工作表“封面”,修改“年”、“月”、“实体编号”、“专业”等。
4、选择写有公式的工作表,点击“Hyperion”,点击“函数”,点击“运行函数(活动页面)”或“运行函数(全部)”。
“运行函数(活动页面)”与“运行函数(全部)”的区别是:“运行函数(活动页面)”将只运行当前选中的工作表中的取数公式;“运行函数(全部)”将运行当前打开的所有文件中的所有取数公式。
SmartView显示器使用快速操作手册注:此手册仅提供主要操作的过程,如需要详细操作说明请查看液位计的使用说明书的第四章。
一、 功能键介绍1、SmartView显示器一共有5个按钮,2、上下选择键,上下翻动来选择数值或者菜单。
3、左右选择键,左右翻动来选择数值或者菜单。
4、转到PV屏界面。
二、 菜单总览三、 开机及液位、温度值查询1、SmartView启动时显示:a、黑屏测试;b、白屏测试;c、Enraf徽标+软件版本+储藏罐识别号;d、PV屏幕2、待机时显示:STANDBY MODE3、按任意键进入启动界面,启动后会显示PV界面,通过键选择要查看的PV值(液位、温度等)。
2四、 调试界面1、同时按键,进入调试界面:Commissioning 调试Commands 命令Level & temperature 显示液位和温度Display contrast 显示对比度Backlight 背景光Identification 识别Display settings 显示设置Display test 显示测试Primary values(PV) PV值显示(液位、温度显示)2、按键选择Commissioning菜单3、同时按键进入Commissioning菜单,显示Enter Password,密码为AAAAAA已经预置,再同时按键进入调试模式。
4、进入调试菜单后,可以看到液位的所安装的功能板:TII-XR 雷达液位测量板FII-RTD PT100点温度测量板HCI-BPM 现场总线通讯卡FII-SMV 显示器通讯卡5、按键选择TII-XR 雷达液位测量板,按键进入菜单:46、按键选择Product level,按键进入参数设置菜单: S-well diameter +2.032000E-01 导向管直径:8寸Tank botton pos +023.5320m 雷达液位计安装高度Max safe fill +022.0000m 最大安全液位……7、按键选择Tank botton pos,按键进入参数设置:Tank bottom pos+023.5320Unit: mEnter Value+023.5320通过键来移动光标, 键来选择当前需要设置的值, 如果需要左移光标,则继续键, 如果选择键, 将退出当前设置菜单。
SmartView软件操作手册欢迎使用 SmartView(TM)SmartView(TM) 是您的系统随附的光盘所提供的一款功能强大、使用方便的分析软件。
SmartView 与摄像机配合使用,就能:, 将热像图像传送到电脑并有效管理它们, 优化和分析红外线和可见光对照图像, 创建和打印包含重要图像数据的详细专业报告,理解系统要求在安装和操作 SmartView(TM) 之前,确保您的计算机满足下列系统要求:软件要求, Microsoft(TM) Windows(TM) 98SE/ME/2000/XP。
, 用于产品注册和查看“常见问答”的 Web 浏览器: Microsoft(TM) InternetExplorer 5.0 或更新版本或者 Netscape Browser(TM) 5.0 或更新版本。
硬件要求, CompactFlash(TM) 存储卡阅读器。
, 20 MB 可用磁盘空间,不包括 Web 浏览器和 Microsoft(TM) Word 所需的空间。
, 16-位色,800 x 600 或更高分辨率视频。
, 彩色打印机(用于打印图像)。
, 光驱(用于安装 SmartView 软件)安装 SmartView要安装 SmartView 软件:1. 关闭所有程序。
2. 将 SmartView 光盘插入系统的光驱中。
如果您的系统启用了“自动运行”功能,则安装会自动开始;请转至步骤 5。
3. 如果“自动运行”未启用,则从“开始”菜单中,选择运行。
4. 键入 <D:\setup>(如果您的光驱使用不同的盘符,请以您的光驱盘符来替换“D”)。
5. 遵照屏幕上的指示完成安装。
卸载 SmartView 软件要从您的计算机上卸载 SmartView 软件:1. 打开 Windows 控制面板。
2. 在 Windows 控制面板中,选择“添加或删除程序”。
3. 选中 SmartView,然后单击相应的按钮删除/卸载 SmartView 软件。
欢迎使用SmartView(TM)SmartView(TM) 是您的系统随附的光盘所提供的一款功能强大、使用方便的分析软件。
SmartView 与摄像机配合使用,就能:.将热像图像传送到电脑并有效管理它们.优化和分析红外线和可见光对照图像.创建和打印包含重要图像数据的详细专业报告.理解系统要求在安装和操作SmartView(TM) 之前,确保您的计算机满足下列系统要求:软件要求∙Microsoft(TM) Windows(TM) 98SE/ME/2000/XP。
∙用于产品注册和查看“常见问答”的Web 浏览器:Microsoft(TM) Internet Explorer 5.0 或更新版本或者Netscape Browser(TM) 5.0 或更新版本。
硬件要求∙CompactFlash(TM) 存储卡阅读器。
∙20 MB 可用磁盘空间,不包括Web 浏览器和Microsoft(TM) Word 所需的空间。
∙16-位色,800 x 600 或更高分辨率视频。
∙彩色打印机(用于打印图像)。
∙光驱(用于安装SmartView 软件)安装SmartView要安装SmartView 软件:1. 关闭所有程序。
2. 将SmartView 光盘插入系统的光驱中。
如果您的系统启用了“自动运行”功能,则安装会自动开始;请转至步骤5。
3. 如果“自动运行”未启用,则从“开始”菜单中,选择运行。
4. 键入<D:\setup>(如果您的光驱使用不同的盘符,请以您的光驱盘符来替换“D”)。
5. 遵照屏幕上的指示完成安装。
卸载SmartView 软件要从您的计算机上卸载SmartView 软件:1. 打开Windows 控制面板。
2. 在Windows 控制面板中,选择“添加或删除程序”。
3. 选中SmartView,然后单击相应的按钮删除/卸载SmartView 软件。
注意: 按钮名称取决于您运行的Windows(TM) 版本而有所不同。
Installation & Operations ManualMade in the USA800-527-9156/us800-451-1460 RP850001SVVer. 4N56W24720 N. Corporate Circle Sussex, WI 53089Thank you for purchasing the SmartView Visual Communication System. We are the largest Emergency Communication Manufacturer in North America and have been in business for over 35 years.We take great pride in our products, service, and support. Our Emergency Products are of the highest quality. Our experienced customer support teams are available to remotely assist with site preparation, installation, and maintenance. It is our sincere hope that your experience with us has and will continue to surpass your expectations.Table of ContentsPre-Installation Requirements . . . . . . . . . . . . . . . . . . Installation . . . . . . . . . . . . . . . . . . . . . . . . . . . . . . . . . .Operations and Testing . . . . . . . . . . . . . . . . . . . . . . . Recording Retrieval . . . . . . . . . . . . . . . . . . . . . . . . . .Troubleshooting . . . . . . . . . . . . . . . . . . . . . . . . . . . . . Installation with Ethernet Extenders . . . . . . . . . . . . .Connections for SmartView Display and Camera . .Installation with CE Elite PI Displays . . . . . . . . . . . . In-Building Intercom Master Setup . . . . . . . . . . . . . .LAN Setup . . . . . . . . . . . . . . . . . . . . . . . . . . . . . . . . . .Appendix A . . . . . . . . . . . . . . . . . . . . . . . . . . . . . . . . .Appendix B . . . . . . . . . . . . . . . . . . . . . . . . . . . . . . . . .Page 3Page 3Page 3Page 4Page 4Page 4Page 5Page 6Page 6Page 7Page 7Page 8800-527-9156/us800-451-1460 N56W24720 N. Corporate Circle Sussex, WI 530891. Power: 12v or 24v or Power over Ethernet (PoE or PoE+)2. Valid internet connection or wireless data device (cellular modem with data)3. 2100-SVC(B) SmartView Controller, 2100-SVD_ SmartView Display (or supported third party display), 2100-SVCD or 2100-SVCF SmartView Camera4. YES and NO buttons5. Laptop with a network connection1. Mount the SmartView Controller in the elevator using the provided adapter plate or mounting kit.2. Mount the Camera in the panel or ceiling of the elevator using the provided hardware. The Camera must be no more than 15 feet from the Controller.3. Connect the Camera to the Controller using the provided USB cable.4. Mount the SmartView Display in the elevator panel. The Display must be no more than 20 feet from the Controller. Note: Reference Appendix A for Display part numbers and window thickness.5. Connect the Display to the Controller using the provided HDMI cable.6. Connect the Display power output of the Controller to the SmartView Display’s power input using the provided cable. Note: The Controller power output is only compatible with the SmartView Display.Note: If using a CE Elite Pi Display, connect to the RS485/422 connection on the Controller. Power must be provided by a separate source.7. Connect the button designated for “YES” to the Controller terminal labeled “YES”.8. Connect the button designated for “NO” to the Controller terminal labeled “NO”. Note: Use 24 AWG wire minimum and 18 AWG wire maximum.9. Connect a CAT5E or greater cable with a valid internet connection to the RJ45/Ethernet port on the Controller.10. Apply 12v or 24v input power to the Controller on the terminal block labeled “Input Power”.Note: If using a PoE network switch, plug the Ethernet cable into the RJ45 port on the Controller. Note: Make all other connections before applying power.2100-SVC 2100-SVCB 2100-SVD_2100-SVCF2100-SVCD See Diagrams on Pages 4-5 for ConnectionsCompatible Internet Browsers: Google Chrome, Mozilla Firefox, Microsoft Edge, or Safari Note: A laptop or computer with a network connection is required for testing.1. Plug the provided flash drive into your laptop or computer.2. Open the SmartView link located on the flash drive.Note: If you have lost the provided flash drive contact RATH ®.3. Enter one of the IDs associated with your job. Note: A new tab will open automatically.4. In the new tab you will see the camera feed from the ID.5. Send a message to the Display by typing into the dialog box and press Enter . Note: YES and NO responses will be shown adjacent to the dialog box.1. Click on the SmartView shortcut on your desktop.2. Click Retrieve Previous Sessions and a new browser tab will open.3. Search by the SmartView ID.4. A list of recordings and time stamps will be shown.Note: Times are displayed in Central Standard Time (CST).5. Click the play icon to view the recording.Recordings are stored for up to 7 years.Installation with Ethernet Extenders (2100-SVE)SmartViewCameraYES HDMIDisplay PowerAux PowerUSBEthernetTX+TX-COM RX+RX-SmartView Controller (12v, 1A or 24v 0.5A)YES NOTo SmartView CameraTo Network SwitchorEthernet ExtenderTo SmartView Display To SmartView DisplayNOSmartView DisplayWiring Example:For initial setup, the SmartView Head-End will need to be connected to the internet.1. Install the SmartView Controllers before setting up the Head-End (see instructions on page 3).2. Power on the Head-End and wait for the software to load.3. Click the SmartView icon to begin linking the Head-End Controllers.4. On the Configuration Screen, enter each SmartView ID installed at your location.5. Click Submit.Note: If you see an error, re-check that a proper ID was entered.6. The IDs will be displayed on the next page.7. Once successfully linked, you will see a list of the devices with a view icon next to each. Note: Wait at least 2 minutes to allow the SmartView devices to link before testing. Note: To verify operation, click the view icon for one of the devices.1. Follow the previous installation steps, omitting steps involving the SmartView Display.2. Mount the CE Elite PI Display in the elevator.3. Follow the wiring schematic below for connecting the SmartView Controller with a CE Elite PI Display via the RS485/422 connectors.SmartView CameraTo SmartView CameraYES To Network SwitchorEthernet ExtenderCE Elite PI DisplayHDMIDisplay PowerAux PowerUSBEthernetSmartView Controller (12v, 1A or 24v 0.5A)YES NOTX+TX-COM RX+RX-NOTo ensure operation if the external internet is compromised, verify the Head-End and Controllers wire back to the same network switch or series of network switches. See wiring example below.Machine RoomNetwork SwitchElevator 6Elevator 3Elevator 4Elevator 2Elevator 1Head EndNetwork SwitchBuilding RouterFloor 1Floor 2Floor 3Floor 4SmartView Controller Specifications:• Power Requirements: 12v or 24v or PoE or PoE+• Curent Draw: 12v Active = 1A 12v Idle = 0.5A 24v Active = 0.5A 24v Idle = 0.25A• Operating Temperature: 32°F to 158°F (0°C to 70°C)• Dimensions: 4” H x 7” W x 1.2” DSmartView Camera Specifications (Powered by Controller):• Power Requirements: Active = 5v, 0.12A Idle = 0v, 0A• Operating Temperature: 32°F to 140°F (0°C to 60°C)SmartView Display Specifications (Powered by Controller):• Power Requirements: Active = 5v, 0.59A Idle = 0v, 0A• Operating Temperature: -4°F to 158°F (-20°C to 70°C)• Screen Size: 5 inches • Part Numbers:2100-SVD (0.0625” window) 2100-SVDA (0.125” window) 2100-SVDB (0.109” window) 2100-SVDC (0.078” window)Example ID Table:。
Fluke 热像仪应用软件
--- SmartView软件简介
Smartview软件说明
保存格式为IS2的红外热图可使用SmartView软件实现图像处理、标注、导出、生成报告等功能,软件适合所有Fluke红外热像仪型号。
SmartView软件可任意安装在有Windows2000、XP、Vista等操作系统的计算机内,安装次数没有限制。
硬件要求:
•SD/CF存储卡阅读器。
•200 MB 可用磁盘空间,不包括 Web 浏览器和Microsoft(TM) Word 所需的空间。
•16位色,800 x 600 或更高分辨率视频。
•光驱(用于安装 SmartView 软件)
软件设置–温度单位设置
注意:当SmartView软
件安装完成后,华氏温
标为其默认温度单位,
请尽快设置为摄氏温标。
操作步骤:编辑–首选
项–应用–温度单位
软件设置–报告输出格式设置
操作步骤:编辑–首选
项–报告
可选择PDF、Word等。
注意:Smartview软件报
告若以Word格式输出,
计算机需要能打开Word
2007版本,否则需要对
Office系统进行升级。
软件操作–打开热图文件
操作步骤:文件–打开–找寻热图
或直接用快捷方式打开热图。
软件支持同时打开多幅热图,并以层叠或平铺形式展开
热图分析–进入热图分析页面
双击在浏览页面下的热图,即可进入分析页面。
热图分析–标注
区域
标注
点标注
软件可在红外图范围内标注任意点、线、区域的温度状态,按鼠标右键可进行标注的编辑和删除。
热图分析–标注(线)
在进行线标注时,
可使用图形工具
显示所标注的线
条(可多条)的
温度分布曲线。
热图分析–红外、可见光融合
拖动滑块,调整可见光
在红外图像中的显示比
例,以便清晰标明问题
点的位置。
热图设置为画中画模式
该功能同样适用。
热图导出–图像
在浏览页面中选取需要导出
的热图,按鼠标右键后选取
“导出”,再选取“图像”
,即
可导出各种格式图片及增加
日期和调色板。
注意:一旦热图导出,导出
的图片不再具有分析功能,
若需要重新分析,必须打开
原始热图(IS2格式)进行
分析。
热图导出–数据
在导出命令框内选择“温
度
数据”即可将热图导出为
包
含全部像素温度值的表格
,表格的X、Y轴的数据与
像素对应。
热像报告生成–选择热图
在主菜单栏中选择“报告”
,
进入向导即可;在浏览页面
中所有的热图均可供选择进
行报告;报告模板一般“基
本”为主;若报告语言与软
件语言不一致(如中文软件
需要出英文报告),请修改
报告模板。
热像报告生成–报告内容
报告内容有:
标题页–客户名称及标题
内容
布局–热像图各参数的显
示及热像仪参数
外观–报告各部分字体及
颜色
摘要–热图各部分的说明
及总体描述
完成报告内容后按“完成”
即。