DigiTech-rp70效果器简体中文说明书21p
- 格式:docx
- 大小:363.13 KB
- 文档页数:21

OWNER’S MANUALWARRANTYWe at DigiTech® are very proud of our products and back-up each one we sell with the following warranty:1. Please register online at within ten days of purchase to validate this warranty. This warranty is valid only in theUnited States.2. DigiTech warrants this product, when purchased new from an authorized U.S. DigiTech dealer and used solely within the U.S.,to be free from defects in materials and workmanship under normal use and service. This warranty is valid to the original purchaser only and is non-transferable.3. DigiTech liability under this warranty is limited to repairing or replacing defective materials that show evidence of defect,provided the product is returned to DigiTech WITH RETURN AUTHORIZATION, where all parts and labor will be covered up to a period of one year. A Return Authorization number may be obtained by contacting DigiTech. The company shall not be liable for any consequential damage as a result of the product’s use in any circuit or assembly.4. Proof-of-purchase is considered to be the responsibility of the consumer. A copy of the original purchase receipt must beprovided for any warranty service.5. DigiTech reserves the right to make changes in design, or make additions to, or improvements upon this product withoutincurring any obligation to install the same on products previously manufactured.6. The consumer forfeits the benefits of this warranty if the product’s main assembly is opened and tampered with by anyoneother than a certified DigiTech technician or, if the product is used with AC voltages outside of the range suggested by the manufacturer.7. The foregoing is in lieu of all other warranties, expressed or implied, and DigiTech neither assumes nor authorizes any personto assume any obligation or liability in connection with the sale of this product. In no event shall DigiTech or its dealers be liable for special or consequential damages or from any delay in the performance of this warranty due to causes beyond their control.NOTE: The information contained in this manual is subject to change at any time without notification. Some information contained in this manual may also be inaccurate due to undocumented changes in the product since this version of the manual was completed. The information contained in this version of the owner’s manual supersedes all previous versions. TECHNICAL SUPPORT & SERVICEIf you require technical support, contact DigiTech Technical Support. Be prepared to accurately describe the problem. Knowthe serial number of your device – this is printed on a sticker attached to the chassis. If you have not already taken the time to register your product, please do so now at .Before you return a product to the factory for service, we recommend you refer to this manual. Make sure you have correctly followed installation steps and operating procedures. For further technical assistance or service, please contact our Technical Support Department at (801) 566-8800 or visit . If you need to return a product to the factory for service, you MUST first contact Technical Support to obtain a Return Authorization Number.NO RETURNED PRODUCTS WILL BE ACCEPTED AT THE FACTORY WITHOUT A RETURN AUTHORIZATION NUMBER.Please refer to the Warranty information, which extends to the first end-user. After expiration of the warranty, a reasonable charge will be made for parts, labor, and packing if you choose to use the factory service facility. In all cases, you are responsible for transportation charges to the factory. If the product is still under warranty, DigiTech will pay the return shipping.Use the original packing material if it is available. Mark the package with the name of the shipper and with these words in red: DELICATE INSTRUMENT, FRAGILE! Insure the package properly. Ship prepaid, not collect. Do not ship parcel post.INTRODUCTIONThanks for choosing the DigiTech® CabDryVR Dual Cabinet Simulator pedal. The CabDryVR was designed for the selective guitarist who wants the highest quality effects in a compact package. The CabDryVR provides such distinguishing features as true bypass and dual-cabinet processing, making the CabDryVR an essential addition to the signal chain of players who know about sound quality and demand the utmost in performance with superior tone and control.The CabDryVR works with both electric guitar and bass, and can be used to provide the sound of a guitar/bass cabinet when the use of an actual cabinet is not practical. For example, connect the CabDryVR directly to a mixer when playing live—eliminating the need to carry a heavy amp and cabinet! Or, connect the CabDryVR directly to an audio interface for recording in an apartment or when acoustic isolation is required.The CabDryVR provides two independent channels with up to 7 different speaker cabinet types to choose from (7 based on popular guitar cabinets and 7 based on bass cabinets). These cabinets can be mixed in multiple varieties using the two 7-position CAB TYPE controls. Two additional controls are provided for each channel to adjust speaker cabinet size (resonance) and output level. CAB B also offers a DRY setting, useful for applications where the unprocessed signal is also required.The CabDryVR has dual inputs and outputs, so it can be placed at the end of a stereo effects chain and maintain stereo separation. Another cool feature is the CabDryVR's mono in to dual-cabinet output capability. This means you can plug your instrument into INPUT A and use both outputs to achieve additional functionality:• Use the CAB A cabinet-simulated signal and set CAB B to the DRY setting to send the dry (unprocessed) signal to a real amplifier simultaneously.• Drive two different cabinet simulations from a single guitar feed for stereo operation with varying tones or for blending various cabinet tones together.To use the CabDryVR pedal:1. Enable the effect with the FOOTSWITCH (the LED will light when the effect is enabled).2. Set the SIZE and LEVEL knobs to 12 o'clock.3. Set the GUITAR/BASS switch to the position that matches the type of instrument you are connecting.4. Strum your instrument and switch through the cabinets using the CAB TYPE A knob until the desiredcabinet is found.5. Fine tune the SIZE and LEVEL knobs for CAB A.6. If you are using a second instrument or want to use two different cabinets together, repeat steps 4–5 forCAB B using the TYPE, SIZE, and LEVEL knobs for CAB B.1FEATURES• Dual-Channel Speaker Cabinet Simulation for Electric Guitar or Bass • 7 Guitar & 7 Bass Cabinets to Choose from• Controls for Cab A/B Type, Cab A/B Size, & Cab A/B Level• Dual 1/4” Inputs & Outputs• Supports Mono Input to Dual Output Operation• Optional Analog Dry Output on Cab 2• LED Indicator Shows Effect On/Off & Output Clipping• True Bypass• Constant High Voltage Power Rails• Soft-Touch Vacuum Switch• Included StompLock™ & Pedalboard Hook & Loop Pad• Optional PS0913DC Adapter (Required)23USER INTERFACE1239111012567841. GUITAR/BASS SwitchSelects whether the CAB TYPE A and CAB TYPE B knobs will select guitar or bass cabinet simulations.2. DC Power JackConnect the specified HARMAN power supply (sold separately) to this jack. Be sure to use the proper power supply for your area’s mains line voltage. See 'Cabinet Model Descriptions' on page 10 for power supply model information. The CabDryVR can only be powered using the external power supply.3. CAB TYPE A KnobSelects the cabinet type for CAB A. There are 7 unique cabinet types for both guitar and bass depending on the position of the GUITAR/BASS switch:4. CAB TYPE B KnobSelects the cabinet type for CAB B. There are 6 unique cabinet types plus an analog dry output option for both guitar and bass depending on the position of the GUITAR/BASS switch:CAB B has the same first 6 cabinet types as CAB A plus an analog dry output selection. This allows a single instrument connection to be split into a processed signal with cabinet simulation applied and a dry(unprocessed) output signal for connecting to the input of a real amplifier or recording interface.NOTE: The "dry" signal does not pass through the A/D/A converters and processing, so it will not incur the latency introduced on the cabinet-simulated (processed) signal. Therefore, care should be taken—or manual latency compensation applied—to minimize phase incoherence in applications where both the processed and dry signals may be blended together or simultaneously audible.5. FootswitchTurns the effect on or off.6. Indicator LEDThis LED lights to indicate the effect is turned on or flashes to indicate clipping. When the LED is lit green, guitar cabs are being used. When the LED is lit yellow, bass cabs are being used. If the LED flashes redwhen signal is present, clipping is occurring in the cabinet filter or at the output of the pedal. If clipping occurs, try reducing the LEVEL controls to eliminate it. If that doesn't work, levels should be reduced pre the CabDryVR.7. CAB A SIZE/LEVEL KnobsThese concentric knobs adjust the size and output level of CAB A. The inner knob adjusts the size(resonance) of CAB A. Higher settings emphasize the upper-mid/high frequencies, while lower settings emphasize the lower-mid/bass frequencies. The outer knob adjusts the output level of CAB A.8. CAB B SIZE/LEVEL KnobsThese concentric knobs adjust the size and output level of CAB B. The inner knob adjusts the size(resonance) of CAB B. Higher settings emphasize the upper-mid/high frequencies, while lower settings emphasize the lower-mid/bass frequencies. The outer knob adjusts the output level of CAB B.9. INPUT A JackConnect your instrument or the output of another effect pedal to this jack when only a single connection is needed. If an input connection is only made to INPUT A, the signal is passed through both cabinet model paths and will be heard at both outputs.410. INPUT B JackConnect a second input to this jack for stereo or dual operation. When a connection is made to this jack, INPUT A is fed through CAB A and INPUT B is fed through CAB B. These are passed separately to OUTPUTS A and B to keep separation between channels.11. OUTPUT A JackConnect this output to a single mixer channel or single input of an audio interface. If running long cable distances, more than approximately 25', a DI box should be used for best signal performance. Only CAB A will be heard at this output when the pedal is active.12. OUTPUT B JackConnect this output to a second mixer channel or a second input of an audio interface. If running long cable distances, more than approximately 25', a DI box should be used for best signal performance. Only CAB B will be heard at this output when the pedal is active. If only INPUT A is connected, the signal will be split to both OUTPUT A and OUTPUT B. If INPUT B is connected, only the INPUT B signal will pass through OUTPUT B.5MAKING CONNECTIONS/APPLYING POWERTo connect the CabDryVR pedal to your system:1. Turn down the input gain or volume of the device that you are connecting the CabDryVR's outputs to(e.g., mixer, audio interface, DI box, etc. ).2. Set the LEVEL knobs on the CabDryVR to 12 o'clock.3. Make all audio connections to the CabDryVR as shown in 'Connection Diagrams' on page 7. It isrecommended to place any preamp or distortion effect before the CabDryVR inputs. Delay, modulation, and stereo effects can be placed either before or after the CabDryVR pedal.4. Connect the appropriate HARMAN power supply (not included) to the POWER input connector andconnect the other end to an available AC outlet.5. Strum your guitar and gradually increase the input gain or volume of the mixer, audio interface, or ampuntil the desired level is achieved. Ensure that no clipping is occurring in the CabDryVR or the device to which you are connected. If clipping does occur, adjust levels accordingly to eliminate the clipping.67OptionalSingle Instrument with Stereo Effects – Stereo Input/Output8Single Instrument – Single Cabinet + Dry OutOptionalSingle Instrument – Amp Preamp/FX Loop Use only unbalanced TS instrument cables for audio connections.CAB A IN CAB A OUTCAB B OUT (Dry) NOTE: Using this application, the guitar signal will pass through the amplifier's preamp before being sentthrough the CabDryVR and on to the mixer or audio interface preamp. The CAB B output should be set to Dry so that the real amplifier will operate normally, without any amp simulation.9Dual Instruments – Dual Input/OutputOptionalCABINET MODEL DESCRIPTIONSGuitar Cabinets• CAB 1 – Vintage American 2x12Based on a classic American twin combo with clean hi-fi sounding speakers.• CAB 2 – Vintage British 2x12Based on a classic British twin combo with Blueback speakers, this cab has a more pronounced midrange.• CAB 3 – British Green Slant 4x12Based on a vintage British slant 4x12 cabinet with 25W Greenback speakers.• CAB 4 – British Straight 4x12Based on a modern British straight 4x12 cabinet with 70W speakers.• CAB 5 – Heavy American 4x12Based on a modern American slant 4x12 with 30W vintage-style speakers, this cab has big chunky lows. • CAB 6 – Smooth Custom 4x12A dirtier custom cabinet with a little more midrange and high-end sizzle than a standard 4x12 cabinet.• CAB 7 – Small Combo 1x8A small American combo speaker that does a great job at cutting through the mix.Bass Cabinets• CAB 1 – Flexy 1x15This cabinet defined the sound of recorded bass and is still a studio staple to this day. Provides a warm character with big low end.• CAB 2 – Bassic 1x15Great tone that features both warmth and clarity from a compact combo 2-way speaker system.• CAB 3 – Big Blue 1x18Big lows from a big 18” speaker in a folded horn cab.• CAB 4 – AmeriTweed 4x10Based on a vintage American tweed 4x10 combo. This cabinet sounds great on guitar too!• CAB 5 – Gold Diamond 4x10Extremely versatile 2-way modern hi-fi cabinet tone with exceptional low end and enhanced presence. • CAB 6 – Vintage Fridge 8x10Nicknamed "The Fridge", this cabinet was the king of rock tone thanks to its massive SPL capability. • CAB 7 – Blonde Basement 2x12Based on a vintage American big blonde 2x12 cabinet. This cabinet also sounds great on guitar.10APPLICATION TIPSUsing Bass & Guitar SimultaneouslyTo use the CabDryVR with bass and guitar simultaneously, set the CabDryVR switch to "BASS" and use either the Ameritweed 4x10 (CAB 4) or Blonde Basement (CAB 7) for the guitar.Simulating a Cabinet in a RoomThis is one of the positives to having a cabinet simulator in pedal format: you can place a reverb, such as the DigiTech Polara (the "Room" algorithm works great for this), post the CabDryVR and dial in a nice room reverb to simulate a "cab-in-a-room" sound.Parallel Fuzzes/DistortionSince the Cab DryVR is dual mono, if you split your signal before the CabDryVR and use different fuzzes (or distortion/overdrive pedals if you swing that way) on each channel and then use different cabs on each channel, you can get massive double-tracked sounds. With this trick you need to be wary of phase issues, as many fuzz/ distortion/overdrive pedals may flip phase, so some experimentation or correction may be required.11PERFORMANCE ACCESSORIESThe performance accessories make integrating the CabDryVR pedal into any pedalboard a snap. The following accessories are included:• Hook-and-loop Pedalboard Pad(designed to attach to the surfaces found on most commercial pedalboards)• StompLock™(keeps your settings where you want them)Hook-and-loop Pedalboard PadTo attach the Pedalboard Pad, do the following:1. Peel off the existing rubber skid pad from the bottom of the pedal.2. Peel the adhesive protector from the back of the Pedalboard Pad.3. Apply the Pedalboard Pad to the bottom of the pedal.4. 5.12StompLock™The included StompLock lets you lock your settings in place, while the open-top design lets you see your settings.To place the StompLock over the pedal knobs:1. Set the knobs to your preferred settings.2. Orient the StompLock so that it lines up with the knobs and gently push it over the top of the knobs.3.To remove the StompLock, grip it from the sides and gently lift it up and off the knobs.13SPECIFICATIONSInterfaceControls: Cab Type A, Cab A Size, Cab A Level, Cab Type B, Cab B Size, Cab B Level Switches: Effect On/Off, Guitar/BassJacks: Cab A Input, Cab B Input, Cab A Output, Cab B Output ElectronicA/D/A Converters: 24-bit high performanceSampling Frequency: 44.1 kHzTHD + Noise: 0.004% @ 1kHzFrequency Response: 20Hz – 20kHzSNR: ≥ -105dB (A weighted): ref = 1dBu w/unity gainInputsJack Type: 1/4” instrument TS, unbalancedInput Impedance: Effect on: >1 MΩ (Input A/B), >500 kΩ (Input A only)Effect off: True hardwire bypassMax Input Level: +5 dBuOutputsJack Type: 1/4” TS, unbalancedOutput Impedance: Effect on: 1 kΩEffect off: True hardwire bypassMax Output Level: +10 dBuPowerPower Requirements: 9V DC external power supplyPower Consumption: 1.2 W (< 125 mA @ 9V DC)Current Draw: 125 mA (typical at 9V DC)Recommended Power Supply (Sold Separately)Power Supply Model: PS0913DC-01 (US, JA, EU)PS0913DC-02 (AU, UK)PS0913DC-04 (US, JA, EU, AU, UK)Power Supply Polarity:Power Supply Output: 9V DC 1.3 APhysicalDimensions: 4.40” (L) x 2.65” (W) x 2.0” (H)11.18cm (L) x 6.73cm (W) x 5.08cm (H)Weight: 1.0 lb. (0.453 kg)Specifications subject to change without notice.14PHONE:(801) 566-8800WEB: SUPPORT:/en-US/supportCabDryVR Owner's Manual5081772-B© 2017 HARMAN.All rights reserved.DigiTech is a registered trademark of HARMAN.。
Digitech RP150中文说明书第一部分介绍恭喜您获得了一部RP150。
您现在拥有了一部令人难以置信的先进的效果处理器,可以追随您的创意甚至推动您的灵感。
它搭载了DigiTech公司专利产品AudioDNA2数字信号处理芯片,以提供给您极为丰富的音色和效果的选择,并忠于您的指尖。
当您转动旋钮从音色库及效果库获取您所需要的音色时,您将激动于它每一个精确的模型和每一个充满动感的音色。
USB接口的应用极大方便了您电脑录音并让您随时使用鼓机。
一切皆来源于RP150:开启您灵感源泉的钥匙。
产品包括:RP150,PS0913B电源,质量保证卡.在您开始之前,请确认包装中的配件。
关于RP150演奏模式:当您接通RP150的电源时,即进入演奏模式。
在演奏模式中,您可以通过调节上下踏板来获得所有预存音色。
转动左起第一个圆形旋钮可以从音色库中选择一种音色,转动第二个旋钮可以从效果库中选择一种效果,第三个旋钮用于调节效果值,第四个旋钮用于调节音量。
旁通模式:旁通状态使音色处于未经RP150处理的吉他音色。
进入旁通状态需要同时踩两个脚踏开关,显示屏显示"BY"字样说明预置被旁通。
踩任何一个脚踏开关都可退出旁通状态。
校音模式:RP150具有音准调节功能。
同时按下两个踏板不放开,当显示屏显示TU时即进入调节模式。
演奏一个音符,显示屏将会显示此音符的音高,左侧的一排指示灯将会显示此音高距标准音的差距。
当上面五个红灯中的一个亮起时,要把音调低一点,当下面的五个红灯亮起时,要把音调高一点;当绿灯亮起时此音即调节完毕。
按下左右任何一个踏板即可退出调节模式。
当进入校音功能时,你可以改变音调的"基准音"。
厂家"基准音"的默认值A=440Hz(显示40)。
按 Value(数值)键可在几个降调中轮流选择,它们分别是A=Ab(显示Ab),A=G(显示g)和A=Gb(显示Gb)。
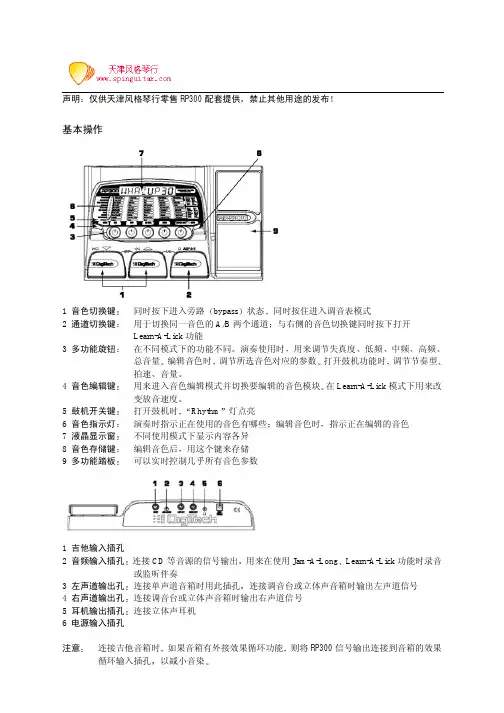
DIGITECHRP2000中文说明书完全版关于效果器1.功能踏板两个功能踏板用来选择预置的效果参数、进入调音状态以及将效果器切换入干琴状态。
右边的用于向上换效果,左边的向下翻,同时踩下进入bypass状态,同时踩下数秒,进入调音器状态。
2.参数旋钮在效果执行模式中用于改变效果的音箱模拟种类、增益及主音量,在编辑模式用来调整该旋钮对应的参数,在鼓机模式中用来改变节奏类型、速度及鼓机音量,在调音器模式中用于改变不同调音标准。
3.效果编辑按钮用于进入效果器编辑模式以及选择不同的效果进行编辑4.鼓机开关进入或退出鼓机模式,进入后鼓机的指示灯亮5.LED灯组用于显示当前效果所使用的效果种类,以及在调音模式中显示调音状况6.储存键用于储存编辑后的音色7.表情踏板通过不同的设定,控制音量、哇音、增益、延时、混响等效果参数关于效果器的电源接入在音箱及效果起都关闭的状态下,将音箱音量、效果起主音量关闭,接入效果起电源,打开音箱。
建议将第一个音色中表情踏板设置为音量踏板,将音量用踏板完全关闭后就可以关闭效果器,或换吉他。
关于音色的编辑1. 用踏板选择到要编辑的效果,按效果编辑按钮一次。
2. 用选择按钮选择要编辑的效果(LED显示当前编辑效果)用参数旋钮编辑所选参数。
3. 编辑完毕按下效果编辑按纽一次,设定效果名称,再按一次选择效果保存的位置完成保存设置,最后按编辑按钮完成保存4. 名称的设定用旋钮1选择所需字母、符号旋钮2选择字母输入的位置关于RP200的效果参数1. PICK UP/WAH 拾音器模拟及哇音设置。
旋钮1用于选择PCK OFF(关闭拾音器模拟起)SC>HUM(用单线圈模拟双线圈)HUM>SC(双线圈模拟单线圈).旋钮2用于选择不同的WAH的种类CRY、BOUTIQ(BOUTIQUE WAH)、FULRNG (FULLRANGE WAH)旋钮3调整WAH的程度(1~99)2. COMPRESSOR 压缩旋钮1选择压缩种类FAST、MEDIUM和SLOW,旋钮2设定压缩比率(范围1~20少量~完全压缩)旋钮3选择压缩的输出增益(范围0~6)3. AMP MODELING 音箱模拟 RP200的音源用旋钮1选择共12种经典音色的模拟AMP OFF 关闭音箱模拟器BLKFAC(模拟`65FENDER TWIN REVERB)BOUTIQ(MATCHLESS DC30)RECTIF(MESA DUAL RECTIFIER)HOTROD(MESA BOOGIE MARKII C)TWEED(`57 FENDER TWEED DELUXE)CLEAN1(VOX AC30 TOP BOOST)CLEAN2(A CLEAN TUBE COMBO)STACK(MARSHALL JCM900)CRUNCH(CRUNCHY COMBO)HIGAIN (JONHNSON JM150 HIGH GAIN)FUZZ (FUZZ DISTORTION)ACOUST(FLAT ACOUSTIC)有旋钮2设定失真的增益(非干琴音色)参数范围(0~99)旋钮3选择所选模拟效果音量的大小范围(0~99)、4. EQ 均衡所有的均衡通道范围(-12DB~12DB)旋钮1设置低音旋钮2设置中音旋钮3设置高音5. CABINET/GATE 空间模拟及噪音门用旋钮1选择DARK 、WARM、及BRIGHT每种4个不同话筒拾音位置的模拟用旋钮2选择GAT OF(关闭噪音门)SILNCR(打开噪音门) SWEL1~9(音量渐变效果从200毫秒到2秒的声音回馈)3种不同的噪音门种类用旋钮3选择从0~99的噪音门变化参数EFFECTS RP200的周边效果器用旋钮1选择效果种类用旋钮2 和3设置所选效果的参数CHORUS FLANGE PHASER TREMOLO PANNER VIBRATO ROTARY SPEAKER YAYA AUTOYA SYNTHTALK SYNTHTALK ENVELOPE FILTER DETUNE PITCH SHIFT WHAMMY 6.DELAY 延时效果旋钮1选择MONO1~9(DIGITAL DELAYS)ANLG1~9(ANALOG DELAYS)PONG1~9(PING PONG DELAYS)3种不同的延时效果旋钮2设定延时的时间1~99 (10~990毫秒)和1。
DAC-70UP / DOWN / CROSS CONVERTER Instruction Manualw w w.d a t a v i d e o.c omUP / DOWN / CROSS CONVERTER2Standard Warranty• Datavideo equipment is guaranteed against any manufacturing defects for one year from the date of purchase.• The original purchase invoice or other documentary evidence should be supplied at the time of any request for repair under warranty.• Damage caused by accident, misuse, unauthorized repairs, sand, grit or water is not covered by this warranty.• All mail or transportation costs including insurance are at the expense of the owner.• All other claims of any nature are not covered.• Cables & batteries are not covered under warranty.• Warranty only valid within the country or region of purchase.• Your statutory rights are not affected.Two Year WarrantyWarrantyWelcome to the DAC-70 Instruction ManualThank you for choosing a Datavideo product, pleasevisit the support pages on our website for the latestversion of the instruction manual./Converters/DAC-70Don’t forget to register your product online to qualify foran additional free one year extension to the standardwarranty, and to receive information from Datavideo onservice & information relevant to your Datavideo productincluding new software updates & drivers• All Datavideo products purchased after 01-Oct.-2008qualify for a free one year extension to the standardWarranty, providing the product is registered withDatavideo within 30 days of purchase. For information on how to register please visit or contact your local Datavideo office or authorized Distributors• Certain parts with limited lifetime expectancy such as LCD Panels, DVD Drives, Hard Drives are only covered for the first 10,000 hours, or 1 year (whichever comes first).Any second year warranty claims must be made to your local Datavideo office or one of its authorized Distributors before the extended warranty expires.DAC-703Disclaimer of Product and Services The information offered in this instruction manual is intended as a guide only. At all times, Datavideo Technologies will try to give correct, complete and suitable information. However, Datavideo Technologies cannot exclude that some information in this manual, from time to time, may not be correct or may be incomplete. This manual may contain typing errors, omissions or incorrect information. Datavideo Technologies always recommend that you double check the information in this document for accuracy before making any purchase decision or using the product. Datavideo Technologies is not responsible for any omissions or errors, or for any subsequent loss or damage caused by using the information contained within this manual. Further advice on the content of this manual or on the product can be obtained by contacting your local Datavideo Office or dealer. ContentsWelcome to the DAC-70 Instruction Manual 2Warranty 2Standard Warranty 2Two Year Warranty 2Disposal 4Warnings and Precautions 4Packing List 5Introdution 6Features 6Video Inputs 6Audio Inputs 6Video outputs 6Control 6Front Panel 7Rear Panel 8MINI Switch Mode Selection 9How to update the DAC-70 firmware 10DAC-70 Center Utility features 11Dimensions 14Specifications 15Service & Support 16UP / DOWN / CROSS CONVERTER4Warnings and Precautions1.Read all of these warnings and save them for later reference.2.Follow all warnings and instructions marked on this unit.3.Unplug this unit from the wall outlet before cleaning. Do not use liquid or aerosol cleaners. Use a slightly damp cloth for cleaning.4.Do not use this unit in or near water.5.Do not place this unit on an unstable surface, cart, stand, or table. The unit may fall, causing serious damage.6.Any slots and openings on the case top, back, and bottom are provided for ventilation. To ensure safe and reliable operation of this unit, and to protect it from overheating, do not block or cover these openings. Do not place this unit on a bed, sofa, rug, or similar surface, as the ventilation openings may become blocked. This unit should never be placed near or over a heat source or radiator. This unit should not be placed in a built-in installation unless proper ventilation is provided.7.This product should only be operated from the type of power source indicated on the marking label of the AC adapter. If you are not sure of the type of power available, consult your Datavideo dealer or your local power company.8.Do not allow anything to rest on the power cord. Do not locate this unit where the power cord will be walked on, rolled over, damaged or otherwise stressed.9.If an extension cord must be used with this unit, make sure that the total of the ampere ratings on the products plugged into the extension cord do not exceed the extension cord’s rating.10.Make sure that the total amperes of all the units that are plugged into a single wall outlet do not exceed 15 amperes.11.Never push objects of any kind into this unit through the case ventilation slots, as they may touch dangerous voltage points or short out parts that could result in risk of fire or electric shock. Never spill liquid of any kind onto or into this unit.12.Except as specifically explained elsewhere in this manual, do not attemptFor EU Customers only - WEEE MarkingThis symbol on the product indicates that it will not be treatedas household waste. It must be handed over to the applicabletake back scheme for the recycling of electrical and electronicequipment. For more detailed information about the recycling ofthis product, please contact your local Datavideo office.DisposalDAC-70 to service this product yourself. Opening or removing covers that are marked “Do Not Remove” may expose you to dangerous voltage points or other risks, and will void your warranty. Refer all service issues to qualified service personnel.13.Unplug this product from the wall outlet and refer to qualified service personnel under the following conditions:a.When the power cord is damaged or frayed;b.When liquid has spilled into the unit;c.When the product has been exposed to rain or water;d.When the product does not operate normally under normal operatingconditions. Adjust only those controls that are covered by the operating instructions in this manual; improper adjustment of other controls may result in damage to the unit and may often require extensive work by a qualified technician to restore the unit to normal operation;e.When the product has been dropped or the case has been damaged;f.When the product exhibits a distinct change in performance, indicating aneed for service.5UP / DOWN / CROSS CONVERTER6IntrodutionFeaturesThe Datavideo DAC-70 is a broadcast quality, set and forget, up-down-cross converter. The unit offers simple mini switch controls and/or a flexible USB 2.0 interface. Whilst the DAC-70 case LEDs quickly confirm, DC power input, source selection and detection. The DAC-70 makes it easy to share VGA or HDMI or SDI inputs within your chosen HDMI or SDI workflow.Housed in a rugged case, the DAC-70 is tough enough to meet the knocks of fast paced set ups in ENG, studio or live production work. Built to the same dimensions as Datavideo’s range of converters, the DAC-70 can also be mounted into a standard 19” rack with a mix of other units when using the RMK-2 module.That’s Datavideo, sharing the value!• Supports 3G-SDI technology with full 10 bit processing and low SDI jitter • DC or AC operation for convenient field or studio use• Quick and easy mini switch setup• Micro USB 2.0 interface for easy firmware updatesVideo Inputs• HD / SD-SDI [BNC] with active SDI loop through• HDMI• VGA [15pin D-Sub Female]Audio Inputs• Supports HDMI / SDI embedded multi-channel audio• Unbalanced RCA Phono sockets [ Stereo L&R Chls @ line level ]Video outputs• Two HD / SD-SDI [BNC] with embedded audio• HDMI with embedded audio• HDMI & SDI outputs are active at the same time regardless of setting Control• Windows only software utility for local configuration and control via Micro USB 2.0 interfaceNote: The DAC-70 supports HDCP copy protection. When you supply protected DVD or BD video the DAC-70 will output no signal.- Choose from:DAC-707Front PanelVGA IN Video InConnects your VGA connector equipment to this connector Supported resolutions 800x600 @60Hz, 1024x768 @60Hz, 1280x1024 @60Hz, 1366x768 @60Hz, 1400x1050 @60Hz, 1600x1200 @60HzHDMI In Connects your HDMI connector equipment to this connectorHDCP Copy Protection For legal reasons the HDMI input is unable to pass on video from copy protected HDMI sources.Audio In Inputs for 2 channels RCA unbalanced audioHD-SDI In & Output (Loop Thru)HD-SDI input and Loop-through output connectors.UP / DOWN / CROSS CONVERTER8Mode Select (Mini switch)Use these Mini switches to manually set the DAC-70 mode, see table on page 9.The unit can also be set up by Windows computerover USB 2.0 cable, see page 11.Source IndicatorDisplays video source format.HDMI OUTVideo and Audio output from HDMI.DC In SocketConnects the supplied 12V PSU to this socket.The connection can be secured by screwingthe outer fastening ring of the DC In plug to thesocket.USBFirmware upgrade/ Function control by DAC-CenterRear PanelDAC-709MINI Switch Mode SelectionMODE SELECT 1920x1080 p601920x1080 p59.941920x1080 p501920x1080 p301920x1080 p29.971920x1080 p251920x1080 p241920x1080 p23.981920x1080 i601920x1080 i59.941920x1080 i501280x720 p601280x720 p59.941280x720 p50720x480 i59(525i)720x570 i50(625i)0000 0001 0010 0011010001010110 0111 1000 1001 1010 1011 1100 1101 11101111 0 INT.1 EXT.00 VGA 01 HDMI 10 SDI 11 PC (DAC Center)Full Screen 01UP / DOWN / CROSS CONVERTER10Mini Switch Pin 8 Up: Full ScreenMini Switch Pin 8 Down: Span Scan 16:9 Span Scan 16:9Input 4:3, output 16:9Input 16:9, output 4:3How to update the DAC-70 firmwareFrom time to time Datavideo may release new firmware to either add new features or to fix reported bugs in the current DAC-70 firmware. Customers can update the DAC-70 firmware themselves or they can contact their local dealer for assistance.This section describes the firmware update process and it should take approximately 10 minutes total time to complete.The current DAC-70 settings should be noted. Once started the update process should not be interrupted as this could result in a non-responsive unit.As well as a working DAC-70 you will need:1. The latest update file for the DAC-70. This can be obtained fromyour local Datavideo dealer or office.2. The Upload Firmware utility. This can also be obtained from yourlocal Datavideo dealer or office.3. A Windows computer with USB 2.0 port.4. A USB 2.0 - USB A to micro USB cable.How to update the DAC-701.Switch off the power to the DAC-70.2.Save the firmware update file and Upload Firmware utility to thedesktop of your Windows computer so they are easy to locate.3. Connect the USB 2.0 cable between the DAC-70 and thecomputer.4. Launch the Datavideo Upload Firmware utility. It will showDisconnected and the connect button will be greyed out.5. Now switch on the power to the DAC-70. The connect button willnow be available to click. Once you clicked the Utility, it will nowshow Connected.6. Click the Open File button and select the update file.7. Click the Start button and wait for the progress bar to finish.8. When finishing the utility it will confirm PASS if the unit has beenupdated successfully.9. The utility will automatically disconnect the DAC-70 unit.10. Remove the USB cable from the DAC-70 and power cycle of theunit.11. The DAC-70 is now ready for use again.DAC-70 Center Utility featuresPlease copy the DAC-70 Center.exe utility software from the supplied CD to your Windows computer. Now connect the DAC-70 by USB cable to the same computer. Switch on the DAC-70 and then launch the DAC-70 Center utility software.1.Click on the Information tab to display the input format & firmware version. Array2.1 Click on the Video tab to enter the video setup.2.2 Set the input source, aspect ratio and output format then click Apply.Note1: When “Input Source” set on “VGA“, the Image Adjust can set Horizontal Position & Vertical Position.Note2: When “Aspect Ratio” set on “Under Scan“, the Image Adjust can set Horizontal Size & Vertical Size.2.3 Click Next Page to set the HDMI output colour & output range thenclick Apply.3.1 Click the Audio tab to set the audio parameters.3.2 Set the audio mute, audio source & audio level then click Apply.Note 1: Audio Level can also be switched between EBU and SMPTE standards. Note 2: Audio Level setting only for RCA input.4.1 Click the Proc AMP tab to adjust the picture settings.4.2 Set the Brightness, Contrast, Hue, and Saturation level.5.1 Click the Setting tab to access the restore factory defaults window.5.2 Click the Factory Default button to reset the DAC-70 to factorydefaults.All measurements in mmDimensionsSpecificationsNotesAll the trademarks are the properties of their respective owners. Datavideo Technologies Co., Ltd. All rights reserved 2013Service & SupportAug.19.2014 P/N: G082060577E3It is our goal to make your products ownership a satisfying experience. Our supporting staff is available to assist you in setting up and operating your system. Please refer to our web site for answers to common questions, support requests or contact your local office below.R.O.C.U.S.A.Datavideo Technologies (S) PTE Ltd No. 178 Paya Lebar Road #06-03Singapore 409030Tel:+65-6749 6866Fax:+65-6749 3266E-mail:******************Datavideo United KingdomDatavideo SingaporeDatavideo UK LimitedUnits1 & 2 Waterside Business Park Hadfield, Glossop, Derbyshire SK13 1BE, UKTel:+44-1457 851 000Fax:+44-1457 850 964E-mail:******************.ukDatavideo IndiaDatavideo Technologies India Pvt Ltd Fax:+91-0120-2427338E-mail:******************Tel:+91-0120-2427337A-132, Sec-63,Noida-201307,Uttar Pradesh (UP), India.Datavideo Technologies Co. Ltd10F. No. 176, Jian 1st Rd.,Chung Ho District, New Taipei City 235, Taiwan, Tel: +886-2-8227-2888Fax: +886-2-8227-2777E-mail:*********************.twDatavideo Corporation 7048 Elmer Avenue.Whittier, CA 90602, Tel:+1-562-696 2324Fax:+1-562-698 6930E-mail:******************Datavideo USADatavideo TaiwanDatavideo Hong KongDatavideo Hong Kong Ltd G/F.,26 Cross Lane Wanchai, Hong Kong Tel: +852-2833-1981Fax: +852-2833-9916E-mail:******************.hkDatavideo Technologies Europe BV Floridadreef 1063565 AM Utrecht, The NetherlandsTel:+31-30-261-96-56Fax:+31-30-261-96-57E-mail:*****************Datavideo EuropeDatavideo ChinaDatavideo Technologies China Co101,NO.618,LiuYing Rd,Zhabei District,Shanghai,ChinaTel: +86 21-5603 6599Fax: +86 21-5603 6770E-mail:********************Datavideo FranceDatavideo France s.a.r.lCité Descartes 1,rue Albert Einstein Champs sur Marne774477-Marne la Vallée cedex 2Tel:+33-1-60370246E-mail:*****************。
RP70操作手冊第一章簡介前言感謝你選擇了RP 70這款性能優異的模組化效果器,它可以幫助你製造出一些超乎想像的音色,由於本機擁有DigiTech新一代AudioDNA2數位DSP晶片,讓你在彈指之間就能體驗許多強的效果,你只要從RP70的音色資料庫或效果資料庫裡,簡單地挑選出擴大機、破音、各式效果串列,你就會喜歡上這些音色,再加上內建的鼓節奏機,讓RP 70充分激發出你床做的潛能吧。
內含配件在正式使用前,請確認包裝箱內的一些應有機件是否齊全。
‧RP 70主機一台。
‧PS 200R外接式電源供應器一個。
‧使用說明書一本。
‧品質保證卡一張。
每部RP 70在出廠前均經過嚴格的檢驗與包裝,內含配件應該都完整無缺,而且設備皆處於正常運作的狀況,無論如何,若是發現有配件短少,請盡快與我們聯繫,並在保證期間內妥善保留紙箱與包裝材料,萬一產品出現問題須要送廠維修,請使用既有的包裝設備來運送。
RP70簡要介紹演奏模式當RP70初次接上電源時,系統便會處於演奏模式,你可以利用上/ 下向腳踏開關選擇內建的各種音色,利用編輯上/ 下向按鍵在效果矩陣裡頭循環切換效果。
編輯模式當你利用編輯上/ 下向按鍵選擇效果的同時,也能利用數值上/ 下向按鍵調整效果參數,一旦內建的效果有了改變,你就必須確定要進行儲存動作,否則一旦選擇其他程式音色或關閉電源,你做的改變都會回復原有設定。
旁路直通模式RP70提供旁路直通的功能,讓你保有未經效果處理的吉他音色,只要同時踏下上/下向腳踏開關然後放開,系統便進入直通旁路狀態,顯示幕會出現BY字樣,在這個模式下,所有按鍵都沒有作用,踏下上/ 下向任何一個腳踏開關,系統變會離開直通旁路狀態,回復到先前的程式。
調音模式RP70內建的調音器能讓您快速調校吉他音準,想要進入調音模式,同時踏住上/ 下向腳踏開關不放約幾秒鐘,此時顯示幕會出現TU字樣代表進入調音模式,並且可以進行吉他調音,顯示幕會顯示輸入訊號的音名,矩陣LED指示燈則是標示音準太高或太低,左方六個紅色指示燈代表聲音太低必,音準須調低高,右方六個紅色指示燈代表聲音太高必須調低,中央指示燈代表準音,調音模式下無聲音輸出。
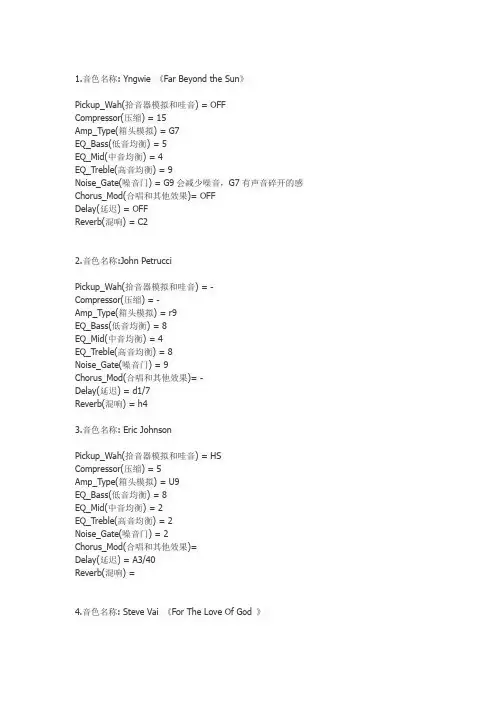
1.音色名称: Yngwie 《Far Beyond the Sun》Pickup_Wah(拾音器模拟和哇音) = OFFCompressor(压缩) = 15Amp_Type(箱头模拟) = G7EQ_Bass(低音均衡) = 5EQ_Mid(中音均衡) = 4EQ_Treble(高音均衡) = 9Noise_Gate(噪音门) = G9会减少噪音,G7有声音碎开的感Chorus_Mod(合唱和其他效果)= OFFDelay(延迟) = OFFReverb(混响) = C22.音色名称:John PetrucciPickup_Wah(拾音器模拟和哇音) = -Compressor(压缩) = -Amp_Type(箱头模拟) = r9EQ_Bass(低音均衡) = 8EQ_Mid(中音均衡) = 4EQ_Treble(高音均衡) = 8Noise_Gate(噪音门) = 9Chorus_Mod(合唱和其他效果)= -Delay(延迟) = d1/7Reverb(混响) = h43.音色名称: Eric JohnsonPickup_Wah(拾音器模拟和哇音) = HSCompressor(压缩) = 5Amp_Type(箱头模拟) = U9EQ_Bass(低音均衡) = 8EQ_Mid(中音均衡) = 2EQ_Treble(高音均衡) = 2Noise_Gate(噪音门) = 2Chorus_Mod(合唱和其他效果)=Delay(延迟) = A3/40Reverb(混响) =4.音色名称: Steve Vai 《For The Love Of God 》Pickup_Wah(拾音器模拟和哇音) = HS Compressor(压缩) = 1Amp_Type(箱头模拟) = R7EQ_Bass(低音均衡) = 6EQ_Mid(中音均衡) = 4EQ_Treble(高音均衡) = 7Noise_Gate(噪音门) = G5Chorus_Mod(合唱和其他效果)= D1 Delay(延迟) = D1Reverb(混响) = OF5.音色名称: MetallicA CleanPickup_Wah(拾音器模拟和哇音) = OF Compressor(压缩) = 10Amp_Type(箱头模拟) = b3EQ_Bass(低音均衡) = b8EQ_Mid(中音均衡) = d6EQ_Treble(高音均衡) = t6Noise_Gate(噪音门) = G5Chorus_Mod(合唱和其他效果)= C1 Delay(延迟) = OFReverb(混响) = S26.音色名称: MetallicAPickup_Wah(拾音器模拟和哇音) = SH Compressor(压缩) = 5Amp_Type(箱头模拟) = o4EQ_Bass(低音均衡) = 7EQ_Mid(中音均衡) = 9EQ_Treble(高音均衡) = 4Noise_Gate(噪音门) = S7Chorus_Mod(合唱和其他效果)= d7 Delay(延迟) = a3/ 35Reverb(混响) = r5音色名称: MetallicA HeavyPickup_Wah(拾音器模拟和哇音) = OFF Compressor(压缩) = OFFAmp_Type(箱头模拟) = R9EQ_Bass(低音均衡) = 9EQ_Treble(高音均衡) = 9Noise_Gate(噪音门) = G9Chorus_Mod(合唱和其他效果)= OFFDelay(延迟) = OFFReverb(混响) = R38.音色名称:ibanez tube screamer9 +boss dd3将Delay(延迟)设置为off就是只有ts9的效果。

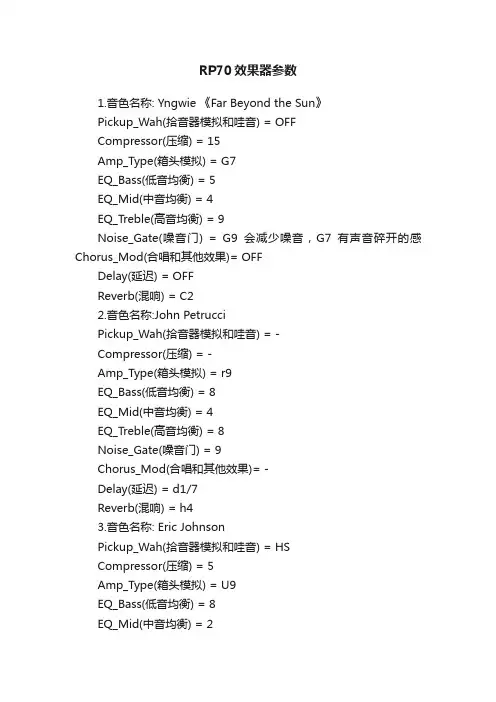
RP70效果器参数1.音色名称: Yngwie 《Far Beyond the Sun》Pickup_Wah(拾音器模拟和哇音) = OFFCompressor(压缩) = 15Amp_Type(箱头模拟) = G7EQ_Bass(低音均衡) = 5EQ_Mid(中音均衡) = 4EQ_Treble(高音均衡) = 9Noise_Gate(噪音门) = G9会减少噪音,G7有声音碎开的感Chorus_Mod(合唱和其他效果)= OFFDelay(延迟) = OFFReverb(混响) = C22.音色名称:John PetrucciPickup_Wah(拾音器模拟和哇音) = -Compressor(压缩) = -Amp_Type(箱头模拟) = r9EQ_Bass(低音均衡) = 8EQ_Mid(中音均衡) = 4EQ_Treble(高音均衡) = 8Noise_Gate(噪音门) = 9Chorus_Mod(合唱和其他效果)= -Delay(延迟) = d1/7Reverb(混响) = h43.音色名称: Eric JohnsonPickup_Wah(拾音器模拟和哇音) = HSCompressor(压缩) = 5Amp_Type(箱头模拟) = U9EQ_Bass(低音均衡) = 8EQ_Mid(中音均衡) = 2EQ_Treble(高音均衡) = 2Noise_Gate(噪音门) = 2Chorus_Mod(合唱和其他效果)=Delay(延迟) = A3/40Reverb(混响) =4.音色名称: Steve Vai 《For The Love Of God 》Pickup_Wah(拾音器模拟和哇音) = HS Compressor(压缩) = 1 Amp_Type(箱头模拟) = R7EQ_Bass(低音均衡) = 6EQ_Mid(中音均衡) = 4EQ_Treble(高音均衡) = 7Noise_Gate(噪音门) = G5Chorus_Mod(合唱和其他效果)= D1 Delay(延迟) = D1 Reverb(混响) = OF5.音色名称: MetallicA CleanPickup_Wah(拾音器模拟和哇音) = OF Compressor(压缩) = 10 Amp_Type(箱头模拟) = b3EQ_Bass(低音均衡) = b8EQ_Mid(中音均衡) = d6EQ_Treble(高音均衡) = t6Noise_Gate(噪音门) = G5Chorus_Mod(合唱和其他效果)= C1 Delay(延迟) = OF Reverb(混响) = S26.音色名称: MetallicAPickup_Wah(拾音器模拟和哇音) = SH Compressor(压缩) = 5 Amp_Type(箱头模拟) = o4EQ_Bass(低音均衡) = 7EQ_Mid(中音均衡) = 9EQ_Treble(高音均衡) = 4Noise_Gate(噪音门) = S7Chorus_Mod(合唱和其他效果)= d7 Delay(延迟) = a3/ 35Reverb(混响) = r5音色名称: MetallicA HeavyPickup_Wah(拾音器模拟和哇音) = OFF Compressor(压缩) = OFFAmp_Type(箱头模拟) = R9EQ_Bass(低音均衡) = 9EQ_Treble(高音均衡) = 9Noise_Gate(噪音门) = G9Chorus_Mod(合唱和其他效果)= OFFDelay(延迟) = OFFReverb(混响) = R38.音色名称:ibanez tube screamer9 +boss dd3将Delay(延迟)设置为off就是只有ts9的效果。
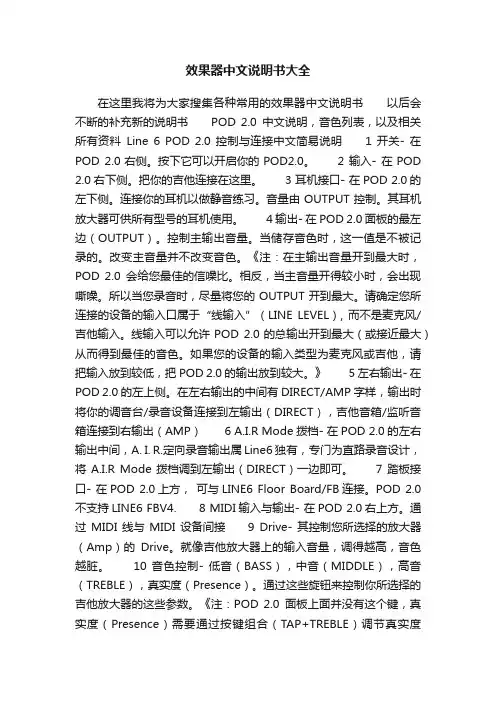
效果器中文说明书大全在这里我将为大家搜集各种常用的效果器中文说明书以后会不断的补充新的说明书POD 2.0中文说明,音色列表,以及相关所有资料Line 6 POD 2.0 控制与连接中文简易说明 1 开关- 在POD 2.0右侧。
按下它可以开启你的POD2.0。
2 输入- 在POD 2.0右下侧。
把你的吉他连接在这里。
3 耳机接口- 在POD 2.0的左下侧。
连接你的耳机以做静音练习。
音量由OUTPUT控制。
其耳机放大器可供所有型号的耳机使用。
4 输出- 在POD 2.0面板的最左边(OUTPUT)。
控制主输出音量。
当储存音色时,这一值是不被记录的。
改变主音量并不改变音色。
《注:在主输出音量开到最大时,POD 2.0会给您最佳的信噪比。
相反,当主音量开得较小时,会出现嘶噪。
所以当您录音时,尽量将您的OUTPUT开到最大。
请确定您所连接的设备的输入口属于“线输入”(LINE LEVEL), 而不是麦克风/吉他输入。
线输入可以允许POD 2.0的总输出开到最大(或接近最大)从而得到最佳的音色。
如果您的设备的输入类型为麦克风或吉他,请把输入放到较低,把POD 2.0的输出放到较大。
》 5 左右输出- 在POD 2.0的左上侧。
在左右输出的中间有DIRECT/AMP字样,输出时将你的调音台/录音设备连接到左输出(DIRECT),吉他音箱/监听音箱连接到右输出(AMP) 6 A.I.R Mode拨档- 在POD 2.0的左右输出中间,A. I. R.定向录音输出属Line6独有,专门为直路录音设计,将A.I.R Mode拨档调到左输出(DIRECT)一边即可。
7 踏板接口- 在POD 2.0上方,可与LINE6 Floor Board/FB连接。
POD 2.0不支持LINE6 FBV4. 8 MIDI输入与输出- 在POD 2.0右上方。
通过MIDI线与MIDI设备间接9 Drive- 其控制您所选择的放大器(Amp)的Drive。

操作说明书DigiTech软件03/2002 0360 839本说明书说明了如何使整个DigiTech自动系统投入运行。
将DigiTech自动系统投入运行的前提条件是硬件部分安装就绪,包括整个喷涂系统的机械安装以以及电路和气路安装就绪。
本操作说明书是DigiTech自动粉末喷涂系统“硬件”说明书的一部分。
目录页号1.DigiTech功能介绍 (7)1.1配方 (7)1.2闪卡 (9)1.3Genius智能设备 (9)1.4特性 (10)1.5间隙和高度控制 (11)1.5.1间隙控制 (11)1.5.2自动先喷和滞后喷 (11)1.5.3高度控制 (11)1.6行程高度控制 (12)1.6.1底部距离/顶部距离 (12)1.6.2“前行距离/后行距离” (12)1.7LSR-D1长行程升降机的操作模式 (13)1.7.1普通操作模式 (13)1.7.2双速操作模式 (13)1.7.3正弦操作模式 (14)2.有助于你理解操作说明书的基本说明 (15)2.1介绍 (15)2.2CCM-D1模块的操作面板 (15)2.3EPG-D1模块的操作面板 (16)2.4操作层 (16)2.5液晶显示器上的屏幕页的编号 (16)2.6操作 (17)2.6.1编辑文本 (17)2.6.2输入数字 (17)2.7DigiTech模型 (19)M-D1模块的维护设置 (20)3.1选择语言 (20)3.2选择模块的系统 (20)3.3启用或禁止第二层的密码保护 (20)3.3.1更改密码 (20)3.4设置液晶显示器的背景照明 (21)3.5设置液晶显示器的对比度 (21)3.6打开/关闭控制要素的说明 (21)4.注册EPG-D1模块(所有模型) (22)4.1在CCM-D1模块上注册EPG-D1模块 (22)4.1.1更改注册 (22)5.配置EPG-D1模块(所有模块) (24)5.2设置液晶显示器的背景照明 (24)5.3设置液晶显示器的对比度 (24)5.4启用或禁止第二层的密码保护 (24)5.4.1密码 (24)5.5恢复厂商设置的默认值 (24)5.6打开EPG-D1模块中的故障信息显示 (25)5.7配置第一个EPG-D1模块 (25)5.7.1“Configuration”(“配置”)菜单 (25)5.7.2“Function”(“功能”)菜单 (26)5.8将配置复制到其它模块(克隆) (26)6.Genius智能模块(所有型号) (27)6.1注册TCS-D1模块 (27)6.2TCS-D1模块的启动 (27)7.模型1:不带间隙/高度控制模块和运动技术 (28)7.1喷枪编组 (28)8.模型 2: 带间隙/高度控制模块 CGH-D1 (28)8.1在CCM-D1模块上注册间隙/高度控制模块 (28)8.2间隙/高度控制模块的校准 (28)8.3输送机的校准 (28)8.3.1间隙控制的配置 (29)8.3.2高度控制的配置 (29)9.模型3:带有LSR-D1升降机 (29)9.1注册 LSR-D1升降机 (29)9.2校准升降机 (30)9.2.1进行设置 (30)9.2.2扫描限位开关 (30)9.2.3设置刹车距离 (30)10.模型 4:带有间隙/高度控制模块和升降机 (30)10.1在CCM-D1模块上注册间隙/高度控制模块 (30)10.2间隙/高度控制模块的校准 (32)10.2.1输送机的校准 (32)10.3注册 LSR-D1升降机 (32)10.4校准升降机 (32)10.4.1进行设置 (34)10.4.2扫描限位开关 (34)10.4.3设置刹车距离 (34)10.4.4测量位置 (35)11.设置喷涂系统 (36)11.1校准Genius模块(若有 TCS-D1 模块) (36)11.3设置喷枪 (EPG-D1) (36)11.4将喷枪的设置复制到其它EPG-D1模块 (37)11.5喷枪的细调/日常校正 (39)11.6设置间隙/高度控制 (39)11.7设置升降机 (40)11.7.1设置行程和升降机速度 (40)11.7.2设置LSR-D1功能 (40)11.8将设置存为配方 (42)12.涉及处方的工作 (42)12.1建立处方 (42)12.2给配方命名 (43)12.3调用配方 (43)12.4搜索配方 (44)12.5将配方存储在闪卡上 (44)12.6从闪卡向CCM-D1模块载入配方 (45)13.喷涂工件 (46)13.1校正粉末输出 (46)14.保养和清洗 (47)14.1清洗 (47)14.2Genius智能设备 (47)14.3保养间隔 (47)14.3.1显示保养间隔 (47)14.3.2保养间隔的重置 (48)14.3.3更改保养间隔 (48)15.注册新设备 (49)15.1注册新的 EPG-D1模块 (49)15.2注册新的LSR-D1模块 (49)16.故障信息 (50)16.1报警 (50)16.2故障 (50)16.2.1带故障继续运行 (50)16.3显示故障清单 (50)16.4删除故障清单 (51)17.故障排除 (51)17.1报警 (51)17.1.1操作 (51)17.1.2配置 (51)17.1.3硬件 (51)17.1.4软件 (52)17.2.1操作故障 (52)17.2.2配置故障 (53)17.2.3硬件故障 (54)17.2.4软件故障 (55)18.常见问题 (56)19.通路 (58)19.1手动模式下的EPG-D1模块 (58)19.1.1调用配方 (58)19.1.2编辑预置的配方 (58)20.担保 (59)WANGNER子公司名称及地址录 (60)1. DigiTech功能介绍1.1 配方如果你有配方,则在更换粉末和工件时可避免再进行复杂的设置。
第一章简介前言感谢你选择了RP 70 这款性能优异的模块化效果器,它可以帮助你制造出一些超乎想像的音色,由于本机拥有DigiT ech 新一代AudioDNA2 数字DSP 芯片,让你在弹指之间就能体验许多强的效果,你只要从RP70 的音色数据库或效果数据库里,简单地挑选出扩大机、破音、各式效果串行,你就会喜欢上这些音色,再加上内建的鼓节奏机,让RP 70 充分激发出你床做的潜能吧。
内含配件在正式使用前,请确认包装箱内的一些应有机件是否齐全。
?RP 70 主机一台。
?PS 200R 外接式电源供应器一个。
?使用说明书一本。
?质量保证卡一张。
每部RP 70 在出厂前均经过严格的检验与包装,内含配件应该都完整无缺,而且设备皆处于正常运作的状况,无论如何,若是发现有配件短少,请尽快与我们联系,并在保证期间内妥善保留纸箱与包装材料,万一产品出现问题须要送厂维修,请使用既有的包装设备来运送。
RP70 简要介绍演奏模式当RP70 初次接上电源时,系统便会处于演奏模式,你可以利用上/ 下向脚踏开关选择内建的各种音色,利用编辑上/ 下向按键在效果矩阵里头循环切换效果。
编辑模式当你利用编辑上/ 下向按键选择效果的同时,也能利用数值上/ 下向按键调整效果参数,一旦内建的效果有了改变,你就必须确定要进行储存动作,否则一旦选择其他程序音色或关闭电源,你做的改变都会回复原有设定。
旁路直通模式RP70 提供旁路直通的功能,让你保有未经效果处理的吉他音色,只要同时踏下上/ 下向脚踏开关然后放开,系统便进入直通旁路状态,显示屏会出现BY 字样,在这个模式下,所有按键都没有作用,踏下上/ 下向任何一个脚踏开关,系统变会离开直通旁路状态,回复到先前的程序。
调音模式RP70 内建的调音器能让您快速调校吉他音准,想要进入调音模式,同时踏住上/ 下向脚踏开关不放约几秒钟,此时显示屏会出现TU 字样代表进入调音模式,并且可以进行吉他调音,显示屏会显示输入讯号的音名,矩阵LED 指示灯则是标示音准太高或太低,左方六个红色指示灯代表声音太低必,音准须调低高,右方六个红色指示灯代表声音太高必须调低,中央指示灯代表准音,调音模式下无声音输出。
Digitech RP150中文说明书第一部分介绍恭喜您获得了一部RP150。
您现在拥有了一部令人难以置信的先进的效果处理器,可以追随您的创意甚至推动您的灵感。
它搭载了DigiTech公司专利产品AudioDNA2数字信号处理芯片,以提供给您极为丰富的音色和效果的选择,并忠于您的指尖。
当您转动旋钮从音色库及效果库获取您所需要的音色时,您将激动于它每一个精确的模型和每一个充满动感的音色。
USB接口的应用极大方便了您电脑录音并让您随时使用鼓机。
一切皆来源于RP150:开启您灵感源泉的钥匙。
产品包括:RP150,PS0913B电源,质量保证卡.在您开始之前,请确认包装中的配件。
关于RP150演奏模式:当您接通RP150的电源时,即进入演奏模式。
在演奏模式中,您可以通过调节上下踏板来获得所有预存音色。
转动左起第一个圆形旋钮可以从音色库中选择一种音色,转动第二个旋钮可以从效果库中选择一种效果,第三个旋钮用于调节效果值,第四个旋钮用于调节音量。
旁通模式:旁通状态使音色处于未经RP150处理的吉他音色。
进入旁通状态需要同时踩两个脚踏开关,显示屏显示"BY"字样说明预置被旁通。
踩任何一个脚踏开关都可退出旁通状态。
校音模式:RP150具有音准调节功能。
同时按下两个踏板不放开,当显示屏显示TU时即进入调节模式。
演奏一个音符,显示屏将会显示此音符的音高,左侧的一排指示灯将会显示此音高距标准音的差距。
当上面五个红灯中的一个亮起时,要把音调低一点,当下面的五个红灯亮起时,要把音调高一点;当绿灯亮起时此音即调节完毕。
按下左右任何一个踏板即可退出调节模式。
当进入校音功能时,你可以改变音调的"基准音"。
厂家"基准音"的默认值A=440Hz(显示40)。
按 Value(数值)键可在几个降调中轮流选择,它们分别是A=Ab(显示Ab),A=G(显示g)和A=Gb(显示Gb)。
Element / Element XPOwner’s ManualDECLARATION OF CONFORMITYManufacturer’s Name: DigiTechManufacturer’s Address: 8760 S. Sandy ParkwaySandy, Utah 84070, USAdeclares that the product:Product name: ELEMENT and ELEMENT XPProduct option: all (requires Class II poweradapter that conformsto the requirements ofEN60065, EN60742, orequivalent.)conforms to the following Product Specifications:Safety: IEC 60065 -01+Amd 1EMC:EN55022:2006EN55024:1998FCC Part 15Supplementary Information:The product herewith complies with the requirements of the:Low Voltage Directive 2006/95/ECEMC Directive 2004/108/EC.RoHS Directive 2011/65/ECWEEE Directive 2002/96/ECEC Regulation 278/2009With regard to Directive 2005/32/EC and EC Regulation1275/2008 of 17 December 2008, this product isdesigned, produced, and classified as Professional AudioEquipment and thus is exempt from this Directive.Rex C. ReedDirector, EngineeringSignal Processing8760 S. Sandy ParkwaySandy, Utah 84070, USADate: July 9, 2013European Contact: Your local DigiTech Sales and ServiceOffice orHarman Signal Processing8760 South Sandy ParkwaySandy, Utah84070 USAPh: (801) 566-8800Fax: (801) 568-7583WARNING FOR YOUR PROTECTIONREAD THE FOLLOWING:KEEP THESE INSTRUCTIONSHEED ALL WARNINGSFOLLOW ALL INSTRUCTIONSThe apparatus shall not be exposed to dripping or splashing liquid and noobject filled with liquid, such as vases, shall be placed on the apparatus.CLEAN ONLY WITH A DRY CLOTH.FOR INDOOR USE ONLY.DO NOT BLOCK ANY OF THE VENTILATION OPENINGS. INSTALL IN ACCOR-DANCE WITH THE MANUFACTURER’S INSTRUCTIONS.DO NOT INSTALL NEAR ANY HEAT SOURCES SUCH AS RADIATORS, HEATREGISTERS, STOVES, OR OTHER APPARATUS (INCLUDING AMPLIFIERS)THAT PRODUCE HEAT.ONLY USE ATTACHMENTS/ACCESSORIES SPECIFIED BY THE MANUFAC-TURER.UNPLUG THIS APPARATUS DURING LIGHTNING STORMS OR WHEN UNUSEDFOR LONG PERIODS OF TIME.Do not defeat the safety purpose of the polarized or grounding-type plug. Apolarized plug has two blades with one wider than the other. A groundingtype plug has two blades and a third grounding prong. The wide blade orthird prong are provided for your safety. If the provided plug does not fityour outlet, consult an electrician for replacement of the obsolete outlet.Protect the power cord from being walked on or pinched particularly atplugs, convenience receptacles, and the point where they exit from theapparatus.Use only with the cart stand, tripod bracket, or table speci-fied by the manufacture, or sold with the apparatus. Whena cart is used, use caution when moving the cart/apparatuscombination to avoid injury from tip-over.Refer all servicing to qualified service personnel. Servicing is required whenthe apparatus has been damaged in any way, such as power-supply cordor plug is damaged, liquid has been spilled or objects have fallen into theapparatus, the apparatus has been exposed to rain or moisture, does notoperate normally, or has been dropped.POWER ON/OFF SWITCH: The Power switch used in this piece of equip-ment DOES NOT break the connection from the mains.MAINS DISCONNECT: The plug shall remain readily operable. For rack-mount or installation where plug is not accessible, an all-pole mains switchwith a contact separation of at least 3 mm in each pole shall be incorpo-rated into the electrical installation of the rack or building.If connected to 240V supply, a suitable CSA/UL certified power cord shallbe used for this supply.WARNING:• APPARATET Må TILKOPLES JORDET STIKKONTAKT.• APPARATEN SKALL ANSLUTAS TILL JORDAT UTTAG.• LAITE ON LIITETTäVä SUOJAKOSKETTIMILLA VARUSTETTUUN PISTORASIAAN.Private households in the 25 member states of the EU, in Switzerland and Norway may return their used electronic products free of charge to designated collection facilities or to a retailer (if you purchase a similar ELECTROMAGNETIC COMPATIBILITYThis device complies with part 15 of the FCC Rules and theProduct Specifications noted on the Declaration of Conformity .Operation is subject to the followingtwo conditions:• t his device may not causeharmful interference, and • t his device must accept any interference received, includinginterference that may causeundesired operation. Operation of this unit withinsignificant electromagnetic fields should be avoided.• use only shielded interconnectingcables.We at DigiTech® are very proud of our products and back-up each one we sell with the following warranty:1. Please register online at within ten days of purchase to validate this warranty. This warranty is valid only in theUnited States.2. DigiTech warrants this product, when purchased new from an authorized U.S. DigiTech dealer and used solely within the U.S.,to be free from defects in materials and workmanship under normal use and service. This warranty is valid to the original purchaser only and is non-transferable.3. DigiTech liability under this warranty is limited to repairing or replacing defective materials that show evidence of defect,provided the product is returned to DigiTech WITH RETURN AUTHORIZATION, where all parts and labor will be covered up to a period of one year. A Return Authorization number may be obtained by contacting DigiTech. The company shall not be liable for any consequential damage as a result of the product’s use in any circuit or assembly.4. Proof-of-purchase is considered to be the responsibility of the consumer. A copy of the original purchase receipt must beprovided for any warranty service.5. DigiTech reserves the right to make changes in design, or make additions to, or improvements upon this product withoutincurring any obligation to install the same on products previously manufactured.6. The consumer forfeits the benefits of this warranty if the product’s main assembly is opened and tampered with by anyoneother than a certified DigiTech technician or, if the product is used with AC voltages outside of the range suggested by the manufacturer.7. The foregoing is in lieu of all other warranties, expressed or implied, and DigiTech neither assumes nor authorizes any personto assume any obligation or liability in connection with the sale of this product. In no event shall DigiTech or its dealers be liable for special or consequential damages or from any delay in the performance of this warranty due to causes beyond their control.NOTE: The information contained in this manual is subject to change at any time without notification. Some information contained in this manual may also be inaccurate due to undocumented changes in the product since this version of the manual was completed. The information contained in this version of the owner’s manual supersedes all previous versions.If you require technical support, contact DigiTech Technical Support. Be prepared to accurately describe the problem. Know the serial number of your device–this is printed on a sticker attached to the chassis. If you have not already taken the time to register your product, please do so now at .Before you return a product to the factory for service, we recommend you refer to the manual. Make sure you have correctly followed installation steps and operating procedures. For further technical assistance or service, please visit our support pageat . If you need to return a product to the factory for service, you MUST first contact Technical Support to obtain a Return Authorization Number.No returned products will be accepted at the factory without a Return Authorization Number.Please refer to the Warranty information, which extends to the first end-user. After expiration of the warranty, a reasonable charge will be made for parts, labor, and packing if you choose to use the factory service facility. In all cases, you are responsible for transportation charges to the factory. DigiTech will pay return shipping if the unit is still under warranty.Use the original packing material if it is available. Mark the package with the name of the shipper and with these words in red: DELICATE INSTRUMENT, FRAGILE! Insure the package properly. Ship prepaid, not collect. Do not ship parcel post.Overview �����������������������������������������������������2 Introduction ���������������������������������������������������������������������2 Features �����������������������������������������������������������������������������3User Interface & Connectors ����������������������4 Top Panel ��������������������������������������������������������������������������4 Rear Panel �������������������������������������������������������������������������6Connection Diagrams ��������������������������������8 Mono Amp Configuration ���������������������������������������������8 Stereo Amp Configuration ���������������������������������������������9 Stereo Recording Configuration ����������������������������������10 Headphone/Practice Configuration ����������������������������11 Operation ��������������������������������������������������12 Modes Explained �����������������������������������������������������������12Play Mode������������������������������������������������������������������12Edit Mode ������������������������������������������������������������������12 Navigating Presets ���������������������������������������������������������13 Editing Presets ����������������������������������������������������������������13Selecting A Tone Bank���������������������������������������������14Selecting An FX Bank ����������������������������������������������15Editing Effects �����������������������������������������������������������16Turning Effects On & Off ����������������������������������������16 Storing/Copying Presets �����������������������������������������������17 Bypassing All Effects �����������������������������������������������������18 Using The Drum Machine ��������������������������������������������18 Using The Tuner �������������������������������������������������������������20 Setup ���������������������������������������������������������21 Mono/Stereo Operation ������������������������������������������������21 Speaker Cabinet Compensation (SCC) ����������������������21 Expression Pedal Calibration (Element XP Only) ����22 Expression Pedal Assignment (Element XP Only) ���23 The Effects �������������������������������������������������25 Wah (Element XP Only) �����������������������������������������������25 Compressor ��������������������������������������������������������������������25 Amp/Distortion Models �����������������������������������������������26 EQ ������������������������������������������������������������������������������������27 Noise Gate �����������������������������������������������������������������������27 Mod FX ���������������������������������������������������������������������������28 Reverb �����������������������������������������������������������������������������31 Element Preset List �����������������������������������32 Element XP Preset List �����������������������������33 Technical Information ������������������������������34 Factory Restore ��������������������������������������������������������������34 Specifications ������������������������������������������������������������������351IntroductionThe Element and Element XP provide a compact and cost-effective guitar effects processing solution.But don’t let that fool you.The Element Series processors offer a powerful effects processing platform and complete feature set,so you can tantalize your creativity,improve your chops,and explore the endless possibilities of guitar effects,all with one simple-to-use,compact device.The Element has 31effects to choose from and allows you to run 8 effects simultaneously.The Element XP has 37 effects to choose from and allows you to run 9 effects simultaneously.The Element XP adds an Expression e it to control the Wah or Whammy™ effect or assign it to the effect you want to control for real-time effect changes with your foot.100 included factory presets allow you to begin exploring immediately and 100 user presets allow you to store all your favorite sounds.Select between the 20 pre-configured FX Banks and T one Banks to explore a multitude of tonal possibilities without even editing any effects!The built in tuner ensures your guitar is in tune and the built-in drum machine and aux input jack allow you to play along with a drum loop,metronome,or your favorite music,so you can improve your skills fast and have fun doing it!Whether you're a budding artist,or an experienced guitar aficionado,you’ll have fun exploring the vast sound-shaping options available in the Element and Element XP.Thanks for choosing DigiT ech®.2Features• 37 Effects (Element XP) / 31 Effects (Element)• 12 Amp & 6 Distortion Models T o Choose From• Built-In Drum Machine With 45 Drum Pattern Loops Including Metronome• Built-In T uner• Built-In Expression Pedal (Element XP Only)• 200 Presets (100 User Presets / 100 Factory Presets)• 9 Simultaneous Effects (Element XP) / 8 Simultaneous Effects (Element)• 20 FX Banks & 20 T one Banks T o Choose From• Mono / Stereo Output• Aux Input For Playing Along With Y our Favorite Songs• 1/8” Headphone Output• Speaker Cabinet Compensation• Heavy Duty Metal Footswitches• Power Supply Included341. 7689101112LED DISPLAYThis display shows the preset numbers when navigating presets (in Play Mode) and effect settings when editing (in Edit Mode).2. SELECT KNOBThis knob serves as both a preset selector and editing control. In Preset Mode, turning this knob will change between presets. In Edit Mode, this knob will modify the currently selected effect or option.3. STORE BUTTONThis button is used to store and copy presets to the 100 user preset memory locations. The STORE LED will light whenever a preset’s stored effect settings are altered, indicating that the changes must be stored to a preset to be retained.4. EDIT BUTTONSThese left/right arrow buttons access effects and drum machine settings for editing.5. EXPRESSION PEDAL (Element XP only)The Expression Pedal is used to control effects in real time.A single effect can be controlled by the expression pedal per preset.6. EFFECTS CHAINThese icons provide a graphical representation of the internal effect signal chain used inthe Element/Element XP.The signal flow is from left to right and offers effects like Wah(Element XP only),Compressor,Amp Modeling/Distortion,EQ,Noise Gate,Mod FX,Delay, and Reverb.The Element XP also has an option for setting up its built-in Expression Pedal to control a variety of these effects.The LED above each of the icons indicates whether each effect is on or off and which effect is selected when editing.These effect LEDs are also used to help you tune your guitar when using the built-in tuner (see "Using The T uner" on page20).7. MASTER LEVEL BUTTONPress this button then turn the SELECT knob to adjust the Master Level.This will adjust the global output level for the Main and Headphone Outputs and will affect all presets.8. PRESET LEVEL BUTTONPress this button then turn the SELECT knob to adjust the Preset Level.Preset Level is a programmable level that is stored with each preset and provides a quick way to balancevolume between presets.Note that changes made to this parameter must be stored to the preset in order to be retained (see "Storing/Copying Presets" on page 17).9. TONE BANK BUTTONThis button is used to select from a preset library of 20 different clean and distorted tone configurations utilizing the Wah (Element only),Compressor,Amp/Distortion Modeling,EQ, and Noise Gate effect modules.Press this button then use the SELECT knob to select froma variety of genre-based amp tone defaults ranging from Blues to Metal to Country.See"Selecting A T one Bank" on page 14 for more information on T one Banks.10. FX BANK BUTTONThis button is used to select from a preset library of 20 different effect configurations utilizing the Mod FX,Delay,and Reverb effect modules.Press this button then turn the SELECT knob to select a variety of post-amplifier model effect chains (Chorus,Chorus + Delay,Delay + Reverb,etc.).See "Selecting An FX Bank" on page 15 for more information on T one Banks. 11. DRUMS BUTTONPressing this button toggles the internal drum machine on and off.12. FOOTSWITCHESThese footswitches are used for preset up/down navigation,bypass,and tuner activation.56Rear Panel234511. INPUTConnect your guitar to this high impedance 1/4” instrument input.2. AUX INUsing a stereo 1/8” cable, connect the headphone output of a portable music or CD player to this 1/8” TRS jack to play along with all your favorite music. Adjust the output level of3. 4. HEADPHONE OUTPUTConnect your headphones to this 1/8” mini TRS jack. This output is optimized for use with headphones having an impedance of 60 Ohms or less. The Master Level controls the global level of this output.5. POWER JACKConnect the included PS0913DC power supply to this power input jack.Before connecting the Element/Element XP processor to an amplifier, it is recommended that you turn down the amplifier's master volume control and make sure that the power to your amplifier and the Element/Element XP are turned off. T o turn the Element/Element XP on or off, connect or disconnect the included power supply from the POWER input jack. Once all is connected and powered on, you can then gradually increase your amplifier's master volume control until the desired level is achieved.Mono Amp Configuration300 mA1/4” Mono CableStereo Amp Configuration300 mAStereo Recording Configuration300 mAHeadphone/Practice ConfigurationPortable Music Player300 mAPlay Mode and Edit Mode.Play ModeWhen the Element/Element XP is powered on, the unit will be in Play Mode. Play Mode is indicated by the effect LEDs being lit for the effects which are active in the currently loadedpreset and the currently loaded preset number being displayed in the LED display. Play Mode is the normal operating mode and allows you to navigate presets using the SELECT knob orFOOTSWITCHES.Preset NumberEdit ModeY ou enter Edit Mode whenever you press the MASTER LEVEL , PRESET LEVEL , TONE BANK , FX BANK , DRUMS, or EDIT buttons. Edit Mode allows you to adjust the global Master Level, the Preset Level, select between the different T one and FX Banks, edit effect and system settings, and edit the settings for the built-in drums. T o exit Edit Mode and return to Play Mode, simply press either FOOTSWITCH . Y ou can tell you are back in Play Mode when the effect LEDs are lit for the effects which are active in the currently loaded preset and the currently loaded preset number is displayed in the LED display.Navigating PresetsThere are two banks of presets in the Element/Element XP:the user preset bank and the factory preset bank.From the factory,the user and factory preset banks will contain the same presets. Therefore,factory preset 45 will be the same as user preset 45 and so er presets appearin the LED display as 1-100 and factory presets appear as F1-F00.Preset banks will automatically round-robin when navigating.In other words,navigating one preset above user preset 100 will select factory preset F1 in the factory preset bank.Navigating one preset below user preset 1 will select factory preset F00 (factory preset 100) in the factory preset bank.To navigate presets:1. From Play Mode,press the UP FOOTSWITCH to navigate up through presets or the DOWNFOOTSWITCH to navigate down through presets.Y ou can also navigate presets by turning the SELECT knob.Editing PresetsThe Element Series processors have been engineered to give you more options for shaping your sounds.Of course you can navigate presets to find sounds which will get you started,and then edit the effects from there to fine tune your sounds–this is standard operation when using effect processors.But there is another layer of options available in the Element processors... Banks. There are two Banks available:T one Banks and FX Banks.Each of these Banks give you a library of 20 pre-set configurations,allowing you to quickly audition different "tones" without affecting your "effects" chain or vice ing this "coarse" and "fine" editing environment,you can quickly experiment with many different sound-shaping options and go only as deep into editing as you feel comfortable with.Selecting A Tone BankT one Banks allow you to select from a preset library of 20 different tones.These tones consist of clean,distortion,and amp tones.Select from a variety of genre-based amp tone defaults ranging from Blues to Metal to Country.Behind the scenes,the Wah (Element XP only),Compressor, Amp/Distortion,EQ,and Noise Gate are configured to create a specified tone.Y ou can then further refine the sound by editing each effect’s settings.Note that changing between different T one Banks does not change the Mod FX,Delay,or Reverb settings,as these processing modules belong to the FX Bank.Available Tone Banks1Overdrive 2Rock 13Blues 14Metal 15Country 1 6Warm Drive 7Crunch8T exas T one 9Rockabilly 10Solo 1Available Tone Banks11Fuzz12Chunky13Smooth14Heavy15Clean 116British17Distortion 18Scooped 19Bright Clean 20AcousticTo select a Tone Bank:1. Press the TONE BANK button.The display will read cu for custom.2. Turn the SELECT knob to select from one of the 20 T one Bank library defaults.The numberof the selected T one Bank will appear in the LED display as you turn the SELECT knob.3. When done,press either FOOTSWITCH to exit Edit Mode.Note that you must store thechanges if you wish to retain the settings.See "Storing/Copying Presets" on page 17 forfurther information on storing presets.Selecting An FX BankFX Banks allow you to select from a preset library of 20 different effect chains.Behind the scenes the Mod FX,Delay,and Reverb are configured to create a specified combination of effects.Y ou can then further refine the sound by editing each effect’s settings.Note that changing between different FX Banks does not change the Wah (Element XP only),Compressor,Amp/Distortion, EQ,or Noise Gate settings,as these processing modules belong to the T one Bank.Available FX Banks1Chorus2Flanger3Phaser4Pitch5Tremolo6Rotary7Envelope Filter 8Digital Delay 9Analog Delay 10T ape Delay Available FX Banks11Hall Reverb12Spring Reverb13Chorus + Digital Delay14Chorus + Delay + Reverb 15Flanger + Analog Delay16Phaser + T ape Delay17Digital Delay + Hall Reverb 18Analog Delay + Spring19Pitch + Room Reverb20Vibrato + T ape DelayTo select an FX Bank:1. Press the FX BANK button.The display will read cu for custom.2. Turn the SELECT knob to select from one of the 20 FX Bank library defaults.The number ofthe selected FX Bank will appear in the LED display as you turn the SELECT knob.3. When done,press either FOOTSWITCH to exit Edit Mode.Note that you must store thechanges if you wish to retain the settings.See "Storing/Copying Presets" on page 17 forfurther information on storing presets.Editing EffectsSelecting a preset and/or T one/FX Bank is the fastest and easiest way to achieve the sound your after.However,if you just can’t seem to quite get the sound you're after it’s time to edit some effects.To edit effects:1. Press either of the EDIT buttons repeatedly until the LED for the effect you wish to edit is lit.For a list of effect settings,see "The Effects" on page 25.2. Once you have selected the effect for editing,strum your guitar then turn the SELECT knobto change the effect settings.Repeat this auditioning process until you find the desired setting.3. T o exit Edit Mode,press either FOOTSWITCH.Turning Effects On & OffThe procedure for turning effects on and off is essentially the same as for editing effects.To turn an effect on or off:1. Press either of the EDIT buttons repeatedly until the LED for the effect you wish to turn onor off is lit.2. Turn the SELECT knob.If the effect is already turned off,turn the SELECT knob to the rightto enable the effect and select between the available options.If the effect is already on and you wish to turn it off,keep turning the SELECT knob to the left until off is shown in the LED display.3. When done,press either FOOTSWITCH to return to Play Mode,indicated by the currentlyloaded preset number being displayed in the LED display.Storing/Copying PresetsThe STORE button is used to save modifications made to a preset’s settings.The STORE button’s LED will light whenever effect settings have been changed from their stored value,indicating the changes must be stored to memory to be retained.Preset setting changes must always be stored to a user preset memory location,since factory presets cannot be overwritten.The Element and Element XP have 100 user preset memory locations.Factory presets can be accessed at any time, used as a starting point,edited,then stored to a user preset location.Y ou can also copy a user or factory preset to any of the available 100 user preset locations.To quickly store a preset to its current memory location (quick update):1. Make the desired edits to the preset’s effect settings.See "Editing Effects" on page 16.2. Press the STORE button twice.Sd will be briefly displayed in the LED display,indicatingthe preset is being stored.This will store the newly changed effect settings to the currently loaded preset memory location.To store an edited preset to a different memory location:1. Make the desired edits to the preset’s effects.See "Editing Effects" on page 16.2. Press the STORE button once.The current preset number will begin flashing in the LEDdisplay.3. Use the SELECT knob to select the user preset memory location at which you would like tostore the user preset (indicated in the display).4. Press the STORE button again to complete the store procedure.Sd will be briefly displayedin the LED display,indicating the preset is being stored.To copy a preset:1. From Play Mode,use the FOOTSWITCHES or SELECT knob to load the preset you wish tocopy.2. Press the STORE button once.The current preset number will begin flashing in the LEDdisplay.3. Use the SELECT knob to select the user preset memory location at which you would like tocopy the preset (indicated in the display).4. Press the STORE button again to complete the copy procedure.Sd will be briefly displayed inthe LED display,indicating the preset is being stored.Bypassing All EffectsThe Element and Element XP offer a global preset bypass feature which bypasses all effects in the currently loaded preset and feeds only the dry/unprocessed signal to the outputs.To bypass all effects:1. Press both FOOTSWITCHES simultaneously.The LED display will read bYP,indicating theeffects are bypassed.2. Press either FOOTSWITCH to exit the preset bypass function.Using The Drum MachinePlaying along with the built-in drum machine is a great way to improve your timing skills.The Element and Element XP give you 45 drum and metronome patterns to choose from and allow you to adjust the tempo and level of the pattern playback.Available Drum Machine ParametersLED Lit Option (Shown In Display)DescriptionPATTERN1-45Selects from the various drum patternsTEMPO1-99Adjusts the drum machine tempoLEVEL1-99Adjusts the drum machine level。
- 1 -第一章简介前言感谢你选择了RP 70 这款性能优异的模块化效果器,它可以帮助你制造出一些超乎想像的音色,由于本机拥有DigiT ech 新一代AudioDNA2 数字DSP 芯片,让你在弹指之间就能体验许多强的效果,你只要从RP70 的音色数据库或效果数据库里,简单地挑选出扩大机、破音、各式效果串行,你就会喜欢上这些音色,再加上内建的鼓节奏机,让RP 70 充分激发出你床做的潜能吧。
内含配件在正式使用前,请确认包装箱内的一些应有机件是否齐全。
‧RP 70 主机一台。
‧PS 200R 外接式电源供应器一个。
‧使用说明书一本。
‧质量保证卡一张。
每部RP 70 在出厂前均经过严格的检验与包装,内含配件应该都完整无缺,而且设备皆处于正常运作的状况,无论如何,若是发现有配件短少,请尽快与我们联系,并在保证期间内妥善保留纸箱与包装材料,万一产品出现问题须要送厂维修,请使用既有的包装设备来运送。
RP70 简要介绍演奏模式当RP70 初次接上电源时,系统便会处于演奏模式,你可以利用上/ 下向脚踏开关选择内建的各种音色,利用编辑上/ 下向按键在效果矩阵里头循环切换效果。
编辑模式当你利用编辑上/ 下向按键选择效果的同时,也能利用数值上/ 下向按键调整效果参数,一旦内建的效果有了改变,你就必须确定要进行储存动作,否则一旦选择其他程序音色或关闭电源,你做的改变都会回复原有设定。
旁路直通模式RP70 提供旁路直通的功能,让你保有未经效果处理的吉他音色,只要同时踏下上/ 下向脚踏开关然后放开,系统便进入直通旁路状态,显示屏会出现BY 字样,在这个模式下,所有按键都没有作用,踏下上/ 下向任何一个脚踏开关,系统变会离开直通旁路状态,回复到先前的程序。
调音模式RP70 内建的调音器能让您快速调校吉他音准,想要进入调音模式,同时踏住上/ 下向脚踏开关不放约几秒钟,此时显示屏会出现TU 字样代表进入调音模式,并且可以进行吉他调音,显示屏会显示输入讯号的音名,矩阵LED 指示灯则是标示音准太高或太低,左方六个红色指示灯代表声音太低必,音准须调低高,右方六个红色指示灯代表声音太高必须调低,中央指示灯代表准音,调音模式下无声音输出。
RP70 可选择调音基准频率,原厂默认标准音A=440Hz,利用数值上/ 下向按键做音准频率微调,例如有A=Ab、A=G、A=Gb,微调频率从A=427-453,屏幕会闪烁显示目前的调音基准,要退出调音模式只需踩下任意一个脚踏开关即可- 3 -音色库按键除了在直路旁通与调音模式下,你可以在任何时刻按下这个按键,进入音色数据库之中,然后利用数值上/ 下向键选择许多不同的效果音色,从蓝调、摇滚到乡村应有尽有,这些音色里头结合了压缩、破音、哇哇、扩大机模块、均衡器等各种效果,当然你也能够进行音色库效果微调的动作,但是这里不会改变和声/延迟/回音等效果,让你能更快速比较不同的仿真扩大机型态差异。
效果串行库按键除了在直路旁通与调音模式下,你可以在任何时刻按下这个按键,进入效果串行数据库之中,你可以利用数值上/ 下向键选择和声/延迟/回音等不同效果,然后进行效果改变的动作,但是它不会改变前段动态压缩、破音、扩大机型态、均衡器方面的参数,让你可以在固定扩大机音色下比较不同的特殊效果。
效果串行音量按键除了在直路旁通与调音模式下,你可以在任何时刻按下这个按键,进入效果音量调整,它可以控制扩大机效果之后,例如和声/延迟/回音等不同效果的输出音量,它可以看成是一个特殊效果混音的控制,提高数值就会增加这方面的效果程度,降低数值就会降低这方面的效果程度。
总音量输出按键按下这个按键后,利用数值键改变总输出音量的大小。
利用音色库、效果串行、效果音量这三个独立按键,让你更容易呼叫出程序音色、效果型态、效果串行模式。
默认程序默认效果程序乃是以序号方式预先储存在RP70 中,程序可经由脚踏开关来呼叫,程式中所启用的效果,对应LED 指示灯会点亮,本机内有50 组自定义音色(1-50)与50 组原厂设定音色(51-100),原厂音色无法变更,自定义音色可供你变更储存,出厂时这两种音色是完全相同,这样你就可以放心改变储存自己的音色,仍能保有原厂专业人士所设计的音色。
RP70 正面1、上/ 下向脚踏开关这两个脚踏开关可以选择效果程序,进入调音、旁路直通模式,右方踏板向上切换不同效果,左方踏板向下切换不同效果,同时踩下两个踏板则进入直路旁通模式,持续踩住两个踏板约两秒钟进入调音模式,踩下任一开关则能离开调音模式。
2、音色库、效果串行库、效果音量、总音量按键RP70 最重要的控制中心就是这几个按键,按下这几个按键之后,利用数值上/ 下键,你可以选择20 种破音音色、20 种效果串行,以及调整效果音量,最后在调整RP70 的输出音量,每个按键的作用如下。
音色库按键这个按键可以用来选择音色库中的不同扩大机音色,按下这个按键之后,利用数值上/ 下键,你可以选择20 种破音音色,从蓝调、摇滚到乡村应有尽有,这些音色里头结合了压缩、破音、哇哇、扩大机模块、均衡器等各种效果,当然你也能够进行音色库效果微调的动作,但是这里不会改变和声/延迟/回音等效果,让你能更快速比较不同的仿真扩大机型态差异,一旦你有做任何改变,屏幕上会出现CU 字样。
效果串行库按键这个按键可以用来选择不同的效果串行,按下这个按键之后,利用数值上/ 下键,你可以选择选择和声/延迟/回音等不同串行效果,然后进行效果改变的动作,但是它不会改变前段动态压缩、破音、扩大机型态、均衡器方面的参数,让你可以在固定扩大机音色下比较不同的特殊效果,一旦你有做任何改变,屏幕上会出现CU 字样。
- 5 -效果音量按键利用这个按键进行效果音量调整,按下这个按键之后,利用数值上/ 下键,可以控制扩大机效果之后,例如和声/延迟/回音等不同效果的输出音量,它可以看成是一个特殊效果混音的控制,提高数值就会增加这方面的效果程度,降低数值就会降低这方面的效果程度。
总输出音量按键这个按键让你可以改变RP70 的总输出音量,按下这个按键之后,利用数值上/ 下键改变整体输出音量大小。
3、编辑上/ 下向键可以选择要编辑的效果,屏幕并会显示效果设定,一旦成有了变动,显示屏右下角指示灯会点亮,这两个按键也能用来改变鼓节奏机的参数,后文有详尽说明。
4、数值上/ 下向键这是用来改变效果参数值,循环改变效果串行,改变效果音量、总输出音量,甚至是改变鼓节奏机设定。
5、显示屏显示屏会依据不同模式出现相关信息,在演奏模式下,显示程序序号,在编辑模式下,显示编辑效果的参数值,显示屏右下角指示灯点亮,代表程序已经有所改变,在调音模式下,显示弹奏音名。
6、效果矩阵区提供目前程序与效果编辑功能的信息,在演奏模式下,每个指示灯代表目前程序中所使用的效果,在编辑模式下,指示灯代表目前正在编辑的效果,在调音模式下,指示灯代表音准高低的参考。
7、鼓节奏机键用来启用或关闭RP70 内建的鼓节奏机,一旦开启,指示灯会点亮,并持续播放所选择的节奏,然后利用数值上/ 下向键选择节奏。
8、储存键储存程序编辑至用户自定义程序位置。
RP70 背面板1、讯号输入插孔连接乐器的输入插孔。
2、扩大机/ 混音座开关切换选择RP70 是要连结到乐器音箱,或者是连结到混音座使用,选择混音座的时候,扩大机补偿功能会开启,方便链接混音座、录音设备、耳机,选择扩大机的时候,你就可以直接连结乐器音箱来使用。
3、左/ 右声道讯号输出端子连结左声道到乐器音箱做为单声道输出形态,左/ 右声道同时输出做为立体声模式。
4、控制踏板输入孔可以链接被动式控制踏板,用来控制音量、哇哇、Whammy 或是其他的效果参数变化。
5、耳机输出端子用来连接立体式耳机,记得扩大机/混音座开关要切换到混音座输出模式,耳机建议使用组抗在100 奥姆以下的款式。
注意:耳机输出可依据左/ 右声道连接端子的状态,作为单声道或立体声讯号输出,如果只有左声道连接做单声道输出,耳机输出则为单声道输出模式,若是左/ 右声道输出没有连接或是做立体声输出,耳机则可以输出立体声讯号。
6、电源插孔连接随机附赠的PS200R 电源供应器。
- 7 -连结RP70连接方法RP70 有许多不同的链接运用模式,在链接正式之前,请确认扩大机与RP70 的电源都没有打开,RP70 没有电源开关,不要接上电源供应器就可以了。
单声道模式将吉他连接到RP70 的讯号输入插孔,由左声道讯号输出端子,链接单声道形态导线扩大机或功率扩大机,扩大机/ 混音座开关切到扩大机输出模式。
立体声模式将吉他连接到RP70 的讯号输入插孔,左/ 右声道各连接一条导线,两条导线分别连接至扩大器、混音座或是立体扩大机,若是连接混音座使用,请将混音座两个声道定位点分别拨至极左与极右位置,并将扩大机/ 混音座开关切到混音座输出模式若是连接乐器音箱,请将扩大机/ 混音座开关切到扩大机输出模式。
启用电源在开启任何电源之前,请先将扩大机切换到没有破音的频道,并将音质控制旋钮都放到中央归零的位置,然后依据下列步骤进行。
1、将扩大机输出音量转到最小声。
2、连接RP70 电源供应器。
3、将电源供应器接上电源插座,利用总输出音量按键以及数值上/ 下键将RP70 输出音量降为0。
4、将扩大机电源开关打开,并将音量调到适当位置。
5、利用总输出音量按键以及数值上/ 下键,逐步调高RP70 的输出音量到你觉得接受的程度。
- 9 -第二章编辑功能编辑/ 创造效果音色利用RP70 来创造个人喜好的音色是轻而易举,当你要创造自己的音色,你都必须由既有的程序开始,但它不必是你最后决定储存的序号位置,因为,最后程序储存的位置是可以改变,任意指定储存在用户自定义程序位置之中。
最简单的开始方是就是利用音色库与效果串行按键,前者可以让你选择各种不同音乐型态的破音放大效果,可参考原文说明书37 页,后者则是能选择不同的效果串行组合,从单纯的延迟效果,到结合调变、延迟、回音的复杂效果,可参考原文说明书39 页,利用效果音量按键调整适当的效果音比例,简单利用这三个按键,你就能创造出相当不错的音效啰,接着在利用编辑键逐一切换效果,然后用数值上/ 下键改变效果参数,轻松做出最完美的声音效果,操作程序如下。
1、首先利用上/ 下向脚踏开关选择一个你要编辑的程序,如果你要全新创造出完全不同于内建音色的程序,那你就可以先利用音色库、效果串行库、效果音量按键及数值上/ 下键,选出接近于你想要的音色。
2、一旦找到自己喜好的相近音色,接着就可以进行程序编辑,利用编辑上/ 下向按键切换到你要改变的效果列。
3、要开启任何一个效果,利用编辑上/ 下向按键选择效果,若要关闭该效果,然后只要按住数值下向按键,直到屏幕出现OF 字样,不过在均衡器中b5、d5、t5 代表没有任何音质衰减、增益的效果。