Struts2教程02
- 格式:ppt
- 大小:478.50 KB
- 文档页数:19
Struts2学习之二--Struts2标签介绍热12已有 14625 次阅读 2009-07-12 18:53[顶]3G移动--Android开发工程师全能班(转) Struts2学习之二--Struts2标签介绍在上一篇文章《为Struts 2.0做好准备》中,我过于详细地介绍了Struts 2.0开发环境和运行环境的配置,所以,本文很少涉及的以上两方面的细节。
如果,您看完《为Struts 2.0做好准备》后,还有什么不明白,或者没法运行文中例子,请联系我。
我的E-MAIL:Max.M.Yuan@。
在介绍常用标志前,我想先从总体上,对Struts 1.x与Struts 2.0的标志库(Tag Library)作比较。
分类将标志库按功能分成HTML、Tiles、Logic和Bean等几部分严格上来说,没有分类,所有标志都在URI为“/struts-tags”命名空间下,不过,我们可以从功能上将其分为两大类:非UI标志和UI标志表达式语言(expression languages)不支持嵌入语言(EL)OGNL、JSTL、Groovy和Velcity以上表格,纯属个人总结,如有所不足或错误,请不吝指正好了,我要开始介绍“常用”(这里所谓的“常用”,是指在已往工作中使用Struts里经常用到的)的标志了。
1.非UI标志o if、elseif和else描述:执行基本的条件流转。
参数:名称必需默认类型描述备注test 是Boolean 决定标志里内容是否显示的表达式else标志没有这个参数id 否Object/String 用来标识元素的id。
在UI和表单中为HTML的id属性例子:<%@ page contentType="text/html; charset=UTF-8" %><%@ taglib prefix="s" uri="/struts-tags" %><!DOCTYPE HTML PUBLIC "-//W3C//DTD HTML 4.01 Transitional//EN"><html><head><title>Condition Flow</title></head><body><h3>Condition Flow</h3><!--这里有点小技巧:本来可以用#[0]来获得,请求中name的值。
一.Struts2基础知识1. struts2的特点及配置1.1struts2与struts1的比较1)在软件设计上struts2没有struts1那样跟ServletApi和StrutsApi有着紧密的耦合,Struts2的应用可以不因爱ServletApi和StrutsApi.struts2的这种设计属于无侵入式设计,而Struts1却属于侵入式设计public class OrderListAction ectends Action//struts依赖于java2)Struts2提供了拦截器,利用拦截器可以进行AOP编程,实现如权限拦截等功能3)Struts2提供了类型转换器,我们可以把特殊的请求参数转换成我们需要的类型,在struts1中,如果我们实现同样的功能,就必须向struts1的底层实现BeanUtil注册类型转换器4)Struts2提供了支持多种表现层技术,如JSp,freeMarker等5)Struts2的输入校验可以对指定方法进行校验,解决了Struts的长久之疼6)提供了全局范围,包范围和Action范围的国际化资源文件管理实现1.2搭建struts2的开发环境1)新建web项目2)导入必要的包3)写配置文件Struts2默认的配置文件为Struts.xml,该文件需要存放在WEB-INF/classes下,该文件的配置模板如下(在m yeclipse中放在src目录下就可以了)模板在D:\Program Files\struts-2.3.4.1-all\struts-2.3.4.1\apps 解压struts2-blank.var再打开web-info/classes中的struts.x m l文件即可<?xml version="1.0"encoding="UTF-8"?><!DOCTYPE struts PUBLIC"-//Apache Software Foundation//DTD Struts Configuration2.3//EN""/dtds/struts-2.3.dtd"><struts></struts>4)在web.xm l中加入Struts2MVC框架启动配置在struts1.x中struts框架是通过Servlet启动的,在struts2中,struts框架式通过Filter 启动的,他在web.xm l中的配置如下:(D:\Program Files\struts-2.3.4.1-all\struts-2.3.4.1\apps 解压struts2-blank.var再打开Web-Info\web.xm l即可)<filter><filter-name>struts2</filter-name><filter-class>org.apache.struts2.dispatcher.ng.filter.Str utsPrepareAndExecuteFilter</filter-class><!—自从struts2.1.3以后,下面的FilterDispatcher已经标注为过时<filter-class>org.apache.struts2.dispatcher.ng.filter.FilterDispather</filter-class> --></filter><filter-mapping><filter-name>struts2</filter-name><url-pattern>/*</url-pattern></filter-mapping>在StrutsPrepareAndEXecuteFilter()方法中将会读取类路径下的默认文件struts.xml完成初始化操作。
在很多Web应用中,为了完成不同的工作,一个HTML form标签中可能有两个或多个submit 按钮,如下面的代码所示:<!--[if !supportLineBreakNewLine]--><ht ml action="" method="post"><input type="submit" value="保存"/><input type="submit" value="打印"/></ht ml>由于在<form>中的多个提交按钮都向一个action提交,使用Struts2 Action的execute 方法就无法判断用户点击了哪一个提交按钮。
如果大家使用过Struts1.x就会知道在Struts1.2.9之前的版本需要使用一个LookupDispatchAction动作来处理含有多个submit 的form。
但使用LookupDispatchAction动作需要访问属性文件,还需要映射,比较麻烦。
从Struts1.2.9开始,加入了一个Event DispatchAction动作。
这个类可以通过java反射来调用通过request参数指定的动作(实际上只是判断某个请求参数是不存在,如果存在,就调用在action类中和这个参数同名的方法)。
使用EventDispatchAction必须将submit的name 属性指定不同的值以区分每个submit。
而在Struts2中将更容易实现这个功能。
当然,我们也可以模拟Event DispatchAction的方法通过request获得和处理参数信息。
但这样比较麻烦。
在Struts2中提供了另外一种方法,使得无需要配置可以在同一个action类中执行不同的方法(默认执行的是execute方法)。
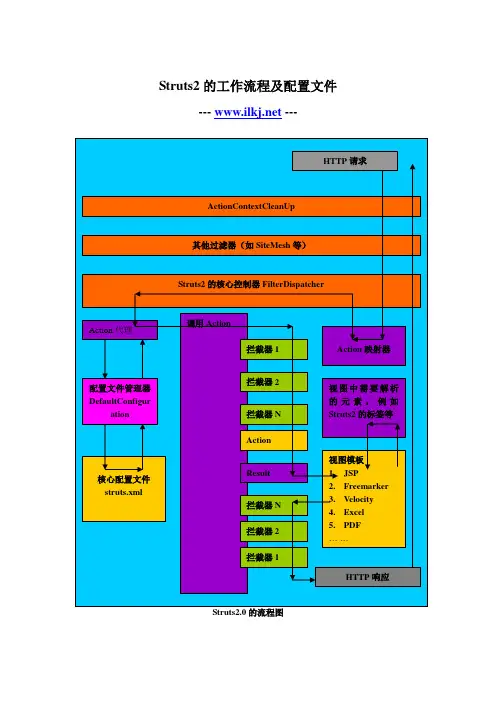
Struts2的工作流程及配置文件--- ---Struts2.0的流程图从图中看到Struts2的工作流程如下:1.服务器接收到的请求首先经过一组过滤器链(实际中的其他过滤器可能还包括诸如Spring 的字符过滤器CharactorEncodingFilter、V elocity的过滤器等,一般FilterDispatcher位于过滤器的最后一个执行),过滤器链按照你在web.xml中的配置顺序在接收客户请求时顺序执行,在向客户发送响应时反序执行,Struts2的核心FilterDispatcher在web.xml中的配置如下:<filter><filter-name>setCharactor</filter-name><!-- 配置字符过滤--><filter-class>org.springframework.web.filter.CharacterEncodingFilter</filter-class><init-param><param-name>encoding</param-name><param-value>UTF-8</param-value></init-param></filter><filter><filter-name>struts2</filter-name><!-- 配置Struts2过滤器--><filter-class>org.apache.struts2.dispatcher.FilterDispatcher</filter-class> </filter><filter-mapping><filter-name>setCharactor</filter-name><url-pattern>/*</url-pattern></filter-mapping><filter-mapping><filter-name>struts2</filter-name><url-pattern>/*</url-pattern></filter-mapping>注意:如果你使用的是W ebLogic6.1作为应用服务器,需要使用FilterDispatcherCompatW eblogic61替代FilterDispatcher。
struts2入门手册首先这个教程是基于你已经安装了myeclipse的基础上的,如果你还没有安装myeclipse 工具软件的话,你需要马上去安装一个。
如果你已经有了工具软件了的话,现在就按照以下步骤来入门struts2吧。
一、下载struts2进入struts的官网/,点击download,选择Full Distrybution:下的struts2-xxx-all.zip,下载struts2的最新版本,将压缩包解压,放置到D盘目录下。
二、解压struts2进入你解压后的struts2文件夹中,到D:\struts2-xxx\apps中,解压其中的struts2-blank.war 压缩文件到D:\struts2-xxx\example,这是struts2提供的基础例子,里面的WEB-INF\lib目录下的包正是struts2正常工作所需要的基本包。
三、导入struts2基本包打开你的myeclipse,创建一个web project工程,命名为test(你也可以自己随意起一个),不要急着点击Finish,先选择Next>,继续选择Next>,在弹出的对话框中把第二个单选框打勾,如图,再点击Finish。
创建好之后在你创建的工程上目录下的WebRoot/WEB-INF/lib目录上单击右键,选择import...,选择General下的File System,点击Next>,选择Browse...,浏览选择到D:\struts\example\WEB-INF\lib目录,点击确定。
选择Sellct All,点击Finish,就完成了struts需要的最基础的核心包的导入。
四、用struts实现一个简单的登陆验证1.修改工程目录下的WebRoot\WEB-INF目录下的web.xml文件,将里面的内容替换为如下代码:<?xml version="1.0"encoding="UTF-8"?><web-app xmlns:xsi="/2001/XMLSchema-instance"xmlns="/xml/ns/javaee"xsi:schemaLocation="/xml/ns/javaee/xml/ns/javaee/web-app_3_0.xsd"id="WebApp_ID"version="3.0"><display-name>test</display-name><!-- 设置初始页面的URL --><welcome-file-list><welcome-file>login.jsp</welcome-file></welcome-file-list><!-- 设置struts过滤器 --><filter><filter-name>struts2</filter-name><filter-class>org.apache.struts2.dispatcher.FilterDispatcher</filter-class></filter><filter-mapping><filter-name>struts2</filter-name><url-pattern>/*</url-pattern></filter-mapping></web-app>2.在工程的src目录下创建struts.xml,代码如下:<?xml version="1.0"encoding="UTF-8"?><!DOCTYPE struts PUBLIC"-//Apache Software Foundation//DTD Struts Configuration 2.3//EN""/dtds/struts-2.3.dtd"><struts><!-- 是否开启动态方法调用 --><constant name="struts.enable.DynamicMethodInvocation"value="false"/> <!-- 指定被struts2处理的请求的后缀类型,多个用逗号隔开 --><constant name="struts.action.extension"value="action"/><!-- 设置浏览器是否静态缓存内容,开发阶段最好关闭 --><constant name="struts.devMode"value="true"/><!-- 设置当struts.xml改动后,是否重新加载,默认为false,开发环境下最好打开 --> <constant name="struts.configuraction.xml.reload"value="true"/> <package name="myPackage"namespace="/"extends="struts-default"> <action name="login"class="action.LoginAction"><result name="success">/welcome.jsp</result> <result name="input">/login.jsp</result></action></package></struts>3.在工程的src目录下创建package(包),命名为action,在action中新建class,命名为LoginAction,代码如下:package action;import javax.servlet.http.HttpSession;import com.opensymphony.xwork2.ActionSupport;import org.apache.struts2.ServletActionContext;@SuppressWarnings("serial")public class LoginAction extends ActionSupport {private String name;private String password;public String getName() {return name;}public void setName(String name) { = name;}public String getPassword() {return password;}public void setPassword(String password) {this.password = password;}public String forward() throws Exception {return SUCCESS;}//重载ActionSupport中的execute()方法public String execute() throws Exception {//验证输入的Name是否为"name",是则返回"success"否则返回"input"if("name".equals(name)) {HttpSession session = ServletActionContext.getRequest().getSession();session.setAttribute("name", name);return SUCCESS;} else {return INPUT;}}}4.在工程的WebRoot目录下创建login.jsp,代码如下:<%@page language="java"contentType="text/html; charset=UTF-8" pageEncoding="UTF-8"%><%@taglib prefix="s"uri="/struts-tags"%><!DOCTYPE html PUBLIC"-//W3C//DTD HTML 4.01 Transitional//EN""/TR/html4/loose.dtd"><html><head><meta http-equiv="Content-Type"content="text/html; charset=UTF-8"> <title>Login</title></head><body><!-- 创建一个登陆表单 --><s:url action="login"id="loginUrl"></s:url><s:form action="%{loginUrl}"method="post"><s:textfield label="Name"name="name"/><s:password label="Password"name="password"/><s:submit></s:submit></s:form></body></html>5.在工程的WebRoot目录下创建welcome.jsp,代码如下:<%@page language="java"contentType="text/html; charset=UTF-8"pageEncoding="UTF-8"%><%@taglib prefix="s"uri="/struts-tags"%><!DOCTYPE html PUBLIC"-//W3C//DTD HTML 4.01 Transitional//EN""/TR/html4/loose.dtd"><html><head><meta http-equiv="Content-Type"content="text/html; charset=UTF-8"> <title>Welcome</title></head><body><h1>登陆成功</h1></body></html>现在就来验证一下我们的登陆页面吧,选择工具栏中的按钮,在弹出的对话框中单击project后的矩形选框,从下拉列表中选择你创建的工程,然后单击Add,从弹出的对话框中单击sever后的矩形选框,从下拉列表中选择tomcat7,单击Finish。
一、发展历史及简介发展历史Struts最早是作为Apache Jakarta项目的组成部分,项目的创立者希望通过对该项目的研究,改进和提高JavaServer Pages、Servlet、标签库以及面向对象的技术水准。
Struts这个名字来源于在建筑和旧式飞机中使用的支持金属架。
这个框架之所以叫"Struts",是为了提醒我们记住那些支撑我们房屋,建筑,桥梁,甚至我们踩高跷时候的基础支撑。
这也是一个解释Struts在开发Web应用程序中所扮演的角色的精彩描述。
当建立一个物理建筑时,建筑工程师使用支柱为建筑的每一层提供支持。
同样,软件工程师使用Struts为业务应用的每一层提供支持。
它的目的是为了帮助我们减少在运用MVC设计模型来开发Web应用的时间。
我们仍然需要学习和应用该架构,不过它将可以完成其中一些繁重的工作。
如果想混合使用Servlets和JSP的优点来建立可扩展的应用,Struts是一个不错的选择。
早期Smalltalk程序语言便采用了MVC(Model-View-Controller)模式(Patterns)以增加程序代码弹性,MVC模式将程序代码整理切割为三部分,Model部分是业务与应用领域(Business domain)相关逻辑、管理状态之对象,Controller部分接收来自View所输入的资料并与Model部分互动,struts业务流程控制(Flow Control)之处,View部分则负责展现资料、接收使用者输入资料。
在Java应用中,JFC/Swing、AWT、JSP皆是可用作View的技术规格,而JavaBean与Enterprise JavaBean规格则可用于Model程序代码,一旦应用程序以MVC模式加以适当的分割,Model部分程序代码可在不同使用者接口外观的应用程序中重复使用。
随着JSP与Servlet技术大量应用于以Web为基础的应用程序,Java开发人员群体认为应以较佳的模式以提升Web应用程序的可维护性与重复使用性。
配置ActionStruts2的核心功能是action,对于开发人员来说,使用Struts2主要就是编写action,action类通常都要实现com.opensymphony.xwork2.Action接口,并实现该接口中的execute()方法。
该方法如下:public String execute() throws ExceptionStruts2并不是要求所有编写的action类都要实现Action接口,也可以直接编写一个普通的Java类作为action,只要实现一个返回类型为String的无参的public方法即可:public String xxx()在实际开发中,action类很少直接实现Action接口,通常都是从com.opensymphony.xwork2.ActionSupport类继承,ActionSupport实现了Action接口和其他一些可选的接口,提供了输入验证,错误信息存取,以及国际化的支持,选择从ActionSupport继承,可以简化action的定义。
开发好action之后,好需要对action进行配置,以告诉Struts2框架,针对某个URL的请求应该交由哪个action进行处理。
1.Action映射:action映射是Struts2框架中的基本”工作单元”,action映射就是将一个请求URL(即action的名字)映射到一个action类,当一个请求匹配某个action的名字时,框架就使用这个映射来确定如何处理请求。
action元素的完整属性表例如:<action name="user" class="erAction"><result name="success">/user.jsp</result></action>2. 使用method属性在配置action时,我们可以通过action元素的method属性来指定action调用的方法,所指定的方法,必须遵循与execute方法相同的格式。
About the T utorialApache Struts 2 is an elegant, extensible framework for creating enterprise-ready Java web applications. This framework is designed to streamline the full development cycle from building, to deploying and maintaining applications over time. Apache Struts 2 was originally known as Web Work 2.This tutorial will teach you, how to use Apache Struts for creating enterprise-ready Java web applications in simple and easy steps.AudienceThis tutorial is designed for Java programmers who are interested to learn the basics of Struts 2.x framework and its applications.PrerequisitesBefore proceeding with this tutorial, you should have a good understanding of the Java programming language. A basic understanding of MVC Framework and JSP or Servlet is very helpful.Disclaimer & CopyrightCopyright 2015 by Tutorials Point (I) Pvt. Ltd.All the content and graphics published in this e-book are the property of Tutorials Point (I) Pvt. Ltd. The user of this e-book is prohibited to reuse, retain, copy, distribute, or republish any contents or a part of contents of this e-book in any manner without written consent of the publisher. We strive to update the contents of our website and tutorials as timely and as precisely as possible, however, the contents may contain inaccuracies or errors. Tutorials Point (I) Pvt. Ltd. provides no guarantee regarding the accuracy, timeliness, or completeness of our website or its contents including this tutorial. If you discover any errorsonourwebsiteorinthistutorial,******************************************iT able of ContentsAbout the Tutorial (i)Audience (i)Prerequisites (i)Disclaimer & Copyright (i)Table of Contents .................................................................................................................................. i i STRUTS 2 - BASIC MVC ARCHITECTURE (1)The Model (2)The View (2)The Controller (2)STRUT 2 – OVERVIEW (3)Struts 2 Framework Features (3)Struts 2 Disadvantages (4)ENVIRONMENT SETUP (5)Step 1 - Setup Java Development Kit (JDK) (5)Step 2 - Setup Apache Tomcat (5)Step 3 - Setup Eclipse (IDE) (7)Step 4 - Setup Struts2 Libraries (8)STRUTS 2 – ARCHITECTURE (10)Request Life Cycle (11)STRUTS 2 – EXAMPLES (12)Create a Dynamic Web Project (13)Create Action Class (14)Create a View (15)Create Main Page (16)iiTo Enable Detailed Log (18)Procedure for Executing the Application (19)STRUTS 2 – CONFIGURATION (22)The web.xml File (22)The Struts.xml File (23)The Struts-config.xml File (25)The Struts.properties File (27)STRUTS 2 – ACTIONS (29)Create Action (29)Create a View (31)Execute the Application (33)Create Multiple Actions (35)STRUTS 2 – INTERCEPTORS (37)Struts 2 Framework Interceptors (37)How to Use Interceptors? (39)Create Custom Interceptors (40)Create Interceptor Class (41)Create Action Class (42)Create a View (43)Create Main Page (43)Configuration Files (44)Stacking Multiple Interceptors (46)STRUTS 2 – RESULT TYPES (48)The Dispatcher Result Type (48)iiiThe Redirect Result Type (50)STRUTS 2 – VALUE STACK / OGNL (52)The Value Stack (52)The OGNL (53)ValueStack/OGNL Example (54)Create Views (56)Configuration Files (57)STRUTS 2 – FILE UPLOADS (60)Create View Files (60)Create Action Class (61)Configuration Files (63)Error Messages (67)STRUTS 2 – DATABASE ACCESS (69)Create Action (69)Create Main Page (71)Create Views (72)Configuration Files (73)STRUTS 2 – SENDING EMAIL (77)Create Action (77)Create Main Page (80)Create Views (81)Configuration Files (82)STRUTS 2 - VALIDATIONS (86)Create Main Page (86)ivCreate Action (87)Configuration Files (88)How this Validation Works? (91)Xml Based Validation (92)STRUTS 2 - LOCALIZATION (95)Resource Bundles (95)Access the messages (96)Localization Example (96)STRUTS 2 – TYPE CONVERTION (104)STRUTS 2 – THEMES & TEMPLATES (110)Selecting Themes (111)How a Theme Works? (112)Creating New Themes (112)STRUTS 2 – EXCEPTION HANDLING (115)Global Exception Mappings (120)STRUTS 2 – ANNOTATIONS (122)Create Main Page (122)Create Views (123)Create Action (124)Configuration Files (125)STRUTS 2 – CONTROL TAGS (130)The If and Else Tags (130)If and Else Tags – Detailed Example (130)The Iterator Tags (134)vThe Iterator Tags – Detailed Example (135)The Merge Tag (142)The Merge Tag – Detailed Example (142)The Append Tag (147)The Append Tag – Detailed Example (148)The Generator Tag (153)The Generator Tag – Detailed Example (154)STRUTS 2 – DATA TAGS (158)The Action Tag (158)The Action Tag – Detailed Example (158)The Include Tag (164)The Include Tag – Detailed Example (164)The Bean Tag (168)The Bean Tag – Detailed Example (169)The Date Tag (173)The Date Tag - Detailed Example (173)The Param Tag (176)The Param Tag – Detailed Example (177)The Property Tag (181)The Property Tag – Detailed Example (181)The Push Tag (185)The Push Tag – Detailed Example (186)The Set Tag (190)The Set Tag – Detailed Example (190)The Text Tag (195)The Text Tag – Detailed Example (195)viThe URLTag (199)STRUTS 2 – THE FORM TAGS (204)Simple UI Tags (204)Group UI Tags (206)STRUTS 2 – THE AJAX TAGS (211)STRUTS 2 & SPRING INTEGRATION (214)STRUTS 2 & TILES INTEGRATION (220)STRUTS 2 & HIBERNATE (226)Database Setup (226)Hibernate Configuration (226)Envrionment Setup (227)Hibernate Classes (228)Action Class (231)Struts Configuration (234)viiStruts 2 1M odel V iew C ontroller or MVC as it is popularly called, is a software design pattern for developing web applications. A Model View Controller pattern is made up of the following three parts:∙Model - The lowest level of the pattern which is responsible for maintaining data. ∙View - This is responsible for displaying all or a portion of the data to the user. ∙ Controller - Software Code that controls the interactions between the Model and View. MVC is popular as it isolates the application logic from the user interface layer and supports separation of concerns. Here the Controller receives all requests for the application and then works with the Model to prepare any data needed by the View. The View then uses the data prepared by the Controller to generate a final presentable response. The MVC abstraction can be graphically represented as follows.STRUTS 2 - BASIC MVC ARCHITECTUREStruts 2The ModelThe model is responsible for managing the data of the application. It responds to the request from the view and it also responds to instructions from the controller to update itself.The ViewIt means presentation of data in a particular format, triggered by a controller's decision to present the data. They are script-based templating systems like JSP, ASP, PHP and very easy to integrate with AJAX technology.The ControllerThe controller is responsible for responding to the user input and perform interactions on the data model objects. The controller receives the input, it validates the input and then performs the business operation that modifies the state of the data model.Struts2 is a MVC based framework. In the coming chapters, let us see how we can use the MVC methodology within Struts2.2Struts 2 3 Struts2 is a popular and mature web application framework based on the MVC design pattern. Struts2 is not just a new version of Struts 1, but it is a complete rewrite of the Struts architecture.The Webwork framework initially started with Struts framework as the basis and its goal was to offer an enhanced and improved framework built on Struts to make web development easier for the developers.After a while, the Webwork framework and the Struts community joined hands to create the famous Struts2 framework.Struts 2 Framework FeaturesHere are some of the great features that may force you to consider Struts2:∙ Pojo Forms and Pojo Actions - Struts2 has done away with the Action Forms that were an integral part of the Struts framework. With Struts2, you can use any POJO to receive the form input. Similarly, you can now see any POJO as an Action class.∙ Tag Support - Struts2 has improved the form tags and the new tags which allow the developers to write less code.∙ Ajax Support - Struts2 has recognized the take over by Web2.0 technologies, and has integrated AJAX support into the product by creating AJAX tags, this function is very similar to the standard Struts2 tags.∙ Easy Integration - Integration with other frameworks like Spring, Tiles and SiteMesh is now easier with a variety of integration available with Struts2.∙ Template Support - Support for generating views using templates.∙ Plugin Support - The core Struts2 behavior can be enhanced and augmented by the use of plugins. A number of plugins are available for Struts2.∙ Profiling - Struts2 offers integrated profiling to debug and profile the application. In addition to this, Struts also offers integrated debugging with the help of built in debugging tools.∙ Easy To Modify Tags - Tag markups in Struts2 can be tweaked using Freemarker templates. This does not require JSP or java knowledge. Basic HTML, XML and CSS knowledge is enough to modify the tags.∙Promote Less Configuration - Struts2 promotes less configuration with the help of using default values for various settings. You don't have to configure something unless it deviates from the default settings set by Struts2.STRUT 2 – OVERVIEWStruts 2 ∙View Technologies- Struts2 has a great support for multiple view options (JSP, Freemarker, Velocity and XSLT)Listed above are the Top 10 features of Struts 2 which makes it as an Enterprise ready framework.Struts 2 DisadvantagesThough Struts 2 comes with a list of great features, there are some limitations of the current version - Struts 2 which needs further improvement. Listed are some of the main points:∙Bigger Learning Curve- To use MVC with Struts, you have to be comfortable with the standard JSP, Servlet APIs and a large & elaborate framework.∙Poor Documentation- Compared to the standard servlet and JSP APIs, Struts has fewer online resources, and many first-time users find the online Apache documentation confusing and poorly organized.∙Less Transparent - With Struts applications, there is a lot more going on behind the scenes than with normal Java-based Web applications which makes it difficult to understand the framework.Final note, a good framework should provide generic behavior that many different types of applications can make use of it.Struts 2 is one of the best web frameworks and being highly used for the development of Rich Internet Applications (RIA).4Struts 2 5Our first task is to get a minimal Struts 2 application running. This chapter will guide you on how to prepare a development environment to start your work with Struts 2. I assume that you already have JDK (5+), Tomcat and Eclipse installed on your machine. If you do not have these components installed, then follow the given steps on fast track: Step 1 - Setup Java Development Kit (JDK)You can download the latest version of SDK from Oracle's Java site: Java SE Downloads . You will find instructions for installing JDK in downloaded files, follow the given instructions to install and configure the setup. Finally, set PATH and JAVA_HOME environment variables to refer to the directory that contains java and javac, typically java_install_dir/bin and java_install_dir respectively.If you are running Windows and installed the SDK in C:\jdk1.5.0_20, you should be inputting the following line in your C:\autoexec.bat file.Alternatively, on Windows NT/2000/XP:∙ You can right-click on My Computer, Select Properties, then Advanced, then Environment Variables. Then, you would update the PATH value and press the OK button.∙On Unix (Solaris, Linux, etc.), if the SDK is installed in /usr/local/jdk1.5.0_20 and you use the C shell, you would put the following into your .cshrc file. Alternatively, if you use an Integrated Development Environment (IDE) like Borland JBuilder, Eclipse, IntelliJ IDEA, or Sun ONE Studio, compile and run a simple program to confirm that the IDE knows where you installed Java, otherwise do proper setup as per the given document of IDE.Step 2 - Setup Apache T omcatYou can download the latest version of Tomcat from /. Once you downloaded the installation, unpack the binary distribution into a convenient location. For example in C:\apache-tomcat-6.0.33 on windows, or /usr/local/apache-tomcat-6.0.33 on Linux/Unix and create CATALINA_HOME environment variable pointing to these locations.ENVIRONMENT SETUPYou can start Tomcat by executing the following commands on windows machine, or you can simply double click on startup.batTomcat can be started by executing the following commands on Unix (Solaris, Linux, etc.) machine:After a successful startup, the default web applications included with Tomcat will be available by visiting http://localhost:8080/. If everything is fine, then it should display the following result:Further information about configuring and running Tomcat can be found in the documentation included here, as well as on the Tomcat website: 67 Tomcat can be stopped by executing the following commands on windows machine:Tomcat can be stopped by executing the following commands on Unix (Solaris, Linux, etc.) machine:Step 3 - Setup Eclipse (IDE)All the examples in this tutorial are written using Eclipse IDE. I suggest that, you have the latest version of Eclipse installed in your machine.To install EclipseDownload the latest Eclipse binaries from /downloads/. Once you download the installation, unpack thebinary distribution into a convenient location.For example in C:\eclipse on windows, or /usr/local/eclipse on Linux/Unix and finally set PATH variable appropriately. Eclipse can be started by executing the following commands on windows machine, or you can simply double click on eclipse.exeEclipse can be started by executing the following commands on Unix (Solaris, Linux, etc.) machine:After a successful startup, if everything is fine, it should display the following result:Step 4 - Setup Struts2 LibrariesNow if everything is fine, then you can proceed to setup your Struts2 framemwork. Following are the simple steps to download and install Struts2 on your machine.∙Make a choice whether you want to install Struts2 on Windows, or Unix and then proceed to the next step to download .zip file for windows and .tz file for Unix.∙Download the latest version of Struts2 binaries from /download.cgi.∙At the time of writing this tutorial, I downloaded struts-2.0.14-all.zip and when you unzip the downloaded file it will give you directory structure inside C:\struts-2.2.3 as follows.8Second step is to extract the zip file in any location, I downloaded & extracted struts-2.2.3-all.zip in c:\folder on my Windows 7 machine so that I have all the jar files into C:\struts-2.2.3\lib. Make sure you set your CLASSPATH variable properly otherwise you will face problem while running your application.9End of ebook previewIf you liked what you saw…Buy it from our store @ https://10。
Struts2(上)一、经典的MVC模式二、Struts1.x对MVC的实现三、Struts1.x的主要组件和作用组件作用ActionServlet 中央控制器Action 分控制器,调用JavaBean实现业务逻辑,Action可以分为Action、DispatchAction等不同类型ActionForm 封装参数,实现服务器验证,文件上传等Forward 转发到目的地,可以是JSP,也可以是另一个ActionStruts-config.xml 配置文件,配置有ActionForm,Action,Forward等,通过XML解析,然后使用反射技术使用该文件Struts标签库和JSTL类似,和Struts-config.xml、ActionForm、Action等对象可以紧密集成四、Struts1.x 开发实例-登录程序见案例。
五、Struts2(WebWork)的MVCStruts2的MVC架构六、Struts2的主要组件组件作用FilterDispatcher 起中央控制器作用的过滤器Action 处于Model层的Action,调用JavaBean实现业务逻辑struts.xml 核心配置文件,配置有Action、Result等result 和forward类似,转发的目的地,支持多种视图技术。
七、Struts2的实例-登录在MyEclipse环境中建立一个新的web工程,名称“Struts2Login”,存放路径“f:\Struts2Login”。
在Struts2.0.11版本中找到war包struts2-blank-2.0.11.war,解开该war包,在WEB-INF/lib 目录下复制出所有的jar包,这些jar包就是一个Struts2程序所需要的基础jar包,把它们复制到新建的web工程的WEB-INF/lib目录中。
在src目录下建立一个类,包名mypack,类名UserAction,其代码如下:package mypack;import com.opensymphony.xwork2.ActionSupport;public class UserAction extends ActionSupport {private String username;private String userpass;public String getUsername() {return username;}public void setUsername(String username) {ername = username;}public String getUserpass() {return userpass;}public void setUserpass(String userpass) {erpass = userpass;}@Overridepublic String execute() throws Exception {if ("Mike".equals(username) && "123".equals(userpass)|| "张三".equals(username) && "abc".equals(userpass))return "success";elsereturn "error";}}在src目录下建立Struts2的配置文件struts.xml,内容如下:<?xml version="1.0" encoding="UTF-8" ?><!DOCTYPE struts PUBLIC"-//Apache Software Foundation//DTD Struts Configuration 2.0//EN""/dtds/struts-2.0.dtd"><struts><!-- 定义包管理配置的action 继承struts-default.xml中的配置 --><package name="actions" extends="struts-default"><!-- 定义Action(login.action) --><action name="login" class="erAction"><!-- 定义转发路径对应的字符串名 --><result name="success">/Success.jsp</result><result name="error">/Error.jsp</result></action></package></struts>修改web.xml,在其中加入一个过滤器,过滤/*路径。
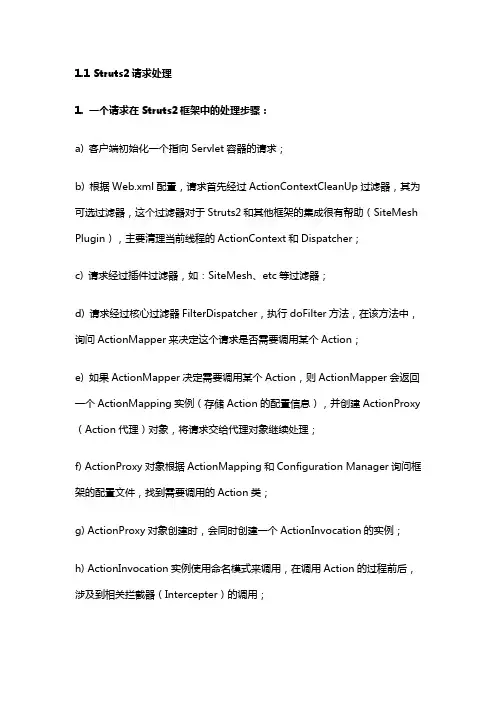
1.1 Struts2请求处理1. 一个请求在Struts2框架中的处理步骤:a) 客户端初始化一个指向Servlet容器的请求;b) 根据Web.xml配置,请求首先经过ActionContextCleanUp过滤器,其为可选过滤器,这个过滤器对于Struts2和其他框架的集成很有帮助(SiteMesh Plugin),主要清理当前线程的ActionContext和Dispatcher;c) 请求经过插件过滤器,如:SiteMesh、etc等过滤器;d) 请求经过核心过滤器FilterDispatcher,执行doFilter方法,在该方法中,询问ActionMapper来决定这个请求是否需要调用某个Action;e) 如果ActionMapper决定需要调用某个Action,则ActionMapper会返回一个ActionMapping实例(存储Action的配置信息),并创建ActionProxy (Action代理)对象,将请求交给代理对象继续处理;f) ActionProxy对象根据ActionMapping和Configuration Manager询问框架的配置文件,找到需要调用的Action类;g) ActionProxy对象创建时,会同时创建一个ActionInvocation的实例;h) ActionInvocation实例使用命名模式来调用,在调用Action的过程前后,涉及到相关拦截器(Intercepter)的调用;i) 一旦Action执行完毕,ActionInvocation实例负责根据struts.xml中的配置创建并返回Result。
Result通常是一个需要被表示的JSP或者FreeMarker 的模版,也可能是另外的一个Action链;j) 如果要在返回Result之前做些什么,可以实现PreResultListener接口,PreResultListener可以在Interceptor中实现,也可以在Action中实现;k) 根据Result对象信息,生成用户响应信息response,在生成响应过程中可以使用Struts2 框架中继承的标签,在此过程中仍会再次涉及到ActionMapper;2. Struts2请求处理示意图:1.2 Struts2请求处理源码分析当用户向Struts2发送请求时,FilterDispatcher的doFilter()方法自动调用,doFilter()方法处理请求过程,如下:1. 创建值栈对象stack;2. 创建Action上下文对象;3. 对请求进行重新封装,此次封装根据请求内容的类型不同,返回不同的对象:如果为multipart/form-data类型,则返回MultiPartRequestWrapper类型的对象,该对象服务于文件上传,否则返回StrutsRequestWrapper类型的对象,MultiPartRequestWrapper是StrutsRequestWrapper的子类,而这两个类都是HttpServletRequest接口的实现。
前言其实神马都是浮云。
相关软件下载1.下载Struts2.2.1.1 /download.cgi#struts217(选择下载fulldistribution)2.下载eclipse,/downloads/(选择下载Eclipse IDE for Java EEDevelopers Windows 32 Bit)3.下载tomcat6.0,4.下载JDK1.6,/download/jdk6安装与设置1.解压struts-2.2.1.1-all.zip2.安装Eclipse(解压即可)3.假设你已经安装好jdk和tomcat了,如C:\JAVA_TOOLS\apache-tomcat-6.0.16和C:\JAVA_TOOLS\JDK\ jdk1.6.0_02HelloWorld1.Eclipse中设定servera)Window –Preferences –Server –Runtime Environments –Add –Apache –ApacheTomcat v6.0(注意选中对话框下方的Create a new local server复选框)b)选择Tomcat installation directoryc)选择JREd)Finishe)双击下方Servers选项卡中的Tomcat v6.0 Server at localhost,设置Server Locations中的Deploy path为Tomcat安装目录下的webapps目录,注意保存文件。
2.Eclipse中建立项目a)打开eclipseb)新建项目c)选择web节点下的Dynamic Web Projectd)项目名称:struts2HelloWorld(注意选中Target runtime为设定好的Server)3.Eclipse中部署运行项目a)右击Servers选项卡中的Tomcat v6.0 Server at localhost,选择Add and Remove添加需要部署的Java web项目。
Sturuts2第一节、Struts2介绍Struts 2是Struts的下一代产品,是在 struts 1和WebWork的技术基础上进行了合并的全新的Struts 2框架。
其全新的Struts 2的体系结构与Struts 1的体系结构差别巨大。
Struts 2以WebWork为核心,采用拦截器的机制来处理用户的请求,这样的设计也使得业务逻辑控制器能够与Servlet API完全脱离开,所以Struts 2可以理解为WebWork的更新产品。
虽然从Struts 1到Struts 2有着太大的变化,但是相对于WebWork,Struts 2的变化很小。
Struts2对Struts1进行了巨大的改进。
主要表现在如下几个方面: 在Action的实现方面:Struts1要求必须统一扩展自Action类,而Struts2中可以是一个POJO。
线程模型方面:Struts1的Action是单实例的,一个Action的实例处理所有的请求。
Struts2的Action是一个请求对应一个实例(每次请求时都新new出一个对象),没有线程安全方面的问题。
Servlet依赖方面:Struts1的Action依赖于Servlet API,比如Action的execute方法的参数就包括request和response对象。
这使程序难于测试。
Struts2中的Action不再依赖于Servlet API,有利于测试,并且实现TDD。
封装请求参数:Struts1中强制使用ActionForm对象封装请求的参数。
Struts2可以选择使用POJO类来封装请求的参数,或者直接使用Action的属性。
表达式语言方面:Struts1中整合了EL,但是EL对集合和索引的支持不强,Struts2整合了OGNL(Object Graph NavigationLanguage)。
绑定值到视图技术:Struts1使用标准的JSP,Struts2使用"ValueStack"技术。