【精心整理】蜜蜂飞机设计图纸
- 格式:ppt
- 大小:7.02 MB
- 文档页数:22
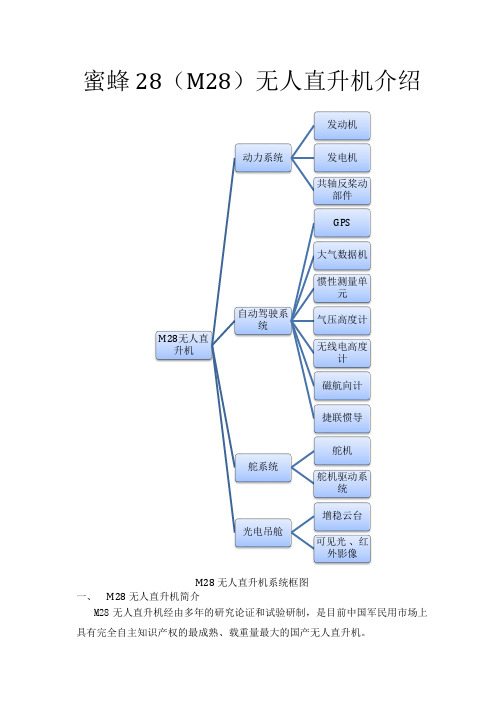
蜜蜂28(M28)无人直升机介绍M28无人直升机系统框图一、 M28无人直升机简介M28无人直升机经由多年的研究论证和试验研制,是目前中国军民用市场上具有完全自主知识产权的最成熟、载重量最大的国产无人直升机。
M28无人直升机动力系统发动机发电机共轴反桨动部件自动驾驶系统GPS 大气数据机惯性测量单元气压高度计无线电高度计磁航向计捷联惯导舵系统舵机舵机驱动系统光电吊舱增稳云台可见光、红外影像M28无人直升机参数介绍旋翼直径 5.1m机身高度 2.2m机身宽度 1.5m总重380kg(海平面)有效载荷80kg (海平面)续航时间3~4小时动升限3000m最大飞行速度120km/s巡航速度100km/s悬停定位水平方向CEP(圆概率误差)< 5m 悬停定位高度方向误差<1.8m直线航线飞行误差<15m数传电台有效距离10-180KmM28总体尺寸设备舱尺寸如图所示:M28外型图M28总体尺寸M28设备舱尺寸完全自主起降M28无人直升机采用完全自主垂直起降系统,不需要人为干预即可以完成从起飞、航线飞行到降落的整个过程。
有效载荷80公斤M28无人直升机以反桨共轴直升机为机体,无尾桨的气动特点使其结构紧凑,动力效率高,避免了飞行中比例高达75%的由尾桨失效引起的事故,尤其适用于海上平台起降。
其有效商用载荷达到80公斤,一个外挂架和一个尺寸为50cm ×50cm×40cm的载荷舱均可使用。
多余度设计M28无人直升机采用HeliAP自动驾驶仪和整体设计的机身,具有可靠的多余度飞行控制和舵系统,用户通过10-180公里的可靠数据链路和简洁的图形用户界面甚至可以操纵直升机在雨中完成从起飞到着陆的整个任务。
M 28无人直升机的机身采取单体横造的高级复合材料外壳,它提供了卓越的强度/重量比例,动力传动系统原件航空级铝钛材料。
北京拓云海智能设备技术有限公司正与民航局密切合作,确保了设计、生产和系统的运作符合有关民航条例。


北京航空航天大学设计制造的蜜蜂系列轻型飞机目前一提起北航的轻型飞机你们想到和看到的就是蜜蜂-3C、蜜蜂-4、蜜蜂-11。
其实早在1978年底,当时的北京航空学院就开始了“蜜蜂一号”的设计工作。
1979年试飞成功,据资料记载,不是人来试飞的,而是遥控试飞的。
没有留下数据。
仅造了一架,目前存放在学校的博物馆里。
蜜蜂一号是三角骨架式伞翼机,它以半柔性的伞翼作为升力面。
基本数据:翼展:8.2米机长:3.7米机高:2.32米起飞重量:100公斤最大平飞速度:55公里/小时“蜜蜂二号” 1982年初开始研制,1982年夏季试飞成功,系新中国第一架载人超小型飞机。
获得1983年全国新产品“金龙杯”奖。
蜜蜂二号也是单座。
共生产了4架,一架作静力实验,一架用作样机,一架到美国展览并被美国人买走,一架目前在大学的博物馆。
蜜蜂二号采用张线支撑的高上单翼。
半封闭座舱。
主要骨架是航空铝管和钢管,外覆合成纤维布和航空棉布。
前轮有刹车,并可左右偏转40度。
动力装置最早采用一台西北工业大学的510型、30马力发动机,木质双叶定距桨,直径980毫米。
后来改为意大利KFM-107型发动机,26马力。
机上有必要的仪表-----磁罗盘、空速表、高度表,发动机转速表和汽缸头温度表。
基本数据:翼展:10米机长:5米机高:2.7米机翼面积:15.4平方米最大起飞重量:200公斤空机重量:95-100公斤最大平飞速度:65-75公里/小时失速速度:41公里/小时最大爬升率:1.7米/秒最小盘旋半径:30米航程:180公里(19升燃油)起飞滑跑距离:41米蜜蜂3C(Honeybee-3C)研制概况“蜜蜂”-3C飞机是中国北京航空航天大学研制的双座超轻型飞机,具有上单翼、半封闭座舱、正常式尾翼、前三点固定式起落架和三轴操纵系统。
该机装一台30.9千瓦(42马力)双缸二种程风冷式发动机,使用推进式螺旋桨。
主油箱容量25升,副油箱油量60升。
该机为多用途飞机,可用于农业灭虫、森林防护、空中摄影、航空测量、飞行训练等方面。

⼀款仿蜜蜂扑翼飞⾏器的总体设计2019年2⽉系统。
2.4利⽤多元化的教学⼿段教师在进⾏课堂教授时,应尝试翻转课堂、⽹络课堂等新的教学模式,注意以学⽣为中⼼,调⽤学⽣的积极性,采⽤启发式、讨论式的教学⽅式,能够使学⽣⾃主性地学习,能给学⽣更多的思考空间。
理论课可以通过主课、专题课、习题课和课堂讨论等形式来提⾼学⽣的学习兴趣和教学效果。
另外,⽹络的普及和发展使得教学⽅式发⽣了很⼤的变化,可以利⽤⽹络创建⼀个操作系统课程学习平台,将跟课程相关的教学资源及时上传到该平台中,还可以增加题库及答案分析、实验指导、师⽣交流、学⽣作业提交、课后作业讲解、疑难问题解答和评价体系等内容模块,这样,学⽣在课后也可以进⾏在线学习,与教师进⾏沟通。
3结束语计算机操作系统课程是计算机专业的核⼼课程之⼀,通过对该课程的教学,培养学⽣分析问题和解决问题的能⼒,以及在计算机科学技术领域的研究能⼒、实践能⼒和创新能⼒。
在此过程中,应根据学⽣的实际情况,及时调整教学内容和教学⽅法,加强实践环节,充分利⽤⽹络的优势,采⽤多元化的教学⼿段,以学⽣为中⼼,调动学⽣的积极性,能够使学⽣⾃主性地学习。
科研项⽬:本项⽬研究受北京交通⼤学海滨学院教科研项⽬资助(HBJY18009)。
参考⽂献[1]胡惠娟.计算机操作系统课程教学改⾰的研究与探讨[J].科技创新导报,2008,27:245.[2]付沙,杨波.计算机操作系统课程教学改⾰的研究与探讨[J].计算机时代,2010,3:52~53,56.[3]吴晓诗.计算机操作系统课程教学改⾰初探[J].考试周刊,2011,15: 8~9.[4]刘羿,翁梅.计算机操作系统课程教学的现状和改⾰[J].计算机光盘软件与应⽤,2011,20:229.[5]赵鹏,刘慧婷,姚晟,等.基于系统能⼒培养的操作系统课程改⾰和建设[J].计算机教育,2016,1:56~58.[6]王英,王鑫,左万利.操作系统课程改⾰的启发和思考[J].计算机教育,2017,2:34~37.收稿⽇期:2019-1-18作者简介:王兰(1983-),⼥,汉族,河北定州⼈,北京交通⼤学海滨学院讲师,硕⼠研究⽣,研究⽅向为计算机软件与理论。
海陆空三栖的微型机器小蜜蜂
佚名
【期刊名称】《纺织科学研究》
【年(卷),期】2018(0)9
【摘要】近日,哈佛大学研发了一款RoboBee微型机器小蜜蜂。
它的体型比真蜜蜂还要细小,重量仅有0.1克重,号称是全球最微型的飞行机器人,两米以外难以觉察它的存在。
【总页数】1页(P12-12)
【关键词】微型机器;蜜蜂;飞行机器人;哈佛大学
【正文语种】中文
【中图分类】TB383
【相关文献】
1.可爱岛海陆空三栖玩转奇幻岛 [J], 黎瑞衍;
2.一种海陆空三栖的多功能搜救器的设计 [J], 姜忠昱;
3.海陆空三栖“海豹” [J], 憨憨;
4.三栖飞机带你翱翔海陆空 [J], ;
5.海陆空三栖飞行器 [J],
因版权原因,仅展示原文概要,查看原文内容请购买。
蜜蜂系列飞机北京航空航天大学设计制造的蜜蜂系列轻型飞机目前一提起北航的轻型飞机你们想到和看到的就是蜜蜂-3C、蜜蜂-4、蜜蜂-11。
其实早在1978年底,当时的北京航空学院就开始了“蜜蜂一号”的设计工作。
1979年试飞成功,据资料记载,不是人来试飞的,而是遥控试飞的。
没有留下数据。
仅造了一架,目前存放在学校的博物馆里。
蜜蜂一号是三角骨架式伞翼机,它以半柔性的伞翼作为升力面。
基本数据:翼展:8.2米机长:3.7米机高:2.32米起飞重量:100公斤最大平飞速度:55公里/小时“蜜蜂二号” 1982年初开始研制,1982年夏季试飞成功,系新中国第一架载人超小型飞机。
获得1983年全国新产品“金龙杯”奖。
蜜蜂二号也是单座。
共生产了4架,一架作静力实验,一架用作样机,一架到美国展览并被美国人买走,一架目前在大学的博物馆。
蜜蜂二号采用张线支撑的高上单翼。
半封闭座舱。
主要骨架是航空铝管和钢管,外覆合成纤维布和航空棉布。
前轮有刹车,并可左右偏转40度。
动力装置最早采用一台西北工业大学的510型、30马力发动机,木质双叶定距桨,直径980毫米。
后来改为意大利KFM-107型发动机,26马力。
机上有必要的仪表-----磁罗盘、空速表、高度表,发动机转速表和汽缸头温度表。
基本数据:翼展:10米机长:5米机高:2.7米机翼面积:15.4平方米最大起飞重量:200公斤空机重量:95-100公斤最大平飞速度:65-75公里/小时失速速度:41公里/小时最大爬升率:1.7米/秒最小盘旋半径:30米航程:180公里(19升燃油)起飞滑跑距离:41米蜜蜂3C(Honeybee-3C)研制概况“蜜蜂”-3C飞机是中国北京航空航天大学研制的双座超轻型飞机,具有上单翼、半封闭座舱、正常式尾翼、前三点固定式起落架和三轴操纵系统。
该机装一台30.9千瓦(42马力)双缸二种程风冷式发动机,使用推进式螺旋桨。
主油箱容量25升,副油箱油量60升。
Inspired by Charles Lindbergh’s “Spirit of St. Louis,” which made the legendary first transatlantic crossing from New York to Paris in 1927, this model recalls the exciting challenges of the early days of American aviation. With all the different steps and tasks involved, from bandsawing to precision cutting and drilling to using a traditional spokeshave, completing this airplane will surely advance your skills. And after you build it, you’ll learn how to apply and use finishes to protect the wood and keep it looking beautiful.WOODWORKS: INTERMEDIATE PROJECTVINTAGE MODEL AIRPLANETOOLS REQUIREDSHOPPING LISTWOOD FINISHING PRODUCTS CUTTING LISTHand Tools – Spokeshave – Hand plane – Wood file – Clamps_ Chisel Power Tools– Table saw– Thickness planer– Bandsaw– Orbital sander– DrillMiscellaneous– Pencil– Safety glasses– Carpenter’s glue– Sandpaper– Masking tape– Clean, lint-free cloths– Respirator– Gloves for finishing– Mineral spirits– Water-filled metal containerwith tight-fitting lid– Minwax®Wood FinishStain Brush, Minwax®Polyurethane Brush orother good quality, naturalbristle brush (for oil-basedstains and finishes)– Minwax®Polycrylic®Brush or other goodquality, synthetic bristlebrush (for water-basedstains and finishes)– Small artist-style brushesRecommended FinishPrep: Minwax®Water Based Pre-Stain Wood Conditioner Stain: Minwax®Water Based Wood StainBody– River Stone*Nose– Harvest Grain*Propeller and Wheels–Onyx*Finish: Minwax®Polycrylic®Protective Finish Semi-Gloss Alternate FinishPrep: Minwax®Pre-Stain Wood ConditionerStain:Minwax®Wood Finish™Body– Golden Pecan**Nose– Golden Pecan**Propeller and Wheels–Ebony**Finish: Minwax®Fast-Drying Polyurethane Semi-Gloss**Or your choice of 24 Minwax®Wood Finish™Stain colors.y t i t n a u Q me t I1"x 7-1/2"x 24"clear, knot-free board 1 7/16"-dia. dowel, 1-5/8"long2 1/8"-dia. dowel, 1"long1 1/4"-dia. dowel, 24"long1 1/4"x 1"fluted dowel8Key Pcs.Part SizeA1Body1-7/8"x 3-3/8"x 10-1/2"B1Engine3/4"x 1-1/2"hexagonC1Wing1/4"x 2-5/8"x 19"D1Elevator1/4"x 2-1/8"x 4-1/4"E2Shock absorbers3/4"x 1-1/4"x 1-3/4"F2Wheel posts7/16"-dia. dowel, 1-5/8"long G2Shock absorber pins1/8"-dia. dowel, 1/2"longH2Wheels5/8"x 1-1/8"-dia. discI2Wheel axles ready-made; see SourceJ1Propeller1/4"x 1"x 4"K1Nose cone5/8"x 1" disc mounted on1/4" dia. dowel, 3/4"longL4Struts1/4"-dia. dowel, 5-1/2"long M8Mufflers1/4"fluted dowelsN1Skid1/4"-dia. dowel, 1"longRecommended Wood: PineAlternate Wood: Poplar or AlderFinishing Note:If you chose more than one color to stain the plane (such as the Recommended Finish), you will find it easierto prep and stain the individual pieces prior to assembly. Be sure to avoid staining areas that will receive glue since that can weaken the glue bond.*Or a Minwax®Water Based Wood Stain of your choice,available in 50 custom-mixed colors and a White WashPickling Stain.BEFORE YOU BEGINGood craftsmanship begins and ends with good work habits, so make the following steps part of your routine workshop practice. If you have any doubts or questions about how to proceed with a project, always discuss them with your shop instructor.• Carefully and fully review plans and instructions before putting a tool to the project lumber.•Work sensibly and safely. Wear safety goggles when doing work that creates flying chips and sawdust; wear the appropriate respirator whenever making sawdust or working with thinners or other solvents.•At the end of every work session, clean up your shop area and put away all portable tools.CUTTING AND ASSEMBLY PROCEDURENOTE TO TEACHERS:This project includes scaled drawings of the plane parts. Photocopy the drawings to 250%, glue them to 1/4" hard-board, and cut them out to produce templates you can use over and over.Prepare the Pieces1.After familiarizing yourself with all the parts as shown in Fig. A, pre-pare and glue together two 1"x 3-1/2"x 11"pieces to make a block for the body (A). Allow the glue to dry.2.Plane pieces for the wing (C), elevator (D) and propeller (J) to thickness slightly greater than dimensions shown on Cutting List. This will allow for planing, shaving and finish sanding to the exact thickness.Make the Body and Engine3.To start shaping the body, machine the body block to 1-7/8"x 3-1/4"x 11".ing the templates found in Fig. B, trace the outlines of the side and top on to the body. Mark the hole locations for the struts and skid.5.Cut the body shape with a bandsaw. Cut the side profiles first, tape the parts back together using masking tape, then cut the top and bottom profiles.6.Draw the 1/4"-deep by 2-5/8"-wide wing notch on the top of the body. Turn the body on its side and use a bandsaw to make several 1/4"-deep cuts, one about every 1/8" across the width of the notch. Clamp the body in a vise and clean out the remaining waste with a chisel. Make sure the base of the notch is flat.7.Locate, mark and drill a 1/4"hole in the center of the front end of the plane body for later mounting of the engine (B).y out the engine (B) by drawing a hexagon measuring 1-1/2" between opposite corners. Cut the shape out carefully with a bandsaw. Draw the octagon on one end of a narrow board so you can keep your hands away from the blade while making the cuts. Or clamp the board in a vise and use a jigsaw.9.Drill 1/4"holes centered in each side of the octagon asshown in Fig. C to prepare for the mufflers.10.Drill a 1/4"hole through the center of the octagon.11.Glue the engine (B) to the front end of the body (A), using a 1/4" dowel to align the parts. Allow the glue to dry.12.Drill the holes for the struts (L) and the skid (N).13.File and sand the body to remove any saw marks and sharp corners. Also file the engine (B) to make it flush with the body (A). 14.Glue the mufflers (M) into the holes in the engine hub. Allow the glue to dry, and trim the dowels so they project 1/4".Make the Wing and Elevator15.Rip (saw wood along the grain) the wing (C) to width to fit the notch in the plane body. Cut it to length. Trace and cut the wing shape.16.Center the wing in the notch in the plane body and mark on the wing the outline of the body.17.Shape the wing with a spokeshave, plane, file and sandpaper. Work from the body outline marks outward. Use the setup shown in Fig. D.18.Trace and cut the elevator (D). File and sand it to shape.Make the Shock Absorbers, Wheel Posts and Wheels19.Make two shock absorber blanks each 3/4"x 4"x 4".Mark out the shock absorbers (E) and drill the 1/4"strut hole and the 1/8"hole for the shock absorber pin (G) as shown in Fig. B. Large pieces are easier to work with than small pieces at this stage.20.Round over the front corners of the shock absorber blank with a file.21.Cut the shock absorber teardrop shape using the bandsaw. Sand out the saw marks.22.Cut the shock absorbers to finish length, (1-3/4")and drill the hole for the wheel post (F).23.Cut the wheel post from 7/16"-dia. dowel and glue it into the shock absorber. Wait for the glue to dry and then drill a 7/32"hole through the wheel post for the ready-made wheel axle (I).24.Counterbore a 1/8"-deep hole in the wheel (H), then use a 1-3/8" hole saw to cut the wheels out. Sand the edges and corners. (Besides the wheel axles, you can also buy ready-made wheels from the Source listed at the end of this project.)25.Slip the wheel axles through the wheels and glue the axles into the wheel posts. Make sure the wheels spin freely. Sand the protruding ends of the axles flush with the wheel posts.Make the Propeller and Nose Cone26.Trace and cut the propeller (J), and drill the 5/16"center hole.27.Pitch the propeller blades by filing and sanding from front to back corners. See the photo of the finished model.28.Cut a 1"disc for the nose cone (K) and drill a 1/4"hole, 1/4"deep in the center. Glue in a 1/4"dowel. Allow glue to dry.29.Secure the nose cone dowel in a drill chuck and use a file and sandpaper to shape the nose cone while the drill is running as shown in Fig. E. Test it against the propeller. The diameter of the nose cone and the circular center of the propeller should match.Make the Struts and Skid30.Working with one strut at a time, set each strut in its hole inthe body. Use a ruler as a straight edge to strike a line on the dowel as shown in Fig.F. It should be 4-3/4"from the body to the inside edge of the dowel. Carefully cut and sand the dowel to this line so it fits to the wing bottom.31.Glue the skid (N) into the hole at the rear underside of the body. FINAL ASSEMBLYWoodworker’s Tip:With the range of colors and detail inthis model, it is recommended that you do the prep and staining before the final assembly. Avoid staining areas thatwill receive glue.32.Glue and clamp the wing into the notch of the body, the elevator to the tail, and the nose cone through the propeller and into the body. Be sure the propeller spins freely. Allow glue to dry.33.Set the rear struts by gluing them into the body and to the bottom of the wing. Allow glue to dry.34.Slide the shock absorbers onto the front struts. Glue the struts into the body and onto the wing. Allow glue to dry.35.Locate each shock absorber 1/2"from the body and hold it per-pendicular to the wing. Using the 1/8"hole as a guide, drill the hole deeper into and through the strut. Glue and insert the shock absorber mounting pin (G) into the hole as shown in Fig. A. Allow glue to dry. Sand the pin flush with the shock absorber.STAINING AND FINISHING Woodworker’s Tip:Though you may be tempted to cut short your sanding, preparation and application, don’t do it. These tasks are very important steps in obtaining a high-quality finish. Remember, it is the finish, just as much as the fit and smoothness of the parts, that will determine how people judge your craftsmanship. To ensure an excellent result, follow the steps listed below and also the instructions the manufacturers put on their products. FINISHING TIPS•Test the stains and finishes you are planning to use on scraps of wood. On the back of the scrap, mark the stain/finish combination and the type of wood. Allow all samples to dry thoroughly before making your final finish selection. Save your samples for quick reference on future projects.•All stains and finishes must be allowed to dry thoroughly between coats. Remember that drying times can vary due to humidity and other climatic conditions.•If you have some leftover stain or finish, wipe the can rim so that stain or finish in the rim won’t dry out and prevent the lid from forming a tight seal.•Given the number of small pieces in this project, you may find it helpful to use small artist-style brushes when staining and finishing the individual pieces.•Brushes used for oil-based finishes must be cleaned with mineral spirits; for water-based products, such as Minwax®Water-Based Wood Stains or Minwax®Polycrylic®Protective Finish, clean brushes with warm water and soap.36.Before staining and finishing, finish-sand all surfaces and ease all the edges. Wipe the piece down with a lightly dampened cloth. Recommended Finishing a nylon/polyester brush, apply a generous coat of Minwax®Pre-Stain Water-Based Wood Conditioner following the directions on the can. After 1 to 5 minutes, wipe off all excess conditioner using a clean, lint-free cloth. Wait 15 to 30 minutes and then use fine-grade sandpaper to sand off any “whiskers" raised by the conditioner. Proceed to the staining within 2 hours.38.Apply the Minwax®Water-Based Wood Stain you’ve chosen using either a nylon/polyester brush or soft cloth. Be sure to work one piece or area at a time and allow stain to penetrate no longer than 3 minutes. While stain is still wet, wipe off excess with a clean cloth that’s been lightly dampened with stain. If a second coat is desired, allow the piece to dry for 2 hours before applying stain. Set the piece aside to dry thor-oughly before applying the protective clear finish.39.Apply Minwax®Polycrylic®Protective Finish following the direc-tions on the can. Stir the can contents thoroughly before starting and periodically repeat the stirring during your work session.40.Working a small area at a time to maintain a wet edge, apply the first coat using a nylon/polyester brush. Work quickly and make the final strokes in each newly finished section using with-the-grain brushstrokes. Woodworker’s Tip: Minwax®Water-Based Wood Stainis available in 50 custom-mixed colors and a White Wash Pickling Stain.41.Allow the finish to dry a minimum of 2 hours. Then lightly sand with 220-grit sandpaper. Thoroughly wipe off all surfaces with a clean soft cloth.42.Repeat steps 39 and 40 to apply the second coat. Allow the finish to cure overnight before handling the airplane.Alternate Finishing a natural bristle brush or a soft cloth, apply a generous coat of Minwax®Pre-Stain Wood Conditioner following the directions on the can. After 1 to 5 minutes, wipe off all excess conditioner using a clean, lint-free cloth. Proceed to the staining within 2 hours.44.Apply Minwax®Wood Finish™using a natural bristle brush or a clean, lint-free cloth. Allow the stain to set for about 5 to 15 minutes, then wipe off any excess using a clean cloth lightly dampened with stain. Allow the stain to dry overnight before applying the protective clear finish.Woodworker’s Tip:When wiping off stain, make certain that your last wipe with the cloth goes with the grain of the wood.45.Apply Minwax®Fast-Drying Polyurethane following the directions on the can. Use a good quality, natural bristle brush intended for use with polyurethane. Allow the first coat to dry overnight.46.The next day, lightly sand all surfaces with 220-grit sandpaper using with-the-grain strokes. Wipe off all surfaces with a clean soft cloth. Applya second coat of polyurethane and set the piece aside to dry.47.When completely dry repeat step 46, applying the third and final coat of polyurethane. Allow the finish to cure overnight before handling the airplane.PRODUCT SAFETYFor your safety and the safety of those you work with, always read the safety warnings, which manufacturers print on their labels, and follow them to the letter. Typical safety advice and instructions will contain information such as the following:WARNING!Removal of old paint by sanding, scraping or other means may generate dust or fumes that contain lead. Exposure to lead dust or fumes may cause brain damage or other adverse health effects, espe-cially in children or pregnant women. Controlling exposure to lead or other hazardous substances requires the use of proper protective equipment, such as properly fitted respirator (NIOSH approved) and proper containment and cleanup. For more information, call the National Lead Information Center at 1-800-424-LEAD (in US) or contact your local health authority. When using oil-based wood finishing products: CAUTIONS: CONTAINS ALIPHATIC HYDROCARBONS. Contents are COMBUSTIBLE.Keep away from heat and open flame. VAPOR e only with adequate ventilation. To avoid overexposure, open windows and doors or use other means to ensure fresh air entry during application and drying. If you experience eye watering, headaches, or dizziness, increase fresh air, or wear respiratory protection (NIOSH approved) or leave the area. Avoid contact with eyes and skin. Wash hands after using. Keep container closed when not in use. Do not transfer contents to other containers for storage. FIRST AID:In case of eye contact, flush thoroughly with large amounts of water for 15 minutes and get medical attention. For skin contact, wash thoroughly with soap and water. In case of respiratory difficulty, provide fresh air and call physician. If swallowed, call Poison Control Center, hospital emergency room, or physician immediately. NOTICE:Reports have associated repeated and prolonged occupa-tional exposure to solvents with permanent brain and nervous system damage. Intentional misuse by deliberately concentrating and inhaling contents may be harmful or fatal.WARNING:This product contains a chemical known to theState of California to cause cancer and birth defects or other reproductive harm.DO NOT TAKE INTERNALLY. KEEP OUT OF REACH OF CHILDREN. When using water-based wood finishing products: CAUTIONS:Use Only With Adequate Ventilation. To avoid overexpo-sure, open windows and doors or use other means to ensure fresh air entry during application and drying. If you experience eye watering, headaches, or dizziness, increase fresh air, or wear respiratory protec-tion (NIOSH approved), or leave the area. Avoid contact with eyes and skin. Wash hands after using. Keep container closed when not in use. Do not transfer contents to other containers for storage.FIRST AID:In case of eye contact, flush thoroughly with large amounts of water. Get medical attention if irritation persists. If swallowed, get medical attention immediately.WARNING:Contains Alkyl propanols, ethylene glycol, n-methyl pyrroli-done. VAPOR e only with adequate ventilation. To avoid overexposure, open windows and doors or use other means to ensure fresh air entry during application and drying. If you experience eye watering, headaches, or dizziness, increase fresh air, or wear respira-tory protection (NIOSH approved) or leave the area. Avoid contact with eyes and skin. Wash hands after using. Keep container closed when not in use. Do not transfer contents to other containers for storage.DO NOT TAKE INTERNALLY.FIRST AID:In case of eye contact, flush thoroughly with large amounts of water for 15 minutes and get medical attention. For skin contact, wash thoroughly with soap and water. In case of respiratory difficulty, provide fresh air and call physician. If swallowed, call Poison Control Center, hospital emergency room, or physician immediately. DELAYED EFFECTS FROM LONG-TERM OVEREXPOSURE. Contains solvents which can cause permanent brain and nervous system damage. Intentional misuse by deliberately concentratingand inhaling contents may be harmful or fatal.WARNING:This product contains a chemical known to theState of California to cause cancer and birth defects or other reproductive harm.KEEP OUT OF REACH OF CHILDREN.SAFE DISPOSAL OF RAGS AND WASTE.Please be mindful of the safe way to dispose of rags and other waste. Rags, steel wool and other waste products soaked with oil finishes or solvents may spontaneously catch fire if improperly discarded. Place rags, steel wool and other waste immediately after use in a water-filled metal container. Tightly seal and dispose of the waste materials in accordance with local trash removal regulations. Be sure to keep the waste out of reach of children.SourceCommercially made wheels and axles are available from Woodcraft Supply(800) 225-11531-1/4"wheels; part #50S41; 12 wheels $3.25Axle pegs, part # 50Q31; 12 axles $1.50Also available at local hobby storesFIG A.VINTAGE MODEL AIRPLANEFIG B.VINTAGE MODEL AIRPLANE DIMENSIONSFIG C.DRILLING THE ENGINE FIG D.SHAPING THE WINGFIG F .MAKING THE STRUTSFIG E.SHAPING THE NOSE CONE。
东莞北京航空航天大学研究院通用航空事业部北航蜜蜂轻型飞机的优点和光荣历史:1、由北航一批航空专业教授设计,外观布局经典;2、中国第一批完全自主研发的轻型飞机,填补国内航空领域的空白;3、中国第一批轻型系列飞机取得民航总局颁发的型号设计批准书、型号合格证(适航证)、飞机生产许可证,即完全符合民航总局要求市场准入的三证齐全轻型飞机;4、体轻;5、价廉;6、安全;7、易检查;8、易修理9、易运输;10、易学即易操作;11、油耗低,经济实用性价比高;12、蜜蜂系列轻型飞机完全满足中国不同通航市场需求;13、中国轻型飞机出口美国、新西兰、马来西亚、加拿大最多机型;14、密蜂是国内用得最多的超轻型飞机;15、89年蜜蜂3C从新疆乌鲁木齐到黑龙江哈尔滨市远距离万里编队飞行;16、89年蜜蜂6号飞艇承担葛洲坝工程架线任务;17、90年蜜蜂3C参加亚运会表演;18、91年蜜蜂3C承担中央电视台节目(望长城)航拍任务;19、93年海峡两岸飞行员驾机蜜蜂4飞越丝绸之路;20、94年承担李双江MTV(我爱五指山,我爱万泉河)航拍任务;21、95年承担电视纪录片(邓小平)航拍任务;22、96年承担纪念红军长征60周年中央电视台、总政治部大型电视纪录片(长征一英雄的诗)航拍任务;23、97年蜜蜂16直升机庆祝香港回归在武汉无仪表夜航飞行;24、蜜蜂11三机编队从珠海到北京远距离飞行;25、98年四机编队从北京飞至珠海传递珠海航展会旗;26、99年庆祝澳门回归,四架蜜蜂11飞机编队从北京飞至珠海;27、太湖世界特技飞行大赛从太湖大桥一号主桥洞穿过;28、2000年四川广汉三星堆钻龙门表演;29、2001年承担中央电视台(东方时空)一一一“山丹军马场”的航拍任务;30、2004年蜜蜂21承担青藏铁路建设工程航拍任务;31、蜜蜂11获国土资源部的一等奖;32、蜜蜂3获得国家科技进步三等奖;33、蜜蜂系列轻型飞机获航空部科技进步奖;34、蜜蜂飞机获得国家测绘局科技进步一等奖;35、蜜蜂11列装部队边防巡逻;36、香港凤凰卫视副台长赵群力驾驶蜜蜂3A在摄影。