ceph集群维护手册
- 格式:pdf
- 大小:413.54 KB
- 文档页数:19
ceph 运维手册
Ceph 运维手册主要包含以下内容:
1. Ceph 集群部署:包括硬件要求、软件安装、网络配置等方面的指导,以确保 Ceph 集群的稳定运行。
2. Ceph 集群监控:介绍如何使用 Ceph 的监控工具,如 `ceph`,
`cephstatus`, `cephhealth`, `cephdf` 等,来实时监控集群状态、存储空间使用情况、集群健康状态等。
3. Ceph 集群维护:包括故障处理、性能优化、数据备份与恢复等方面的指导,以确保 Ceph 集群的可用性和可靠性。
4. Ceph 集群升级:介绍如何进行 Ceph 集群的升级,包括软件版本升级、配置参数调整等方面的指导。
5. Ceph 集群安全:介绍如何设置和管理 Ceph 集群的安全性,包括用户权限管理、数据加密等方面的指导。
6. Ceph 集群日志管理:介绍如何收集、分析和存储 Ceph 集群的日志信息,以便于故障排查和性能分析。
7. Ceph 集群最佳实践:提供一些基于实际经验的最佳实践,帮助运维人员更好地管理和维护 Ceph 集群。
以上是 Ceph 运维手册的主要内容,具体内容可能因版本和实际需求而有所不同。
建议查阅官方文档或相关资料以获取更详细的信息。
ceph 运维手册一、引言1.Ceph 简介Ceph 是一款开源的分布式存储系统,它具有高度可扩展性、性能优异、易于管理等特点。
Ceph 能够为云计算、虚拟化和企业级存储场景提供稳定、可靠的存储服务。
2.Ceph 运维手册目的本手册旨在为运维人员提供一份详细的Ceph 运维指南,帮助读者更好地理解和掌握Ceph 存储系统的部署、管理、优化和维护。
二、Ceph 架构1.组件介绍(1)Ceph Monitor(MON)Ceph Monitor 负责维护整个集群的元数据信息,包括监控OSD 节点的状态、存储池配置等。
(2)Ceph OSD 节点Ceph OSD 节点是Ceph 集群中的存储节点,负责存储数据和处理数据复制、恢复等操作。
(3)Ceph 客户端Ceph 客户端用于访问Ceph 存储系统,为应用提供存储服务。
2.架构原理Ceph 采用去中心化的设计,将数据分散存储在多个OSD 节点上,并通过Ceph Monitor 进行统一管理。
数据在OSD 节点之间自动进行复制和分布,以保证数据的可靠性和性能。
三、Ceph 运维流程1.部署Ceph 集群(1)准备环境确保服务器硬件、网络和操作系统满足Ceph 部署要求。
(2)安装和配置Ceph 组件根据Ceph 版本和集群规模,安装MON、OSD 和客户端等相关组件。
(3)配置集群参数设置集群名称、存储池、副本数等参数,以满足业务需求。
2.Ceph 集群日常运维(1)监控集群状态使用Ceph 提供的命令行工具或监控工具,定期检查集群健康状况。
(2)扩容和缩容集群根据业务需求,动态调整集群规模和存储容量。
(3)处理故障遇到故障时,及时排查并采取相应措施解决问题。
3.Ceph 存储管理(1)创建和删除存储池根据业务需求,创建和管理存储池。
(2)配置和调整存储策略根据数据特点,设置合适的存储策略,以提高存储利用率。
(3)监控存储性能定期检查存储性能,优化存储配置。
Ceph094.6安装-2016一、安装环境4台虚拟机,1台deploy,1台mon,2台osd,操作系统rhel71Ceph-adm 192.168.16.180Ceph-mon 192.168.16.181Ceph-osd1 192.168.16.182Ceph-osd2 192.168.16.183二、安装预环境1、配置主机名/ip地址(所有主机单独执行)hostnamectl set-hostname 主机名修改/etc/sysconfig/network-scripts/ifcfg-eno*IPADDR/NETMASK/GATEWAY2、adm节点上生成节点列表,/etc/ceph/cephlist.txt192.168.16.180192.168.16.181192.168.16.182192.168.16.1833、在adm上编辑/etc/hosts4、adm利用脚本同步所有节点的/etc/hosts[root@ceph-adm ceph]# cat /etc/ceph/rsync_hosts.shWorkDir=/etc/cephfor ip in $(cat ${WorkDir}/cephlist.txt);do echo -----$ip-----;rsync -avp --delete /etc/hosts $ip:/etc/;done5、所有主机生成ssh-key,并所有主机都执行id的copyssh-keygen -t rsassh-copy-id root@ceph-admssh-copy-id root@ceph-monssh-copy-id root@ceph-osd1ssh-copy-id root@ceph-osd26、adm上执行A、同步创建/etc/ceph目录[root@ceph-adm ceph]# cat mkdir_workdir.shWorkDir=/etc/cephfor ip in $(cat ${WorkDir}/cephlist.txt);do echo -----$ip-----;ssh root@$ip mkdir -p /etc/ceph ;doneb、同步关闭防火墙[root@ceph-adm ceph]# cat close_firewall.sh#!/bin/shset -xWorkDir=/etc/cephfor ip in $(cat ${WorkDir}/cephlist.txt)do echo -----$ip-----ssh root@$ip "sed -i 's/SELINUX=enforcing/SELINUX=disabled/g' /etc/selinux/config"ssh root@$ip setenforce 0ssh root@$ip "firewall-cmd --zone=public --add-port=6789/tcp --permanent"ssh root@$ip "firewall-cmd --zone=public --add-port=6800-7100/tcp --permanent"ssh root@$ip "firewall-cmd --reload"donec、所有脚本执行系统优化,打开文件限制[root@ceph-adm ceph]# cat system_optimization.sh#!/bin/shset -xWorkDir=/etc/cephfor ip in $(cat ${WorkDir}/cephlist.txt)do echo -----$ip-----ssh root@$ip "sed -i 's/4096/102400/' /etc/security/limits.d/20-nproc.conf"ssh root@$ip "cat /etc/rc.local | grep "ulimit -SHn 102400" || echo "ulimit -SHn 102400" >>/etc/rc.local"doned、编辑wty_project.repo和wty_rhel7.repo文件,并同步到所有节点[root@ceph-adm ceph]# cat rsync_repo.shWorkDir=/etc/cephfor ip in $(cat ${WorkDir}/cephlist.txt);do echo -----$ip-----;rsync -avp --delete /etc/ceph/*.repo$ip:/etc/yum.repos.d/;donee、安装ceph以及必要的rpm包[root@ceph-adm ceph]# cat ceph_install.sh#!/bin/shset -xWorkDir=/etc/cephfor ip in $(cat ${WorkDir}/cephlist.txt)do echo -----$ip-----ssh root@$ip "yum install redhat-lsb -y"ssh root@$ip "yum install ceph -y"done三、deploy安装,在adm节点1、deploy安装cd /etc/ceph/yum install ceph-deploy -y2、初始化集群[root@ceph-adm ceph]# ceph-deploy new ceph-mon3、安装集群ceph软件包(与二e的那一步有点重复,但是还是有需要的包要安装例如fcgi/ceph-radosgw)Ceph-deploy Install ceph-adm ceph-mon ceph-osd1 ceph-osd24、添加初始monitor节点和收集秘钥[root@ceph-adm ceph]# ceph-deploy mon create-initial5、osd节点操作A、osd1/osd2各增加2块100G硬盘B、adm节点操作ceph-deploy disk zap ceph-osd1:sdb ceph-osd1:sdc ceph-osd2:sdb ceph-osd2:sdcceph-deploy osd create ceph-osd1:sdb ceph-osd1:sdc ceph-osd2:sdb ceph-osd2:sdcceph –sceph osd tree检测正常*disk zap操作对硬盘进行zero操作,*osd create操作合并了osd prepare/osd activate操作,但是挂载目录不能指定/var/lib/ceph/osd/ceph-X6、将所有节点加为admin,使节点可以运行ceph的所有命令Ceph-deploy admin ceph-adm ceph-mon ceph-osd1 ceph-osd2。

ceph运维手册一、介绍Ceph是一个分布式存储系统,具有高性能、高可靠性和高可扩展性的特点。
在大规模数据存储领域,Ceph已经成为一种非常流行的解决方案。
本文将深入探讨Ceph的运维手册,包括必要的配置、监控、故障处理等方面。
二、环境准备在进行Ceph的运维工作之前,需要准备以下环境:1.硬件设备:Ceph要求至少3台服务器,并且每台服务器要有足够的计算和存储资源。
2.操作系统:推荐使用Linux操作系统,例如CentOS、Ubuntu等。
3.网络配置:确保服务器之间能够正常通信,并且网络带宽要足够支持存储系统的数据传输。
三、Ceph集群部署3.1 安装Ceph软件包在每台服务器上执行以下命令,安装Ceph软件包:$ sudo apt-get install ceph -y3.2 配置Ceph集群1.创建一个用于存储Ceph配置文件的目录:$ sudo mkdir /etc/ceph2.在主节点上执行以下命令,生成配置文件:$ sudo ceph-deploy new <主节点>3.编辑生成的Ceph配置文件,添加以下内容:osd pool default size = 2osd crush chooseleaf type = 14.在主节点上执行以下命令,部署配置文件到所有节点:$ sudo ceph-deploy --overwrite-conf config push <所有节点>3.3 启动Ceph集群在主节点上执行以下命令,启动Ceph集群:$ sudo ceph-deploy mon create-initial四、Ceph监控Ceph提供了一套监控工具,可以用于实时监控集群的状态和性能。
4.1 安装和配置监控工具在主节点上执行以下命令,安装和配置监控工具:$ sudo apt-get install ceph-mgr ceph-mgr-dashboard -y4.2 访问监控面板通过浏览器访问主节点的IP地址和监控面板端口,例如:主节点IP地址>:7000。
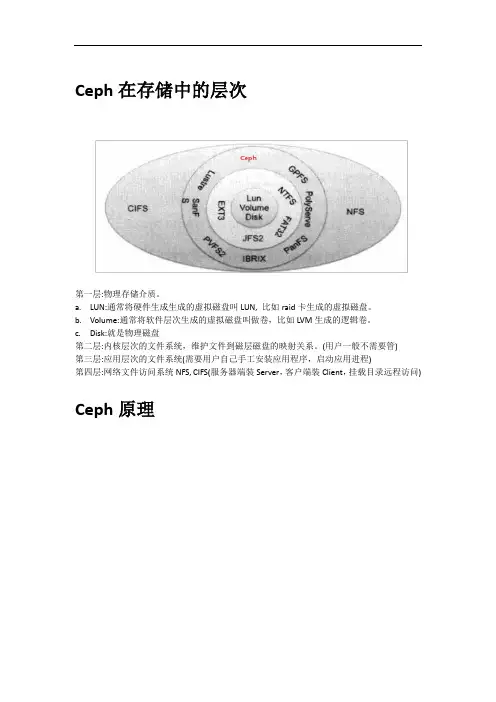
Ceph在存储中的层次第一层:物理存储介质。
a.LUN:通常将硬件生成生成的虚拟磁盘叫LUN, 比如raid卡生成的虚拟磁盘。
b.Volume:通常将软件层次生成的虚拟磁盘叫做卷,比如LVM生成的逻辑卷。
c.Disk:就是物理磁盘第二层:内核层次的文件系统,维护文件到磁层磁盘的映射关系。
(用户一般不需要管)第三层:应用层次的文件系统(需要用户自己手工安装应用程序,启动应用进程)第四层:网络文件访问系统NFS, CIFS(服务器端装Server,客户端装Client,挂载目录远程访问) Ceph原理1.Ceph存储系统的逻辑结构2.Rados的系统逻辑结构3.Ceph寻址流程4.ceph部署网络拓扑备注:Cluster Network可选,但是最好建议有该网络,用于OSD扩展时,后端网络传输数据用。
在实际工作中时,深有体会,如果只有public network,在OSD扩展时,由于ceph需要重新“搬运”数据,导致升级长达5个小时。
如果有专门的集群网络(万兆交换机+光钎),几分钟升级完成。
Ceph安装(ceph-deploy)1.环境准备以及各ceph节点初始化➢部署逻辑架构节点安装组件备注该章节的操作均通过root执行且在各个ceph节点均要执行➢修改/etc/hostname#vi /etc/hostname #如果为其他节点调整为其他节点的名称ceph{number} #如ceph1#hostname -F /etc/hostname #立即生效,断开shell重新登录➢创建安装用户irteam且该用户不需要tty#useradd -d /home/irteam -k /etc/skel -m irteam#sudo passwd irteam#echo " irteam ALL = (root) NOPASSWD: ALL" | sudo tee /etc/sudoers.d/irteam#chmod 0440 /etc/sudoers.d/irteam修改/etc/sudoers,irteam用户不需要tty#chmod 755 /etc/sudoers#vi /etc/sudoers #添加如下配置,而不是将原来的Default requiretty注释掉Defaults:irteam !requiretty#chmod 440 /etc/sudoers➢yum源以及ceph源设置#yum clean all#rm -rf /etc/yum.repos.d/*.repo#wget -O /etc/yum.repos.d/CentOS-Base.repo /repo/Centos-7.repo #wget -O /etc/yum.repos.d/epel.repo /repo/epel-7.repo#sed -i '/aliyuncs/d' /etc/yum.repos.d/CentOS-Base.repo#sed -i 's/$releasever/7.2.1511/g' /etc/yum.repos.d/CentOS-Base.repo#vi /etc/yum.repos.d/ceph.repo #增加ceph源[ceph]name=cephbaseurl=/ceph/rpm-jewel/el7/x86_64/gpgcheck=0[ceph-noarch]name=cephnoarchbaseurl=/ceph/rpm-jewel/el7/noarch/gpgcheck=0➢安装ceph#yum makecache#yum install -y ceph#ceph --version #版本查看ceph version 10.2.2 (45107e21c568dd033c2f0a3107dec8f0b0e58374)➢关闭selinux & firewalld#sed -i 's/SELINUX=.*/SELINUX=disabled/' /etc/selinux/config#setenforce 0#systemctl stop firewalld#systemctl disable firewalld➢同步时间节点(rdate & ntp均可以)#timedatectl set-timezone Asia/Shanghai #设置时区#yum install -y rdate#rdate -s #选个可用且权威的服务器#echo "00 0 1 * * root rdate -s " >> /etc/crontab #加入调度2.部署Ceph集群备注:以下操作均在admin-node节点执行,在本文中,由于admin-node与ceph1共享,所以在ceph1执行就可以了,统一用用户:irteam执行➢修改/etc/hosts#sudo vi /etc/hosts192.168.11.119 ceph1192.168.11.124 ceph2192.168.11.112 ceph3➢生成密钥对& 复制秘钥到各节点(防止部署输入密码,即无密码验证)#sudo su - irteam#ssh-keygenGenerating public/private key pair.Enter file in which to save the key (/irteam/.ssh/id_rsa):Enter passphrase (empty for no passphrase):Enter same passphrase again:Your identification has been saved in /irteam/.ssh/id_rsa.Your public key has been saved in /irteam/.ssh/id_rsa.pub.#ssh-copy-id irteam@ceph1#ssh-copy-id irteam@ceph2#ssh-copy-id irteam@ceph3➢用户配置,防止部署时输入用户名#sudo su - irteam #如果当前登录用户是irteam,则忽略该步骤#vi ~/.ssh/configStrictHostKeyChecking noHost ceph1Hostname ceph1User irteamHost ceph2Hostname ceph2User irteamHost ceph3Hostname ceph3User irteam#chmod 600 ~/.ssh/config➢安装部署工具#sudo yum -y install ceph-deploy#ceph-deploy --version1.5.34➢创建集群#sudo su - irteam #如果当前登录用户是irteam,则不用执行#mkdir ~/my-cluster && cd ~/my-cluster#创建集群:在当前目录下生成ceph.conf以及ceph.mon.keyring#ceph-deploy new ceph1 ceph2 ceph3#ls ~/my-cluster #查看生成的文件ceph.conf ceph-deploy-ceph.log ceph.mon.keyring修改集群ceph.conf配置,增加public_network,增加monitor之间的时差(默认为0.05s,现改为2s),总共的副本数据调整为2#vi ceph.conf[global]fsid = 7cec0691-c713-46d0-bce8-5cb1d57f051fmon_initial_members = ceph1, ceph2, ceph3 #也可以用IP,用hostname最佳mon_host = 192.168.11.119,192.168.11.124,192.168.11.112auth_cluster_required = cephxauth_service_required = cephxauth_client_required = cephxpublic_network = 192.168.11.0/24mon_clock_drift_allowed = 2osd_pool_default_size = 2➢部署monitors#ceph-deploy mon create-initial#ll ~/my-clusterceph.bootstrap-mds.keyringceph.bootstrap-rgw.keyringceph.confceph.mon.keyringceph.bootstrap-osd.keyringceph.client.admin.keyringceph-deploy-ceph.log#sudo ceph -s #查看集群情况cluster 7cec0691-c713-46d0-bce8-5cb1d57f051fhealth HEALTH_ERRno osdsmonmap e1: 3 mons at {ceph1=192.168.11.119:6789/0,ceph2=192.168.11.124:6789/0,ceph3=192.168.11.112:6789/0} election epoch 4, quorum 0,1,2 ceph3,ceph1,ceph2osdmap e1: 0 osds: 0 up, 0 inflags sortbitwisepgmap v2: 64 pgs, 1 pools, 0 bytes data, 0 objects0 kB used, 0 kB / 0 kB avail64 creating➢部署osds由于没有足够多的磁盘(如果用磁盘请参考维护章节),用文件夹:#以下创建文件夹,赋权的动作均在ceph1,ceph2,ceph3上执行#sudo mkdir /var/local/osd1 && sudo chmod 777 -R /var/local/osd1osd预处理与激活#ceph-deploy osd prepare ceph1:/var/local/osd1 ceph2:/var/local/osd1 ceph3:/var/local/osd1#ceph-deploy osd activate ceph1:/var/local/osd1 ceph2:/var/local/osd1 ceph3:/var/local/osd1备注:a.如果你有足够多的磁盘,你也可以直接对磁盘操作#ceph-deploy osd prepare ceph1:sdb#ceph-deploy osd activate ceph1:sdbb.对上述osd prepare & osd activate,也可以一步完成#ceph-deploy osd create ceph1:sdb查看集群状态#sudo ceph -scluster 7cec0691-c713-46d0-bce8-5cb1d57f051fhealth HEALTH_OKmonmap e1: 3 mons at{ceph1=192.168.11.119:6789/0,ceph2=192.168.11.124:6789/0,ceph3=192.168.11.112:6789/0} election epoch 4, quorum 0,1,2 ceph3,ceph1,ceph2osdmap e15: 3 osds: 3 up, 3 inflags sortbitwisepgmap v26: 64 pgs, 1 pools, 0 bytes data, 0 objects29590 MB used, 113 GB / 142 GB avail64 active+cleanCeph安装(kolla)除了官方推荐的ceph-deploy安装方式,你还可以选择如下安装方式:通过工具ansible,远程登录到各node节点安装,并且让mon,osd,rgw用docker方式来承载另外:由于我们使用docker的目的是想部署openstack,涉及到openstack部分,则不涉及。
Red Hat Ceph Storage 4文件系统指南配置和挂载 Ceph 文件系统Last Updated: 2023-08-26Red Hat Ceph Storage 4 文件系统指南配置和挂载 Ceph 文件系统Enter your first name here. Enter your surname here.Enter your organisation's name here. Enter your organisational division here. Enter your email address here.法律通告Copyright © 2022 | You need to change the HOLDER entity in the en-US/File_System_Guide.ent file |.The text of and illustrations in this document are licensed by Red Hat under a Creative Commons Attribution–Share Alike 3.0 Unported license ("CC-BY-SA"). An explanation of CC-BY-SA is available at/licenses/by-sa/3.0/. In accordance with CC-BY-SA, if you distribute this document or an adaptation of it, you must provide the URL for the original version.Red Hat, as the licensor of this document, waives the right to enforce, and agrees not to assert, Section 4d of CC-BY-SA to the fullest extent permitted by applicable law.Red Hat, Red Hat Enterprise Linux, the Shadowman logo, the Red Hat logo, JBoss, OpenShift, Fedora, the Infinity logo, and RHCE are trademarks of Red Hat, Inc., registered in the United States and other countries.Linux ® is the registered trademark of Linus Torvalds in the United States and other countries. Java ® is a registered trademark of Oracle and/or its affiliates.XFS ® is a trademark of Silicon Graphics International Corp. or its subsidiaries in the United States and/or other countries.MySQL ® is a registered trademark of MySQL AB in the United States, the European Union and other countries.Node.js ® is an official trademark of Joyent. Red Hat is not formally related to or endorsed by the official Joyent Node.js open source or commercial project.The OpenStack ® Word Mark and OpenStack logo are either registered trademarks/service marks or trademarks/service marks of the OpenStack Foundation, in the United States and other countries and are used with the OpenStack Foundation's permission. We are not affiliated with, endorsed or sponsored by the OpenStack Foundation, or the OpenStack community.All other trademarks are the property of their respective owners.摘要本指南说明了如何配置 Ceph 元数据服务器(MDS),以及如何创建、挂载和使用 Ceph 文件系统(CephFS)。
5.6、ceph集群添加和删除OSD4 添加和删除OSD新加节点 hostname: ceph-node04 IP: 172.16.1.34 OS: CentOS7.5 Cpu/Memory: 2vcpu/2GB disk /: 60GB4.1 添加OSD1 在新创建的 172.16.1.34 节点上新增加两块未使⽤的硬盘"/dev/sdb(20GB)、/dev/sdc(20GB)"。
[root@ceph-node04 ~]# lsblkNAME MAJ:MIN RM SIZE RO TYPE MOUNTPOINTsda 8:0 0 60G 0 disk├─sda1 8:1 0 200M 0 part /boot├─sda2 8:2 0 2G 0 part└─sda3 8:3 0 57.8G 0 part /sdb 8:16 0 20G 0 disksdc 8:32 0 20G 0 disksr0 11:0 1 1024M 0 rom2 在 ceph-deploy 节点上添加 ceph-node04 节点的 hosts 解析[root@ceph-deploy my-cluster]# echo "172.16.1.34 ceph-node04" >> /etc/hosts3 在 ceph-deploy 节点上分发秘钥到 ceph-node04 节点上(1) 分发秘钥[root@ceph-deploy my-cluster]# ssh-copy-id root@ceph-node04(2) 检查秘钥是否分发成功[root@ceph-deploy my-cluster]# ssh root@ceph-node04[root@ceph-node04 ~]# exit4 在 ceph-node04 节点上配置阿⾥云 yum 源(1) 配置 ceph 源[root@ceph-node04 ~]# cat > /etc/yum.repos.d/ceph.repo << EOF[Ceph]name=Ceph packages for $basearchbaseurl=/ceph/rpm-octopus/el7/\$basearchgpgcheck=0[Ceph-noarch]name=Ceph noarch packagesbaseurl=/ceph/rpm-octopus/el7/noarchgpgcheck=0[ceph-source]name=Ceph source packagesbaseurl=/ceph/rpm-octopus/el7/SRPMSgpgcheck=0EOF(2) 配置 base、epel 源[root@ceph-node04 ~]# wget -O /etc/yum.repos.d/CentOS-Base.repo https:///repo/Centos-7.repo [root@ceph-node04 ~]# wget -O /etc/yum.repos.d/epel.repo /repo/epel-7.repo(3) ⽣成 yum 源缓存[root@ceph-node04 ~]# yum clean all[root@ceph-node04 ~]# yum makecache5 通过 ceph-deploy 命令在 ceph-node04 节点上安装 ceph 相关的软件包[root@ceph-deploy my-cluster]# ceph-deploy install --no-adjust-repos ceph-node046 使⽤ ceph-deploy 命令将配置⽂件 ceph.conf 和 admin key 复制到 ceph-node04 节点的 "/etc/ceph" ⽬录下,以便每次执⾏ceph CLI 命令⽆需指定 monitor 地址和 ceph.client.admin.keyring[root@ceph-deploy my-cluster]# ceph-deploy admin ceph-node047 通过 ceph-deploy 命令添加 ceph-node04 节点上的 OSD 到 ceph 集群[root@ceph-deploy my-cluster]# ceph-deploy osd create --data /dev/sdb ceph-node04[root@ceph-deploy my-cluster]# ceph-deploy osd create --data /dev/sdc ceph-node048 在 ceph-node04 节点查看 osd 进程[root@ceph-node04 ~]# ceph -scluster:id: 14912382-3d84-4cf2-9fdb-eebab12107d8health: HEALTH_OKservices:mon: 3 daemons, quorum ceph-node01,ceph-node02,ceph-node03 (age 12m)mgr: ceph-node01(active, since 12m), standbys: ceph-node03, ceph-node02osd: 8 osds: 8 up (since 3m), 8 in (since 3m)pools: 1 pools, 1 pgsobjects: 0 objects, 0 Busage: 8.1 GiB used, 152 GiB / 160 GiB availpgs: 1 active+clean[root@ceph-node04 ~]# ps -ef | grep -v grep | grep ceph图⽰:4.2 删除OSD将 ceph-node04 172.16.1.34 节点 osd.6、osd.7 下线说明:ceph-node04 节点上 /dev/sdb 磁盘对应的 osd id 为 6,/dev/sdc 磁盘对应的 osd id 为 7。
Red Hat Ceph Storage 5Open, performant, and massively scalable unified storage for demanding workloads Red Hat Ceph Storageprovides:Capacity and performance with proven scalability up to hundreds of petabytes and tens of billions of objects.•1Simplified installation and automation along with operation, monitoring, and capacity management for greater flexibility and control over your data.•Security with client-side and object-level encryption and sophisticated authentication features.•Product overview Organizations understand that effective data management offers new insights and opportunities for theirbusinesses. More than just accommodating the growing need for storage, capitalizing on the value of data now offers the opportunity to disrupt existing competitive business models by facilitating innovation. Y et building out hybrid cloud storage solutions can be complex and fraught with the risk of data fragmentation and proprietary lock-in.Red Hat® Ceph® Storage provides an open, robust, and compelling software-defined data storage solution that can significantly lower enterprise data storage costs. Red Hat Ceph Storage helps companies manage exponential data growth in an automated fashion as a self-healing and self-managing platform with no single point of failure. Red Hat Ceph Storage is optimized for large installations—efficiently scaling to support hundreds of petabytes of data and tens of billions of objects. Powered by industry-standard x86servers, the platform delivers solid reliability and data durability. Red Hat Ceph Storage is also multisite aware and supports georeplication for disaster recovery.A single Red Hat Ceph Storage cluster can support object, block, and file access methods with a single underlying pool of storage capacity. The cluster's scale-out capabilities can be focused on capacity or performance as needed to match the intended workloads. Clusters can expand or shrink on-demand to fit workload capacity needs. Hardware can be added or removed while the system is online and under load.Administrators can apply updates without interrupting vital data services.Red Hat Ceph Storage delivers results for a wide range of use cases requiring data-intensive workloads,including:Object storage-as-a-service . Red Hat Ceph Storage is ideal for implementing an on-premise object storage service compatible with the Amazon Web Services (AWS) Simple Storage Service (S3)interface. With proven scalability and performance storing both small and large objects alike, Red Hat Ceph Storage supplies a shared data context for all your projects, whether served by a trusted service provider, shared across a consortium, or delivered to an extended enterprise.•Data analytics . Red Hat Ceph Storage can support massive parallel data ingest from various sources extending from the edge to the core datacenter and private and public clouds. Ceph facilitates access to data stores and data lakes to drive business insights with data warehousing and analytics tools such as Apache Spark , IBM Db2 Warehouse , and Starburst Trino . Support for Amazon S3 Select lets you use simple structured query language (SQL) statements to filter the contents of an S3 object to retrieve just the subset of data needed.•Evaluator Group demonstrated Red Hat Ceph Storage scalability to over 10 billion objects in 2020.1Red Hat Ceph Storage features and benefitsComponentCapabilities Massive scalabilityScale-out architecture Grow a cluster to thousands of nodes; replace failed nodesand conduct rolling hardware upgrades while data is liveObject store scalability Continued object store scalability improvements, withscalability to 10+ billion objects serving the AWS S3 andOpenStack Swift protocolsSelf-healing and rebalancing Peer-to-peer architecture balances data distributionthroughout the cluster nodes and handles failures withoutinterruption, automatically recovering to the desiredpredefined data resiliency levelRolling software upgradesClusters upgraded in phases with no downtime so dataremains available to applicationsArtificial intelligence and machine learning (AI/ML). Red Hat Ceph Storage provides a shared data platform allowing data scientists to collaborate and accelerate projects. Platforms such as SAP Data Intelligence, Microsoft SQL Server Big Data Clusters, and Red Hat OpenShift® Data Science rely on Ceph.•Data engineering patterns . With Ceph bucket notifications and eventing, organizations can automate data pipelines . Robust data patterns can support use cases from aiding healthcare diagnosis to building a smart city pipeline from edge to core.•Backups and archives . Ceph is an ideal platform to provide storage for backup targets and dataarchives, spanning Kubernetes-based application recovery to long-term immutable archives required for data governance (including support for write-once-read-many [WORM] governance). Red Hat Ceph Storage 5 includes node-based subscription options for backup and archive solutions delivered jointly with our data protection ecosystem partners.•Hybrid cloud applications . Red Hat Ceph Storage extends from the core datacenter to public and private cloud deployments, all with a common user experience—regardless of deployment model. Red Hat Ceph Storage offers industry-leading scalability for private cloud deployments on Red Hat OpenStack® Platform supporting Cinder, Glance, Nova, Manila, and Swift application programming interfaces (APIs). Red Hat OpenShift Data Foundation brings file, block, and object data services with Ceph storage technology to stateful applications running on Red Hat OpenShift . With support for the S3 interface, applications can access Red Hat Ceph Storage with the same API—in public, private, or hybrid clouds.•23Ceph storage is reliably the most popular storage for OpenStack with more than 50% market share. For the latest information see the OpenStack Foundation Annual Survey .Red Hat OpenShift Data Foundation automates Ceph technology with the Rook Kubernetes operator and NooBaa multicloud object gateway.23Component Capabilities API and protocolsupportObject, block, and file storage Cloud integration with the object protocols used by AWS S3 and OpenStack Swift; block storage integrated with OpenStack, Linux®, and Kernel-based Virtual Machine (KVM) hypervisor; CephFS highly available, scale-out shared filesystem for file storage; support for Network File System (NFS) v4 and native Ceph protocol via kernel and user space (FUSE) driversREST management API Ability to manage all cluster and object storage functions programmatically for automation and consistency by not having to manually carry out provisioningMultiprotocol with NFS, iSCSI, and AWS S3 support Ability to build a common storage platform for multiple workloads and applications based on industry-standard storage protocolsNew Ceph filesystem capabilities New access options through NFS, enhanced monitoring tools, disaster recovery support, and data reduction with erasure codingEase of managementNew manageability features Integrated (Cephadm) control plane, stable management API, failed drive replacement workflows, and object multisite monitoring dashboardAutomation Integrated Ceph-aware control plane, based on Cephadm and the Ceph Manager orchestration module encompassing Day-1 and Day-2 operations, including simplified device replacement and cluster expansion; cluster definition files encompass the entire configuration in a single exported file, and the REST management API offers further automation possibilitiesManagement and monitoring Advanced Ceph monitoring and diagnostic information integrated in the built-in monitoring dashboard with graphical visualization of the entire cluster, including cluster-wide and per-node usage and performance statistics; operator-friendly shell interfaces for management and monitoring, including top-styled in-terminal visualizationComponent Capabilities SecurityAuthentication and authorization Integration with Microsoft Active Directory, lightweight directory access protocol (LDAP), AWS Auth v4, and KeyStone v3Policies Limit access at pool, user, bucket, or data levelsWORM governance S3 object lock with read-only capability to store objects using a write-once-read-many (WORM) model, preventing objects from being deleted or overwrittenFIPS 140-2 support Validated cryptographic modules when running on certified Red Hat Enterprise Linux versions (currently 8.2)External key manager integration Key management service integration with Hashicorp Vault, IBM Security Guardium Key Lifecycle Manager (SGKLM), OpenStack Barbican, and OpenID Connect (OIC) identity support; compatible with any KMIP-compliant key management infrastructureEncryption Implementation of cluster-wide, at-rest, or user-managed inline object encryption; operator-managed encryption keys and user-managed encryption keys are supportedRed Hat Enterprise Linux Mature operating system recognized for its high security and backed by a strong open source community; Red Hat Enterprise Linux subscriptions included at no extra chargeReliability and availabilityHighly available and highly resilient Highly available and resilient out of the box, with default configurations able to withstand loss of multiple nodes (or racks) without compromising service availability or data safetyStriping, erasure coding, or replication across nodes Full range of data reduction options, including replica 2 (2x), replica 3 (3x), and erasure coding for object, block and file, inline object compression, and backend compressionDynamic volume sizing Ability to expand Ceph block devices with no downtimeStorage policies Configurable data placement policies to reflect service-level agreements (SLAs), performance requirements, and failure domains using the Controlled Replication Under Scalable Hashing (CRUSH) algorithmSnapshots Snapshots of individual block devices with no downtime or performance impactComponent CapabilitiesCopy-on-write cloning Instant provisioning of tens or hundreds of virtual machine instances from the same image with zero wait timeSupport services SLA-backed technical support with streamlined product defect resolution and hot-fix patch access; consulting, service, and training optionsPerformanceIncreased virtual machine performance Better performance for virtual machines with faster block performance than previous releases, LibRBD data path optimization, and CephFS ephemeral pinningUpdated cache architecture New read-only large object cache offloads object reads from the cluster, with improved in-memory write-around cache; optional Intel Optane low-latency write cache option (tech preview)Improved performance Achieved random object read performance approaching 80 GiB/s sustained throughput with hard disk drives (HDDs); better block performance with a shortened client input/output (I/O) pathClient-cluster data path Clients share their I/O load across the entire clusterIn-memory client-sidecachingEnhanced client I/O using a hypervisor cacheServer-side journaling Accelerated data write performance with serialized writes Georeplication supportand disaster recoveryGlobal clusters Global namespace for object users with read and write affinity to local clusters, reflecting the zones and region topology of AWS S3Disaster recovery Object multisite replication suitable for disaster recovery, data distribution, or archiving; block and file snapshot replication across multiple clusters for disaster recovery; streaming block replication for zero recovery point objective (RPO=zero) configurationsEfficiency and cost-effectivenessContainerized storage daemons Reliable performance, better utilization of cluster resources, and decreased hardware footprint, with the ability to colocate Ceph daemons on the same machine, significantly improving total cost of ownership for small clustersIndustry-standard hardware Optimized servers and storage technologies from Red Hat’s hardware partners, tailored to meet each customer’s needs and diverse workloads/redhatinc@Redhat /company/red-hatO-F30080Component CapabilitiesImproved resourceconsumption for smallobjectsPrevious backend allocation size has been reduced four-foldfor solid state drives (SSD) and sixteen-fold for hard diskdrives (HDD), significantly reducing overhead for small filesunder 64KB in sizeFaster erasure codingrecoveryErasure coding recovery with K shards (rather than K+1 shardsrequired previously), results in improved data resiliency whenrecovering erasure coded pools after a hardware failure Thin provisioningSparse block images enable over-provisioning of storage andimmediate virtual or container instance launch Technical requirementsDescription Minimum requirementHost operating systemRed Hat Enterprise Linux 8.4 and higher (included in theproduct), or Red Hat Enterprise Linux 8.4 Extended UserSupport (sold separately)For additional information see the compatibility matrix Hardware requirementsMinimum 2-core 64-bit x86 processors per host; minimum of4GB of RAM per Object Storage Daemon (OSD) process;minimum of 16GB of RAM for the operating systemActual node configuration is defined based on underlyingstorage technology and target workloadsA minimum of three storage hosts with seven recommendedAbout Red HatRed Hat is the world’s leading provider of enterprise open source software solutions, using a community-powered approach to deliver reliable and high-performing Linux, hybrid cloud, container, and Kubernetes technologies. Red Hat helps customers develop cloud-native applications, integrate existing and new IT applications, and automate and manage complex environments. A trusted adviser to the Fortune 500, Red Hat provides award-winning support, training, and consulting services that bring the benefits of open innovation to any industry. Red Hat is a connective hub in a global network of enterprises, partners, and communities, helping organizations grow, transform, and prepare for the digital future.NORTH AMERICA1–888–REDHA T1EUROPE, MIDDLEEAST,AND AFRICA00800 7334 2835*****************ASIA PACIFIC+65 6490 4200***************LA TIN AMERICA+54 11 4329 7300*********************Copyright © 2021 Red Hat, Inc. Red Hat, the Red Hat logo, Ceph, and OpenShift are trademarks or registered trademarks of Red Hat, Inc. or its subsidiaries in the United States and other countries. Linux® is the registered trademark of Linus Torvalds in the U.S. and other countries. The OpenStack word mark and the Square O Design, together or apart, are trademarks or registered trademarks of OpenStack Foundation in the United States and other countries, and are used with the OpenStack Foundation’s permission. Red Hat, Inc. is not affiliated with, endorsed by, or sponsored by the OpenStack Foundation or the OpenStack community.。

ceph运维手册Ceph是一个开源的分布式存储系统,可提供高可用性、高性能和可扩展性。
为了能够有效地管理和维护Ceph集群,需要掌握一些运维技巧和最佳实践。
以下是关于Ceph运维的一些指南和手册。
1. 部署和安装Ceph集群:- 选择合适的硬件配置:了解Ceph的硬件要求,并根据需要选择适当的硬件,如存储设备、网络等。
- 安装Ceph软件包:根据操作系统版本和类型,选择合适的Ceph 软件包,并按照官方文档进行安装。
- 配置Ceph集群:了解Ceph的配置文件和参数,按照需求进行相应的配置,如存储池、存储节点等。
2. 监控和调优Ceph集群:- 使用Ceph管理工具:了解Ceph提供的管理工具,如cephadm、ceph-deploy等,可以方便地监控和管理Ceph集群。
- 监控集群状态:配置和使用监控工具,如Ceph Dashboard、Prometheus等,定期监控集群的状态和性能指标,及时发现和解决问题。
- 调优集群性能:根据实际需求和负载特点,调整Ceph集群的参数和配置,例如调整副本数、调整缓存策略等,以提高性能和可靠性。
3. 故障排除和故障恢复:- 日志分析和排查:仔细分析Ceph集群的日志,找出可能的问题根源,并采取相应的解决措施。
- 数据恢复和修复:当发生数据丢失或损坏时,根据Ceph提供的工具和方法,进行数据恢复和修复操作,确保数据的完整性和可用性。
- 灾难恢复:制定和实施灾难恢复计划,确保在灾难事件发生时,能够快速恢复Ceph集群的运行。
4. 安全和权限管理:- 访问控制和身份认证:了解Ceph的访问控制机制,配置和管理用户、角色和权限,确保集群的安全性。
- 数据加密和传输安全:配置和使用Ceph的加密功能,保护数据的隐私和机密性,确保数据在传输过程中的安全性。
5. 升级和扩展Ceph集群:- 升级Ceph软件:根据官方文档,了解和执行Ceph软件的升级过程,确保平滑升级,并避免数据丢失或故障。
Ceph常规操作笔记-运维⼩结⼀、Ceph集群管理每次⽤命令启动、重启、停⽌Ceph守护进程(或整个集群)时,必须指定⾄少⼀个选项和⼀个命令,还可能要指定守护进程类型或具体例程。
**命令格式如{commandline} [options] [commands] [daemons]常⽤的commandline为"ceph",对应的options如下表:对应的commands如下表:能指定的daemons(守护进程)类型包括mon,osd及mds。
通过SysVinit机制运⾏ceph:在 CentOS、Redhat、发⾏版上可以通过传统的SysVinit运⾏Ceph,Debian/Ubuntu的较⽼的版本也可以⽤此⽅法。
使⽤SysVinit管理Ceph守护进程的语法如下:[root@ceph ~] sudo /etc/init.d/ceph [options] [start|restart] [daemonType|daemonID]1. 管理Ceph集群内所有类型的守护进程:通过缺省[daemonType|daemonID],并添加"-a" options,就可以达到同时对集群内所有类型的守护进程进⾏启动、关闭、重启等操作⽬的。
启动默认集群(ceph)所有守护进程:[root@ceph ~] sudo /etc/init.d/ceph -a start停⽌默认集群(ceph)所有守护进程:[root@ceph ~] sudo /etc/init.d/ceph -a stop如果未使⽤"-a"选项,以上命令只会对当前节点内的守护进程⽣效。
2. 管理Ceph集群内指定类型的守护进程:根据命令语法,要启动当前节点上某⼀类的守护进程,只需指定对应类型及ID即可。
启动进程,以OSD进程为例:#启动当前节点内所有OSD进程[root@ceph ~] sudo /etc/init.d/ceph start osd#启动当前节点内某⼀个OSD进程,以osd.0为例[root@ceph ~] sudo /etc/init.d/ceph start osd.0重启及关闭进程,以OSD进程为例:#关闭当前节点内所有OSD进程[root@ceph ~] sudo /etc/init.d/ceph stop osd#关闭当前节点内某⼀个OSD进程,以osd.0为例[root@ceph ~] sudo /etc/init.d/ceph stop osd.0#重启当前节点内所有OSD进程[root@ceph ~] sudo /etc/init.d/ceph restart osd#重启当前节点内某⼀个OSD进程,以osd.0为例[root@ceph ~] sudo /etc/init.d/ceph restart osd.0⼆、Ceph集群状态监控1. 检查集群健康状况检查Ceph集群状态[root@ceph ~] ceph health [detail]如果集群处于健康状态,会输出HEALTH_OK,如果输出HEALTH_WARN甚⾄HEALTH_ERR,表明Ceph处于⼀个不正常状态,可以加上"detail"选项帮助排查问题。
Ceph集群配置说明书◆预备知识:✓需要创建6台虚拟机,每台的硬盘占用10G就ok。
✓命名分别是:✓各自对应的IP是:(这几个IP已经被我用了,请配置未被使用的IP)◆开始配置ceph集群:↓1.在mon00上使用这个镜像创建虚拟机(帐户名随便,密码最好用admin123)2.开通root登录:sudo passwd三次都输入admin1233.重启:sudo reboot启动的时候就可以用root登录4.配置IP:vim /etc/network/interfaces152这个ip被我用了,请用未被使用的。
5.修改主机名:vim /etc/hostname6.再次重启reboot以便激活新的主机名和IP。
7.更新一下,并且安装opssh-server以便用这个软件来远程。
sudo apt-get update && sudo apt-get install openssh-server8.为了能远程root帐户,请再修改一下:vim /etc/ssh/sshd_config将这一行改成截图的样子。
(原来是without-password)9.重启,关掉控制台,我们去远程它。
记住ip是192.168.0.15210.修改hosts:vim /etc/hosts11.安装cephwget -q -O-'https:///git/?p=ceph.git;a=blob_plain;f=keys/release.asc' | sudo apt-key add -enter echo deb /debian $(lsb_release -sc) main | sudo tee /etc/apt/sources.list.d/ceph.list enter sudo apt-get update && sudo apt-get install ceph -yenter 以上步骤就是ubuntu14.04+ceph 的模版了,关掉mon00虚拟机的电源,将mon00的模版替换掉里面的其他5台虚拟机的配置。
Ceph分布式存储平台部署手册目录1.CEPH的架构介绍 (5)2.CEPH在OPENSTACK中应用的云存储的整体规划 (6)3.CEPH集群安装在UBUNTU 12.04 (7)3.1.配置ceph源73.2.依需求修改ceph.conf配置文件73.3.设置主机的hosts 93.4.设置集群节点之间无密钥访问93.5.创建目录103.6.创建分区与挂载103.7.执行初始化113.8.启动ceph 113.9.ceph健康检查114.CEPH集群安装在CENTOS6.4 (12)4.1.安装更新源124.2.使用rpm安装ceph0.67.4 124.3.依需求修改ceph.conf配置文件134.4.设置主机的hosts 214.5.设置集群节点之间无密钥访问214.6.创建目录224.7.执行初始化224.8.启动ceph 224.9.ceph健康检查235.OPENSTACK GLANCE 使用CEPH集群的配置 (24)5.1.创建卷池和图像池245.2.增加两个池的复制水平245.3.为池创建 Ceph 客户端和密钥环245.4.在计算节点应用密钥环245.4.1.创建libvirt密钥245.4.2.计算节点ceph安装255.5.更新你的 glance-api 配置文件256.OPENSTACK VOLUMES使用CEPH集群的配置 (27)6.1.计算节点ceph安装276.2.创建临时的 secret.xml 文件276.3.设定 libvirt 使用上面的密钥286.4.更新 cinder 配置286.4.1.cinder.conf文件更改286.4.2.更改 cinder 启动脚本配置文件296.4.3.更改/etc/nova/nova.conf配置296.4.4.重启 cinder 服务296.5.验证cinder-volume 296.6.验证rdb创建volume 307.挂载CEPHFS (31)7.1.配置/etc/fstab 317.2.挂载vm实例目录318.FQA (32)1.CEPH的架构介绍CEPH的组件主要包括客户端ceph client(数据用户),元数据服务器mds(缓存和同步分布式元数据),一个对象存储集群osd(将数据和元数据作为对象存储,执行其他关键职能),集群监视器mon(执行监视功能)。
ceph操作手册Ceph是一种分布式存储系统,提供了高性能、高可用性和可扩展性的存储服务。
以下是Ceph操作手册,以帮助您快速上手使用Ceph。
一、概述Ceph是一个开源的分布式存储系统,具有高性能、高可用性和可扩展性,广泛应用于存储大规模数据。
Ceph提供了块存储、文件存储和对象存储三种服务,可以根据实际需求选择合适的存储类型。
二、安装与部署1.安装前准备:确保服务器硬件满足Ceph的要求,包括CPU、内存、磁盘和网络等。
同时,需要准备Ceph软件包和安装工具。
2.安装Ceph:根据您的操作系统和需求,选择合适的Ceph版本,并按照官方文档的指引进行安装。
3.配置Ceph:编辑Ceph的配置文件,设置集群名称、监控组件、存储组件等参数。
4.启动Ceph:启动Ceph的各个组件,包括监视器、存储节点等。
5.测试Ceph:通过创建对象、文件或块设备,测试Ceph 是否正常工作。
三、管理维护1.监控Ceph:使用Ceph命令行工具或图形化界面,监控集群状态、性能指标和故障排除等。
2.维护Ceph:定期进行Ceph的维护操作,如更新配置、修复故障和升级版本等。
3.数据备份与恢复:定期备份Ceph中的数据,以防止数据丢失。
同时,需要制定数据恢复计划,以便在数据损坏或丢失时快速恢复。
4.安全防护:确保Ceph集群的安全性,采取措施防止未经授权的访问和数据泄露。
四、性能优化1.调整配置:根据实际需求和硬件性能,调整Ceph的配置参数,提高存储性能。
2使用SSD:使用SSD可以提高I/O性能和数据可靠性。
3.多路径I/O:配置多路径I/O可以增加数据传输带宽和可靠性。
4.压缩与去重:启用数据压缩和去重功能可以减少存储空间占用和网络带宽消耗。
五、常见问题与解决方案1.Ceph集群无法启动:检查硬件和网络连接是否正常,查看日志文件查找故障原因。
2.数据损坏或丢失:检查数据备份和恢复计划是否完善,及时采取恢复措施。
One Stop Virtualization Shop StarWind® Ceph all-in-one ClusterHow to deploy Ceph all-in-one ClusterJUNE 2017TECHINCAL PAPERTrademarks“StarWind”, “StarWind Software” and the StarWind and the StarWind Software logos are registered trademarks of StarWind Software. “StarWind LSFS” is a trademark of StarWind Software which may be registered in some jurisdictions. All other trademarks are owned by their respective owners.ChangesThe material in this document is for information only and is subject to change without notice. While reasonable efforts have been made in the preparation of this document to assure its accuracy, StarWind Software assumes no liability resulting from errors or omissions in this document, or from the use of the information contained herein. StarWind Software reserves the right to make changes in the product design without reservation and without notification to its users.Technical Support and ServicesIf you have questions about installing or using this software, check this and other documents first - you will find answers to most of your questions on the Technical Papers webpage or in StarWind Forum. If you need further assistance, please contact us.In 2016, Gartner named StarWind “Cool Vendor for Compute Platforms”.Gartner does not endorse any vendor, product or service depicted in its research publications, and does not advise technology users to select only those vendors with the highest ratings or other designation. Gartner research publications consist of the opinions of Gartner's research organization and should not be construed as statements of fact. Gartner disclaims all warranties, expressed or implied, with respect to this research, including any warranties of merchantability or fitness for a particular purpose.About StarWindStarWind is a pioneer in virtualization and a company that participated in the development of this technology from its earliest days. Now the company is among the leading vendors of software and hardware hyper-converged solutions. The company’s core product is the years-proven StarWind Virtual SAN, which allows SMB and ROBO to benefit from cost-efficient hyperconverged IT infrastructure. Having earned a reputation of reliability, StarWind created a hardware product line and is actively tapping into hyperconverged and storage appliances market. In 2016, Gartner namedSta rWind “Cool Vendor for Compute Platforms” following the success and popularity of StarWind HyperConverged Appliance. StarWind partners with world-known companies: Microsoft, VMware, Veeam, Intel, Dell, Mellanox, Citrix, Western Digital, etc.Copyright ©2009-2017 StarWind Software Inc.No part of this publication may be reproduced, stored in a retrieval system, or transmitted in any form or by any means, electronic, mechanical, photocopying, recording or otherwise, without the prior written consent of StarWind Software.ContentsIntroduction (4)Before you begin (5)Virtual Machine Deployment and OS installation (5)Virtual Machine configuration (19)Ceph Deployment (21)Conclusion (22)Contacts (23)IntroductionThis guidance will show you how to deploy a Ceph all-in-one cluster. The paper will walk you through the Ceph cluster configuration process and describe how to create a Ceph monitor and Ceph OSD.Ceph is an open-source project, which provides unified software solution for storing blocks, files, and objects. The main idea of the project is to provide a high-performing distributed storage system which can provide an ability to perform a massive storage scale-out and will have no single points of failure. It has become one of the most popular Software-Defined Storage technologies.Ceph becomes more attractive to the storage industry due to its openness, scalability, and reliability. Cloud computing and IaaS era requires a system which must be Software-Defined and ready for cloud technologies. Ceph injects here more than perfect, regardless the environment where it is going to be used (public, private, or hybrid cloud).This guide is intended for experienced IT and Storage administrators and professionals who would like to deploy the Ceph all-in-one cluster to check out all the benefits of Ceph object storage.A full set of up-to-date technical documentation can always be found here, or by pressing the Help button in the StarWind Management Console.For any technical inquiries please visit our online community, Frequently Asked Questions page, or use the support form to contact our technical support department.Before you beginThis guide describes the installation and configuration of the Ceph all-in-one cluster, which means that we are going to build the Ceph cluster using only one VM. We are going to deploy the ESXi VM and install Debian 8 on it.You can download our pre-deployed OVF template or follow these steps:Virtual Machine Deployment and OS installation1.Download Debian 8 ISO for OS installation here:https:///cdimage/archive/8.8.0/amd64/iso-cd/debian-8.8.0-amd64-netinst.iso2.Create the ESXi VM with following settings:3.Mount the ISO image to the VM and boot from it.4.Choose Graphical install option5.Choose an eligible language for the installation process6.Select your location, which is going to be used to set your time zone.7.Configure the keyboard (choose American English)8.Enter the hostname9.Configure your network.10.Set up a password for ‘root’account11.Create a user account which is going to be used instead of the root account for non-administrative activities12.Set up a password for the newly created account13.Select the desired time zone for you14.Partition the disks15.Write changes to the disks16.Configure the package manager17.S elect a Debian Archive mirror18.Enter proxy information if you need to use HTTP proxy.19.Configure popularity contest20.Select software needed21.Install the GRUB boot loader22.Finish the installationVirtual Machine configuration23.Add a Virtual Disk with a desirable size to the VM. This Virtual Disk will be used by OSDDaemon.24.Boot the VM into the recently installed OS and log in to it using the root account. UpdateDebian using the following command: apt-get -y update25.Install packages and configure NTP.apt-get install -y sudo python python-pip ntp;systemctl enable ntp;systemctl start ntp;26.Add user you have created to sudoers (where %USERNAME% is the user account youhave created during OS installation):usermod -aG sudo %USERNAME%;echo "%USERNAME% ALL = (root) NOPASSWD:ALL" | sudo tee/etc/sudoers.d/%USERNAME%;chmod 0440 /etc/sudoers.d/%USERNAME%;27.Connect to the VM via SSH and log in using your user account.28.Configure SSH:Generate the ssh keys for %USERNAME%user:ssh-keygenLeave passphrase as blank/empty.Edit file id_rsa.pub and remove "%USERNAME%@host" (name of your user) at the end of the stringnano /home/%USERNAME%/.ssh/id_rsa.pubcp /home/%USERNAME%/.ssh/id_rsa.pub/home/%USERNAME%/.ssh/authorized_key29.Add to /etc/hosts host ip (eth0) and a hostnameCeph Deployment30.Deploy Ceph "all-in-one":•Create directory "Ceph-all-in-one":mkdir ~/Ceph-all-in-one;cd ~/Ceph-all-in-one;•Install Ceph-deploy:sudo pip install Ceph-deploy•Create new config:sCeph-deploy new Ceph-all-in-one;echo "[osd]" >> /home/%USERNAME%/Ceph-all-in-one/Ceph.conf;echo "osd pool default size = 1" >> /home/sw/Ceph-all-in-one/Ceph.conf;echo "osd crush chooseleaf type = 0" >> /home/%USERNAME%/Ceph-all-in-one/Ceph.conf;31.Install Ceph and add mon role to nodeCeph-deploy install Ceph-all-in-one; ("Ceph-all-in-one" our hostname)Ceph-deploy mon create-initial;Ceph-deploy osd create Ceph-all-in-one:sdb; ("Ceph-all-in-one" our hostname, sdb name of the disk we have added in the Virtual Machine configurationsection)32.Change Ceph rbd pool size:sudo Ceph osd pool set rbd size 133.After deployment:Check cluster status: sudo Ceph -sNOTE: Please keep in mind that we have deployed Ceph cluster without the replication. It is not recommended to use this scenario in production.ConclusionBy following these instructions, you have deployed Debian VM and configured it for creating Ceph all-in-one cluster. We have configured the VM as a Ceph monitor and created an OSD and Ceph pool. As a result, you can create RBD device, format it and mount to store your data.Contacts1-617-449-7717 1-617-507-5845 +44 20 3769 1857 (UK)+49 302 1788 849 (Germany) +33 097 7197 857 (France) +7 495 975 94 39 (Russian Federation and CIS) 1-866-790-2646Customer Support Portal:Support Forum:Sales: General Information: https:///support https:///forums ***********************************StarWind Software, Inc. 35 Village Rd., Suite 100, Middleton, MA 01949 USA ©2017, StarWind Software Inc. All rights reserved.。
ceph集群常用命令梳理结合网络、官网、手动查询等多方渠道,整理ceph维护管理常用命令,并且梳理常规命令在使用过程中的逻辑顺序。
另外整理期间发现ceph 集群的命令体系有点乱,详细情况各自体验。
一:ceph集群启动、重启、停止1:ceph 命令的选项如下:选项简写描述--verbose-v详细的日志。
--valgrindN/A(只适合开发者和质检人员)用Valgrind 调试。
--allhosts-a在ceph.conf 里配置的所有主机上执行,否则它只在本机执行。
--restartN/A核心转储后自动重启。
--norestartN/A核心转储后不自动重启。
--conf-c使用另外一个配置文件。
Ceph 子命令包括:命令描述start启动守护进程。
stop停止守护进程。
forcestop暴力停止守护进程,等价于kill -9killall杀死某一类守护进程。
cleanlogs清理掉日志目录。
cleanalllogs清理掉日志目录内的所有文件。
2:启动所有守护进程要启动、关闭、重启Ceph 集群,执行ceph 时加上相关命令,语法如下:/etc/init.d/ceph [options] [start|restart|stop] [daemonType|daemonID]下面是个典型启动实例:sudo /etc/init.d/ceph -a start加-a (即在所有节点上执行)执行完成后Ceph本节点所有进程启动。
把CEPH 当服务运行,按此语法:service ceph [options] [start|restart] [daemonType|daemonID]典型实例:service ceph -a start3:启动单一实例要启动、关闭、重启一类守护进程本例以要启动本节点上某一类的所有Ceph 守护进程,/etc/init.d/ceph [start|restart|stop] [daemonType|daemonID]/etc/init.d/ceph start osd.0把ceph当做服务运行,启动一节点上某个Ceph 守护进程,按此语法:service ceph start {daemon-type}.{instance}service ceph start osd.0二:集群维护常用命令概览1:检查集群健康状况启动集群后、读写数据前,先检查下集群的健康状态。
Ceph0.87安装使用手册(v0.1)2015年3月28日目录第一部分:环境准备...................................................................................................................- 1 -一、准备.......................................................................................................................- 1 -二、在admin节点上安装ceph-deploy......................................................................- 1 -三、在每个机器上安装ntp ........................................................................................- 2 -四、在每个机器上安装openssh-server .....................................................................- 2 -五、在每个机器上创建user并给予sudo权限 ........................................................- 2 -六、设置从admin节点到其他三个节点的免密码登录...........................................- 3 -七、一些注意事项.......................................................................................................- 5 -第二部分:安装...........................................................................................................................- 5 -一、在wx-ceph-admin节点上创建目录....................................................................- 5 -二、清空配置(purge configuration) ............................................................................- 5 -三、安装.......................................................................................................................- 6 -四、配置OSD(目录做OSD)...................................................................................- 7 -五、配置OSD(硬盘做OSD)...................................................................................- 8 -六、配置文件拷贝.......................................................................................................- 9 -七、安装MDS........................................................................................................... - 10 -八、Ceph运行 .......................................................................................................... - 10 -第三部分:使用........................................................................................................................ - 11 -一、集群监控............................................................................................................ - 11 -二、用户管理............................................................................................................ - 14 -三、Pool(池)管理 ...................................................................................................... - 15 -第四部分:Cephfs..................................................................................................................... - 15 -一、创建ceph文件系统.......................................................................................... - 15 -二、挂载(mount) ceph文件系统............................................................................. - 16 -第一部分:环境准备一、准备预备1:修改每个机器里边的/etc/hosts文件,添加这些机器的ip例如:在wx-ceph-admin机器的/etc/hosts文件中,添加:172.16.100.46 wx-ceph-admin172.16.100.42 wx-ceph01172.16.100.44 wx-ceph02172.16.100.45 wx-ceph03二、在admin节点上安装ceph-deploy1、Add the release key:执行:wget -q -O- 'https:///git/?p=ceph.git;a=blob_plain;f=keys/release.asc' | sudo apt-key add –2、Add the Ceph packages to your repository. Replace {ceph-stable-release} with a stable Ceph release (e.g., cuttlefish, dumpling, emperor, firefly, etc.). For example:echo deb /debian-{ceph-stable-release}/ $(lsb_release -sc) main | sudo tee /etc/apt/sources.list.d/ceph.list执行:echo deb /debian-giant/ $(lsb_release -sc) main | sudo tee/etc/apt/sources.list.d/ceph.list3、Update your repository and install ceph-deploy:执行:sudo apt-get update && sudo apt-get install ceph-deployNote:You can also use the EU mirror for downloading your packages. Simply replace / by /三、在每个机器上安装ntpWe recommend installing NTP on Ceph nodes (especially on Ceph Monitor nodes) to prevent issues arising from clock drift.On Debian / Ubuntu, 执行:sudo apt-get install ntp四、在每个机器上安装openssh-serversudo apt-get install openssh-server五、在每个机器上创建user并给予sudo权限1、在每个机器上创建user格式:ssh user@ceph-serversudo useradd -d /home/{username} -m {username}sudo passwd {username}实际操作:登录到每台机器,然后执行:sudo useradd -d /home/ceph -m cephsudo passwd ceph2、For the user you added to each Ceph node, ensure that the user has sudo privileges.格式:echo "{username} ALL = (root) NOPASSWD:ALL" | sudo tee /etc/sudoers.d/{username}sudo chmod 0440 /etc/sudoers.d/{username}实际操作:登录到每台机器,然后执行:echo "ceph ALL = (root) NOPASSWD:ALL" | sudo tee /etc/sudoers.d/cephsudo chmod 0440 /etc/sudoers.d/ceph六、设置从admin节点到其他三个节点的免密码登录1、以新创建的用户登录到admin节点在admin节点上执行:su ceph2、执行ssh-keygen,一路回车。
Ceph群集维护简明手册 (2)前言 (2)MON (2)MON节点添加 (3)MON节点删除 (4)MON故障恢复 (4)OSD (6)OSD添加 (6)OSD删除 (6)日志迁移 (6)硬盘更换 (7)RBD (7)块存储的基本操作 (7)快照 (10)导入导出 (11)增量备份与恢复 (12)Ceph群集维护简明手册作者: 普通人前言本手册针对已部署完成ceph集群进行阐述(通过ceph-deploy工具),部署架构图如下:MON环境配置节点 主机名 Public ip address Cluster ip address Admin/ceph ubuntu-ceph-06 192.168.0.24 10.10.0.6ceph ubuntu-ceph-07 192.168.0.25 10.10.0.7ceph ubuntu-ceph-06 192.168.0.26 10.10.0.8在管理节点的配置目录下,使用ceph-depoloy工具添加新的mon节点。
1.更新配置文件,添加新mon的信息2.推送新的配置文件到所有节点,或者在添加时覆盖(ceph-deploy会提示)3.使用ceph-deploy工具添加MON新节点root@ubuntu-ceph-06:/opt/ceph# ceph-deploy mon create ubuntu-ceph-08[ceph_deploy.cli][INFO ] Invoked (1.4.0): /usr/bin/ceph-deploy mon create ubuntu-ceph-08 [ceph_deploy.mon][DEBUG ] Deploying mon, cluster ceph hosts ubuntu-ceph-08[ceph_deploy.mon][DEBUG ] detecting platform for host ubuntu-ceph-08 ...[ubuntu-ceph-08][DEBUG ] connected to host: ubuntu-ceph-08[ubuntu-ceph-08][DEBUG ] detect platform information from remote host[ubuntu-ceph-08][DEBUG ] detect machine type[ceph_deploy.mon][INFO ] distro info: Ubuntu 14.04 trusty[ubuntu-ceph-08][DEBUG ] determining if provided host has same hostname in remote [ubuntu-ceph-08][DEBUG ] get remote short hostname[ubuntu-ceph-08][DEBUG ] deploying mon to ubuntu-ceph-08[ubuntu-ceph-08][DEBUG ] get remote short hostname………………..]**************************************************************************** [ubuntu-ceph-08][DEBUG ] status for monitor: mon.ubuntu-ceph-08[ubuntu-ceph-08][DEBUG ] {[ubuntu-ceph-08][DEBUG ] "election_epoch": 0,[ubuntu-ceph-08][DEBUG ] "extra_probe_peers": [[ubuntu-ceph-08][DEBUG ] "192.168.0.24:6789/0",[ubuntu-ceph-08][DEBUG ] "192.168.0.25:6789/0"[ubuntu-ceph-08][DEBUG ] ],[ubuntu-ceph-08][DEBUG ] "monmap": {[ubuntu-ceph-08][DEBUG ] "created": "0.000000",[ubuntu-ceph-08][DEBUG ] "epoch": 14,[ubuntu-ceph-08][DEBUG ] "fsid": "fc989fb1-eea9-47f4-83e1-999c47df0930", [ubuntu-ceph-08][DEBUG ] "modified": "2015-08-19 02:50:54.480663",[ubuntu-ceph-08][DEBUG ] "mons": [[ubuntu-ceph-08][DEBUG ] {[ubuntu-ceph-08][DEBUG ] "addr": "192.168.0.24:6789/0",[ubuntu-ceph-08][DEBUG ] "name": "ubuntu-ceph-06",[ubuntu-ceph-08][DEBUG ] "rank": 0[ubuntu-ceph-08][DEBUG ] },[ubuntu-ceph-08][DEBUG ] {[ubuntu-ceph-08][DEBUG ] "addr": "192.168.0.25:6789/0",[ubuntu-ceph-08][DEBUG ] "name": "ubuntu-ceph-07",添加mon节点也可以使用ceph-deploy mon add --address [ADDRESS] hostname在管理节点的配置目录下,使用ceph-depoloy工具删除mon节点。
1.更新配置文件,删除将放弃mon的信息2.推送新的配置文件到所有节点,或者在添加时覆盖(ceph-deploy会提示)3.使用ceph-deploy工具删除MON新节点root@ubuntu-ceph-06:/opt/ceph# ceph-deploy mon destroy ubuntu-ceph-08[ceph_deploy.cli][INFO ] Invoked (1.4.0): /usr/bin/ceph-deploy mon destroy ubuntu-ceph-08 [ceph_deploy.mon][DEBUG ] Removing mon from ubuntu-ceph-08[ubuntu-ceph-08][DEBUG ] connected to host: ubuntu-ceph-08[ubuntu-ceph-08][DEBUG ] detect platform information from remote host[ubuntu-ceph-08][DEBUG ] detect machine type[ubuntu-ceph-08][DEBUG ] get remote short hostname[ubuntu-ceph-08][INFO ] Running command: ceph --cluster=ceph -n mon. -k /var/lib/ceph/mon/ceph-ubuntu-ceph-08/keyringmon remove ubuntu-ceph-08[ubuntu-ceph-08][WARNIN] removed mon.ubuntu-ceph-08 at 192.168.0.26:6789/0, there are now 2 monitors[ubuntu-ceph-08][INFO ] polling the daemon to verify it stopped[ubuntu-ceph-08][INFO ] Running command: initctl status ceph-mon cluster=ceph id=ubuntu-ceph-08[ubuntu-ceph-08][INFO ] polling the daemon to verify it stopped[ubuntu-ceph-08][INFO ] Running command: initctl status ceph-mon cluster=ceph id=ubuntu-ceph-08[ubuntu-ceph-08][INFO ] Running command: mkdir -p /var/lib/ceph/mon-removed [ubuntu-ceph-08][DEBUG ] move old monitor dataMON故障恢复一般来说,在实际运行中,ceph monitor的个数是2n+1(n>=0)个,在线上至少3个,只要正常的节点数>=n+1,ceph的paxos算法能保证系统的正常运行。
更通俗些就是正常节点的比例大于50%即可保证Ceph集群能够正常运行。
因为,对于3个节点,同时只能挂掉一个。
但是,如果屋漏偏逢雨,3个节点中挂了2个,paxos算法就无法正常进行仲裁(quorum),此时,ceph集群会阻塞对集群的操作,直到超过半数的Mon节点恢复.Ø通过monmaptool工具,根据ceph集群信息生成monmap########################################################################### ubuntu-ceph-06、ubuntu-ceph-07是将要被修复的mon节点##########root@ubuntu-ceph-06:/opt/ceph##monmaptool–create--addubuntu-ceph-07192.168.0.25:678 9 --add ubuntu-ceph-08192.168.0.26:6789 --fsid fc989fb1-eea9-47f4-83e1-999c47df0930--clobber monmapØ把monkeyring和monmap传送到Ubuntu-ceph-07节点上root@ubuntu-ceph-06# cat /var/lib/ceph/mon/ceph-ubuntu-ceph-06/keyring[mon.]key = AQDZQ8VTAAAAABAAX9HqE0NITrUt7j1w0YadvA==caps mon = "allow *"Ø在故障的mon节点初始化root@ubuntu-ceph-07#ceph-mon --cluster ceph -i ubuntu-ceph-07 --mkfs --monmapmonmap --keyringkeyringØ创建upstart空文件,实现sysV管理root@ubuntu-ceph-07:/var/lib/ceph/mon/ceph-ubuntu-ceph-07#touch upstartØ启动故障节点root@ubuntu-ceph-07# start ceph-mon id=Ubuntu-ceph-07Ø同样的方法修复ubuntu-ceph-08,最终可以使集群正常状态OSDOSD添加OSD推荐使用ceph-deploy工具来部署,默认OSD添加到CRUSH是以host为隔离域,所以,如果已经变更了crush结构,会新添加host bucket .在管理节点的配置目录下,使用ceph-depoloy工具添加新的OSD。