酶标仪数据处理部分-Gen5 2.0
- 格式:doc
- 大小:715.00 KB
- 文档页数:16

全波长酶标仪软件中文操作手册1. 安装CD此软件为光盘自动安装,按所提示步骤一步步操作即可。
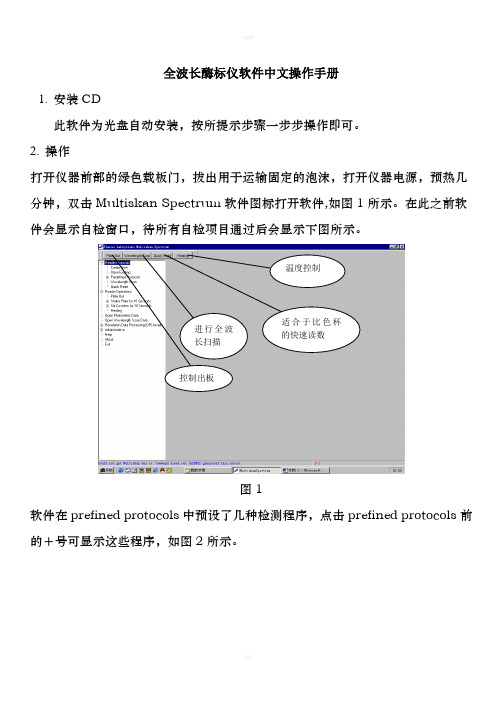
2. 操作打开仪器前部的绿色载板门,拔出用于运输固定的泡沫,打开仪器电源,预热几分钟,双击Multiskan Spectrum 软件图标打开软件,如图1所示。
在此之前软件会显示自检窗口,待所有自检项目通过后会显示下图所示。
图1软件在prefined protocols 中预设了几种检测程序,点击prefined protocols 前的+号可显示这些程序,如图2所示。
控制出板进行全波长扫描适合于比色杯的快速读数温度控制图2用户也可通过点击“create new ”来自编新程序,首先是option 选项如图3所示。
点击此处显示预设程序名点击此处,下拉树状结构显示“start dsDNA ”和”show dsDNA ”分别表示开始程序和显示程序参数,在此用户可修改参数并保存选择使用酶标板还是比色杯选择酶标板类型如为大孔板,在此选择测量区域输入新编的程序名,软件将自动保存选择检测方法,一般多用endpoint 即终点法图3Temp/shake选项,设置温度控制和振荡,如图4所示。
图4 setting选项,如图5所示。
在此打钩代表选择加热,并可输入加热温度选择高,中,低速三种振荡速度点击endpoint,可设置检测的波长,如图6所示。
图6点击blank,设置空白,如图7所示。
在此打钩,表示软件将自动保存测得的原始数据,并可在空白框中输入保存数据的文件名在此打钩,表示软件 将此程序列入预定义的程序在此打钩,表示软件将起用光程校准功能,可在下拉框中选择预设溶剂的光程校准系数。
如所使用溶剂不在此列表中,则可在Administrative 中的reader option 中进行设置。
可在列表中选择检测所需的主波长和参考波长,如在列表中找不到则可以在键盘输入,在200-1000nm 范围内可任意输入。
在此打钩,下面96孔板图变黑,然后用鼠标点击设置空白,可多次点击设置多个空白,在已设置空白位置再点一次表示取消空白的设置。

BioTek酶标仪简易操作规范1、检测准备接通电源,打开设备,预热15min;打开电脑,开启Gen5 CHS 1.10软件,检测设备与电脑连接是否完好。
2、程序设置点击“实验”,选择所需“实验方案”,“确定”后即可进入程序设置:2.1单击“程序”,弹出程序设置对话框,先选择“板类型”,然后点击“检测”,设置检测步骤,点击“全板”,设置扫描范围,若为部分区域扫描,则去选“选择所有孔”并设置相应扫描区域,“确定”完成扫描范围设置;2.2下拉菜单选择所需检测类型和检测速度,常规检测一般选择默认的“终点”、“正常”即可,此外,还可选择“光程校正”设置设备检测与分光光度计检测数值之间的转换关系,具体应用可参照使用说明书;2.3设置检测波长,同一程序可对每样品检测6个波长下的吸收值,根据需要设置相应检测波长,“确定”后完成检测步骤设置;2.4设备提供“振板”、“延迟”、“动力学”、“监视孔”、“设置温度”、“进/出板”、“停止/恢复”、“注释”等功能,常规检测一般不需使用,根据具体实验可参照使用说明书进行相应设置;2.5完成所有程序设置后,点击“验证”,检查程序设置是否有正确,然后进入布板设置。
3、布板单击“板布局”,进入布板设置,设置“复本”数量及方向、“自动选择”方向、“填充”方向、“类型”及起始编号等参数,根据板上样品在对应坐标位置上依次设置布局,检查无误后“确定”完成设置。
4、数据处理单击“数据处理”,进入数据处理设置,设备提供“转换”、“孔分析”、“曲线分析”、“临界值”、“验证”、“偏振”等功能选择,可进行简单数据分析处理,但若不需要出具正式检验报告,一般在Excel上处理更为方便,本步骤设置可直接跳过。
5、导出设置设备软件提供“文件导出”、“文本导出”功能,但常规检测一般不须使用,具体使用时可参照说明书进行设置。
6、检测6.1在完成上述程序设置后,对所有步骤检查一遍,复核无误后即可进行检测,单击“检测板”,输入“板ID”或“条形码”对板进行编号,必要时进行“注释”;6.2点击“检测”,设置文件保存路径并命名,“确定”后将板置于托架上,“确定”后设备即开始扫描,若欲放弃检测,此时点击“中止检测”即可,吸光度扫描完毕后,数据自动保存于存储路径目录下,窗体也会显示检测结果。

多功能酶标仪常见配置及全参数Infinite M200 PRO1.一般参数:支持的检测模式:光吸收、荧光顶部底部、时间分辨荧光(TRF)、连续发光、瞬时发光、双色发光、BRET、光吸收和荧光波长扫描1.1 光源:UV高能闪烁氙灯,10^8次闪烁寿命,自带光强监测、校准,免维护无需预热1.2 光栅杂光率:<10^-61.3 支持板型:6-384孔板,预设常用品牌型号;自动扫描并定义特殊规格板型,NanoQuant微量检测板,4位卧式比色杯,立式比色杯(选配)1.4 孔内多点读数(光吸收/荧光顶底):6-384孔板,最多15×15个点(依板型模式可有不同),覆盖全孔,7种点布局1.5 温度控制:环境温度+5℃至42℃(选配)1.6 振荡:线性或圆形可选;振幅1-6mm,0.5mm步进;1-1000秒可调1.7 多标记多模式检测:单个实验中可进行无限制的多波长、多模式检测(光吸收、荧光、发光、波长扫描)1.8 最快读板速度:96孔板:20秒;384孔板:30秒1.9 波长扫描速度(FI EX/EM):150秒;450-550nm,5nm步进,96孔板1.10 认证:DLReady,Transcreener Red FI2.光吸收模块2.1 波长范围:230-1000nm,1nm连续可调2.2 波长选择:双光栅2.3 带宽:<5nm(λ≦315nm),<9nm(λ>315nm)2.4 波长准确性:<±0.3nm(λ≦315nm),<±0.5nm(λ>315nm)2.5 波长重复性:<±0.3nm(λ≦315nm),<±0.5nm(λ>315nm)2.6 检测器:紫外硅光电二级管2.7 检测范围:0-4 OD2.8 检测分辨率:0.0001 OD2.9 检测准确性:<0.5% @260nm2.10 检测精确性:<0.2% @260nm2.11 260/280nm精度:±0.073.荧光模块3.1 波长范围:Ex 230-600nm,Em 330-600nm,1nm步进3.2 波长选择:Quad4四光栅3.3 带宽:Ex <5nm(λ≦315nm),<9nm(λ>315nm);Em<20nm3.4 光栅杂光率:<10^-63.5 波长准确性:<±1nm(λ≦315nm),<±2nm(λ>315nm)3.6 波长重复性:<±0.5nm(λ≦315nm),<±1nm(λ>315nm)3.7 检测器:光电倍增管(PMT),可选紫外和红外敏感型3.8 荧光灵敏度:顶部:170 amol/孔,(1.7 pM;384孔板),Fluorescein;底部:1.2 fmol/孔,(6 pM;96孔板),Fluorescein3.9 检测线性范围:7个数量级,扩展范围模式3.10 增益(Gain)值:1-255,四种模式:手工、自动、从孔计算、扩展范围3.11 顶部荧光Z轴聚焦:14800μm-23000μm连续可调,手工设定或自动探测,最强信号或最高信噪比两种模式4.时间分辨荧光模块4.1 灵敏度:90 amol/孔,(0.9 pM;384孔板),Europium4.2 延迟时间Lag time:0-2000 μs4.3 积分时间Integration time:10-2000 μs5.发光模块5.1 波长范围:380-600nm5.2 检测器:低暗电流单光子计数光电倍增管5.3 发光灵敏度:连续发光:225 amol ATP/孔,(9 pM;low volume 384孔板);5.4 瞬时发光:12 amol ATP/孔,(218 fM;384孔板)5.5 检测范围:6-8个数量级(扩展动态范围功能)5.6 积分时间:100-20,000 ms5.7 孔间干扰:<0.01%,黑板6.Nanoquant微量检测板模块6.1 用途:核酸定量:dsDNA,RNA,ssDNA,cDNA,Oligos 等;蛋白定量:280nm;核酸纯度:260/280nm 或260/230nm;荧光探针标记效率:Cy3,Cy5,Alexa 555,Alexa 647及其他6.2 样品量:2μL6.3 材质:全金属与聚光石英6.4 光程:严格0.5 mm,误差<±5μm6.5 检测范围:1-2900 μg/ml,dsDNA6.6 准确度:CV<3%6.7 重复性:CV<1%6.8 清洁:70%乙醇擦拭,或超声水浴,无需重新校准6.9 样品数量:16个6.10 检测时间:核酸定量:~1 分钟;荧光探针标记效率:~1分45秒7.气体控制模块7.1 范围:CO2:0 - 15%;O2:0.1 - 21%7.2 数据监控:实时测量内部气体浓度,精确到0.1%,LCD屏幕显示7.3 数据记录:通过i-control软件记录气体浓度变化7.4 海拔校准:自动-500米至4000米海拔高度校准8.软件模块配置Magellan软件预设多种实验模板,Nanoquant专有应用,内置DNA/RNA 定量及纯度计算,图形界面,拖放式操作,检测结果直接导出至Excel,中文软件操作,强大的数据处理功能,可以进行定性、定量、波长扫描、动力学检测、IC/EC50等复杂计算。

Gene5软件中文操作手册美国伯腾仪器有限公司北京代表处第一章:仪器连接1 仪器的连接:按照操作指南连接酶标仪与计算机,确保电源线和USB接口正常后,打开酶标仪。
2 仪器自检:当酶标仪与计算连接好之后,打开Gene5软件,出现欢迎界面向导精灵读板系统测试软件培训系统菜单选择System Menu> System >Read Configuration>Add>选择当前使用的酶标仪的型号和正确的Com Port>Test Comm(检测连接)> OK> OK > Close第二章如何编写一个检测程序任何一次检测实验都要以相应的检测程序为基础,因此实验的第一步就是要打开一个程序(protocol),如果是第一次编写程序,建议您在Gene5软件的欢迎界面中选择向导精灵来帮助您完成程序的编写。
双击欢迎界面的向导精灵> Next第一步:检测步骤设置双击对话框中Procedure下方彩色图标看到编程界面(根据仪器的配置不同,可以选择的功能按钮为黑色,不能选择的功能按钮变为灰色)Plate Type:在右侧的下拉框中选择酶标板的型号和类型1 点击Synchronized mode:选择Well模式(逐孔读数:加一孔读一孔)或者Plate模式(整板读数:加完整板后读数),该工具在使用分液装置时才需要使用。
2 :读板,单击Read按钮,设置读板参数Step label:对你所进行的读取步骤进行命名Detection method:对你进行的检测类型进行选择(吸光发光荧光)Read type:对选择的检测类型定义方法(终点法面积扫描法光谱法)Sanning 功能,点击右侧则弹出下面的对话框,选择扫描的矩阵选择该功能可以对每个孔进行多次读数,读数的次数通过设置矩阵的大小来控制,读数次数越多准确度越高,但是读板的速度会降低。
Spectrum 功能跳出如下对话框,设置扫描的起始波长、终止波长和波长间隔Read speed:定义阅读的速度(正常扫描)Wavelenghs:对检测的波长进行定义,可以同时定义6个检测波长。
Operator’s ManualMicroplate SpectrophotometerEon™© 2012, BioTek ® Instruments, Inc. PN 1021000 Rev C1 Page 1 of 1Eon Microplate Spectrophotometer (all models)Notification for Kinetic Assays Utilizing the Continuous Shake FeatureA Gen5 experiment that specifies the following parameters may not run successfully on the Eon:• Continuous Shake• Kinetic Interval greater than 15 minutesWhen the experiment is initiated, plate shaking will begin but shaking may stop prematurely with no error message.One suggested workaround is to shorten the kinetic interval. For example, if your desired experiment is 25 kinetic reads with 60 minute intervals, use 100 kinetic reads at 15 minute intervals.Another suggestion is to perform multiple Shake steps and then a Read step with the Discontinuous Kinetic Procedure feature enabled. For example, if your desired experiment looks like this:Do this (this example assumes the Read step takes one minute):Please contact BioTek’s Technical Assistance Center with any questions, tac@ .Eon™Microplate Spectrophotometer Operator's ManualOctober 2012© 2012Part Number 1021000Revision CBioTek Instruments, Inc.ii | PrefaceNoticesBioTek® Instruments, Inc.Highland Park, P.O. Box 998Winooski, Vermont 05404-0998 USAAll Rights Reserved© 2012, BioTek® Instruments, Incorporated. No part of this publication may bereproduced, transcribed, or transmitted in any form, or by any means electronic ormechanical, including photocopying and recording, for any purpose other than thepurchaser’s use without written permission of BioTek Instruments, Inc.TrademarksBioTek® is a registered trademark, and Eon™, Gen5™, and Take3™ and Take3 Trio™Micro-Volume Plate are trademarks of BioTek Instruments, Inc. BioCell™ is atrademark of BioTek Instruments and is patented under U.S. patent number 5,963,318.Microsoft®, Windows®, and Excel® are either registered trademarks or trademarks ofMicrosoft Corporation in the United States and/or other countries.All other trademarks are the property of their respective holders.Restrictions and LiabilitiesInformation in this document is subject to change and does not represent acommitment by BioTek Instruments, Inc. Changes made to the information in thisdocument will be incorporated in new editions of the publication. No responsibility isassumed by BioTek for the use or reliability of software or equipment that is notsupplied by BioTek or its affiliated dealers.BioTek Instruments, Inc.Contents | iii Eon Operator’s ManualContentsNotices ...........................................................................................................ii Contact Information ........................................................................................ v Revision History .............................................................................................. v i Document Conventions ................................................................................... vii Intended Use Statement ................................................................................. vii Quality Control ............................................................................................. viii Warranty and Product Registration .................................................................. viii Repackaging and Shipping ............................................................................. viii Warnings ....................................................................................................... i x Hazards ......................................................................................................... i x Precautions .................................................................................................... x CE Mark ......................................................................................................... x i Electromagnetic Interference and Susceptibility .................................................. xii User Safety .................................................................................................. xiii Safety Symbols .. (xiv)Chapter 1: Introduction ................................................................................... 1 Product Description ......................................................................................... 2 Package Contents ........................................................................................... 3 Optional Accessories ........................................................................................ 3 Product Support and Service . (4)Chapter 2: Installation ..................................................................................... 5 Product Registration ........................................................................................ 6 1: Unpack and Inspect the Instrument ............................................................... 6 2: Remove the Microplate Carrier Shipping Bracket .............................................. 7 3: Select an Appropriate Location ...................................................................... 8 4: Connect the Power Supply ............................................................................ 9 5: Connect the Host Computer ......................................................................... 10 6: Install Gen5 on the Host Computer ............................................................... 10 7: Turn on the Reader .................................................................................... 10 8: Establish Communication ............................................................................ 12 9: Run a System Test ..................................................................................... 13 Operational/Performance Qualification .............................................................. 14 Getting Started with Gen5 ............................................................................... 14 Repackaging and Shipping (15)Chapter 3: Instrument Qualification ............................................................... 19 Overview ...................................................................................................... 20 IQ/OQ/PQ ..................................................................................................... 20 Recommended Qualification Schedule ............................................................... 21 System Self-Test ........................................................................................... 22 Absorbance Plate Test .................................................................................... 26 Absorbance Liquid Tests . (31)iv | Preface BioTek Instruments, Inc.Chapter 4: Preventive Maintenance ................................................................ 41 Overview ...................................................................................................... 42 Required Materials ......................................................................................... 42 Warnings and Precautions ............................................................................... 42 Routine Cleaning Procedure ............................................................................. 43 Decontamination .. (44)Appendix A: Specifications ............................................................................. 45 General Specifications .................................................................................... 46 Read Specifications . (47)Appendix B: Error Codes ................................................................................ 49 Overview ...................................................................................................... 50 General Errors ............................................................................................... 51 Fatal Errors (58)A ppendix C: Instrument Dimensions (59)Index (63)Contact Information | vEon Operator’s Manual Contact Information See also Product Support & Service on page 4.BioTek ® Instruments, Inc.Highland Park, P.O. Box 998Winooski, Vermont 05404-0998 USACustomer Service and SalesInternet: Phone:888-451-5171 (toll free in the U.S.)802-655-4740 (outside the U.S.) Fax:802-655-7941 E-Mail: customercare@Service/TACPhone:800-242-4685 (toll free in the U.S.) 802-655-4740 (outside the U.S.)Fax: 802-654-0638E-Mail: tac@European Coordination Center/Authorized European RepresentativeBioTek ® Instruments GmbHKocherwaldstrasse 34D-74177 Bad FriedrichshallGermanyInternet: www.biotek.dePhone:+49 (0) 7136 9680 Fax:+49 (0) 7136 968 111 E-Mail:info@biotek.devi | Preface BioTek Instruments, Inc. Revision History RevDate Changes A 8/2011 Initial release to ProductionB 6/2012 Preface: Updated the Intended Use Statement. Added ‘Service’ and ‘Accessories’ hazard warnings. Added ‘Spare Parts’ precaution. Updated the CE Mark information to include EN 61010-2-081 and EN 61010-2-101. Added ‘(if labeled for this use)’ to Directive 98/79/EC: In Vitro Diagnostics.Ch. 3 Instrument Qualification: Simplified the Absorbance Plate Test and liquid tests.C 10/2012 Preface: Updated the CE Mark information to include EN 61010-2-010. Updated the Intended Use Statement to include the “optional cuvette port”.Document Conventions | vii Document ConventionsSee also Safety Symbols on page xiv.This icon calls attention to important safety notes.Warning! A Warning indicates the potential for bodily harm and tells you how to avoid the problem.Caution A Caution indicates potential damage to the instrument and tells you how to avoid the problem.Note: Bold text is primarily used for emphasis.This icon calls attention to important information.Intended Use StatementThe Eon is a single-channel, automated, benchtop, general-purpose microplatespectrophotometer that performs optical density measurements of samples in a microplate format and optional cuvette port. The performance characteristics of the data reduction software have not been established with any laboratory diagnostic assay. The user must evaluate this instrument and (if used) PC-based software in conjunction with their specific assay(s). This evaluation must include the confirmation that performance characteristics for the specific assay(s) are met.If the instrument has an “IVD” label it may be used for clinical and non-clinical purposes, including research & development. If there is no such label the instrument may only be used for research & development or other non-clinical purposes.viii | PrefaceQuality ControlIt is considered good laboratory practice to run laboratory samples according toinstructions and specific recommendations included in the package insert for the test to be conducted. Failure to conduct Quality Control checks could result in erroneous test data. Warranty and Product RegistrationTake a moment to review the warranty information that shipped with your product.Please also register your product with BioTek to ensure that you receive importantinformation and updates about the product(s) you have purchased. You can register online through the Customer Resource Center (CRC) at or by calling (888) 451-5171 or (802) 655-4740.Repackaging and ShippingIf you need to ship the instrument to BioTek for service or repair,contact BioTek for a Return Materials Authorization (RMA)number, and be sure to use the original packing materials. Otherforms of commercially available packaging are not recommendedand can void the warranty. If the original packing materials havebeen damaged or lost, contact BioTek for replacement packing.Warnings | ixWarningsOperate the instrument on a level, stable surface away from excessive humidity. Bright sunlight or strong incandescent light can reduce the linear performance range of the instrument.Measurement values may be affected by extraneous particles (such as dust) in the microplate wells or cuvettes. A clean work area is necessary to ensure accurate readings.When operated in a safe environment according to the instructions in thisdocument, there are no known hazards associated with the instrument. However, the operator should be aware of certain situations that could result in serious injury; these may vary depending on the instrument model. See Hazards and Precautions .HazardsThe following hazard warnings are provided to help avoid injury:Warning! Internal Voltage. Always turn off the power switch and unplug the power supply before cleaning the outer surface of the instrument.Warning! Power Rating. The instrument’s power supply must be connected toa power receptacle that provides voltage and current within the specified rating for the system. Use of an incompatible power receptacle may produce electrical shock and fire hazards.Warning! Electrical Grounding. Never use a plug adapter to connect primarypower to the external power supply. Use of an adapter disconnects the utilityground, creating a severe shock hazard. Always connect the power supply directly to an appropriate receptacle with a functional ground.Warning! Service. Only qualified technical personnel should perform service procedures on internal components.Warning! Accessories. Only accessories which meet the manufacturer’s specifications shall be used with the instrument.Warning! Liquids. Avoid spilling liquids on the reader; fluid seepage intointernal components creates a potential for shock hazard or instrument damage. If a spill occurs while a program is running, abort the program and turn off the instrument. Wipe up all spills immediately. Do not operate the instrument if internal components have been exposed to fluid.x | PrefaceWarning! Unspecified Use.Failure to operate this equipment according to theguidelines and safeguards specified in this manual could result in a hazardouscondition.Warning! Software Quality Control. The operator must follow themanufacturer’s assay package insert when modifying software parameters andestablishing reading methods. Failure to conduct quality control checks couldresult in erroneous test data.Warning! Reader Data Reduction Protocol. No limits are applied to the rawabsorbance data. All information exported via computer control must bethoroughly analyzed by the operator.Warning! Potential Biohazards.Some assays or specimens may pose abiohazard. Adequate safety precautions should be taken as outlined in the assay’spackage insert. Always wear safety glasses and appropriate protective equipment,such as chemically resistant rubber gloves and apron.PrecautionsThe following precautions are provided to help avoid damage to the instrument:Caution: Service.The instrument should be serviced by BioTek-authorizedservice personnel. Only qualified technical personnel should perform serviceprocedures on internal components.Caution: Spare Parts. Only approved spare parts should be used formaintenance. The use of unapproved spare parts and accessories may result in aloss of warranty and potentially impair instrument performance or cause damageto the instrument.Caution: Environmental Conditions. Do not expose the instrument totemperature extremes. For proper operation, ambient temperatures shouldremain with the range listed in the Specifications section. Performance may beadversely affected if temperatures fluctuate above or below this range. Storagetemperature limits are broader.Caution: Sodium Hypochlorite.Do not expose any part of the instrument tothe recommended diluted sodium hypochlorite solution (bleach) for more than 20minutes. Prolonged contact may damage the instrument surfaces. Be certain torinse and thoroughly wipe all surfaces.Caution: Power Supply.Only use the power supply shipped with the instru-ment. Operate this power supply within the range of line voltages listed on it.Caution: Disposal. This instrument contains printed circuit boards and wiringwith lead solder. Dispose of the instrument according to Directive 2002/96/EC,“on waste electrical and electronic equipment (WEEE),” or local ordinances.CE Mark | xi Caution: Warranty. Failure to follow preventive maintenance protocols mayvoid the warranty.Caution: Shipping Hardware.All shipping hardware (e.g., carrier shippingbracket) must be removed before operating the instrument and reinstalled beforerepackaging the instrument for shipment.Caution: Electromagnetic Environment. Per IEC 61326-2-6 it is the user’sresponsibility to ensure that a compatible electromagnetic environment for thisinstrument is provided and maintained in order that the device will perform asintended.Caution: Electromagnetic Compatibility. Do not use this device in closeproximity to sources of strong electromagnetic radiation (e.g., unshieldedintentional RF sources), because these may interfere with the proper operation. CE MarkBased on the testing described below and information containedherein, this instrument bears the CE mark.Refer to the Declaration of Conformity for more specific information. Directive 2004/108/EC: Electromagnetic Compatibility Emissions—Class AThe system has been type-tested by an independent, accredited testing laboratory and found to meet the requirements of EN 61326-1: Class A for Radiated Emissions and Line Conducted Emissions. Verification of compliance was conducted to thelimits and methods of EN 55011 – (CISPR) Class A. In a domestic environment itmay cause radio interference, in which case you may need to mitigate theinterference.ImmunityThe system has been type-tested by an independent, accredited testing laboratory and found to meet the requirements of EN 61326-1 and EN 61326-2-6 forImmunity. Verification of compliance was conducted to the limits and methods of the following:EN 61000-4-2, Electrostatic DischargeEN 61000-4-3, Radiated EM FieldsEN 61000-4-4, Electrical Fast Transient/BurstEN 61000-4-5, Surge Immunityxii | PrefaceEN 61000-4-6, Conducted Disturbances from RFIEN 61000-4-11, Voltage Dips, Short Interruptions and Variations Directive 2006/95/EC Low Voltage (Safety)The system has been type-tested by an independent testing laboratory and was foundto meet the requirements of this Directive. Verification of compliance was conducted to the limits and methods of the following:EN 61010-1, “Safety requirement for electrical equipment for measurement, control and laboratory use. Part 1, General requirements.”EN 61010-2-081, “Particular requirements for automatic and semi-automatic laboratory equipment for analysis and other purposes.”EN 61010-2-010, “Particular requirements for laboratory equipment for the heating ofmaterials.”Directive 2002/96/EC: Waste Electrical and Electronic Equipment Disposal Notice: This instrument contains printed circuit boards and wiring with leadsolder. Dispose of the instrument according to Directive 2002/96/EC, “on wasteelectrical and electronic equipment (WEEE)” or local ordinances.Directive 98/79/EC: In Vitro Diagnostics (if labeled for this use) •Product registration with competent authorities.•Traceability to the U.S. National Institute of Standards and Technology (NIST)•EN 61010-2-101, “Particular requirements for in vitro diagnostic (IVD) medical equipment.”Electromagnetic Interference and Susceptibility USA FCC CLASS ARADIO AND TELEVISION INTERFERENCENOTE: This equipment has been tested and found to comply with the limits for a ClassA digital device, pursuant to Part 15 of the FCC Rules. These limits are designed toprovide reasonable protection against harmful interference when the equipment isoperated in a commercial environment. This equipment generates, uses, and canradiate radio frequency energy and, if not installed and used in accordance with theinstruction manual, may cause harmful interference to radio communications.Operation of this equipment in a residential area is likely to cause harmful interference, in which case the user will be required to correct the interference at their own expense.User Safety | xiii In order to maintain compliance with FCC regulations shielded cables must be usedwith this equipment. Operation with non-approved equipment or unshielded cables is likely to result in interference to radio and television reception.Canadian Department of Communications Class AThis digital apparatus does not exceed Class A limits for radio emissions from digitalapparatus set out in the Radio Interference Regulations of the Canadian Department of Communications.Le present appareil numerique n'émet pas de bruits radioélectriques depassant leslimites applicables aux appareils numérique de la Class A prescrites dans le Réglement sur le brouillage radioélectrique édicté par le ministère des Communications duCanada.User SafetyThis device has been type-tested by an independent laboratory and found to meet therequirements of the following:•Underwriters Laboratories UL 61010-1, “Safety requirements for electrical equipment for measurement, control and laboratory use; Part 1: Generalrequirements.”•Canadian Standards Association CAN/CSA C22.2 No. 61010-1, “Safety requirements for electrical equipment for measurement, control and laboratoryuse; Part 1: General requirements.”•EN 61010 Standards, see CE Mark starting on page xi.xiv | PrefaceSafety SymbolsSome of these symbols appear on the instrument or accessories:Safety Symbols | xvIn vitro diagnostic medical device Dispositif médical dediagnostic in vitro Medizinisches In-Vitro-DiagnostikumDispositivo médico de diagnóstico in vitroDispositivo medico diagnostico in vitroSeparate collection for electrical and electronic equipmentLes équipements électriques etélectroniques font l’objet d’une collecte sélectiveGetrennte Sammlung von Elektro- und ElektronikgerätenRecogida selectiva de aparatos eléctricos y electrónicosRaccolta separata delle apparecchiature elettriche ed elettronicheConsult instructions for useConsulter la notice d’emploi Gebrauchsanweisung beachten Consultar las instrucciones de usoConsultare le istruzioni per usoLaser radiation: Do not stare into beam Rayonnement laser: Ne pas regarder dans le faisceauLaserstrahlung: Nicht in den strahl blicken Radiación de láser: No mire fijamente al rayoRadiazione di laser: Non stare nel fascioxvi | PrefaceChapter 1IntroductionThis chapter introduces the Eon and describes its hardware andsoftware features, and technical specifications. Instructions on how to contact BioTek for product support and service are included onpage 4.Product Description (2)Package Contents (3)Optional Accessories (3)Product Support and Service (4)Technical Assistance Center (TAC) (4)2 | Chapter 1: IntroductionProduct DescriptionThe Eon Microplate Spectrophotometer offers tunable wavelength selection and wave-length scanning without the need for interference filters. The single-channel reader iscompletely computer controlled via BioTek’s intuitive and user-friendly Gen5 software.Key features include:• A variety of read modes including endpoint, kinetic, multiwavelength, and spectral scanning.• A monochromator for continuous wavelength selection from 200 to 999 nm in 1-nm increments, and a xenon flash lamp for both UV and visible light absorbancemeasurements.•Superior optical specifications, with an extended dynamic range of up to 4.000 OD.•Ability to read standard microplates from 6- to 384-wells, Terasaki plates (with adapter), BioTek’s patented BioCell quartz vessel for 1-cm measurements, and theBioTek Take3 and Take3 Trio Micro-Volume Plates. Use of microplates other thanthose listed here can result in positioning errors during program execution.•Normal and Sweep reading speeds.•Temperature control from 4°C over ambient to 65°C that ensures superior temperature uniformity necessary for kinetic assays.•Programmable plate shaking that allows for control of shaking intensity and timing.•Optional cuvette port available.•Applications that include ELISA, kinetic enzyme assays, nucleic acid quantitation, A260/A280 ratios, protein analysis and much more.•Robot-accessible carrier. Compatible with BioTek’s optional BioStack Microplate Stacker.See Appendix A for performance and technical specifications.BioTek Instruments, Inc.Package Contents | 3Eon Operator’s Manual Package Contents Part numbers are subject to change. Please contact BioTek Customer Care with any questions. Item Part # Eon Operator’s Manual 1021000 Power supply76077 Power cordvaries according to country of use USB cable, Virtual COM Driver Software75108, 7090204 RS-232 serial cable 75034Screwdriver 01188Optional AccessoriesAccessory availability and part numbers are subject to change. Please contact BioTek Customer Care if you have any questions or visit and use the Accessories search tool. ItemPart # 7-filter Absorbance Test Plate for absorbance measurement testing7260522 Eon Product Qualification (IQ-OQ-PQ) package1020512 BioCell quartz vessel for 1-cm wavelength fixed pathlength absorbance measurements7272051 BioCell adapter plate for containing up to eight BioCells7270512 Terasaki plate adapter for 60-, 72-, and 96-well Terasaki plates7220531Absorbance Liquid Test Solutions:BioTek Wetting Agent Solution (PN 7773002)BioTek QC Check Solution No. 1 (25 mL) orBioTek QC Check Solution No. 1 (125 mL)7773002 7120779 7120782 Take3 Micro-Volume PlateTAKE3 Take3 Trio Micro-Volume PlateTAKE3TRIO Cuvette holder (for EONc) 1020508 The Eon is compatible with the BioStack Microplate Stacker. The BioStack rapidly and systematically transfers a stack of microplates to and from the reader’s microplate carrier. Contact BioTek or visit our website to learn more.4 | Chapter 1: IntroductionProduct Support and ServiceTechnical Assistance Center (TAC)If your instrument or software fails to function properly, if you have questions abouthow to use or maintain our products, or if you need to send an instrument to BioTekfor service or repair, please contact our Technical Assistance Center (TAC).TAC is open from 8:30 AM to 5:30 PM (EST), Monday through Friday, excludingstandard U.S. holidays.Phone: 800-242-4685 or Fax: (802) 654-0638 E-Mail: tac@802-655-4740 Web: Please be prepared to provide the following information:•Your name and company informationm along with a daytime phone or fax number, and/or an email address•The product name, model, and serial number•The basecode software part number and version (available via Gen5 by selecting System > Reader Control > Information)•Gen5 software version information (Help > About Gen5)•For troubleshooting assistance or instruments needing repair, the specific steps that produce your problem, and any error codes displayed (see alsoAppendix B, Error Codes).If you need to return an instrument to BioTek for service or repair, please contact theTAC for a Return Materials Authorization (RMA) number and the shipping address.Repackage the instrument according to the instructions at the end of Chapter 2,Installation.BioTek Instruments, Inc.。
酶标仪简介:酶标仪即酶联免疫检测仪是酶联免疫吸附试验的专用仪器又称微孔板检测器。
可简单地分为半自动和全自动2大类,但其工作原理基本上都是一致的,其核心都是一个比色计,即用比色法来进行分析。
测定一般要求测试液的最终体积在250μL以下,用一般光电比色计无法完成测试,因此对酶标仪中的光电比色计有特殊要求。
酶标仪原理:酶标仪实际上就是一台变相光电比色计或分光光度计,其基本工作原理与主要结构和光电比色计基本相同. 图示是一种单通道自动进样的酶标仪工作原理图.光源灯发出的光波经过滤光片或单色器变成一束单色光,进入塑料微孔极中的待测标本.该单色光一部分被标本吸收,另一部分则透过标本照射到光电检测器上,光电检测器将这一待测标本不同而强弱不同的光信号转换成相应的电信号.电信号经前置放大,对数放大,模数转换等信号处理后送入微处理器进行数据处理和计算,最后由显示器和打印机显示结果. 微处理机还通过控制电路控制机械驱动机构X方向和Y方向的运动来移动微孔板,从而实现自动进样检测过程.而另一些酶标仪则是采用手工移动微孔板进行检测,因此省去了X,Y方向的机械驱动机构和控制电路,从而使仪器更小巧,结构也更简单.微孔板是一种经事先包理专用于放置待测样本的透明塑料板,板上有多排大小均匀一致的小孔,孔内都包埋着相应的抗原或抗体,微孔板上每个小孔可盛放零点几毫升的溶液.光是电磁波,波长100nm~400nm称为紫外光,400nm~780nm之间的光可被人眼观察到,大于780nm称为红外光。
人们之所以能够看到色彩,是因为光照射到物体上被物体反射回来。
绿色植物之所以是绿色,是因为植物吸收的大部分为红橙光和蓝紫光,但对绿色不吸收,反射出来,所以植物呈现为绿色。
酶标仪测定的原理是在特定波长下,检测被测物的吸光值。
随着检测方式的发展,拥有多种检测模式的单体台式酶标仪叫做多功能酶标仪,可检测吸光度(Abs)、荧光强度(FI)、时间分辨荧光(TRF)、荧光偏振(FP)、和化学发光(Lum)。
Gen5简要操作说明
一:新建方案
双击桌面上Gen5软件图标,出现如下界面,新建实验用来选择已经编辑好的方案来读板,新建方案可以编辑新的读板方法。
点击新建方案按钮弹出如下界面
双击Procedure(步骤),弹出如下界面,在此我们可以编辑检测(Read)方法,如吸收光,荧光,发光检测
点击Read,进入下面界面
在此界面,我们可以选择我们需要的吸收光或荧光或发光检测方法,吸收光检测的界面如上,我们只要手动输入测量波长,点击OK,确认就可以。
荧光检测如上,只需选择合适的激发光和发射光滤光片即可。
发光实验的编辑界面。
如第一次做荧光或者发光实验,不知道合适的灵敏度值,可以点击Options按钮,进入自动校正灵敏度设定。
方案编辑完成后取名字,保存。
二:新建实验
方案编辑完成后,我们就可以通过新建实验直接调用方案来检测样品。
选择新建实验
选择需要的方案
选择好方案,如果不需要对方案进行修改,就直接点击读板按钮,进行读板检测。
点READ,出现保存实验数据界面,可以保存在自己的文件夹下面。
如不需要原始的实验数据,也可以点击取消不保存。
保存好实验数据,会出现“把板子放到载板平台上“的对话框,放板后点击确定,仪器会收回载板台,开始读板检测。
三:数据导出
读板过程结束,载板台会弹出,软件上出现读板结果,我们只需要点击Excel导出数据图标,就可以把数据导出到Excel表中,进行后续的数据处理。
浓度计算:
1、双击板布局,出现以下对话框:
通常我们选择背景、分析对照、标准曲线、样品等
2、点击下一步,依次出现本底、分析对照、标准曲线浓度设定、样品设定等,只需要输入
标准品的浓度以及样品的稀释度
稀释度即样品稀释倍数。
点击完成。
3、根据样品板实际布板方式进行布板
完成后点击确定,完成布板。
4、双击点击数据处理
可以进行相应的数据处理,如扣除本底、变量转换等;
5、点击标准曲线
Y轴选择需要引用到标准曲线的数据
选择曲线拟合的方法即拟合方程;
数据导出,选择计算浓度,对于前面设置稀释度的实验,需要勾选浓度×稀释度。
点击确定即可完成设置,检测结束后可以找到对应的结果
四参数分析
1、双击板布局,出现以下对话框,
由于我们没有标准曲线,所以选择样品,然后点击下一步:
在“类型”里面选择“浓度”,输入我们的浓度,如下:
点击完成,开始布局:
复本表示复孔个数,点击右边的框调节微孔板中分布情况,布局。
完成后如下图:
点击确定,完成布板。
2、数据处理部分:
双击数据处理,如下对话框:
点击剂量响应-EC50:
数据导入选择我们需要导入的数据;
曲线拟合选择我们拟合的方程,我们实验选择非线性回归-四参数;
数据导出部分,我们如图设置(对于有标准曲线的实验,我们可以选择计算浓度,来计算我们样品的浓度):最后点击确定。
3、图像编辑:
在数据右侧选择“图形”:
点击最上面的“编辑图形”,如下图:
默认标题可以编辑图形的标题
X轴部分,我们需要编辑X轴显示的坐标轴名称,以及比例显示方式,线性回归为自动即可,剂量效应曲线为对数,所以我们选择对数
Y轴部分,同样可以编辑Y坐标轴的名称,其他可以默认,点击确定。
最终结果如下:
如果想让我们将这次结果整合在一起,我们也可以实现,在上面的长方形框位置,选择“新建图形”,出现如下对话框:
自定义一个名字,布局、X轴、Y轴设置如上面各曲线编辑。
在曲线部分,将我们左边三个曲线添加到右边框中,点击确定:
当然选中一个曲线名称,点击右边框下面的编辑,可以自定义些曲线显示特征。
如果有些孔调点比较严重,我们可以在板布局中清除这个点布局即可。
我们的EC50这个可以在下面表格中找到,X轴值就是我们的EC50值,如下图:
图形导出,点击右侧的Excel图标即可。