奥科网关配置
- 格式:doc
- 大小:2.59 MB
- 文档页数:33

Mediant 1000配置文档一、访问web界面Web页面可以用标准浏览器打开1、打开一个标准浏览器页面2、在地址栏输入网关的ip地址,网关出厂地址:.10.输入完后回车出现下表面界面:3、在User Name和Password中输入用户名和密码(网关默认用户名密码都是Admin) .4、点击Ok按钮就可以进入设备web主界面.二、修改设备ip地址1、在首页中选中Configuration菜单,点击Network Settings—IP Settings打开ip 设置界面,如下图:2、在IP Addresss中填写要设置的ip,Subnet Mask中填写掩码,Defalt GatewayAddress中填写网关.3、填写完成点Submit.三.配置PSTM测参数(信令设置—E1线路两端的信令一定是network side与user side相对应。
不能同时使用一种信令)1、在首页中选中Configuration菜单(选中左上角的Full),点击PSTN Settings—Trunk Settings打开PSTN配置界面,选择第四个E1点击Stop按钮出现如下图界面:Protocol Type选择E1 EURO ISDN,下拉右边的下拉条,把ISDN Termination Side 选择User side,如下图:2、点击上图左下角Apply to all Trunks按钮把配置应用到所有E1,再点击Submit.四、Trunk Group配置1、在首页中选中Configuration,点击Protocol Configuration—Trunk Group—Trunk Group进入Trunk Group设置界面,如图:Module是选择板卡,From Trunk是指从哪个E1开始,To Trunk是到哪个E1结束,Channels是来定义时隙的,Pri的一般都是1-31。
Phone Number不用填,因为E1对用户来说只是通道。
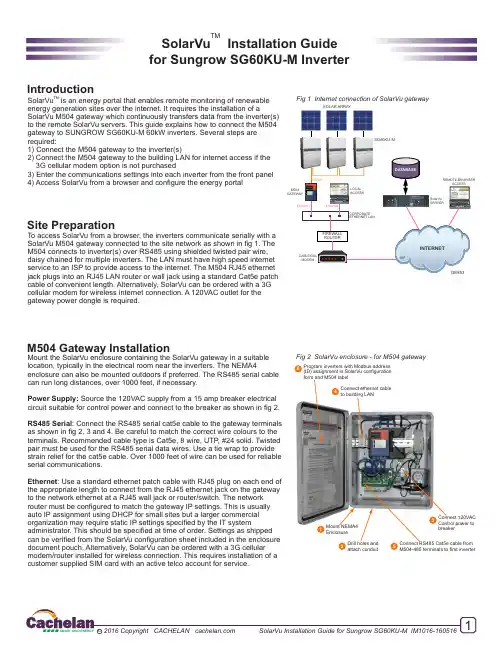
Fig 2 SolarVu enclosure - for M504 gatewayFig 1 Internet connection of SolarVu gatewayLOCAL ACCESSINTERNETREMOTE BROWSERACCESSM504GATEWAYRS485ISPGE853SOLAR ARRAYSG60KU-M1Mount NEMA4Enclosure2Drill holes and attach conduit3Connect 120VAC Control power to breaker4Connect ethernet cable to building LAN5Connect RS485 Cat5e cable from M504-485 terminals to first inverter6Program inverters with Modbus address (ID) assignment in SolarVu configuration form and M504 labelTM SolarVu is an energy portal that enables remote monitoring of renewable energy generation sites over the internet. It requires the installation of aSolarVu M504 gateway which continuously transfers data from the inverter(s) to the remote SolarVu servers. This guide explains how to connect the M504 gateway to SUNGROW SG60KU-M 60kW inverters. Several steps are required:1) Connect the M504 gateway to the inverter(s)2) Connect the M504 gateway to the building LAN for internet access if the 3G cellular modem option is not purchased3) Enter the communications settings into each inverter from the front panel 4) Access SolarVu from a browser and configure the energy portalIntroductionTo access SolarVu from a browser, the inverters communicate serially with a SolarVu M504 gateway connected to the site network as shown in fig 1. The M504 connects to inverter(s) over RS485 using shielded twisted pair wire, daisy chained for multiple inverters. The LAN must have high speed internet service to an ISP to provide access to the internet. The M504 RJ45 ethernet jack plugs into an RJ45 LAN router or wall jack using a standard Cat5e patch cable of convenient length. Alternatively, SolarVu can be ordered with a 3G cellular modem for wireless internet connection. A 120VAC outlet for the gateway power dongle is required.Site PreparationTMSolarVu Installation Guide for Sungrow SG60KU-M InverterMount the SolarVu enclosure containing the SolarVu gateway in a suitable location, typically in the electrical room near the inverters. The NEMA4enclosure can also be mounted outdoors if preferred. The RS485 serial cable can run long distances, over 1000 feet, if necessary.Power Supply: Source the 120VAC supply from a 15 amp breaker electrical circuit suitable for control power and connect to the breaker as shown in fig 2.RS485 Serial : Connect the RS485 serial cat5e cable to the gateway terminals as shown in fig 2, 3 and 4. Be careful to match the correct wire colours to the terminals. Recommended cable type is Cat5e, 8 wire, UTP , #24 solid. Twisted pair must be used for the RS485 serial data wires. Use a tie wrap to provide strain relief for the cat5e cable. Over 1000 feet of wire can be used for reliable serial communications.Ethernet : Use a standard ethernet patch cable with RJ45 plug on each end of the appropriate length to connect from the RJ45 ethernet jack on the gateway to the network ethernet at a RJ45 wall jack or router/switch. The network router must be configured to match the gateway IP settings. This is usually auto IP assignment using DHCP for small sites but a larger commercial organization may require static IP settings specified by the IT systemadministrator. This should be specified at time of order. Settings as shipped can be verified from the SolarVu configuration sheet included in the enclosure document pouch. Alternatively, SolarVu can be ordered with a 3G cellular modem/router installed for wireless connection. This requires installation of a customer supplied SIM card with an active telco account for service.M504 Gateway InstallationGE855Screw TerminalFig 3 SG60KU-M Comm BoardFig 4 M504 to Sungrow SG60KU-M RS485 wiringCommunication boardinside SG60KU-M inverterUse outdoor grade cat5e cable to connect between SolarVuM504-485 Comm board and the inverters as shown in Fig 4.The SG60KU-M inverter communication board comes with twotypes of connections - screw terminals and RJ45 jacks. Use thescrew terminals for SolarVu communication.After wiring is complete, refer to fig 5 in the next page toconfigure the communication settings and address in eachinverter.Inverter Communication WiringON ON ON*GE856 RS485 Connector1. Press to enter the Menu screenENTER 2. Press to move the cursor to “Set-param” and confirm by pressing ENTER3. A password confirmation screen will show up. Press to move cursor right and Press to input the password “111111"4. Press to confirm the password and enter the “Set-param” sub menuENTER 5. Press to move the cursor to “Com-param” and press ENTER ENTER6. Press to move the cursor to “Modbus param” and press7. Press and use to set the address to the desired value. Typically, set address to match ENTER the inverter #. i.e. set 1 for inverter #1, 2 for inverter #2 etc. Address settings can be found in the configuration sheet in the SolarVu document pouch. When done, press to return to the ESC previous menu.8. Press to move the cursor to “Uart param” and confirm by pressing ENTER9. Make sure the Baud is set to “9600", Parity is set to “NO” and Stop bit is set to “1". When done, press to return to the previous menu.ESC Configuration StepsPress for less than 2 secondsPress for more than 2 secondsMove upwards or downwards or scrollto as “Press ”.Return to the previous menu or cancel the command. Hereinafter, it is referred to as “Press ”ESC Press for less than 2 secondsPress for more than 2 secondsit is referred to as “Press ”.Enter into the sub-menu or confirm the command.Hereinafter, it is referred to as “Press ”ENTER Button Functions and DescriptionFig 5 SG60KU-M inverter communication configuration setupTesting the SystemAt this point the installation should be complete and ready for testing. It is helpful to have access to a PC that is connected to the internet for viewing SolarVu screens. Using the URL supplied for the system. The gateway is preconfigured to automatically send inverter data to the SolarVu servers. To do this it must first establish an internet connection. Then it will collect data from the inverters and periodically transmit it. Verifying correct operation is described in the sections that follow. Indicator lights and actual values accessible from the SolarVu Analyzer > Inverter Status screen Fig 6 are useful for determining the status of the system.To access the inverter status screen, enter the SolarVu URL in your browserclick ANALYZERInverter StatusTime of last update receivedfrom the M504 gatewayMeasured valuesfrom the inverterAlarms and status reported by the inverterLight is green if M504 gateway is reading valid datafrom the inverter over RS485. M504 must be connectedto the internet.Light is green if M504 gateway is connected to the internet Time of last communication. M504 sends an update every 10 minutes.Fig 6 Use the ANALYZER > Inverter Status screen to check system statusNetwork SetupOn power up, the gateway looks for a DHCP server to provide it a dynamic IP address. If a PC connected to the network can automatical-ly connect to the internet through a browser then the network is already configured to accept the gateway. If a dedicated IP address was programmed instead, subnet mask and DNS server address are required. This needs to be entered into the gateway before work configuration is shown on the gateway label and the Configuration Settings page in the doc pouch. Once the gateway receives its IP address it acts as a client. It will automatically try to connect to the SolarVu server and begin transferring data from the inverter to the server.504-485 Comm BoardPORT1PORT2PORT3PORT4485 serial communication portsInverter is normally connected to PORT1.See SLD drawing in doc pouch for detailsBlue data LED flashes when transmitting and receiving Power OFF-no power ON-power OK Ready ON M504 booted up and running Link/ActOFF-no ethernet connection FLASH- data traffic activityP1P2P3P4INDICATOR STATUSLED NORMAL STATUSIP Address Obtain IP by DHCP or set static IPNetwork must be configured to same settings SerialCheck inverter connected to correct port.Polarity of serial twisted pair wires.Serial ID entered correctly in each inverter InverterPowered on.Serial ID has been set to match SLD drawing.Serial wiring correct.Internet Internet connection for ISP to LAN working SupportFor Cachelan technical support **************************************TROUBLESHOOTING CHECKLISTGE829Serial Port 1 usually inverterT ransmit=orange, Receive=green, flashing Serial Port 2 usually option T ransmit=orange, Receive=green, flashing Serial Port 3 usually option T ransmit=orange, Receive=green, flashing Serial Port 4 usually option T ransmit=orange, Receive=green, flashingFig 7 M504 Gateway IndicatorsGE828Site Summary ScreenVisit for a features videoHelp guideLIVE view shows current conditionsANALYSER - select performance views from pulldownSite ScreenFor a summary of information about the site, click the SITE menu button. On the upper left, the current charging status of the solar panels, total power being gen-erated now and in the last 30 days is displayed. Underneath, the carbon footprint of energy equivalents is displayed since startup. Links to other websites can be left as defaults or changed in SETUP to personal preferences. The local weather ***************************************************.Forviewingona widescreen TV suitable for display in a public place, click the WIDE PAGE button. On the right is a slideshow for public viewing. Content can be personalized using uploaded graphics in SETUP .Live DataClick the LIVE menu button to display current power being generated in the array. Actual power and energy generated today are shown on the meter dial. For a normally operating system, the status indicator should be green with the last update time less than 15 minutes ago. Lifetime energy and revenue are shown digitally. For correct revenue display, the sell price per kWh must be entered in SETUP . If connection to the site is lost, or if an alarm is detected, the status indicator will be red. Click the Listen button with sound on for more information.Trends are shown for the lifetime of the system using the graphs on the right. Select either an Energy or Revenue view using the button. Click the desired time period under the graph. Scroll over a data point with the mouse for more detailed information about that day. The carbon footprint pulldown gives energy equivalents for the solar power generated for the selected time period.Analyzer - PerformanceClick the ANALYZER menu button and select a category in the pulldown menu and a time period under the graph. The carbon footprint will compute the energy equivalents to the solar energy generated over the selected time period. This helps visitors get a practical feel for the benefits available. To find the carbon equivalent for an arbitrary value, override the actual solar amount by entering a kWh value and selecting a category, then click the Cal-culator button. Other views including buy/sell energy use, performance and payback can be selected within the pulldown menu. The screen will return Video TourFor an overview of available features, visit and play the What to the last value selected on return.is SolarVu video. Each screen has a HELP button that explains how all the features work. An online help guide is available for printing under SETUP >DOWNLOADS > PRINTED HELP .Select wide screen view for pub-lic display on an HDTV。

奥科网关使用手册北京英立讯科技有限公司Zinglabs Beijing Co.,Ltd1 配置网关IP (4)1.1登陆web修改IP (4)1.2 使用BootP-tftp软件修改IP (4)1.2.1 设置软件参数 (4)1.2.2 修改IP (5)2 MP114配置端口呼入、呼出 (6)2.1 Protocol Management — Protocol Definition — DTMF&Dialing (6)2.2 Protocol Management — Advanced Applications — FXO Settings (7)2.3 Protocol Management — Endpoint Phone Numbers (8)2.4 Protocol Management — Hunt Group Settings (8)2.5 Protocol Management — Endpoint Settings — Automatic Dialing (9)2.6 Protocol Management — Routing Tables — Tel to IP Routing (10)2.7 Protocol Management — Routing Tables — IP to Trunk Group Routing .. 102.8 Protocol Management — Advanced Parameters — Supplementary Services 112.9 Maintenance (12)2.10 Advanced Configuration — Configuration File (12)3 MO118-FXS与MO118-FXO配置端口呼入、呼出 (13)3.1 Protocol Management-Routing Tables-Tel to IP Routing (13)3.2 Protocol Management-Routing Tables-IP to Hunt Group Routing (14)3.3 Protocol Management-Endpoint Phone Numbers (16)3.4 Protocol Management — Advanced Applications — FXO Settings (17)3.5 Protocol Management-Endpoint Settings—Automatic Dialing (17)3.6 Advanced Configuration-Media Settings-Voice Settings (18)3.7 传送主叫号码设置 (19)3.7.1 Protocol Management—EndpointSettings—Generate Caller ID to Tel193.7.2 Protocol Management—EndpointSettings—Caller ID Permissions .. 203.7.3 Protocol Management—Advanced Parameters—Supplementary Services213.7.4 Protocol Management—Advanced Parameters—Supplementary Services213.7.5 Advanced Configuration — Media Settings — Fax/Modem/CID settings (22)4 奥科软座席设置 (23)4.1 修改IP地址 (23)4.2 调节增益 (23)4.3 设置电话号码位数 (24)4.4 设置SAS (25)4.5 设置Tel to IP Routing (25)4.6 设置IP To Hunt Group Routing Table (26)4.7 设置自动外拨 (27)4.8 设置本端号码 (27)4.9 设置拨号模式 (28)4.10 设置 Hunt Group Settings (29)4.11 保存重启 (29)4.12 配置文件导入导出 (30)5 奥科中继网关的常见问题解决办法 (30)5.1 拿到 AudioCodes 中继网关后应该用什么方式登陆到中继网关里? (30)5.2 Audio Codes 不同型号的中继网关默认 IP 是多少? (30)5.3 Audio Codes 中继网关默认登陆用户名和密码是多少? (30)5.4 如果忘记 IP 地址后应该怎样登陆? (31)5.5 中继网关已经可以登陆进去了,怎么把默认的中继网关 IP 改为公网 IP 地址?315.6 如果有一台中继网关正在使用,我想把另一台 AudioCodes 中继网关配置成相同配置,但我不知道怎么配置,怎么办? (31)5.7 如何更改 AudioCodes 默认密码? (31)5.8 如何改变 WEB 页面登陆默认 8080 端口? (31)5.9 如果通话中感觉有回音怎么办? (31)5.10 如果通话时感觉声音较小怎么办? (32)5.11 如果通话正常,但拨分机不能切断拨号音怎么办? (32)5.12 如果使用 SIP 协议时,回铃消息为 180 时怎么办? (32)5.13 传真无法发送成功 (32)1 配置网关IP1.1登陆web修改IPAudioCodes 的所有型号中继网关默认IP 为10.1.10.10 ,TP1610/SB1610 中继网关默认IP 为10.1.10.10 与10.1.10.11 登录web修改,用户名:Admin,密码:Admin。

AudioCodes 奥科 BootP使用手册本帖最后由 turbot 于 2009-12-21 16:58 编辑BootP 为AudioCodes (奥科) 官方提供的对奥科产品进行强制性软件更新/IP更新/密码清空/INI配置文件更新的操作软件,以下为各个功能的操作步骤说明注:以下功能可以分别按实际情况单个使用,也可同时一起进行操作,主要按实际情况进行更新即可AudioCodes 设备版本升级流程第一步、准备工作:一台笔记本(必须使用固定IP 地址)、一根交叉线第二步、在笔记本上安装BOOTP软件、然后用交叉线把笔记本和中继网关连接起来第三步、打开BOOTP软件先设置一下基本参数Edit-->Preferences对话框中设置如下图on interface:下边的IP 地址默认是你本机的地址,如果不是说明您的电脑没有使用固定IP 地址,请先设置IP 地址以后再运行该软件;Directory:这里的所指的路径是中继网关CMP软件和INI配置文件所在的文件夹(绝对路径),CMP文件和INI文件可以到本站论坛转贴下载相关的文件ARP Manipulation Enabled 打勾其它保持默认即可第四步:设置常用工具栏如下图所示:002图将所有工具栏菜单按钮按上来,不必参照上图所示第五步:重启奥科设备,bootp将自动收到当前网关的MAC地址第六步:点击常用菜单栏中的“编辑客户端”(图002左边起第二个按钮)出现如下对话框003图第七步:点击客户端配置对话框中的“添加新的客户端”(003图左边起第一个按钮)如现如下对话框第八步:添写右边对话框信息:Client MAC:指定网关的MAC地址 #即所要配置的中继网关MAC地址,中继网关前面板有MAC地址Client Name:针对这个MAC地址起一个名称,但不能和已有客户端名称重复,可以随便添一个Template:保持默认即可IP:这里添的是你要给中继网关指定的IP地址,必须和你笔记本的IP地址在同一网段,例如你的笔记本IP地址192.168.1.100那么这里的IP地址应该添写192.168.1.XSubnet:这里的子网掩码必须和你笔记本的子网掩码一样Gateway:默认网关设为和你电脑一样就可以了,也可以不设TFTP Server IP:这里默认是你电脑的IP地址,如果不是说明你本机没有使用固定IP地址,请关掉BOOTP软件重新设置本地IP地址Boot File:选中下拉列表中的文件名,在后边加一个空格–fb(例:Mediant2000_H323_460_018_008.cmp –fb)INI File:选中下拉列表中的INI文件(例:tp1610ok.ini)第九步:点击Apply 再点击OK,BOOTP软件不要关掉,然后把中继网关电源断掉,等待五秒钟之后再开启中继网关电源第十步:正常的话几秒钟之内BOOTP软件的视图区会出现信息,(包含MAC地址和IP地址等信息)同时会提示软件刷新新进度100%第十一步:大约等60秒就可能通过刚刚指定的IP地址访问中继网关了,这样你就可以在WEB界面下边修改其它参数了。


基带EOC配置手册湖南鼎新沃克信息技术有限公司目 录第一章 配置准备 (1)第一节交换机端口编号 (1)第二节启动交换机之前 (1)第三节获得帮助 (2)第四节命令模式 (2)第五节撤销命令 (3)第六节保存配置 (3)第二章 设备配置实例 (4)第一节超级终端方式 (4)第二节设备命名 (7)第三节配置AAA认证 (7)第四节配置设备管理VLAN (7)第五节配置管理地址(默认网关) (8)第六节配置端口VLAN(内层标签) (8)第七节配置接入口与级联口为trunk口(中继端口) (9)第八节配置简单网络管理协议 (10)第九节保存配置 (10)第十节显示配置 (10)第十一节特别注意 (15)第三章 设备测试 (15)第一节调试前的准备工作 (15)第二节头端调试 (15)第三节终端入户调试 (16)第一章 配置准备本文档主要描述了您在第一次配置交换机时需要熟悉的信息,包括端口编号、启动交换机之前需要的工作以及命令行界面介绍。
z交换机的端口编号z启动交换机之前z获得帮助z命令模式z撤销命令z保存配置第一节交换机端口编号交换机物理端口的编号按照<type><slot>/<port>的形式,类型与名称的对照表为:接口类型 名称 简称10M以太网 Ethernet e 100M快速以太网 FastEthernet f1000M以太网 GigaEthernet g 标配端口的扩展槽号固定为0,其它扩展槽依照自左至右的次序从1开始编号。
在同一扩展槽的端口号一律由下至上,从左至右依次从1开始编号。
如果只存在一个端口,port 号为1。
注:对于各种模块内的端口,由下至上,从左至右按顺序依次编号。
第二节启动交换机之前在你打开交换机电源开始配置之前,请确认以下几步:按照手册的要求设置好交换机的硬件。
配置PC终端仿真程序。
对于IP网络协议,首先决定IP地址规划。
第三节获得帮助使用问号(?)和方向键,可以帮助您输入命令:z输入一个问号,获得当前可用的命令列表Switch> ?z输入若干已知字符,紧接着输入问号(无空格),显示当前可用的已知字符开头的命令列表。
Net-Net® 9000 EMSConfiguration GuideRelease Version 6.0 Acme Packet, Inc.71 Third AvenueBurlington, MA 01803 USAt 781-328-4400f 781-425-5077Last Updated: July 16, 2008Document Number: 400-0084-60 Rev. 1.0.0Notices©2002—2008 Acme Packet, Inc., Burlington, Massachusetts. All rights reserved. Acme Packet®, Session Aware Networking®, Net-Net®, and related marks are registered trademarks of Acme Packet, Inc. All other brand names are trademarks, registered trademarks, or service marks of their respective companies or organizations. Patents Pending, Acme Packet, Inc.The Acme Packet Documentation Set and the Net-Net systems described therein are the property of Acme Packet, Inc. This documentation is provided for informational use only, and the information contained within the documentation is subject to change without notice.Acme Packet, Inc. shall not be liable for any loss of profits, loss of use, loss of data, interruption of business, nor for indirect, special, incidental, consequential, or exemplary damages of any kind, arising in any way in connection with the Acme Packet software or hardware, third party software or hardware, or the documentation. Some jurisdictions do not allow the exclusion or limitation of incidental or consequential damages, so the above exclusions may not apply. These limitations are independent from all other provisions and shall apply notwithstanding the failure of any remedy provided herein.Copying or reproducing the information contained within this documentation without the express written permission of Acme Packet, Inc., 71 Third Avenue, Burlington, MA 01803, USA is prohibited. No part may be reproduced or retransmitted.Acme Packet Net-Net products are protected by one or more of the following patents: United States: 7072303, 7028092, 7002973, 7133923, 7031311, 7142532, 7151781. France: 1342348, 1289225, 1280297, 1341345, 1347621. Germany: 1342348, 1289225, 1280297, 1341345, 1347621. United Kingdom: 1342348, 1289225, 1280297, 1341345, 1347621. Other patents are pending.ContentsAbout this Guide . . . . . . . . . . . . . . . . . . . . . . . . . . . . . . . . . . . . . . . . . . . . . . . . . 19Overview . . . . . . . . . . . . . . . . . . . . . . . . . . . . . . . . . . . . . . . . . . . . . . . . . . . . . . . . . . . . . . . . . . . . . . .19 Configuring Different Versions of Net-Net SBCs . . . . . . . . . . . . . . . . . . . . . . . . . . . . . . . . . . . .19Configuration Timestamp . . . . . . . . . . . . . . . . . . . . . . . . . . . . . . . . . . . . . . . . . . . . . . . . . . . . . . .19Who is Acme Packet?. . . . . . . . . . . . . . . . . . . . . . . . . . . . . . . . . . . . . . . . . . . . . . . . . . . . . . . . . . .20 Associated Documentation . . . . . . . . . . . . . . . . . . . . . . . . . . . . . . . . . . . . . . . . . . . . . . . . . . . . . . .20 Customer Questions, Comments, or Suggestions. . . . . . . . . . . . . . . . . . . . . . . . . . . . . . . . . . . .21Contact Us. . . . . . . . . . . . . . . . . . . . . . . . . . . . . . . . . . . . . . . . . . . . . . . . . . . . . . . . . . . . . . . . . . . .21 3Getting Started. . . . . . . . . . . . . . . . . . . . . . . . . . . . . . . . . . . . . . . . . . . . . . . . . . . 21Introduction. . . . . . . . . . . . . . . . . . . . . . . . . . . . . . . . . . . . . . . . . . . . . . . . . . . . . . . . . . . . . . . . . . . . .21 Using the Net-Net EMS to Configure the Net-Net SBC . . . . . . . . . . . . . . . . . . . . . . . . . . . . . .21Configuration Timestamp . . . . . . . . . . . . . . . . . . . . . . . . . . . . . . . . . . . . . . . . . . . . . . . . . . . . . . .21Filtering Configuration Tables. . . . . . . . . . . . . . . . . . . . . . . . . . . . . . . . . . . . . . . . . . . . . . . . . . . .22 Installation and Start-Up . . . . . . . . . . . . . . . . . . . . . . . . . . . . . . . . . . . . . . . . . . . . . . . . . . . . . . . . .24 Hardware Installation Summary. . . . . . . . . . . . . . . . . . . . . . . . . . . . . . . . . . . . . . . . . . . . . . . . . .24Connecting to Your Net-Net SBC System . . . . . . . . . . . . . . . . . . . . . . . . . . . . . . . . . . . . . . . . . .24 Local Connections and Time-outs . . . . . . . . . . . . . . . . . . . . . . . . . . . . . . . . . . . . . . . . . . . . .24Telnet Remote Connections and Time-outs. . . . . . . . . . . . . . . . . . . . . . . . . . . . . . . . . . . . . .25Connecting Using Telnet through Net-Net EMS . . . . . . . . . . . . . . . . . . . . . . . . . . . . . . . . .26SSH Remote Connections . . . . . . . . . . . . . . . . . . . . . . . . . . . . . . . . . . . . . . . . . . . . . . . . . . . .27SSH Through Net-Net EMS . . . . . . . . . . . . . . . . . . . . . . . . . . . . . . . . . . . . . . . . . . . . . . . . . .27 System Boot. . . . . . . . . . . . . . . . . . . . . . . . . . . . . . . . . . . . . . . . . . . . . . . . . . . . . . . . . . . . . . . . . . .29 Net-Net SBC Boot Parameters. . . . . . . . . . . . . . . . . . . . . . . . . . . . . . . . . . . . . . . . . . . . . . . . . . . . .30 Displaying Boot Parameters. . . . . . . . . . . . . . . . . . . . . . . . . . . . . . . . . . . . . . . . . . . . . . . . . . . . . .30Changing Boot Parameters . . . . . . . . . . . . . . . . . . . . . . . . . . . . . . . . . . . . . . . . . . . . . . . . . . . . . .32 Using the ACLI. . . . . . . . . . . . . . . . . . . . . . . . . . . . . . . . . . . . . . . . . . . . . . . . . . . . . . . . . . . . .32Interrupting Boot in Progress. . . . . . . . . . . . . . . . . . . . . . . . . . . . . . . . . . . . . . . . . . . . . . . . . .33Virtual IP Address for Management . . . . . . . . . . . . . . . . . . . . . . . . . . . . . . . . . . . . . . . . . . . .34 Setting Up System Basics . . . . . . . . . . . . . . . . . . . . . . . . . . . . . . . . . . . . . . . . . . . . . . . . . . . . . . . . .35Version 6.0 Net-Net 9200 EMS Configuration Guide 3NTP Synchronization. . . . . . . . . . . . . . . . . . . . . . . . . . . . . . . . . . . . . . . . . . . . . . . . . . . . . . . . . . .35 Configuring the Time Zone . . . . . . . . . . . . . . . . . . . . . . . . . . . . . . . . . . . . . . . . . . . . . . . . . . .36 About Your Net-Net SBC Image. . . . . . . . . . . . . . . . . . . . . . . . . . . . . . . . . . . . . . . . . . . . . . . . . . .38 Obtaining a New Image. . . . . . . . . . . . . . . . . . . . . . . . . . . . . . . . . . . . . . . . . . . . . . . . . . . . . . . . .38Using FTP to Copy an Image on Your Net-Net SBC. . . . . . . . . . . . . . . . . . . . . . . . . . . . . . . . . .38 System Image Filename . . . . . . . . . . . . . . . . . . . . . . . . . . . . . . . . . . . . . . . . . . . . . . . . . . . . . .39 Booting an Image on Your Net-Net SBC. . . . . . . . . . . . . . . . . . . . . . . . . . . . . . . . . . . . . . . . . . . .40 Booting from Flash Memory . . . . . . . . . . . . . . . . . . . . . . . . . . . . . . . . . . . . . . . . . . . . . . . . . . . . .40Booting from an External Device. . . . . . . . . . . . . . . . . . . . . . . . . . . . . . . . . . . . . . . . . . . . . . . . . .41 Software Licensing. . . . . . . . . . . . . . . . . . . . . . . . . . . . . . . . . . . . . . . . . . . . . . . . . . . . . . . . . . . . . . .42 Unlicensed Net-Net SBCs . . . . . . . . . . . . . . . . . . . . . . . . . . . . . . . . . . . . . . . . . . . . . . . . . . . . . . .43Obtaining a License . . . . . . . . . . . . . . . . . . . . . . . . . . . . . . . . . . . . . . . . . . . . . . . . . . . . . . . . . . . .43 Trial Licenses. . . . . . . . . . . . . . . . . . . . . . . . . . . . . . . . . . . . . . . . . . . . . . . . . . . . . . . . . . . . . . .43 Adding Licenses . . . . . . . . . . . . . . . . . . . . . . . . . . . . . . . . . . . . . . . . . . . . . . . . . . . . . . . . . . . . . . .43Deleting Licenses . . . . . . . . . . . . . . . . . . . . . . . . . . . . . . . . . . . . . . . . . . . . . . . . . . . . . . . . . . . . . .44Expiration. . . . . . . . . . . . . . . . . . . . . . . . . . . . . . . . . . . . . . . . . . . . . . . . . . . . . . . . . . . . . . . . . . . . .45Viewing Licenses . . . . . . . . . . . . . . . . . . . . . . . . . . . . . . . . . . . . . . . . . . . . . . . . . . . . . . . . . . . . . .45 RADIUS Authentication. . . . . . . . . . . . . . . . . . . . . . . . . . . . . . . . . . . . . . . . . . . . . . . . . . . . . . . . . .46 How It Works . . . . . . . . . . . . . . . . . . . . . . . . . . . . . . . . . . . . . . . . . . . . . . . . . . . . . . . . . . . . . . . . .46PAP Handshake . . . . . . . . . . . . . . . . . . . . . . . . . . . . . . . . . . . . . . . . . . . . . . . . . . . . . . . . . . . . . . .47 PAP Client Request Example. . . . . . . . . . . . . . . . . . . . . . . . . . . . . . . . . . . . . . . . . . . . . . . . . .47PAP RADIUS Response. . . . . . . . . . . . . . . . . . . . . . . . . . . . . . . . . . . . . . . . . . . . . . . . . . . . . .48 CHAP Handshake . . . . . . . . . . . . . . . . . . . . . . . . . . . . . . . . . . . . . . . . . . . . . . . . . . . . . . . . . . . . .48 CHAP Client Request Example . . . . . . . . . . . . . . . . . . . . . . . . . . . . . . . . . . . . . . . . . . . . . . . .48CHAP RADIUS Response . . . . . . . . . . . . . . . . . . . . . . . . . . . . . . . . . . . . . . . . . . . . . . . . . . . .48 MS-CHAP-v2 Handshake. . . . . . . . . . . . . . . . . . . . . . . . . . . . . . . . . . . . . . . . . . . . . . . . . . . . . . .48 MS-CHAP-v2 Client Request Example . . . . . . . . . . . . . . . . . . . . . . . . . . . . . . . . . . . . . . . . .49MS-CHAP-v2 RADIUS Response. . . . . . . . . . . . . . . . . . . . . . . . . . . . . . . . . . . . . . . . . . . . . .49 Management Protocol Behavior . . . . . . . . . . . . . . . . . . . . . . . . . . . . . . . . . . . . . . . . . . . . . . . . . .49 Configuring RADIUS Authentication . . . . . . . . . . . . . . . . . . . . . . . . . . . . . . . . . . . . . . . . . . . . . .50 RADIUS Server Settings. . . . . . . . . . . . . . . . . . . . . . . . . . . . . . . . . . . . . . . . . . . . . . . . . . . . . .514System Configuration. . . . . . . . . . . . . . . . . . . . . . . . . . . . . . . . . . . . . . . . . . . . . 49 Introduction. . . . . . . . . . . . . . . . . . . . . . . . . . . . . . . . . . . . . . . . . . . . . . . . . . . . . . . . . . . . . . . . . . . . .49General System Information . . . . . . . . . . . . . . . . . . . . . . . . . . . . . . . . . . . . . . . . . . . . . . . . . . . . . .49 Configuring General System Information . . . . . . . . . . . . . . . . . . . . . . . . . . . . . . . . . . . . . . . . . .49 System Description and Location . . . . . . . . . . . . . . . . . . . . . . . . . . . . . . . . . . . . . . . . . . . . . .50 Physical Interfaces . . . . . . . . . . . . . . . . . . . . . . . . . . . . . . . . . . . . . . . . . . . . . . . . . . . . . . . . . . . . . . .50 Overview. . . . . . . . . . . . . . . . . . . . . . . . . . . . . . . . . . . . . . . . . . . . . . . . . . . . . . . . . . . . . . . . . . . . .50Types of Physical Interfaces. . . . . . . . . . . . . . . . . . . . . . . . . . . . . . . . . . . . . . . . . . . . . . . . . . . . . .50 4 Net-Net 9200 EMS Configuration Guide Version 6.0Slot and Card Location. . . . . . . . . . . . . . . . . . . . . . . . . . . . . . . . . . . . . . . . . . . . . . . . . . . . . . . . . .51 Management Interfaces . . . . . . . . . . . . . . . . . . . . . . . . . . . . . . . . . . . . . . . . . . . . . . . . . . . . . .51 Before You Configure. . . . . . . . . . . . . . . . . . . . . . . . . . . . . . . . . . . . . . . . . . . . . . . . . . . . . . . . . . .52 Configuring Physical Interfaces . . . . . . . . . . . . . . . . . . . . . . . . . . . . . . . . . . . . . . . . . . . . . . . . . . .52 Configuring Physical Interfaces. . . . . . . . . . . . . . . . . . . . . . . . . . . . . . . . . . . . . . . . . . . . . . . . . . .52 Configuring the Physical Interface . . . . . . . . . . . . . . . . . . . . . . . . . . . . . . . . . . . . . . . . . . . . .53 Network Interfaces. . . . . . . . . . . . . . . . . . . . . . . . . . . . . . . . . . . . . . . . . . . . . . . . . . . . . . . . . . . . . . .54 Overview. . . . . . . . . . . . . . . . . . . . . . . . . . . . . . . . . . . . . . . . . . . . . . . . . . . . . . . . . . . . . . . . . . . . .54IP Configuration . . . . . . . . . . . . . . . . . . . . . . . . . . . . . . . . . . . . . . . . . . . . . . . . . . . . . . . . . . . . . . .54 VLANs . . . . . . . . . . . . . . . . . . . . . . . . . . . . . . . . . . . . . . . . . . . . . . . . . . . . . . . . . . . . . . . . . . . .54VLAN Network Layer Segmentation . . . . . . . . . . . . . . . . . . . . . . . . . . . . . . . . . . . . . . . . . . .55Overlapping Networks. . . . . . . . . . . . . . . . . . . . . . . . . . . . . . . . . . . . . . . . . . . . . . . . . . . . . . .55HIP. . . . . . . . . . . . . . . . . . . . . . . . . . . . . . . . . . . . . . . . . . . . . . . . . . . . . . . . . . . . . . . . . . . . . . .55 Configuring Network Interfaces . . . . . . . . . . . . . . . . . . . . . . . . . . . . . . . . . . . . . . . . . . . . . . . . . .55 Special Considerations. . . . . . . . . . . . . . . . . . . . . . . . . . . . . . . . . . . . . . . . . . . . . . . . . . . . . . .55Configuring the Network Interface. . . . . . . . . . . . . . . . . . . . . . . . . . . . . . . . . . . . . . . . . . . . .56Configuring a HIP Interface. . . . . . . . . . . . . . . . . . . . . . . . . . . . . . . . . . . . . . . . . . . . . . . . . . .57Enabling Management Traffic . . . . . . . . . . . . . . . . . . . . . . . . . . . . . . . . . . . . . . . . . . . . . . . . .58 SNMP . . . . . . . . . . . . . . . . . . . . . . . . . . . . . . . . . . . . . . . . . . . . . . . . . . . . . . . . . . . . . . . . . . . . . . . . . .58 Overview. . . . . . . . . . . . . . . . . . . . . . . . . . . . . . . . . . . . . . . . . . . . . . . . . . . . . . . . . . . . . . . . . . . . .58 Basic SNMP Parameters. . . . . . . . . . . . . . . . . . . . . . . . . . . . . . . . . . . . . . . . . . . . . . . . . . . . . .58SNMP Community. . . . . . . . . . . . . . . . . . . . . . . . . . . . . . . . . . . . . . . . . . . . . . . . . . . . . . . . . .59Trap Receivers. . . . . . . . . . . . . . . . . . . . . . . . . . . . . . . . . . . . . . . . . . . . . . . . . . . . . . . . . . . . . .59 Configuring SNMP . . . . . . . . . . . . . . . . . . . . . . . . . . . . . . . . . . . . . . . . . . . . . . . . . . . . . . . . . . . . . .59 SNMP Configuration Overview . . . . . . . . . . . . . . . . . . . . . . . . . . . . . . . . . . . . . . . . . . . . . . . . . .59SNMP Configuration . . . . . . . . . . . . . . . . . . . . . . . . . . . . . . . . . . . . . . . . . . . . . . . . . . . . . . . . . . .59 SNMP Community Configuration. . . . . . . . . . . . . . . . . . . . . . . . . . . . . . . . . . . . . . . . . . . . . .61 Alarm Thresholds. . . . . . . . . . . . . . . . . . . . . . . . . . . . . . . . . . . . . . . . . . . . . . . . . . . . . . . . . . . . . . . .64 Configuring Alarm Thresholds . . . . . . . . . . . . . . . . . . . . . . . . . . . . . . . . . . . . . . . . . . . . . . . . . . .64 HDR Trap for Data Push Success . . . . . . . . . . . . . . . . . . . . . . . . . . . . . . . . . . . . . . . . . . . . . . . . . .65 Configuring HDR Data Push Success Trap . . . . . . . . . . . . . . . . . . . . . . . . . . . . . . . . . . . . . . . . .65 Persistent Protocol Tracing. . . . . . . . . . . . . . . . . . . . . . . . . . . . . . . . . . . . . . . . . . . . . . . . . . . . . . . .66 About Persistent Protocol Tracing. . . . . . . . . . . . . . . . . . . . . . . . . . . . . . . . . . . . . . . . . . . . . . . . .66About the Logs . . . . . . . . . . . . . . . . . . . . . . . . . . . . . . . . . . . . . . . . . . . . . . . . . . . . . . . . . . . . . . . .66 Process Logs . . . . . . . . . . . . . . . . . . . . . . . . . . . . . . . . . . . . . . . . . . . . . . . . . . . . . . . . . . . . . . .66Communication Logs. . . . . . . . . . . . . . . . . . . . . . . . . . . . . . . . . . . . . . . . . . . . . . . . . . . . . . . .67Protocol Trace Logs. . . . . . . . . . . . . . . . . . . . . . . . . . . . . . . . . . . . . . . . . . . . . . . . . . . . . . . . . .67 Configuring Persistent Protocol Tracing. . . . . . . . . . . . . . . . . . . . . . . . . . . . . . . . . . . . . . . . . . . .67 Syslog and Process Logs. . . . . . . . . . . . . . . . . . . . . . . . . . . . . . . . . . . . . . . . . . . . . . . . . . . . . . . . . .69 Overview of Log Files. . . . . . . . . . . . . . . . . . . . . . . . . . . . . . . . . . . . . . . . . . . . . . . . . . . . . . . . . . .69Version 6.0 Net-Net 9200 EMS Configuration Guide 5Process Log Messages . . . . . . . . . . . . . . . . . . . . . . . . . . . . . . . . . . . . . . . . . . . . . . . . . . . . . . .69Syslog. . . . . . . . . . . . . . . . . . . . . . . . . . . . . . . . . . . . . . . . . . . . . . . . . . . . . . . . . . . . . . . . . . . . .69. . . . . . . . . . . . . . . . . . . . . . . . . . . . . . . . . . . . . . . . . . . . . . . . . . . . . . . . . . . . . . . . . . . . . . . . . .70Global Log Level. . . . . . . . . . . . . . . . . . . . . . . . . . . . . . . . . . . . . . . . . . . . . . . . . . . . . . . . . . . .71Configuring a Process Log Server. . . . . . . . . . . . . . . . . . . . . . . . . . . . . . . . . . . . . . . . . . . . . .71Task-Specific Logging . . . . . . . . . . . . . . . . . . . . . . . . . . . . . . . . . . . . . . . . . . . . . . . . . . . . . . .71Facility Logging for Specific Tasks. . . . . . . . . . . . . . . . . . . . . . . . . . . . . . . . . . . . . . . . . . . . . .72General Management Support . . . . . . . . . . . . . . . . . . . . . . . . . . . . . . . . . . . . . . . . . . . . . . . .73 Host Routes. . . . . . . . . . . . . . . . . . . . . . . . . . . . . . . . . . . . . . . . . . . . . . . . . . . . . . . . . . . . . . . . . . . . .74 Overview. . . . . . . . . . . . . . . . . . . . . . . . . . . . . . . . . . . . . . . . . . . . . . . . . . . . . . . . . . . . . . . . . . . . .74Configuring Host Routes. . . . . . . . . . . . . . . . . . . . . . . . . . . . . . . . . . . . . . . . . . . . . . . . . . . . . . . .74 Accounting. . . . . . . . . . . . . . . . . . . . . . . . . . . . . . . . . . . . . . . . . . . . . . . . . . . . . . . . . . . . . . . . . . . . . .75 SIP Session Accounting . . . . . . . . . . . . . . . . . . . . . . . . . . . . . . . . . . . . . . . . . . . . . . . . . . . . . . . . .75Accounting Configuration . . . . . . . . . . . . . . . . . . . . . . . . . . . . . . . . . . . . . . . . . . . . . . . . . . . . . . .76 Accounting Server. . . . . . . . . . . . . . . . . . . . . . . . . . . . . . . . . . . . . . . . . . . . . . . . . . . . . . . . . . .78 Packet Trace. . . . . . . . . . . . . . . . . . . . . . . . . . . . . . . . . . . . . . . . . . . . . . . . . . . . . . . . . . . . . . . . . . . . .81 How It Works . . . . . . . . . . . . . . . . . . . . . . . . . . . . . . . . . . . . . . . . . . . . . . . . . . . . . . . . . . . . . . . . .81Packet Trace Scenarios. . . . . . . . . . . . . . . . . . . . . . . . . . . . . . . . . . . . . . . . . . . . . . . . . . . . . . . . . .82 Packet Trace for One Endpoint . . . . . . . . . . . . . . . . . . . . . . . . . . . . . . . . . . . . . . . . . . . . . . . .82Packet Trace for Both Call Legs. . . . . . . . . . . . . . . . . . . . . . . . . . . . . . . . . . . . . . . . . . . . . . . .83Packet Trace for a Net-Net SBC Signaling Address . . . . . . . . . . . . . . . . . . . . . . . . . . . . . . .83 Configuring Packet Tracing. . . . . . . . . . . . . . . . . . . . . . . . . . . . . . . . . . . . . . . . . . . . . . . . . . . . . . .84System ACLs. . . . . . . . . . . . . . . . . . . . . . . . . . . . . . . . . . . . . . . . . . . . . . . . . . . . . . . . . . . . . . . . . . . .86 Configuring System ACLs. . . . . . . . . . . . . . . . . . . . . . . . . . . . . . . . . . . . . . . . . . . . . . . . . . . . . . .86 Adding an ACL for the Management Interface . . . . . . . . . . . . . . . . . . . . . . . . . . . . . . . . . . .865Realms and Nested Realms . . . . . . . . . . . . . . . . . . . . . . . . . . . . . . . . . . . . . . . . 77 Introduction. . . . . . . . . . . . . . . . . . . . . . . . . . . . . . . . . . . . . . . . . . . . . . . . . . . . . . . . . . . . . . . . . . . . .77Overview. . . . . . . . . . . . . . . . . . . . . . . . . . . . . . . . . . . . . . . . . . . . . . . . . . . . . . . . . . . . . . . . . . . . .77 About Realms and Network Interfaces. . . . . . . . . . . . . . . . . . . . . . . . . . . . . . . . . . . . . . . . . .78About the SIP Home Realm. . . . . . . . . . . . . . . . . . . . . . . . . . . . . . . . . . . . . . . . . . . . . . . . . . .78About Realms and Other Net-Net SBC Functions . . . . . . . . . . . . . . . . . . . . . . . . . . . . . . . .78 Configuration Overview. . . . . . . . . . . . . . . . . . . . . . . . . . . . . . . . . . . . . . . . . . . . . . . . . . . . . . . . . .79 Before You Configure. . . . . . . . . . . . . . . . . . . . . . . . . . . . . . . . . . . . . . . . . . . . . . . . . . . . . . . . . . .79Configuration Overview. . . . . . . . . . . . . . . . . . . . . . . . . . . . . . . . . . . . . . . . . . . . . . . . . . . . . . . . .79Configuration Timestamp . . . . . . . . . . . . . . . . . . . . . . . . . . . . . . . . . . . . . . . . . . . . . . . . . . . . . . .81 Configuring Realms. . . . . . . . . . . . . . . . . . . . . . . . . . . . . . . . . . . . . . . . . . . . . . . . . . . . . . . . . . . . . .81 Creating the Realm. . . . . . . . . . . . . . . . . . . . . . . . . . . . . . . . . . . . . . . . . . . . . . . . . . . . . . . . . . . . .81Configuring the Realm. . . . . . . . . . . . . . . . . . . . . . . . . . . . . . . . . . . . . . . . . . . . . . . . . . . . . . . . . .83 6 Net-Net 9200 EMS Configuration Guide Version 6.0Nested Realms . . . . . . . . . . . . . . . . . . . . . . . . . . . . . . . . . . . . . . . . . . . . . . . . . . . . . . . . . . . . . . . . . .84 Configuring Nested Realms. . . . . . . . . . . . . . . . . . . . . . . . . . . . . . . . . . . . . . . . . . . . . . . . . . . . . .86Configuring Nested Realms. . . . . . . . . . . . . . . . . . . . . . . . . . . . . . . . . . . . . . . . . . . . . . . . . . . . . .86 Choosing the Parent Realm. . . . . . . . . . . . . . . . . . . . . . . . . . . . . . . . . . . . . . . . . . . . . . . . . . .87 Realm-Based Packet Marking . . . . . . . . . . . . . . . . . . . . . . . . . . . . . . . . . . . . . . . . . . . . . . . . . . . . .87 About TOS/DiffServ. . . . . . . . . . . . . . . . . . . . . . . . . . . . . . . . . . . . . . . . . . . . . . . . . . . . . . . . . . . .87 ToS Byte. . . . . . . . . . . . . . . . . . . . . . . . . . . . . . . . . . . . . . . . . . . . . . . . . . . . . . . . . . . . . . . . . . .88DiffServ Byte . . . . . . . . . . . . . . . . . . . . . . . . . . . . . . . . . . . . . . . . . . . . . . . . . . . . . . . . . . . . . . .88 Packet Marking for Media . . . . . . . . . . . . . . . . . . . . . . . . . . . . . . . . . . . . . . . . . . . . . . . . . . . . . . .88Configuring Packet Marking by Media Type . . . . . . . . . . . . . . . . . . . . . . . . . . . . . . . . . . . . . . . .88 Creating the QoS Marking Profile. . . . . . . . . . . . . . . . . . . . . . . . . . . . . . . . . . . . . . . . . . . . . .89Applying the QoS Marking Profile . . . . . . . . . . . . . . . . . . . . . . . . . . . . . . . . . . . . . . . . . . . . .90 Configuring Packet Marking for Signaling. . . . . . . . . . . . . . . . . . . . . . . . . . . . . . . . . . . . . . . . . .90 Creating a Class Policy. . . . . . . . . . . . . . . . . . . . . . . . . . . . . . . . . . . . . . . . . . . . . . . . . . . . . . .91Applying a Class Policy to a Realm. . . . . . . . . . . . . . . . . . . . . . . . . . . . . . . . . . . . . . . . . . . . .92 Steering Pools. . . . . . . . . . . . . . . . . . . . . . . . . . . . . . . . . . . . . . . . . . . . . . . . . . . . . . . . . . . . . . . . . . .92 Configuration Overview. . . . . . . . . . . . . . . . . . . . . . . . . . . . . . . . . . . . . . . . . . . . . . . . . . . . . . . . .93Configuring Steering Pools . . . . . . . . . . . . . . . . . . . . . . . . . . . . . . . . . . . . . . . . . . . . . . . . . . . . . .93 Multiple Interface Realms . . . . . . . . . . . . . . . . . . . . . . . . . . . . . . . . . . . . . . . . . . . . . . . . . . . . . . . .94 How It Works . . . . . . . . . . . . . . . . . . . . . . . . . . . . . . . . . . . . . . . . . . . . . . . . . . . . . . . . . . . . . . . . .95Steering Pool Port Allocation . . . . . . . . . . . . . . . . . . . . . . . . . . . . . . . . . . . . . . . . . . . . . . . . . . . .97Configuring Multiple Interface Realms. . . . . . . . . . . . . . . . . . . . . . . . . . . . . . . . . . . . . . . . . . . . .97 Media over TCP . . . . . . . . . . . . . . . . . . . . . . . . . . . . . . . . . . . . . . . . . . . . . . . . . . . . . . . . . . . . . . . . .99 TCP Bearer Conditions. . . . . . . . . . . . . . . . . . . . . . . . . . . . . . . . . . . . . . . . . . . . . . . . . . . . . . . . . .99TCP Port Selection . . . . . . . . . . . . . . . . . . . . . . . . . . . . . . . . . . . . . . . . . . . . . . . . . . . . . . . . . . . . .99 SDP Offer Example. . . . . . . . . . . . . . . . . . . . . . . . . . . . . . . . . . . . . . . . . . . . . . . . . . . . . . . . .102Timers. . . . . . . . . . . . . . . . . . . . . . . . . . . . . . . . . . . . . . . . . . . . . . . . . . . . . . . . . . . . . . . . . . . .103 Configuring Media Over TCP . . . . . . . . . . . . . . . . . . . . . . . . . . . . . . . . . . . . . . . . . . . . . . . . . . .103 Media Management Behind the Same IP . . . . . . . . . . . . . . . . . . . . . . . . . . . . . . . . . . . . . . . . . .104 Additional Media Management Options . . . . . . . . . . . . . . . . . . . . . . . . . . . . . . . . . . . . . . . . . .104Configuring Media Management Behind the Same IP. . . . . . . . . . . . . . . . . . . . . . . . . . . . . . .104 6SIP Signaling Services. . . . . . . . . . . . . . . . . . . . . . . . . . . . . . . . . . . . . . . . . . . . 105Introduction. . . . . . . . . . . . . . . . . . . . . . . . . . . . . . . . . . . . . . . . . . . . . . . . . . . . . . . . . . . . . . . . . . . .105About the Net-Net SBC and SIP. . . . . . . . . . . . . . . . . . . . . . . . . . . . . . . . . . . . . . . . . . . . . . . . . .105 Types of SIP Devices. . . . . . . . . . . . . . . . . . . . . . . . . . . . . . . . . . . . . . . . . . . . . . . . . . . . . . . . . . .105Basic Service Models. . . . . . . . . . . . . . . . . . . . . . . . . . . . . . . . . . . . . . . . . . . . . . . . . . . . . . . . . . .106 About B2BUA . . . . . . . . . . . . . . . . . . . . . . . . . . . . . . . . . . . . . . . . . . . . . . . . . . . . . . . . . . . . .106SIP B2BUA Peering. . . . . . . . . . . . . . . . . . . . . . . . . . . . . . . . . . . . . . . . . . . . . . . . . . . . . . . . .106B2BUA Hosted IP Services. . . . . . . . . . . . . . . . . . . . . . . . . . . . . . . . . . . . . . . . . . . . . . . . . . .107 Version 6.0 Net-Net 9200 EMS Configuration Guide 7SIP B2BUA and L3/L5 NAT. . . . . . . . . . . . . . . . . . . . . . . . . . . . . . . . . . . . . . . . . . . . . . . . . .107 About SIP Interfaces. . . . . . . . . . . . . . . . . . . . . . . . . . . . . . . . . . . . . . . . . . . . . . . . . . . . . . . . . . .107 SIP Network Models and Types . . . . . . . . . . . . . . . . . . . . . . . . . . . . . . . . . . . . . . . . . . . . . . . . . .107 Network Model. . . . . . . . . . . . . . . . . . . . . . . . . . . . . . . . . . . . . . . . . . . . . . . . . . . . . . . . . . . . . . .108Network Type . . . . . . . . . . . . . . . . . . . . . . . . . . . . . . . . . . . . . . . . . . . . . . . . . . . . . . . . . . . . . . . .108Default Network Model and Type. . . . . . . . . . . . . . . . . . . . . . . . . . . . . . . . . . . . . . . . . . . . . . . .108Upgrade Considerations . . . . . . . . . . . . . . . . . . . . . . . . . . . . . . . . . . . . . . . . . . . . . . . . . . . . . . .108Configuring the Network Type and Network Model . . . . . . . . . . . . . . . . . . . . . . . . . . . . . . . .108 Configuring the Network Model. . . . . . . . . . . . . . . . . . . . . . . . . . . . . . . . . . . . . . . . . . . . . .109Configuring the Network Type . . . . . . . . . . . . . . . . . . . . . . . . . . . . . . . . . . . . . . . . . . . . . . .109 Configuring the Net-Net SBC for SIP Signaling . . . . . . . . . . . . . . . . . . . . . . . . . . . . . . . . . . . .110 Using the Net-Net EMS to Configure the Net-Net SBC . . . . . . . . . . . . . . . . . . . . . . . . . . . . .111Configuration Timestamp . . . . . . . . . . . . . . . . . . . . . . . . . . . . . . . . . . . . . . . . . . . . . . . . . . . . . .111 Configuring the Home Realm . . . . . . . . . . . . . . . . . . . . . . . . . . . . . . . . . . . . . . . . . . . . . . . . . . . .111 Overview. . . . . . . . . . . . . . . . . . . . . . . . . . . . . . . . . . . . . . . . . . . . . . . . . . . . . . . . . . . . . . . . . . . .111 SIP NAT Function. . . . . . . . . . . . . . . . . . . . . . . . . . . . . . . . . . . . . . . . . . . . . . . . . . . . . . . . . .112Home Realm’s Purpose . . . . . . . . . . . . . . . . . . . . . . . . . . . . . . . . . . . . . . . . . . . . . . . . . . . . .112 Configuring the Home Realm. . . . . . . . . . . . . . . . . . . . . . . . . . . . . . . . . . . . . . . . . . . . . . . . . . .112 Configuring a SIP Interface . . . . . . . . . . . . . . . . . . . . . . . . . . . . . . . . . . . . . . . . . . . . . . . . . . . . . .114 Overview. . . . . . . . . . . . . . . . . . . . . . . . . . . . . . . . . . . . . . . . . . . . . . . . . . . . . . . . . . . . . . . . . . . .114About SIP Ports. . . . . . . . . . . . . . . . . . . . . . . . . . . . . . . . . . . . . . . . . . . . . . . . . . . . . . . . . . . . . . .114 Preferred SIP Port. . . . . . . . . . . . . . . . . . . . . . . . . . . . . . . . . . . . . . . . . . . . . . . . . . . . . . . . . .114 Proxy Mode. . . . . . . . . . . . . . . . . . . . . . . . . . . . . . . . . . . . . . . . . . . . . . . . . . . . . . . . . . . . . . . . . .114Redirect Action . . . . . . . . . . . . . . . . . . . . . . . . . . . . . . . . . . . . . . . . . . . . . . . . . . . . . . . . . . . . . . .115Trust Mode . . . . . . . . . . . . . . . . . . . . . . . . . . . . . . . . . . . . . . . . . . . . . . . . . . . . . . . . . . . . . . . . . .115 About the Process. . . . . . . . . . . . . . . . . . . . . . . . . . . . . . . . . . . . . . . . . . . . . . . . . . . . . . . . . .115 Configuring a SIP interface . . . . . . . . . . . . . . . . . . . . . . . . . . . . . . . . . . . . . . . . . . . . . . . . . . . . .116 Configuring SIP Ports. . . . . . . . . . . . . . . . . . . . . . . . . . . . . . . . . . . . . . . . . . . . . . . . . . . . . . .122Configuring Carriers. . . . . . . . . . . . . . . . . . . . . . . . . . . . . . . . . . . . . . . . . . . . . . . . . . . . . . . .123 Configuring SIP Timers . . . . . . . . . . . . . . . . . . . . . . . . . . . . . . . . . . . . . . . . . . . . . . . . . . . . . . . . .124 Overview. . . . . . . . . . . . . . . . . . . . . . . . . . . . . . . . . . . . . . . . . . . . . . . . . . . . . . . . . . . . . . . . . . . .124Configuring SIP Timers . . . . . . . . . . . . . . . . . . . . . . . . . . . . . . . . . . . . . . . . . . . . . . . . . . . . . . . .124 Configuring SIP Options Tag Handling . . . . . . . . . . . . . . . . . . . . . . . . . . . . . . . . . . . . . . . . . . .126 Overview. . . . . . . . . . . . . . . . . . . . . . . . . . . . . . . . . . . . . . . . . . . . . . . . . . . . . . . . . . . . . . . . . . . .126Configuration Overview. . . . . . . . . . . . . . . . . . . . . . . . . . . . . . . . . . . . . . . . . . . . . . . . . . . . . . . .126Configuring SIP Options Tag Handling. . . . . . . . . . . . . . . . . . . . . . . . . . . . . . . . . . . . . . . . . . .127 ENUM: Large UDP Datagram Support for DNS NAPTR Responses . . . . . . . . . . . . . . . . . .129 How It Works . . . . . . . . . . . . . . . . . . . . . . . . . . . . . . . . . . . . . . . . . . . . . . . . . . . . . . . . . . . . . . . .129Configuring Large UDP Datagram Support. . . . . . . . . . . . . . . . . . . . . . . . . . . . . . . . . . . . . . . .129 Configuring SIP Options . . . . . . . . . . . . . . . . . . . . . . . . . . . . . . . . . . . . . . . . . . . . . . . . . . . . . . . .1308 Net-Net 9200 EMS Configuration Guide Version 6.0。
Document #: LTRT-08089May 2010User's ManualVersion 6.0SIP User's Manual ContentsTable of Contents1 Overview (29)2 Configuration Concepts (31)2.1 Configuration Tools (31)2.2 Main Operating Modes (31)2.2.1 Operating in VoIP and Data-Routing Mode (31)2.2.1.1 Configuring Data-Routing LAN Interface (32)2.2.1.2 Configuring Device's DHCP Server (33)2.2.1.3 Assigning a WAN IP Address (34)2.2.1.4 Configuring Port Forwarding and NAT (35)2.2.1.5 Configuring Quality of Service (43)2.2.2 Operating in VoIP-Only Mode (51)3 Web-Based Management (53)3.1 Getting Acquainted with the Web Interface (53)3.1.1 Computer Requirements (53)3.1.2 Accessing the Web Interface (54)3.1.3 Areas of the GUI (55)3.1.4 Toolbar (56)3.1.5 Navigation Tree (57)3.1.5.1 Displaying Navigation Tree in Basic and Full View (58)3.1.5.2 Showing / Hiding the Navigation Pane (59)3.1.6 Working with Configuration Pages (60)3.1.6.1 Accessing Pages (60)3.1.6.2 Viewing Parameters (60)3.1.6.3 Modifying and Saving Parameters (62)3.1.6.4 Entering Phone Numbers (63)3.1.6.5 Working with Tables (64)3.1.7 Searching for Configuration Parameters (66)3.1.8 Creating a Login Welcome Message (67)3.1.9 Getting Help (68)3.1.10 Logging Off the Web Interface (69)3.2 Using the Home Page (70)3.2.1 Assigning a Port Name (72)3.2.2 Resetting an Analog Channel (72)3.2.3 Viewing Analog Port Information (73)3.2.4 Viewing Trunks' Channels (73)3.2.5 Replacing Modules (74)3.3 Configuration Tab (76)3.3.1 System Settings (76)3.3.1.1 Configuring the Application Settings (77)3.3.1.2 Configuring the NFS Settings (78)3.3.1.3 Configuring the Web User Accounts (79)3.3.1.4 Configuring the Web and Telnet Access List (82)3.3.1.5 Configuring the Certificates (83)3.3.1.6 Configuring the General Security Settings (86)3.3.2 VoIP Settings (87)3.3.2.1 Network Settings (87)3.3.2.2 Media Settings (93)3.3.2.3 PSTN Settings (99)3.3.2.4 Protocol Configuration (103)3.3.2.5 Configuring TDM Bus Settings (204)3.3.2.6 Advanced Applications (204)3.3.3 Data Settings (209)Version 6.0 3 May 2010Mediant 1000 MSBG3.3.3.1 Getting Acquainted with the Data Configuration Pages (209)3.3.3.2 WAN Access Settings (210)3.3.3.3 Firewall and ACL Settings (217)3.3.3.4 QoS Settings (230)3.3.3.5 VPN Settings (239)3.3.3.6 Services Settings (247)3.3.3.7 Routing Settings (253)3.3.3.8 Objects and Rules Settings (259)3.3.3.9 Configuring Network Connections (263)3.4 Management Tab (305)3.4.1 Management Configuration (305)3.4.1.1 Configuring the Management Settings (305)3.4.1.2 Configuring the Regional Settings (311)3.4.1.3 Maintenance Actions (312)3.4.2 Software Update (315)3.4.2.1 Loading Auxiliary Files (315)3.4.2.2 Loading a Software Upgrade Key (317)3.4.2.3 Software Upgrade Wizard (319)3.4.2.4 Backing Up and Restoring Configuration (322)3.5 Status & Diagnostics Tab (324)3.5.1 Status & Diagnostics (324)3.5.1.1 Viewing Ethernet Port Information (324)3.5.1.2 Viewing Active IP Interfaces (325)3.5.1.3 Viewing Device Information (326)3.5.1.4 Viewing Performance Statistics (327)3.5.1.5 Viewing Active Alarms (327)3.5.2 Data Status (328)3.5.2.1 Viewing WAN Status (328)3.5.2.2 Viewing LAN Status (329)3.5.2.3 Viewing Network Connection Statistics (331)3.5.2.4 Viewing Logged Security Events (332)3.5.2.5 Viewing Internet Connection Utilization (334)3.5.2.6 Viewing QoS Queues Statistics (335)3.5.2.7 Viewing Logged System Events (336)3.5.2.8 Running Diagnostic Tests (338)3.5.3 Gateway Statistics (339)3.5.3.1 Viewing Call Counters (339)3.5.3.2 Viewing SAS/SBC Registered Users (341)3.5.3.3 Viewing Call Routing Status (342)3.5.3.4 Viewing Registration Status (343)3.5.3.5 Viewing IP Connectivity (344)4 INI File Configuration (347)4.1 INI File Format (347)4.1.1 Configuring Individual ini File Parameters (347)4.1.2 Configuring ini File Table Parameters (348)4.1.3 General ini File Formatting Rules (349)4.2 Modifying an ini File (350)4.3 Secured Encoded ini File (350)5 Element Management System (EMS) (351)5.1 Familiarizing yourself with EMS GUI (351)5.2 Adding the Device in EMS (352)5.3 General Trunk Configuration (354)5.4 Provisioning SIP MLPP Parameters (356)5.5 Configuring the Device to Operate with SNMPv3 (357)SIP User's Manual 4 Document #: LTRT-08089SIP User's Manual Contents5.5.1 Configuring SNMPv3 using SSH (357)5.5.2 Configuring EMS to Operate with a Pre-configured SNMPv3 System (358)5.5.3 Configuring SNMPv3 to Operate with Non-Configured SNMPv3 System (359)5.5.4 Cloning SNMPv3 Users (360)6 Configuration Parameters Reference (361)6.1 Networking Parameters (361)6.1.1 VoIP Multiple Network Interfaces and VLAN Parameters (361)6.1.2 VoIP Static Routing Parameters (362)6.1.3 Quality of Service Parameters (363)6.1.4 NAT and STUN Parameters (365)6.1.5 NFS Parameters (366)6.1.6 DNS Parameters (367)6.1.7 DHCP Parameters (369)6.1.8 NTP and Daylight Saving Time Parameters (370)6.2 Web and Telnet Parameters (371)6.2.1 General Parameters (371)6.2.2 Web Parameters (372)6.2.3 Telnet Parameters (373)6.3 Debugging and Diagnostics Parameters (374)6.3.1 General Parameters (374)6.3.2 Syslog, CDR and Debug Parameters (376)6.3.3 Remote Alarm Indication Parameters (379)6.3.4 Serial Parameters (380)6.4 Security Parameters (381)6.4.1 HTTPS Parameters (381)6.4.2 SRTP Parameters (382)6.4.3 TLS Parameters (383)6.4.4 SSH Parameters (385)6.4.5 OCSP Parameters (385)6.5 RADIUS Parameters (386)6.6 SNMP Parameters (388)6.7 SIP Configuration Parameters (391)6.7.1 General SIP Parameters (391)6.7.2 IP Group, Proxy, Registration and Authentication Parameters (411)6.7.3 Network Application Parameters (422)6.7.4 Voice Mail Parameters (424)6.7.5 Fax and Modem Parameters (427)6.7.6 DTMF and Hook-Flash Parameters (429)6.7.7 Digit Collection and Dial Plan Parameters (434)6.7.8 Coders and Profile Parameters (435)6.8 SBC Parameters (441)6.9 Supplementary Services Parameters (451)6.9.1 Caller ID Parameters (451)6.9.2 Call Waiting Parameters (456)6.9.3 Call Forwarding Parameters (459)6.9.4 Message Waiting Indication Parameters (461)6.9.5 Call Hold Parameters (463)6.9.6 Call Transfer Parameters (464)6.9.7 Three-Way Conferencing Parameters (465)6.9.8 Emergency Call Parameters (466)6.9.9 FXS Call Cut-Through Parameter (467)6.9.10 Automatic Dialing Parameters (468)6.9.11 Direct Inward Dialing Parameters (469)6.9.12 MLPP Parameters (470)Version 6.0 5 May 2010Mediant 1000 MSBG6.10 Standalone Survivability Parameters (473)6.11 IP Media Parameters (477)6.12 PSTN Parameters (488)6.12.1 General Parameters (488)6.12.2 TDM Bus and Clock Timing Parameters (492)6.12.3 CAS Parameters (494)6.12.4 ISDN Parameters (497)6.13 ISDN and CAS Interworking Parameters (504)6.14 Answer and Disconnect Supervision Parameters (521)6.15 Tone Parameters (526)6.15.1 Telephony Tone Parameters (526)6.15.2 Tone Detection Parameters (530)6.15.3 Metering Tone Parameters (532)6.16 Telephone Keypad Sequence Parameters (534)6.17 General FXO Parameters (537)6.18 FXS Parameters (539)6.19 Trunk Groups, Number Manipulation and Routing Parameters (540)6.19.1 Trunk Groups and Routing Parameters (540)6.19.2 Alternative Routing Parameters (547)6.19.3 Number Manipulation Parameters (551)6.19.4 LDAP Parameters (560)6.20 Channel Parameters (562)6.20.1 Voice Parameters (562)6.20.2 Coder Parameters (564)6.20.3 Fax and Modem Parameters (566)6.20.4 DTMF Parameters (570)6.20.5 RTP, RTCP and T.38 Parameters (571)6.21 Auxiliary and Configuration Files Parameters (576)6.21.1 Auxiliary/Configuration File Name Parameters (576)6.21.2 Automatic Update Parameters (578)7 Restoring Factory Default Settings (581)7.1 Restoring Defaults using CLI (581)7.2 Restoring Defaults using an ini File (581)7.3 Restoring Defaults using Hardware Reset Button (582)8 Auxiliary Configuration Files (583)8.1 Call Progress Tones File (583)8.1.1 Distinctive Ringing (585)8.1.2 FXS Distinctive Ringing and Call Waiting Tones per Source Number (587)8.2 Prerecorded Tones File (588)8.3 Voice Prompts File (588)8.4 CAS Files (589)8.5 Dial Plan File (590)8.6 User Information File (591)9 IP Telephony Capabilities (593)9.1 Dialing Plan Features (593)9.1.1 Dialing Plan Notation for Routing and Manipulation (593)9.1.2 Digit Mapping (595)9.1.3 External Dial Plan File (596)9.1.3.1 Modifying ISDN-to-IP Calling Party Number (597)SIP User's Manual 6 Document #: LTRT-08089SIP User's Manual Contents9.1.4 Dial Plan Prefix Tags for IP-to-Tel Routing (598)9.2 Multiple SIP Signaling/Media Interfaces using Signaling Routing Domains (600)9.2.1 Signaling Routing Domains (600)9.2.1.1 Media Realms (601)9.2.1.2 SIP Interfaces (601)9.2.2 Configuration Example (603)9.3 SBC Application (607)9.3.1 Overview (607)9.3.1.1 NAT Traversal (607)9.3.1.2 VoIP Firewall (608)9.3.1.3 Topology Hiding (608)9.3.1.4 SIP Normalization (608)9.3.1.5 Survivability (608)9.3.2 SIP Network Definitions (609)9.3.3 SIP Dialog Initiation Process (609)9.3.3.1 Determining Source and Destination URL (611)9.3.3.2 Source IP Group Classification (611)9.3.3.3 SBC IP-to-IP Routing (612)9.3.3.4 IP-to-IP Inbound and Outbound Manipulation (613)9.3.3.5 SIP Header Manipulation (615)9.3.4 User Registration and Internal Database (617)9.3.4.1 Initial Registration Request Processing (617)9.3.4.2 Internal Database (618)9.3.4.3 Routing using Internal Database (618)9.3.4.4 Registration Refreshes (619)9.3.4.5 Registration Restriction Control (619)9.3.5 SBC Media Handling (620)9.3.5.1 Media Anchoring without Transcoding (Transparent) (621)9.3.5.2 Media Anchoring with Transcoding (621)9.3.5.3 No Media Anchoring (623)9.3.5.4 Interworking DTMF Methods (624)9.3.5.5 Transcoding Modes (625)9.3.5.6 SRTP-RTP Transcoding (625)9.3.5.7 Coder Restrictions Control (626)9.3.6 SIP Dialog Admission Control (627)9.3.7 Handling of SIP 3xx Redirect Responses (628)9.3.8 SBC Configuration Example (630)9.3.8.1 General SBC Setup (630)9.3.8.2 Survivability and Alternative Routing (641)9.3.8.3 SBC-to-PSTN Routing (644)9.3.8.4 Basic Coder Transcoding (651)9.3.8.5 Advanced Coder Transcoding (654)9.3.8.6 RTP-SRTP Transcoding (658)9.3.8.7 SIP URI Manipulation (659)9.4 IP-to-IP Routing Application (662)9.4.1 Theory of Operation (663)9.4.1.1 Proxy Sets (664)9.4.1.2 IP Groups (664)9.4.1.3 Inbound and Outbound IP Routing Rules (665)9.4.1.4 Accounts (666)9.4.2 Configuring IP-to-IP Routing (666)9.4.2.1 Step 1: Enable the IP-to-IP Capabilities (668)9.4.2.2 Step 2: Configure the Number of Media Channels (669)9.4.2.3 Step 3: Define a Trunk Group for the Local PSTN (669)9.4.2.4 Step 4: Configure the Proxy Sets (670)9.4.2.5 Step 5: Configure the IP Groups (672)9.4.2.6 Step 6: Configure the Account Table (675)Version 6.0 7 May 2010Mediant 1000 MSBG9.4.2.7 Step 7: Configure IP Profiles for Voice Coders (676)9.4.2.8 Step 8: Configure Inbound IP Routing (677)9.4.2.9 Step 9: Configure Outbound IP Routing (679)9.4.2.10 Step 10: Configure Destination Phone Number Manipulation (680)9.5 Stand-Alone Survivability (SAS) Application (682)9.5.1 Configuring SAS (683)9.5.2 Configuring SAS Emergency Calls (684)9.6 DSP Channel Resources for SBC/IP-to-IP/IP Media Functionality (685)9.6.1 Software Upgrade Keys (685)9.6.2 Hardware Configuration (686)9.6.3 ini File Configuration (686)9.7 Transcoding using Third-Party Call Control (688)9.7.1 Using RFC 4117 (688)9.7.2 Using RFC 4240 (NetAnn Conferencing) (689)9.8 Emergency Phone Number Services - E911 (691)9.8.1 FXS Device Emulating PSAP using DID Loop-Start Lines (691)9.8.2 FXO Device Interworking SIP E911 Calls from Service Provider's IP Network toPSAP DID Lines (693)9.9 Routing Based on LDAP Active Directory Queries (697)9.9.1 LDAP Overview (697)9.9.2 AD-Based Tel-to-IP Routing in Microsoft OCS 2007 Environment (698)9.10 Configuring DTMF Transport Types (699)9.11 FXS and FXO Capabilities (701)9.11.1 FXS/FXO Coefficient Types (701)9.11.2 FXO Operating Modes (701)9.11.2.1 FXO Operations for IP-to-Tel Calls (701)9.11.2.2 FXO Operations for Tel-to-IP Calls (704)9.11.2.3 Call Termination on FXO Devices (706)9.11.3 Remote PBX Extension Between FXO and FXS Devices (707)9.11.3.1 Dialing from Remote Extension (Phone at FXS) (708)9.11.3.2 Dialing from PBX Line or PSTN (708)9.11.3.3 Message Waiting Indication for Remote Extensions (709)9.11.3.4 Call Waiting for Remote Extensions (709)9.11.3.5 FXS Gateway Configuration (710)9.11.3.6 FXO Gateway Configuration (711)9.12 Configuring Alternative Routing (Based on Connectivity and QoS) (712)9.12.1 Alternative Routing Mechanism (712)9.12.2 Determining the Availability of Destination IP Addresses (712)9.12.3 PSTN Fallback (713)9.13 Fax and Modem Capabilities (714)9.13.1 Fax/Modem Operating Modes (714)9.13.2 Fax/Modem Transport Modes (714)9.13.2.1 T.38 Fax Relay Mode (714)9.13.2.2 G.711 Fax / Modem Transport Mode (716)9.13.2.3 Fax Fallback (716)9.13.2.4 Fax/Modem Bypass Mode (716)9.13.2.5 Fax / Modem NSE Mode (717)9.13.2.6 Fax / Modem Transparent with Events Mode (718)9.13.2.7 Fax / Modem Transparent Mode (718)9.13.2.8 RFC 2833 ANS Report upon Fax/Modem Detection (719)9.13.3 V.34 Fax Support (719)9.13.3.1 Using Bypass Mechanism for V.34 Fax Transmission (720)9.13.3.2 Using Relay mode for both T.30 and V.34 faxes (720)9.13.4 V.152 Support (720)9.14 Working with Supplementary Services (722)SIP User's Manual 8 Document #: LTRT-08089SIP User's Manual Contents9.14.1 Call Hold and Retrieve (722)9.14.2 Consultation Feature (724)9.14.3 Call Transfer (724)9.14.4 Call Forward (725)9.14.4.1 Call Forward Reminder Ring (726)9.14.4.2 Call Forward Reminder (Off-Hook) Special Dial Tone (727)9.14.5 Call Waiting (727)9.14.6 Message Waiting Indication (728)9.14.7 Caller ID (729)9.14.7.1 Caller ID Detection / Generation on the Tel Side (729)9.14.7.2 Debugging a Caller ID Detection on FXO (730)9.14.7.3 Caller ID on the IP Side (731)9.14.8 Three-Way Conferencing (732)9.15 Routing Examples (733)9.15.1 SIP Call Flow Example (733)9.15.2 SIP Authentication Example (735)9.15.3 Proxy or Registrar Registration Example (737)9.15.4 Establishing a Call between Two Devices (738)9.15.5 Trunk-to-Trunk Routing Example (739)9.15.6 SIP Trunking between Enterprise and ITSPs (740)9.16 Mapping PSTN Release Cause to SIP Response (743)9.17 Querying Device Channel Resources using SIP OPTIONS (743)9.18 Answer Machine Detector (AMD) (743)9.19 Event Notification using X-Detect Header (747)9.20 Supported RADIUS Attributes (750)9.21 Call Detail Record (753)9.22 Dynamic Jitter Buffer Operation (754)10 VoIP Networking Capabilities (757)10.1 NAT (Network Address Translation) Support (757)10.1.1 First Incoming Packet Mechanism (757)10.1.2 No-Op Packets (758)10.2 Robust Receipt of Media Streams (758)10.3 Multiple Routers Support (759)10.4 Simple Network Time Protocol Support (759)10.5 IP QoS via Differentiated Services (DiffServ) (760)10.6 Network Configuration (760)10.6.1 Multiple Network Interfaces and VLANs (760)10.6.1.1 Overview of Multiple Interface Table (761)10.6.1.2 Columns of the Multiple Interface Table (762)10.6.1.3 Other Related Parameters (764)10.6.1.4 Multiple Interface Table Configuration Summary and Guidelines (766)10.6.1.5 Troubleshooting the Multiple Interface Table (768)10.6.2 Static Routing Table (768)10.6.2.1 Routing Table Overview (768)10.6.2.2 Routing Table Columns (768)10.6.2.3 Routing Table Configuration Summary and Guidelines (770)10.6.2.4 Troubleshooting the Routing Table (771)10.6.3 Setting Up VoIP Networking (772)10.6.3.1 Using the Web Interface (772)10.6.3.2 Using the ini File (772)10.6.3.3 Networking Configuration Examples (773)Version 6.0 9 May 2010Mediant 1000 MSBG11 Advanced PSTN Configuration (777)11.1 Clock Settings (777)11.2 Release Reason Mapping (778)11.2.1 Reason Header (778)11.2.2 Fixed Mapping of ISDN Release Reason to SIP Response (778)11.2.3 Fixed Mapping of SIP Response to ISDN Release Reason (780)11.3 ISDN Overlap Dialing (782)11.4 ISDN Non-Facility Associated Signaling (NFAS) (783)11.4.1 NFAS Interface ID (783)11.4.2 Working with DMS-100 Switches (784)11.4.3 Creating an NFAS-Related Trunk Configuration (785)11.5 Redirect Number and Calling Name (Display) (785)11.6 Automatic Gain Control (AGC) (786)12 Tunneling Applications (787)12.1 TDM Tunneling (787)12.1.1 DSP Pattern Detector (789)12.2 QSIG Tunneling (790)13 IP Media Capabilities (791)13.1 Conference Server (791)13.1.1 Simple Conferencing (NetAnn) (792)13.1.1.1 SIP Call Flow (792)13.1.1.2 Creating a Conference (793)13.1.1.3 Joining a Conference (793)13.1.1.4 Terminating a Conference (793)13.1.1.5 PSTN Participants (794)13.1.2 Advanced Conferencing (MSCML) (794)13.1.2.1 Creating a Conference (794)13.1.2.2 Joining a Conference (795)13.1.2.3 Modifying a Conference (796)13.1.2.4 Applying Media Services on a Conference (797)13.1.2.5 Active Speaker Notification (798)13.1.2.6 Terminating a Conference (799)13.1.3 Conference Call Flow Example (800)13.2 Announcement Server (806)13.2.1 NetAnn Interface (807)13.2.1.1 Playing a Local Voice Prompt (807)13.2.1.2 Playing using HTTP/NFS Streaming (807)13.2.1.3 Supported Attributes (808)13.2.2 MSCML Interface (808)13.2.2.1 Operation (809)13.2.2.2 Operating with Audio Bundles (811)13.2.2.3 Playing Announcements (812)13.2.2.4 Playing Announcements and Collecting Digits (812)13.2.2.5 Playing Announcements and Recording Voice (813)13.2.2.6 Stopping the Playing of an Announcement (814)13.2.2.7 Relevant Parameters (815)13.2.2.8 Signal Events Notifications (815)13.2.3 Voice Streaming (816)13.2.3.1 Voice Streaming Features (816)13.2.3.2 Using File Coders with Different Channel Coders (819)13.2.3.3 Maximum Concurrent Playing and Recording (820)13.2.3.4 LBR Coders Support (820)13.2.3.5 HTTP Recording Configuration (821)SIP User's Manual 10 Document #: LTRT-0808913.2.3.6 Supported HTTP Servers (821)13.2.3.7 Common Troubleshooting (823)13.2.4 Announcement Call Flow Example (823)13.3 Voice XML Interpreter (826)13.3.1 Features (826)13.3.2 Feature Key (826)13.3.3 VXML Scripts (826)13.3.4 Proprietary Extensions (827)13.3.4.1 Record (827)13.3.4.2 Audio Extensions (828)13.3.4.3 Language Identifier Support (831)13.3.5 Combining <audio> Elements (832)13.3.6 Notes Regarding Non-compliant Functionality (833)13.3.7 Supported Elements and Attributes (833)13.3.7.1 VoiceXML Supported Elements and Attributes (833)13.3.7.2 SRGS and SSML Support (843)13.3.7.3 VoiceXML Supported Properties (843)13.3.7.4 VoiceXML Variables and Events (844)13.3.7.5 ECMAScript Support (846)13.3.8 Example of UDT ‘beep’ Tone Definition (847)13.3.9 Limitations and Restrictions (847)14 SIP Software Package (849)15 Technical Specifications (851)List of FiguresFigure 1-1: Mediant 1000 MSBG Typical Application (29)Figure 2-1: Connections Page (32)Figure 2-2: Defining LAN Data Routing IP Address (32)Figure 2-3: Configuring the DHCP Server (33)Figure 2-4: Selecting WAN Connection (34)Figure 2-5: Port Forwarding Page (36)Figure 2-6: Adding a Port Forwarding Rule (36)Figure 2-7: Defining Service Name (e.g., for SIP UDP Ports) (36)Figure 2-8: Defining Ports (e.g., SIP UDP) (36)Figure 2-9: Port Numbers Successfully Defined (e.g., for SIP UDP) (37)Figure 2-10: Defining Port Forwarding (37)Figure 2-11: Port Forwarding for SIP and RTP Protocols (38)Figure 2-12: NAT Page (38)Figure 2-13: Adding NAT IP Address (39)Figure 2-14: WAN IP Address Added as NAT IP Address (39)Figure 2-15: Adding the NAPT Rule (39)Figure 2-16: Defining Source Address (40)Figure 2-17: Defining Source IP Address (i.e., VoIP LAN) (40)Figure 2-18: Added Source IP Address (of VoIP LAN) (40)Figure 2-19: Defining Service Name (e.g., for SIP UDP Ports) (40)Figure 2-20: Defining Source Ports (e.g., UDP) (41)Figure 2-21: Port Successfully Added (e.g., SIP UDP) (41)Figure 2-22: Source Ports Added for Static NAPT (42)Figure 2-23: Source Ports Added for Static NAPT (43)Figure 2-24: Selecting Device for Traffic Shaping (44)Figure 2-25: Defining Traffic Shaping (44)Figure 2-26: Adding Class Rule (45)Figure 2-27: Defining Shaping Class (for VoIP Tx Traffic) (45)Figure 2-28: Configured Traffic Shaping for Total WAN and VoIP Bandwidth (46)Figure 2-29: Match Rules Page (47)Figure 2-30: Adding a Traffic Priority Rule (48)Figure 2-31: Defining Incoming SIP Ports (48)Figure 2-32: Defining SIP Ports (e.g. TCP) (48)Figure 2-33: Configured Ports for Incoming SIP (49)Figure 2-34: Traffic Matching Rule for Received SIP Signaling Traffic (49)Figure 2-35: Matching Rule for Received RTP Traffic (50)Figure 2-36: Traffic Matching Rule for WAN Tx/Rx RTP and SIP Signaling (50)Figure 2-37: Disabling Data-Routing Connection Interface (51)Figure 2-38: Removing Data-Routing Connection Interface (51)Figure 2-39: Multiple Interface Table (52)Figure 2-40: Multiple Interfaces with VLANs (52)Figure 2-41: Defining VLANs per LAN Port (52)Figure 3-1: Login Screen (54)Figure 3-2: "Reset" Displayed on Toolbar (56)Figure 3-3: Terminology for Navigation Tree Levels (57)Figure 3-4: Navigation Tree in Basic and Full View (58)Figure 3-5: Showing and Hiding Navigation Pane (59)Figure 3-6: Toggling between Basic and Advanced Page View (61)Figure 3-7: Expanding and Collapsing Parameter Groups (62)Figure 3-8: Editing Symbol after Modifying Parameter Value (62)Figure 3-9: Value Reverts to Previous Valid Value (63)Figure 3-10: Adding an Index Entry to a Table (64)Figure 3-11: Compacting a Web Interface Table (65)Figure 3-12: Searched Result Screen (66)Figure 3-13: User-Defined Web Welcome Message after Login (67)Figure 3-14: Help Topic for Current Page (68)Figure 3-15: Log Off Confirmation Box (69)Figure 3-16: Web Session Logged Off (69)Figure 3-17: Home Page (70)Figure 3-18: Shortcut Menu for Adding Port Name (72)Figure 3-19: Shortcut Menu for Resetting Port Channel (72)Figure 3-20: Selecting Port Settings from Shortcut Menu (73)Figure 3-21: Basic Information Screen (73)Figure 3-22: Trunks and Channels Status Screen (73)Figure 3-23: Basic Channel Information Page (74)Figure 3-24: Remove Module in Home Page (75)Figure 3-25: Module Removal Confirmation Message Box (75)Figure 3-26: “Reserved” Displayed (75)Figure 3-27: “Insert Module” Displayed (75)Figure 3-28: Applications Settings Page (77)Figure 3-29: NFS Settings Page (78)Figure 3-30: WEB User Accounts Page (for Users with 'Security Administrator' Privileges) (80)Figure 3-31: Web & Telnet Access List Page - Add New Entry (82)Figure 3-32: Web & Telnet Access List Table (82)Figure 3-33: Certificates Signing Request Page (83)Figure 3-34: General Security Settings Page (86)Figure 3-35: Multiple Interface Table Page (88)Figure 3-36: IP Routing Table Page (90)Figure 3-37: DiffServ Table Page (92)Figure 3-38: Voice Settings Page (93)Figure 3-39: Fax/Modem/CID Settings Page (94)Figure 3-40: RTP/RTCP Settings Page (95)Figure 3-41: IPMedia Settings Page (96)Figure 3-42: General Media Settings Page (97)Figure 3-43: Analog Settings Page (97)Figure 3-44: Media Security Page (98)Figure 3-45: CAS State Machine Page (99)Figure 3-46: Trunk Settings Page (101)Figure 3-47: Trunk Scroll Bar (102)Figure 3-48: SIP Media Realm Page (104)Figure 3-49: Applications Enabling Page (106)Figure 3-50: Trunk Group Table Page (107)Figure 3-51: Trunk Group Settings Page (109)Figure 3-52: SIP General Parameters Page (113)Figure 3-53: DTMF & Dialing Page (114)Figure 3-54: SRD Table Page (115)Figure 3-55: SIP Interface Table Page (117)Figure 3-56: IP Group Table (119)Figure 3-57: Account Table Page (124)Figure 3-58: Proxy & Registration Page (127)Figure 3-59: Proxy Sets Table Page (128)Figure 3-60: Coders Page (133)Figure 3-61: Coder Group Settings Page (134)Figure 3-62: Tel Profile Settings Page (136)Figure 3-63: IP Profile Settings Page (138)Figure 3-64: Advanced Parameters Page (140)Figure 3-65: Supplementary Services Page (141)Figure 3-66: Metering Tones Page (142)Figure 3-67: Charge Codes Table Page (143)Figure 3-68: Keypad Features Page (144)Figure 3-69: General Settings Page (145)Figure 3-70: Source Phone Number Manipulation Table for Tel-to-IP Calls (147)Figure 3-71: Redirect Number IP to Tel Page (150)Figure 3-72: Redirect Number Tel to IP Page (152)Figure 3-73: Phone Context Table Page (154)Figure 3-74: Reasons for Alternative Routing Page (157)Figure 3-75: Routing General Parameters Page (158)Figure 3-76: Outbound IP Routing Table Page (160)Figure 3-77: Inbound IP Routing Table (164)Figure 3-78: Internal DNS Table Page (166)Figure 3-79: Internal SRV Table Page (167)Figure 3-80: Release Cause Mapping Page (168)Figure 3-81: Forward on Busy Trunk Destination Page (169)Figure 3-82: Authentication Page (171)Figure 3-83: Automatic Dialing Page (172)Figure 3-84: Caller Display Information Page (173)Figure 3-85: Call Forward Page (174)Figure 3-86: Caller ID Permissions Page (175)Figure 3-87: Digital Gateway Parameters Page (177)Figure 3-88: IP Media Settings Page (178)Figure 3-89: SAS Configuration Page (179)Figure 3-90: IP2IP Routing Page (180)Figure 3-91: General Settings Page (183)Figure 3-92: Admission Control Page (184)Figure 3-93: Message Manipulations Page (186)Figure 3-94: Classification Table Page (191)Figure 3-95: IP2IP Routing Table Page (193)Figure 3-96: IP2IP Inbound Manipulation Page (197)Figure 3-97: IP to IP Outbound Manipulation Page (200)Figure 3-98: Alternative Routing Reasons Page (202)Figure 3-99: Allowed Coders Group Page (203)Figure 3-100: TDM Bus Settings Page (204)Figure 3-101: Voice Mail Settings Page (205)Figure 3-102: RADIUS Parameters Page (206)Figure 3-103: FXO Settings Page (207)Figure 3-104: LDAP Settings Page (208)Figure 3-105: Working with Tables (209)Figure 3-106: WAN Access (211)Figure 3-107: Manual WAN Connection (212)Figure 3-108: PPPoE WAN Connection (212)Figure 3-109: PPTP WAN Connection Type (212)Figure 3-110: L2TP WAN Connection Type (213)Figure 3-111: WAN Access Page (213)Figure 3-112: PPP Over T1 (214)Figure 3-113: Settings Tab (214)Figure 3-114: PPP Tab (215)Figure 3-115: T1 Tab (215)Figure 3-116: HDLC Over T1 (216)Figure 3-117: Device's Firewall (Example) (217)Figure 3-118: Configuring General Security (218)Figure 3-119: Configuring LAN Restriction Rules (219)Figure 3-120: Adding an Access Control Rule (219)Figure 3-121: Disabled LAN Restrictions - Cleared Check Box (220)Figure 3-122: Configuring Port Forwarding (221)Figure 3-123: Adding Port Forwarding Rule (221)Figure 3-124: Defining a DMZ Host (222)Figure 3-125: Configuring Port Triggering (223)Figure 3-126: Editing Port Triggering Rule (223)Figure 3-127: Defining Trigger Ports (224)Figure 3-128: Configuring Website Restrictions (224)Figure 3-129: Adding a Restricted Website (224)Figure 3-130: Configuring NAT (225)Figure 3-131: Defining Public IP Address (226)Figure 3-132: Defining NAT/NAPT Rule (226)。
Mediant 1000配置文档一、访问web界面Web页面可以用标准浏览器打开1、打开一个标准浏览器页面2、在地址栏输入网关的ip地址,网关出厂地址:.10.输入完后回车出现下表面界面:3、在User Name和Password中输入用户名和密码(网关默认用户名密码都是Admin) .4、点击Ok按钮就可以进入设备web主界面.二、修改设备ip地址1、在首页中选中Configuration菜单,点击Network Settings—IP Settings打开ip 设置界面,如下图:2、在IP Addresss中填写要设置的ip,Subnet Mask中填写掩码,Defalt GatewayAddress中填写网关.3、填写完成点Submit.三.配置PSTM测参数(信令设置—E1线路两端的信令一定是network side与user side相对应。
不能同时使用一种信令)1、在首页中选中Configuration菜单(选中左上角的Full),点击PSTN Settings—Trunk Settings打开PSTN配置界面,选择第四个E1点击Stop按钮出现如下图界面:Protocol Type选择E1 EURO ISDN,下拉右边的下拉条,把ISDN Termination Side 选择User side,如下图:2、点击上图左下角Apply to all Trunks按钮把配置应用到所有E1,再点击Submit.四、Trunk Group配置1、在首页中选中Configuration,点击Protocol Configuration—Trunk Group—Trunk Group进入Trunk Group设置界面,如图:Module是选择板卡,From Trunk是指从哪个E1开始,To Trunk是到哪个E1结束,Channels是来定义时隙的,Pri的一般都是1-31。
Phone Number不用填,因为E1对用户来说只是通道。

多功能Portal网关UAC500配置说明2014/8/11V 1.2目录1. 系统管理 (2)1.1 系统管理方式 (2)2. 网络管理 (4)2.1 IP设置 (4)2.2 DHCP服务器配置 (4)2.3 路由配置 (5)2.4 端口映射 (6)2.5 外网直通和内网直通 (6)3. 用户管理 (7)3.1 创建用户 (7)3.2 创建用户组 (8)3.3 账户查询 (9)3.4 导入和导出用户 (9)3.4.1 批量导入用户 (9)3.5 导出用户 (10)3.6 删除用户 (10)4. Portal管理 (11)4.1 本地portal (11)4.2 外部AAA服务器Portal (15)4.3 加入UACloud (17)5. 微信认证 (19)6. 系统维护 (24)6.1 系统升级 (24)6.2 配置备份和恢复 (25)6.2.1 配置备份 (25)6.2.2 配置恢复 (25)1.系统管理1.1 系统管理方式UAC500支持通过浏览器进行直观的图像界面管理,也支持使用console来进行命令行的管理。
由于通过console管理相对复杂,这里以网页管理方式来进行说明。
UAC500拥有1个console口,6个以太网接口。
默认情况下,第一个以太网接口为WAN口,其他接口为LAN 口。
由于LAN口默认开启了认证,因此可以通过WAN口来进行管理。
WAN口的默认IP地址为192.168.1.11。
要对UAC500进行管理,请将电脑的有线网卡IP地址设置为192.168.1.0网段,然后连接到第一个以太网接口(eth0),这时候打开浏览器,输入http://192.168.1.11:8080就能访问UAC500的配置页面了。
默认的用户名和密码为admin/admin。
此外,也可以将PC连接到第二个以太网口(eth1),默认情况下eth1开启了DHCP,当获取到IP之后,是上不了外网的。
实验1 OCE典型配置1.1 实验内容与目标完成本实验,您应该能够:●使各种终端注册到ippbx服务器上●掌握基本的业务配置方法●掌握会议的配置方法1.2 实验组网图图1-1实验组网实验组网如图1-1所示。
部署一台ICG3000设备,即安装了OAP板卡以及FXS语音板卡的MSR30-40,以及一台VG3108语音网关,模拟电话、IP电话以及PC若干.OCE的会议组件,作为本公司的会议服务器,实现公司内部电话会议功能;OCE的即时通信组件,为公司内用户提供即时通信以及多媒体会议等功能。
1.3 实验设备与版本1.3.1本实验所需之主要设备器材如表1-1所示。
表1-1命令列表()1.3.2电话号码规划原则:实验环境通过VG3108的FXO口出局,实验环境中任何一部座机可以拨打公司内线四位短号,通过拨打0加13………或者八位固话号码的方式拨打外线电话;实验环境中所有电话号码均为三位,具体规划详见实验组网图;电话会议接入号码为8888,所有预约会议号码为8888开头的五位号码,如88881;所有业务号码配置为99开头的三位短号,如自动话务员991;Only业务992等等。
1.4 实验过程实验任务一:各种终端的注册一、掌握各种终端常用的注册oce-ippbx的方法1) ICG3000(MSR)下的模拟电话注册2) VG3108下的模拟电话注册方3) IP电话注册方法4) IM软电话的注册方法二、步骤:步骤一:ICG3000下的模拟电话注册到OCE的IP-PBX组件列出具体操作,输入的具体命令,执行命令之后的现象,display和debugging信息等,配置和显示信息如下:<ICG3000> sys[ICG3000] voice-setup[ICG3000-voice]sip //配置SIP Server相关信息[ICG3000-voice-sip] registrar ipv4 192.168.207.211[ICG3000-voice-sip]proxy ipv4 192.168.207.211[ICG3000-voice-sip] register-enable on[ICG3000-voice-sip] entity 101 pots //配置Pots实体匹配101[ICG3000-voice-entity101] ine 5/0[ICG3000-voice-entity101] match-template 101[ICG3000-voice-entity101]outband sip[ICG3000-voice-sip] entity 102 pots //配置Pots实体匹配102[ICG3000-voice-entity102] ine 5/1[ICG3000-voice-entity102] match-template 102[ICG3000-voice-entity102]outband sip注意:OCE上缺省使用严格注册,要求每个pots实体对应一个OCE上的gateway。
奥科网关配置手册Strong目录奥科网关配置手册 (1)一.硬件连接 (2)1.1.奥科网关硬件连接(图1) (2)1.2.电脑配置成自动获得IP地址(DHCP)(图2) (2)1.3.查看电脑IP信息(图3) (3)二.登陆系统 (3)2.1.浏览器登陆(图4) (3)2.2.系统IP地址配置(图5) (4)三.系统升级 (4)3.1.查看系统版本信息(图6,7) (4)3.2系统升级(图8,9,10,11,12) (5)3.3.查看系统升级版本(图13) (7)四.系统配置 (7)4.1.信令配置,SIP服务器的IP地址为120.174(图14) (7)4.2.语音编码配置,选择编码G.711,64kbpx,Alaw(图15) (8)4.3.配置电话号码及密码(图16,17) (9)五.系统远程维护配置 (10)六.查看系统状态 (10)6.1.查看网络状态(图19) (10)6.2.查看分机号码状态(图20) (11)一.硬件连接1.1.奥科网关硬件连接(图1)⏹奥科网关的WAN口与公司局域网连接⏹奥科网关的LAN口与PC连接⏹奥科网关的电源线与公司220V电源相连图11.2.电脑配置成自动获得IP地址(DHCP)(图2)点击电脑右下方的网卡指示图标,按照图2标出的红色位置配置电脑。
1.3.查看电脑IP信息(图3)192.168.2.1就是奥科网关的默认IP地址,如果得不到IP地址,请点击修复按钮。
图3二.登陆系统2.1.浏览器登陆(图4)在IE浏览器中输入奥科网关的IP地址(192.168.2.1)及输入用户名(admin)和密码(admin),进入系统维护界面。
2.2.系统IP地址配置(图5)点击菜单,选择手动配置模式进行配置IP地址,请按照图5配置,配置完成点击按钮OK.请注意在输入IP地址的时候输入法为英文输入模式也不能输入空格,IP地址请与系统管理员联系。
图5三.系统升级3.1.查看系统版本信息(图6,7)点击按钮,选择子菜单,最新版本为MP20x_2_6_4_build_9_REV_B_SIP,如果小于这个版本请升级。
奥科网关使用手册北京英立讯科技有限公司Zinglabs Beijing Co.,Ltd1 配置网关IP (4)1.1登陆web修改IP (4)1.2 使用BootP-tftp软件修改IP (4)1.2.1 设置软件参数 (4)1.2.2 修改IP (5)2 MP114配置端口呼入、呼出 (6)2.1 Protocol Management — Protocol Definition — DTMF&Dialing (6)2.2 Protocol Management — Advanced Applications — FXO Settings (7)2.3 Protocol Management — Endpoint Phone Numbers (8)2.4 Protocol Management — Hunt Group Settings (8)2.5 Protocol Management — Endpoint Settings — Automatic Dialing (9)2.6 Protocol Management — Routing Tables — Tel to IP Routing (10)2.7 Protocol Management — Routing Tables — IP to Trunk Group Routing .. 102.8 Protocol Management — Advanced Parameters — Supplementary Services 112.9 Maintenance (12)2.10 Advanced Configuration — Configuration File (12)3 MO118-FXS与MO118-FXO配置端口呼入、呼出 (13)3.1 Protocol Management-Routing Tables-Tel to IP Routing (13)3.2 Protocol Management-Routing Tables-IP to Hunt Group Routing (14)3.3 Protocol Management-Endpoint Phone Numbers (16)3.4 Protocol Management — Advanced Applications — FXO Settings (17)3.5 Protocol Management-Endpoint Settings—Automatic Dialing (17)3.6 Advanced Configuration-Media Settings-Voice Settings (18)3.7 传送主叫号码设置 (19)3.7.1 Protocol Management—EndpointSettings—Generate Caller ID to Tel193.7.2 Protocol Management—EndpointSettings—Caller ID Permissions .. 203.7.3 Protocol Management—Advanced Parameters—Supplementary Services213.7.4 Protocol Management—Advanced Parameters—Supplementary Services213.7.5 Advanced Configuration — Media Settings — Fax/Modem/CID settings (22)4 奥科软座席设置 (23)4.1 修改IP地址 (23)4.2 调节增益 (23)4.3 设置电话号码位数 (24)4.4 设置SAS (25)4.5 设置Tel to IP Routing (25)4.6 设置IP To Hunt Group Routing Table (26)4.7 设置自动外拨 (27)4.8 设置本端号码 (27)4.9 设置拨号模式 (28)4.10 设置 Hunt Group Settings (29)4.11 保存重启 (29)4.12 配置文件导入导出 (30)5 奥科中继网关的常见问题解决办法 (30)5.1 拿到 AudioCodes 中继网关后应该用什么方式登陆到中继网关里? (30)5.2 Audio Codes 不同型号的中继网关默认 IP 是多少? (30)5.3 Audio Codes 中继网关默认登陆用户名和密码是多少? (30)5.4 如果忘记 IP 地址后应该怎样登陆? (31)5.5 中继网关已经可以登陆进去了,怎么把默认的中继网关 IP 改为公网 IP 地址?315.6 如果有一台中继网关正在使用,我想把另一台 AudioCodes 中继网关配置成相同配置,但我不知道怎么配置,怎么办? (31)5.7 如何更改 AudioCodes 默认密码? (31)5.8 如何改变 WEB 页面登陆默认 8080 端口? (31)5.9 如果通话中感觉有回音怎么办? (31)5.10 如果通话时感觉声音较小怎么办? (32)5.11 如果通话正常,但拨分机不能切断拨号音怎么办? (32)5.12 如果使用 SIP 协议时,回铃消息为 180 时怎么办? (32)5.13 传真无法发送成功 (32)1 配置网关IP1.1登陆web修改IPAudioCodes 的所有型号中继网关默认IP 为10.1.10.10 ,TP1610/SB1610 中继网关默认IP 为10.1.10.10 与10.1.10.11 登录web修改,用户名:Admin,密码:Admin。
登录后点击Quick Setup,更改IP后点击reset键重启后生效。
1.2 使用BootP-tftp软件修改IP网关背面标签写有MAC地址,使用BootP软件根据MAC地址修改网关IP。
1.2.1 设置软件参数点击Edit--->preferences 弹出参数选择窗口,设置如下图所示1、ARP Manipulation Enabled:允许ARP 处理,需要打开。
2、TFTP Server enable:允许,需要打开。
3、on interface:默认是本机IP。
4、Directory CMP 或是INI 文件存放的目录,如果不是请选择对应的CMP 文件或INI 文件(软件中自带)其它的选项默认。
1.2.2 修改IP1、将设有静态IP 地址的电脑用交叉线与设备相连,或是在同一个网络交换机下。
2、打开BootP 软件,将常用工具栏设置如下图所示:3、点击常用工具栏中的“编辑客户端”弹出如下窗口:4、点击“添加新的客户端”出现如下对话框:5、添写右选项框信息:Client MAC:添写需要配置的中继网关的MAC 地址Client Name :针对这个MAC地址起一个名称,随便写一个即可Template :保持默认即可IP:设定网关的IP地址,必须和PC机在同一网段Subnet:设置网关子网掩码(必须和连接的PC机的子网掩码一样)Gateway :设置默认网关TFTP Server IP :默认是本地电脑的IP 地址,如果不是关掉BootP软件重新设置电脑IP 为静态IP 地址。
下边的选项保持默认。
6、点击Apply 然后点OK,BootP 软件不要关掉,将网关断电隔5S 重新加电,正常在BootP 软件视图区可以看到操作信息(包括MAC 地址和IP 地址等信息)7、大约1分钟后可以通过新的IP 地址访问网关。
2 MP114配置端口呼入、呼出2.1 Protocol Management —Protocol Definition —DTMF&Dialing设置Max Digits in Phone Num (电话号码的位数),其他配置为默认。
设置完成后点击Submit 保存如图:2.2 Protocol Management —Advanced Applications —FXO Settings 配置Dialing Mode (拨号模式)为 One Stage (一次拨号)其他配置为默认,设置完成后点击Submit 保存。
当与MP118 Audio Codes 搭配时需设置为 Two Stage 。
如图:2.3 Protocol Management —Endpoint Phone Numbers配置本端S口号码(可设为任意号)Phone Number,并设置通道号Channel(s),以及对号码进行分组Hunt Group ID,分组可一将号码分为同一个组,也可以分为不同的组别,但S口与O口不可以设置为一组。
Profile ID 处默认设置为 0 。
本端O口号码可不进行设置但分组及通道号需要添加。
设置完成后点击Submit 保存。
如图:2.4 Protocol Management —Hunt Group Settings对分组进行相关设置,配置分组1(即本端S口分组)为 By Dest Phone Number 。
其他分组则可以设置为Cyclic Ascending。
设置完成后点击Submit 保存。
如图:2.5 Protocol Management —Endpoint Settings —Automatic Dialing设置FXO为对端网关S口的号码。
Auto Dial Status 处设置为Enable,设置完成后点击Submit 保存。
如图:2.6 Protocol Management —Routing Tables —Tel to IP Routing配置方式为:任意主叫号码(Source Phone Prefix)拨打任意被叫号码(Dest. Phone Prefix)都传送到对端网关(Dest. IP Address)。
任意号码设置为“*”,Profile ID设置为0。
其他不用设置。
设置完成后点击Submit 保存。
如图:2.7 Protocol Management —Routing Tables —IP to Trunk Group Routing配置方式为:首先任意一个主叫号码(Source Phone Prefix )拨打到本端号码(Dest. Phone Prefix )都将传送至本端网关(Source IP Address 即可添本端网关的IP地址,也可以用* 代替),分组(Hunt Group ID )为本端S口的组别。
其次,当主叫号码为对端的号码(Source Phone Prefix)拨打任意号码(Dest. Phone Prefix )时都将传送到本端网关(Source IP Address 即可添本端网关的IP地址,也可以用 * 代替),分组(Hunt Group ID )为本端O口的组别。