闪电战1-地图编辑器初级教程1
- 格式:doc
- 大小:3.01 MB
- 文档页数:13
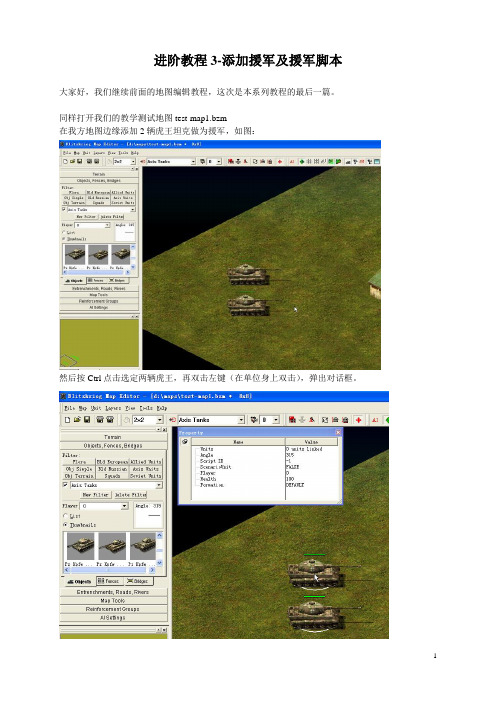
进阶教程3-添加援军及援军脚本大家好,我们继续前面的地图编辑教程,这次是本系列教程的最后一篇。
同样打开我们的教学测试地图test-map1.bzm在我方地图边缘添加2辆虎王坦克做为援军,如图:然后按Ctrl点击选定两辆虎王,再双击左键(在单位身上双击),弹出对话框。
可以看到单位的ID是默认值“-1”。
(就是Script ID那行)我们双击“-1”,就可以改动单位ID值,我这里改成100。
如图(注意,单位的ID是对应脚本里的单位ID设置,和援军代码是两个概念,但是为了方便记忆,单位ID和援军代码往往设置同样的数值。
)然后关闭对话框,点击左边工具栏的第5行“Reinforcement Groups”进行援军设置。
我们点击“New Group”新建援军代码,如图然后会弹出一个对话框,要你输入援军的代码,我们这里设置为100。
记住,这个“100”是援军代码而不是单位ID,只是为了方便记忆,所以设置成同样数值。
(避免援军多批次造成的混乱)好了,点击OK完成添加,我们可以看见左边的援军列表里已经添加了代码为“100”的援军。
如图但是这个援军代码没有和单位ID形成关联时,是没有任何意义的。
我们还要设置援军代码和单位ID 的关联。
(其实就是把特定ID的单位加入该代码的援军组,一个援军代码可以和几个单位ID关联,即一个代码的援军可以调用几个ID的单位,但是为了方便记忆,我还是建议大家设置一对一的关联。
)点击援军代码列表下方的“add group with script”选项进行关联设置。
(图中的“add”只能看见一个“d”)。
然后可以看见弹出一个对话框,要你输入关联的单位ID,我们输入两辆虎王的ID:100。
如图点击OK,可以看到援军代码列表下方的单位ID列表上多了一行“Script Id:100”,证明关联成功!如图好了,地图编辑器部分的设置完成,保存后退出,我们进行脚本部分的援军设置。
同前用记事本打开脚本文件test-map1.lua在里面添加这段代码:function GReinforcement100()LandReinforcement(100);Suicide();end;如图单单这段命令,游戏是不会执行这条命令的,我们还需要把这条命令和其他已经可以运行的命令关联。
![闪电战1脚本编写基础教程-[闪电战论坛]](https://img.taocdn.com/s1/m/b97a7187cc22bcd126ff0c9d.png)
序言闪电战1发行之时,地图编辑器与资源编辑器作为―赠品‖与游戏一同打包。
然而编辑器的帮助文件内容有限,而且完全没有介绍如何通过编码(脚本)控制自定义任务内的事件。
全靠累积玩家们在各个论坛上分享的发现,我们才能找出如何发挥编辑器的最大效能。
单从脚本语言LUA方面来看,同样是依靠准确解码、反复试错以及广泛开放的发现共享才得以完善。
数量众多的个人玩家以―破解‖Lua为己任来制作自定义地图,为跟随者开创了一条更为平坦的道路。
直到这些先驱人物在―闪‖界隐退,每一位玩过或尝试过制作自定义地图的玩家都应该感谢那些慷慨分享心得的编码破译者大量的辛勤劳作。
破译编码过程中产生的重要贡献之一是Calvin的Blitzkrieg Guideto Programming Lua Functions。
它提供了一份闪电战1中使用脚本函数的列表以及如何运用这些函数的指导。
它对于编写闪电战脚本的人是十分必要的。
这个指南像是一本LUA词典,但它没有提供如何将这些术语组合成可用脚本的浅易说明。
(Calvin提供了一个例子,但是这个例子不能被称为―简介‖所以脚本编写的新手最好忽略它。
)Calvin的Blitzkrieg Guideto Programming Lua Functions可以在Blitzkrieg Portal下载。
Wespex是第一位制作完整编辑地图指南的人,为此他编辑了地图,编写了脚本,并且打包了可以与其他玩家分享的自定义游戏。
这个指南(再版很多次并最终与Calvin的指南合并)是任何希望制作自定义地图玩家的入门教程。
在发布这个指南之后,Wespex在BKP论坛就脚本编写提供了非常广泛的问题答疑。
这些指南和答疑最有价值的特征是在脚本范例中提供了全面的注释,不仅提供了制成的脚本,还解释了脚本运作的原理。
如果说现在绝大多数脚本编写者是靠这个指南启蒙应该是不失公允的。
这个基础教程的编写是为了响应BKP论坛上的一些评论以及解决很多地图编辑者在开始尝试脚本编写时所面临的困难。
闪电战1 单位编辑教程作者:小欧欧目录序章:单位相关文件的种类说明介绍 (4)第一章:单位属性文件修改初步教程第一节:坦克及装甲车属性文件详解 (9)第二节:火炮及卡车、火车属性文件详解 (14)第三节:飞机属性文件详解 (17)第四节:步兵及步兵班属性文件详解 (18)第五节:建筑属性文件详解 (22)第六节:1.xml文件修改示范 (25)第二章:单位属性文件修改进阶教程第一节:武器文件的详解 (31)第二节:效果文件的详解 (36)第三节:单位指令详解 (39)第四节:单位设定及武器设定的匹配及技巧 (42)第三章:新单位的导入第一节:新单位导入原版的方法 (50)第二节:新单位导入Mod的方法 (54)第四章:系统文件consts.xml的解析 (56)前言《闪电战1》是一款扩展性很好的即时战略游戏,各种新单位和新建筑可以非常容易的导入游戏,而且单位的制作也不难,因此《闪电战1》的组模非常的丰富。
本人修改的第一款游戏就是《闪电战1》,当时还没有上网,完全是自己摸索。
经过不断的尝试,终于找到了修改单位属性的方法。
而这一步往往是修改党的第一步。
接触闪电战论坛后,经过前辈们的不断指导,终于学会了使用Maya建模。
这个软件曾经让我疯狂的去尝试建模,有时甚至在梦中都会想着如何去制作新单位。
闪电战的单位建模是一个比较复杂的过程,每一步都不难,但是都需要教程来指导。
非常遗憾的是,当年的老论坛关闭后,所留下来的教程不多,而且凌乱。
本人作为新论坛的技术专区版主,有义务将这些零碎的教程整合重写。
重新编写成一部完整的教程。
虽然《闪电战1》这款游戏已经渐渐老去,但是还有不少热心的老玩家在关注,这部教程就是献给所有热爱这款游戏玩家的礼物!小欧欧2014年2月序章:单位相关文件的种类说明介绍《闪电战1》的单位相关文件分为几种:一个是单位属性文件“1.xml”,另一个是单位模型文件“1.mod”,还有单位皮肤文件“.dds”。
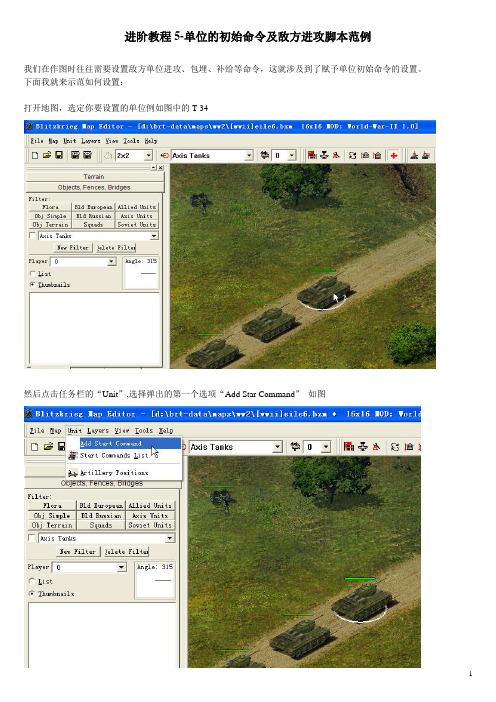
进阶教程5-单位的初始命令及敌方进攻脚本范例我们在作图时往往需要设置敌方单位进攻、包埋、补给等命令,这就涉及到了赋予单位初始命令的设置。
下面我就来示范如何设置:打开地图,选定你要设置的单位例如图中的T-34然后点击任务栏的“Unit”,选择弹出的第一个选项“Add Star Command”如图然后就会弹出一个对话框,这个就是设置单位初始命令的地方。
双击第一行的那个“Stop”,然后就弹出命令选项,例如,我要选择“移动-进攻”命令,就选择“SW ARM_TO”然后再把鼠标移动到你要该单位进攻的地方,点左键(建议点空地),这样就完成一个命令设置了。
同理,如果要设定单位包埋,步骤相同,选择“ENTRENCH_SELF”,然后点击到单位身上即可。
常用的命令还有原地待命,选择“STAND_GROUD”,然后点到单位身上。
补给车的补给命令“RESUPPL Y”,可以选择补给的地点(火炮或坦克旁边)或者点击在补给车身上(原地补给)某些补给车可以补充步兵,相应的命令是“RESUPPL Y_HUMANS”,设置方法同上。
最后示范设置敌方援军进攻的脚本设置方法。
首先在地图编辑器里设置敌方援军,例如“ID 1000”然后为ID 1000的敌方单位设定初始命令“SW ARM_TO”,设定你要进攻的区域。
然后设置条件触发调用ID 1000的脚本,这样在游戏里就会按照你设定的条件调用ID 1000的援军,并按照你设置的初始命令向预定区域进攻。
例如function EattackA()if GetNUnitsInArea(1, "V1A") < 30 thenRunScript("RReinforcement1000", 1000);Suicide();end;end;function RReinforcement1000()LandReinforcement(1000);DisplayTrace("注意!敌人前来增援!");Suicide();end;该脚本的意义为:当区域“V1A”的敌军数量少于30时,调用命令“RReinforcement1000()”命令“RReinforcement1000()”的意义即调用ID为1000的援军。

玩魔兽的人有N多,但是肯于研究地图制作的人很少(只是相对而言),首先我们来看看地图的制作过程。
(这里只介绍中文WE,英文版的稍后再说)位置:地图编辑器的位置如图:是一个名字叫做worldedit.exe的诡异的文件(之所以说诡异是因为没有图标)这个就是编制地图的基础工具作好的地图则是放在一个叫maps的文件夹里,如图:那么首先我们来打开WE(地图编辑器,以后统称WE)第一件事就是在窗口中关闭刷子表,如图:至于原因就是会提高速度,尤其是改名字时的速度。
然后就是去除WE默认的创建新地图,如图:点击之后出现如下图:将开始时自动创建新地图一项前面的勾勾去掉这样做的目的是提高打开WE时的速度,避免创建无谓的地图所浪费的内存资源另外请注意:当涂贴触发器时自动创建未知变量。
很明白了,不用解释。
下面我们可以看到这就是指令栏,如图:具体作用,将鼠标在按钮上稍做停留便会出现指示条这里是微缩地图,如图:这里可以看到你的地图的全貌然后是预览窗口,如图:这里可以看到单位模型,各种动作,魔法效果等,以便于更好的选择适当的东西。
熟悉了WE之后,就要开始从做图学起,本人的经验,一边做图一边学习是最快的但是通常这个边学边做的处女作都是练习用的,上不得台面,首先建图,如图:点击之后出现这样的画面,如图:在这里:地图尺寸:就是地图的大小实用区域:就是在游戏时实际能够到达的地方(有人问为什么会有尺寸和实用区域之分,原因就是:即使你的单位到了地图的边缘,但是单位总还是有视力的,不可能一下子视线就阻断在了那里,那会给人不真实感。
)尺寸描述:就是在游戏中进入地图时可以让玩家大致了解这张地图的大小地形设置:选择你创建的地图是属于哪类环境的初始地表:你创建的地图最初所有地方的地面类型,通常选择想要创建的地图中最多的那类地表初始海拔高度:这个关系到你创建的地图中所能升高和降低的地面的限制,建议用默认值。
初始水位:顾名思义,就是水产生陡峭地形:钩上之后创建的地面全是坑包,没钩的就很平滑,因地图而选择吧创建了一个新的地图之后,地图上会显示格子,对于格子的控制如图:可以选择是否有格子和格子的大小,建议做地形的时候使用格子。
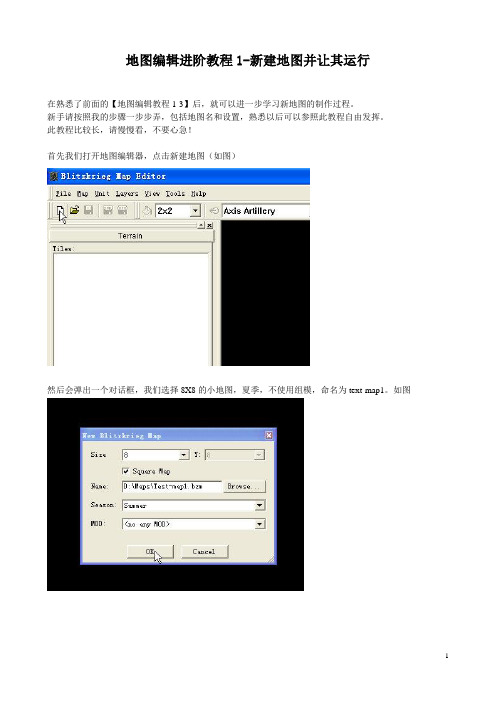
地图编辑进阶教程1-新建地图并让其运行在熟悉了前面的【地图编辑教程1-3】后,就可以进一步学习新地图的制作过程。
新手请按照我的步骤一步步弄,包括地图名和设置,熟悉以后可以参照此教程自由发挥。
此教程比较长,请慢慢看,不要心急!首先我们打开地图编辑器,点击新建地图(如图)然后会弹出一个对话框,我们选择8X8的小地图,夏季,不使用组模,命名为text-map1。
如图然后就进入编辑器了,我们开始编辑。
如图我们现在左下角设置玩家0(即玩家)的资源仓库(我方单位和建筑在小地图里是绿色),如图然后在右上角设置玩家1(即电脑)的资源仓库,(电脑的单位和建筑在小地图里是红色)如图这里之所以先设置资源仓库是为了强调这一建筑的重要性,地图上必须要有资源仓库补给车才会自动补充资源(单纯野外仓库不行)然后我们回到玩家0的设置,添加我方单位,这里设为德军。
如图添加完毕(先添加少量单位测试),如图然后调到玩家1设置电脑单位,如图然后回到玩家0的基地,选择玩家0,点击编辑器上方中间的摄像机,这样认为开始的画面就是我方基地了,如图(成功添加后编辑器里可以看到一个绿色的摄像机)接下来我们设置阵营和空中支援,点击摄像机旁边的倒置小飞机,如图。
看到弹出的对话框调节对话框大小,并且点击“+”号展开选项,在玩家0的“Party name ”里设置为德国“German”,空中支援按我的设置弄(这是一个熟悉过程,以后你可以自己发挥),如图但是单单这样设置是不能调用空军的,因为没有设置起飞点,因此我们点击“Apper points”,如图又弹出一对话框,点击“Add...”添加起飞点,如图再弹出一对话框,可以看到两个坐标值可以设置,我们取X=0,Y=0。
(即左下角,左下角数值永远是0,0),点OK。
如图好了,设置好的话“Apper points”选项里可以看到有1个起飞点,如图同样设置玩家1(电脑)的空军和阵营,如图同样玩家1是没有起飞点的,我们要添加,例如我想其在最右侧起飞,把鼠标移到最右边,记住地图编辑器下方的坐标值128 ,128. 如图然后和上面一样添加起飞点,坐标:128,128,如图设置好了,如图点击保存,如图地图制作完成了,按照建图的路径找到地图文件,如图然后我再教一次大家制作PAK文件,进入闪电战的data文件夹,复制最后那个PAK文件,如图重命名为我们的地图名test-map1 (方便你以后查找修改),如图用WinRAR打开新建的PAK文件,把放我们新地图的maps文件夹拖动添加到PAK文件里,如图添加好了,如图删去多余的文件,这样新图的pak文件就出步建好了,如图但是单单这样我们是无法在游戏里找到地图的,我们还有制作一些文件。
魔兽地图编辑器技能新手教程(Warcraft map editor skills novicetutorial)Warcraft map editor - skills section guide (turn)If you have read the introduction of the unit, I believe you are not so strange to WE, so now we begin to explore the skills of warcraft. Before starting, I would like to clarify that in order to take care of the novice, I can only understand the skills more easily, explain them in a narrower sense, and explain only the common features of skills.First of all, skills are divided into 3 categories: unit skills, hero skills, and item skills.1. Unit skills: skills need not be learned and can not be upgraded automatically. As long as the unit has the skills, it can be used.Prompt:1. No matter how much you set the unit of skill level, but on the unit on the default is 1, but this is not to say that the unit skill is useless, after the trigger text (Trigge), we can transform the skill level to trigger.2. Hero skills: skills, turn. Shoot tip also satisfied the construction of disaster Hui Mo Shan Ao Ding, the young, because of the ash was a pile of words was a hero skills shortage Yi Di?.3. Product skills: skills need not be learned, and can not be upgraded automatically. As long as the unit has the goods with this skill, it can be used only in the role of the goods.Prompt:In Warcraft, 3 types of skills are not explicitly limited by category, and each skill category can be changed by setting. That is to say, hero skills can be set to unit skills, units, skills, items, skills, and so on, so that we change the characteristics of the various skills into commonalities.First of all, we have to do some of the same steps.Step:1. Open WE and press F6 to open the object editor.2. Click on the skills editor bar and select the human hero focus halo on the tree branch that appears on the right.3. Ctrl - C replication, Ctrl - V paste, shows a focused halo skill in the custom branch.OneScoring timesAlthough very old, but very practical strength + 50 agility + 50 intelligence + 50 F coin + 50DonghailwCollection sharing scoreReply to reference subscriptions TOPSend a short messageAdd to good friendsAt at DEG up = offlineEssence 0 strength, 66 agility, 74 intelligence, 62 prestige, 0 F coins, 70 read authority 10Registered members (Junior)UID996653 post 12 points 235, read permissions 10, online time 2 hours, registration time 2009-4-16, finally login 2009-4-18 2 floorAt at DEG up = published in 2009-4-17 16:34 | only see the author image classShadow effects: set the effects of light and shadow, such as the red lightning of the finger of death, and the chain lightning of the prophet.Prompt:1. The effect of light and shadow is to create 1 lightningeffects between 2 points. What is called lightning effect? It is the effect of variable length and fast propagation, like lightning, whose starting point is to release the unit's position and terminate it at the target unit.2. Not any skill that has starting and ending points can be set up with light and shadow effects, skills with light and shadow effects, chain lightning, death fingers, medical waves, and so on.3. You can set the most light effect skills can only have 1 kinds of lighting effects, such as: the means of death, mana, but individual skills can have 2 types of lighting effects, such as: medical chain lightning wave, this skill lighting effects is divided into primary and secondary two, between the main need is cast the unit and the first unit lighting effect between secondary and subordinate units is the superior target unit lighting effects. But if only 1 shadows are set, then the main and minor lighting effects are the same.Name: make animation unit release skills when the action, general common action: Attack (attack action), walk (walking action), stand (standing action), spell (Magic action), death (death action) and so on, we can find what they want in action WE.Prompt:1. Some units do not have the action mentioned above, because the actions in each unit model file are different, and the names of actions are different.2. Find the action unit in WE, through the WE window in the command panel unit for open panel unit, the unit in the unit to find out the panel, then WE in the left side of the object will appear in the observation window units, units will show the motion of animation and animation.3. Some animations have some parameters, such as Attack - 1, Attack - 2, Attack, Slam, Stand, victory, and so on. When we set up the animation, we should set it this way, such as: Attack - 1, set to:/ / attack/ / oneAgain: Stand, victory, Attack, Slam, set to:Stand / / attack / // / victory,/ / slam.Reply reference TOPSend a short messageAdd to good friendsAt at DEG up = offlineEssence 0 strength, 66 agility, 74 intelligence, 62 prestige, 0 F coins, 70 read authority 10Registered members (Junior)UID996653 post 12 points 235, read permissions 10, online time2 hours, registration time 2009-4-16, finally login 2009-4-183 floorAt at DEG up = published in 2009-4-17 16:35 | only see the author icon - closed set can be opened or closed after opening the skill icon, such as: Invincible riding after opening the icon of st..Icon - General: sets skill icons.Icon - Research: sets icons for learning skills, that is, icons when added.Image - target: set the target's skill, image, and effect after release. That is, display an image model file on your casting target.Prompt:1. Image - the target can only target skills with definite goals, that is, individual skills. Generally only set 1, more useless, but individual skills can be set more than one.2. Image - target skills, image effects will not last, can only exist for a short time, how short? That is, the 1 image animationtime, such as the image model file you set without animation, will not display.3. Image target set so that we can easily change the image effect, show the target unit applying method in other words, it can make us more COOL skills, such as: we can be the paladin image - Divine Light skills goal setting riding skills sanctification revival effect, so that the use of the sacred the light to ally with blood, there will be a light effect or angel drop from the clouds.Image target add point: sets the image - the image effect of the target, which can be created on the target unit. The maximum is 6, and the minimum is default 0. This 0 is not representative of no, but is related to the setting of the image the target, not set in the large and useless. As long as the image is set - the target, the image will be created.Image - target add point 1: sets the position of the first target image created on the target unit. Image target add point2/3/4/5/6: the same.Prompt:1. Novice to image target additional points may be difficult to understand, for example: when we get the ball lightning items, there will be a lightning ball rotation in our arms, this is to create 1 lightning ball animation in weapons, his additional point is weapon (weapon), and in the US shadowstrike poison behind you a black kid, the kid is the additional point overhead (head), so perhaps you will understand.2. Because of the additional point is a very large string library, so I quote analysis of Changfeng long:Reply reference TOPSend a short messageAdd to good friendsAt at DEG up = offlineEssence 0 strength, 66 agility, 74 intelligence, 62 prestige, 0 F coins, 70 read authority 10Registered members (Junior)UID996653 post 12 points 235, read permissions 10, online time 2 hours, registration time 2009-4-16, finally login 2009-4-18 4 floorAt at DEG up = 16:35 published in 2009-4-17 | just look at the main part of the author:Overhead floats on top of the unit, but does not move with unit movementsThe head is on the head of the unit and shakes with the action of the head of the unitChest is on the chest of the unit and shakes with the chestmovements of the unitOrigin preset, that is, in the unit position, will not shakeThe hand hand (sometimes indistinguishable from the weapon) will go hand in handThe foot of the foot moves with the footWeapon weapons will move with weapons, usually at the half of the weapon's position or tipSprite tour match, ELF (only for architecture, mechanical units and heroes blood is blood) turn around the sphere, with the following first second third fourth fifth sixth, but not all buildings or machinery are the six position, the six position is different for things. When you use it, you can test yourself. If not decorated, defaults to firstThe medium intermediate (only valid for the building) matches the following first second third fourth fifth sixth, and the test results are valid for the last part.Large whole (valid only for buildings) ibidMount mounts (valid only for mounts), see below for example Rear (for a quadruped or a horse) is their butt position Position and position correction:Left on the left (such as hand left = left hand, enter left, hand, too)Right rightRallypoint assembly point,The rally point, however, is the default rally point location, which does not change as you click in the gameSpecific collocation is very much, probably have:Left, chest, right, chest, left, mount, right, mount, left, hand, right, hand, left, rear, right, rear, mount, rear, left, foot, right, foot, weapon,, left, weapon, rightExample: take the Terran Knight (because he has almost everything) and the effects are flagsOn the right side of the ground, the origin- moves along with the rider, unaffected by his modified movementsHand = right hand/hand Right in the right hand, hand waving flag willLeft hand/hand Left on the left hand.Head- is on his head, and when he turns his back, the flag moves (no left, head, and right head)Chest chest is advancing forward, the flag isLeft, chest=left, mount=mount, left=chest, left, right, chest=right, mount=mount, right=chest, right:, on one side of the body, will moveLeft/right: on the left / right front leg will move with the legsRear=right rear: on the right hind leg (the horse's legs)Left rear: on left hind legMount: on the horse's headMount, rear, ass on the horseFoot= (right, foot) =rightLeft foot=leftWeapon left (not written left weapon): left handed weapon tipWeapon=weapon right: right handed weaponAlso, 1 does not have statements such as overhead, left//origin, left, and so onReply reference TOPSend a short messageAdd to good friendsAt at DEG up = offlineEssence 0 strength, 66 agility, 74 intelligence, 62 prestige, 0 F coins, 70 read authority 10Registered members (Junior)UID996653 post 12 points 235, read permissions 10, online time 2 hours, registration time 2009-4-16, finally login 2009-4-18 5 floorAt at DEG up = published in 2009-4-17 16:35 | at the beginning of 2 if you are using the wrong words such as: left eye will only perform meaningful part is from left to right left; if eye in left is what is not executed.Finally, in a word, not all units have additional points above.Arrow tip: set the arrow image release skills.Prompt:1. This is the image and arrows unit setting as well as in the image is you shoot the target hitting skills. Which skeleton does death roll over?. If we put this removed, then this skill will not see from the image, this to our editor some acute skills helpful, such as: we will Hill storm hammer arrows skills removed, in the setting of image target for monsoon, it will see a lightning drop from the clouds hit the target, then thetarget he was stunned. Or a COOL?2. Not all skills can be set to the original arrow skill, can use some skills.Arrow speed: flight speed skill set of arrows. This is what I said in my unit. If it's too late, when your second skills are issued, your first skill hasn't hit the target yet.Image - button - off - X: the set of skills can be opened or closed after opening the horizontal position of the icon. It is a skill icon in the command bar unit horizontal position.Image - button position - off - Y: sets the open position of the icon after opening the skills that can be turned on or off.Image button position - General - X/Y: sets the position of the skill icon.Image button position - Research - X/Y: location of skill icons when setting learning skills.Prompt:1. The location of the skill icon is as follows:X0, Y0, X1, Y0, X2, Y0, X3, Y0X0, Y1, X1, Y1, X2, Y1, X3, Y1X0, Y2, X1, Y2, X2, Y2, X3, Y22. Between skill and skill icon positions, it is best not to overlap, so that skills may be invisible. If positions overlap, skills can be hidden, but passive skills work just as well, which suggests a way to hide skills. But he's not 100% useful, maybe this is a WE for BUG.Image caster: the same image - the target, but it acts on the head of the skilled release.Status classInfluence area: the area where skills are set.Prompt:1. This only attack on the circumferential surface of skills, such as: tau warstomp, Hill thunder, various aura, shock wave have no effect on the skill, for a class of plane shock wave attack skills, in his class settings in the relevant items can be set.2. The principle is to set the radius of the attacking circle area at the center of the caster. A screen's width is about 2000.Permission: sets the unit type of skill that may be applied or acted upon, as specified in the unit's text.Prompt:1. A skill set allows, I can say the reference unit in text setpermits, not to say it like units in truth, a little change can be, but when you want to set the skills to allow for dramatic change when you follow the unit of change is allowed no, because each skill set is allowed to set up WE in advance, that is what kind of skills will be what kind of set allowed, much like ID, where his set allows ID to change or chaos, this skill will not achieve the effect you want. So at this point, we're going to find exactly what we want and allow about the skills that will be allowed to be copied and pasted, and then changed in the smallest range.Duration unit: sets the duration of skills to common units.Duration - Hero: sets the duration of skill to hero.Reply reference TOPSend a short messageAdd to good friendsAt at DEG up = offlineEssence 0 strength, 66 agility, 74 intelligence, 62 prestige, 0 F coins, 70 read authority 10Registered members (Junior)UID996653 post 12 points 235, read permissions 10, online time 2 hours, registration time 2009-4-16, finally login 2009-4-18 6 floorAt at DEG up = published in 2009-4-17 16:36 | only see the author suggests:1. The duration of effect only, to have lasting effects of skills such as: Paladin time invincible, hill stormbolt stun time shadowstrike poisoning time and so on, with no lasting effect on the skills of the role.2. The duration is 0, not without, but forever, until the unit dies. So the minimum spell time is 0.01 seconds.3. Duration is also related to the time of magic effect (spell effects will be explained below).Item skills: setting this skill is an item skill. False is false, True is true.Hero skill: setting this ability is a heroic skill. False is false, True is true.Prompt:1. If the above 2 items are False, then this skill is the unit skill.Special effects: set skills, special effects, is an image effect.Prompt:1. Special effects only work with set durations and face attacks, such as prophetic earthquakes, Lich deaths, withering, etc..2. Special effects only affect the areas of the cast, not on units, such as the prophets, the rising volcanoes of the earthquake, the shadow of the Lich's death, the shadow.3. Replace or remove the effects will not affect the function of the skill, but the image effect, such as: the quiet effects for deer prophet of the earthquake, so the display will be quiet, the image effect of the earthquake, but still quiet in action.4. Special effects can be edited in detail: for example, we can change the shadow of the Lich's death to the holy light of the Lich or the frost star of the lich. This will allow us to personalize our skills and create new skills. Its specific editing process is:A. in the object editor, select the magic effect bar, and find the special effects you want to edit in the tree branch on the left (you can use the editor's search command to find it), remember that special effects are not magic effects.B. select the effect you want to edit, the right side will appear the corresponding settings, and now you can edit your own special effects, but the general effects of additional points, please do not change, because the effect is in the area of the effect.C. finally use your editing effects in your skills.Magic effect: sets the skill magic effect, which is an image effect.Reply reference TOPSend a short messageAdd to good friendsAt at DEG up = offlineEssence 0 strength, 66 agility, 74 intelligence, 62 prestige, 0 F coins, 70 read authority 10Registered members (Junior)UID996653 post 12 points 235, read permissions 10, online time 2 hours, registration time 2009-4-16, finally login 2009-4-18 7 floorAt at DEG up = published in 2009-4-17 | only see the author that 16:36:1. The magic effect only works with set duration skills, such as the paladin's invincibility, the storm hammer of the fall, the Lich's death, the aura, and the skills2. The magic effect only in the target body, and moves with the target unit is mobile, continuous display, duration and duration related, such as: the mask ride invincible, halo mountain autumn storm hammer stun unit, the Lich unit head ofthe black death and decay (generally small fire no attention)3. Replacing or removing magic effects does not affect skill, but magic effects change.Such as: the paladin riding the focus of the magic effect of halo replaced blood ring, then each unit will show blood halo effect, but the role is still focused halo. If you take out the magic effect, general skills can not see the magic effect, but some skills as part of the effect, such as shadowstrike poisoning damage per second (it is inexorably hangs on. ah).4. Magic effects can be edited specifically, with the same effect editor. The magic effects and effects are explained here. Unlike editors, the icons in the effects editor are useless in the game, and the icons of magic effects are displayed in the status bar of the unit.Level: how many levels can set skills?.Prompt:1. This is generally only heroic, because skill is only useful at 1 levels no matter how many levels you set.2. Not the unit skills are useless. We can use the Trigger Editor to set its level of change, which will be explained in the next trigger section.3. Item skills are totally useless.Rating: sets the level of skill required for hero learning, only valid for hero skills.Skip setting requirements: learning level requirements, the default 0 for each of the 2 stage of learning.Magic release time: set the time before the spell is released, that is, let your units do enough to release the magic. Typical representative: bloodmage's fire.Magic release interval: set the time after the release of magic.Magic: scope between skill set casters and target unit distance, if you want to do BT skills, the modified high can be scary, as we have seen with death and decay of the Lich fight each other in their base base.Mana cost: sets the skill to display the required mana.Tech tree - whether to use: set skills, and whether or not to use technical restrictions. If so, skills must be completed to build the relevant technology.Tech tree - Requirements: set up technologies for limiting.Tech tree - requirements level: the level of technology that must be restricted to set.Prompt:Reply reference TOPSend a short messageAdd to good friendsAt at DEG up = offlineEssence 0 strength, 66 agility, 74 intelligence, 62 prestige, 0 F coins, 70 read authority 10Registered members (Junior)UID996653 post 12 points 235, read permissions 10, online time 2 hours, registration time 2009-4-16, finally login 2009-4-18 8 floorAt at DEG up = published in 2009-4-17 16:36 | at the beginning of 1. If you're doing a RPG map, you can usually remove all of the tech restrictions.After finished the above, most people may still feel at a loss of skills, that's for sure, because I only speak skills and common characteristics of all skills but did not speak anything, not the lazy, but WE skills in 100 - a large quantity, but shallow and simple to understand, so if I this is one point to some trivial. In order to vivid understanding of skills, skills to inspire people to study, I will try some skill for everyone to see:Skill 1: a frost star with a face attack.Skill: a thunder strike on the hill.Step 1: change the thunder strike icon and name to frost stars. Step 2: remove the strike image from the casterStep 3: change the duration of the thunder strike to 2 seconds.Step 4: find the frost star in the object editor's skill bar and copy its image - the target item.Step 5: find the thunder strike magic effect in the object editor's magic effects bar, paste it on its image - the target item.Step 6: remove the thunder strike magic effect icon.Step 7: assign skills to a hero and place some enemy unit tests.If you are successful, you can try to change the blood mage skills storm.Skill 2: a mass attack on the finger of death.The prophet's chain lightning.Step 1: change the link lightning icon and name to the icon of the finger of death.Step 2: change the 2 lighting effects of chain lightning to the finger of death.Step 3: turn the chain lightning image into a special image of the death finger - special.Step 4: modify the relevant data of the skills and attack power.Step 5: assign skills to a hero and place some enemy unit tests.If you are successful, you can try to change the forked lightning skills trial of Garner.Skill 3: reduces the enemy's defense aura.True skill: the concentrated halo of paladin.Step 1: change the icon and name of the focused aura to the name you like.Step 2: hold Shift double click (allowing you to enter negative numbers), focus on Halo data - armor rewards, enter -100 insideStep 3: find the slowing aura in the object editor's skill bar (using the find command in the editor) to locate, allow, copy, paste, and paste into your concentration aura.Step 4: find the focus halo magic effect in the object editor's magic effects bar, change the icons inside to the chart you set, and introduce the anti aura as well.Step 5: assign skills to a hero and place some enemy unit tests.If you are successful, you can try other auras such as evil auras.The above example is only a small change, but we can find a forest, or it can be said that every skill in WE is a forest, waiting for you to use it to discover it.。
新手做图入门指导教程〔第一章〕作者:心魔工作室-巴哈姆涛前言:现在有很多玩家都对WE有着浓厚的兴趣,而且都想能创作出自己的魔兽地图,虽然在论坛里也有很多相关的讨论贴,但是大部份都是针对一些对WE有一定了解的玩家所做的,而对于刚刚起步并才开始弄WE的玩家则没有一些基本的教程或讨论贴,所以,在此,本人决定以自己学习WE及做图的经验与心得写一个面向初识WE玩家的地图制作指导教程,希望对各位新手们有所帮助!当然要完成一张RPG地图或是对战地图还要有作者的很大的决心及恒心,对魔兽这个游戏,包括战役地图,对战地图及RPG地图要有一定的了解,至少要会玩魔兽。
如果你有以上两点条件的话,呵呵,那么请继续往下看吧,你一定会有所收获的!第一章:认识WE第一节相关的名词及概念相信有些新手们还不知道什么是WE吧!呵呵,WE就是W orld Editor的简写啦,译做中文应该是叫做世界编辑器,这个东西就是大多数地图制作者们的工具了,你只需要在魔兽的安装目录下就能找到了。
如果是第一次运行的话,会出现个用户协议之类的,不用管了,有对话框就只管按确定吧!关于什么是T?-我们在一些讨论贴中经常会看到一些诸如“用T吧,T不对吧”的语句,其实这个T也是一个简写,它是触发事件编辑器(Trigger),它的功能是很强大的,知道为什么对战地图时一来每个玩家都有一定的资源和单位吗?就是它弄的了,还有像一些RPG地图里的剧情啊,对话啊,包括开始时选择英雄也是用它来实现的,可以说,只要是一张RPG地图的话,T就是整个地图的精髓与灵魂所在。
没有T,那么你的地图就只是一张好看的摆设罢了(由于这是新手教学贴,所以在以下的课程里面会专门提出来进行讲解,现在暂不讨论)关于JASS,我想还是有很多人听说过JASS吧,这个的确是个好东东,功能比T还要强大,但是需要一定的程序设计能力的人才会用了吧,这对于新手来说更是不沾边的了,所以在本教程中不涉及讨论!如果各位有兴趣的话可以自己去找点相关的教程!另外的几个相关东东:物品管理器,声音管理器及输入管理器将在具体的制图过程教学中提到!第二节熟悉WE 不知怎么说呢,大多数地图作者都必须经历的一个过程吧:修改地图。
地图编辑器使用说明一、电子地图的相关概念:电子地图:通常我们所看到的地图是以纸张、布或其他可见真实大小的物体为载体的,地图内容是绘制或印制在这些载体上。
而电子地图是存储在计算机的硬盘、软盘、光盘或磁带等介质上的,地图内容是通过数字来表示的,需要通过专用的计算机软件对这些数字进行显示、读取、检索、分析等。
工作空间:工作空间管理的是用户的工作环境,用于保存用户的工作环境和工作过程中操作和处理的所有数据,包括数据源、地图名、布局和资源等内容,如下图所示:1、工作空间中存放了数据源相对于工作空间文件(扩展名为*.smw)的相对路径、数据源别名、数据源打开方式(只读、独占、事务、加密四种方式)等信息。
由于工作空间存放的是数据源的相对路径和打开别名,而不是存储和拷贝整个数据源,因此工作空间文件可以和数据源(文件)分开存放,而且通常文件大小比数据源文件(扩展名为*.SDB,*.SDD)小。
空间数据仍然存储于数据源中。
2、地图主要存放相关数据集叠加显示而形成的图层。
它存储了地图中每个图层对应的数据源和数据集,显示风格、显示比例以及图层的状态信息(显示、选择、编辑、捕捉等)。
3、工作空间中的布局存储的是布局中的地图对象对应的地图名、各个制图要素对象的位置和大小以及相互关系(叠放的层次、是否成组、比例尺与地图间的对应关系等)。
4、资源存放了系统中打开和制作的符号、线型和填充符号。
5、在使用工作空间时需注意,工作空间作为用户的工作环境只有一个。
因此,工作空间控件在同一个应用程序中只需加载一次,打开一个工作空间的同时必须关闭另一个工作空间。
数据源:数据源是存储空间数据的场所。
空间数据存放于数据源中,任何对空间数据的操作都需要先打开或者获得数据源。
对空间数据的存储方式有两种:一是采用文件方式进行存储;一是存储于关系数据库或空间数据库中。
对于文件存储方式,数据源对应于扩展名为SDB和SDD的一对文件,其中扩展名为SDB的文件存储空间数据,SDD文件存储属性数据。
游戏地图编辑器使用指南游戏地图编辑器使用指南1.简介游戏地图编辑器是一个强大的工具,用于创建和编辑游戏地图。
本文档将详细介绍地图编辑器的各项功能和操作指南。
2.系统要求在使用地图编辑器之前,请确保您的计算机满足以下最低系统要求:- 操作系统:Windows 7或更高版本- 处理器:双核心2.0 GHz或更高- 内存.4 GB RAM或更高- 显卡:支持OpenGL 3.0或更高的显卡- 存储空间:至少100 MB可用空间3.安装和启动安装地图编辑器的步骤如下:a) 地图编辑器安装程序。
b) 双击安装程序并按照提示完成安装过程。
启动地图编辑器的步骤如下:a) 在桌面或应用程序列表中找到地图编辑器的图标。
b) 双击图标以启动地图编辑器。
4.界面概览地图编辑器的界面由以下几个主要组件组成:a) 菜单栏:提供各种编辑器功能的菜单选项。
b) 工具栏:包含常用工具的快捷按钮,如绘制、擦除等。
c) 地图视图:显示当前编辑的地图。
d) 属性面板:显示当前选择的地图元素的属性。
e) 图层面板:显示地图的各个图层,并控制其可见性和顺序。
f) 资源库:包含各种可用的地图元素和素材。
5.创建新地图要创建新地图,请按照以下步骤操作:a) 打开地图编辑器。
b) 菜单栏中的“文件”选项。
c) 选择“新建地图”选项。
d) 输入地图的名称和尺寸。
e) “确定”按钮创建新地图。
6.编辑地图地图编辑器提供了多种工具和功能,用于编辑地图,如绘制、擦除、拖放等。
下面是一些常用操作的步骤:a) 选择绘制工具。
b) 在地图视图中并拖动以绘制地图元素。
c) 使用擦除工具删除地图上的元素。
d) 在资源库中选择要添加的元素,然后将其拖放到地图上。
e) 使用选择工具选择和移动地图元素。
f) 调整地图元素的属性,如大小、旋转角度和透明度。
7.保存和导出地图在编辑地图后,您可以选择保存地图以便将来继续编辑,或导出地图以在游戏中使用。
以下是保存和导出地图的步骤:a) 菜单栏中的“文件”选项。
闪电战1 地图编辑器教程第1讲
打开地图+添加单位
小欧欧制作
首先用地图编辑器前,我们要知道地图文件在哪里。
打开闪电战1的安装目录,然后打开data文件夹。
你可以看到很多pak结尾的文件。
这是闪电战1的所有数据文件的压缩包,可以用压缩软件WinRAR打开。
(你可以把所有pak文件都当做普通的文件夹)找到data.pak文件,用WinRAR打开。
打开后可以看到下图,里面有很多文件夹,所有的地图文件都在Maps文件夹里。
打开Maps文件夹,可以看到下图:以bzm后缀的就是地图文件。
而相同文件名以lua后缀的文件是相应的地图脚本文件,我们会在以后的教程里用到。
其他的文件夹里的文件是战役的地图文件和教程地图,联机地图,不推荐初学者修改。
(Allies.German,USSR 分别对应盟军,德军,苏军的战役地图,Multiplayer 里的是联机地图)
我把kursk.bzm文件解压到F盘的Maps文件夹。
(事先在F盘建一个Maps空文件夹)
然后在游戏安装目录里打开地图编辑器mapditor.exe
打开后可以看到下图,在任务栏左上角点File——Open打开地图。
会弹出一个对话框,见下图
Name就是地图名称和路径,我们可以点后面的Browse...找到解压的地图文件。
而下面的MOD是指用什么组模打开,如果我们是修改原版地图,就选择“no any MOD”这里强烈不推荐新手使用各种组模打开原版地图,弄不好这会导致无法进入游戏!切记!
在F盘的maps文件夹里找到解压的地图文件,见下图
好了,选择成功后可以看到下图,点“OK”
看,成功打开地图了。
地图的左边是任务栏,是我们修改地图的主要操作界面,如果不慎关闭,可以点任务栏右上角左边第3个按钮(见红圈)
左边的任务栏第一行“Terrain”是编辑地形的工具,我们先跳过。
点击第二行的“Object,Fences,Bridge”(看不懂英文的,本人建议自己用翻译软件,我这里不一一解释了)可以看到下图:
点击那个小三角,会弹出一排选项,例如我要添加苏军火炮,就选择“Soviet Artillery”
然后在前面的小方框点一下(打钩)
接着在下面的“Thumbnails”前的小圆圈里点一下,就可以看到单位的图标。
见下图。
然后我们找到152mm_ML-20,选择它,然后在地图上点一下左键就添加一个文件。
我们可以通过左下角的小地图来调整地图界面的方位。
我们添加2门炮,但是火炮朝向明显不合适。
可以通过“Angle”里的那个指针调整方向,见下图。
选择“Soviet Transp”见下图。
和添加火炮一样,添加运输车。
好了,初步编辑到此,我们点左上角的保存图标保存地图。
好了,修改完的地图如何才能在游戏里读取呢?
我们就要把修改好的地图文件制作成新的Pak文件。
这里说明一下,data文件夹里所有的pak文件都是同级平行的,如果两个pak文件里有同一文件名的文件,系统会默认读取最新的文件。
(这也是各种绿色补丁的工作原理)
利用这一特点,新建一个pak文件可以不改动原版的pak文件,如果出错,可以直接删掉我们做的文件,而不影响游戏运行。
好了,开始新pak文件的制作:
首先复制一个最小的pak文件“updata-1.pak”
然后重命名为“My-maps”(方便记忆,可以随意命名)
用压缩软件打开My-maps.pak
打开F盘,找到我们新建的Maps文件夹
如下图,把Maps文件夹直接拖到压缩文件里。
然后删掉压缩文件里其他的文件夹,只保留Maps文件夹(不删也可以,不过可能会影响游戏的运行)
最后进入游戏看看修改的效果吧,选择自定义任务,选择“Not One Step Back”这个任务(就是我们修改的任务)
进入游戏后可以看到新添加的单位。