VDC配置方法实例及命令
- 格式:doc
- 大小:30.00 KB
- 文档页数:2

[精] 主题:关于MM4变频器中Vdc直流电压控制器的解释和各种制动方式的使用Vdc直流电压控制器1、Vdc max最大电压控制器以前我简单地解释过,鼠笼式异步电机在电机学中,就相当于一台变压器。
定子线圈相当初级,鼠笼转子相当短路的次级,通过定子、转子铁心作电磁场变换产生力旋转力矩。
当转子转速大于旋转磁场的转速时,(可以是被拖动的机械惯性太大,也可以是被其他动力(包括重力)拖动。
)转子切割磁力线的方向反向,电动机就处于发电状态。
其结果是较高的电压对直流侧的大容量电容充电。
这负的滑差越大,充电电压越高。
问题是:直流侧电容的耐压是有限的,也就是说,可以储存的电量(电能)是有限的。
如果过高,电容将会过压击穿(爆炸)。
针对于:仅仅是转动惯量很大原因造成过电压的系统,并且控制上没有受控减速(例如:必须按斜率在2秒停止)的要求。
变频器设计了一个Vdc直流电压控制器。
其原理是:既然是频率下降过快造成的过压,那么我们停止频率下降不就行了?正是如此,MM4系列变频器内置的Vdc max最大直流电压控制器中,应对直流侧过压的问题,采用通过内部PID算法,不理睬你给定的下降变化,以保持直流侧电压不致过高为目的,自行给出频率。
当电机转速有所降低,并且直流侧电压降低到设定的限值以内后,继续按减速斜坡减速。
如果直流侧电压再次过高,控制器再次动作。
应用场合:通过对Vdc max最大直流电压控制器工作原理的理解,可以看出,应用的条件是:大惯量的、不会被拖动(超速)的,同时对降速过程没有要求的机械系统。
使用注意事项:注意上述的使用条件。
如果电机是被拖动(例如:势能下降装置,下降拖动速度没有限制时)产生过压,使能这个控制器很可能不管用。
使能这个控制器是P1240=1(bit1)。
此外,建议使能自动电平检测P1254=1。
特别注意:这两项都是默认的(恢复出厂值后)。
2、Vdc min 最小电压控制器(动态缓冲)既然当转子转速大于旋转磁场的转速时,产生再生电流对电容充电。

dcuterm常用命令dcuterm是一种用于控制和管理数据中心网络设备的命令行工具。
以下是一些常用的dcuterm命令:1. login:登录到设备。
例如:`login <设备IP地址>`2. logout:退出设备。
例如:`logout`3. enable:切换到特权模式。
例如:`enable`4. disable:退出特权模式。
例如:`disable`5. show running-config:显示当前运行配置。
例如:`show running-config`6. show interface:显示接口信息。
例如:`show interface <接口名称>`7. show ip route:显示IP路由表。
例如:`show ip route`8. show vlan:显示VLAN信息。
例如:`show vlan`9. show mac-address-table:显示MAC地址表。
例如:`show mac-address-table`10. show version:显示设备版本信息。
例如:`show version`11. configure terminal:进入全局配置模式。
例如:`configure terminal`12. interface <接口名称>:进入接口配置模式。
例如:`interface GigabitEthernet1/0/1`13. ip address <IP地址> <子网掩码>:配置接口IP地址。
例如:`ip address 192.168.1.1 255.255.255.0`14. no shutdown:启用接口。
例如:`no shutdown`15. shutdown:禁用接口。
例如:`shutdown`16. vlan <VLAN编号>:进入VLAN配置模式。
例如:`vlan 10`17. name <VLAN名称>:配置VLAN名称。

2UDFOH 9LUWXDO 'HVNWRS &OLHQW 8VHU Guide6LPSOLILHG &KLQHVHFebruary 2011Oracle Virtual Desktop Client 2.0 User Guide - Simplified ChineseCopyright © 2011, Oracle and/or its affiliates. All rights reserved.This software and related documentation are provided under a license agreement containing restrictions on use and disclosure and are protected by intellectual property laws. Except as expressly permitted in your license agreement or allowed by law, you may not use, copy, reproduce, translate, broadcast, modify, license, transmit, distribute, exhibit, perform, publish, or display any part, in any form, or by any means. Reverse engineering, disassembly, or decompilation of this software, unless required by law for interoperability, is prohibited.The information contained herein is subject to change without notice and is not warranted to be error-free. If you find any errors, please report them to us in writing.If this software or related documentation is delivered to the U.S. Government or anyone licensing it on behalf of the U.S. Government, the following notice is applicable:U.S. GOVERNMENT RIGHTS Programs, software, databases, and related documentation and technical data delivered to U.S. Government customers are "commercial computer software" or "commercial technical data" pursuant to the applicable Federal Acquisition Regulation and agency-specific supplemental regulations. As such, the use, duplication, disclosure, modification, and adaptation shall be subject to the restrictions and license terms set forth in the applicable Government contract, and, to the extent applicable by the terms of the Government contract, the additional rights set forth in FAR 52.227-19, Commercial Computer Software License (December 2007). Oracle USA, Inc., 500 Oracle Parkway, Redwood City, CA 94065.This software is developed for general use in a variety of information management applications. It is not developed or intended for use in any inherently dangerous applications, including applications which may create a risk of personal injury. If you use this software in dangerous applications, then you shall be responsible to take all appropriate fail-safe, backup, redundancy, and other measures to ensure the safe use of this software. Oracle Corporation and its affiliates disclaim any liability for any damages caused by use of this software in dangerous applications.Oracle is a registered trademark of Oracle Corporation and/or its affiliates. Other names may be trademarks of their respective owners.This software and documentation may provide access to or information on content, products, and services from third parties. Oracle Corporation and its affiliates are not responsible for and expressly disclaim all warranties of any kind with respect tothird-party content, products, and services. Oracle Corporation and its affiliates will not be responsible for any loss, costs, or damages incurred due to your access to or use of third-party content, products, or services.Oracle Virtual Desktop Client 2.0 用户指南目录OVDC 简介关于 Oracle Virtual Desktop Client使用 OVDC连接到 Sun Ray 服务器与 Sun Ray 会话断开连接从命令行运行 OVDC命令行示例使用 Sun 快捷键OVDC 的限制常见问题解答我是否需要知道我的 Sun Ray 服务器的名称?是否可以通过虚拟专用网络连接?< /h2>如果无法连接到 Sun Ray 服务器,那会怎样?是否可以使用智能卡登录?< /h2>是否可以使用多个显示器?< /h2>如何在客户端计算机上播放和录制音频?< /h2>如何可以改善显示质量?< /h2>如何设置我的 Sun Ray 会话的显示大小?如何从全屏会话退出?< /h2>是否可以使用多个配置文件?< /h2>配置设置" 连接"选项卡" 网络"选项卡" 热键"选项卡" 记录"选项卡" 高级"选项卡" 关于"选项卡使用配置文件关于配置文件配置文件和日志文件创建新配置文件编辑配置文件覆盖配置文件设置从命令行创建新配置文件卸载 OVDC如何卸载 OVDCOVDC 简介关于 Oracle Virtual Desktop ClientOracle Virtual Desktop Client (OVDC) 是可安装在常见客户端操作系统上的应用程序。

云计算中的VDC 一、介绍1\1 背景1\2 目的1\3 范围二、VDC的定义与概述2\1 VDC的基本概念2\2 VDC的特点与优势2\3 VDC的应用场景三、VDC架构与组成3\1 VDC的总体架构3\2 VDC的组件详解3\2\1 虚拟化层3\2\2 网络层3\2\3 存储层3\2\4 安全与管理层四、VDC的部署与配置4\1 VDC环境准备4\1\1 硬件要求4\1\2 软件要求4\2 VDC的部署步骤4\2\1 安装与配置虚拟化平台4\2\2 配置网络与存储4\2\3 部署安全与管理策略4\3 VDC的配置注意事项4\3\1 性能调优4\3\2 容灾备份策略4\3\3 安全防护配置五、VDC的管理与运维5\1 VDC资源管理5\1\1 虚拟机管理5\1\2 网络与存储资源管理5\2 VDC的监控与报警5\3 VDC的扩展与升级5\4 VDC的故障排查与恢复六、VDC的安全与隐私保护6\1 VDC的安全策略6\1\1 访问控制策略6\1\2 安全审计与日志管理6\2 VDC的隐私保护策略6\2\1 用户数据保护6\2\2 安全通信与加密七、VDC的法律合规性7\1 数据保护法律法规概述7\2 VDC的合规性考虑7\3 VDC的数据保护措施7\4 法律合规性的监管与审计八、附件附件一:VDC架构图附件二:VDC部署配置文件示例附件三:VDC管理手册法律名词及注释:1\虚拟化:将物理硬件资源转化为虚拟资源的技术,使得多个操作系统和应用程序能够在同一台服务器上运行。
2\容灾备份:为了保证系统和数据的连续性,将数据备份在多个地点,以防止设备故障、自然灾害等造成的数据丢失。
3\访问控制策略:指定哪些用户可以访问哪些资源的安全策略。
4\安全审计与日志管理:对系统的安全状况进行定期检查和审查,并记录相关操作日志,以便追踪和回溯。
5\数据保护法律法规:包括但不限于《个人信息保护法》、《电子商务法》等法律规定,用于保护个人信息和数据的安全和隐私。
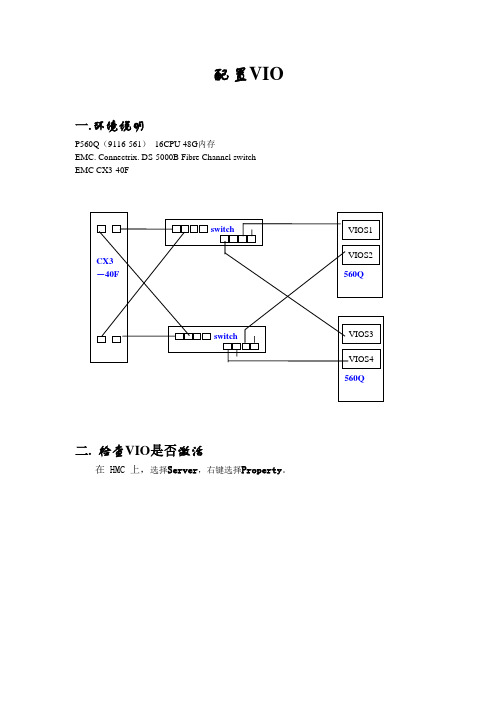
配置VIO一.环境说明P560Q(9116-561)16CPU 48G内存EMC. Connectrix. DS-5000B Fibre Channel switchEMC CX3-40F二. 检查VIO是否激活在 HMC 上,选择Server,右键选择Property。
如上图两项为TRUE时,表示已激活。
三. 划分VIO SERVER分区1.在 HMC 上,打开Server和Partition文件夹,然后打开ServerManagement文件夹。
2.右键单击想要在其上创建分区的所管理系统,选择Create,然后选择Logical Partition。
3.为您的 VIO Server 提供名称,在Partition Environment框中选择Virtual I/O Server单选按钮,单击Next4.暂时不使用工作负载管理,直接单击Next。
5.为您的分区输入概要名称,并确保未选中Use all the resources in thesystem复选框。
单击Next。
6.输入您确定对系统适当的内存量。
VIO Server 至少需要512MB 的RAM。
LPAR 分配整个处理器。
这里我们选择Shared。
8.输入最低、所需和最大处理单元(CPU) 数量。
9.此时将向您显示系统上已安装的 I/O 设备。
对于VIO Server,必须至少分配一个存储控制器和一个以太网卡(因为共有两个VIO Server,所以可以将全部I/O设备的一半分配给每个VIO Server),单击Add as required。
光驱只有一个,所以应该设为Add as desired(下图中的Slot T15),以便以后在分区间迁移。
10.I/O Pool 面板用于 i5/OS,所以对于 VIO Server、AIX 和 Linux 分区,可忽略该面板。
单击Next。
11.选择Yes, I want to specify virtual I/O adapters,然后单击Next。

1、配置资源模板This example shows how to configure a VDC resource template:vdc resource template TemplateAlimit-resource port-channel minimum 4 maximum 128limit-resource span-ssn minimum 1 maximum equal-to-minlimit-resource vlan minimum 32 maximum 1024limit-resource vrf minimum 32 maximum 1000通过命令show vdc resource template TemplateA查看,可以看到和如下类似结果:2、创建VDCThis example shows how to create and initialize a VDC:switch# config tswitch(config)# vdc testNote :Creating VDC ,one moment please…switch(config-vdc)# allocate interface ethernet 2/46Moving ports will cause all config associated to them in source vdc to be removed. Are you sure you want to move the ports? [yes] yes //通过show vdc N7K membership 查看分配的接口switch(config-vdc)# exitswitch(config)# switchto vdc test----System Admin Account Setup ----Do you want to enforce secure password standard (yes/no) [y]: yEnter the password for "admin":<password>Confirm the password for "admin":<password>----Basic System Configuration Dialog ----This setup utility will guide you through the basic configuration ofthe system. Setup configures only enough connectivity for managementof the system.Please register Cisco Nexus7000 Family devices promptly with yoursupplier. Failure to register may affect response times for initialservice calls. Nexus7000 devices must be registered to receiveentitled support services.Press Enter at anytime to skip a dialog. Use ctrl -c at anytimeto skip the remaining dialogs.Would you like to enter the basic configuration dialog (yes/no): yesCreate another login account (yes/no) [n]: nConfigure read-only SNMP community string (yes/no) [n]: nConfigure read-write SNMP community string (yes/no) [n]: nEnter the switch name : TestContinue with Out-of-band (mgmt0) management configuration? (yes/no) [y]:Mgmt0 IPv4 address :10.10.5.5Mgmt0 IPv4 netmask : 255.255.254.0Configure the default gateway? (yes/no) [y]: yIPv4 address of the default gateway :10.10.5.1Configure advanced IP options? (yes/no) [n]:Enable the telnet service? (yes/no) [y]:Enable the ssh service? (yes/no) [n]: yType of ssh key you would like to generate (dsa/rsa/rsa1) : rsaNumber of key bits <768-2048> : 768Configure the ntp server? (yes/no) [n]:Configure default switchport interface state (shut/noshut) [shut]:Configure default switchport trunk mode (on/off/auto) [on]:The following configuration will be applied:switchname Testinterface mgmt0ip address 10.10.5.5 255.255.254.0no shutdownexitvrf context managementip route 0.0.0.0/0 10.10.5.1exittelnet server enablessh key rsa 768 force配置VDC2018年6月18日17:50ssh key rsa 768 forcessh server enablesystem default switchport shutdownsystem default switchport trunk mode onWould you like to edit the configuration? (yes/no) [n]:Use this configuration and save it? (yes/no) [y]:[########################################] 100%Cisco Data Center Operating System (NX-OS) SoftwareTAC support: /tacCopyright (c) 2002-2007, Cisco Systems, Inc. All rights reserved.The copyrights to certain works contained herein are owned byother third parties and are used and distributed under license.Some parts of this software may be covered under the GNU PublicLicense or the GNU Lesser General Public License. A copy ofeach such license is available at/licenses/gpl.html and/licenses/lgpl.htmlswitch-test# exitswitch来自<https:///c/en/us/td/docs/switches/datacenter/sw/nx-os/virtual_device_context/configuration/guide/b-7k-Cisco-Nexus-7000-Series-NX-OS-Virtual-Device-Context-Configuration-Guide/creating-vdc.html> 查看VDC可能是如下情况:3、限制VDC资源使用DC2-N7K-1(config)#vdc DC2-N7K-3DC2-N7K-1(config-vdc)#template TemplateA可以通过show vdc DC2-N7K-1 resource查看4、限制VDC关联模块DC2-N7K-1(config)#vdc DC2-N7K-3DC2-N7K-1(config-vdc)#limit-resource module-type m1xl f2eThis wil cause all ports of unallowed types to be removed from this vdc.Continue(y/n)[yes]yes通过show vdc查看对应VDC关联的模块限制5、配置启动顺序默认的启动顺序为1,具有相同的启动顺序时,VDC ID越小的越优先启动,default VDC,admin VDC 总是第一个启动!DC2-N7K-1(config)#vdc DC2-N7K-3DC2-N7K-1(config-vdc)#boot-order 2 >>>>范围1-96、查看VDC高可用性的默认配置双引擎:Bringdown,让VDC进入failed状态Restart,将重启启动进程,报错shut所有的接口,停止虚拟化服务进程,然后重新启动保存了的服务,配置,那些没有保存在startup config的配置会丢失Switchover,初始化一个引擎模块切换单引擎:Bringdown,让VDC进入failed状态Reload,重启引擎模块Restart,将重启启动进程,报错shut所有的接口,停止虚拟化服务进程,然后重新启动保存了的服务,配置,那些没有保存在startup config的配置会丢失DC2-N7K-1#show vdc DC2-N7K-33 detailSwtichwide mode is m1 f1 m1xl f22 m2xl f2e f3vdc id:3vdc name:DC2-N7K-3vdc state:activevdc mac address:01:e1:a3:3c:45:a3vdc ha policy:RESTARTvdc dual-sup ha policy:SWITCHOVERvdc boot Order:2CPU share:10CPU share Percentage:22%vdc create time:Thu Oct 23 21:13 55 2017vdc reload count:0vdc uptime:0 day(s),8 hour(s),5 minute(s),20 second(s)vdc restart count:0vdc type:Ethernetvdc supported linecards:m1xl f2e修改配置DC2-N7K-1(config)#vdc DC2-N7K-3DC2-N7K-1(config-vdc)#ha-policy singe-sup bringdownDC2-N7K-1(config-vdc)#ha-policy dual-sup restartDC2-N7K-1#show vdc DC2-N7K-33 detailSwtichwide mode is m1 f1 m1xl f22 m2xl f2e f3vdc id:3vdc name:DC2-N7K-3vdc state:activevdc mac address:01:e1:a3:3c:45:a3vdc ha policy:BRINGDOWNvdc dual-sup ha policy:RESTARTvdc boot Order:2CPU share:10CPU share Percentage:22%vdc create time:Thu Oct 23 21:13 55 2017vdc reload count:0vdc uptime:0 day(s),8 hour(s),5 minute(s),20 second(s)vdc restart count:0vdc type:Ethernetvdc supported linecards:m1xl f2e7、创建管理VDC、VDC之间的切换、绑定主机名DC2-N7K-1(config)#system admin-vdc migrate DC2-N7K-5default vdc切换为admin vdc,限制default vdc里面的网络配置迁移到DC2-N7K-5 DC2-N7K-1(config)# switchto vdc test----System Admin Account Setup ----Do you want to enforce secure password standard (yes/no) [y]: no Enter the password for "admin":Confirm the password for "admin":----Basic System Configuration Dialog VDC:2 ----Would you like to enter the basic configuration dialog(yes/no):no DC2-N7K-1-test(config)#switchbackDC2-N7K-1(config)#no vdc combined-hostnameDC2-N7K-1(config)# switchto vdc testtest(config)#。
这里以F 2e 的板卡为例,说明端口组,端口组是处于同一个asic 所处理的范围之下,N 7K 规定,一个asic 只能位于一个vdc 之下,所以同一个端口组只能位于同一个vdc 之下。
判断端口组的方法:这里就是1-8口为一个端口组。
2月20日VDC 理论和设计(2)2017年1月19日21:32这里就是1-8口为一个端口组。
在这里我们可以看到端口在每个vdc种的分配情况。
Vdc 0里所代表的是没有分配到任何vdc种的接口(这个显示仅适用于admin vdc),如果是default vdc的话,所有未分配的接口都存放在default vdc也就是1号vdc中,作为default vdc的接口。
Shared interface特性是指在普通vdc和存储vdc之间,两个vdc共用一个接口,在普通vdc之内,这个接口运行普通的以太流量,在存储vdc之内,这个接口仅能运行fcoe流量(这个接口仅支持以太类型8906和8914的fcoe流量)。
如果在普通vdc中关闭这个接口,那么存储vdc 中这个接口将不能使用,如果在存储vdc中关闭这个接口,fcoe流量将不能被处理,而不影响普通vdc中的这个接口。
配置如上在admin vdc或者default vdc上可以通过switchto命令切换到任意vdc的console界面板卡没有这个vdc,那么就不会被同步到这个板卡上。
启。
mac 地址表示vdc的system mac,boot order表示vdc的启动顺序。
引擎和双引擎。
在vdc创建的时候可以直接加入参数,设备将以这些参数直接创建vdc。
创建admin vdc的两种方法:1.初始化的时候2.在config下输入system admin-vdc。
参考上图。
上去,防止因为创建admin vdc造成的流量的中断。
上去,防止因为创建admin vdc造成的流量的中断。
在vdc之间进行切换。
挂起vdc和重启vdc。
Nexus Configuration Simple Guide目录Nexu7000缺省端口配置 (2)CMP连接管理处理器配置 (3)带外管理VRF (4)划分Nexus 7010 VDC (5)基于EthernetChannel的vPC (7)割裂的vPC:HSRP和STP (11)vPC的细部配置 (12)Nexus的SPAN (13)VDC的MGMT接口 (13)DOWN的VLAN端口 (13)Nexus的路由 (14)Nexus上的NLB (15)标识一个部件 (15)Nexus7000基本配置汇总 (16)Cisco NX-OS/IOS Configuration Fundamentals Comparison (16)Cisco NX-OS/IOS Interface Comparison (24)Cisco NX-OS/IOS Port-Channel Comparison (30)Cisco NX-OS/IOS HSRP Comparison (35)Cisco NX-OS/IOS STP Comparison (40)Cisco NX-OS/IOS SPAN Comparison (44)Cisco NX-OS/IOS OSPF Comparison (49)Cisco NX-OS/IOS Layer-3 Virtualization Comparison (54)vPC Role and Priority (61)vPC Domain ID (62)vPC Peer Link (62)Configuration for single 10 GigE Card (62)CFSoE (64)vPC Peer Keepalive or FT Link (64)vPC Ports (64)Orphan Ports with non-vPC VLANs (65)HSRP (66)HSRP Configuration and Best Practices for vPC (66)Advertising the Subnet (67)L3 Link Between vPC Peers (67)Cisco NX-OS/IOS TACACS+, RADIUS, and AAA Comparison (68)Nexus5000的配置同步 (73)初始化Nexus 2000 Fabric Module (75)Nexu7000缺省端口配置缺省时所有端口是关闭的no system default switchport shutdowncopy running-config startup-config vdc-all 存配置dir bootflash:dir bootflash://sup-standby/dir bootflash://sup-remoteshow roleshow inventory显示系统详细目录,或称为存货清单,可以看到各组件产品编号以及序列号show hardware 显示系统硬件详细信息show sprom backplane 1 显示交换机序列号show environment power 显示电源信息power redundancy-mode ps-redundant 如果没有双电网供电则使用此模式power redundancy-mode insrc-redundant 如果有双电网供电则使用此模式show module 检验各模块状态attach module slot_numberdir bootflash dir slot0:查看ACTIVE引擎的FLASH空间如果查看备份引擎的FLASH空间呢?首先attach module command to attach to the module number, and then use the dir bootflash: or dir slot0:out-of-service module slot Shutting Down a Supervisor or I/O Moduleout-of-service xbar slot Shutting Down a Fabric Moduleshow environmentshow environment temperatureshow environment fanbanner motd #Welcome to the switch#clock timezoneclock setreload 重启交换机reload module numberswitchto VDC切换至某VDC管理界面switchbackpoweroff module slot_numberno poweroff module slot_numberpoweroff xbar slot_numberCMP连接管理处理器配置CMP配置:You should also configure three IP addresses—one for each cmp-mgmt interface and one that is shared between the active and standby supervisor mgmt 0 interfaces.attach cmp 进入CMP命令输入后自动存盘,不需要copy run start通过NX-OS CLI来配置CMP1. configure terminal2. interface cmp-mgmt module slot 通过module 槽号分别为5/6来实现主备引擎上的CMP配置3. ip address ipv4-address/length4. ip default-gateway i pv4-address5. show running-config cmp通过CMP CLI来配置CMP1. attach cmp2. configure terminal3. ip default-gateway i pv4-address4. interface cmp-mgmt5. ip address ipv4-address/length6. show running-config在CMP上可执行的动作:show cp statereload cpattach cpmonitor cpping or traceroute 192.0.2.15reload system To reload the complete system, including the CMPs带外管理VRFManagement VRF and Basic ConnectivityThe management interface is, by default, part of the management VRF. The management interface “mgmt0” is the only interface allowed to be part of this VRF.The philosophy beyond Management VRF is to provide total isolation for the management trafficfrom the rest of the traffic flowing through the box by confining the former to its own forwarding table.In this step we will:- Verify that only the mgmt0 interface is part of the management VRF- Verify that no other interface can be part of the management VRF- Verify that the default gateway is reachable only using the management VRF如果想Ping 带外网管的网关等地址必须在Ping命令后面加上vrf managementping 10.2.8.1 vrf management划分Nexus 7010 VDCVDC是Nexus7000系列的特色功能。
VDC配置命令:
之前首先确保有7000授权才行。
建立VDC:
conf t
vdc {name}定义一个vdc并进入该vdc的配置接口
查看命令
Show vdc
如同vlan表。
在VDC中划分端口
Conf t
Vdc {name}进入vdc的配置接口
Allocate interface Ethernet 1/1-8 将1-8口放入的vdc中。
有一个要求确认的地方默认是yes可以直接回车确认。
差看命令是
show vdc membership可以看出每个vdc中都包含哪个接口。
保存配置:
Copy running-config startup-config
进入到一个子VDC中命令为:
Switchto vdc {子vdc的名字}
其他的配置方式就如平常的交换一样
配置端口的模式:
Conf t
Interface Ethernet 1/1-2现在不需要再使用rang的命令来选中一排接口了。
Switchport
Switchport mode trunk
No shutdown
退出子VDC回到主交换模式命令:
Switchback
查看缺省资源模版的命令:
Show resource
在虚拟VDC中配置vlan等内容
Switchto vdc {子vdc的名字}
Conf t
Vlan 10
Name lan10
No shut
Vlan 20
Name lan20
No shut
查看vlan :
Show vlan
激活vlan的SVI和激活HSRP
依然还是在子VDC中
Conf t
Feature interface-vlan
Feature hsrp
HSRP的配置方法。
Interface vlan 10
No shut
Ip add xx.xxx.xx.xx/24
Hsrp 1
Preempt
Priority 255
Ip xx.xxx.xx.xx
查看hsrp的命令
Show hsrp
配置VDC管理地址,为每个VDC配置管理接口Vrf context management
Ip route 0.0.0.0/0 x.x.x.x 指定一条静态路由。
Interface mgmt0
No snmp trap link-status
Vrf member management
Ip address x.x.x.x/24
联通性检测。
Ping x.x.x.x。