Lync安装步骤
- 格式:pdf
- 大小:211.83 KB
- 文档页数:7

Lync企业版部署目录一、部署环境介绍 (4)二、部署准备 (4)1、软硬件要求 (4)2、更改IP地址 (6)1)更改DC的ip地址 (6)2)更改前端ip地址 (7)3)更改后端ip地址 (8)3、在DC中新建域 (9)4、更改计算机名,加入新建的域 (13)5、lync部署的先决条件安装 (14)6、创建主机A记录SRV记录以及为DC添加证书服务 (16)1)A记录 (17)2)SRV记录 (18)3)证书服务 (21)7、后端准备工作 (22)1)登录 (22)2)导入SQL安装包 (23)3)安装SQL数据库 (24)4)创建共享文件夹 (26)5)打开1433端口重启计算机 (27)三、开始部署 (28)1、登录 (28)2、安装lync server 2010 (29)3、开始部署 (30)1)准备Active Directory (30)2)添加administrator账户到CSAdministrator组 (32)3)安装拓扑生成器以及发布拓扑 (32)4)新建拓扑 (33)5)编辑拓扑 (41)6)发布拓扑 (43)7)配置中央管理器和安装组件 (45)8)请求分配证书 (49)9)启动服务 (56)10)检查服务 (57)四、lync测试 (58)1、登录lync server控制面板 (58)2、新建用户 (59)3、启用用户 (59)4、登录lync通信测试 (60)Lync企业版部署一、部署环境介绍首先需要3台装有Windows server 2008 R2 SP1(企业版)操作系统的计算机分别作为:DC、前端、后端其中:DC服务器ip:192.168.10.2前端服务器ip:192.168.10.5后端服务器ip:192.168.10.3(注:所有网关默认为192.168.10.1;前端和后端DNS服务器都需要指向DC服务器,即前端后端服务器DNS服务器地址为192.168.10.2)二、部署准备1、软硬件要求服务器CPU必须为以下之一:•64-bit dual processor, quad-core, 2.0 gigahertz (GHz) or higher•64-bit 4-way processor, dual-core, 2.0 GHz or higher建议内存16GB10,000转本地硬盘上的72GB可用空间双网卡, 均为千兆网卡更改计算机IP地址,建域,计算机更名加域。

中国石化即时消息系统-Lync 2010用户使用手册一、环境检查为了成功安装使用Lync 2010即时消息客户端,用户计算机必须满足下列条件:1)操作系统为Windows XP专业版SP3以上。
点击开始,右键点击“我的电脑”,选择“属性”,在“常规”选项卡下确认操作系统版本;2)安装了.Net Framework 3.5 SP1。
二、安装Lync 2010客户端以XP操作系统为例,根据以下步骤完成安装配置过程:1.双击Lync安装程序压缩包进行解压缩:2.解压完成后会弹出如下提示界面,若您的C盘空间不足500MB,请关闭本窗口并清理出足够空间后重试;若大于500MB,可按任意键继续:3.安装程序会首先为您导入证书并安装Microsoft .NET Framework4.0 ,此阶段无需用户干预:4.上一步完成后会自动弹出Lync 2010安装程序,点击“安装”继续:5.在确保所列程序中已打开的程序如Outlook, IE和Office(Excel、PowerPoint、Word)全部保存并关闭后,点击“是”:6.安装完成后点击“关闭”运行Lync,建议在安装完成后重新启动计算机:7.Lync客户端运行后界面如下图,按照提示格式输入登陆地址,用户名和密码进行登录,默认情况下,登陆地址应为中国石化电子邮件系统的email地址(如果尚未开通邮箱功能,则登陆格式为username@),密码为邮箱或者相应帐户的密码。
8.点击“更改”可以更改登录地址:9.点击菜单栏的“文件”-“注销”,则可以退出Lync客户端。
三、体验Lync 2010客户端3.1查找和添加联系人1.登录Lync,在“查找联系人”处输入要添加人的地址格式为:username@,在查找到的联系人图标上点击鼠标右键,选择“添加到联系人列表”,添加到组:2.对方将弹出如下提示:3.添加后即可在联系人列表中看到新添加的联系人,双击后即可进行对话、传送文件、共享信息和视频等。
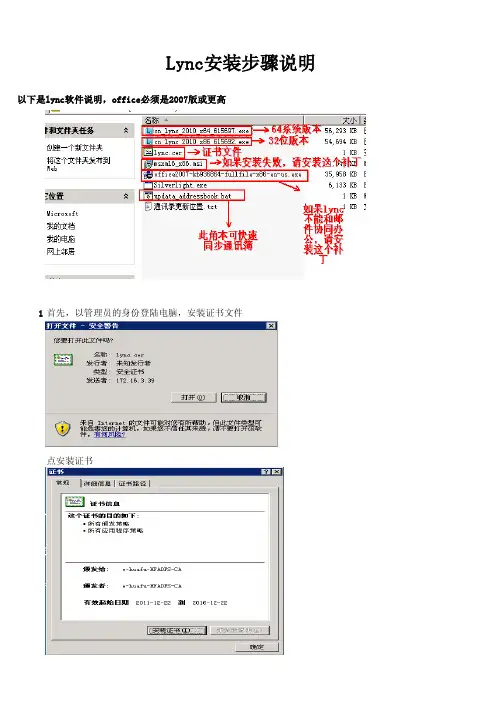
Lync安装步骤说明以下是lync软件说明,office必须是2007版或更高
1首先,以管理员的身份登陆电脑,安装证书文件
点安装证书
下一步
选择“浏览”,按下图操作。
完成证书安装
2跟据操作系统版本,选择对应版本软件,公司内windows2008为64位版本,其它的系统都是32位版本安装,一直点下一步,完成就可以了,如果安装失败,请先装安msxml6_x86.msi(32位)或
msxml6_x64.msi,
然后再重新装安lync软件,完成。
以下是安装截图
安装补丁
重新安装Lnyc软件,成功安装完成如下。
3执行updata_addressbook.bat文件,重新登陆就可以了。
4lync登陆都是邮箱名,登陆后,右下角如果有错误提示,
请安装软件列表中的office2007-kb936864-fullfile-x86-en-us.exe 登陆帐号是邮箱地址,如果电脑是加入域的,并用域帐号登陆,软件会自动登陆,如果电脑没有加入域,
请手动登陆
设置如下。
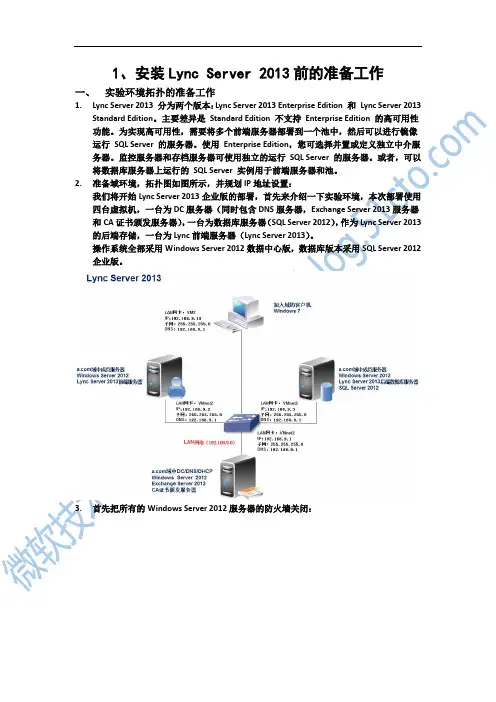
1、安装Lync Server 2013前的准备工作一、实验环境拓扑的准备工作1.Lync Server 2013 分为两个版本:Lync Server 2013 Enterprise Edition 和Lync Server 2013Standard Edition。
主要差异是Standard Edition 不支持Enterprise Edition 的高可用性功能。
为实现高可用性,需要将多个前端服务器部署到一个池中,然后可以进行镜像运行SQL Server 的服务器。
使用Enterprise Edition,您可选择并置或定义独立中介服务器。
监控服务器和存档服务器可使用独立的运行SQL Server 的服务器。
或者,可以将数据库服务器上运行的SQL Server 实例用于前端服务器和池。
2.准备域环境,拓扑图如图所示,并规划IP地址设置:我们将开始Lync Server 2013企业版的部署,首先来介绍一下实验环境,本次部署使用四台虚拟机,一台为DC服务器(同时包含DNS服务器,Exchange Server 2013服务器和CA证书颁发服务器),一台为数据库服务器(SQL Server 2012),作为Lync Server 2013的后端存储,一台为Lync前端服务器(Lync Server 2013)。
操作系统全部采用Windows Server 2012数据中心版,数据库版本采用SQL Server 2012企业版。
3.首先把所有的Windows Server 2012服务器的防火墙关闭:二、DNS服务器的准备工作1.在正式部署Lync Server 2013之前,我们需要提前在DNS中创建Lync所需要的A记录和SRV记录,做好DNS记录的创建和规划,也是部署中比较重要的一项任务。
2.首先,我创建了Lync Server 2013所需要的一些A记录,如图所示:3.然后,继续创建SRV记录,根据官方文档要求,我创建了两条SRV记录,如图所示:4.首先我们在DNS服务器新建一条“其他新记录”:5.选择资源记录类型为“服务位置(SRV)”:6.配置如下图所示:7.以同样的方法在创建一条资源记录,如下图所示:三、CA服务器的准备工作在部署Lync Server 2013之前,要求我们的环境中有证书服务器,我们可以利用Windows 的CA服务来搭建自己的企业证书服务器,该服务器可以为Exchange/Lync/IIS等微软的服务器颁发证书。
LYNC安装步骤1、下载lync客户端安装软件32位操作系统下载地址:ftp://192.168.200.20/办公软件/LYNC Client/LyncSetupMSDN_x86_中文.exe64位操作系统下载地址:ftp://192.168.200.20/办公软件/LYNC Client/LyncSetupMSDN_x64_中文.exe2、安装lync客户端安装路径可以根据个人喜好选择,点击“安装”,进入下一步。
安装的时间将根据机器的性能决定。
安装完成之后提示:已成功安装。
点击“关闭”按钮将启动lync,Lync登录之前,先导入证书3、下载证书证书下载地址:ftp:///%B0%EC%B9%AB%C8%ED%BC%FE/LYNC%20Client/lync2010.cer 4、导入证书点击“安装证书”按钮,开始导入证书。
点击下一步,选择“将所有的证书放入下列存储”,单击浏览,选择“受信任的根证书颁发机构”,单击“确定”。
单击“下一步”单击“完成”,这样就完成了证书的导入。
5、快速同步地址簿文件在命令提示符窗口下运行一下命令:Reg Add HKLM\Software\Policies\Microsoft\Communicator /v GalDownloadInitialDelay /tREG_DWORD /d 0 /flync客户端我们可以通过更改如下注册表值,让客户端马上下载GalContacts.db和GalContacts.db.idx这两个文件,可在命令提示符中输入如下命令:但当你的电脑中已经存在GalContacts.db和GalContacts.db.idx这两个文件时,还是需要等待1-60分钟时间比对和服务器ABS的区别,才会同步地址簿。
我们可以退出客户端,删除GalContacts.db和GalContacts.db.idx这两个文件,此时再登录时就能马上重新下载完整的地址簿文件GalContacts.db和GalContacts.db.idx。
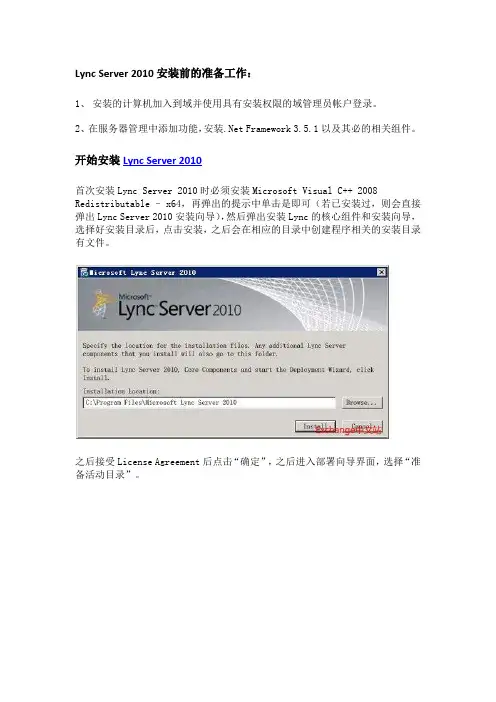
Lync Server 2010安装前的准备工作:1、安装的计算机加入到域并使用具有安装权限的域管理员帐户登录。
2、在服务器管理中添加功能,安装.Net Framework 3.5.1以及其必的相关组件。
开始安装Lync Server 2010首次安装Lync Server 2010时必须安装Microsoft Visual C++ 2008 Redistributable –x64,再弹出的提示中单击是即可(若已安装过,则会直接弹出Lync Server 2010安装向导),然后弹出安装Lync的核心组件和安装向导,选择好安装目录后,点击安装,之后会在相应的目录中创建程序相关的安装目录有文件。
之后接受License Agreement后点击“确定”,之后进入部署向导界面,选择“准备活动目录”。
首先运行“准备架构”,在“准备架构”窗口中点击“下一步”,然后点击“完成”,之后回到部署向导界面。
运行“准备当时林”,在“准备林”窗口中点击“下一步”,在“通用组位置”中选择“本地域”,然后单击“下一步”选择“完成”,之后回到部署向导界面。
运行“准备当前域”,在“准备域”窗口中点击“下一步”,然后点击“完成”回到部署向导界面。
在准备完活动目录后,点击向导窗口左上角的“部署”(中文版可能名为:配置),然后在欢迎的界面中选择右侧的“准备安装标准版的服务器”。
在打开的窗口中选择“下一步”,这一步骤是在安装SQL Server Express和安装Central Management Service,经过一段长时间的安装后,看到完成界面后点击“完成”。
在安装完成后也可以检查计算机是否已经安装了SQL Server的相关程序。
之后返回到Lync欢迎界面,选择右侧的“安装Topology Builer”,Topology Builer的安装很快就可以完成。
安装完成Topology Builer后,在Windows的所有程序中的Microsoft Lynv Server 2010目录中,选择Microsoft Lync Topology Builer,在打开的窗口中选择新建。
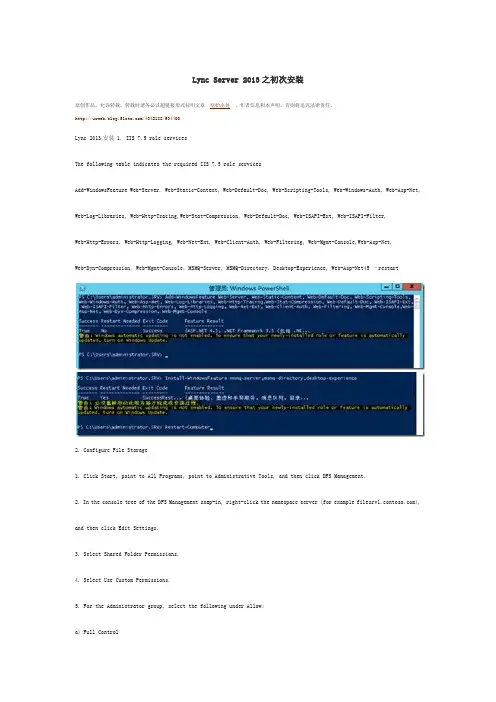
Lync Server 2013之初次安装原创作品,允许转载,转载时请务必以超链接形式标明文章原始出处、作者信息和本声明。
否则将追究法律责任。
/4042188/934400Lync 2013安装 1. IIS 7.5 role servicesThe following table indicates the required IIS 7.5 role servicesAdd-WindowsFeature Web-Server, Web-Static-Content, Web-Default-Doc, Web-Scripting-Tools, Web-Windows-Auth, Web-Asp-Net, Web-Log-Libraries, Web-Http-Tracing,Web-Stat-Compression, Web-Default-Doc, Web-ISAPI-Ext, Web-ISAPI-Filter,Web-Http-Errors, Web-Http-Logging, Web-Net-Ext, Web-Client-Auth, Web-Filtering, Web-Mgmt-Console,Web-Asp-Net,Web-Dyn-Compression, Web-Mgmt-Console,MSMQ-Server, MSMQ-Directory,Desktop-Experience, Web-Asp-Net45 –restart2. Configure File Storage1. Click Start, point to All Programs, point to Administrative Tools, and then click DFS Management.2. In the console tree of the DFS Management snap-in, right-click the namespace server (for example ), and then click Edit Settings.3. Select Shared Folder Permissions.4. Select Use Custom Permissions.5. For the Administrator group, select the following under Allow:a) Full Controlb) Changec) Read6. Click Apply, and then click OK.3. Install Lync Server Administrative Tools1. Log on as a local administrator (minimum requirement) to the computer where you want to install the administrative tools. If you are logged on as an a standard user on the Windows Vista or Windows 7 operating systems, and User Account Control (UAC) is enabled, you will be prompted for the local administrator or a domain equivalent user name and password.2. Locate the installation media on your computer, and then double-click \Setup\amd64\Setup.exe.3. If you are prompted to install the Microsoft Visual C++ 2008 distributable, click Yes.4. On the Microsoft Lync Server 2013 Preview Installation Location page, click OK. Change this path to another location or drive if you need to have the files installed to another location.5. On the End User License Agreement page, review the license terms, click I accept, and then click OK. This step is required before you can continue.6. On the Microsoft Lync Server 2013 Preview – Deployment Wizard page, click Install Topology Builder.7. When the installation successfully completes, click Exit.8.4. Run Schema Preparation1. Log on to a computer in the forest as a member of the Schema Admins group and with administrator rights on the schema master.2. Install Lync Server Core components as follows:a) From the Lync Server 2013 Preview installation folder or media, run Setup.exe to start the Lync Server Deployment Wizard.b) If you are prompted to install the Microsoft Visual C++ Redistributable, click Yes.c) The Lync Server 2013 Preview Setup dialog box prompts you for a location to install the Lync Server files. Choose the default location or Browse to a location of your choice, and then click Install.d) On the License Agreement page, check I accept the terms in the license agreement, and then click OK. The installer installs the Lync Server 2013 Preview Core Components.3. Start the Lync Server Management Shell: Click Start, click All Programs, click Microsoft Lync Server 2013 Preview, and then click Lync Server Management Shell.4. Run cmdletInstall-CsAdServerSchema5. Use the following cmdlet to verify that schema preparation ran to completion.Get-CsAdServerSchemaThis cmdlet returns a value of SCHEMA_VERSION_STATE_CURRENT if schema preparation was successful6. Wait for Active Directory replication to complete or force replication.5. Run Forest Preparation1. Start the Lync Server Management Shell: Click Start, click All Programs, click Microsoft Lync Server 2013 Preview, and then click Lync Server Management Shell.2. Run:Enable-CsAdForest -GroupDomain is my domain name3. To verify that forest preparation was successfulLog on to a computer that is joined to a domain as a member of the Domain Admins group in the forest root domain.1. Start the Lync Server Management Shell: Click Start, click All Programs, click Microsoft Lync Server 2013 Preview, and then click Lync Server Management Shell.2. Run:Get-CsAdForestThis cmdlet returns a value of LC_FORESTSETTINGS_STATE_READY if forest preparation was successful.6. Run Domain PreparationTo use cmdlets to prepare the domain1.Log on to any server in the domain as a member of the Domain Admins group.2.Install Lync Server Core components as follows:a. From the Lync Server 2013 Preview installation folder or media, run Setup.exe to start the Lync Server Deployment Wizard.b. If you are prompted to install the Microsoft Visual C++ Redistributable, click Yes.c. The Lync Server 2013 Preview Setup dialog box prompts you for a location to install the Lync Server files. Choose the default location or Browse to a location of your choice, and then click Install.d. On the License Agreement page, check I accept the terms in the license agreement, and then click OK. The installer installs the Lync Server 2013 Preview Core Components.3.Start the Lync Server Management Shell: Click Start, click All Programs, click Microsoft Lync Server 2013 Preview, and then click Lync Server Management Shell.4.Run:Enable-CsAdDomain -Domain If you do not specify the Domain parameter, the default is the local domain.5.To verify that domain preparation was successfulGet-CsAdDomain -Domain -GlobalSettingsDomainController If you do not specify the Domain parameter, the default is the local domain.This cmdlet returns a value of LC_DOMAINSETTINGS_STATE_READY if domain preparation was successful.7. Design the topology1. Log on to the computer where Topology Builder is installed as a member of the Domain Admins group and the RTCUniversalServerAdmins group.2. Start Topology Builder: Click Start, click All Programs, click Microsoft Lync Server 2013 Preview, and then click Lync Server Topology Builder.3. Start Topology Builder: Click Start, click All Programs, click Microsoft Lync Server 2013 Preview, and then click Lync Server Topology Builder.4. In Topology Builder, select New Topology. You are prompted for a location and file name for saving the topology. Give the topology file a meaningful name and accept the default extension of .tbxml. Click OK.5. Navigate to the location where you want to save the new topology XML file, enter a name for the file, and then click Save.6. On the Define the primary domain page, enter the name of the primary SIP domain for your organization, and then click Next.7. On the Specify additional supported domains page, enter the names of additional domains, if any, and then click Next.8. On the Define the first site page, enter a name and a description for the first site, and then click Next.9. On the Specify site details page, enter the location information for the site, and then click Next.10.On the New topology was successfully defined page, ensure the Open the New Front End Wizard when this wizard closes check box is selected, and then click Finish8. Define and Configure a Front End Pool1. In the Define New Front End Pool Wizard, on the Define the New Front End pool page, click Next.2. On the Define the Front End pool FQDN page, enter a fully qualified domain name (FQDN) for the pool you are creating, click Enterprise Edition Front End pool, and then click Next.3. On the Define the computers in this pool page, enter a computer FQDN for the first Front End Server in the pool, and then click Add. Repeat this step for any additional computers (up to eight) that you want to add to the pool, and then click Next.4. On the Select features page, select the check boxes for the features that you want on this Front End pool. For example, if you are deploying only instant messaging (IM) and presence features, you would select the Conferencing check box to allow multiparty IM, but would not select the Dial-in (PSTN) conferencing, Enterprise Voice, or Call Admission Control check boxes, because they represent voice, video, and collaborative conferencing features.a) Conferencing This selection enables a rich set of features including:i. IM with more than two parties in an IM session.ii. Conferencing, which includes document collaboration, application sharing, and desktop sharing.iii. A/V conferencing, which enables users to have real-time audio/video (A/V) conferences without the need for external services such as the Live Meeting service or a third-party audio bridge.b) Dial-in (PSTN) conferencing Allows users to join the audio portion of a Lync Server 2013 Preview conference by using a public switched telephone network (PSTN) phone without requiring an audio conferencing provider.c) Enterprise Voice Enterprise Voice is the Voice over IP (VoIP) solution in Lync Server 2013 Preview that allows users to make and receive phone calls. You would deploy this feature if you plan to use Lync Server 2013 Preview for voice calls, voice mail, and other functions that use a hardware device or a software client.d) Call admission control (CAC) CAC determines, based on available network bandwidth, whether to allow real-time communications sessions such as voice or video calls to be established. If you have deployed only IM and presence, CAC is not needed because neither of these two features uses CAC.e) Archiving Archiving provides a way for you to archive IM content, conferencing (meeting) content, or both that is sent through Lync Server 2013 Preview.f) Monitoring Monitoring Server enables you to collect numerical data that describes the media quality on your network and endpoints, usage information related to VoIP calls, IM messages, A/V conversations, meetings, application sharing, and file transfers, and call error and troubleshooting information for failed calls.5. On the Select collocated server roles page, you can to collocate the Mediation Server on the Front End Server or to deploy it as a stand-alone server.You can collocate the Mediation Server on the Front End pool.a) If you intend to collocate the Mediation Server on the Enterprise Edition Front End pool, ensure the check box is selected. The server role will be deployed on the pool servers.b) If you intend to deploy the Mediation Server as a stand-alone server, clear the appropriate check box. You will deploy Mediation Server in a separate deployment step after you completely deploy the Front End Server.6. The Associate server roles with this Front End pool page allows you to define and associate server roles with the Front End pool. The following role is available:Enable an Edge pool Defines and associates a single Edge Server or a pool of Edge Servers. An Edge Server facilitates communication and collaboration between users inside the organization and people outside the organization, including federated users.There are two possible scenarios that you can use to deploy and associate the server roles:For scenario one, you are defining a new topology for a new installation. You can approach the installation in one of two ways:a) Leave the check box clear and proceed with defining the topology. After you have published, configured, and tested the Front End and Back End Server roles, you can run Topology Builder again to add the role servers to the topology. This strategy will allow you to test the Front End pool and the server running SQL Server without additional complications from additional roles. After you have completed your initial testing, you can run Topology Builder again to select the roles you need to deploy.b) Select roles that you need to install, and then set up the hardware to accommodate the selected roles.For scenario two, you have an existing deployment and your infrastructure is ready for new roles or you need to associate existing roles with a new Front End Server:c) In this case, you will select the roles that you intend to deploy or associate with the new Front End Server. In either case, you will proceed with the definition of the roles, set up any needed hardware, and proceed with the installation.7. On the Define the SQL store page, do one of the following:a) To use an existing SQL Server store that has already been defined in your topology, select an instance from SQL store.b) To define a new SQL Server instance to store pool information, click New and then specify the SQL Server FQDNin the Define New SQL Store dialog box.c) To specify the name of a SQL Server instance, select Named Instance, and then specify the name of the instance.d) To use the default instance, click Default instance.e) To use SQL Mirroring, select Enable SQL mirroring and select an existing instance or create a new instance.8. On the Define the file share page, do one of the following:a) To use a file share that has already been defined in your topology, select Use a previously defined file share.To define a new file share, select Define a new file share, in the File Server FQDN box, enter the FQDN of the existing file server where the file share is to reside, and then enter a name for the file share in the File Share box.9. On the Specify the Web Services URL page, do one or both of the following:a) If you are configuring DNS load balancing, select the Override internal Web Services pool FQDN check box, enter the internal base URL (which must be different from the pool FQDN and could be, for example, internal-<your base URL>) in Internal Base URL.b) Optionally enter the external base URL in External Base URL. You would enter the external base URL to differentiate it from your internal domain naming. For example, your internal domain is , but your external domain name is . You would define the URL using the domain name. This is also important in the case of a reverse proxy. The external base URL domain name would be the same as the domain name of the FQDN of the reverse proxy. Instant messaging and presence does require HTTP access to the Front End pool.10. If you selected Conferencing on the Select Features page, on the Specify the WAC Server URL page enter the WAC server discovery URL.11. On the Define the SQL store for archiving page, select an existing instance or SQL Server, or define a new instance to store the data associated with archiving data.12. On the Define the SQL store for monitoring page, select an existing instance or SQL Server, or define a new instance to store the data associated with monitoring data.13. Click Next. If you defined other role servers on the Associate server roles with this Front End pool page, separate role configuration wizard pages will open to allow you to configure the server roles. For details, see the following: 14. If you did not select additional server roles to configure and deploy, or when you have finished the configuration of the additional role servers, click Finish.Setup 1Setup 2Setup 3Setup 4本文出自“阳光☆奋进”博客,请务必保留此出处/4042188/934400。

Lync客户端使用手册用户使用文档2011年9月15日文档修改记录目录1使用即时消息和状态 (1)1.1登录并开始工作 (1)1.2自定义您的联系信息 (2)1.3更改您的图片设置 (4)1.3.1隐藏您的联系人的图片 (4)1.3.2隐藏或更改您的图片 (4)1.4创建您的联系人列表 (5)1.5通过IM进行联系 (6)2使用语音和视频 (7)2.1选择音频设备 (7)2.2查找所需的人员 (7)2.3发出语音呼叫 (8)2.4开始电话会议 (8)2.5应答呼叫 (9)2.6邀请其他人加入对话 (9)2.7在IM对话中添加语音 (10)2.8使用呼叫控件 (10)2.9插入网络摄像机 (11)2.10在对话中添加视频 (11)3设置、开始和加入联机会议 (12)3.1安排联机会议或电话会议 (12)3.2更改会议访问和演示者选项 (12)3.3开始计划外会议 (13)3.4加入计划的联机会议或电话会议 (14)3.5加入计划外会议 (14)3.6设置音频首选项 (15)4共享桌面或程序 (15)4.1与其他人共享您的桌面 (16)4.2共享程序 (17)4.3共享P OWER P OINT 演示文稿 (17)4.4创建白板 (18)4.5为其他人授予控制权 (19)1使用即时消息和状态本节介绍了使用Microsoft® Lync™2010 通信软件进行通信的基础知识。
它说明了如何使用Lync 2010 方便地与工作场所的其他人进行交互和协作。
1.1登录并开始工作如果您已登录到您的组织的网络,请启动Lync以进行登录。
1)在Windows® 任务栏中,依次单击“开始”、“所有程序”、“Microsoft Lync”和“MicrosoftLync 2010”。
在打开Lync 主窗口时,如果看到您的姓名和状态,则说明您已登录。
2)单击您的姓名下面的可用性菜单,然后单击您的状态,或者单击“重置状态”,让Lync 根据您的活动和Microsoft® Outlook® 日历自动设置状态。
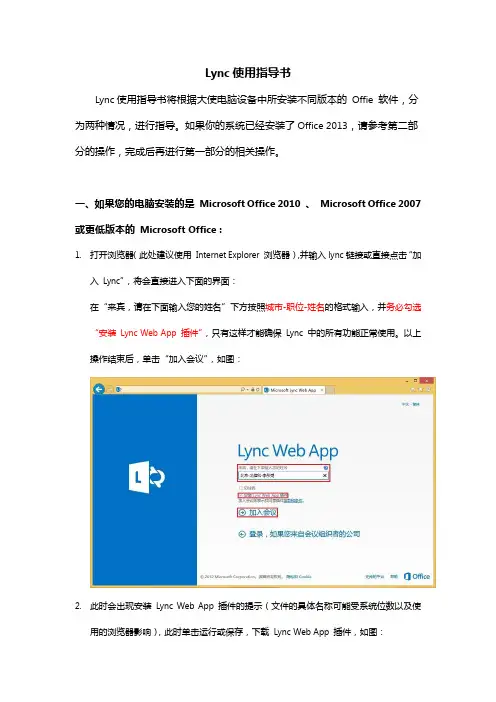
Lync使用指导书Lync使用指导书将根据大使电脑设备中所安装不同版本的Offie 软件,分为两种情况,进行指导。
如果你的系统已经安装了Office 2013,请参考第二部分的操作,完成后再进行第一部分的相关操作。
一、如果您的电脑安装的是Microsoft Office 2010 、Microsoft Office 2007 或更低版本的Microsoft Office :1.打开浏览器(此处建议使用Internet Explorer 浏览器),并输入lync链接或直接点击“加入Lync”,将会直接进入下面的界面:在“来宾,请在下面输入您的姓名”下方按照城市-职位-姓名的格式输入,并务必勾选“安装Lync Web App 插件”,只有这样才能确保Lync 中的所有功能正常使用。
以上操作结束后,单击“加入会议”,如图:2.此时会出现安装Lync Web App 插件的提示(文件的具体名称可能受系统位数以及使用的浏览器影响),此时单击运行或保存,下载Lync Web App 插件,如图:3.Lync Web App 插件安装完毕后,浏览器会自动跳转到已进入虚拟会议厅中的界面,第一次进入会出现是否允许使用插件的对话,只需点击“允许”即可。
如果有Windows 防火墙的安全提示,同样单击允许,如图:之后会进入正常的虚拟会议厅界面,以后进入都会直接进入此界面,如图:4.进入会议后,会出现下图界面。
请首先务必设置静音(为了保证会议效果,这非常重要!),只需单击电话和麦克风形状的按钮,麦克风的标志上会出现一个红杠,表示设置静音成功,如图:5.单击会话气泡形状的按钮会出现文字聊天窗口,在这里可以输入文字进行群聊,也可以看大家的发言,如图:6.单击两个小人形状的按钮可以查看当前加入会议的成员以及他们的状态,如图:7.将鼠标悬停在电话和麦克风形状的按钮上会出现设置音量的选项,可以调节会议音量的大小,如图:8.当有会议参与者开始屏幕演示的时候,您的屏幕上会显示对方屏幕上的内容,如图:对方在演示PPT 的时候,为了获得最佳的PPT 浏览效果,建议您单击右下角的视图按钮并选择“演示文稿视图”,如图:选择“演示文稿视图”后,会进入浏览PPT 的最佳视图,如图:为了获得最佳的培训体验,建议您将浏览器设置为全屏模式,如果您使用的是Internet Explorer,只需要按F11即可进入全屏模式,如图:9.会议结束后,只需单击屏幕右上角的退出会议按钮,并在弹出的对话框中单击确定即可退出会议,如图:10.退出会议后,关闭浏览器即可,如图:二、如果您的电脑安装的是Microsoft Office 2013 :1.打开“控制面板”,选择“程序”分类下的“卸载程序”,如图:2.单击“Microsoft Office 2013 Professional Plus ”(如果安装了其它版本的MicrosoftOffice 2013 ,请单击相应的版本),然后单击更改按钮,如图:3.在弹出的窗口中选择“添加或删除功能”并单击“继续”按钮,如图:4.在“安装选项”选项卡下单击Microsoft Lync 左边的磁盘和向下箭头图标并选择“不可用”,然后单击继续按钮,如图:5.等待Microsoft Office 2013配置完成,如图:6.等待Microsoft Office 2013 配置完毕,单击关闭按钮,如图:7.完成以上步骤后,剩余步骤同一中的1-10步。
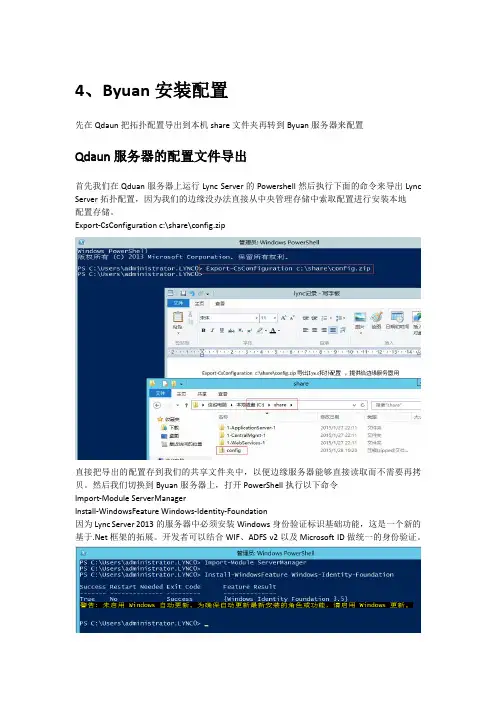
4、Byuan安装配置先在Qdaun把拓扑配置导出到本机share文件夹再转到Byuan服务器来配置Qdaun服务器的配置文件导出首先我们在Qduan服务器上运行Lync Server的Powershell然后执行下面的命令来导出Lync Server拓扑配置,因为我们的边缘没办法直接从中央管理存储中索取配置进行安装本地配置存储。
Export-CsConfiguration c:\share\config.zip直接把导出的配置存到我们的共享文件夹中,以便边缘服务器能够直接读取而不需要再拷贝。
然后我们切换到Byuan服务器上,打开PowerShell执行以下命令Import-Module ServerManagerInstall-WindowsFeature Windows-Identity-Foundation因为Lync Server 2013的服务器中必须安装Windows身份验证标识基础功能,这是一个新的基于.Net框架的拓展。
开发者可以结合WIF、ADFS v2以及Microsoft ID做统一的身份验证。
安装lync server 2013同样的,把lync server 2013 的ISO挂载到虚拟机或者物理机插上光盘,打开lync部署向导点击确定后安装,完后会弹出lync的部署向导配置lync server 2013安装本地配置存储这里我们没办法直接从中央管理存储中索取配置进行安装本地配置存储,所以就必须以从文件导入的形式,输入Qduan服务器share文件夹里之前导出的配置文件的路径。
安装lync组件Byuan证书配置这里我们可以看到需要两个证书,一个用于内部一个用于外部,我们首先来申请内部证书,单击右侧的请求按钮申请内部证书边缘服务器和前端服务器的证书请求有区别是这里选稍后发送这个选项把证书文件先放到Qduan的share文件夹上面,后面要用到,申请外部边缘证书,也是选择将证书放到Qduan服务器上,也可以放在本地,再复制到Qduan服务器,因为后面会用到,不过两个证书的名字要区分开来添加两个使用者替代名称继续下一步用我们生成的req文件,去内网证书服务器请求证书中途切到Qduan操作两个Byuan证书请求我们用记事本打开Nbu.req , 复制到白色框,提交生成证书文件,下载下来。
根据之前规划,在实现Lync Server 2010时,采用各角色分离的环境进行部署。
前面已经完成了基本环境、活动目录、后端服务器的准备,并且完成了Lync Server 2010企业拓扑的规划。
接下来,可以着手配置Lync Server 2010的前端服务器。
对于Lync Server 2010的前端服务器主要用于响应客户端的各种服务请求。
在整个环境的实现中起到尤为重要的地位。
要实现其功能,在此评估环境的Lync-ls-fe服务器上运行Lync Server 2010部署向导,如图61所示,点击“安装或更新Lync Server系统”。
图61一、安装本地配置存储其目的是安装本地配置存储并使用中央管理存储中的数据进行填充,先决条件需要本地管理员权限,如图62。
图62点击“运行”,在“配置中央管理存储的本地副本”页面中,选择“直接从中央管理存储检索(需要对中央管理存储具有读取权限)”,如图63,点击“下一步”。
图63向导自动执行并完成脚本,如图64,点击“完成”,结束“安装本地配置存储”。
图64二、安装Lync Server 2010服务组件必须要具有“本地管理员权限”,而且需要对当前域中的AD用户和组具有读取权限的域用户凭证,如图65。
因此,直接使用域管理员来进行操作是比较方便的选择。
图65点击“运行”,在设置Lync Server组件页面点击“下一步”,如图66。
图66系统自动执行并完成安装脚本,最后点击“完成”,结束Lync服务组件的安装,如图67。
图67在此需要注意的是:前端服务器上,IIS角色的配置,如果要正确运行整个脚本,安装如下功能:静态内容、默认文档、HTTP错误、、.NET扩展性、Internet服务器API(ISAPI)、ISAPI筛选器、HTTP日志记录、日志记录工具、跟踪、客户端证书映射身份验证、Windows身份验证、请求筛选、静态内容压缩、IIS管理控制台、IIS管理脚本和工具。
LYNC2013部署系列PART6:边缘部署前言:本篇文章将介绍LYNC2013边缘服务器的部署,之前已经将LYNC内网的角色全部部署完成了,要使在外网能够使用LYNC,就需要部署边缘,以及将LYNC发布至外网。
本系列的整个拓扑架构如下:边缘部署分为5部分:1.系统环境准备2.配置拓扑3.安装LYNC边缘4.配置证书5.启动LYNC服务操作步骤:一、系统环境准备1.边缘服务器是配置了2张网卡,分别连接内网和DMZ网段。
2.配置DNS后缀,同时在DNS上面对应新建一条A记录。
2.安装Windows-Identity-Foundation命令:Import-Module ServerManagerInstall-WindowsFeature Windows-Identity-Foundation3.导入根证书,具体步骤就不演示了。
二、配置拓扑1.在前端服务器上面打开LYNC2013拓扑生成器,右键单击边缘池—新建边缘池。
2.直接下一步3.指定池FQDN4.选择使用一个FQDN和IP地址5.选择内、外部接口的IPV4,以及NAT转换。
6.指定边缘服务的FQDN为,在外网的LYNC客户端通过这个FQDN进行登录,以及参加会议等。
我们将A/V服务的443端口修改成442,将443端口留给前端用。
7.指定边缘服务器连接内网网卡的IP地址8.指定边缘服务器连接DMZ网卡的IP地址9.指定NAT转换的公网地址,我们指定TMG上面的Internet网口的IP。
10.选择边缘池的下一跃点11.关联前端池,我们测试环境都只有一个站点和一个前端池。
12.接着将拓扑进行发布13.最后导出配置,由于边缘是工作组环境,不能直接从CMS下载配置,需要手动导出和导入。
导完后拷贝至边缘服务器上面。
命令:Export-CsConfiguration c:\topology\config.zip三、安装LYNC边缘1.打开LYNC2013的安装介质,点击安装2.接受许可3.点击安装或更新LYNC SERVER系统4.安装本地存储5.选择之前导出的配置文件6.本地配置存储安装完成7.接着安装LYNC组件8.下一步9.过一段时间后安装完成四、配置证书1.接着前面步骤的安装界面进行证书的配置工作2.先进行边缘内部证书的申请3.直接下一步4.由于边缘没有加入域,只能通过自定义文件进行申请,选择稍后发送。
LYNC 中文版安装详解(摘)/blog/static/10414320113662944967/LYNC 中文版安装详解-第一部分LYNC 2010 中文版已经发布有几天了,现在发布中文版的一些安装图解和大家共同探讨一下LYNC 2010的安装部署流程。
CTO_LiuJinFeng 和一些热心读者也给了我一些很好的意见,让我从比较基础的说起来,这样可以照顾更多的人。
所以我这次就打算弄一个LYNC部署序列文章,这样读者通过这么一连串的学习之后就可以掌握LYNC部署的部分内容。
由于这个序列包含的内容会比较多些,所以先大概的了解一下拓扑可能会有助于整个部署框架的了解。
基本拓扑:本次的LYNC系列的部署系列将包含中介服务器部署、LYNC边缘部署、TMG发布、奥科网关MP118以及和Exchange 2010集成等的相关的配置等内容。
这些内容也算是企业进行基本LYNC部署的相关内容。
不过需要说明的是本次的部署内容并未涉及任何安全、权限和审计方面的内容。
所以如果你是进行部署学习的话,可以参考这个文档,如果是企业级别的部署,请务必考虑规划、设计、安全和管理方面的问题,必要时请和相关的专业人士探讨。
备注:以前我在OCS 2007 R2的中介服务器上配置过相关的基于Windows 的软交换平台软件-Freeswitch,使用它可以完成普通SIP电话机注册的功能,从而实现sip 电话呼叫OC客户端。
但是目前还不知道Freeswitch和LYNC的兼容性如何,如果之后可以配置的话下也会写一些FreeSwitch和LYNC配置相关的内容。
第一部分的部署所涉及到3台计算机,分别为域控制器、前端和后端。
下面进入部署流程:为了让客户端可以自动登录系统,我们需要在DNS服务器上创建相关的SRV记录。
首先登录DC,然后创建一条A 记录对应我们的LYNC前端服务器。
然后创建一条SRV记录对应刚才创建的A记录,服务的内容为_sipinternaltls,协议为_tcp,端口为5061,对应的主机则是然后分别创建dialin、meet和admin三条A记录。
Lync2013安装手册一、准备条件:1、DNS准备:lync服务器加域,并在DNS上建以下几条A记录如果部署企业版lync还要添加pool这条A记录新建SRV记录:2、安装前端功能组件:Windows Powershell3.0(win2012自带).net 4.5,(win2012自带)IISWindows桌面体验Add-WindowsFeature Web-Server, Web-Static-Content, Web-Default-Doc, Web-Scripting-Tools , Web-Windows-Auth, Web-Asp-Net, Web-Log-Libraries, Web-Http-Tracing,Web-Stat-Compression, Web-Default-Doc, Web-ISAPI-Ext, Web-ISAPI-Filter, Web-Http-Errors, Web-Http-Logging, Web-Net-Ext, Web-Client-Auth, Web-Filtering, Web-Mgmt-Console,Web-Asp-Net, Web-Dyn-Compression, Web-Asp-Net45,web-mgmt-console,msmq-server,msmq-directory,Desktop-Experience, RSAT-ADDS安装后重启二、运行lync2013安装程序:1、准备Active Directory1.1:准备架构:1.2:准备当前林:1.3:准备当前域:1.4、添加lync控制面板管理权限:1)将域管理员添加到CSAdministrator组中添加完成后,点击上一步或退出重新点安装2、设置拓扑:2.1、安装管理工具:2.2、创建拓扑:1)打开拓扑生成器:2)选择新建拓扑:3)输入文件名,点保存点击完成,打开新建向导:2.3、定义新的前端池:1)定义前端池:2)输入前端池名字点击下一步:3)向池中添加lync服务器:4)勾选会议、企业语音、呼叫允许控制,下一步:5)不并置中介服务器:6)点下一步:7)定义SQL SERVER存储页面,点击新建:8)定义新的SQL SERVER存储:9)点下一步:10)定义文件存储,点下一步:要先手动建立这个share文件,并共享,对该目录的共享权限设置管理员帐号有完全权限,everyone 用户只要有只读权限。
安装Microsoft .Net Framework 3.5(需要sever2012安装镜像并指定文件位置)如下:Import-Module ServerManagerdism.exe /online /enable-feature /all /featurename:NetFX3 /Source:D:\sources\sxs (d:是指的光驱所在盘符)安装功能组件和IIS如下:Install-WindowsFeature AS-HTTP-Activation, Desktop-Experience,NET-Framework-45-Features, RPC-over-HTTP-proxy, RSAT-Clustering,Web-Mgmt-Console, WAS-Process-Model, Web-Asp-Net45, Web-Basic-Auth,Web-Client-Auth, Web-Digest-Auth, Web-Dir-Browsing, Web-Dyn-Compression,Web-Http-Errors, Web-Http-Logging, Web-Http-Redirect, Web-Http-Tracing,Web-ISAPI-Ext, Web-ISAPI-Filter, Web-Lgcy-Mgmt-Console, Web-Metabase,Web-Mgmt-Console, Web-Mgmt-Service, Web-Net-Ext45, Web-Request-Monitor,Web-Server, Web-Stat-Compression, Web-Static-Content, Web-Windows-Auth, Web-WMI, Windows-Identity-Foundation安装AD管理工具Add-WindowsFeature RSAT-ADDS插入LYNC 2013光盘并运行提示安装lync 2013 前需要先安装microsoft visual C++ 2011,点击“是”,进行安装点击install进行安装然后会弹出许可协议,选择“I accept the terms in the license agreement”(我接受许可协议),点击“OK”进入安装主界面首先安装 administrative tools准备AD架构:先“Prepare Schema”(架构准备),点击“Run”,启动向导点击下一步点击“Finish”,完成架构准接下来“Prepare Current Forest”(准备当前森林),点击“Run”启动向导点击“Finish”,完成域准备接下来回到桌在Server2012的metro中打开“Lync Server Topology Builder”拓扑构建器构建向导中,此处选择“New Topology”(新建拓扑)选择一个拓扑存放位置,并为拓扑起一名字定义“主SIP域”此处为“”,点击“Next”设置其他支持的域,由于没有其他的域,保持默认,点击“Next”设置Lync Server站点,这里的站点并非我们的AD站点,是Lync Server独立的站点。
目录一、軟硬件需求 (2)1.Lync 2010 与 Windows 的兼容性 (2)2.Lync2010的硬件要求 (3)二、下载 (4)三、程序安裝 (5)1.安裝Foxconn根證書 (5)2.安裝Lync2010客戶端(以32位系統為例) (5)四、使用Lync (6)1.登陸 (6)2.添加聯繫人或通訊組 (6)3.發送即時消息 (8)4.撥打電話 (8)5.桌面共享 (9)6.記錄保存功能 (10)五、修改密碼 (10)一、軟硬件需求1.Lync 2010 与Windows 的兼容性2.Lync2010的硬件要求二、下载下载地址为https:///software 或https://10.191.131.215/software. 如出現以下情況,點擊紅色框內的選項進入網站。
♦Foxconn根證書:FoxconnRootCA.p7b♦Lync2010客戶端:點擊Lync進入三、程序安裝1.安裝Foxconn根證書♦右擊FoxconnRootCA.p7b證書,選擇“安裝證書”♦在證書導入嚮導對話框中單擊“下一步”♦選擇證書的存儲位置為“受信任的證書頒發機構”,如圖所示。
單擊“下一步”。
♦如果出現以下警告,請選擇“是”。
♦證書安裝成功,點擊“確定”。
2.安裝Lync2010客戶端(以32位系統為例)♦雙擊安裝文件en_lync_2010_x86_598490(For 32Bit OS).exe。
♦在“Microsoft lync 2010 setup”框中點擊“install”。
♦安裝完成后,單擊“close”。
四、使用Lync1.登陸♦打開lync客戶端。
♦在“登陸地址”欄輸入您的Lync帳號,格式為:username@。
單擊“登陸”。
♦輸入您的UC帳戶名(格式為:username@)和密碼,單擊登陸即可。
2.添加聯繫人或通訊組Lync2010同步通訊錄需要一定的時間,如果想立即同步通訊錄,則要修改註冊表,步驟如下:新建一個文本文檔,在裏面輸入Windows Registry Editor Version 5.00[HKEY_LOCAL_MACHINE\SOFTWARE\Policies\Microsoft\Communicator] "GalDownloadInitialDelay"=dword:00000000然後將該文本的後綴名修改為.reg 轉換成註冊表文件,接著雙擊添加入註冊表,完成后即已同步通訊錄。
Lync安装教程安装环境:操作系统:Windows server 2008 R2操作系统windows server 2008 R2 X64Exchange服务器名称: IP地址:10.133.82.164 Lync服务器名称: IP地址:10.133.82.172这里需要说明,exchange 服务器同时也是域控器,这个在exchange的安装教程中有过介绍。
这里说明一下,如果这两个虚拟机是通过克隆复制过来的系统,那么最好检查一下机器的SID,使用who am i命令,检查一下,看看是不是相同的,如果相同,那么就需要重新初始化一下SID号。
首先需要将这台Lync服务器加入域中,之后为Lync服务器在域控中添加几条主机记录。
接下来的操作是在域控也就是exchange服务器上面做的操作。
请大家注意,不要弄混,如果需要在Lync上做操作,我会先写出来,免得弄混。
名称自己填写好,IP地址当然就是你现在的Lync的服务器地址。
之后还需要配置服务器位置记录。
点击新建服务位置记录提供此服务的主机就是Lync服务器的主机名称,例如我当时说过的,Lync服务器的名称是这里DNS服务器的配置可以结束了。
之后就需要去安装一个证书服务器了。
使用域管理员登录到域控服务器中,添加角色服务,选择证书服务这里大家要格外的注意,CA的公用名称,最好是将这个公用名称设置为exchange 的服务器的名称,也就是,这样方便于以后进行exchange与Lync的整合。
之后下一步由于以前已经安装过IIS全部服务,所以这里安装的时候不会再提示安装IIS,如果没有安装过exchange,那么就在这里选择一下需要安装的,下图所示需要安装的组件之后就静静的等待安装成功。
重新启动服务器,配置生效。
在exchange服务器上面的操作先告一段落,接下来需要转战到Lync 的服务器:。
在开始的时候,说需要加入到域中,如果还没有加入到域的,现在必须要加入到域,在加入到域的时候,一般情况需要将IP地址的首选DNS指向到域控器。
Lync安装步骤说明以下是lync软件说明,office必须是2007版或更高
1首先,以管理员的身份登陆电脑,安装证书文件
点安装证书
下一步
选择“浏览”,按下图操作。
完成证书安装
2跟据操作系统版本,选择对应版本软件,公司内windows2008为64位版本,其它的系统都是32位版本安装,一直点下一步,完成就可以了,如果安装失败,请先装安msxml6_x86.msi(32位)或
msxml6_x64.msi,
然后再重新装安lync软件,完成。
以下是安装截图
安装补丁
重新安装Lnyc软件,成功安装完成如下。
3执行updata_addressbook.bat文件,重新登陆就可以了。
4lync登陆都是邮箱名,登陆后,右下角如果有错误提示,
请安装软件列表中的office2007-kb936864-fullfile-x86-en-us.exe 登陆帐号是邮箱地址,如果电脑是加入域的,并用域帐号登陆,软件会自动登陆,如果电脑没有加入域,
请手动登陆
设置如下。