柯达M753_M853使用说明书
- 格式:pdf
- 大小:4.00 MB
- 文档页数:27

FILM, KODAK X-MATProduct Number F5263, F5388, F5513, Z35848-7, Z35849-5, Z35858-4, F5763, F5888, F5014, F5138Synonyms: XAR-2 (F5763, F5888, F5014), XAR-5(F5513, F5388, F5263, Z35848-7, Z35849-5, Z35858-4), XAR-351 (F5138)Product DescriptionA general-purpose film with emulsion coated on both sides of a clear film base. Suitable for most autoradiography applications using low-energy or high-energy isotopes. Signal from high-energy isotopes can be increased by using in combination with intensifying screens. Suitable for chemiluminescence.The film supplied under all three film types, XAR-2, XAR-5, and XAR-351, is the same. The difference between the three types is the packaging method. XAR-2 is packaged with each sheet of film in a light-protected envelope, XAR-5 has 50 sheets of film in a single foil envelope, and XAR-351 is a 25-meter roll, which can be cut to the desired length.Storage/StabilityX-OMAT film may be stored safely at room temperature. The shelf life can be extended by storing at 4°C. If stored at 4°C allow to warm to room temperature before opening the box. As film ages the background, called fogging, slowing increases. This is caused by the oxidation of the silver in the emulsion. Storing at a lower temperature slows the development of background fogging.SafelightThe GBX-2 Safelight Filter (F9515) is recommended for darkroom handling of X-OMAT films. A Kodak 6B Safelight Filter (F9895) is also suitable.Use a 7.5 Watt frosted bulb in the safelight placed at least four feet from the film handling area.ProcedureDirect Exposure: For most autoradiography applications the direct exposure method is used.14C, 35S, and 32P are isotopes commonly used in this technique. The labeled dry sample is placed directly on the film and placed in an exposure cassette. If the sample is a damp gel we recommend placing a layer of plastic wrap between the film and sample.Indirect Exposure: This technique is used for weak energy isotopes such as 3H. In many samples the emission from these isotopes is quenched trying to get out of the sample. If the sample is overlaid or impregnated with a fluor. The fluor inactivated by the isotope and re-emits the energy as visible light which exposes the film. Commonly used fluors are2,5-Diphenyloxazole (D4630) or Sodium Salicylate(S3007). They are usually used with 3H but can be used with 14C and 35S.Chemiluminescence: In the process the sample is treated with reagents to perform a series of reaction, the end result of which is emission of visible light. The light exposes the film.Because most exposures require an extended period of time the film and sample are placed in an exposure cassette. If no intensifying screen is used simply place the sample on the film in the cassette. If an intensifying screen is used the film should be placed on the screen and the sample placed on the film. The film is sandwiched between the screen and the sample. Intensifying screens will enhance the signal of strong emitters like 32P. As seen in the diagram the beta particles from the isotope may or may not expose the film as they pass through. An intensifying screen opposite the sample will capture the radiation that passes through and re-emit the energy as visible light to expose the film. In general a second screen on the other side of the cassette will not improve signal significantly. The light generated would have to pass through the sample to expose the film and especially if the sample is a piece of nitrocellulose or nylon, these would be opaque and little light would pass through. The energy of weaker isotopes such as 14C or 35S are generally not strong enough to pass through the film to activate the screen. In these cases a screen is not needed.Exposure Temperature: In the case of weak signals placing the assembled exposure cassette at -70°C can improve the signal. A silver grain must absorb three photons of energy to be stable. If there is too much time between absorption of the first and third photon the unstable 1- or 2-photon stage can lose a photon and the exposed state takes longer to stabilize. Placing the film and sample at -70°C helps stabilize these complexes giving a longer time to get the needed third photon. The times involved are not available. This ProductInformationholds only for very weak signals. Strong signals are not generally improved significantly by -70°C exposure temperatures. Users may want to test this in their laboratories.Processing Procedure: X-Mat films can be processed manually or by an automated processor.Automated Processing: See the manual for your instrument for processing instructions. Sigma offers Kodak Processing Chemicals for automated processing.RP X-OMAT Developer/Replenisher (Z35409-0)RP-X-OMAT LO Fixer/Replenisher (Z35410-4)RP-XOMAT Developer Starter (Z35411-2)Developer System Cleaner (Z35412-0)Fixer/Wash System Cleaner (Z35413-9)Manual Processing: There are two different methods of processing these films manually, Tray of Deep Tank. The only difference between the two methods is in the volume of processing chemicals used.The tray method employs three trays that are at least2-3 cm longer and wider than the film to be processed. One tray is for development, one for rinsing between development and fixing, and one for fixing. The film is moved from one tray to the other with print tongs.The Deep Tank method generally uses two or three 5-gallon tanks in a water bath to help regulate the temperature of the solutions. The film is placed in film hangers to move it from one tank to the next. Processing times are the same no matter which manual processing method is used. The recommended processing temperature for development is 20°C, for rinsing, fixing and washing should be 16-24°C the temperature of all solutions should be close to the same. Extreme differences can lead to damage to the film emulsion. Processing times and temperatures should be a constant in the process. If a different signal strength is desired the exposure time for the film is the recommended parameter to vary.Development: Place the film in GBX developer for5 minutes with moderate agitation for 5 seconds every 60 seconds. Agitation is accomplished by gently rocking the tray or moving the film hanger up and down in the deep tank method. The developer should be replenished at a rate of 60 ml Developer/Replenisher for every 35 X 43 cm sheet of film processed in tray or tank.Rinsing: Rinse in Kodak Indicator Stop Bath (P7292) or running water for 30 seconds with moderate constant agitation.Fixing: Place film in GBX fixer for 5-10 minutes with moderate agitation for 5 seconds every 60 seconds. The fixer should be replenished at a rate of 75 mlFixer/Replenisher for every 35 x 43 cm sheet of film processed in tray or tank.Wash: Place film in running water, with a change rate of 8 volumes/hour, 5-10 minutes.Dry: Hang in a dust-free area to air dry. An optional post-wash rinses in Photo-Flo 200 (P7417) for 30 seconds before drying allows the film to dry essentially spot free.Notes:1. As the developer is used it will become yellow incolor. This is normal. If the developer becomestoo yellow it will have lost much of its developingability.2. As fixer is used and ages it can form a precipitate.If the amount of precipitate is small decant and use the supernatant.3. The purpose of the fixer is to remove unexposedsilver form the emulsion. If after the normal fixingtime the film still seems to have a film of emulsionremaining place the film back in fresh fixer for about5 minutes to complete the fixing process. Do notbe concerned if this has been observed in roomlight. The film will not fog if only the fixing processis performed.ReferencesAutoradiographic Detection Principles. Kodak Bulletin SI-100. Copyright 1/93.jwm 4/21/99Sigma brand products are sold through Sigma-Aldrich, Inc.Sigma-Aldrich, Inc. warrants that its products conform to the information contained in this and other Sigma-Aldrich publications. Purchaser must determine the suitability of the product(s) for their particular use. Additional terms and conditions may apply. Please see reverse side ofthe invoice or packing slip.。
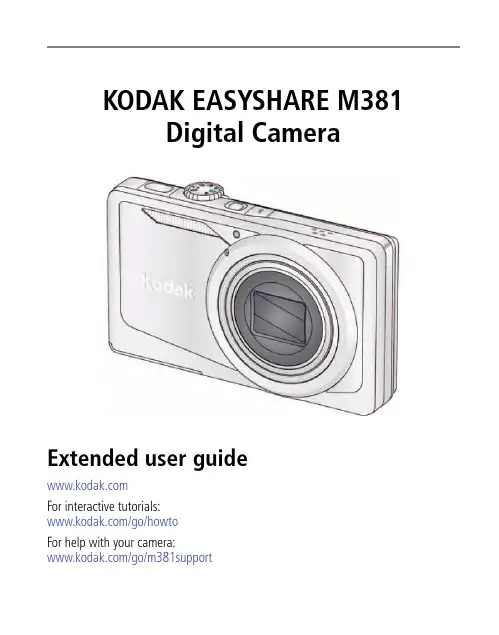
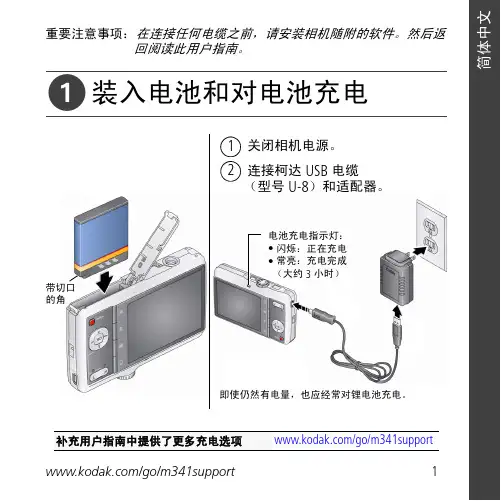
KODAK EASYSHARE M381Digital CameraExtended user guideFor interactive tutorials:/go/howtoFor help with your camera:/go/m381supportEastman Kodak CompanyRochester, New York 14650© Kodak, 2009All screen images are simulated.Kodak, EasyShare, and Perfect Touch are trademarks of Eastman Kodak Company. 4H6510_enProduct featuresFront viewShutter buttonMode dialPower button Flash button Self-timer lightLens/CoverMicro-phoneFlashProduct featuresBack viewlight(Telephoto/Wide Angle) buttonUSB/AV Out DC-In (5V)Strap postOK button SD/SDHC Card/Battery compartmentShare button Tripod socketReview buttonTable of contents1 Setting up your camera (1)Attaching the strap (1)Loading the KLIC-7003 battery (1)Charging the battery (2)Turning on the camera (3)Setting the language and date/time (3)Storing pictures on an optional SD or SDHC Card (4)2 Taking pictures/videos (5)Taking a picture (5)Using optical and digital zoom (6)Using the flash (7)Using different modes (8)Taking a video (10)Using shortcuts (10)Using the self-timer (11)Taking panoramic pictures (12)Understanding the picture-taking icons (13)3 Working with pictures/videos (14)Reviewing pictures/videos (14)Deleting pictures/videos (15)Viewing pictures/videos in different ways (16)Selecting multiple pictures/videos (16)Making a multimedia slide show (17)Using the menu button in review (19)Cropping pictures (20)Using KODAK PERFECT TOUCH Technology (20)Copying pictures/videos (21)Editing videos (21)Understanding the review icons (24)Table of contents4 Using the Menu button (25)Using the Capture tab (25)Using the Setup tab (29)5 Transferring, printing, tagging (32)Installing the software (32)Transferring pictures/videos (33)Printing pictures (34)Tagging/marking your pictures (36)6 Getting help (40)Getting help from your camera (40)Getting help on the Web (41)Troubleshooting (42)7 Appendix (46)Camera specifications (46)Care and maintenance (48)Upgrading your software and firmware (48)Storage capacities (49)Important safety instructions (49)Battery replacement, battery life (50)Limited warranty (51)Regulatory compliance (53)1Setting up your cameraIMPORTANT: For package contents, see your product package.Attaching the strapLoading the KLIC-7003 batteryFor information on replacing the battery and extending battery life, see page 50.Notched cornerSetting up your cameraCharging the batteryOther charging optionsPurchase accessories /go/m381accessoriesBattery Charging light:• Blinking: charging • Steady: finishedTurn off the camera.1Connect the KODAK USB Cable,Model U-8.2frequently, even if power remains.KODAK 5V AC Adapter (May be sold separately)Setting up your cameraTurning on the cameraSetting the language and date/timeNOTE: To change language and date/time in the future, use the Setup tab (see page29).to change current field.for previous/next field.OK to accept.At the prompt, press OK.to change.OK to accept.Language:Date/Time:Setting up your cameraStoring pictures on an optional SD or SDHC CardYour camera has internal memory. You can purchase an SD or SDHC Card to conveniently store more pictures/videos.CAUTION:A card can only be inserted one way; forcing it may causedamage. Inserting or removing a card while the camera is on may damage the pictures, the card, or the camera.Purchase accessories /go/m381accessories1Turn off the camera.2Insert or remove the optional card.3Turn on the camera.2Taking pictures/videos Taking a picture1Turn the Mode dial to Smart Capture . Thenpress the Power button to turn on the camera.2Compose the picture.3Press the Shutter button halfway to focus andset exposure. When the framing marks turn green,press the Shutter button completely down.Using the framing marks to take picturesFraming marks indicate the camera focus area. In Smart Capture mode (and in SCN modes designed for pictures of people), the camera attempts to focus on faces.halfway.completely down toTaking pictures/videosReviewing the picture/video just takenAfter you take a picture/video, the LCD briefly displays a quickview. (To exit the quickview sooner, press the Shutter button halfway.) To review pictures/videos anytime, seepage 14.Using optical and digital zoom1To zoom in, press Telephoto (T).To zoom out, press Wide Angle (W).2Take the picture.NOTE: For focus distances, see Camera Specifications starting onpage 46.To use the 5X digital zoom:■In video mode, press the Telephoto (T) button.■In picture-taking mode, press the Telephoto (T) button until the slider on the LCD is at themaximum optical zoom range. ReleaseTelephoto (T), then press it again.NOTE: Optical zoom is not available in Video mode. Digital zoom is not available in Smart Capture mode.You may notice decreased image quality when using digital zoom. The slider pauses and turns red when the picture quality reaches the limit for an acceptable 4 x 6-in. (10 x 15 cm) print.Delete the current picture/videoOK Play/pause a videoAdjust volumeTaking pictures/videosUsing the flashFlash modesFlash fires AutoWhen the lighting conditions require it.Fill (Flash On)Every time you take a picture, regardless of the lightingconditions. Use when the subject is in shadow or is“backlit” (when the light is behind the subject). In lowlight, hold the camera steady or use a tripod.NOTE: (Not available in Smart Capture mode.)Red Eye Your camera can correctred-eye using 2methods. To choose a red eye setting, see Red Eye Reduction, page 29.PreflashA preflash fires, shrinking the eye pupil, before the picture is taken.Digital Correction A preflash does not fire; the camera corrects red eye.Off NeverPress the flash button repeatedlyto scroll through flash modes.The current flash mode is shown inthe LCD status area.Taking pictures/videosUsing different modesTurn the Mode dial to the mode that best suits your subjects and surroundings.Use this mode ForSmartCapture General picture taking—it offers excellent image quality and ease of use.■Faces are detected.■The scene is analyzed for other content and for lighting.You can choose the best picture size and aspect ratio for your needs—just press the Menu button and choose Picture Size.■3:2 (the best choice when making 4 x 6 prints)■16:9 (wide screen)■4:3 (the default setting)Program Advanced picture taking—allows access to manual settings.BlurReductionReducing blur caused by camera shake or subject motion.Sport Action pictures.Panorama“Stitching” up to 3 pictures into a panoramic scene. (See page12.)Scene Point-and-shoot simplicity when taking pictures in practically anysituation. (See page9.)Video Capturing video with sound. (See page10.)Taking pictures/videosUsing Scene (SCN) modesChoose a Scene mode—for great pictures in practically any situation!1Turn the Mode dial to SCN.2Press to view scene mode descriptions.If the mode description turns off before you finish reading it, press OK.3Press OK to choose a Scene mode.SCN mode ForPortrait Full-frame portraits of people.Landscape Distant scenes.Close-up Close range. Use available light instead of flash, if possible.Flower Close-ups of flowers or other small subjects in bright light.Sunset Subjects at dusk.Backlight Subjects that are in shadow or “backlit” (when light is behind thesubject).Candle Light Subjects illuminated by candle light.Children Action pictures of children in bright light.Manner/ Museum Quiet occasions, like a wedding or lecture. Flash and sound are disabled. Place the camera on a steady surface or tripod.Text Documents. Place the camera on a steady surface or tripod. Beach Bright beach scenes.Snow Bright snow scenes.Fireworks Fireworks. Place the camera on a steady surface or tripod.Self-PortraitClose-ups of yourself. Assures proper focus and minimizes red eye. Night Portrait Reduction of red eye in night scenes or low-light conditions. Night Landscape Distant scenery at night. Flash does not fire.Panning Emphasizing horizontal motion, keeping the foreground sharp. High-ISO Low-light pictures (such as people on a stage).Taking pictures/videosTaking a video1Turn the Mode dial to Video.2Press the Shutter button completely down,then release it. To stop recording, press and releasethe Shutter button again.To review and work with videos, see page14.Using shortcutsFor quick access to the most popular functions:1Press the Info button.The shortcuts appear.2Press to access functions like Exposure Compensation, Self-timer, and Auto focus. (You’ll see different functions in different modes.)3Press to choose a setting.4To hide the shortcuts again, press .ShortcutsTaking pictures/videosUsing the self-timer Use the self-timer when you want to be included in a picture, or to ensure a steadyShutter button press. Place the camera on a tripod or flat surface.1In any picture-taking mode, press the Infobutton to show shortcuts.2Pressto highlight the self-timer icon. Pressto choose a setting:10 seconds— A picture is taken after a 10-second delay (so you have time to get into the scene). 2 seconds— A picture is taken after a 2-second delay (for a steady, shutter release on a tripod).2 shot—The first picture is taken after a 10-second delay. A second picture is taken 8 seconds later.3Compose the scene. Press the Shutter button halfway , then completely down .The camera takes the picture/pictures after the delay.NOTE: In Panoramic modes (page 12), only the 2- and 10-second options are available.Use the same procedure to take a 2- or 10-second self-timer video, but press the Shutter button completely down .1022xTaking pictures/videosTaking panoramic picturesUse panorama to “stitch” up to 3 pictures into a panoramic scene.NOTE: For best results, use a tripod. Only the panoramic picture is saved; individual pictures are not. (Exposure and white balance are set with the first picture. The flash is set to Off.)1Turn the Mode dial to .2Press to highlight Panorama Left-Right or Panorama Right-Left (dependingon the direction you want to pan), then press OK.3Take the first picture.After a quickview, the LCD displays the liveview and an “overlay” from the first picture.4Compose the second picture. Make the overlay from the first picture cover the same portion in the new picture. (You can press the Delete button to re-take a picture.)5If you are taking only 2 pictures, press OK to stitch them together.After you take 3 pictures, the pictures are automatically stitched together.NOTE: To use the self-timer 10-second or 2-second setting, see page 11.Take 2 or 3pictures.Get 1panoramicpicture.Taking pictures/videosUnderstanding the picture-taking icons Battery levelCapturemode Pictures/time remaining Zoom slider Tag name Self timer Flash modeExposure compensation FPO3Working with pictures/videosReviewing pictures/videos 1Press the Review button.2Press for previous/next picture/video.■Press the Shutter button halfway down to returnto Capture mode.■To view pictures/videos as thumbnails, see page 16.Magnifying a picture 1Press T to magnify 1X–8X.2Pressto view other parts of a picture.■Press OK to return to 1X.Playing a videoPress OK to play a video. Press OK to pause/resume.During playback:■Press to adjust the volume.■Press to play at 2X speed; press again for 4X.■Press to reverse at 2X speed; press again for 4X.4X 4X 1X 2X 2XForwardReverse Playback speedDeleting pictures/videos1Press the Review button.2Press for previous/next picture/video.3Press the Delete button.4Follow the screen prompts.NOTE: To delete protected pictures/videos, remove protection before deleting. (See Protecting pictures/videos from deletion.)Using the undo delete featureIf you accidentally delete a picture, you may be able to use Undo Delete to retrieve it. This feature is only available immediately after you delete a picture.Protecting pictures/videos from deletion1Press the Review button.picture/video.previous/next2Press for3Press the Menu button.4Press to highlight Protect, then press OK.The picture/video is protected and cannot be deleted. The Protect icon appearswith the protected picture/video.■Press the Shutter button halfway down to return to Capture mode. IMPORTANT: Your camera offers a built-in Help system. See page40.CAUTION:Formatting internal memory or an SD or SDHC Card deletes all(including protected) pictures/videos. (Formatting internalmemory also deletes email addresses and tag names. To restorethem, see EASYSHARE Software Help.)Viewing pictures/videos in different waysViewing as thumbnails (multi-up)1Press the Review button.The camera shows the last picture that was taken.2Press the Wide Angle (W) button to view pictures/videos as thumbnails. (Press it again to see more, smaller thumbnails.) To view all pictures/videos, highlight the All tab. To sort by favorites, date, or tagged pictures/videos, press and highlight theappropriate tab.3To see a single picture/video, pressto highlight it. Then press the Telephoto (T) button.■To select multiple pictures/videos, see Selecting multiple pictures/videos .■Press the Shutter button halfway down to return to Capture mode.Selecting multiple pictures/videosUse the multi-select feature when you have two or more pictures to print, transfer, delete, etc. Multi-select is used most effectively in Multi-Up mode, page 16.1Press the Review button, thenandto find a picture/video.2Press OK to select pictures/videos.A check mark appears on the picture. You can nowprint, transfer, delete, etc. the selected pictures. You can press OK a second time to remove a check mark.SelectedpicturesMaking a multimedia slide showUse Multimedia Slide Show to display your pictures/videos on the LCD. You can play all pictures/videos, or select pictures to include in the slide show. You can even save a slide show.Make a multimedia slide show that you can save1Press the Review button. Select 2-100 pictures (see page16).2Press the Menu button, then to highlight the Review tab. HighlightMultimedia Slide Show, then press OK.3Press to highlight Preview Show, then press OK.Each picture/video is displayed once. To interrupt the slide show, press OK. After the slide show plays, you may save or modify it.IMPORTANT: Your camera offers a built-in Help system. See page40.Play a multimedia slide show loopWhen you turn on Loop, the slide show is continuously repeated.1On the Multimedia Slide Show menu, press to highlight Loop, then press OK.2Press to highlight On, then press OK.3Press to highlight Preview Show, then press OK.The slide show repeats until you press OK or until the battery is exhausted.Displaying pictures/videos on a televisionYou can display pictures/videos on a television, computer monitor, or any device equipped with a video input. To connect the camera directly to a television, use an A/V cable (may be sold separately).NOTE: Ensure that the Video Out setting (NTSC or PAL) is correct (see page 30). The slide show stops if youconnect or disconnect the cable while the slide show is running. (Image quality on a television screen may not be as good as on a computer monitor or when printed.) Purchase accessories/go/m381accessoriesUsing the menu button in reviewTo use the Menu button in review:1Press the Review button, then the Menu button.2Press to highlight a tab:■Review to view and share pictures/videos■Edit to edit pictures/videos■Setup to control how your camera operates3Press to highlight a setting, then press OK.4Highlight an option, then press OK.IMPORTANT: Your camera offers a built-in Help system. See page40.Cropping picturesYou can crop a picture so that only the desired portion of the picture remains.1Press the Review button, then to find a picture to crop. 2Press the Menu button, thento highlightthe Edit tab. Highlight Crop, then press OK.3Press Telephoto (T) to zoom in, orto move the crop box. Press OK.4Follow the screen prompts.The picture is cropped. (The original is saved.) Cropped pictures cannot be cropped again on the camera. ■Press the Shutter button halfway down to return to Capture mode.IMPORTANT: Your camera offers a built-in Help system. See page 40.Using KODAK PERFECT TOUCH Technology KODAK PERFECT TOUCH Technology helps ensure better, brighter pictures. PERFECT TOUCH Technology is automatically applied to pictures taken in Smart Capture mode. (You cannot apply PERFECT TOUCH Technology to videos, panoramic pictures, orpictures to which PERFECT TOUCH Technology is already applied.)1Press the Review button, then for previous/next picture.2Press the Menu button, then to highlight the Edit tab. Highlight PERFECT TOUCH Tech, then press OK.The enhancement is previewed. Press to view other parts of the picture.3Press OK. Follow the screen prompts to replace the original picture or to save the enhanced picture as a new one.■Press the Shutter button halfway down to return to Capture mode.Picture Cropped pictureCopying pictures/videosYou can copy pictures/videos from a card to internal memory or from internal memory to a card.Copy pictures/videos:1Press the Review button.2Press the Menubutton, then to highlight the Review tab. 3Press to highlight Copy, then press OK. Highlight a choice, then press OK.NOTE:Pictures/videos are copied, not moved. To remove pictures/videos from the original location after copying, delete them (see page15).IMPORTANT: Your camera offers a built-in Help system. See page 40.Editing videosYou can do incredible things with your videos!Making a picture from a video You can choose a single frame from a video, then make a picture suitable for a 4 x 6-inch (10 x 15 cm) print.1Press the Reviewbutton, then to find a video.2Press the Menubutton, then to highlight the Edit tab. Highlight Make Picture, then press OK.3Follow the screen prompts.A picture is created. (The original video is saved.)■Press the Shutter button halfway down to return to Capture mode.IMPORTANT: Your camera offers a built-in Help system. See page 40.Video PictureTrimming a videoYou can remove an unwanted start or end from a video, saving only the desired portion.Press the Review button, thento find a video.Press the Menubutton, then to highlight the Edit tab. Highlight Trim, then press OK.3Follow the screen prompts.The video is trimmed. (You can save it as a new videoor replace the original.)■Press the Shutter button halfway down to return to Capture mode.IMPORTANT: Your camera offers a built-in Help system. See page 40.Video Trimmed videoMaking a video action printFrom a video, you can make a 9-up picture, suitable for a 4 x 6-inch (10 x 15 cm) print.1Press the Reviewbutton, then to find a video.2Press the Menu button, then to highlightthe Edit tab. Highlight Action Print, then press OK.3Highlight an option, then press OK.Auto—The camera includes the first and lastframes, then 7 equally spaced frames.Manual—Choose the first and last frames; thecamera chooses 7 frames.A 9-up picture is created.■Press the Shutter button halfway down to return to Capture mode. IMPORTANT: Your camera offers a built-in Help system. See page40.VideoUnderstanding the review iconsAdd text tag View multi-upSelect pictureEmail tagFavorite tagPrint tag/number of printsProtectedPicture/Video number Upload tagVideo durationBattery levelText tag name Play videoFPO4Using the Menu buttonYou can change settings to get the best results from your camera.1Press the Menu button.2Press to highlight a tab:■Capture/Videofor the most common picture/video-taking settings ■Setupfor other camera settings 3Pressto highlight a setting, then press OK.4Highlight an option, then press OK.NOTE: Some modes offer limited settings. Some settings remain until you change them; others, until youchange modes or turn off the camera.Using the Capture tabPress Menu,, then , and OK to access settings Capture OptionsIMPORTANT: Your camera offers a built-in Help system. See page 40.Exposure CompensationMake a picture lighter ordarker. (Available in Programand Panorama modes.) To usea shortcut, see page 10.0.0, +/-0.3, +/-0.7, +/-1.0, +/-1.3, +/-1.7, +/-2.0Picture SizeChoose a picture resolution.See Camera specifications, page 46.BurstTake up to 3 pictures in quicksuccession. (Burst is notavailable in Panorama mode.)Off On —press the Shutter button halfway to focus and set exposure. Press the Shutter button completely down and hold it to take pictures.Using the Menu buttonSelf-timerTake a picture/video after a delay, or take 2 pictures. (Also see page11.)10 seconds 2 seconds 2-shotFocus ModeSelect a large or concentrated area of focus.Auto—for general picture-taking.Macro—for sharpness and detail in pictures at close range. Use available light instead of flash, if possible. The camera automatically sets the focus distance depending on the zoom position.Infinity—for distant subjects; auto-focus framing marks are unavailable.Long Time Exposure Choose how long the shutter stays open.None0.5, 1.0, 2.0, 4.0, 8.0 secondsColor ModeChoose color tones. Unavailable in Video mode.High ColorNatural ColorLow ColorBlack & WhiteSepiaNOTE: EASYSHARE Software also lets you change a color picture to black-and-white or sepia.AF Control (Still) Choose an auto-focus setting.Continuous AF—because the camera is always focusing, there is no need to press the Shutter button halfway down to focus.Single AF—uses TTL-AF (through-the-lens auto focus) when the Shutter button is pressed halfway down.Press Menu,, then , and OK to access settings Capture OptionsIMPORTANT: Your camera offers a built-in Help system.See page40.Using the Menu buttonWhite BalanceChoose your lighting condition. (Available only in Program and Panorama modes.)Auto—automatically corrects white balance. Ideal for general picture taking.Daylight—for pictures in natural lighting. Tungsten—corrects the orange cast of incandescent light bulbs. Ideal for indoor pictures under tungsten or halogen lighting without flash.Fluorescent—corrects the green cast of fluorescent lighting. Ideal for indoor pictures under fluorescent lighting without flash.Open Shade—for pictures in shade in natural lighting.Face Detect Capture Choose if faces get focus priority.On—in SCN modes designed for pictures of people, the camera attempts to focus on faces.OffNOTE: Not available in Smart Capture mode (because face detection is always on).Exposure Metering Evaluate light levels at specific areas of a scene.Multi-Pattern—evaluates lighting conditions throughout the image to give an optimum picture exposure. Ideal for general picture taking.Center-Weight—evaluates the lighting conditions of the subject centered in the lens. Ideal for backlit subjects. Center-Spot—similar to Center-weight, except the metering is concentrated on a smaller area of the subject centered in the LCD.AF ZoneSelect a large or concentrated area of focus.Multi-Zone—evaluates 5 zones to give an even picture focus. Ideal for general picture taking.Center-Zone—evaluates the small area centered in the lens. Ideal when you need precise focus.Press Menu,, then , and OK to access settings Capture OptionsIMPORTANT: Your camera offers a built-in Help system.See page40.Using the Menu buttonVideo settingsISO SpeedControl the sensitivity of thecamera sensor.See Camera specifications, page 46.Sharpness Control picture sharpness.Sharp NormalSoftPress Menu,, , and OK to access settings Video OptionsIMPORTANT: Your camera offers a built-in Help system. See page 40.Video SizeChoose a video resolution.640 x 480 @ 30 fps (VGA) 320 x 240 @ 30 fps (QVGA)Self-timerTake a picture/video after adelay, or take 2 pictures. (Alsosee page 11.)10 seconds 2 seconds 2-shot Focus ModeSelect a large or concentratedarea of focus.Auto—for general video-taking. TBD Macro—for close range. TBDInfinity—for distant subjects. TBDVideo Blur Reduction Reduce blur caused by camera shake or subject motion.OnOff Press Menu,, then , and OK to access settings Capture OptionsIMPORTANT: Your camera offers a built-in Help system. See page 40.Using the Menu buttonUsing the Setup tabPress Menu,to highlight Setup, thenand OK to access settings Setup Options IMPORTANT: Your camera offers a built-inHelp system. See page 40.Share button Choose how pictures/videos are handled when you press the Share button (via EASYSHARE Software for WINDOWS-OS only).NOTE: Some online services limit video file sizes. Use EASYSHARE Software or choose a preferred online service.Favorite and Upload—pictures/videos aretagged as Favorites and uploaded to yourpreferred online service when you connect to yourcomputer or network.Favorite—pictures/videos are tagged asFavorites (5-star in EASYSHARE Software, on yourcomputer).Upload—pictures/videos are uploaded to yourpreferred online service when you connect to yourcomputer or network.LCD Brightness Choose LCD brightness.Power Save—Lower LCD brightness; conservespower.High Power—Higher LCD brightness; uses morepower.Image Storage Choose a storage location for pictures/videos.Auto—the camera uses the card if one is in thecamera. If not, the camera uses internal memory.Internal Memory—the camera always usesinternal memory, even if a card is installed.Set Tag Create tag names and assign them to pictures/videos. See page 36.New Tag—create a tag.Delete Tag—delete a tag.Clear All—cancel selected tags.Red Eye Reduction Choose how you want to reduce red eye.Preflash—red eye preflash fires before the picture is taken.Digital Correction—red eye preflash does notfire; the camera corrects red eye.Using the Menu buttonQuickview Briefly display a picture after it is taken.OnOffDigital Zoom Turn digital zoom on/off.OnOffOrientation Sensor Orient pictures/videos so that they are displayed with the correct side up.On—the camera rotates pictures so that allappear in the same orientation on the camera.Off—pictures are not rotated.Camera Sounds Choose sound effects, volume.Power OnFocus LockShutterErrorSelf-timerSound Volume (High, Medium, Low, Mute)Date & Time Set date and time.Video Out Choose the regional setting that lets you connect the camera to a television or other external device.NTSC—used in North America and Japan; mostcommon format.PAL—used in Europe and China.LanguageChoose your language.Reset CameraReset settings to their default.Press Menu,to highlight Setup, thenand OK to access settings Setup Options IMPORTANT: Your camera offers a built-inHelp system. See page 40.。
安装和取出胶卷安装胶卷装上胶卷以后, 相机会自动把胶卷卷到自己的卷片轴上. 然后每照一张照片, 就有一张胶片回卷到胶卷盒里.1 把拨盘拨到除锁定键以外的任何地方.2 推开相机后盖.3 如图所示,以一定斜度将胶卷装入.4 压着胶卷盒, 拉出胶片头,与相机上的橙色标志对起,然后关上后盖.如果胶片头太长以至超过了橙色标记, 请将多余的退回去.关上相机后盖后,胶片开始缠绕到相机的轴上, 同时胶片记数器开始工作. 然后, 相机发出快门释放的声音, 并显示胶片张数◎如果张数不显示, 就意味着胶卷没有装好. 那么就拿出来重装.第21页本相机不能使用红外线胶卷。
快门帘使用几高精度标准制造。
为了避免损坏,不能触摸。
装胶卷过程中千万小心,保证手指和胶卷不碰它。
取胶卷最后依仗曝光后,相机自动回卷。
当胶卷回卷到头,显示屏上将只显示◎标志。
先检查这个标志是否显示,然后打开相机后盖,取出胶卷。
中途回卷。
最后一张胶卷曝光前回卷胶卷时,请参照以下步骤:1.将命令拨盘转到中途回卷◎《《2.按住◎《《控制按钮不放,至少持续1秒。
胶卷开始回卷。
当回卷到头,相机会发出快门释放的声音。
3打开相机后盖,取出胶卷。
第22页如果你经过回卷就把一格未拍完的胶卷从相机里取出,并装入新胶卷。
这个新胶卷的片头只能回卷到卷盒里。
为了避免这种情形,在装入新胶卷前请关上相机后盖,并完全按下快门一次。
拿稳相机为了排出的照片不模糊,请参考以下的姿势拿相机。
用右手握住相机手柄并抓紧。
将胳膊肘轻轻的靠在自己的身体上。
左手托住镜头。
把相机压在自己的前额上,通过取景器观察图像。
为了更好的稳定,请保持一只脚稍微靠前。
这部分描述命令拨盘基本区域的照相模式。
这些模式能自动设置相机。
需要你做的就三取景和按快门。
而且,这些模式不艘主拨盘和其他控制钮的控制。
从而可以避免意外的错误操作而导致相片效果不好。
相机控制的自动拍摄。
在运用程序影像模式拍摄时,如果闪光灯标志在取景器里闪烁,请用手指抬起内置闪光灯。

KODAKUser Manual12.4"H | 6.1"W | 8.4"D(31,5 cm | 15,4 cm | 21,3 cm) Please read all directions before using the product and retain this guide for reference.INTRODUCTION ................................................................................................................................................................SPECIFICATIONS ..............................................................................................................................................................PACKAGE CONTENTS .....................................................................................................................................................SAFETY PRECAUTIONS ..................................................................................................................................................ABOUT .................................................................................................................................................................................PRODUCT OVERVIEW .....................................................................................................................................................CONTROL PANEL OVERVIEW ......................................................................................................................................PORT PANEL OVERVIEW ................................................................................................................................................FILM INSTALLATION ....................................................................................................................................................OPERATING INSTRUCTIONS ........................................................................................................................................MENU FUNCTIONS ..................................................................................................................................................CUSTOMER SERVICE .....................................................................................................................................................WARRANTY ..................................................................................................................................................................444556677-9910-171717-1912345678910111213TO SEE THIS GUIDE INFRENCH, ITALIAN, OR GERMANPLEASE VISITOR USE THIS QR CODE:PARA VER ESTA GUÍA EN FRANCÉS, ITALIANO O ALEMÁN, VISITE O UTILICE ESTE CÓDIGO QR.POUR VOIR CE GUIDE EN FRANÇAIS, ITALIEN OU ALLEMAND, VEUILLEZ VISITER OU UTILISER CE CODE QR. UM DIESE ANLEITUNG AUF FRANZÖSISCH, ITALIENISCH ODER DEUTSCH ZU SEHEN, BESUCHEN SIE BITTE ODERVERWENDEN SIE DIESEN QR-CODE.PER VEDERE QUESTA GUIDA IN FRANCESE, ITALIANO O TEDESCO VISITATE IL SITO OUSATE QUESTO CODICE QR.Thank you for purchasing the KODAK REELZ Film Digitizer. This User Guide is intended to provide you with guidelines to ensure that operation of this product is safe and does not pose risk to the user.Any use that does not conform to the guidelines described in this User Guide mayvoid the limited warranty.Please read all directions before using the product and retain this guide for reference. This product is intended for household use only. It is not intended for commercial use.This product is covered by a limited one-year warranty. Coverage is subject to limits and exclusions. See warranty for details.Dimensions: 12.4″ x 6.1″ x 8.4″ (31,5 x 15,4 x 21,3 cm)Image sensor: 8.08 megapixels (3280 x 2464) 1/3” CMOS sensorNative resolution: 1296pDisplay: 5″ TFT LCDMemory capacity: Up to 128 GB SD™ cardFile output format: MPEG-4Power source: 12 V DCExposure control: Auto, manual (-2 to +2 EV)White balance: AutoFrame rate: 20 frames/secFocus system: Fixed focusScan speed: 2 frames/secLanguage options: English/Spanish/French/German/ItalianSupport systems: Windows XP, Vista/Windows 7, 8, and 10/Mac 10.7.3Compatible film reel sizes: 3" - 9" film reelsKODAK REELZ Film Digitizer7″ empty film reelAC/DC adapterGray reel adapterRed reel adapterMicro USB cableCleaning clothUser guide• Convert 8 mm and Super 8 reels into digital video files • Easy to operate• Transfer your converted video files to an SD™ card • No computers, software, or drivers required • High-quality, frame-by-frame digitizing process• WARNING: CHOKING HAZARD – Small parts. This product contains small parts and is not suitable for children under 3 years old.• Remove all packaging before using this device. Please keep all packaging materials out of reach of children and pets.• Properly dispose of all packing materials immediately after unpacking the product, as the bags used for packaging could present a suffocation or choking hazard.• Read all instructions carefully before attempting to operate this device. Improper usage could result in a reduction in efficacy.• Do not attempt to disassemble or modify any part of this device.• Do not use the device if smoke or unknown smell arises.• Do not use products such as alcohol, gasoline, thinner, or any other organic solvents to clean this device.• Do not operate the device in dusty or wet areas.• Make sure the device is properly clean before operating it.• Keep the scanner out of reach of children.• Never handle the scanner with damp or wet hands. This could damage the scanner or create the risk of electric shock.• Do not place, drop, or submerge the scanner in water or any other liquid.• If the scanner somehow falls into water despite you taking all of the above precautions, please do not reach into the water to retrieve it. Unplug it immediately and then retrieve it.• Take care that objects do not fall and liquids are not spilled onto the scanner.1. Control panel2. Display screen3. Reel shafts4. Film type switch5. Film spools6. Film lid7. Film lid tab8. Empty reel1. Power2. OK/Enter3. Back4. Left5. Down6. Right7. Up8. Minus9. Plus1. SD™ card slot2. MICRO USB slot3. DC 12 V port1. Unfold the two (2) reel shafts until they click into place.2. Carefully pull out the end of the film on your 8mm or Super 8 reel (not included). Then, fold up the end of the film nice and tight and slowly insert the end of the film in the slot on the empty reel (included). This process will help you connect your film to the empty reel.3. Spin your empty reel around a few times to make sure your film is now securely connected to the empty reel.4. Insert your reel onto the left reel shaft and place the empty reel onto the right reel shaft.(If the reel you’re using has a big mounting hole, use the provided red color reel adapter. If adapters are needed, always place red color adapter on the left reel shaft; gray color adapter on the right reel shaft.)5. Take the film between the two (2) reels and carefully thread it through the scanner. Use the white, solid line on the film scanner to follow how to thread the film on the film spools.6. Push the film lid tab to the left to lift the film lid and gently wipe down the film area with the cleaning cloth (included) before placing the film.7. Hold the film firmly in between your pointer finger and thumb. Slowly place the film under the first black tab (tab farthest left in the film area). Then, carefully twist the film and place it under the second black tab in the film area.8. Twist the film slightly again to fit the film under the third tab.SUPER 8STANDARD 87.90 mm7.90 mm3.3 mm(0.130")(0.158")(0.228")(0.177")8 mm film, also known as Standard 8, has a frame size of 4.5 x 3.3 mm. Super 8 film has a frame size of 5.79 x 4.01 mm. Make sure you adjust to the film type switch to the correct film type you are currently using.NOTE: If your picture is upside down, then you are at the end of the film and need to berewind onto another reel.1. Connect the power adapter to the scanner. Then, plug the other end of the power adapter intoa power outlet.2. Insert an SD™ card (not included) into the SD™ card slot. Make sure to insert the memorycard facing up.3. Press the Power button to turn on the scanner and the main menu will appear. The scannerwill take a few seconds to turn on. The white LED light will indicate that the scanner is on. NOTES: The scanner will automatically shut down after 15 minutes of inactivity.Keep in mind that it is common for the scanner to jam if parts of the film are distorted.Make sure film is in good condition. The scanner will not be able to operate on film that is damaged, overlapping, torn, unaligned, or crooked.Scotch tape can be used to repair torn parts of the film. Make sure to carefully apply thetape and only use a small amount. Overusing the scotch tape can cause the film tojam the scanner.Power On/Off Function• Press the Power button to start the machine and the main menu interface will appear.Recording Function1. Choose the “Record” option in the Video Preview Mode. Once selected, the record icon will appear white.2. Press the OK/Enter button to enter the prompt interface for switching between Super8 and 8mm.3. Use the film type switch in front of the film scanner to select film type. Then, press theOK/Enter button to record.2. After entering the adjustment interface, press the directional arrow buttons toadjust the margin and press the Plus or Minus button to zoom in or out.3. Once the desired settings are reached, press the OK/Enter to confirm.MAIN MENU: MENUSelect “Menu” in the main menu interface and press the OK/Enter button to enter the menu interface. In the menu interface, you should see the options: My Recordings, Rewind,NOTE: Use the dotted line to thread the negative for the rewind process.The film should be lifted out of the film slot so the gray pin doesn’t slow down the film. Fast Forward Function1. Press the Up or Down button to choose the “Fast Forward” option in the Menu.2. Press the OK/Enter button to enter the option.3. After entering, press the OK/Enter button according to the prompts.Language Section1. Select “Language” in the submenu and press the OK/Enter button to confirm.2. Use the directional arrow buttons to select a language and press the OK/Enter button to confirm your selection.Erase SD Card Section1. Press the Up or Down button to select “Erase SD Card” and then press the OK/Enter button to confirm.2. Select “No” and press OK/Enter button to go back to the previous screen.3. Select “Yes” and press OK/Enter button to clear files on the SD™ card.LIMITED WARRANTY TO ORIGINAL CONSUMERThis KODAK REELZ Film Digitizer (“Product”), including any accessories included in the original packaging, as supplied and distributed new by an authorized retailer is warranted by C&A Marketing, Inc. (the “Company”) to the original consumer purchaser only, against certain defects in material and workmanship (“Warranty”) as follows:To receive Warranty service, the original consumer purchaser must contact the Company or its authorized service provider for problem determination and service procedures. Proof of purchase in the form of a bill of sale or receipted invoice, evidencing that the Product is within the applicable Warranty period(s), MUST be presented to the Company or its authorized service provider in order to obtain the requested service.About Section1. Press the Up or Down button to select “About” and then press the OK/Enter button to view the website and version.2. Press the OK/Enter or Back button to exit from the screen.Service options, parts availability, and response times may vary and may change at any time.In accordance with applicable law, the Company may require that you furnish additional documents and/or comply with registration requirements before receiving warranty service. Please contact our customer service for details on obtaining warranty service:USA:*********************,844-516-1539International:*************************,+1-844-516-1540Shipping expenses to the Company’s Return Facility are not covered by this warranty, and must be paid by the consumer. The consumer likewise bears all risk of loss or further damage to the Product until delivery to said facility.EXCLUSIONS AND LIMITATIONS The Company warrants the Product against defects in materials and workmanship under normal use for a period of ONE (1) YEAR from the date of retail purchase by the original end-user purchaser (“Warranty Period”). If a hardware defect arises and a valid claim is received within the Warranty Period, the Company, at its sole option and to the extent permitted by law, will either (1) repair the Product defect at no charge, using new or refurbished replacement parts, (2) exchange the Product with a Product that is new or which has been manufactured from new or serviceable used parts and is at least functionally equivalent to the original device, or (3) refund the purchase price of the Product.A replacement Product or part thereof shall enjoy the warranty of the original Product forthe remainder of the Warranty Period, or ninety (90) days from the date of replacement or repair, whichever provides you longer protection. When a Product or part is exchanged, any replacement item becomes your property, while the replaced item becomes the Company’s property. Refunds can only be given if the original Product is returned.This Warranty does not apply to:(a) Any non-KODAK REELZ Film Digitizer product, hardware or software, even if packaged orsold with the Product;(b) Damage caused by use with non-KODAK REELZ Film Digitizer products;(c) Damage caused by accident, abuse, misuse, flood, fire, earthquake, or other external causes;(d) Damage caused by operating the Product outside the permitted or intended uses described by the Company;(e) Damage caused by third party services;(f) A Product or part that has been modified to alter functionality or capability without thewritten permission of the Company;(g) Consumable parts, such as batteries, fuses and bulbs;(h) Cosmetic damage; or(i) If any KODAK REELZ Film Digitizer serial number has been removed or defaced.This Warranty is valid only in the country where the consumer purchased the Product, and only applies to Products purchased and serviced in that country.The Company does not warrant that the operation of the Product will be uninterrupted or error-free. The Company is not responsible for damage arising from your failure to follow instructions relating to its use.NOTWITHSTANDING ANYTHING TO THE CONTRARY AND TO THE MAXIMUM EXTENT PERMITTED BY APPLICABLE LAW, THE COMPANY PROVIDES THE PRODUCT “AS-IS” AND“AS-AVAILABLE” FOR YOUR CONVENIENCE AND THE COMPANY AND ITS LICENSORS AND SUPPLIERS EXPRESSLY DISCLAIM ALL WARRANTIES AND CONDITIONS, WHETHER EXPRESSED,IMPLIED, OR STATUTORY, INCLUDING THE WARRANTIES OF MERCHANTABILITY, FITNESS FOR A PARTICULAR PURPOSE, TITLE, QUIET ENJOYMENT, ACCURACY, AND NON-INFRINGEMENT OF THIRD-PARTY RIGHTS. THE COMPANY DOES NOT GUARANTEE ANY SPECIFIC RESULTS FROM THE USE OF THE PRODUCT, OR THAT THE COMPANY WILL CONTINUE TO OFFER OR MAKE AVAILABLE THE PRODUCT FOR ANY PARTICULAR LENGTH OF TIME. THE COMPANY FURTHER DISCLAIMS ALL WARRANTIES AFTER THE EXPRESS WARRANTY PERIOD STATED ABOVE.YOU USE THE PRODUCT AT YOUR OWN DISCRETION AND RISK. YOU WILL BE SOLELY RESPONSIBLE FOR (AND THE COMPANY DISCLAIMS) ANY AND ALL LOSS, LIABILITY, OR DAMAGES RESULTING FROM YOUR USE OF THE PRODUCT.NO ADVICE OR INFORMATION, WHETHER ORAL OR WRITTEN, OBTAINED BY YOU FROMTHE COMPANY OR THROUGH ITS AUTHORIZED SERVICE PROVIDERS SHALL CREATE ANY WARRANTY.IN NO EVENT WILL THE COMPANY’S TOTAL CUMULATIVE LIABILITY ARISING FROM OR RELATED TO THE PRODUCT, WHETHER IN CONTRACT OR TORT OR OTHERWISE EXCEED THE FEES ACTUALLY PAID BY YOU TO THE COMPANY OR ANY OF ITS AUTHORIZED RESELLERS FOR THE PRODUCT AT ISSUE IN THE LAST YEAR FROM YOUR PURCHASE. THIS LIMITATION IS CUMULATIVE AND WILL NOT BE INCREASED BY THE EXISTENCE OF MORE THAN ONE INCIDENT OR CLAIM. THE COMPANY DISCLAIMS ALL LIABILITY OF ANY KINDOF ITS LICENSORS AND SUPPLIERS. IN NO EVENT WILL THE COMPANY OR ITS LICENSORS, MANUFACTURERS, AND SUPPLIERS BE LIABLE FOR ANY INCIDENTAL, DIRECT, INDIRECT, SPECIAL, PUNITIVE, OR CONSEQUENTIAL DAMAGES (SUCH AS, BUT NOT LIMITED TO, DAMAGES FOR LOSS OF PROFITS, BUSINESS, SAVINGS, DATA, OR RECORDS) CAUSED BY THE USE, MISUSE, OR INABILITY TO USE THE PRODUCT.Nothing in these terms shall attempt to exclude liability that cannot be excluded under applicable law. Some countries, states, or provinces do not allow the exclusion or limitation of incidental or consequential damages or allow limitations on warranties, so certain limitationsor exclusions may not apply to you. This warranty gives you specific legal rights, and you may have other rights that vary from state to state or province to province. Contact your authorized retailer to determine ifanother warranty applies.Kodak does NOT manufacture this Product or provide any Warranty or support.The Kodak trademark, logo, and trade dress are used under license from Eastman Kodak Company.MicroSD and SD are trademarks of SD-3C, LLC.Mac is a trademark of Apple Inc. in the U.S. and other countries.Windows is a trademark of Microsoft Corporation in the US and/or other countries.All other products, brand names, company names, and logos are trademarks of their respective owners,used merely to identify their respective products, and are not meant to connote any sponsorship, endorsement, or approval. Distributed by C&A Marketing, Inc., 114 Tived Lane East, Edison, NJ 08837 USA.© 2021. C&A IP Holdings LLC. All Rights Reserved. Made in China.。
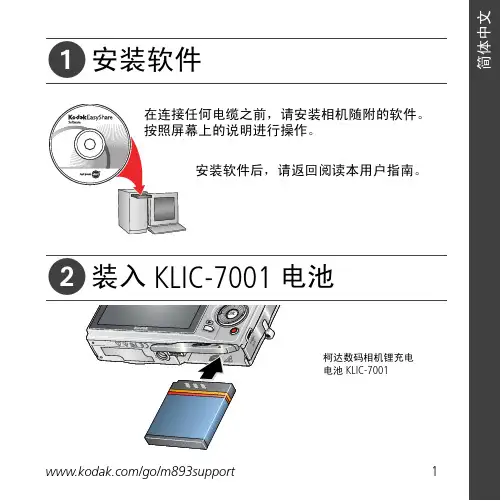
ᕡ安装软件ᕣ为 KLIC-7001 电池充电计算机将 USB 电缆连接到计算机的 USB 端口,而不是集线器。
确保计算机电源已打开并且不处于睡眠模式。
/go/easysharecenter语言:确定确定确定4/go/easysharecenterᕦ拍摄照片/录像按 打开/关闭:完全按下快门按钮然后释放。
要停止录制,请再次按下快门按钮。
• 取景窗格• 状态图标 按快门按钮以进行对焦并设置曝光。
就绪指示灯变绿时完全按下。
/go/m893support5ᕧ以查看上一照片按 Review 录像播放。
调节音量。
以 2 倍速或暂停/播放。
确定播放期间:1关闭相机电源。
2连接 A/Vᕨ传输照片/录像闪光灯镜头/go/easysharecenter/go/m893support 9简体中文/ Menu (菜单)按钮Share (分享)按钮5Delete (删除)按钮13电池仓6变焦按钮(广角/远摄)14SD/SDHC 存储卡插槽7模式转盘15底座接口8直流输入(5 伏),适用于可选购的交流变压器16三脚架连接孔1关于相机的其它操作(T) 可放大。
按广角 (W) 可缩小。
始终使用自动对焦取景标记。
如果不使用变焦(1 倍,广角),则您与主体最近可以相距 0.6 米(2 英尺)。
在变焦时,您需要进一步远离主体。
W T D(广角)(远摄)(数码)10/go/easysharecenter(请参阅下面的闪光灯模式)自动闪光补光关于相机的其它操作使用其它拍摄模式使用此模式适用于自动一般拍照 — 既能保证极高的影像品质又易于使用。
特写近距离。
如有可能,请使用现场光,而不要使用闪光灯。
场景即使在特殊条件下拍照,也可获得对准即拍的简单性。
(请参阅第 13 页。
)高感光度使用较高的 ISO 在室内拍摄弱光场景中的人物。
录像拍摄有声录像。
(请参阅第 4 页。
)收藏夹查看收藏的照片。
SCNISO关于相机的其它操作场景模式选择一种场景模式,以使您无论在何种情景下均可拍摄出精美照片。
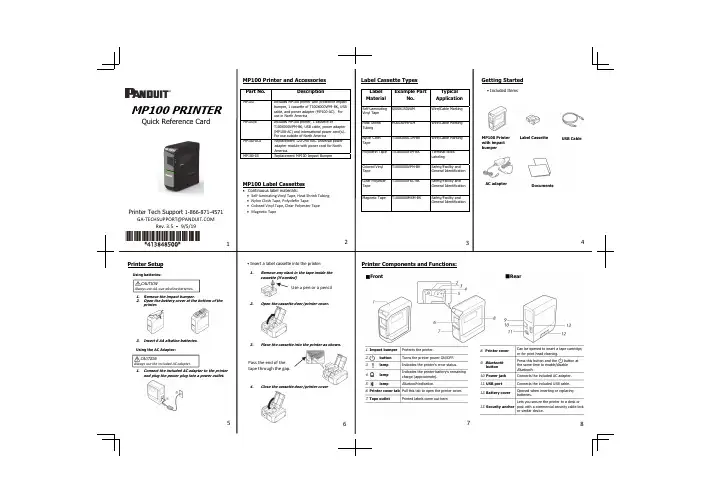
■Front1. Impact bumper Protects the printer.2.button Turns the printer power ON/OFF.3. lamp Indicates the printer's error status.4.lamp Indicates the printer battery's remaining charge (approximate).5. lampBluetooth indication.6. Printer cover tab Pull this tab to open the printer cover.7. Tape outletPrinted labels come out here.■Rear8.Printer cover Can be opened to insert a tape cartridge, or for print head cleaning.9.BluetoothbuttonPress this button and the button at the same time to enable/disable Bluetooth .10. Power jack Connects the included AC adapter.11. USB port Connects the included USB cable.12. Battery coverOpened when inserting or replacing batteries.13. Security anchor Lets you secure the printer to a desk or post with a commercial security cable lockor similar device.cassette (if needed)Open the cassette door/printer cover.Place the cassette into the printer as shown.Close the cassette door/printer coverMP100 PRINTERQuick Reference CardPrinter Tech Support 1-866-871-4571**************************Rev. 3.5 ‐9/5/19Printer SetupUsing batteries:1.Remove the impact bumper.Open the battery cover at the bottom of theInsert 6 AA alkaline batteries.Using the AC Adapter:1.Connect the included AC adapter to the printer and plug the power plug into a power outlet.6784Pass the end of the tape through the gap.MP100 Printer with impact bumperLabel Cassette USB CableAC adapterDocumentsCAUTIONAlways use AA-size alkaline batteries.CAUTIONAlways use the included AC adapter.2.BluetoothPress theBluetoothSee "Enabling and Disabling theOn your mobile device, turn on theYou can check the state of thefunction with theIf the power of the printer ison, press theturn off the power.Press the button Bluetoothbutton at the same time to turn onthe power of the printer.word mark and logos are registered trademarks owned by the Bluetooth SIG, Inc.Easy-Mark iLabel AppEasy-Mark Network AppAndroid™ logo is a trademark of Google Inc.iOS is a trademark or registered trademark of Ciscoin the U.S. and other countries and is used under license.Visit Path: Support / Download Center / SoftwareReplacement Quick Reference CardProduct specification and safety information.Path: Support / Product RegistrationEasy-Mark Plus Labeling SoftwarePANDUIT TECHNICAL SUPPORT1-866-871-4571**************************Part Number: MP100-QRC-A, Rev 3.5DWG Number: 00210ECBConnecting Printer to Computer Install the printer driver.1.For USBConnect the printer and the computer with a USB cable following the on-screen instructions.2.For Bluetooth®TroubleshootingMeanings of lampsThe lamps indicate printer statuses.Lamp's condition*: Depends on printer operation status--: Unit Printer status--*Fading in and out Bluetooth enabled. Or connected to an Androiddevice or Windows computer.Bluetooth connection completed. (when connectingto an iOS device)Performing operation such as printing or labelcutting.Bluetooth disabled.Power OFF.Low batteries and to be replaced. Havereplacement batteries ready.Replace batteries.9121416Printing from Easy-Mark Plus SoftwareConnect the MP100 printer to a computer with USBPrint from Easy-Mark Plus Labeling Software. Easy-Mark Plus is sold separately and includes the MP100Easy-Mark Plus on disc: EMPLUS-CDEasy-Mark Plus on USB flash drive: EMPLUS-2GOEasy-Mark downloadable version: EMPLUS-DLExample using T100X000VXM-BK, black on yellowcontinuous vinyl tape:CAUTIONPlace your mobile device no more than one meter away from the printer when making the settings.CAUTIONDo not connect the printer and computer before installing the software.Connect the printer as directed in the installation screen.The procedure given here is for Windows computers.See "Enabling the Bluetooth Function".Turn on the Bluetooth featureof your computer.3)Select the checkbox as shown below.4)Select the printer as shown below.。

ARTIFACT GUIDEPrintedCircuit BoardFilmsProtecting Your ImagesINTRODUCTIONPrinted Circuit Board Films – Artifact GuideMinimizing artifacts to maximize qualityWhile many factors can affect image quality,microscopic defects known as artifacts degrade film images.If the images are seriously degraded,it’s likely that the printed circuit boards made from those images will be rejected.Rejected boards can’t be sold.They cost you money.And doing them over wastes time and resources.Your productivity suffers.You lose capacity. To make sure you achieve the highest quality images – and operate cost-effectively – it is critical to minimize the number and types of artifacts that appear on processed films.The solution is simple – Proper film handling practices will prevent nearly all artifacts that cause rejects on printed circuit board films.Film defects fall into two main categories:•D-max Artifacts – a clear mark in the black part of the film•D-min Artifacts – a mark in clear areas of the filmWe have also included a third section describing less common varieties of physical artifacts which may be found anywhere on the phototool.In all cases,artifacts can be drastically reduced with proper careand consideration of your:•Facility set-up – Cleanliness is critical in darkrooms andphotoplotter rooms.•Film handling and processing methods – Keep equipment and workspaces clean.Rigorously maintain film processors andhandle film with care.This guide will help you identify a wide variety of artifacts andshow you how to avoid each of them.Each of the following pages explains one type of artifact.Examples are shown along with a description of how and where that type of artifact may form.Detailed troubleshooting procedures are offered to help you prevent similar artifacts in the future.We hope you find this useful.If you have any questions,please e-mail us at pcbproducts@ or visit /go/pcbproductsI. GENER AL GUIDELINESII. D-MAX ARTIFACTSIII. D-MIN ARTIFACTSIV. OTHER PHYSIC AL ARTIFACTSFor more information on Kodak’s Printed Circuit Board products or other products for imaging,contact your local Kodak sales representative or visit/go/pcbproductsOr contact us at:Eastman Kodak CompanyAerial & Industrial MaterialsPrinted Circuit Board Products1447 St.Paul StreetRochester,NY 14653-7128pcbproducts@©EASTMAN KODAK COMPANY,2003.Kodak,Accumax,and Take Pictures.Further.are trademarks of Eastman Kodak Company.IMC-945 CAT No.846-2517。

Eastman Kodak Company | 343 State Street | Rochester, NY | 14650Packaging Change from Cans to Vacuum Bags forKODAK VISION Color Print Film 2383 / 35 mm x 2000 ft KODAK Black-and-White Print Film 2302 / 35 mm x 2000 ftKodak will be supplying the following catalog items in vacuum packaged bags rather than metal film cans until further notice.PageProduct Description CAT No.26 US,KODAK VISION Color Print Film 2383 26 CADKODAK VISION Color Print Film 2383 / VCP666 / 35 mm x 2000 ft roll / On Core / KS 1870 (8274037)KODAK VISION Color Print Film 2383 / VCP242 / 35 mm x 2000 ft roll / On Core / BH 1866 ……………………. 8523581♦KODAK VISION Color Print Film 2383 / VCP701 / 35 mm x 2000 ft roll / On Core / BH 1870 ……………………. 1246883♦27 US,KODAK Black-and-White Print Film 2302 26 CAD KODAK Black-and-White Print Film 2302 / ESTAR Base / SP666 / 35 mm x 2000 ft roll / On Core / KS-1870 8906422 ♦ Finish-to-Order (FTO) catalog number. Sold only in specific minimum order quantities or multiplies of the minimum order quantities; non-returnable; US and Canada delivery time of 3 weeks from receipt of order. Other restrictions may apply. Contact your local Kodak representative for further information.To Order Film and Other ItemsCall Kodak Customer Service, Monday - Friday, 8:00 am to 5:00 pm Eastern Time: (800) 621-FILM (3456)Fax Orders: (800) 648-9805Email Orders: ********************For detailed information about KODAK Motion Picture Products visit our site on the Internet at /go/motion© Kodak, 2021. Kodak, Vision, Estar and the Kodak logo are trademarks.April 2021Kodak News Motion Picture and Entertainment。
柯达 EasyShare CD33变焦数码相机用户指南关于互动式教学,请访问/go/howto关于相机帮助,请访问/go/cd33supportEastman Kodak CompanyRochester, New York 14650© Eastman Kodak Company, 2005所有的屏幕影像都是模拟影像。
柯达 (Kodak)、EasyShare 和 Retinar 是伊士曼柯达 (Eastman Kodak) 公司的商标。
P/N 4J3725_zh-cn产品功能/go/supporti1麦克风7自拍/连拍按钮2腕带孔8闪光灯3自拍器/录像指示灯9取景器4模式拨盘:相机模式/电源设置10镜头5快门按钮11USB 、A/V 输出 6闪光灯按钮12直流输入(3 伏),用于可选购的交流变压器向控制器或 MMC6Review(查看)按钮14Share(分享)按钮7Menu(菜单)按钮15电池仓8液晶显示屏开/关/信息按钮ii /go/support/go/supportiii目录1 设置相机 (1)附接腕带..........................................................................................1装入电池..........................................................................................1打开相机电源...................................................................................2第一次设置日期/时间......................................................................2其它时间设置语言和日期/时间.......................................................3在 SD 或 MMC 存储卡上存储照片...................................................32 拍摄照片和录像 . (4)拍摄照片..........................................................................................4使用光学变焦...................................................................................8使用闪光灯......................................................................................9查看照片和录像...............................................................................9保护照片和录像,防止删除..........................................................123 传输和打印照片 .. (14)安装软件........................................................................................14使用 USB 电缆传输照片.................................................................15打印照片........................................................................................16相机的底座兼容性.........................................................................194 关于相机的其它操作 (20)使用自拍........................................................................................20使用连拍........................................................................................21放映幻灯片....................................................................................21复制照片和录像.............................................................................23更改闪光灯设置.............................................................................24照片拍摄模式.................................................................................25更改拍摄设置.................................................................................27自定义相机 (30)目录查看照片/录像信息 (32)预先标记相册名称 (33)分享您的照片 (35)5 故障排除 (40)相机故障 (40)计算机/接口问题 (42)照片质量问题 (43)相机就绪指示灯状态 (44)直接打印(使用 PictBridge 打印机)问题 (45)6 获得帮助 (46)帮助链接 (46)电话客户支持 (47)7 附录 (49)相机规格 (49)存储容量 (53)节电功能 (54)重要安全事项 (54)电池信息 (56)升级软件和固件 (57)其它维护和保养 (58)保修 (58)监管信息 (60)iv /go/support/go/support11设置相机装入电池1打开电池仓盖。
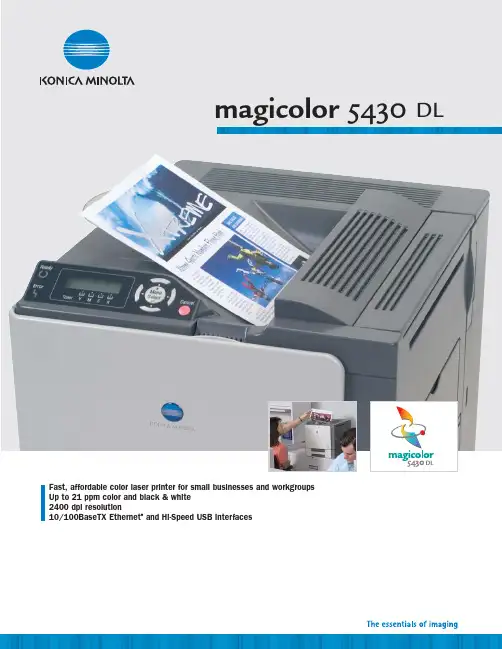
magicolor 5430 Fast, affordable color laser printer for small businesses and workgroupsUp to 21 ppm color and black & white2400 dpi resolution10/100BaseTX Ethernet®and Hi-Speed USB interfacesExtreme color for the business on the moveTake Printing to the ExtremeGet extreme speed and bold, high-impact color with the magicolor ®5430 DL from KONICA MINOLTA. It pumps out pages at up to 21 ppm and makes chal-lenging jobs look so easy. Plus it’s equipped with network-ready gear and a quick set up package. All at an extremely good price.•All-in-one toner cartridges mean fewer supplies to orderand replace. They’re pre-installed for quick set-up and color coded for easy replacement.•Conveniently check remaining toner levels from theprinter’s front keypad and view how much paper remains with a quick glance at the input cassette.Express YourselfEasy Does ItWorking for You•The magicolor 5430 DL prints 2400 x 600 dpi on plainpaper, labels, envelopes, transparencies, glossy and thick paper—so all your office projects will look great.•Everything you print, from business reports andcorrespondence to digital photos and flyers, will stand out with color appeal thanks to the printer’s 2400 x 600 dpi print quality.•The magicolor 5430 DL prints pages extremelyfast—up to 21 ppm in both color and black & white.•Built-in 10/100BaseTX Ethernet ®and high-speedUSB interfaces mean you can share the value of the magicolor 5430 DL throughout the office.•With its fast speed and low cost, the magicolor5430 DL can easily become your office standard,replacing color inkjet and black-&-white printers.magicolor 5430 DL with optional 500-sheet lowerinput feeder and duplexermagicolor 5430 DLbasicsoptions250-sheet cassetteQuick-view paper level indicatorAt-a-glance toner gauges for two-sided printingmagicolor 5430DL–TechnicalPrinting ProcessPrint Method:Print SpeedColor: up to 21 ppmMonochrome: up to 21 ppmFirst Page Output TimeKONICA MINOLTAPRINTING SOLUTIONS U.S.A., INC.(USA, Canada, Latin America)Tel.: +1 (800) 523 2696Fax: +1 (251) 639 4490Websites:PN:mc5430DLSs01_05Copyright ©2005 KONICA MINOLTA PRINTING SOLUTIONS U.S.A., INC. All Rights Reserved. KONICA MINOLTA and the KONICA MINOLTA logo are trademarks or registered trademarks of KONICA MINOLTA HOLDINGS, INC.magicolor is a trademark or registered trademarkof KONICA MINOLTA PRINTING SOLUTIONS U.S.A., INC. PageScope is a trademark or registered trademark of KONICA MINOLTA BUSINESS TECHNOLOGIES, INC. All other trademarks or registered trademarks are the property of their respective owners.Some images provided by kind courtesy of .* The addition of some options, in some combinations may cause the product to become non-compliant. Energy Star compliance does not represent an EPA endorsement of any product or service. Specifications are subject to change without notice.。
©Eastman Kodak Company, 2012January 2012 • CIS-289CURRENT INFORMATION SUMMARYCalibration Routines for KODAK PROFESSIONAL ENDURA Premier PaperGENERAL INFORMATIONKODAK PROFESSIONAL ENDURA Premier Paper isoptimized for digital printers. Significant testing has been done across a broad range of Kodak Professional and other manufacturers’ digital printers to validate satisfactory digital performance of KODAK PROFESSIONAL ENDURA Premier Paper.Kodak’s Printer Calibrations for KODAK PROFESSIONAL ENDURA Premier PaperT o achieve optimal quality prints on KODAKPROFESSIONAL ENDURA Premier Paper with Kodakdigital output devices such as the KODAK PROFESSIONAL Digital Multiprinter or the KODAK PROFESSIONAL LED II Printer, you must install new calibration files.The latest calibration files for Windows NT and 2000 (V4.3) and Macintosh (V4.3) operating systems areavailable at /go/propapersupport. If your printer does not have the newest calibration files, download and install them at this time. These files currently support:LED and laser printers, including:•KODAK PROFESSIONAL RR 30 Laser Printer •KODAK PROFESSIONAL RP 30 and SRP 30 Laser Printers •KODAK PROFESSIONAL RP 50 LED Printer•KODAK PROFESSIONAL LED II Printers 20R and 20P •KODAK PROFESSIONAL LED Digital Color Printers 20R and 20PCRT printers, including:•KODAK PROFESSIONAL Digital Multiprinters (KPDM & KPDM II)•KODAK DIGITAL SCIENCE LF CRT Color Printer •KODAK 4" CRT Color PrinterNote: New ICC output profiles are also recommended for ENDURA Premier Paper because of its greater color gamut. ICC output profiles can be found at /go/colorprofiles.Other Equipment Manufacturer’s Printer Calibration for KODAK PROFESSIONAL ENDURA PremierPaperThe starting-point recommendations listed in the following table have yielded good image quality in prints on KODAK PROFESSIONAL ENDURA Premier Paper produced by other equipment manufacturers' digital output devices.Calibration Routines for KODAK PROFESSIONAL ENDURA Premier PaperPaper and Output SystemsEASTMAN KODAK COMPANY • ROCHESTER, NY 14650Revised 01-12Calibration Routines for KODAK PROFESSIONAL ENDURA Premier PaperKODAK Publication No. CIS-289Printer CalibrationOce LightJet 430 and 50001.Go to the Oce FTP Site at /PrinterSupport/LJ_Customer_Access.2.Read the "Lightjet Media Read Me" document for information regarding downloading printer aims.3.Select the link to the Media Targets for your Lightjet printer.4.Download the appropriate aim files, as directed in the read-me file.Durst Lambda 130 and 76+Starting D-max: 2.45R, 2.30G, 2.22B (It is possible to obtain higher D-max in images that do not include text.)Basic Calibration settings: Y=91.70, M=81.90, C=0.00, D=116.9Durst Epsilon 30For best results, select HIQ or SIQ mode.Starting D-max: 2.35R, 2.20G, 2.15BBasic Calibration settings: D=0.967, C=0.000, M=0.203, Y=0.159Durst Theta 76Starting D-max: 2.25R, 2.20G, 2.15B,Basic Calibration settings: D=1.452, C=0, M=0.012, Y=0.154Durst Theta 50/51Starting D-max: 2.30R, 2.20G, 2.20BBasic Calibration settings: D=131.00, C=0.0, M=87.00, Y=140.00Durst Zeta Please contact your Durst service representative for the file.Fuji FrontierWe recommend that you use KODAK PROFESSIONAL ENDURA Premier Paper to calibrate the printer channel that you plan to use. If you don't have a recommended channel that you normally use, please start testing with Channel I.1.Load ENDURA Premier Paper into the paper magazine that you will use to print.2.From the Setup and Maintenance menu, select Print Condition Setup and Check . Then select Paper Condition Setup to perform a standard calibration.Noritsu QSS-2711 and Noritsu MP1600Setting up a Channel for KODAK PROFESSIONAL ENDURA Premier Paper1.Set up a paper channel with ENDURA Premier Paper, using the normal Setup procedure. This setup includes MLVA Setup, Uniformity, and Gamma tests.2.If any color changes are needed, enter them using the Magazine Balance function on the NORITSU MP1600 printer.Noritsu QSS 31XX, 32XX, 33XX, 34XX, and R2R printers 1.Contact Noritsu for the software which contains the profile data for KODAK PROFESSIONAL ENDURA Premier Paper.2.If profile data is not available from Noritsu, use the Supra VC channel. Calibrate using the "Registering a New Paper Type and Setup" procedure. Refer to your Noritsu manual.Polielettronica LASERLAB 1.Set these starting Laser Maximum Density values: Y=257, M=236, C=191.2.Starting Color Compensation Values: Y=0.93, M=0.84, C=0.97.3.Proceed with the manufacturer's standard paper calibration procedure. Gretag Netprinter Basic Data required for calibration are available from Gretag Imaging.Sienna Mileca HSP Basic Data required for calibration are available from Sienna Imaging.ZBE ChromiraSelect Kodak on the Emulsion menu, and enter:D-max Aim: 2.45R, 2.45G, 2.40BStarting Calibration Values: (C) 0, (M) 47, (Y) -45, (D) -22 Then follow the standard paper calibration procedure.Kodak, Kodak Professional, Endura, and Supra are trademarks.。
全新紫激光印版,为报业量身设计柯达Libra VP 数码印版是柯达数码印版家族的最新成员,将进一步加强报业的永续发展能力。
永续发展,要求的不仅仅是绿色印刷—— Libra VP 印版还具备一流的质量和产能,将助您创造新的利润增长点,同时降低成本,减少对环境的影响。
高度兼容,显著提高效率Libra VP 印版与市场领先的紫激光CTP 系统和制版线兼容。
如果用户目前采用传统的方式冲洗印版,可以继续使用现有的设备,只需用一种低pH 值的清洗定影液替换以前的显影液和补充液即可,这不仅能简化冲洗工艺,还能减少对环境的影响。
如果报社希望提高效率、节约水耗,可以采用Easy chem 系统—— 该系统取消了预清洗和显影冲洗步骤,使用的是改良的传统冲版机或专门的清洁单元。
质量和产能二者兼得无论您是日报、周报、地区性报纸还是全国性报纸,或者您还在开展半商业的印刷,Libra VP 印版将全面满足您在产能和印刷质量方面的需求。
该印版与最快的紫激光制版机兼容,所以能随时制版实时上机印刷。
Libra VP 印版若是采用传统方式冲洗,印量高达35万;而采用Easy chem 系统冲洗亦可达30万印。
此外,印版的分辨率在调幅加网时可达150 lpi ,在混合加网时可达180 lpi ,轻松创造优异的印刷质量。
节约药水和水资源Libra VP 印版使用一种低pH 值的清洁定影液—— Libra 清洁定影液。
若Libra VP 印版以传统方式冲洗,冲洗液的使用寿命更长,帮助用户减少废弃物,节约时间。
如果采用Easy chem 系统,Libra 清洁定影液可清洁、冲洗并上胶印版,杜绝印版预清洗和显影冲洗环节及相关水耗。
无论您是以传统方式还是使用Easy chem 系统冲洗,Libra VP 印版都将助您减少对环境的影响。
Libra VP 印版和柯达其他印版一起,为报业环保做贡献:柯达腾格里News 免冲洗印版是热敏印版,完全取消了冲洗工艺及所有相关的水耗、药水、能耗,从CTP 设备出来后可直接上机印刷;柯达ThermalNews PT 数码印版是唯一取消了预热步骤的冲洗类报业印版,这减少了能耗,此外由于印版也取消了预清洗,所以也节约了水耗。
B2B 商店用户指南–客户版本 1.0 – 2022 年 7 月 5 日目录柯达客户门户网站 (1)单点登录 (2)Partner Place (2)登录 (2)选择买方地址(可选) (2)购买 (2)快速订购 (2)保存的购物车 (3)保存购物车 (3)查看和恢复保存的购物车 (3)导入保存的购物车 (3)搜索 (3)购物车和结账 (3)查看购物车 (3)结账 (4)地址簿 (4)订单状态 (4)发货清单 (5)打印头更换 (5)回扣和销售方式 (5)柯达客户门户网站柯达客户门户是您与柯达开展业务的接入点。
在门户网站中,您可以:•快速导航到您的应用程序•管理您的应用程序•管理您的用户设置进入https://注意:收到确认后最长可能需要 24 小时才能完成应用程序配置。
单点登录客户门户网站和 B2B 商店使用 Microsoft 提供的单点登录。
获得门户网站的访问权限后,您将收到包含邀请链接的电子邮件。
Partner PlacePartner Place 将保留供您在客户门户网站中尚不可访问的应用程序。
注意:短期内,您仍可通过 Partner Place 下订单。
登录建立单点登录后,您可以登录柯达客户门户网站并单击 Shop & Orders 应用程序。
1.进入https://2.单击 Shop & Orders 应用程序选择买方地址(可选)如果您的用户已配置多个买方帐户,系统将提示您选择要为之下单的帐户。
1.单击买方旁的单选按钮2.单击“选择”购买有几种购买方式有助于尽可能加快和简化流程。
快速订购快速订购是一个简单的订单,您可在其中输入多个材料编号和数量,然后将它们快速添加到购物车。
保存的购物车您可通过“保存的购物车”保存购物车中的材料和数量以备将来使用,这有助于您处理经常下的订单。
保存购物车1.将商品添加到购物车2.打开购物车3.单击“保存购物车”链接4.填写“名称”和“描述”字段5.单击“保存”查看和恢复保存的购物车1.单击黄色菜单栏中的“我的帐户”2.单击下拉菜单中的“保存的购物车”3.单击要查看的“保存的购物车的名称”4.单击“恢复”5.选中该复选框以在“保存的购物车”中保留此购物车的副本,以便以后下相同的订单。
TIB4361June 2002How To Get The Best From Your KODAK Inkjet PrintsUpdated: 20 June, 2002Does Kodak offer an inkjet paper that will work in my printer?Kodak offers many choices of Inkjet papers; please visit our website for the paper that will help you achieve the results you are looking for. Go to: /go/inkjetChoosing the correct printer settings.Kodak offers a selection of papers that will help you print out documents to photos. Once you have chosen your Kodak Inkjet paper, Kodak offers recommended printer settings to use with your printer. These settings are available on a sheet inside most paper packages. You can also visit our website to obtain these settings, /go/inkjet Along with manually changing your printer settings, Kodak offers a free downloadable software package called “Picture Software”. This software will also allow you to download an application called “One Touch for Better Pictures.” This software will allow you to pick your printer and operating system when using the KODAK Ultima Picture Paper and the KODAK Premium Picture Paper only. Downloading these 2 files will eliminate the manual step of having to change your printer settings for the papers mentioned above.Kodak Inkjet Printing Recommendations.When handling Kodak Inkjet Papers please follow the below recommendations:•Handle Kodak Inkjet Papers like photographic papers, by the edges to avoid oil deposits and fingerprints.•Be sure you are printing on the correct side of the paper, that is, the coated side. (some papers are coated on both sides).•Store unused print media in a cool, dry place. Avoid exposure to direct sunlight for prolonged periods of time. All media products are best when used within 1 year of purchase date.•Be sure to adjust your printers settings for the recommended paper.•Remove each print from printer’s output tray as it is finished to avoid ink smearing or transfer. To avoid smudging, allow inks to air dry completely before stacking. Many papers dry almost immediately, but less-than-ideal drying conditions may slow down the process. It is recommended to keep each print separated until completely dry (24 hours, recommended) before storing in an acid free folder.Storing and Preserving Kodak Inkjet prints.When storing Kodak Inkjet prints please follow the recommendations below:•Visible and UV light, along with atmospheric pollution, hasten image fading. Keep prints away from bright lights - especially direct UV illumination and sunlight along with above average exposure to florescent lighting.•Store finished prints in a cool, dry, dark place.•Avoid hot temperatures and high humidity.•Avoid exposure to dirt, dust, scratches and fingerprints.•Use acid-free interleaves between printed sheets when stacking for long-term storage (after ink is thoroughly dry).when storing prints in clear viewing sleeves, use a breathable clear cover sheet to prevent inks from transferring / sticking to the sleeve. (Obtain at your local photo retailer)•Be sure to install an acid free mat board between the frame and photo to prevent prints from sticking to the glass over time. (Obtain at your local photo retailer)•Be sure to always save your images on a digital storage devise. Be sure to save your images to the appropriate device as technology progresses.•Laminating Kodak Inkjet Prints - Due to the various makes and models of laminating machines and materials on the market today. It is extremely difficult to determine specific recommendations with Kodak Inkjet papers.•UV Sprays on Kodak Inkjet Papers - Due to the various makes and models of UV Sprays on the market today. It is extremely difficult to determine specific recommendations with Kodak Inkjet Papers.•KODAK Ultima Picture Paper and KODAK Premium Picture Paper are designed to be fade resistant. The use of UV sprays is not required.The following materials should be avoided when mounting, displaying or storing your Kodak Inkjet prints.•Materials with high acidic levels•Plastics containing pvc or acetate materials•Cellophane tape•Masking tape•Rubber cement•CardboardThings not to do:•Don’t mount your photo so that it is directly in contact with the glass in a framed display. Instead use good quality acid-free or rag mat board, and cut a window in it to provide an air space between it and the glass.•Don’t store prints in a damp basement or hot attic.•Handle prints by the edges to avoid skin oils and fingerprints.Acid free materials can be obtained through your local photo retailer.How does ultraviolet light affect my Kodak inkjet print?Print life is determined and affected by environmental factors such as light, humidity and air quality temperature. These factors add to print dye loss. Ultraviolet light can cause a print, especially a color print, to fade. Light fading photos displayed in normal household conditions will suffer a progressive loss/color shift in the highlighted areas. To reduce these effects you can make sure prints are not displayed in direct sunlight or in windows. Dye shift may also occur even when photos are kept in dark storage (albums) but usually at a much slower rate.Ultraviolet Absorbing Glass: Framed prints, for display can be protected with the use of ultraviolet absorbing glass or special lightweight acrylic that has UV absorbing properties.Inkjet Definitions:•Absorbency- The ability of paper to absorb and hold ink or other liquids•Acid Free paper- Paper, which has had the acid, removed from the pulp so that it has a neutral 7.0 pH.Examples: Commonly used for fine art prints and limited edition printing, as well as permanent records where contact with paper acidity could harm the documents.•Archival Paper (Archival media)- Acid free and lignin free paper that lasts longer than other papers and holds color well.Examples: With a quality lifetime of 100 years or longer, archival paper is often used for critical, permanent records that must be kept for many years.•Bleed Through- When paper is too thin or the ink applied too heavily the color can bleed through to the other side.Using the right paper for the type of ink coverage required can eliminate bleed-through.•CMYK- Short for Cyan-Magenta-Yellow-Black, and pronounced as separate letters. CMYK is a color model in which all colors are described as a mixture of these four process colors. CMYK is the standard color model used in offset printing for full-color documents. Because such printing uses inks of these four basic colors, it is often called four-color printing.In contrast, display devices generally use a different color model called RGB, which stands for Red-Green-Blue. One of the most difficult aspects of desktop publishing in color is color matching -- properly converting the RGB colors into CMYK colors so that what gets printed looks the same as what appears on the monitor.•Color Gamut- The total range of colors that can be reproduced by a digital device.•Color management system (CMS)- A system for ensuring that colors remain the same regardless of the device or medium used to display the colors. This is extremely difficult because different devices use different technologies and models to produce colors. In addition, color is highly subjective. The same colors look different to different people•Color matching- the process of assuring that a color on one medium remains the same when converted to another medium. This is extremely difficult because different media use different color models. Color monitors, for example, use the RGB model, whereas process printing uses the CMYK model. As color desktop publishing matures, color matching is gaining more and more attention. The most recent WINDOWS and MACINTOSH operating systems include a color management system (CMS) to assist in color matching.•Crop marks (Cut Marks)- To cut out or trim unneeded portions of an image or a page. Crossed lines placed at the corners of an image or a page to indicate where to trim it. Also called corner marks. Center marks indicate the center of a 2-page spread.•Dithering- Creating the illusion of new colors and shades by varying the pattern of dots. Newspaper photographs, for example, are dithered. If you look closely, you can see that varying the patterns of black and white dots produces different shades of gray. There are no gray dots at all. the more dither patterns that a device or program supports, the more shades of gray it can represent. In printing, dithering is usually called halftoning, and shades of gray are called halftones.•DPT (dots per inch)- A measure of the resolution of a printer is called DPI or dots per inch. It properly refers to the dots of ink or toner used by an imagesetter, laser printer, or other printing device to print your text and graphics. In general, the more dots the better and sharper the image. DPI is printer resolution. DPI is not image resolution although frequently used that way.•Duplex paper (Duplex Media)- Paper designed to be printed on either side or both sides.•Matte Finish- Coated paper with a low gloss finish without luster.•Opacity- Opacity is the measure of how resistant to show-through a piece of paper is. The more fibers or fillers in a paper, the more opaque (less see-through) it will be.•Paper Grade- Classification of different types of paper based on the type of pulp, treatments, and the end use of the paper. some common grades of paper include bond, book, cover, newsprint and photo.•Pigment Inks- While conventional inks are commonly dye-based, pigment inks consist of tiny chunks of solid pigment suspended in a liquid medium. According to their proponents, pigment inks have fewer tendencies to run, bleed or feather.•Pixel- Short for Picture Element, a pixel is a single point in a graphic image. Graphics monitors display pictures by dividing the display screen into thousands (or millions) of pixels, arranged in rows and columns. The pixels are so close together that they appear connected.•PPI (Pixels per inch)- PPI is a measure of the number of pixels per inch displayed or captured in an image. A digital image is composed of samples that your screen displays in pixels. Also known as: display resolution, screenresolution.•Print driver- A software routine that describes the physical characteristics of a particular printer, and converts data for printing into a form that printer can understand.•Resolution- Affects to the sharpness and clarity of an image. Most often used to describe monitors, printers and cameras, it indicates the number of dots or pixels per inch. For printers, a 720-dpi (dots per inch) resolution means that there are 720 separate dots per 1-inch line of print.For graphics monitors (VGA, SVGA) the screen resolution means the overall number of (pixels) displayed on the entire screen. 800x600 resolution would contain 800 pixels across the screen and 600 pixels down the screen. The overall screen resolution would be 480,000 pixels. On a 15” monitor this would represent a 72-(PPI) display.•True Black- Black produced by separate black ink rather than the ‘process black’ produced from a mixture of syan, magenta and yellow.•UV resistance- The resistance to fading under direct sunlight and other UV light sources.•Waterfast- The ability of a print to resist damage when exposed to water.Kodak is a trademark of Eastman Kodak Company.。
Kodak Scan Station 730EX Plus ScannerPowerful features. Unlimited integration options.It’s not what you put intoyour scanner, it’s what yourscanner puts into your businessGet more valuable information into your business systems fasterby capturing your information at the edge of your processes.Kodak Scan Station 730EX Plus Scanners deliver powerful featuresand integrations for streamlined customization, and scanningby more people in more places. Turn business-critical data intodecisions quickly and seamlessly with simple network setup androbust remote management.Set-up, access, and security simplifiedAn array of safer, smarter, speedy features make the KodakScan Station 730EX Plus ideal for today’s information challenges.• P owerful security features – such as administration-levelpassword protection – maintain accessibility for ad-hoc users• E asy integration into the Microsoft ecosystem, plusautomatic, ongoing installation of their latest security updates• E asily port your Windows 10 application to create yourown custom scanning kiosk• C lassify, organize, and search content efficiently withimproved file naming• Deliver data to applications automatically with built-inbarcode readingTruly user-friendly featuresGet fewer mistakes and faster proficiency without the needfor a separate PC.• F ind the functions you need quickly with a bright,easy-to- navigate touchscreen• I ntegrated OCR engine lets users convert documents totext-searchable PDFs and deliver them to a variety ofconfigurable destinations – all with a single touch onthe scannerSimple remote managementBy networking Scan Stations throughout your business, you spend less time visiting devices individually and more time on other tasks.• R etain control of available features with administrator- managed functionality • C onfigure and maintain all of your scanners from one place Turn abstract information into dynamic dataThe Scan Station 730EX Plus converts the information in your documents into a valuable digital resource.• I mprove communication by connecting the scanner to your network and pulling data directly into your business processes quickly and easily • E ffortlessly send digital files to multiple destinations • S treamline processes with improved paper handling Protect your investmentGet the best possible performance from your scanners and software with a full range of service and support contracts available to protect your investment and keep productivity at peak levels. Along with the initial warranty, you can put Alaris knowledge to work for you, helping your Kodak Scan Station 730EX Plus Scanners satisfy your changing business process needs for years to come.AT A HOSPITAL, documents are scanned into workflow from multiple remote sites. These sites don’t have dedicated scanning staff, aren’t controlled by the hospital, and this information is subject to HIPAA guidelines. Documents need to include appropriate metadata and must be searchable. To complicate matters, lab work results and other records of conditions and treatments must go to multiple locations in various formats – such as a physician who wants emails, a head nurse who prefers faxes to a nursing station, etc.Multiple Scan Station 730EX Plus units are now in place to meet these mandates. To simplify scanning, users only need to gather documents, load them into the feeder, add voice notes as attachments (if desired), and push one button. Metadata, such as patients’ Medical Record Numbers (MRN) and birth dates, are added by barcode and zonal OCR respectively. Now lab results, echocardiograms, and other records of varying sizes can be quickly scanned and sent. Desired file formats are easy to specify,HIPAA guidelines are met, document security transfer is assured, and all stakeholders receive paperwork in their desired format(s).Bright, easy to navigate touchscreen Connect your scanner to network Improved paper handling21421353FeaturesConnectivity 10/100/1000 Base T and no host PC requiredOutput Methods Scan to network share, scan to print, scan to e-mail, scan to fax server, scan to portable USB drive, scan to Kofax Front Office Server, FTP, sFTP, FTPS (anonymous, authenticated, with proxy support), and scan to Microsoft SharePoint (on-premise)Network Protocols FTP, HTTP, WINS, TCP/IP, SMB, authenticated SMTP (login, plain text, CRAM, NTLM), DHCP (or static IP), Network domain authentication Security FeaturesAutomatic, ongoing installation of Microsoft’s latest security updates via default update feature; PDF private key encryption, optional password access, option to enable/disable the ability to scan to portable USB drives, secure login via LDAP, activity logging by Login ID, IP port blockingRemote Administration(for system administrators only)Secure login with a customizable password, ability to create and manage lists of Scan Station 730EX Plus devices, group and easily classify managed devices, update the configuration and/or embedded software of one, some or all managed devices, view the status of managed devices, remotely access and manage the logs of a single managed device, restart or power off a single managed device Embedded Operating System Windows 10 loT Enterprise LTSC 2019 versionFile Format Outputs Text searchable PDF, Single and multipage TIFF, JPEG, PDF, PDF, PDF/A, Microsoft Word, Microsoft Excel, RTF, encrypted PDF, JPEG-compressed TIFF, WAV audio filesThroughput Speeds Up to 70 ppm/140 ipm at 200 dpi (portrait, letter size, black-and-white/grayscale/color)Multifeed Detection With ultrasonic technologyFeeder CapacityUp to 75 sheets of 20 lb. (80 g/m2) paper Recommended Daily Volume Up to 6,000 pages per dayDimensionsWeight: 10.5 kg (23 lbs.); Depth: 38.2 cm (15 in.); Width: 35.6 cm (14.0 in.); Height: 20.6 cm (8.1 in.)Recommended PC Configuration for Scanner Administration Software ************************************************,4GBRAM,USB2.0,runningWindows10(32-bitand64-bit),Windows 8.1 (32-bit and 64-bit), Windows 8 (32-bit and 64-bit), Windows 7 (SP1)Accessories Available Portable USB drives, Kodak Scan Station Keyboard and Stand Accessory, Kodak Legal Size Flatbed Accessory, Kodak A3 Size Flatbed Accessory WarrantyPlease contact your local sales representative for warranty detailsEnvironmental Factors Operating temperature: 10-35° C (50-95° F); Operating humidity: 10% to 85% RH, Altitude <2000M or 6562 feet Power ConsumptionOff mode: <0.3 Watts; ENERGY STAR 3.0/Sleep mode: ≤5.26 Watts; Operating mode: <50 WattsKodak Scan Station 730EX Plus Scanner Want to learn more?/go/ScanStation730EXPlus Contact us:/go/contactusAll trademarks and trade names used are the property of their respective holders.The Kodak trademark and trade dress are used under license from Eastman Kodak Company.© 2019 Kodak Alaris Inc. TM/MC/MR: Alaris03/20。