柯达Z812IS详细使用说明
- 格式:doc
- 大小:1.80 MB
- 文档页数:46
KODAK EASYSHARE M381Digital CameraExtended user guideFor interactive tutorials:/go/howtoFor help with your camera:/go/m381supportEastman Kodak CompanyRochester, New York 14650© Kodak, 2009All screen images are simulated.Kodak, EasyShare, and Perfect Touch are trademarks of Eastman Kodak Company. 4H6510_enProduct featuresFront viewShutter buttonMode dialPower button Flash button Self-timer lightLens/CoverMicro-phoneFlashProduct featuresBack viewlight(Telephoto/Wide Angle) buttonUSB/AV Out DC-In (5V)Strap postOK button SD/SDHC Card/Battery compartmentShare button Tripod socketReview buttonTable of contents1 Setting up your camera (1)Attaching the strap (1)Loading the KLIC-7003 battery (1)Charging the battery (2)Turning on the camera (3)Setting the language and date/time (3)Storing pictures on an optional SD or SDHC Card (4)2 Taking pictures/videos (5)Taking a picture (5)Using optical and digital zoom (6)Using the flash (7)Using different modes (8)Taking a video (10)Using shortcuts (10)Using the self-timer (11)Taking panoramic pictures (12)Understanding the picture-taking icons (13)3 Working with pictures/videos (14)Reviewing pictures/videos (14)Deleting pictures/videos (15)Viewing pictures/videos in different ways (16)Selecting multiple pictures/videos (16)Making a multimedia slide show (17)Using the menu button in review (19)Cropping pictures (20)Using KODAK PERFECT TOUCH Technology (20)Copying pictures/videos (21)Editing videos (21)Understanding the review icons (24)Table of contents4 Using the Menu button (25)Using the Capture tab (25)Using the Setup tab (29)5 Transferring, printing, tagging (32)Installing the software (32)Transferring pictures/videos (33)Printing pictures (34)Tagging/marking your pictures (36)6 Getting help (40)Getting help from your camera (40)Getting help on the Web (41)Troubleshooting (42)7 Appendix (46)Camera specifications (46)Care and maintenance (48)Upgrading your software and firmware (48)Storage capacities (49)Important safety instructions (49)Battery replacement, battery life (50)Limited warranty (51)Regulatory compliance (53)1Setting up your cameraIMPORTANT: For package contents, see your product package.Attaching the strapLoading the KLIC-7003 batteryFor information on replacing the battery and extending battery life, see page 50.Notched cornerSetting up your cameraCharging the batteryOther charging optionsPurchase accessories /go/m381accessoriesBattery Charging light:• Blinking: charging • Steady: finishedTurn off the camera.1Connect the KODAK USB Cable,Model U-8.2frequently, even if power remains.KODAK 5V AC Adapter (May be sold separately)Setting up your cameraTurning on the cameraSetting the language and date/timeNOTE: To change language and date/time in the future, use the Setup tab (see page29).to change current field.for previous/next field.OK to accept.At the prompt, press OK.to change.OK to accept.Language:Date/Time:Setting up your cameraStoring pictures on an optional SD or SDHC CardYour camera has internal memory. You can purchase an SD or SDHC Card to conveniently store more pictures/videos.CAUTION:A card can only be inserted one way; forcing it may causedamage. Inserting or removing a card while the camera is on may damage the pictures, the card, or the camera.Purchase accessories /go/m381accessories1Turn off the camera.2Insert or remove the optional card.3Turn on the camera.2Taking pictures/videos Taking a picture1Turn the Mode dial to Smart Capture . Thenpress the Power button to turn on the camera.2Compose the picture.3Press the Shutter button halfway to focus andset exposure. When the framing marks turn green,press the Shutter button completely down.Using the framing marks to take picturesFraming marks indicate the camera focus area. In Smart Capture mode (and in SCN modes designed for pictures of people), the camera attempts to focus on faces.halfway.completely down toTaking pictures/videosReviewing the picture/video just takenAfter you take a picture/video, the LCD briefly displays a quickview. (To exit the quickview sooner, press the Shutter button halfway.) To review pictures/videos anytime, seepage 14.Using optical and digital zoom1To zoom in, press Telephoto (T).To zoom out, press Wide Angle (W).2Take the picture.NOTE: For focus distances, see Camera Specifications starting onpage 46.To use the 5X digital zoom:■In video mode, press the Telephoto (T) button.■In picture-taking mode, press the Telephoto (T) button until the slider on the LCD is at themaximum optical zoom range. ReleaseTelephoto (T), then press it again.NOTE: Optical zoom is not available in Video mode. Digital zoom is not available in Smart Capture mode.You may notice decreased image quality when using digital zoom. The slider pauses and turns red when the picture quality reaches the limit for an acceptable 4 x 6-in. (10 x 15 cm) print.Delete the current picture/videoOK Play/pause a videoAdjust volumeTaking pictures/videosUsing the flashFlash modesFlash fires AutoWhen the lighting conditions require it.Fill (Flash On)Every time you take a picture, regardless of the lightingconditions. Use when the subject is in shadow or is“backlit” (when the light is behind the subject). In lowlight, hold the camera steady or use a tripod.NOTE: (Not available in Smart Capture mode.)Red Eye Your camera can correctred-eye using 2methods. To choose a red eye setting, see Red Eye Reduction, page 29.PreflashA preflash fires, shrinking the eye pupil, before the picture is taken.Digital Correction A preflash does not fire; the camera corrects red eye.Off NeverPress the flash button repeatedlyto scroll through flash modes.The current flash mode is shown inthe LCD status area.Taking pictures/videosUsing different modesTurn the Mode dial to the mode that best suits your subjects and surroundings.Use this mode ForSmartCapture General picture taking—it offers excellent image quality and ease of use.■Faces are detected.■The scene is analyzed for other content and for lighting.You can choose the best picture size and aspect ratio for your needs—just press the Menu button and choose Picture Size.■3:2 (the best choice when making 4 x 6 prints)■16:9 (wide screen)■4:3 (the default setting)Program Advanced picture taking—allows access to manual settings.BlurReductionReducing blur caused by camera shake or subject motion.Sport Action pictures.Panorama“Stitching” up to 3 pictures into a panoramic scene. (See page12.)Scene Point-and-shoot simplicity when taking pictures in practically anysituation. (See page9.)Video Capturing video with sound. (See page10.)Taking pictures/videosUsing Scene (SCN) modesChoose a Scene mode—for great pictures in practically any situation!1Turn the Mode dial to SCN.2Press to view scene mode descriptions.If the mode description turns off before you finish reading it, press OK.3Press OK to choose a Scene mode.SCN mode ForPortrait Full-frame portraits of people.Landscape Distant scenes.Close-up Close range. Use available light instead of flash, if possible.Flower Close-ups of flowers or other small subjects in bright light.Sunset Subjects at dusk.Backlight Subjects that are in shadow or “backlit” (when light is behind thesubject).Candle Light Subjects illuminated by candle light.Children Action pictures of children in bright light.Manner/ Museum Quiet occasions, like a wedding or lecture. Flash and sound are disabled. Place the camera on a steady surface or tripod.Text Documents. Place the camera on a steady surface or tripod. Beach Bright beach scenes.Snow Bright snow scenes.Fireworks Fireworks. Place the camera on a steady surface or tripod.Self-PortraitClose-ups of yourself. Assures proper focus and minimizes red eye. Night Portrait Reduction of red eye in night scenes or low-light conditions. Night Landscape Distant scenery at night. Flash does not fire.Panning Emphasizing horizontal motion, keeping the foreground sharp. High-ISO Low-light pictures (such as people on a stage).Taking pictures/videosTaking a video1Turn the Mode dial to Video.2Press the Shutter button completely down,then release it. To stop recording, press and releasethe Shutter button again.To review and work with videos, see page14.Using shortcutsFor quick access to the most popular functions:1Press the Info button.The shortcuts appear.2Press to access functions like Exposure Compensation, Self-timer, and Auto focus. (You’ll see different functions in different modes.)3Press to choose a setting.4To hide the shortcuts again, press .ShortcutsTaking pictures/videosUsing the self-timer Use the self-timer when you want to be included in a picture, or to ensure a steadyShutter button press. Place the camera on a tripod or flat surface.1In any picture-taking mode, press the Infobutton to show shortcuts.2Pressto highlight the self-timer icon. Pressto choose a setting:10 seconds— A picture is taken after a 10-second delay (so you have time to get into the scene). 2 seconds— A picture is taken after a 2-second delay (for a steady, shutter release on a tripod).2 shot—The first picture is taken after a 10-second delay. A second picture is taken 8 seconds later.3Compose the scene. Press the Shutter button halfway , then completely down .The camera takes the picture/pictures after the delay.NOTE: In Panoramic modes (page 12), only the 2- and 10-second options are available.Use the same procedure to take a 2- or 10-second self-timer video, but press the Shutter button completely down .1022xTaking pictures/videosTaking panoramic picturesUse panorama to “stitch” up to 3 pictures into a panoramic scene.NOTE: For best results, use a tripod. Only the panoramic picture is saved; individual pictures are not. (Exposure and white balance are set with the first picture. The flash is set to Off.)1Turn the Mode dial to .2Press to highlight Panorama Left-Right or Panorama Right-Left (dependingon the direction you want to pan), then press OK.3Take the first picture.After a quickview, the LCD displays the liveview and an “overlay” from the first picture.4Compose the second picture. Make the overlay from the first picture cover the same portion in the new picture. (You can press the Delete button to re-take a picture.)5If you are taking only 2 pictures, press OK to stitch them together.After you take 3 pictures, the pictures are automatically stitched together.NOTE: To use the self-timer 10-second or 2-second setting, see page 11.Take 2 or 3pictures.Get 1panoramicpicture.Taking pictures/videosUnderstanding the picture-taking icons Battery levelCapturemode Pictures/time remaining Zoom slider Tag name Self timer Flash modeExposure compensation FPO3Working with pictures/videosReviewing pictures/videos 1Press the Review button.2Press for previous/next picture/video.■Press the Shutter button halfway down to returnto Capture mode.■To view pictures/videos as thumbnails, see page 16.Magnifying a picture 1Press T to magnify 1X–8X.2Pressto view other parts of a picture.■Press OK to return to 1X.Playing a videoPress OK to play a video. Press OK to pause/resume.During playback:■Press to adjust the volume.■Press to play at 2X speed; press again for 4X.■Press to reverse at 2X speed; press again for 4X.4X 4X 1X 2X 2XForwardReverse Playback speedDeleting pictures/videos1Press the Review button.2Press for previous/next picture/video.3Press the Delete button.4Follow the screen prompts.NOTE: To delete protected pictures/videos, remove protection before deleting. (See Protecting pictures/videos from deletion.)Using the undo delete featureIf you accidentally delete a picture, you may be able to use Undo Delete to retrieve it. This feature is only available immediately after you delete a picture.Protecting pictures/videos from deletion1Press the Review button.picture/video.previous/next2Press for3Press the Menu button.4Press to highlight Protect, then press OK.The picture/video is protected and cannot be deleted. The Protect icon appearswith the protected picture/video.■Press the Shutter button halfway down to return to Capture mode. IMPORTANT: Your camera offers a built-in Help system. See page40.CAUTION:Formatting internal memory or an SD or SDHC Card deletes all(including protected) pictures/videos. (Formatting internalmemory also deletes email addresses and tag names. To restorethem, see EASYSHARE Software Help.)Viewing pictures/videos in different waysViewing as thumbnails (multi-up)1Press the Review button.The camera shows the last picture that was taken.2Press the Wide Angle (W) button to view pictures/videos as thumbnails. (Press it again to see more, smaller thumbnails.) To view all pictures/videos, highlight the All tab. To sort by favorites, date, or tagged pictures/videos, press and highlight theappropriate tab.3To see a single picture/video, pressto highlight it. Then press the Telephoto (T) button.■To select multiple pictures/videos, see Selecting multiple pictures/videos .■Press the Shutter button halfway down to return to Capture mode.Selecting multiple pictures/videosUse the multi-select feature when you have two or more pictures to print, transfer, delete, etc. Multi-select is used most effectively in Multi-Up mode, page 16.1Press the Review button, thenandto find a picture/video.2Press OK to select pictures/videos.A check mark appears on the picture. You can nowprint, transfer, delete, etc. the selected pictures. You can press OK a second time to remove a check mark.SelectedpicturesMaking a multimedia slide showUse Multimedia Slide Show to display your pictures/videos on the LCD. You can play all pictures/videos, or select pictures to include in the slide show. You can even save a slide show.Make a multimedia slide show that you can save1Press the Review button. Select 2-100 pictures (see page16).2Press the Menu button, then to highlight the Review tab. HighlightMultimedia Slide Show, then press OK.3Press to highlight Preview Show, then press OK.Each picture/video is displayed once. To interrupt the slide show, press OK. After the slide show plays, you may save or modify it.IMPORTANT: Your camera offers a built-in Help system. See page40.Play a multimedia slide show loopWhen you turn on Loop, the slide show is continuously repeated.1On the Multimedia Slide Show menu, press to highlight Loop, then press OK.2Press to highlight On, then press OK.3Press to highlight Preview Show, then press OK.The slide show repeats until you press OK or until the battery is exhausted.Displaying pictures/videos on a televisionYou can display pictures/videos on a television, computer monitor, or any device equipped with a video input. To connect the camera directly to a television, use an A/V cable (may be sold separately).NOTE: Ensure that the Video Out setting (NTSC or PAL) is correct (see page 30). The slide show stops if youconnect or disconnect the cable while the slide show is running. (Image quality on a television screen may not be as good as on a computer monitor or when printed.) Purchase accessories/go/m381accessoriesUsing the menu button in reviewTo use the Menu button in review:1Press the Review button, then the Menu button.2Press to highlight a tab:■Review to view and share pictures/videos■Edit to edit pictures/videos■Setup to control how your camera operates3Press to highlight a setting, then press OK.4Highlight an option, then press OK.IMPORTANT: Your camera offers a built-in Help system. See page40.Cropping picturesYou can crop a picture so that only the desired portion of the picture remains.1Press the Review button, then to find a picture to crop. 2Press the Menu button, thento highlightthe Edit tab. Highlight Crop, then press OK.3Press Telephoto (T) to zoom in, orto move the crop box. Press OK.4Follow the screen prompts.The picture is cropped. (The original is saved.) Cropped pictures cannot be cropped again on the camera. ■Press the Shutter button halfway down to return to Capture mode.IMPORTANT: Your camera offers a built-in Help system. See page 40.Using KODAK PERFECT TOUCH Technology KODAK PERFECT TOUCH Technology helps ensure better, brighter pictures. PERFECT TOUCH Technology is automatically applied to pictures taken in Smart Capture mode. (You cannot apply PERFECT TOUCH Technology to videos, panoramic pictures, orpictures to which PERFECT TOUCH Technology is already applied.)1Press the Review button, then for previous/next picture.2Press the Menu button, then to highlight the Edit tab. Highlight PERFECT TOUCH Tech, then press OK.The enhancement is previewed. Press to view other parts of the picture.3Press OK. Follow the screen prompts to replace the original picture or to save the enhanced picture as a new one.■Press the Shutter button halfway down to return to Capture mode.Picture Cropped pictureCopying pictures/videosYou can copy pictures/videos from a card to internal memory or from internal memory to a card.Copy pictures/videos:1Press the Review button.2Press the Menubutton, then to highlight the Review tab. 3Press to highlight Copy, then press OK. Highlight a choice, then press OK.NOTE:Pictures/videos are copied, not moved. To remove pictures/videos from the original location after copying, delete them (see page15).IMPORTANT: Your camera offers a built-in Help system. See page 40.Editing videosYou can do incredible things with your videos!Making a picture from a video You can choose a single frame from a video, then make a picture suitable for a 4 x 6-inch (10 x 15 cm) print.1Press the Reviewbutton, then to find a video.2Press the Menubutton, then to highlight the Edit tab. Highlight Make Picture, then press OK.3Follow the screen prompts.A picture is created. (The original video is saved.)■Press the Shutter button halfway down to return to Capture mode.IMPORTANT: Your camera offers a built-in Help system. See page 40.Video PictureTrimming a videoYou can remove an unwanted start or end from a video, saving only the desired portion.Press the Review button, thento find a video.Press the Menubutton, then to highlight the Edit tab. Highlight Trim, then press OK.3Follow the screen prompts.The video is trimmed. (You can save it as a new videoor replace the original.)■Press the Shutter button halfway down to return to Capture mode.IMPORTANT: Your camera offers a built-in Help system. See page 40.Video Trimmed videoMaking a video action printFrom a video, you can make a 9-up picture, suitable for a 4 x 6-inch (10 x 15 cm) print.1Press the Reviewbutton, then to find a video.2Press the Menu button, then to highlightthe Edit tab. Highlight Action Print, then press OK.3Highlight an option, then press OK.Auto—The camera includes the first and lastframes, then 7 equally spaced frames.Manual—Choose the first and last frames; thecamera chooses 7 frames.A 9-up picture is created.■Press the Shutter button halfway down to return to Capture mode. IMPORTANT: Your camera offers a built-in Help system. See page40.VideoUnderstanding the review iconsAdd text tag View multi-upSelect pictureEmail tagFavorite tagPrint tag/number of printsProtectedPicture/Video number Upload tagVideo durationBattery levelText tag name Play videoFPO4Using the Menu buttonYou can change settings to get the best results from your camera.1Press the Menu button.2Press to highlight a tab:■Capture/Videofor the most common picture/video-taking settings ■Setupfor other camera settings 3Pressto highlight a setting, then press OK.4Highlight an option, then press OK.NOTE: Some modes offer limited settings. Some settings remain until you change them; others, until youchange modes or turn off the camera.Using the Capture tabPress Menu,, then , and OK to access settings Capture OptionsIMPORTANT: Your camera offers a built-in Help system. See page 40.Exposure CompensationMake a picture lighter ordarker. (Available in Programand Panorama modes.) To usea shortcut, see page 10.0.0, +/-0.3, +/-0.7, +/-1.0, +/-1.3, +/-1.7, +/-2.0Picture SizeChoose a picture resolution.See Camera specifications, page 46.BurstTake up to 3 pictures in quicksuccession. (Burst is notavailable in Panorama mode.)Off On —press the Shutter button halfway to focus and set exposure. Press the Shutter button completely down and hold it to take pictures.Using the Menu buttonSelf-timerTake a picture/video after a delay, or take 2 pictures. (Also see page11.)10 seconds 2 seconds 2-shotFocus ModeSelect a large or concentrated area of focus.Auto—for general picture-taking.Macro—for sharpness and detail in pictures at close range. Use available light instead of flash, if possible. The camera automatically sets the focus distance depending on the zoom position.Infinity—for distant subjects; auto-focus framing marks are unavailable.Long Time Exposure Choose how long the shutter stays open.None0.5, 1.0, 2.0, 4.0, 8.0 secondsColor ModeChoose color tones. Unavailable in Video mode.High ColorNatural ColorLow ColorBlack & WhiteSepiaNOTE: EASYSHARE Software also lets you change a color picture to black-and-white or sepia.AF Control (Still) Choose an auto-focus setting.Continuous AF—because the camera is always focusing, there is no need to press the Shutter button halfway down to focus.Single AF—uses TTL-AF (through-the-lens auto focus) when the Shutter button is pressed halfway down.Press Menu,, then , and OK to access settings Capture OptionsIMPORTANT: Your camera offers a built-in Help system.See page40.Using the Menu buttonWhite BalanceChoose your lighting condition. (Available only in Program and Panorama modes.)Auto—automatically corrects white balance. Ideal for general picture taking.Daylight—for pictures in natural lighting. Tungsten—corrects the orange cast of incandescent light bulbs. Ideal for indoor pictures under tungsten or halogen lighting without flash.Fluorescent—corrects the green cast of fluorescent lighting. Ideal for indoor pictures under fluorescent lighting without flash.Open Shade—for pictures in shade in natural lighting.Face Detect Capture Choose if faces get focus priority.On—in SCN modes designed for pictures of people, the camera attempts to focus on faces.OffNOTE: Not available in Smart Capture mode (because face detection is always on).Exposure Metering Evaluate light levels at specific areas of a scene.Multi-Pattern—evaluates lighting conditions throughout the image to give an optimum picture exposure. Ideal for general picture taking.Center-Weight—evaluates the lighting conditions of the subject centered in the lens. Ideal for backlit subjects. Center-Spot—similar to Center-weight, except the metering is concentrated on a smaller area of the subject centered in the LCD.AF ZoneSelect a large or concentrated area of focus.Multi-Zone—evaluates 5 zones to give an even picture focus. Ideal for general picture taking.Center-Zone—evaluates the small area centered in the lens. Ideal when you need precise focus.Press Menu,, then , and OK to access settings Capture OptionsIMPORTANT: Your camera offers a built-in Help system.See page40.Using the Menu buttonVideo settingsISO SpeedControl the sensitivity of thecamera sensor.See Camera specifications, page 46.Sharpness Control picture sharpness.Sharp NormalSoftPress Menu,, , and OK to access settings Video OptionsIMPORTANT: Your camera offers a built-in Help system. See page 40.Video SizeChoose a video resolution.640 x 480 @ 30 fps (VGA) 320 x 240 @ 30 fps (QVGA)Self-timerTake a picture/video after adelay, or take 2 pictures. (Alsosee page 11.)10 seconds 2 seconds 2-shot Focus ModeSelect a large or concentratedarea of focus.Auto—for general video-taking. TBD Macro—for close range. TBDInfinity—for distant subjects. TBDVideo Blur Reduction Reduce blur caused by camera shake or subject motion.OnOff Press Menu,, then , and OK to access settings Capture OptionsIMPORTANT: Your camera offers a built-in Help system. See page 40.Using the Menu buttonUsing the Setup tabPress Menu,to highlight Setup, thenand OK to access settings Setup Options IMPORTANT: Your camera offers a built-inHelp system. See page 40.Share button Choose how pictures/videos are handled when you press the Share button (via EASYSHARE Software for WINDOWS-OS only).NOTE: Some online services limit video file sizes. Use EASYSHARE Software or choose a preferred online service.Favorite and Upload—pictures/videos aretagged as Favorites and uploaded to yourpreferred online service when you connect to yourcomputer or network.Favorite—pictures/videos are tagged asFavorites (5-star in EASYSHARE Software, on yourcomputer).Upload—pictures/videos are uploaded to yourpreferred online service when you connect to yourcomputer or network.LCD Brightness Choose LCD brightness.Power Save—Lower LCD brightness; conservespower.High Power—Higher LCD brightness; uses morepower.Image Storage Choose a storage location for pictures/videos.Auto—the camera uses the card if one is in thecamera. If not, the camera uses internal memory.Internal Memory—the camera always usesinternal memory, even if a card is installed.Set Tag Create tag names and assign them to pictures/videos. See page 36.New Tag—create a tag.Delete Tag—delete a tag.Clear All—cancel selected tags.Red Eye Reduction Choose how you want to reduce red eye.Preflash—red eye preflash fires before the picture is taken.Digital Correction—red eye preflash does notfire; the camera corrects red eye.Using the Menu buttonQuickview Briefly display a picture after it is taken.OnOffDigital Zoom Turn digital zoom on/off.OnOffOrientation Sensor Orient pictures/videos so that they are displayed with the correct side up.On—the camera rotates pictures so that allappear in the same orientation on the camera.Off—pictures are not rotated.Camera Sounds Choose sound effects, volume.Power OnFocus LockShutterErrorSelf-timerSound Volume (High, Medium, Low, Mute)Date & Time Set date and time.Video Out Choose the regional setting that lets you connect the camera to a television or other external device.NTSC—used in North America and Japan; mostcommon format.PAL—used in Europe and China.LanguageChoose your language.Reset CameraReset settings to their default.Press Menu,to highlight Setup, thenand OK to access settings Setup Options IMPORTANT: Your camera offers a built-inHelp system. See page 40.。
安装和取出胶卷安装胶卷装上胶卷以后, 相机会自动把胶卷卷到自己的卷片轴上. 然后每照一张照片, 就有一张胶片回卷到胶卷盒里.1 把拨盘拨到除锁定键以外的任何地方.2 推开相机后盖.3 如图所示,以一定斜度将胶卷装入.4 压着胶卷盒, 拉出胶片头,与相机上的橙色标志对起,然后关上后盖.如果胶片头太长以至超过了橙色标记, 请将多余的退回去.关上相机后盖后,胶片开始缠绕到相机的轴上, 同时胶片记数器开始工作. 然后, 相机发出快门释放的声音, 并显示胶片张数◎如果张数不显示, 就意味着胶卷没有装好. 那么就拿出来重装.第21页本相机不能使用红外线胶卷。
快门帘使用几高精度标准制造。
为了避免损坏,不能触摸。
装胶卷过程中千万小心,保证手指和胶卷不碰它。
取胶卷最后依仗曝光后,相机自动回卷。
当胶卷回卷到头,显示屏上将只显示◎标志。
先检查这个标志是否显示,然后打开相机后盖,取出胶卷。
中途回卷。
最后一张胶卷曝光前回卷胶卷时,请参照以下步骤:1.将命令拨盘转到中途回卷◎《《2.按住◎《《控制按钮不放,至少持续1秒。
胶卷开始回卷。
当回卷到头,相机会发出快门释放的声音。
3打开相机后盖,取出胶卷。
第22页如果你经过回卷就把一格未拍完的胶卷从相机里取出,并装入新胶卷。
这个新胶卷的片头只能回卷到卷盒里。
为了避免这种情形,在装入新胶卷前请关上相机后盖,并完全按下快门一次。
拿稳相机为了排出的照片不模糊,请参考以下的姿势拿相机。
用右手握住相机手柄并抓紧。
将胳膊肘轻轻的靠在自己的身体上。
左手托住镜头。
把相机压在自己的前额上,通过取景器观察图像。
为了更好的稳定,请保持一只脚稍微靠前。
这部分描述命令拨盘基本区域的照相模式。
这些模式能自动设置相机。
需要你做的就三取景和按快门。
而且,这些模式不艘主拨盘和其他控制钮的控制。
从而可以避免意外的错误操作而导致相片效果不好。
相机控制的自动拍摄。
在运用程序影像模式拍摄时,如果闪光灯标志在取景器里闪烁,请用手指抬起内置闪光灯。
傻瓜相机使用方法傻瓜相机使用方法使用合适的底片因大部分傻瓜机最大光圈都在f3.5以下,所以尽量使用iso400底片,可让相机用较快快门,减低模糊机率。
并可降低闪光灯使用,节省电力,即使必须使用闪光灯,亦可增加其有效距离。
室外照人像时用闪光灯可让人的脸更漂亮,去除一些阴影。
别紧张,傻瓜相机的闪光灯没那么强,把相机设定在强制闪光即可在室外亦让闪光灯作用。
室内关闭闪光灯在室内昏暗灯光下,或是外黑暗中,把闪光灯关掉!则相机会尝试以最慢快门及最大光圈曝光当然你得设法稳固相机,用三角架或放在一平面上。
若实在太暗要提醒被拍者一二三不许动。
切忌不要用全自动模式,否则相机会让闪光灯作用,却仍使用一般光圈快门组合,结果是主题勉强够亮(有时也很难啦)背景则一片乌漆嘛黑。
有些相机甚至可以选择慢速快门加闪光灯,那就可以处理夜景人像了。
练习选择性测光一般傻瓜多为中央重点式测光,类似fm2,所以可用半按快门方式锁定曝光值。
针对画面中某一部份测光。
但要注意其距离需与主题相近,否则对焦就不准了。
此为高级技巧,笔者仍在摸索中。
避免失焦若隔着窗户或纱窗照相,要选择无限距离对焦(infinitelock)或把相机镜头紧靠窗户,才不会失焦。
相机镜头对焦距离查一下说明书看看你的相机镜头对焦距离是多少。
若为40cm 则不要拍低于此距离的东西,因为一定会失焦。
大部份相机若物体近于其焦距离,会有一警示灯于观景窗旁亮起,看清楚了!使用观景窗同前述,因观景窗与镜头非同轴,因此其视野有差异,物体愈近,此误差愈大。
常会把图边切掉了,观景窗中有一较小格子,通常即为近距离构图用的。
但也只是大概而已仍会有误差。
阅读说明书新的相机要熟读说明书,往后定期复习。
千万别明天要拍朋友结婚了今天才买相机,那可能连电池、底片怎么装都不知道。
使用新底片请使用新的底片!不要笑,前些日子笔者才被冲洗店告知我的送洗底片已有三年历史,效果不好,也不知要怪相机、技术、店家,还是底片?前几天老妈拿给我一卷在她梳妆台发现的底片,好像已经数年了!我是不会带它出游啦!还有请尽快拍完一卷赶快送洗,不要宝贵底片。

KODAKUser Manual12.4"H | 6.1"W | 8.4"D(31,5 cm | 15,4 cm | 21,3 cm) Please read all directions before using the product and retain this guide for reference.INTRODUCTION ................................................................................................................................................................SPECIFICATIONS ..............................................................................................................................................................PACKAGE CONTENTS .....................................................................................................................................................SAFETY PRECAUTIONS ..................................................................................................................................................ABOUT .................................................................................................................................................................................PRODUCT OVERVIEW .....................................................................................................................................................CONTROL PANEL OVERVIEW ......................................................................................................................................PORT PANEL OVERVIEW ................................................................................................................................................FILM INSTALLATION ....................................................................................................................................................OPERATING INSTRUCTIONS ........................................................................................................................................MENU FUNCTIONS ..................................................................................................................................................CUSTOMER SERVICE .....................................................................................................................................................WARRANTY ..................................................................................................................................................................444556677-9910-171717-1912345678910111213TO SEE THIS GUIDE INFRENCH, ITALIAN, OR GERMANPLEASE VISITOR USE THIS QR CODE:PARA VER ESTA GUÍA EN FRANCÉS, ITALIANO O ALEMÁN, VISITE O UTILICE ESTE CÓDIGO QR.POUR VOIR CE GUIDE EN FRANÇAIS, ITALIEN OU ALLEMAND, VEUILLEZ VISITER OU UTILISER CE CODE QR. UM DIESE ANLEITUNG AUF FRANZÖSISCH, ITALIENISCH ODER DEUTSCH ZU SEHEN, BESUCHEN SIE BITTE ODERVERWENDEN SIE DIESEN QR-CODE.PER VEDERE QUESTA GUIDA IN FRANCESE, ITALIANO O TEDESCO VISITATE IL SITO OUSATE QUESTO CODICE QR.Thank you for purchasing the KODAK REELZ Film Digitizer. This User Guide is intended to provide you with guidelines to ensure that operation of this product is safe and does not pose risk to the user.Any use that does not conform to the guidelines described in this User Guide mayvoid the limited warranty.Please read all directions before using the product and retain this guide for reference. This product is intended for household use only. It is not intended for commercial use.This product is covered by a limited one-year warranty. Coverage is subject to limits and exclusions. See warranty for details.Dimensions: 12.4″ x 6.1″ x 8.4″ (31,5 x 15,4 x 21,3 cm)Image sensor: 8.08 megapixels (3280 x 2464) 1/3” CMOS sensorNative resolution: 1296pDisplay: 5″ TFT LCDMemory capacity: Up to 128 GB SD™ cardFile output format: MPEG-4Power source: 12 V DCExposure control: Auto, manual (-2 to +2 EV)White balance: AutoFrame rate: 20 frames/secFocus system: Fixed focusScan speed: 2 frames/secLanguage options: English/Spanish/French/German/ItalianSupport systems: Windows XP, Vista/Windows 7, 8, and 10/Mac 10.7.3Compatible film reel sizes: 3" - 9" film reelsKODAK REELZ Film Digitizer7″ empty film reelAC/DC adapterGray reel adapterRed reel adapterMicro USB cableCleaning clothUser guide• Convert 8 mm and Super 8 reels into digital video files • Easy to operate• Transfer your converted video files to an SD™ card • No computers, software, or drivers required • High-quality, frame-by-frame digitizing process• WARNING: CHOKING HAZARD – Small parts. This product contains small parts and is not suitable for children under 3 years old.• Remove all packaging before using this device. Please keep all packaging materials out of reach of children and pets.• Properly dispose of all packing materials immediately after unpacking the product, as the bags used for packaging could present a suffocation or choking hazard.• Read all instructions carefully before attempting to operate this device. Improper usage could result in a reduction in efficacy.• Do not attempt to disassemble or modify any part of this device.• Do not use the device if smoke or unknown smell arises.• Do not use products such as alcohol, gasoline, thinner, or any other organic solvents to clean this device.• Do not operate the device in dusty or wet areas.• Make sure the device is properly clean before operating it.• Keep the scanner out of reach of children.• Never handle the scanner with damp or wet hands. This could damage the scanner or create the risk of electric shock.• Do not place, drop, or submerge the scanner in water or any other liquid.• If the scanner somehow falls into water despite you taking all of the above precautions, please do not reach into the water to retrieve it. Unplug it immediately and then retrieve it.• Take care that objects do not fall and liquids are not spilled onto the scanner.1. Control panel2. Display screen3. Reel shafts4. Film type switch5. Film spools6. Film lid7. Film lid tab8. Empty reel1. Power2. OK/Enter3. Back4. Left5. Down6. Right7. Up8. Minus9. Plus1. SD™ card slot2. MICRO USB slot3. DC 12 V port1. Unfold the two (2) reel shafts until they click into place.2. Carefully pull out the end of the film on your 8mm or Super 8 reel (not included). Then, fold up the end of the film nice and tight and slowly insert the end of the film in the slot on the empty reel (included). This process will help you connect your film to the empty reel.3. Spin your empty reel around a few times to make sure your film is now securely connected to the empty reel.4. Insert your reel onto the left reel shaft and place the empty reel onto the right reel shaft.(If the reel you’re using has a big mounting hole, use the provided red color reel adapter. If adapters are needed, always place red color adapter on the left reel shaft; gray color adapter on the right reel shaft.)5. Take the film between the two (2) reels and carefully thread it through the scanner. Use the white, solid line on the film scanner to follow how to thread the film on the film spools.6. Push the film lid tab to the left to lift the film lid and gently wipe down the film area with the cleaning cloth (included) before placing the film.7. Hold the film firmly in between your pointer finger and thumb. Slowly place the film under the first black tab (tab farthest left in the film area). Then, carefully twist the film and place it under the second black tab in the film area.8. Twist the film slightly again to fit the film under the third tab.SUPER 8STANDARD 87.90 mm7.90 mm3.3 mm(0.130")(0.158")(0.228")(0.177")8 mm film, also known as Standard 8, has a frame size of 4.5 x 3.3 mm. Super 8 film has a frame size of 5.79 x 4.01 mm. Make sure you adjust to the film type switch to the correct film type you are currently using.NOTE: If your picture is upside down, then you are at the end of the film and need to berewind onto another reel.1. Connect the power adapter to the scanner. Then, plug the other end of the power adapter intoa power outlet.2. Insert an SD™ card (not included) into the SD™ card slot. Make sure to insert the memorycard facing up.3. Press the Power button to turn on the scanner and the main menu will appear. The scannerwill take a few seconds to turn on. The white LED light will indicate that the scanner is on. NOTES: The scanner will automatically shut down after 15 minutes of inactivity.Keep in mind that it is common for the scanner to jam if parts of the film are distorted.Make sure film is in good condition. The scanner will not be able to operate on film that is damaged, overlapping, torn, unaligned, or crooked.Scotch tape can be used to repair torn parts of the film. Make sure to carefully apply thetape and only use a small amount. Overusing the scotch tape can cause the film tojam the scanner.Power On/Off Function• Press the Power button to start the machine and the main menu interface will appear.Recording Function1. Choose the “Record” option in the Video Preview Mode. Once selected, the record icon will appear white.2. Press the OK/Enter button to enter the prompt interface for switching between Super8 and 8mm.3. Use the film type switch in front of the film scanner to select film type. Then, press theOK/Enter button to record.2. After entering the adjustment interface, press the directional arrow buttons toadjust the margin and press the Plus or Minus button to zoom in or out.3. Once the desired settings are reached, press the OK/Enter to confirm.MAIN MENU: MENUSelect “Menu” in the main menu interface and press the OK/Enter button to enter the menu interface. In the menu interface, you should see the options: My Recordings, Rewind,NOTE: Use the dotted line to thread the negative for the rewind process.The film should be lifted out of the film slot so the gray pin doesn’t slow down the film. Fast Forward Function1. Press the Up or Down button to choose the “Fast Forward” option in the Menu.2. Press the OK/Enter button to enter the option.3. After entering, press the OK/Enter button according to the prompts.Language Section1. Select “Language” in the submenu and press the OK/Enter button to confirm.2. Use the directional arrow buttons to select a language and press the OK/Enter button to confirm your selection.Erase SD Card Section1. Press the Up or Down button to select “Erase SD Card” and then press the OK/Enter button to confirm.2. Select “No” and press OK/Enter button to go back to the previous screen.3. Select “Yes” and press OK/Enter button to clear files on the SD™ card.LIMITED WARRANTY TO ORIGINAL CONSUMERThis KODAK REELZ Film Digitizer (“Product”), including any accessories included in the original packaging, as supplied and distributed new by an authorized retailer is warranted by C&A Marketing, Inc. (the “Company”) to the original consumer purchaser only, against certain defects in material and workmanship (“Warranty”) as follows:To receive Warranty service, the original consumer purchaser must contact the Company or its authorized service provider for problem determination and service procedures. Proof of purchase in the form of a bill of sale or receipted invoice, evidencing that the Product is within the applicable Warranty period(s), MUST be presented to the Company or its authorized service provider in order to obtain the requested service.About Section1. Press the Up or Down button to select “About” and then press the OK/Enter button to view the website and version.2. Press the OK/Enter or Back button to exit from the screen.Service options, parts availability, and response times may vary and may change at any time.In accordance with applicable law, the Company may require that you furnish additional documents and/or comply with registration requirements before receiving warranty service. Please contact our customer service for details on obtaining warranty service:USA:*********************,844-516-1539International:*************************,+1-844-516-1540Shipping expenses to the Company’s Return Facility are not covered by this warranty, and must be paid by the consumer. The consumer likewise bears all risk of loss or further damage to the Product until delivery to said facility.EXCLUSIONS AND LIMITATIONS The Company warrants the Product against defects in materials and workmanship under normal use for a period of ONE (1) YEAR from the date of retail purchase by the original end-user purchaser (“Warranty Period”). If a hardware defect arises and a valid claim is received within the Warranty Period, the Company, at its sole option and to the extent permitted by law, will either (1) repair the Product defect at no charge, using new or refurbished replacement parts, (2) exchange the Product with a Product that is new or which has been manufactured from new or serviceable used parts and is at least functionally equivalent to the original device, or (3) refund the purchase price of the Product.A replacement Product or part thereof shall enjoy the warranty of the original Product forthe remainder of the Warranty Period, or ninety (90) days from the date of replacement or repair, whichever provides you longer protection. When a Product or part is exchanged, any replacement item becomes your property, while the replaced item becomes the Company’s property. Refunds can only be given if the original Product is returned.This Warranty does not apply to:(a) Any non-KODAK REELZ Film Digitizer product, hardware or software, even if packaged orsold with the Product;(b) Damage caused by use with non-KODAK REELZ Film Digitizer products;(c) Damage caused by accident, abuse, misuse, flood, fire, earthquake, or other external causes;(d) Damage caused by operating the Product outside the permitted or intended uses described by the Company;(e) Damage caused by third party services;(f) A Product or part that has been modified to alter functionality or capability without thewritten permission of the Company;(g) Consumable parts, such as batteries, fuses and bulbs;(h) Cosmetic damage; or(i) If any KODAK REELZ Film Digitizer serial number has been removed or defaced.This Warranty is valid only in the country where the consumer purchased the Product, and only applies to Products purchased and serviced in that country.The Company does not warrant that the operation of the Product will be uninterrupted or error-free. The Company is not responsible for damage arising from your failure to follow instructions relating to its use.NOTWITHSTANDING ANYTHING TO THE CONTRARY AND TO THE MAXIMUM EXTENT PERMITTED BY APPLICABLE LAW, THE COMPANY PROVIDES THE PRODUCT “AS-IS” AND“AS-AVAILABLE” FOR YOUR CONVENIENCE AND THE COMPANY AND ITS LICENSORS AND SUPPLIERS EXPRESSLY DISCLAIM ALL WARRANTIES AND CONDITIONS, WHETHER EXPRESSED,IMPLIED, OR STATUTORY, INCLUDING THE WARRANTIES OF MERCHANTABILITY, FITNESS FOR A PARTICULAR PURPOSE, TITLE, QUIET ENJOYMENT, ACCURACY, AND NON-INFRINGEMENT OF THIRD-PARTY RIGHTS. THE COMPANY DOES NOT GUARANTEE ANY SPECIFIC RESULTS FROM THE USE OF THE PRODUCT, OR THAT THE COMPANY WILL CONTINUE TO OFFER OR MAKE AVAILABLE THE PRODUCT FOR ANY PARTICULAR LENGTH OF TIME. THE COMPANY FURTHER DISCLAIMS ALL WARRANTIES AFTER THE EXPRESS WARRANTY PERIOD STATED ABOVE.YOU USE THE PRODUCT AT YOUR OWN DISCRETION AND RISK. YOU WILL BE SOLELY RESPONSIBLE FOR (AND THE COMPANY DISCLAIMS) ANY AND ALL LOSS, LIABILITY, OR DAMAGES RESULTING FROM YOUR USE OF THE PRODUCT.NO ADVICE OR INFORMATION, WHETHER ORAL OR WRITTEN, OBTAINED BY YOU FROMTHE COMPANY OR THROUGH ITS AUTHORIZED SERVICE PROVIDERS SHALL CREATE ANY WARRANTY.IN NO EVENT WILL THE COMPANY’S TOTAL CUMULATIVE LIABILITY ARISING FROM OR RELATED TO THE PRODUCT, WHETHER IN CONTRACT OR TORT OR OTHERWISE EXCEED THE FEES ACTUALLY PAID BY YOU TO THE COMPANY OR ANY OF ITS AUTHORIZED RESELLERS FOR THE PRODUCT AT ISSUE IN THE LAST YEAR FROM YOUR PURCHASE. THIS LIMITATION IS CUMULATIVE AND WILL NOT BE INCREASED BY THE EXISTENCE OF MORE THAN ONE INCIDENT OR CLAIM. THE COMPANY DISCLAIMS ALL LIABILITY OF ANY KINDOF ITS LICENSORS AND SUPPLIERS. IN NO EVENT WILL THE COMPANY OR ITS LICENSORS, MANUFACTURERS, AND SUPPLIERS BE LIABLE FOR ANY INCIDENTAL, DIRECT, INDIRECT, SPECIAL, PUNITIVE, OR CONSEQUENTIAL DAMAGES (SUCH AS, BUT NOT LIMITED TO, DAMAGES FOR LOSS OF PROFITS, BUSINESS, SAVINGS, DATA, OR RECORDS) CAUSED BY THE USE, MISUSE, OR INABILITY TO USE THE PRODUCT.Nothing in these terms shall attempt to exclude liability that cannot be excluded under applicable law. Some countries, states, or provinces do not allow the exclusion or limitation of incidental or consequential damages or allow limitations on warranties, so certain limitationsor exclusions may not apply to you. This warranty gives you specific legal rights, and you may have other rights that vary from state to state or province to province. Contact your authorized retailer to determine ifanother warranty applies.Kodak does NOT manufacture this Product or provide any Warranty or support.The Kodak trademark, logo, and trade dress are used under license from Eastman Kodak Company.MicroSD and SD are trademarks of SD-3C, LLC.Mac is a trademark of Apple Inc. in the U.S. and other countries.Windows is a trademark of Microsoft Corporation in the US and/or other countries.All other products, brand names, company names, and logos are trademarks of their respective owners,used merely to identify their respective products, and are not meant to connote any sponsorship, endorsement, or approval. Distributed by C&A Marketing, Inc., 114 Tived Lane East, Edison, NJ 08837 USA.© 2021. C&A IP Holdings LLC. All Rights Reserved. Made in China.。

数码相机操作指南在当今社会,数码相机的普及程度越来越高,成为人们记录生活的重要工具。
然而,对于初学者来说,操作数码相机可能会有一定的困难。
本文将为您介绍一份简明的数码相机操作指南,帮助您更好地使用数码相机,拍摄出精彩的照片。
一、相机基础知识在开始操作数码相机之前,我们先来了解一些基础知识。
1. 相机构造:数码相机主要由镜头、图像传感器、液晶显示屏、快门按钮等部件组成。
镜头负责聚焦光线,传感器将光线转化为数字图像,液晶显示屏用于查看拍摄的照片,快门按钮则负责触发拍摄。
2. 数码相机模式:数码相机通常具有全自动模式、半自动模式和手动模式。
全自动模式下,相机会根据环境光线自动选择快门速度和光圈大小;半自动模式可以手动设置快门速度或光圈大小;手动模式下,用户可以完全控制快门速度和光圈大小。
二、相机设置在使用数码相机之前,您需要了解如何进行基本的相机设置。
1. 日期和时间设置:打开相机菜单,找到日期和时间设置选项,按照提示进行调整。
2. 图片质量设置:数码相机通常提供不同的图片质量选项,如RAW格式、JPEG格式等。
您可以根据需要选择适合的图片质量。
3. 白平衡设置:白平衡设置有助于调整照片颜色,确保拍摄的照片色彩真实。
您可以选择自动白平衡或手动设置白平衡值。
4. ISO设置:ISO设置用于调整相机的感光度。
较低的ISO值适用于光线充足的环境,较高的ISO值适用于光线较暗的场景。
一般情况下,您可以选择自动ISO。
三、拍摄技巧了解了相机的基本设置,接下来是一些拍摄技巧,帮助您拍摄出更好的照片。
1. 聚焦技巧:使用相机的自动对焦功能,将焦点对准您想要拍摄的主体。
您可以通过按下快门按钮轻按一下来进行自动对焦。
2. 曝光技巧:曝光是指相机在拍摄照片时所采用的光线条件。
在光线充足的环境下,自动曝光即可满足需求。
在光线较暗的场景下,可以使用闪光灯或增加曝光补偿来提高照片亮度。
3. 拍摄角度:尝试不同的拍摄角度,可以带来意想不到的效果。
数码相机操作指南数码相机已成为现代人生活中必备的高科技产品。
它不仅为我们记录下珍贵的瞬间,还拥有多种拍摄模式和功能,帮助我们创造出更美的照片。
然而,对于初次使用数码相机的人来说,操作和设置可能会有些困难。
本篇文章将为您简要介绍数码相机的基本操作指南,以帮助您快速上手。
一、相机外部结构和功能1. 机身部分:数码相机一般由机身、镜头、触摸屏、拍摄按键、模式选择钮等组成。
机身上通常也配备有电源开关、快门按钮和存储卡插槽等。
2. 镜头部分:镜头是数码相机最重要的组成部分,负责捕捉光线并将其转化为图像。
镜头上的镜片具有不同的焦距,在拍摄时可以进行调整,以获取更合适的画面。
3. 触摸屏:触摸屏是一种用手指触摸操作的界面。
通过触摸屏,您可以方便地进行设置调整、浏览照片和录制视频等操作。
4. 拍摄按键:拍摄按键通常位于相机顶部,用于启动相机拍摄功能。
按下快门按钮,相机就会捕捉图像。
5. 模式选择钮:数码相机通常配备多种拍摄模式,如自动模式、场景模式、手动模式等。
模式选择钮可帮助您切换不同的拍摄模式。
二、基本操作步骤1. 电源开关和存储卡插槽:首先,确保数码相机已插上电池并打开电源开关。
然后,插入存储卡以便保存照片和视频。
2. 设置时间和日期:根据相机的提示,在菜单栏中找到时间和日期设置选项。
输入正确的时间和日期,以确保照片和视频的时序信息准确。
3. 自动模式拍摄:如果您是初次使用数码相机,可以选择自动模式进行拍摄。
自动模式下,相机会根据场景自动调节曝光、白平衡和对焦等参数,以便获得更好的拍摄效果。
4. 脸部识别:数码相机通常具备脸部识别功能。
在拍摄人物时,相机会自动检测人脸并进行对焦和曝光的优化,以确保人物的清晰度和亮度。
5. 使用焦距调节:如果您需要拍摄远距离或近距离的物体,可以通过调节镜头上的焦距环来实现。
向左旋转可拍摄广角景物,向右旋转则可进行望远拍摄。
6. 使用闪光灯:在暗光环境下,您可以打开相机上的闪光灯来增加照片的光线亮度。

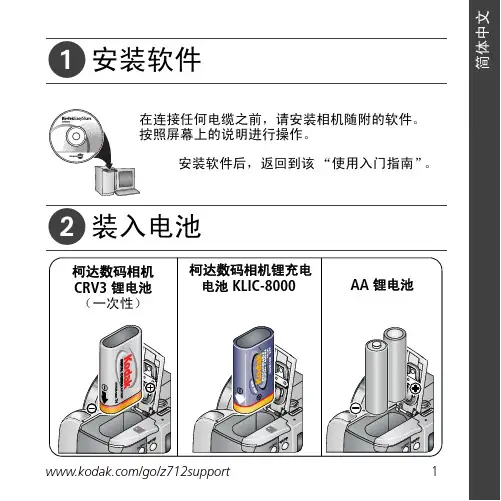
ᕡ安装软件ᕢ装入电池OK (确定)OK (确定)ᕥ拍摄照片/录像半按快门按钮可进行对焦并设置曝光。
当 AF/AE 指示灯变绿时,将快门按钮完全按下。
完全按下快门按钮然后释放。
要停止录制,请再次按下快门按钮。
AF/AE(自动对焦/自动曝光)指示灯/go/z712support3录像:2调节音量2 录像ᕨ学习有关相机的更多知识!祝贺您!您已经学习了:• 设置相机• 拍摄照片• 将照片传输到计算机请访问以便获得:• 用户指南的补充• 互动式故障排除及维修• 互动式教学• 常见问题解答• 下载• 配件• 打印信息• 产品注册继续了解更多信息!阅读完这本手册之后,您将能够拍摄和分享您的最佳照片!5对焦按钮(特写/微距、风景、手动对焦)11扬声器6Drive(驱动)按钮(自拍定时、连拍和包围曝光)/go/easysharecenter/go/z712support 7简体中5LCD 14OK (确定)按钮6EVF/LCD 按钮157EVF (电子取景器)16Share (分享)按钮8变焦(广角/远摄)按钮17Menu (菜单)按钮9操控旋钮18Delete (删除)按钮1关于相机的其它操作在 SD 或 MMC 存储卡上存储照片您的相机有内存。
您可以购买 SD 或 MMC 存储卡以存储更多照片和录像。
建议您使用柯达 SD 或 MMC 存储卡。
(请访问/go/z712accessories。
)存储卡只能按一个方向插入;按错误方向强行插入可能会损坏存储卡。
相机正在存取时插入或取出存储卡可能会损坏照片、存储卡或相机。
注:如果是第一次使用存储卡,请在拍照之前先将其格式化。
(要在“设置”菜单中使用此功能,请参阅第 17 页。
)8/go/easysharecenter关于相机的其它操作/go/z712support9使用光学变焦使用光学变焦,可使您与主体的距离最多缩短 12 倍。
您可以在录制EVF 或 LCD 为主体取景。

数码相机操作指南近年来,数码相机的普及使得摄影变得更加简单和方便。
然而,对于许多人来说,使用数码相机仍然是一项具有挑战性的任务。
本文章将为您提供一个简单而全面的数码相机操作指南,以帮助您更好地使用您的数码相机。
1. 准备工作在开始使用数码相机之前,有几个准备工作是必要的。
首先,确保您的相机已经充满电或者插入新的电池。
其次,准备一张空白的存储卡,并确保它已正确安装到相机中。
最后,清除镜头和相机的镜头盖,并清理相机的外壳以确保它没有灰尘或污垢。
2. 设置相机在使用数码相机之前,您需要设置一些基本参数。
这些设置可能会因相机型号而有所不同,但以下设置通常是常见的:- 照片质量:选择高质量的JPEG格式或RAW格式,以获得更高的图像质量。
- 图像分辨率:根据您的需求选择合适的分辨率。
较高的分辨率将产生更大的图像文件。
- 白平衡:根据拍摄环境选择适当的白平衡模式,以确保图像色彩准确。
- 对焦模式:选择自动对焦或手动对焦模式,具体取决于您的拍摄需求和技能水平。
- 曝光模式:根据场景选择适当的曝光模式,如自动模式、光圈优先模式或快门优先模式。
3. 调整光线和构图在开始拍摄之前,仔细观察您的拍摄场景。
调整光线和构图以获得最佳的照片效果。
以下是一些实用的技巧:- 光线:利用自然光或人工灯光来照亮您的主题,并避免直接的背光,以避免过暗或过曝的照片。
- 构图:使用取景器来选择您的主题,并按照“第三规则”来划分画面,以获得更好的构图效果。
- 角度:尝试不同的拍摄角度和镜头视角,以使您的照片更加生动和有趣。
4. 拍摄技巧开始拍摄前,请牢记以下几点拍摄技巧:- 稳定相机:使用三脚架或稳定的表面来稳定相机,以避免拍摄模糊的照片。
您还可以使用相机防抖功能(如果有的话)来提高图像的清晰度。
- 快门速度:根据您的主题选择适当的快门速度。
快速运动的主题需要更快的快门速度,而静物则可以使用较慢的快门速度。
- 使用闪光灯:在光线不足的情况下,使用内置闪光灯或外置闪光灯来提供额外的照明。
数码相片打印机使用手册及维护指南数码相片打印机使用手册及维护指南一、功能介绍数码相片打印机是一种可将数码照片直接打印成照片的设备。
它能够根据用户的需求选择出合适的照片尺寸,进行打印,打印出的照片画质清晰,色彩饱满,便于收藏、分享和展示。
二、操作说明1.机器开关打开机器电源,在显示屏上会出现“欢迎使用”字样,此时机器已开启。
关闭机器电源,长按电源键约三秒,即可关闭机器。
2.存储卡读取将存储照片的卡插入机器中的卡槽,机器将自动读取该卡中的照片并显示在屏幕上。
也可以通过USB线将相机连接到机器上进行照片传输,同样也可以对照片进行操作。
3.照片操作通过屏幕上的“打印”、“删除”等按键,可对照片进行打印、删除等操作。
其中,“打印”按键可选择不同尺寸的照片进行打印。
4.打印在确认要打印的照片后,将打印纸放入纸盒中,然后按下“打印”键,机器将自动将照片打印出来。
打印时间根据照片大小不同而有所不同。
三、使用注意事项1.避免直接抓取打印纸,以免损坏打印机。
2.每次打印前,应先检查打印纸装在纸盒中的位置是否正确。
3.在长时间不使用打印机时,应注意清洁打印机,以确保打印质量。
4.切勿使用普通墨水替代或更换耗材,以免损坏打印机。
四、维护指南1.经常清洁打印机的进纸口和出纸口,避免灰尘积累,影响打印质量。
2.使用的打印纸应保持干燥,存储时应注意避免曝晒在阳光下。
3.定期更换耗材并及时清理墨盒残留物。
4.如遇打印纸堵塞,应及时处理,以免对打印机造成伤害。
五、故障排除1.打印机不能开机检查电源线是否插紧,电源是否供电。
2.无法读取卡中照片检查卡片是否插入牢固,卡片是否损坏。
3.照片打印不清晰可能是耗材使用时间过长,需要更换。
六、总结使用数码相片打印机,能够方便快捷地将自己的珍贵回忆变成实体照片,同时也能够将美好的瞬间分享给朋友和家人。
使用过程中需要注意的事项和维护技巧需要我们认真对待,以保障打印机的长期使用和打印质量的稳定性。
数码相机操作指南数码相机已经成为我们日常生活中不可或缺的工具之一,它让我们能够捕捉珍贵的瞬间,记录美好的回忆。
然而,对于很多人来说,数码相机的操作可能还有些困难。
在本篇文章中,我将为大家提供一份简单易懂的数码相机操作指南,帮助大家更好地使用数码相机。
一、了解相机的基本功能在开始使用数码相机之前,我们首先需要了解相机的基本功能。
数码相机通常具有拍照、录像、防抖、闪光灯等功能。
拍照是数码相机最基本的功能,通过按下快门按钮来拍摄照片。
录像功能可以记录视频,防抖功能可以减少照片模糊,而闪光灯则可以在光线不足的情况下提供补光。
二、设置相机的参数在拍摄之前,我们可以根据自己的需求来设置相机的参数。
首先是白平衡,它用来调整相机对不同光源下的颜色表现,如阴天、白炽灯、荧光灯等。
然后是ISO,它用来调整相机感光度,较低的ISO值适用于光线充足的环境,而较高的ISO值适用于光线较暗的环境。
此外,还可以调整曝光补偿、对焦模式、测光模式等参数,以满足不同拍摄场景的需求。
三、掌握焦距和光圈的运用焦距和光圈是影响照片效果的重要因素。
焦距决定了照片的视角和景深,较长的焦距适合拍摄远处的景物,而较短的焦距适合拍摄近距离的主体。
光圈决定了照片的明暗程度和背景虚化效果,较大的光圈可以让更多光线进入相机,使照片更亮,同时背景虚化效果更明显。
因此,我们可以根据拍摄需求来调整焦距和光圈,以获得理想的照片效果。
四、运用不同的拍摄模式数码相机通常提供多种不同的拍摄模式,如自动模式、光圈优先模式、快门优先模式和手动模式等。
自动模式适用于大多数情况下,相机会根据环境自动调整参数。
光圈优先模式适用于强调景深的拍摄,快门优先模式适用于强调运动冻结或运动模糊的拍摄,而手动模式则允许我们完全控制相机的参数。
了解和灵活运用这些拍摄模式,可以让我们更好地应对不同的拍摄场景。
五、注意构图和角度除了技术参数的设置,构图和角度也是拍摄时需要注意的重要因素。
构图是指将主体放置在画面中的位置和角度,我们可以运用黄金分割、对称、对角线等构图原则来提升照片的美感。
ᕡ安装软件ᕣ为 KLIC-7001 电池充电计算机将 USB 电缆连接到计算机的 USB 端口,而不是集线器。
确保计算机电源已打开并且不处于睡眠模式。
/go/easysharecenter语言:确定确定确定4/go/easysharecenterᕦ拍摄照片/录像按 打开/关闭:完全按下快门按钮然后释放。
要停止录制,请再次按下快门按钮。
• 取景窗格• 状态图标 按快门按钮以进行对焦并设置曝光。
就绪指示灯变绿时完全按下。
/go/m893support5ᕧ以查看上一照片按 Review 录像播放。
调节音量。
以 2 倍速或暂停/播放。
确定播放期间:1关闭相机电源。
2连接 A/Vᕨ传输照片/录像闪光灯镜头/go/easysharecenter/go/m893support 9简体中文/ Menu (菜单)按钮Share (分享)按钮5Delete (删除)按钮13电池仓6变焦按钮(广角/远摄)14SD/SDHC 存储卡插槽7模式转盘15底座接口8直流输入(5 伏),适用于可选购的交流变压器16三脚架连接孔1关于相机的其它操作(T) 可放大。
按广角 (W) 可缩小。
始终使用自动对焦取景标记。
如果不使用变焦(1 倍,广角),则您与主体最近可以相距 0.6 米(2 英尺)。
在变焦时,您需要进一步远离主体。
W T D(广角)(远摄)(数码)10/go/easysharecenter(请参阅下面的闪光灯模式)自动闪光补光关于相机的其它操作使用其它拍摄模式使用此模式适用于自动一般拍照 — 既能保证极高的影像品质又易于使用。
特写近距离。
如有可能,请使用现场光,而不要使用闪光灯。
场景即使在特殊条件下拍照,也可获得对准即拍的简单性。
(请参阅第 13 页。
)高感光度使用较高的 ISO 在室内拍摄弱光场景中的人物。
录像拍摄有声录像。
(请参阅第 4 页。
)收藏夹查看收藏的照片。
SCNISO关于相机的其它操作场景模式选择一种场景模式,以使您无论在何种情景下均可拍摄出精美照片。
摄影是一门技术,同样也是经验的积累。
今天介绍十二条最经典、最实用的摄影技巧希望能帮助你应对很多难以掌控的拍摄场景。
中关村在线柯达Z812 IS1.阳光十六法则中关村在线柯达 Z812 IS中关村在线柯达 Z812 IS阳光十六法则中关村在线柯达 Z812 IS“阳光十六法则”是在没有测光表时,正确估算日光下曝光数值的方法,所以这条法则只有在阳光充足的情况下适合使用。
将光圈设为F/16,快门与ISO同步,或者略快。
如,ISO设为100时,快门应该设为1/100秒(1/125秒)。
所以,根据这个法则,在海滩上摄影时,应该使用F/22光圈,在多云时应使用F/11光圈。
中关村在线柯达 Z812 IS2.月光11、8和5.6法则中关村在线柯达 Z812 IS中关村在线柯达 Z812 IS月光11、8和5.6法则中关村在线柯达 Z812 IS如果你想拍摄月亮,那么这里有一条很好的法则。
快门与ISO同步的时候,拍摄满月用F11光圈,弦月的时候用F8光圈,新月则使用F5.6光圈。
中关村在线柯达 Z812 IS3.相机抖动法则中关村在线柯达 Z812 IS当你手持相机拍摄时,快门的速度不能小于镜头焦距的倒数。
如果快门速度越慢,那么拍摄抖动时就越可能降低锐度。
如果用50mm焦距的话,快门就要达到1/60秒以上为宜,只有当环境实在昏暗时,用闪光灯、脚架或者把相机放在硬物上防止抖动。
中关村在线柯达 Z812 IS4.灰板法则中关村在线柯达 Z812 IS中关村在线柯达 Z812 IS18%中灰版中关村在线柯达 Z812 IS随身携带18%中灰板是拍摄的利器。
可是如果身上没有灰度板怎么办呢?可以将手掌摊开面向阳光,对手掌进行测光,然后加一档曝光。
5L jecky119 的补充!特别是光线复杂下的人物拍摄,极力推进18%灰色版方法。
正确的方法是:将手掌背面垂直并平行被摄者脸部,使手背的光照情况与被摄者脸部的光照(亮度)接近,然后用相机测光--锁定测光值---重新构图-----“茄子”-----“咔嚓”!中关村在线柯达 Z812 IS5.景深法则中关村在线柯达 Z812 IS中关村在线柯达 Z812 IS后景深是前景深的2倍中关村在线柯达 Z812 IS当被摄物体比较深的时候,应该对焦点选择在景深的前1/3处,因为这样,对焦点后的景深是之前的2倍。
柯达Z812IS详细使用说明将照片存储在 SD 存储卡上您的相机有内存。
您可以购买 sd 存储卡以存储更多照片和录像。
请访问 /go/z812access ories。
存储卡只能按一个方向插入;按错误方向强行插入可能会损坏存储卡。
相机正在存取时插入或取出存储卡可能会损坏照片、存储卡或相机。
1 关闭相机电源。
2 插入或取出选购的存储卡。
3 打开相机电源。
拍摄照片拍摄照片后,evf/lcd 将以快速查看方式显示,时间约为 5 秒钟。
除非您按 delete(删除)按钮,否则相机将保存照片。
使用自动对焦取景标记(用于拍照)当使用 lcd 或 evf 作为取景器时,取景标记会指示相机对准的区域。
相机将试图按前景主体对焦,即使主体未在场景内居中。
1.半按快门按钮。
当取景标记变绿时,则表示对焦完成。
如果相机没有对准您期望的主体(或者如果取景标记消失),请释放快门按钮,重新取景构图。
2.将快门按钮完全按下可拍摄照片。
所有模式下都不会显示取景标记。
在使用“对焦区域”功能并设置为“中心区域”时,取景标记将固定为“居中宽对焦”。
拍摄录像1半按快门按钮。
当取景标记变绿时,则表示对焦完成。
如果相机没有对准您期望的主体(或者如果取景标记消失),请释放快门按钮,重新取景构图。
2. 将快门按钮完全按下可拍摄照片。
所有模式下都不会显示取景标记。
在使用“对焦区域”功能并设置为“中心区域”时,取景标记将固定为“居中宽对焦”。
拍摄录像拍摄录像后,evf/lcd 将以快速查看方式显示,时间约为 5 秒钟。
要在快速查看期间播放/暂停录像,请按 ok(确定)。
除非您按 delete(删除)按钮,否则相机将保存录像。
使用光学变焦使用光学变焦,可使您与主体的距离最多缩短 12 倍。
您可以在录制录像之前(而不是录制录像期间)更改光学变焦。
1. 使用 evf 或 lcd 为主体取景。
2. 按远摄 (t) 可放大。
按广角 (w) 可缩小。
变焦指示灯将显示变焦状态。
3. 拍摄照片或录像。
要想每次都获得对焦成功的照片,请记住:1 始终使用自动对焦取景标记,请参阅“使用自动对焦取景标记(用于拍照)”。
2 如果不使用变焦(1 倍,广角),则您与主体最近可以相距 60 厘米(24 英寸)。
(有关特写/微距模式,请参阅“使用对焦按钮”)。
3 在放大(最多 12 倍)时,您需要进一步远离主体。
使用数码变焦1.按远摄 (t) 按钮,直至越过光学变焦极限(12 倍)。
2.变焦指示灯将显示变焦状态。
拍摄照片或录像。
您会注意到使用数码变焦时影像品质降低了。
当照片质量达到获得 10 x 15 厘米(4 x 6 英寸)打印照片的极限时,变焦指示灯上的蓝色滚动条会暂停,然后呈红色显示。
不能将数码变焦用于录像录制。
使用驱动按钮使用自拍定时要在拍照之前取消自拍定时,请按驱动按钮。
(自拍定时设置仍然有效。
)使用相同步骤拍摄录像,但需要:将快门按钮完全按下。
在没有剩余存储空间时录像停止。
录像模式仅提供 2 秒和 10 秒两个选项。
使用连拍按驱动按钮选择连拍模式。
1. 在大多数拍照模式下,反复按驱动按钮可选择其中的选项。
2. 半按快门按钮可进行对焦并设置曝光。
3. 将快门按钮完全按下并按着不动可拍摄照片。
在释放快门按钮、拍摄照片后或存储空间不足时,相机将停止拍照。
在快速查看时,您可以按连拍的顺序删除所有照片。
要进行选择性删除,请在查看模式下进行(请参阅“删除照片和录像”)。
快门速度超过 0.5 秒时连拍不可用。
(要调整快门速度,请参阅“更改 p、a、s 或 m 模式设置”。
)使用包围曝光使用包围曝光确定不同条件下的最佳曝光级别。
在包围曝光期间,相机拍摄三张照片:一张以 +(高于当前值)曝光一张以 0(正常)曝光一张以 -(低于当前值)曝光测定这三张照片,然后确定哪个曝光级别适合您。
(包围曝光并非在所有模式下都可用。
)1. 反复按“驱动”按钮可选择“包围曝光”。
2. 半按快门按钮可进行对焦并设置曝光。
将快门按钮3.完全按下以拍摄 3 张照片。
要测定这些照片,请按 review(查看)按钮。
使用信息按钮拍摄图标的意义拍摄模式 - 未按任何按钮拍摄模式 - 半按快门查看照片和录像按 review(查看)按钮,查看并处理照片和录像。
放大照片删除照片和录像使用撤消删除功能如果意外删除了某张(段)照片/录像,可以使用“撤消删除”将其恢复。
此功能只能在删除单个照片/录像后立即使用。
保护照片和录像以防意外删除按 menu(菜单)按钮退出菜单。
格式化存储卡会删除所有(包括受保护的)照片和录像。
格式化内存还会删除所有照片/录像、电子邮件地址、相册名称和收藏夹。
在查看模式下使用 Menu(菜单)按钮1.按 review(查看)按钮,然后按 menu(菜单)按钮。
4.突出显示选项,然后按 ok(确定)按钮。
使用柯达添彩特技柯达添彩特技可为您带来更精美、更靓丽的照片。
1.按 review(查看)按钮。
5.按 ok(确定)。
根据屏幕提示执行操作,替换原始照片或将增强后的照片另存为新照片。
已增强的照片不会在相机上再次增强。
柯达添彩特技只能用于拍照,而不能用于录像。
按 menu(菜单)按钮退出菜单。
裁切照片1.按 review(查看)按钮。
6.按 ok(确定),然后按照屏幕提示执行操作。
照片先被复制,然后被裁切。
原始照片将会被保存。
裁切过的照片不能在相机上再次进行裁切。
按 menu(菜单)按钮退出菜单。
添加声音标签可以为照片录制语音或音乐(最长 1 分钟)。
每张照片只能添加一个声音标签(无法为录像添加)。
录制声音标签4.突出显示“录制”,然后按 ok(确定)按钮。
5.根据屏幕提示执行操作。
声音标签只对于您的照片有效。
按 menu(菜单)按钮退出菜单。
播放声音标签编辑录像您可以让人对您的录像刮目相看!从录像制作照片4.根据屏幕提示执行操作。
这样便可以创建照片。
(原始录像将会被保存。
)按 menu(菜单)按钮退出菜单。
剪裁录像您可以从录像中剪裁掉不需要的片头或片尾,而只保存需要的部分。
突出显示“录像画面打印”,然后按 ok(确定)按钮。
4.突出显示选项,然后按 ok(确定)按钮:自动 - 相机包含第一个和最后一个画面,然后选择 2 个、7 个或 14 个等距的画面。
手动 - 您选择第一个和最后一个画面,然后相机选择 2 个、7 个或 14 个等距的画面。
全手动 - 您选择 4 个、9 个或 16 个画面。
使用书签 - 相机使用已添加书签的画面。
创建 1 页 4 张、1 页 9 张或 1 页 16 张的照片。
如果书签不足 4 个或 9 个,则使用等距的录像画面。
按 menu(菜单)按钮退出菜单。
使用录像书签您可以在录像中令您感兴趣的位置设置书签,然后从一个书签跳到另一个书签。
设置书签按 menu(菜单)按钮退出菜单。
使用书签要查看所有已添加到书签的录像画面,请按变焦广角 (w) 按钮。
要返回正常视图,请按“远摄 (t)”按钮。
使用柱状图查看照片曝光情况使用柱状图测定拍照前后的亮度分布。
如果峰值位于图的右侧,则表明主体明亮;如果位于左侧,则表明主体灰暗。
如果峰值位于柱状图中间,则可获得最佳曝光效果。
如果场景太暗或太亮,可以在拍摄照片前调整曝光补偿(请参阅“ p、a、s 和 m 模式”)。
闪光灯可能会影响照片的亮度和阴影,而在拍摄照片之前不会影响柱状图。
放映幻灯片使用“放映幻灯片”在相机上显示照片和录像。
要在电视或任何外部设备上放映幻灯片,请参阅“在电视上显示照片和录像”。
要节省电池电力,请使用可选购的柯达 3 伏交流变压器。
(请访问 www.kodak.co m/go/z812accessories。
)开始放映幻灯片1.按 review(查看)按钮,然后按 menu(菜单)按钮。
要中断幻灯片放映,请按 ok(确定)。
更改幻灯片显示的时间间隔默认时间间隔设置为每张照片显示 5 秒钟。
您可以设置的显示时间间隔为从 3 秒到 60 秒。
2.选择显示时间间隔。
3.按 ok(确定)。
除非您更改时间间隔设置,否则它保持不变。
运行幻灯片循环放映打开循环时,幻灯片不断重复放映。
幻灯片将重复放映,直到按下 ok(确定)按钮或电池电力耗尽为止。
除非您更改循环放映功能,否则它保持不变。
在电视上显示照片和录像您可以在电视、计算机显示器或任何配备视频输入的设备上显示照片/录像。
要将相机连接到电视,请使用可选购的 a/v 电缆(请访问 /go/z812accessories)。
以不同方式查看照片/录像以缩略图方式查看(多张同屏)1. 按 review(查看)按钮。
2. 按变焦广角 (w) 按钮将单张照片视图更改为多张同屏缩略图。
3. 按远摄 (t) 返回单张照片视图。
要选择多个照片/录像,请参阅“选择多个照片/录像”。
按 review(查看)按钮退出查看模式。
按日期、相册或影像存储查看1.按 review(查看)按钮,然后按 menu(菜单)按钮。
按 review(查看)按钮退出查看模式。
有关相册的详情,请参阅“标记相册的照片/录像”。
选择多个照片/录像如果您有两个以上的照片/录像要打印、传输或删除,请使用多画面选择功能。
(多画面选择最适用于多张同屏模式,以缩略图方式查看(多张同屏)。
)2. 按 ok(确定)按钮选择照片/录像。
照片上将出现一个选中标记。
现在您可以打印、通过电子邮件发送、复制、保护、删除或以幻灯片形式放映所有选中的照片。
您可以第二次按 ok(确定)按钮来删除选中标记。
复制照片和录像您可以将照片和录像从存储卡中复制到内存,也可以从内存复制到存储卡中。
复制之前请确保存储卡已插入相机中。
复制照片或录像:1.按 review(查看)按钮,然后按 menu(菜单)按钮。
5.按 ok(确定)。
照片和录像被复制而不是被移动。
要在复制后从原始位置删除照片,请将其删除(请参阅“删除照片和录像”)。
已复制相册标志。
打印、电邮和收藏标记无法复制。
保护设置也无法复制。
要对照片或录像应用保护,请参阅“保护照片和录像以防意外删除”。
查看图标的意义拍摄模式scn(场景)模式1.将模式转盘设置为scn。
如果 scn(场景)模式说明关闭,请按 ok(确定)按钮。
要选择 scn(场景)模式,请按 ok(确定)按钮或保持 scn(场景)模式突出显示。
使用 Menu(菜单)按钮您可以对设置进行更改,以使相机拍照效果最佳。
有些设置除非您进行更改,否则将一直保留;而其他设置则在更改模式或关闭相机时消除。
某些模式提供有限的设置。
1.按 menu(菜单)按钮。
4.突出显示一个选项,然后按 ok(确定)。
使用“拍摄”选项卡使用“拍摄+”选项卡使用“录像”选项卡使用“设置”菜单使用“设置”来自定义相机设置。
拍摄全景照片使用全景模式可将最多 3 张照片“拼接”成一张全景照片。