kodak dryview5800系列中文简单使用说明
- 格式:pdf
- 大小:677.01 KB
- 文档页数:46
1.安全说明本章对热升华显色系统的安装、操作人员需了解的警告用语以及粘贴在热升华显色系统上的注意事项和警告标签做出说明* 在热升华显色系统的安装和操作过程中,请务必遵从本手册的指导和警告1.1警告、注意和参考本操作手册中的警报显示内容和热升华显色系统粘贴的警告标签按照其危险程度(事故等级)的优先顺序分为以下三级。
请理解以下警告用语的含义并遵从本手册的内容(指示)警告含义用于如不避免则有可能导致死亡或严重伤害等危险的情况用于如不避免则有可能导致轻度或中度疾病、或造成本产品完全或部分损坏等危险的情况○参○考用于特定注意事项以及需要强调的信息1.2重要的安全说明为了保证热升华显色系统的安全使用,以下是必须遵从的通用注意事项。
◎不要将热升华显色系统安装在以下可能导致绘图仪损坏或者可能造成热升华显色系统跌落或可能被意外碰落的地方:- 1 -不稳固的地面倾斜的地方可传导其它机械振动的地方◎不要踩踏热升华显色系统,且勿将重物放在热升华显色系统之上。
否则可能导致热升华显色系统损坏、跌落或被意外碰落。
◎不要用毯子或桌布等遮盖热升华显色系统,且勿封闭通风孔。
如果封闭通风孔,热升华显色系统内部可能会聚积热量并可能导致火灾。
◎不要将热升华显色系统安装在湿度大、灰尘多的场所,则可能会导致触电和火灾。
◎不要使用破损的电源线,否则可能会导致触电和火灾。
◎不要用湿手插拔电源插头,可能会导致触电。
◎不要将地线连接到下列地方:燃气管线存在起火和爆炸的危险。
电话线和避雷针的地线被闪电击中时可能会有强电流通过。
水管和水龙头如果金属管线中间接有塑料管,则可能导致接地不起作用。
- 2 -◎若有异物或水等液体进入热升华显色系统,此时请勿使用热升华显色系统。
否则可能会导致触电和火灾。
应立即关闭,将电源线与电源插座分离,并联系当地的经销商。
◎要按照操作手册中的指示连接各种电线。
错误的接线可能会导致火灾。
◎要直接从电源插座向打印机供电。
不要在同一插座上使用复杂的多个插头。

Philips 5800 series Ultra-Slim Full HD LED Smart TV108 cm (43")500 Picture Performance Index FHDPixel Plus HD43PFS5803Ultra-Slim Full HD LED Smart TV with Pixel Plus HDThe Philips 5800 Series with Smart TV brings all your favourite apps and content to the big screen in Full HD. Blockbuster films, live sport and multiplayer gaming are now just a few clicks away.Television viewing at your convenience•Two HDMI input ports and Easylink for integrated connectivity•USB for multimedia playbackConnect to a bigger world with this Smart TV•Philips app gallery brings entertainment to you•SAPHI. The smart way to enjoy your TVBeautiful attention to detail•Slim, refined stands communicate lightnessSee every detail•Full HD LED TV—brilliant LED images with incredible contrast•Pixel Plus HD gives you beautiful images you'll loveIssue date 2023-10-18Version: 10.1.1EAN: 87 18863 01491 2© 2023 Koninklijke Philips N.V.All Rights reserved.Specifications are subject to change without notice. Trademarks are the property of Koninklijke Philips N.V. or their respective owners.SpecificationsUltra-Slim Full HD LED Smart TV108 cm (43") 500 Picture Performance Index, FHD, Pixel Plus HDHighlightsPixel Plus HDPhilips' Pixel Plus HD engine optimises picture quality to deliver crisp images with beautiful contrast. So whether you're streaming online or watching from a disc, you'll enjoy sharper images with brighter whites and blacker blacks.Full HD LED TVPicture Quality matters. Regular HDTVs deliver quality, but you expect more. Imagine crisp detail paired with high brightness, incredible contrast and realistic colours for a true to life picture.Philips TV/STA galleryThe Philips app gallery is a wide-ranging collection of online apps that you can access as soon as your Smart TV is connected to the Internet. It's that easy! Just switch on your TV, connect to the Internet and experience a whole new world of entertainment online.SAPHISAPHI is a fast, intuitive operating system that makes your Philips Smart TV a real pleasure to use. Enjoy great picture quality and one-button access to a clear icon-based menu. Operate your TV with ease and quickly navigate to popular Philips Smart TV appsincluding YouTube, Netflix and more.Picture/Display•Aspect ratio: 4:3/16:9•Diagonal screen size (inch): 43 inch •Diagonal screen size (metric): 108 cm •Display: LED Full HD•Panel resolution: 1920 x 1080p•Picture enhancement: Pixel Plus HD •Peak Luminance ratio: 65 %Supported Display Resolution•Computer inputs: up to 1920 x 1080 @ 60 Hz•Video inputs: up to 1920 x 1080pTuner/Reception/Transmission•Digital TV: DVB-T/T2/T2-HD/C/S/S2•Video Playback: NTSC, PAL, SECAM •MPEG Support: MPEG2, MPEG4•HEVC supportSmart TV Features•User Interaction: SimplyShare •Interactive TV:HbbTV•Programme: Pause TV, USB recording*•SmartTV apps*: Online video stores, Open Internet browser, Social TV, TV on demand, YouTube•Ease of Installation: Auto detect Philips devices, Device connection wizard, Network installation wizard, Settings assistant wizard•Ease of Use: One-stop smart menu button, On-screen user manual•Firmware upgradeable: Firmware auto upgrade wizard, Firmware upgradeable via USB, Online firmware upgrade•Screen Format Adjustments: Basic - Fill Screen, Fit to screen, Zoom, stretch•Philips TV Remote app*: Apps, Channels, Control, NowOnTV, TV Guide, Video On DemandMultimedia Applications•Video Playback Formats: Containers: AVI, MKV, H264/MPEG-4 AVC, MPEG-1, MPEG-2, MPEG-4, WMV9/VC1, HEVC (H.265), VP9•Music Playback Formats: AAC, MP3, WAV, WMA (v2 up to v9.2)•Subtitles Formats Support: .SMI, .SRT, .SSA, .SUB,.TXT, .ASS•Picture Playback Formats: JPEG, BMP, GIF, PNGSound•Output power (RMS): 20 W•Speaker configuration: 2 x 10 W full-range speaker •Sound Enhancement: Incredible Surround, Clear Sound, Auto Volume Leveller, Bass Control, Smart SoundConnectivity•Number of HDMI connections: 2•EasyLink (HDMI-CEC): Remote control pass-through, System audio control, System standby, One touch play •Number of USBs: 2•Wireless connection: Built-in 1T1R Single band •Other connections: Common Interface Plus (CI+), Digital audio out (optical), Antenna IEC75, Ethernet-LAN RJ-45, Satellite Connector, Headphone outPower•Mains power: AC 220 - 240 V 50/60 Hz •Ambient temperature: 5°C to 35°C •Standby power consumption: <0.3 W •Energy Label Class: A++•EU Energy Label power: 37 W•Power Saving Features: Auto switch-off timer, Eco mode, Picture mute (for radio)•Off mode power consumption: N/A •Annual energy consumption: 55 kW·h •Presence of lead: Yes*•Mercury content: 0 mgAccessories•Included accessories: Remote Control, 2 x AAA Batteries, Power cord, Quick start guide, Legal and safety brochure, Tabletop standColour & Finish •TV Front: Black High Gloss Dimensions•Set Width: 969.6 mm •Set Height: 562.5 mm•Set Depth: 78.5 mm •Product weight: 7.2 kg•Set width (with stand): 969.6 mm•Set height (with stand): 584.0 mm•Set depth (with stand): 218.1 mm •Product weight (+stand): 7.3 kg •Box width: 1070 mm •Box height: 680 mm •Box depth: 140 mm•Weight incl. Packaging: 10.0 kg•Wall-mount compatible: 200 x 200 mm •TV stand width distance: 787.3 mm*EPG and actual visibility (up to 8 days) is country- and operator-dependent.*Energy consumption in kWh per year based on the powerconsumption of the television operating 4 hours per day for 365 days. The actual energy consumption will depend on how the television is used.*The TV supports DVB reception for 'Free to air' broadcast. Specific DVB operators may not be supported. An up to date list can be found in the FAQ section of the Philips support website. For some operators Conditional Access and subscription are required. Contact your operator for more information.*(Philips) only compatible with specific Philips player device.*This television contains lead only in certain parts or components where no technology alternatives exist in accordance with existing exemption clauses under the RoHS Directive.。

DRYPIX PRIMA柯尼卡DRYPRO 793DRYPRO 793型产品在新增图像诊断业务后,柯尼卡美能达再次满足了医学影像行业的严格要求,推出了其新一代DRYPRO 793型干式成像系统。
具有5种尺寸的打印功能并采用节省空间的设计。
可打印5种尺寸的胶片(14×17、14×14、11x14、10×12、8×10英寸)。
并可适合更多的设备类型。
这种通用性可用一台成像系统满足CR、CT、MRI、超声和乳腺X线摄影的尺寸需要。
即使配上6盘分片器,DRYPRO 793型相机占地面积仅为0.43m²,使其成为标准尺寸最小的、多模态干式成像系统。
*•* 当前时间截至2004年12月。
配备各种便捷的功能。
定时开机功能可使您进入办公室前设备自动启动和预热。
打印前一页功能便于方便快速地重新打印胶片。
状态指示器可提示您各托盘内还剩余多少胶片。
提供多种选件,满足用户要求。
设备标准配置为一个胶片供片盒,可选配第二个和第三个供片盒。
可选择14英寸(适合14×17、14×14、11×14英寸胶片)、10英寸(适合10×12英寸胶片)和8英寸(适合8×10英寸胶片)三种供片盒,配置灵活,满足用户各种需求。
另外,还提供6通道分片器,便于打印后分片。
用户友好的操作方式DRYPRO 793型产品具有宽大的彩色液晶触摸屏。
清晰的显示器可有多种显示语言可供选择,方便察看。
菜单直观,易于浏览。
DRYPRO 793型相机还设计了新的屏幕布局,可显示胶片类型、尺寸和系统状态。
配有新的动画显示系统中胶片用完或者需要用户进行一些操作时,DRYPRO 793型相机会进行动画提示。
动画以简单易懂的方式一步步地显示操作程序,便于迅速解决问题。
这一功能使用户在日常工作中不必查阅操作手册,减轻工作负担,即使经验不丰富的操作员也能方便地使用设备。
更为先进的打印管理DRYPRO 793型成像系统具有网络维护功能,用户可使用同一网络内的个人计算机通网络浏览器了解设备状态和打印进度等信息。

紫光A4平板扫描仪D5800使用手册目录技术规格 (3)功能特点 (3)包装附件 (4)安装程序步骤 (5)连接计算机 (6)安装程序注意事项 (7)使用扫描仪 (8)扫描仪校正 (9)按键模板功能 (10)高级设置功能 (11)配套软件功能 (12)TWAIN驱动程序 (13)TWAIN驱动功能设置 (14)纸张选择 (15)注意事项 (15)技术支持 (15)(1) D5800采用CIS 扫描元件。
(2) 高亮度LED 光源,无需预热,即插即用。
(3) 结合USB2.0接口直接供电简单易用。
(4) 可实现自动裁切纠偏等功能。
(5) 超高清的影像传感器,扫描更专业。
(6) 支持多文档格式扫描,满足不同办公需求。
(7) 5个快捷键的设计,轻松实现一键式操作。
(8) 符合绿色环保标准,节能省电,低碳环保。
(9) 全新的完美影线技术,处理文档更轻松。
包装附件:在您打开包装后,请务必按照装箱单进行设备的清点,该型号扫描仪的包装箱内有以下物品:安装程序步骤:将扫描仪连接到计算机:程序安装注意事项:1、如果自动运行使用不了可以打开光盘中的文件或进入紫光扫描仪官网 进入服务&支持在驱动中下载。
2、电脑防火墙可能会阻止程序的开机启动,在右下的选项中选择允许程序所有操作。
3、重启电脑后连接上扫描仪并打开扫描仪开关,系统会自动未扫描仪更新硬件信息,更新完成后会再桌面右下角显示图标,更新失败则会显示;如果安装失败需在计算机管理中的设备管理器中进行手动的更新。
注:win XP 操作系统连接上扫描仪之后不会自动更新硬件信息,会弹出新硬件向导,需要手动更新硬件;更新成功后设备管理器中会由之前的其他设备”scanner”变成图像设备的“Uniscan Flatbed Scanner “,扫描仪可以正常工作。
使用扫描仪:扫描仪校正程序:如果扫描出的图像有竖向条纹,请在开始菜单中打开Uniscan Flatbed Scanner 文件夹,运行一下校正程序,此时计算机不会有程序运行,该程序会再下一次运行扫描时对扫描仪进行校正。
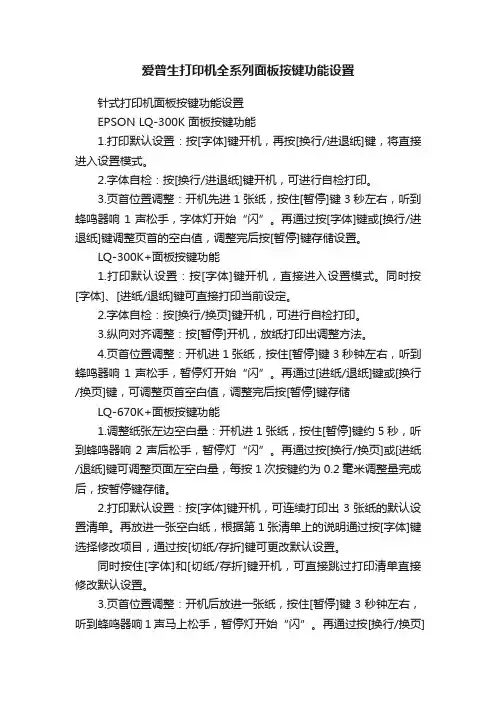
爱普生打印机全系列面板按键功能设置针式打印机面板按键功能设置EPSON LQ-300K 面板按键功能1.打印默认设置:按[字体]键开机,再按[换行/进退纸]键,将直接进入设置模式。
2.字体自检:按[换行/进退纸]键开机,可进行自检打印。
3.页首位置调整:开机先进1张纸,按住[暂停]键3秒左右,听到蜂鸣器响1声松手,字体灯开始“闪”。
再通过按[字体]键或[换行/进退纸]键调整页首的空白值,调整完后按[暂停]键存储设置。
LQ-300K+面板按键功能1.打印默认设置:按[字体]键开机,直接进入设置模式。
同时按[字体]、[进纸/退纸]键可直接打印当前设定。
2.字体自检:按[换行/换页]键开机,可进行自检打印。
3.纵向对齐调整:按[暂停]开机,放纸打印出调整方法。
4.页首位置调整:开机进1张纸,按住[暂停]键3秒钟左右,听到蜂鸣器响1声松手,暂停灯开始“闪”。
再通过[进纸/退纸]键或[换行/换页]键,可调整页首空白值,调整完后按[暂停]键存储LQ-670K+面板按键功能1.调整纸张左边空白量:开机进1张纸,按住[暂停]键约5秒,听到蜂鸣器响2声后松手,暂停灯“闪”。
再通过按[换行/换页]或[进纸/退纸]键可调整页面左空白量,每按 1 次按键约为0.2毫米调整量完成后,按暂停键存储。
2.打印默认设置:按[字体]键开机,可连续打印出3张纸的默认设置清单。
再放进一张空白纸,根据第1张清单上的说明通过按[字体]键选择修改项目,通过按[切纸/存折]键可更改默认设置。
同时按住[字体]和[切纸/存折]键开机,可直接跳过打印清单直接修改默认设置。
3.页首位置调整:开机后放进一张纸,按住[暂停]键3秒钟左右,听到蜂鸣器响1声马上松手,暂停灯开始“闪”。
再通过按[换行/换页]键或[进纸/退纸]键可连续调整页首值,调整完后按暂停键存储。
4.切纸位置调整:在连续纸状态下装上连续纸,按一下[切纸/存折]键使[切纸/存折]灯“闪”亮。
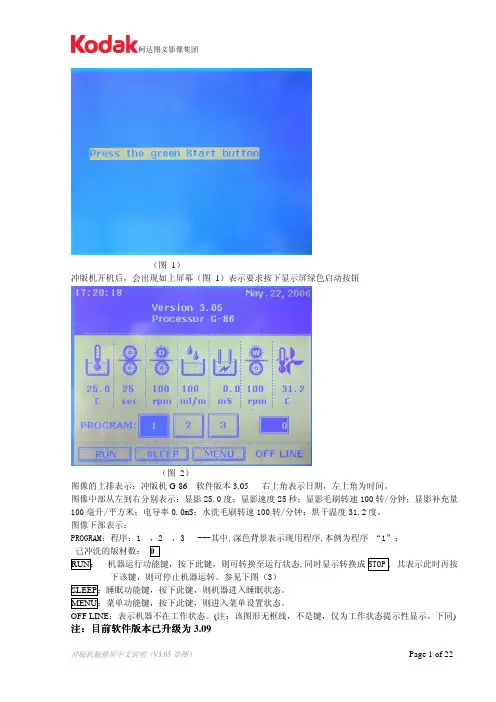
(图1)冲版机开机后,会出现如上屏幕(图1)表示要求按下显示屏绿色启动按钮(图2)图像的上排表示:冲版机G-86 软件版本3.05 右上角表示日期,左上角为时间。
图像中部从左到右分别表示:显影25.0度;显影速度25秒;显影毛刷转速100转/分钟;显影补充量100毫升/平方米;电导率0.0mS;水洗毛刷转速100转/分钟;烘干温度31.2度。
图像下部表示:PROGRAM:程序:1 ,2 ,3 ---其中,深色背景表示现用程序,本例为程序 “1”;已冲洗的版材数:0RUN: 机器运行功能键,按下此键,则可转换至运行状态,同时显示转换成STOP , 其表示此时再按下该键,则可停止机器运转。
参见下图(3)SLEEP:睡眠功能键,按下此键,则机器进入睡眠状态。
MENU:菜单功能键,按下此键,则进入菜单设置状态。
OFF LINE:表示机器不在工作状态。
(注:该图形无框线,不是键,仅为工作状态提示性显示。
下同) 注:目前软件版本已升级为3.09在上图(2)页面中,按下RUN 键即可显示此界面:(图3)最下一行:STOP:和ONLINE同时显示表示机器己进入运行状态,按下此键可停止机器运转, 进入OFFLINE 状态,但在冲版过程中按此键无效。
ONLINE:表示机器己进入运行状态。
READY:表示机器已准备好,可以冲版。
其主要决定于显影温度是否到达预定值范围、大盖是否盖好、液位是否正常等各种工作状态。
NO READY:即表示机器不能正常冲版,有某些工作状态不符合要求。
在图2界面中,按下1 键,则可得下述图片 ( 注:数秒钟后自动恢复至图3页面),表示在程序(l)中设置的内容及参数。
按下2 或3 ,同样可得到程序(2)或程序(3)中的设置内容。
(图4)图(4)表示程序(1)中设置的参数。
程序(1)Dev Temperature :25.0 ℃显影温度25.0度Dry Temperature :50.0 ℃ 烘干温度50.0度Dip Time :25 sec 显影时间25秒Area Replenish :100ml/㎡面积补充100毫升/每平米Time Replenish :100ml 定时补充量100毫升Time Period :60 min 定时补充周期60分钟Sleep Replenish :100ml/hr 睡眠补充100毫升/每小时Off-Time Replenish : 100ml/hr 关机补充100毫升/每小时Dev-Brush Speed :100rpm 显影毛刷速度100转/分钟Wash-Brush Speed : 100rpm 水洗毛刷速度100转/分钟Gum Apply:YES 上胶有Gum-Start Advance :0 cm 预先上胶0厘米(指印版离上胶轴的距离)Gum Duration :0 sec 上胶持续时间0秒,(指补胶泵工作时间)以上参数均可在一定范围内修改、设置,但不在此页。

TIB4361June 2002How To Get The Best From Your KODAK Inkjet PrintsUpdated: 20 June, 2002Does Kodak offer an inkjet paper that will work in my printer?Kodak offers many choices of Inkjet papers; please visit our website for the paper that will help you achieve the results you are looking for. Go to: /go/inkjetChoosing the correct printer settings.Kodak offers a selection of papers that will help you print out documents to photos. Once you have chosen your Kodak Inkjet paper, Kodak offers recommended printer settings to use with your printer. These settings are available on a sheet inside most paper packages. You can also visit our website to obtain these settings, /go/inkjet Along with manually changing your printer settings, Kodak offers a free downloadable software package called “Picture Software”. This software will also allow you to download an application called “One Touch for Better Pictures.” This software will allow you to pick your printer and operating system when using the KODAK Ultima Picture Paper and the KODAK Premium Picture Paper only. Downloading these 2 files will eliminate the manual step of having to change your printer settings for the papers mentioned above.Kodak Inkjet Printing Recommendations.When handling Kodak Inkjet Papers please follow the below recommendations:•Handle Kodak Inkjet Papers like photographic papers, by the edges to avoid oil deposits and fingerprints.•Be sure you are printing on the correct side of the paper, that is, the coated side. (some papers are coated on both sides).•Store unused print media in a cool, dry place. Avoid exposure to direct sunlight for prolonged periods of time. All media products are best when used within 1 year of purchase date.•Be sure to adjust your printers settings for the recommended paper.•Remove each print from printer’s output tray as it is finished to avoid ink smearing or transfer. To avoid smudging, allow inks to air dry completely before stacking. Many papers dry almost immediately, but less-than-ideal drying conditions may slow down the process. It is recommended to keep each print separated until completely dry (24 hours, recommended) before storing in an acid free folder.Storing and Preserving Kodak Inkjet prints.When storing Kodak Inkjet prints please follow the recommendations below:•Visible and UV light, along with atmospheric pollution, hasten image fading. Keep prints away from bright lights - especially direct UV illumination and sunlight along with above average exposure to florescent lighting.•Store finished prints in a cool, dry, dark place.•Avoid hot temperatures and high humidity.•Avoid exposure to dirt, dust, scratches and fingerprints.•Use acid-free interleaves between printed sheets when stacking for long-term storage (after ink is thoroughly dry).when storing prints in clear viewing sleeves, use a breathable clear cover sheet to prevent inks from transferring / sticking to the sleeve. (Obtain at your local photo retailer)•Be sure to install an acid free mat board between the frame and photo to prevent prints from sticking to the glass over time. (Obtain at your local photo retailer)•Be sure to always save your images on a digital storage devise. Be sure to save your images to the appropriate device as technology progresses.•Laminating Kodak Inkjet Prints - Due to the various makes and models of laminating machines and materials on the market today. It is extremely difficult to determine specific recommendations with Kodak Inkjet papers.•UV Sprays on Kodak Inkjet Papers - Due to the various makes and models of UV Sprays on the market today. It is extremely difficult to determine specific recommendations with Kodak Inkjet Papers.•KODAK Ultima Picture Paper and KODAK Premium Picture Paper are designed to be fade resistant. The use of UV sprays is not required.The following materials should be avoided when mounting, displaying or storing your Kodak Inkjet prints.•Materials with high acidic levels•Plastics containing pvc or acetate materials•Cellophane tape•Masking tape•Rubber cement•CardboardThings not to do:•Don’t mount your photo so that it is directly in contact with the glass in a framed display. Instead use good quality acid-free or rag mat board, and cut a window in it to provide an air space between it and the glass.•Don’t store prints in a damp basement or hot attic.•Handle prints by the edges to avoid skin oils and fingerprints.Acid free materials can be obtained through your local photo retailer.How does ultraviolet light affect my Kodak inkjet print?Print life is determined and affected by environmental factors such as light, humidity and air quality temperature. These factors add to print dye loss. Ultraviolet light can cause a print, especially a color print, to fade. Light fading photos displayed in normal household conditions will suffer a progressive loss/color shift in the highlighted areas. To reduce these effects you can make sure prints are not displayed in direct sunlight or in windows. Dye shift may also occur even when photos are kept in dark storage (albums) but usually at a much slower rate.Ultraviolet Absorbing Glass: Framed prints, for display can be protected with the use of ultraviolet absorbing glass or special lightweight acrylic that has UV absorbing properties.Inkjet Definitions:•Absorbency- The ability of paper to absorb and hold ink or other liquids•Acid Free paper- Paper, which has had the acid, removed from the pulp so that it has a neutral 7.0 pH.Examples: Commonly used for fine art prints and limited edition printing, as well as permanent records where contact with paper acidity could harm the documents.•Archival Paper (Archival media)- Acid free and lignin free paper that lasts longer than other papers and holds color well.Examples: With a quality lifetime of 100 years or longer, archival paper is often used for critical, permanent records that must be kept for many years.•Bleed Through- When paper is too thin or the ink applied too heavily the color can bleed through to the other side.Using the right paper for the type of ink coverage required can eliminate bleed-through.•CMYK- Short for Cyan-Magenta-Yellow-Black, and pronounced as separate letters. CMYK is a color model in which all colors are described as a mixture of these four process colors. CMYK is the standard color model used in offset printing for full-color documents. Because such printing uses inks of these four basic colors, it is often called four-color printing.In contrast, display devices generally use a different color model called RGB, which stands for Red-Green-Blue. One of the most difficult aspects of desktop publishing in color is color matching -- properly converting the RGB colors into CMYK colors so that what gets printed looks the same as what appears on the monitor.•Color Gamut- The total range of colors that can be reproduced by a digital device.•Color management system (CMS)- A system for ensuring that colors remain the same regardless of the device or medium used to display the colors. This is extremely difficult because different devices use different technologies and models to produce colors. In addition, color is highly subjective. The same colors look different to different people•Color matching- the process of assuring that a color on one medium remains the same when converted to another medium. This is extremely difficult because different media use different color models. Color monitors, for example, use the RGB model, whereas process printing uses the CMYK model. As color desktop publishing matures, color matching is gaining more and more attention. The most recent WINDOWS and MACINTOSH operating systems include a color management system (CMS) to assist in color matching.•Crop marks (Cut Marks)- To cut out or trim unneeded portions of an image or a page. Crossed lines placed at the corners of an image or a page to indicate where to trim it. Also called corner marks. Center marks indicate the center of a 2-page spread.•Dithering- Creating the illusion of new colors and shades by varying the pattern of dots. Newspaper photographs, for example, are dithered. If you look closely, you can see that varying the patterns of black and white dots produces different shades of gray. There are no gray dots at all. the more dither patterns that a device or program supports, the more shades of gray it can represent. In printing, dithering is usually called halftoning, and shades of gray are called halftones.•DPT (dots per inch)- A measure of the resolution of a printer is called DPI or dots per inch. It properly refers to the dots of ink or toner used by an imagesetter, laser printer, or other printing device to print your text and graphics. In general, the more dots the better and sharper the image. DPI is printer resolution. DPI is not image resolution although frequently used that way.•Duplex paper (Duplex Media)- Paper designed to be printed on either side or both sides.•Matte Finish- Coated paper with a low gloss finish without luster.•Opacity- Opacity is the measure of how resistant to show-through a piece of paper is. The more fibers or fillers in a paper, the more opaque (less see-through) it will be.•Paper Grade- Classification of different types of paper based on the type of pulp, treatments, and the end use of the paper. some common grades of paper include bond, book, cover, newsprint and photo.•Pigment Inks- While conventional inks are commonly dye-based, pigment inks consist of tiny chunks of solid pigment suspended in a liquid medium. According to their proponents, pigment inks have fewer tendencies to run, bleed or feather.•Pixel- Short for Picture Element, a pixel is a single point in a graphic image. Graphics monitors display pictures by dividing the display screen into thousands (or millions) of pixels, arranged in rows and columns. The pixels are so close together that they appear connected.•PPI (Pixels per inch)- PPI is a measure of the number of pixels per inch displayed or captured in an image. A digital image is composed of samples that your screen displays in pixels. Also known as: display resolution, screenresolution.•Print driver- A software routine that describes the physical characteristics of a particular printer, and converts data for printing into a form that printer can understand.•Resolution- Affects to the sharpness and clarity of an image. Most often used to describe monitors, printers and cameras, it indicates the number of dots or pixels per inch. For printers, a 720-dpi (dots per inch) resolution means that there are 720 separate dots per 1-inch line of print.For graphics monitors (VGA, SVGA) the screen resolution means the overall number of (pixels) displayed on the entire screen. 800x600 resolution would contain 800 pixels across the screen and 600 pixels down the screen. The overall screen resolution would be 480,000 pixels. On a 15” monitor this would represent a 72-(PPI) display.•True Black- Black produced by separate black ink rather than the ‘process black’ produced from a mixture of syan, magenta and yellow.•UV resistance- The resistance to fading under direct sunlight and other UV light sources.•Waterfast- The ability of a print to resist damage when exposed to water.Kodak is a trademark of Eastman Kodak Company.。
写真机操作手册编辑:技术部面板主菜单说明:1. 装载打印载体(测量纸张大小)2. 切割(无用)3. 暂停(当机器打图时,喷头断线或其他问题时按此键暂停)4. 重新设置(当机器工作中想终止工作时按下此键)当按下“5馈送载体”键后,屏幕显示:馈送载体菜单:Array说明:此菜单是对载体进行装载操作,可选择“进”或“退”,按“退出”回到主菜单。
当按下“6 设置菜单”后,屏幕显示:设置菜单:说明:一般情况下C,E,F项不能随便更改,建议保持默认数值不变。
当选择A菜单时,屏幕显示:说明:各项设置如下:彩色模式(选“彩色”)优质模式(选“使用者自定”)英寸点数(选“600”或“300”,建议选:“600”)每行喷印次数(选“六”次)托架速度(即小车的行走速度,选“7”或“8”次)打印方向(选“双向”). 1 .当选择B 菜单时,屏幕显示:说明:各项设置如下:打印载体类型(选“卷轴或自动收卷”)打印载体标准(选“全部”)页边留白(选“正常”或“扩展”,建议选择“扩展”)自动装载延迟(选“6”)自动切割(选“关”)节省打印载体(选“开“)自动擦墨(选“开”或“关”)C 菜单用户勿须设定!!!当选择C注意:非专业人员..以上各项禁止随意改动。
当选择D 时,屏幕显示:说明:各项设置如下:选择使用者设定(把使用者选定的菜单设置保存在“1—8”中任意一项中)保存使用者设定(所需项选顶后必须保存在“使用者设定菜单”中选定的那一项中)计量单位选择(选“公制”)语种(选“中文”)初始设定值(勿动)打印设定值(勿动)液晶显示对比度(根据实际情况)当选择“7辅助功能菜单”时,屏幕显示:说明:各项功能如下:清洗(用于清洗喷头出墨是否正常)存取墨水匣(打印过程中用于对喷头进行抽墨等操作)颜色校准菜单(用于喷头的校正)选择“颜色校准菜单“时,屏幕显示:青色垂直/水平(根据校准打印测试来定制)品红色垂直/水平(根据校准打印测试来定制)黄色垂直/水平(根据校准打印测试来定制)选择“校准菜单“时,屏幕显示:校准菜单. 3 .选择“颜色静区菜单“时,屏幕显示:静区的数值(根据测试的值来定). 4 .喷头的校正一、喷头的校正分两步1. 颜色的静区校正,具体方法如下:主菜单里选择“辅助功能菜单”“校准菜单”“颜色静区菜单”“颜色静区测试”即在纸上打印出颜色静区测试条2. 颜色的水平垂直校正主菜单里选择“辅助功能菜单”“颜色校准菜单”“校准打印测试”即在纸上打印出颜色校准测试条,二、图纸纵轴线测试主菜单里选择“辅助功能菜单”“颜色校准菜单”“图纸纵轴线测试打印”即在纸上起始端开始走纸,默认参数为:83.82cm. 如果打完偏大或偏少此数值则用打印的实际数值代替原有的数值.注:默认参数83.82CM不会随更改数值所改变.. 5 .蒙泰软件安装及设置电脑设置:一在CMOS中对打印端口进行设置:重启电脑,在电脑进行硬件自检时按DEL键进入CMOS设置,进入INTEGRATED PERIPHERALS 功能选项,将其中的Parallel Port Mode 设置为ECP(注意:一定要是标准ECP,而不能是EPP、SPP 或者ECP/EPP),最后保存并建出BIOS设置,随后,电脑会重新启动,WINDOWS系统自动检测到ECP 打印口并为其安装驱动程序,这时,您就可以使用ECP打印口所提供的高速传输性能了。
武汉睿昇数码科技有限公司喷绘机操作规程第一条开机顺序:先开前三个开关,再打开打印软件。
然后打开35V电源跟其它开关。
(送布开关:往上为放车体,往下为放布,中间为停)第二条关机顺序:从后往前依次关闭。
第三条上布时布的两边最好压在两个压轮之间。
把布挣平,拉紧,抬起压杆。
第四条轨道定期加润滑油,地线定期浇盐水第五条冬天室内温度最好不低于20摄氏度,室内湿度不低于40%第六条保持室内清洁,以免灰尘堵塞喷头第七条光栅定期擦拭第八条严禁更改系统时间第九条不能连续打开两次打印软件第十条须打开软件后在打开35v电源开关第十一条冲洗喷头以后一定要保证喷头电路部分的干燥,如果有电路部分有液体或不干燥容易烧掉喷头跟喷头控制板第十二条每次工作完以后都要对喷头进行保养维护(使用保鲜膜与面巾纸包喷头)第十三条Photoshop的模式必须设为CMYK,存储为TIFF格式第十四条在机器工作的时候,其它机器严禁访问本机,否则容易出现乱码现象第十五条机器电路所有部分不能带电插拔第十六条机器两边的急停开关不能随意乱动第十七条使用吸尘器清洗喷头时要竖着清洗,不要来回摩擦清洗第十八条打雷时最好关闭机器断电喷绘机喷头的保养技巧喷绘机在使用过程中的喷头堵塞问题,主要是以“预防为主”。
要保持喷头最佳工作状态的最好方法,是每天对喷头做一些适当而有效的日常维护,那将大大减少喷嘴堵塞的可能性。
一:设备安装完毕后,以及设备启用初期对喷头进行的保养维护1 为使喷头进入最佳工作状态,在设备正式开始工作前,请务必用一至二天时间尽最大可能多打印一些画面,最好是CMYK四色全用到,而且在画面的二边都加上C,M,Y,K四色的测试条以确保所有喷头始终处于喷墨状态。
2 喷绘时最好把机器清洗端内的海绵连同其托架一起取出。
二:每天工作完成后如何对喷头进行保养维护1 关闭设备电源2 先用专用清洗液将保湿海绵或保鲜膜清洗干净,然后清洗液倒在其上面。
3 将喷绘机机头移回机器的清洗端并使喷头喷嘴与保湿海绵或保鲜膜紧密结合。
AU5800简易操作规程中文(全中)AU5800 操作规程一、新建索引号每天下午建立新索引,以便把之后的所有数据保存在该索引文件夹下。
步骤如下:在仪器待机状态下点击“Home”----选择“Start Condition”---点击“Edit”—点击“New Index”-“Confirm”二、仪器日保养执行日保养内容并将检查内容在保养记录表中做记录。
a)检查样品注射器、试剂注射器和清洗水注射器及ISE注射器是否有任何泄露。
b)检查主清液的液面,如液面低则进行补充.c)检查样品探针、试剂探针和搅拌棒,如有粘附杂质用酒精棉球进行擦拭清洁。
d)检测电解质试剂的液面高度。
e)执行电解质清洗。
在电解质ISE模块的Clean 位置放入Clean Solution液的样品杯,然后点击“Home”——选择“Analyzer Maintenance”----“ISE Maintenance”---- 点击“Cleaning ”三、试剂检查点击“Home”——选择“Reagent management”——选择“Main”----确认试剂量是否足够, 对于当日不够的项目试剂进行补充(原装试剂放入对应R1或者R2 1-40任意位置,非原装试剂按试剂仓标签提示放试剂),盖好盖子后——点击“Reagent Check”——点击“Check All Position ”进行试剂检查。
四、定标a)ISE定标在电解质ISE模块的S-L和S-H 位置分别放入ISE Low SERUM STANDAD和ISE High SERUM STANDAD的样品杯. 然后点击“Home”——选择“Analyzer Maintenance”----“ISE Maintenance”----“Calibration ”-----“Serum Start”. 等待定标结束后观察定标是否通过。
b)其它项目定标点击“Home”——选择“Rack Require”——点击“Calibration”—选择需要定标的单元-----击“Start Entry”——选需定标项目(CO2和CREA每天定标)——点击“Enter”保存并退出。
·QS5800使用说明书版本号:Ver1.9发布日期:2011-5-16目录更新记录 (4)1.简介 (5)2.接口说明 (5)2.1接口介绍 (6)2.1.1温度传感口 (6)2.1.2 RS232/RS485接口 (6)2.1.3电源接口 (7)2.1.4外接电源控制器接口 (7)2.1.5音频接口 (7)2.1.6光控接口 (7)2.1.7 RS232串口 (8)2.1.8 USB串口 (8)2.1.9风扇接口 (8)3.规格书 (8)4.典型应用 (10)4.1 脱机应用 (10)4.2 同步应用 (10)4.2.1 通过LVDS接口和单板电脑同步 (11)4.2.2 通过DVI接口和电脑同步 (11)4.2.3 通过千兆以太网接口同步 (12)4.2.4通过光纤接口同步 (12)5.主板的配置 (13)6让显示屏进入测试状态 (15)7将创建好的显示信息发送到显示屏 (17)7.1U盘传送(脱机) (17)7.2Web (18)7.3播放SD卡或U盘上的内容 (18)9设置显示调度 (19)10让显示屏具有RSS功能 (20)11让显示屏具有自动更新显示内容功能 (22)11.1设置共享服务器 (22)11.2配置主板 (23)11.3验证下载 (25)12配置主板WIFI功能 (25)13应用参数配置 (26)13.1设置亮度调度(AD值设置) (27)13.2设置开关机调度 (27)13.3sms和email报警功能 (28)13.3.1原理 (28)13.3.2设置保护 (29)13.3.3sms及email设置 (30)14日志信息 (31)14.1查看当前播放内容(实时) (31)14.2查看播放日志与导出日志 (31)14.3查看列表更新日志 (33)14.4查看温度日志 (33)15系统诊断 (34)15.1查看应用程序版本信息 (34)15.2查看箱体信息 (35)15.3查看像点信息 (35)16系统升级 (36)16.1sigma3000升级 (36)16.2升级包升级 (37)16.3U盘升级 (39)17高级应用 (40)17.1分窗口播放 (40)17.2分公司播放 (41)17.3公司管理 (42)17.4web用户管理 (43)18FAQ (45)18.1web初始用户名密码 (45)18.2屏没有内容播放怎么办? (45)18.3以因为太网连接不上的原因分析? (46)附录: (47)更新记录版本修改内容修改人修改日期Ver1.0 编写第一个版本ZWJ 2011-1-7 Ver1.1 修改不完善的流程ZWJ 2011-1-10 Ver1.2 修改部分格式YangLei 2011-1-17 Ver1.3 修改部分格式ZWJ 2011-1-17 Ver1.4 修改部分格式ZWJ 2011-1-24 Ver1.5 修改硬件连接部分ZWJ 2011-2-13 Ver1.6 从新排版ZWJ 2011-2-14 Ver1.7 内容修改ZWJ 2011-2-15ZWJ 2011-4-15 Ver1.8 增加SIGMA升级,及WEB 1.5内容修正。