供应商系统操作手册 711 seven7
- 格式:pptx
- 大小:3.21 MB
- 文档页数:27
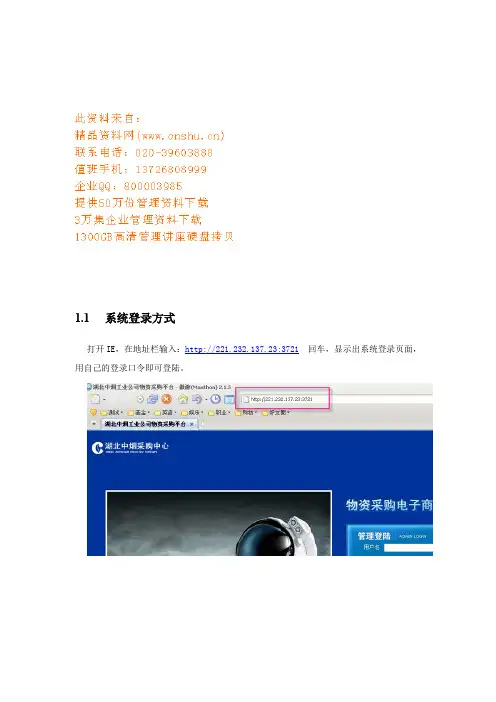
1.1系统登录方式打开IE,在地址栏输入:http://221.232.137.23:3721回车,显示出系统登录页面,用自己的登录口令即可登陆。
1.2IE设置1.2.1设置受信任站点如遇到登陆不了的情况,请按以下步骤操作1.从IE的工具栏选择Internet选项2.在安全标签,选择“可信站点”3.鼠标点击“默认级别”按钮。
点击击“站点”按钮。
4.输入EPMS的访问地址,点击“添加”按钮即可。
5.点击“关闭”按钮,再点击“确定”按钮,设置完成。
注意事项:VISTA下IE7具备一个特殊的保护模式方式,请确保此模式处于未启用状态,否则会对相关操作造成较大的影响。
如果加入可信站点,默认是不启用保护模式的。
1.2.2允许文件下载在安全标签,选择“可信站点”,点击“自定义级别”;点击“确定”,再点“确定”就设置好了1.2.3允许弹出窗口设置允许弹出窗口一般很多IE使用助手都有拦截弹出窗口的功能,我们需允许IE弹出窗口。
IE7本身具有阻止弹出窗口的设置,可按照如下步骤把站点加入允许弹出窗口的列表中:在隐私页签中“弹出窗口组织程序”上,根据个人喜好决定是否启用IE自带的过滤弹出广告窗口功能,如果启用了“打开弹出窗口阻止程序”,请点击“设置”按钮,将需要使用的EPMS 服务器登陆地址添加到允许网站区域中来1.3工作流基本概念工作流是把我们需要做的工作分成一个一个的环节,每个环节由相应的人员去做,环节一次一个一个往下走,直到工作完成。
工作流的每个环节都有相应的参与者(也就是应该做这个事情的人),只有有权限做这个事情的人才能处理该环节。
每个环节只有等上一个环节结束后,下一个环节才会启动。
每个可以处理的环节,我们称之为一个工作单,工作单有待签收,待处理,已完成,已终止几个状态。
待签收的工作单:每当一个环节启动时,此工作单就是待签收的状态,这时,所有有权限处理该工作单的人员都可以在自己的任务列表里看到此工作单。
待处理的工作单:点击处理或者双击一个待签收的工作单,就签收了此工作单,此工作单的状态改为待处理,待处理的工作单只有签收人可以看到并处理,其他人看不到也不能签收。


O RDER T RACKING S UPPLIER U SER M ANUALTable of ContentsChapter 1:Supplier User ____________________________________________________________________ 1 Chapter 2:Viewing the Documents ____________________________________________________________ 2Chapter 3:Orders __________________________________________________________________________ 53.1Acknowledging an Order ------------------------------------------------------------------------------------------------ 5Chapter 4:Advance Shipping Notice ___________________________________________________________ 74.1Creating an ASN document--------------------------------------------------------------------------------------------- 74.1.1Basic Details (8)4.1.2Supplier Details (9)4.1.3Shipping and Delivery Information (9)4.1.4Line Details (10)4.1.5Notes and Attachments (11)4.1.6Comments (15)4.2Managing an ASN ------------------------------------------------------------------------------------------------------- 154.3Cancel ASN---------------------------------------------------------------------------------------------------------------- 17Chapter 1:Supplier UserIn this guide, you will your role as a supplier in the procurement process along with information on the process of creating and finalizing the following documents: Order and ASN.Chapter 2:Viewing the DocumentsOnce the buyer has finalised the order you will receive an email notification to acknowledge the Order.You will receive an email from *************** as per example below.You can click on click here to open order and review the details of it.Alternately, On the Workspace home page, you can view the existing order documents either under the Task section or the Manage section, if you are already logged in to SMART GEP portal.a.) Under the Task section, the documents are grouped under action pomading card. You can search for and work on the required Order document.b.) You can also search for the required document using the search field on the Workspace home page.c.) Under the Manage section, the documents are arranged according to the document types. Scroll through the list of cards to locate the card for the required document type, and then click the required document. To view the document-specific landing page for that document type, click Show All.Not e For information on logging into SMART by GEP and navigating the Task and Manage sections of Workspace, see Workspace Overview User Manual.Chapter 3:OrdersAs a supplier, you can acknowledge orders in SMART GEP. An order is a document created and sent to you with the purpose of engaging in a transaction of products or services.3.1Acknowledging an OrderOnce you received the Order, it will appear in “Sent to supplier” statu s.You can review the order details along with additional information or special instruction providedby customer to create ASN for this Order undercomments. Click icon to view commentsprovided by customer.Not e If there are any comments provided by customer, the ASN icon will appear with dot as else it will be visible asClick Acknowledge Order, the order is successfully acknowledged message will appear on screen and Order status will changed to “Supplier Acknowledge”You can now view the order Under the Manage section and create ASN against it.Chapter 4:Advance Shipping NoticeAdvance Shipping Notice (ASN) provides detailed information about the shipment to let the buyer organization known that the shipment is coming. It will give you all the details of the shipment including the shipping quantity along with the order quantity the buyer has placed. You can create the ASN based on the Purchase Order placed by the buyer. ASN is created only for Material line items. Once the buyer validates the ASN, the buyer can use this to create a Receipt.4.1Creating an ASN documentTo create an ASN document:1)On the Workspace home page, click the Manage button and go to the Order card.2)Scroll and open the Order document for which you wish to create an ASN.Not eASN is created only for Material Line Items.Please follow the instruction/additional information provided by customer under “Comment” boxas mentioned above to create ASN for that Order.3)From the More Action menu, click Create ASN. The ASN for the Order is created in Draft.Following are the different section for an ASN documents:Basic DetailsSupplier DetailsShipping and Delivery InformationLines DetailsNotes and Attachments4.1.1Basic DetailsOn the Basic Details section, you can capture the basic details about the ASN such as the ASN Name, ASN Number. The order details for the ASN are directly populated from the Order document.The Basic Details section for an ASN is as shown below:While submitting your ASN in GEP SMART please ensure that quantity shipped does not exceed the quantity requested in the PO.4.1.2Supplier DetailsOn the Supplier Details section, the details regarding the supplier associated with the order is captured.The Supplier Details section is as shown below:4.1.3Shipping and Delivery InformationOn the Shipping and Delivery Information section, you can capture the Estimated Delivery Date, Tracking Number for the shipment. Ship To/Service To location and address are populated from the Order.The Shipping and Delivery Information section is as shown below:Not e Expected Delivery Date refers to the date when item mentioned in this ASN are scheduled to be delivered from suppliers.4.1.4Line DetailsOn the Line Details section, under Lines, you can view all the line details for the order raised by the customer. You can edit the line details to set the buyer expectation for the order they would receive.The Line Details section is as shown below:If you want to send ASN for particular lines, select the line for which you don’t want to send the ASN and click icon.Not e The Shipping Quantity must not be greater than the Order Quantity.ASNs with shipping quantity exceeding Order quantity would not be accepted by customer and you will be required to cancel this ASN and create new with corrected shipping quantity or changes requested by customer.4.1.5Notes and AttachmentsUsing the Notes & Attachments section, you can embed milestone information along with supporting files and informative links for your ASN document.Upload all relevant documents either as scanned or as individual attachments, including:Internal Process Sign off FormsAppendicesNotes and external linksAny other documents pertaining to the contract that may be useful4.1.5.1Adding Notes (Milestones)Use this section to provide milestones information to customer.You may create one or multiple ASN against order. Please follow the instructions provided in by customer in Order comment section about ASN requirement, if any.To add milestones, click Notes, on the notes pop-up enter the name and description for the notes and click Save.Name: Enter the date of milestone in format DD-MM-YYY Description: Add description or additional information for milestone Classification: Select Milestone from below drop-down valuesYou can provide information for following milestones•Fabrication•Ready to pick up•Port of loading•Port of Discharge•Custom clearance•Transport to Plant/LocationEnter the information as shown below and click SAVEOnce you finished with adding milestone information, it will be shown in table format as shown below.Based on requirement from customer you can choose to add one or multiple milestones in an ASN.Not e You must create multiple ASN’s when you want to inform customer about new milestone for Refinery Units (RU) Order materials or as per instructions provided by customer in Header comment section of Order.4.1.5.2Adding a FileTo upload a file:1)Click File Upload, browse to the document, select it and click Open to upload the document.ORDrag and drop the document.A note/attachment, by default, is shared with the customer and can be used for internal purposes. However, you can configure a note/attachment to be shared with the customer/internal user, by selecting the Shared Externally checkbox, for that note/attachment.Select the document you want to delete and the click the Delete icon. After deleting the required document system will ask for confirmation, select Yes to delete the selected document or else select No.4.1.5.3Adding an External LinkTo add external link, click External link, enter the name and URL for the external link and click Save.4.1.6CommentsAs a supplier, you can also add comments to the ASN, if required. On the top-right corner of the ASN page, click the comment icon .The comments pop-up is displayed.Enter your comments in the field and click “Post”You can also upload an attachment along with comments using icon .4.2Managing an ASNYou can submit the ASN for buyer approval once you have filled in all the required details for the ASN, you can then submit it to send it to the Buyer. Click the Submit button on the bottom-right corner of the ASN page to send the order document to the Buyer.Similarly, to delete an ASN, click the More Action on the top-right corner of the ASN page, and click Delete.Not e“Delete” option is only available when ASN is in Draft mode.4.3Cancel ASNIn case, there are changes requested by customer in ASN submitted previously, you must cancel that ASN and create new ASN with terms/changes agreed with customer.To cancel the ASN, Click on More Actions and then click “Cancel ASN”.ASN will now appeared in “Cancelled” status and you can create new ASN for that Order.4.4ASN reminder notificationASN reminder notification will give a reminder to the supplier about the pending task of ASN creation before the delivery date (5/7/10 days can be configured as per users choice). Following are the steps that need to be done to configure the notification.1.After the Login on SMART user can go to user profile at the top right side andchange the setting for the Time zone , Language and for receiving notification forPending Task.2.After clicking on the User profile user will see two option to change the settingGeneral Setting: In the general setting user can do setup according to hispreference in Regional setting for the Time-zone, Country, Language andemail id3.Notifications Setting:On the Notification setting the user can set the frequency for days and time when the notification w ill get triggered for the Pending task to the supplier user.For example: If the frequency days is set to 2 days so after every 2 days thesupplier user will get the notification for the pending task that has to becompleted by them.Notification Time: If the user set the notification t ime 10 AM and frequency day as 2 days so after every 2 day the user will get the notification at 10 AM for the pending task that has to be completedNotification email that will be received by supplier after the above setup is doneAbout SMART by GEPGEP helps global enterprises operate more efficiently and effectively, gain competitive advantage, boost profitability, and maximize business and shareholder value.Fresh thinking, innovative products, unrivaled domain and subject expertise, and smart, passionate people –this is how GEP creates and delivers unified business solutions of unprecedented scale, power and effectiveness.With 14 offices and operations centers in Europe, Asia and the Americas, Clark, New Jersey-based GEP helps enterprises worldwide realize their strategic, operational and financial objectives.Recently named Best Supplier at the EPIC Procurement Excellence Awards, GEP is frequently honored as an innovator and leading provider of source-to-pay procurement software by top industry and technology analysts, such as Forrester, Gartner, Spend Matters, Paystream and Ardent Partners. GEP also earns top honors in consulting and managed services from the industry’s leading research firms, professional associations and journals, including Everest Group on its PEAK Matrices of Procurement Services Providers and Supply Chain Services Providers; NelsonHall on its NEAT Matrix of Global Procurement BPO Service Providers; HfS in its Blueprint Report on Procurement-as-a-Service; and ALM Intelligence in its Vanguard Reports on both Procurement Consulting and Supply Chain Consulting.To learn more about our comprehensive range of strategic and managed services, please visit . For more about SMART by GEP, our cloud-native, unified source-to-pay platform, please visit 。
供应商管理系统操作指南一、登录系统在浏览器中输入供应商管理系统的网址,并按下回车键进入系统登录页面。
输入您的用户名和密码,然后点击登录按钮。
二、导航菜单登录成功后,系统将进入主界面。
在界面的左侧,您将看到导航菜单,其中包含各个功能模块的链接。
通过单击这些链接,可以进入相应的功能页面。
三、供应商信息管理1. 添加供应商信息点击导航菜单中的“供应商管理”,进入供应商信息管理页面。
在页面上方可以看到一个“添加供应商”按钮,点击打开供应商信息添加页面。
在页面中填写供应商的相关信息,如供应商名称、地址、联系人等,然后点击“保存”按钮,完成供应商信息的添加。
2. 修改供应商信息进入供应商信息管理页面后,您可以看到一个供应商列表。
在列表中找到您要修改的供应商,点击其相应的编辑按钮。
进入编辑页面后,您可以对供应商信息进行修改,并保存更改。
3. 删除供应商信息在供应商信息管理页面的供应商列表中,找到您要删除的供应商,点击其相应的删除按钮。
系统将要求您再次确认是否删除该供应商,确认后,该供应商信息将从系统中删除。
四、采购计划管理1. 创建采购计划点击导航菜单中的“采购计划管理”,进入采购计划管理页面。
在页面上方可以看到一个“创建采购计划”按钮,点击打开采购计划创建页面。
在页面中填写采购计划的详细信息,包括采购物品、数量、预算等,然后点击“保存”按钮,完成采购计划的创建。
2. 修改采购计划进入采购计划管理页面后,您可以看到一个采购计划列表。
在列表中找到您要修改的采购计划,点击其相应的编辑按钮。
进入编辑页面后,您可以对采购计划进行修改,并保存更改。
3. 删除采购计划在采购计划管理页面的采购计划列表中,找到您要删除的采购计划,点击其相应的删除按钮。
系统将要求您再次确认是否删除该采购计划,确认后,该采购计划将从系统中删除。
五、合同管理1. 创建合同点击导航菜单中的“合同管理”,进入合同管理页面。
在页面上方可以看到一个“创建合同”按钮,点击打开合同创建页面。
“供应商自助协同”系统使用说明书尊敬的供应商:您好!派昂医药为了给您提供更加优质便利的服务,加快彼此之间业务工作的效率,特斥巨资打造“协同商务”平台。
通过该平台下的“供应商自助协同”系统,您可以生成付款单据进行付款,查询各类往来业务,通过查询及时获知品种的库存状况、销售记录等。
具体操作请参考如下说明。
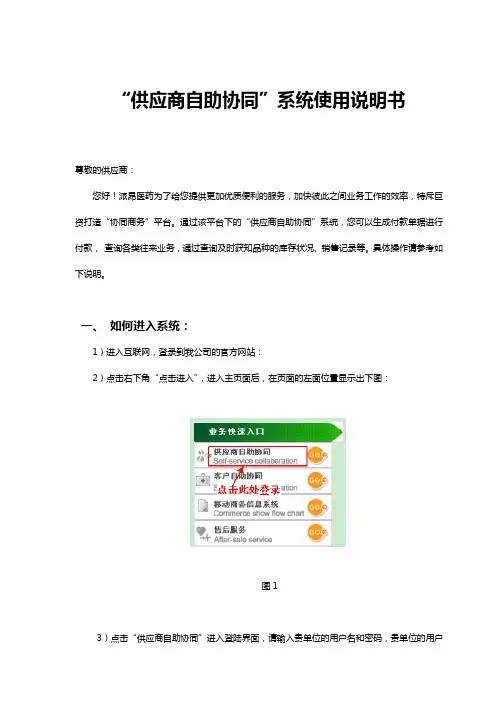
一、如何进入系统:1)进入互联网,登录到我公司的官方网站:2)点击右下角“点击进入”,进入主页面后,在页面的左面位置显示出下图:图13)点击“供应商自助协同”进入登陆界面,请输入贵单位的用户名和密码,贵单位的用户名为:user@ ,初始密码都为:z (小写)。
输完用户名、密码和校验码便可登录系统。
以下是系统各个部分功能简介:二、付款流程:1、协同商务-付款生成单此项用于供应商网上生成付款数据。
登录系统后,首先双击界面左上角的“协同商务-付款生成单”,然后点击“生成付款数据”,出现可付款单据(如图2)。
图2是否选择打‘√’的单子为可付款单子。
如果本次不想对此单付款,则取消此单最前列的‘√’即可(只可取消入库单据,退补价单据和退回单据不可以取消)。
如果点击‘生成付款数据’,出现如下图情况(图3)图3如果提示的是退货处、质检部、业务部等有部门的错误信息,则联系相应的部门进行处理解决,如果是付款单已生成、付款类型不合法等提示则联系相应的采购员处理解决。
根据提示的错误原因,作出相应的解决方法。
2、协同商务-付款单跟踪查询:此项可对所生成的付款单的进度进行跟踪查询。
双击打开“协同商务-付款单跟踪查询”界面。
点击“查询”,查看付款单付款的情况(如图4),可以查询出保存后的“付款生成单”。
通过此查询可以查看付款单当前的进度情况以及付款明细数据,以便供应商更好的了解付款进度,不影响正常付款业务。
若需要查询特定时间段的付款单,只需双击“起始日期”和“终止日期”对时间进行更改。
同时还可以对未进行过返利确认的付款单进行删除操作,在重新进入‘付款生成单’界面生成付款单图43、协同商务-付款方式变更单:此项只用于对本次付款方式的变更申请。

供应商操作手册V1.1编制:运营中心2016年5月29日目录第1章背景介绍 ...................................................................................................................................... - 3 -1.1 平台目标 .................................................................................................................................................. - 3 -1.2 云筑网介绍 .............................................................................................................................................. - 3 - 第2章供应商后台管理 ........................................................................................................................... - 5 -2.1 登录 .......................................................................................................................................................... - 5 -2.2 首页 .......................................................................................................................................................... - 6 -2.3 投标 .......................................................................................................................................................... - 7 -2.3.1 投标管理 .................................................................................................................................................................- 8 -2.3.2 合同管理 ...............................................................................................................................................................- 18 -2.3.3 产值单管理 ...........................................................................................................................................................- 21 -2.3.4 结算单管理 ...........................................................................................................................................................- 38 -2.3.5 成为分供商 ...........................................................................................................................................................- 38 -2.4 订单 ........................................................................................................................................................ - 41 -2.4.1 订单管理 ...............................................................................................................................................................- 41 -2.4.2 发货单管理 ...........................................................................................................................................................- 43 -2.4.3 发货地址管理 .......................................................................................................................................................- 44 -2.5 子账户 .................................................................................................................................................... - 47 -2.5.1 子账户管理 ........................................................................................................................................................... - 47 -第3章云筑网联系方式 ......................................................................................................................... - 49 -编制:运营中心2016年5月29日第1章背景介绍1.1平台目标云筑网()是中国建筑总公司于2015年投资创办的垂直电子商务平台,是落实党组”完善集中采购平台“,”推进集中采购‘廉洁高效、阳光透明’”要求的重要举措之一,是中国建筑推进”互联网+“创新战略的重要布局之一。

腾讯供应商门户系统用户操作手册2021年6月仅供腾讯供应商参考使用,请勿对外传阅目录1.供应商自主注册(含认证)2.供应商邀请注册(含认证&申报)3.供应商响应需求4.供应商投诉附1:响应需求信息更新附2:响应需求澄清附3:响应报价磋商返回目录供应商自主注册(含认证)1供应商自主注册❖供应商可以在腾讯供应商门户()自主注册,同时完成认证,以备用❖在自主注册后,也可以按需要,接受腾讯业务人员“邀请注册”,补充信息及进行关系申报第1步:供应商登录绑定账号第3步:进行供应商认证(企业或个人)◼登录供应商系统门户端(Portal)◼绑定任一账号✓个人QQ✓个人微信✓邮箱◼三要素认证◼企业随机打款/个人手机短信第2步:选择“自主注册”,填写信息◼填写用户信息◼填写供应商资质信息并上传相关证照◼填写银行账户信息◼填写联系人信息第4步:接受邀请,补充填报信息第5步:关联关系申报◼进行关联人员申报◼腾讯业务人员可按需进行“邀请注册”◼供应商收到“邀请注册”邮件◼登录供应商门户填写邀请码、上传管理员授权函自主注册自主注册后接受“邀请注册”非必须12345◼选择注册方式为“自主注册”❖供应商登录门户系统(),选择个人微信、QQ或者邮箱登录❖供应商注册方式为“自主注册”在未收到腾讯内部经办人发出的注册邀请场景下,可以选择自主注册,点击确定❖若用户为首次登录该供应商账号,需在填写个人信息填写*号标识的必填字段,然后点击“提交”❖若供应商为库外供应商,则按照准入要求填写相关信息企业名称为邀请时腾讯经办人填写,若供应商发现信息错误,可联系经办人失效本次邀请重新发送❖若供应商为库外供应商,则按照准入要求填写相关信息需填写证照信息及相关供应商情况❖若供应商为库外供应商,则按照准入要求填写相关信息点击新增填写银行账户信息❖若供应商为库外供应商,则按照准入要求填写相关信息❖若供应商为库外供应商,则按照准入要求填写相关信息点击新增添加供应商联系人信息❖若供应商为库外供应商,则按照准入要求填写相关信息点击将联系人信息填充为用户信息❖若供应商为库外供应商,则按照准入要求填写相关信息供应商按腾讯业务要求,上传其它相关附件供应商–供应商认证流程❖供应商认证流程如下:企业类供应商个人类供应商第1步:企业三要素认证◼系统将进行企业供应商三要素认证(企业全称、法人、统一社会信用代码/营业执照号)第2步:银行账户随机打款认证◼系统会对注册信息中填写的银行账户进行随机打款◼供应商在收到打款后填写打款金额第3步:完成认证◼若银行账户认证通过则完成供应商认证流程◼若银行账户认证未通过则供应商修正银行账户信息后重新执行第2步操作第1步:个人三要素认证◼系统将进行个人供应商三要素认证(姓名、身份证号、手机号)第2步:手机短信验证码认证◼系统将向注册信息中填写的手机号发送短信验证码◼供应商在收到短信验证码后填写验证码信息◼若手机短信验证码认证通过则完成供应商认证流程◼若手机短信验证码认证未通过则供应商修正手机号重新执行第2步操作第3步:完成认证❖供应商认证操作-填写完全部的注册信息后,点击操作面板中的“下一步”触发供应商三要素认证填写完全部的注册信息后,点击“下一步”触发供应商三要素认证❖供应商认证操作-若为企业类供应商,则在三要素认证成功后点击“下一步”进行银行打款认证❖供应商认证操作-若为企业类供应商,则在收到银行打款后填写“银行打款金额”然后点击“提交”输入银行打款金额供应商–企业供应商认证流程,完成认证及自主注册❖供应商认证操作-若为企业类供应商,则在银行打款金额验证完成后,点击“完成”结束认证操作系统将显示通过认证的三要素信息供应商–个人供应商认证流程❖供应商认证操作-若为个人类供应商,则在三要素认证成功后点击“下一步”进行短信验证码认证供应商–个人供应商认证流程❖供应商认证操作-若为个人类供应商,则在收到短信验证码后填写“短信验证码”然后点击“提交”输入短信验证码供应商–个人供应商认证流程,完成认证及自主注册❖供应商认证操作-若为个人类供应商,则在短信验证码认证成功后,点击“完成”按钮结束认证操作系统将显示通过认证的三要素信息自主注册后的邀请注册:供应商–收到邀请注册邮件❖若需要进一步邀请注册,腾讯经办人将发起邀请❖供应商收到系统发送的注册邀请邮件,并按邮件信息登录供应商管理系统门户端补充信息系统自动向供应商发送注册邀请邮件,提供邀请码等信息,若为管理员,邮件会进行相关提示。

供应商管理系统操作手册第1章系统概述供应商管理系统,是通过供应商档案、供应商资质申请表、样品试制申请单、供应商评估方案、供应商评分表、询报价管理、品质异常报告、采购订单变更通知单、采购/委外对账单等功能综合运用的管理系统,以建立和维护供应商伙伴关系为导向,涉及供应商整个生命周期的管理。
该系统可以独立执行供应商管理操作;与供应链其他子系统、应付款管理系统等其他系统结合运用,将能提供更完整、全面的企业物流业务流程管理和财务管理信息。
结合我公司目前供应商管理情况,在本模块中暂时只涉及到供应商档案、供应商评估方案、供应商评分表、报表分析这四大块来实现对供应商的管理。
并结合我公司实际需求在系统中对某些单据进行了调整,以最大限度满足我公司供应商管理在ERP软件中的需求运用,更好的协助我公司对供应商的管理。
下面我们围绕以上四个方面来讲述供应商管理在ERP系统中的操作方法及操作规范。
第2章供应商管理系统设置2.1 供应商评估指标管理供应商评估管理以及供应商绩效管理的关键在于建立完整的评估体系。
这套评估体系包括定义评估要素即评估指标,并针对不同的供应商类别设置评估要素的权重和组合即建立评估方案。
企业通过考查和数据统计分析等手段,得出供应商在某项评估要素的分值,最终得出该供应商的总分,并通过总分对供应商进行分级管理,指导企业的采购决策。
供应商评估指标管理用于定义供应商评估指标,包括定性指标和定量指标两类。
通过【供应链】-【供应商管理】-【评估管理】-【供应商评估指标管理】来进行供应商评估指标的维护和查询工作。
①增加供应商评估指标通过单击【新组】按钮或者菜单新增供应商指标的上级组,通过单击【新增】按钮或者菜单新增明细的供应商评估指标。
下表介绍供应商评估明细指标录入内容和方法:②修改供应商评估指标对已保存的供应商评估指标进行修改,可以使用下列方法:选中需要修改的供应商评估指标,然后(1)单击工具栏上的【修改】;(2)选择【编辑】→【修改】;(3)直接使用快捷键Ctrl+M;(4)直接双击该条记录;都可以调出“供应商评估指标修改”界面。

网上招投标系统操作手册(供应商)目录第一部分系统注册 (1)1.1供应商注册流程 (1)1。
2注册并填写基本信息 (1)1。
3获取系统激活码 (1)1.4修改登陆密码 (1)1。
5修改机构注册信息 (1)第二部分系统登录 (2)2。
1CA驱动安装 (2)第一步:下载驱动 (2)第二步:驱动安装 (2)2.2用户名登录 (3)2.3CA安全证书绑定 (3)2.4CA登录 (4)第三部分网上招投标 (4)3。
1报名 (4)3.1.1参与报名 (4)3.1。
2下载采购文件 (4)3。
1。
3我已报名的项目 (5)3.2投标 (5)3.2.1提交投标保证金 (5)3.2.2提交投标文件 (5)3.2.3我已投标项目 (6)3。
2.4 开启投标文件 (6)3。
2。
5确认中标通知书 (6)第四部分协议供货 (7)4。
1商品库 (7)4.1。
1操作流程图 (7)4.3.2维护商品品牌 (7)4。
2维护商品信息 (7)4。
2.1操作流程图 (7)4。
2.2录入商品信息 (7)4。
3.3维护商品信息 (7)4。
3。
4录入配件信息 (7)4.3。
5维护配件信息 (7)4。
3维护商品行情 (7)4。
3.1操作流程图 (7)4.3。
2维护商品行情 (7)4。
3。
3维护配件行情 (7)4.4协议采购 (8)4.4。
1操作流程图 (8)4.4。
2 确认供货通知单 (8)第一部分系统注册1.1供应商注册流程访问地址:http:// 注意:1。
注册的用户登陆名不能重复,否则保存注册信息后会提示失败。
2。
注册时请登记正确的电子邮箱地址,以便正常接收激活码信息。
1.2注册并填写基本信息第一步:注册用户需承诺遵守相关采购网运行条款第二步:机构信息和机构管理员资料信息录入第三步:提交注册信息选择"供应商”角色,并选择"同意”方框中的协议条款,填写详细信息输入验证码,提交注册信息。
第四步:注册成功1.3获取系统激活码注册成功后,请等待”芜湖市政府采购网”管理员审核您的机构资料信息,暂时还不能登陆系统,待审核通过后,方可登陆图1—2—1 系统登陆提示一审核通过的注册信息,系统会发送一封激活码的邮件到您注册时填写的邮件,请到邮件中获取激活码。
目录第一章登录供应商平台系统1.1登录供应商平台系统 (2)第二章库存管理2.1基础资料 (3)2.1.1品种架构 (3)2.2补货作业 (4)2.2.1未读订单 (4)2.2.2已读订单 (5)2.2.3采购订单查询 (5)第三章结算管理3.1结算处理 (6)3.1.1历史结算单查询 (6)3.1.2验收单查询 (7)3.1.3往来查询 (7)第四章报表分析4.1进销存主体分析 (8)4.1.1进销存分析 (8)第一章登录供应商平台系统1.1登录供应商平台系统打开IE浏览器,在地址栏输入供应商平台IE地址(http://218.25.14.34:8080/SRPWeb/),打开网络平台后点击“ I 逬入簸1 ”按钮;系统将弹出登录窗口,请在登录窗口输入工号、密码,初始密码为:供应商编码然后点击“登录I”按钮,稍后将会进入供应商平台系统。
首次登录的供应商请在此页面右上角点击“安装”按钮,在相关软件下载中点击第一项“打印组件下载”并安装。
图1-12.1基础资料2.1.1品种架构模块位置: 库存管理f 基础资料f 品种架构模块功能:查询供应商所经营的商品信息。
操作步骤: 进入模块后选择“分组方式”,然后点击“查询”按钮。
分组方式:分为二种:明细、品牌、商品类型。
♦需要查询某一单品的信息时,查询类型选择:商品条码、商品名称,在后 面的空格输入相应的商品条码或商品名称点击查询即可。
2.2 补货作业第二章库存管理图2-12.2.1 未读订单 模块位置:库存管理一补货作业一未读订单模块功能:查询超市向供应商的最新要货订单信息并进行打印。
操作步骤:进入模块后选择订单日期段,然后点击“查询”按钮即可。
如需打印 订单,请先在单据号前面打勾,然后点击“打印”按钮。
篩寵 0軽删館.J 議綸胖3北誌科帛耳餓盂沖&辭F "MIL2C13-1H : 3 飜晡 20U-11-27擠单辭 餚专 孵訟K 鹏噺1 •晌榊「戏訊「脸卩銅龍師|氓捱g ■|2lli]112L.ta2KLIL WD 砂 20J1125.,. II (W 皿血 418&I-三拥負图2-2安徽淮商连锁超市商品采购订单图2-3♦在单据号上双击可以预览查看订单商品明细,如需打印订单,点击打印按 钮打印出订单,根据订单备货送货。
供应商平台操作手册文档信息项目名称:王品集团供应商平台项目系统名称:SUPPLIER PLATFORM文档版本:V1.0更新日期:2017-10-10目录一、供应商平台新增功能介绍 (4)二、新的供应商注册信息及审核查询 (4)(一)注册界面 (4)1.选择“供应商申请-登录” (4)2.注册界面 (4)3.登录界面 (7)三、已有供应商编号的厂商 (8)(一)平台登录 (8)(二)欢迎界面 (9)(三)订单中心管理 (11)1.采购单查询 (11)2.收货单查询 (14)(四)退货中心管理 (17)(五)财务对账 (17)1.采购/退货对账 (17)2.结算单查询 (21)3.预付款查询 (22)(六)系统管理 (22)1.公司管理 (22)2.用户管理 (23)3.收件人邮箱 (26)4.角色管理 (27)(七)厂家信息 (30)1.品项资质修改 (30)一、供应商平台新增功能介绍为了与供应商更快捷有效的沟通,供应商平台新增加2个模块内容:1.厂家信息2.发货资料上传二、新的供应商注册信息及审核查询(一)注册界面1.选择“供应商申请-登录”(此功能适用于还未与王品有过合作的供应商,待注册信息及资质审核通过后将成为王品的合作厂商,之后再用“平台登录”即可。
)2.注册界面点击“注册”之后,进入“供应商信息”画面,输入相关基础信息,尽量填全,填完后“保存”,王品采购员会走内部流程进行审核。
保存完后,选择“供应品项资质”选项框,这里会根据选择的品项类型需要上传不同的资质材料和信息,以做追溯查询使用。
每一种类别增加完后,必须“保存”。
(注:品项编号留空,王品采购人员会补充完整)3.登录界面1.在审核通过之前,供应商可根据注册的邮箱账号和密码进行登录查看审批状态。
2.若已通过审批,则审批状态会变更,供应商编号会返回,后续可根据供应商编号登录“平台登录”进行所有操作。
三、已有供应商编号的厂商(一)平台登录(二)欢迎界面登录之后,首先会进入到《王品集团诚实政策》确认界面:页面下方会有两个选项:我同意;勾选此选项,点击『确认』按钮,进入系统首页; 我不同意:勾选此选项,点击『确认』按钮,退出系统。
【供应商管理】某公司供应商用户操作手册(doc 42页)部门: xxx时间: xxx整理范文,仅供参考,可下载自行编辑版本说明:编写本快速操作指南的目的,是让供应商快速的学会使用中国神华煤制油有限公司煤制油厂物资采购供应管理信息系统参与报价、投标。
本快速操作手册中凡是用红色突出的内容表示重点的操作提示。
在您准备操作系统前请至少先认真阅读一遍本操作指南。
小窍门:打印后对照阅读更方便,查阅目录阅读更方便。
中国神华煤制油有限公司煤制油厂物资采购供应管理信息系统供应商用户操作手册(快速操作指南版)中国神华煤制油有限公司煤制油厂北京三维天地科技有限公司2007年11月目录1 软件说明 (5)1.1功能 (5)1.2性能 (5)2 系统使用 (5)2.1首页 (5)2.1.1 招标公告 (6)2.1.2 物资供需信息 (8)2.1.3 供应商新产品 (10)2.1.4 管理信息 (11)2.1.5 关于我们(请查阅《供应商用户操作手册完整版》) (12)2.1.6 供应商名录 (12)2.1.7 友情链接(请查阅《供应商用户操作手册完整版》) (13)2.1.8 新会员注册 (13)2.1.9 供应商登录 (14)2.2报价管理 (15)2.2.1 招标询价书报价 (15)2.2.2 查询未提交的报价书 (17)2.2.3 提交报价书 (18)2.2.4 回退报价书 (19)2.2.5 查询已提交的报价书 (20)2.3中标通知 (21)2.3.1 中标通知书接收 (21)2.3.2 查询中标通知书 (22)2.4合同管理 (23)2.4.1 合同接收 (23)2.4.2 采购单接收 (24)2.4.3 协议采购单接收 (25)2.4.4 采购协议接收 (26)2.4.5 合同查询 (27)2.4.6 采购单查询 (28)2.4.7 协议采购单查询 (29)2.4.8 采购协议查询 (30)2.5到货验收管理(请查阅《供应商用户操作手册完整版》) (31)2.6供应商自助服务 (31)2.6.1 供应商新产品发布 (31)2.8.2 供应商新产品查询 (32)2.9消息管理 (33)2.9.1 发件箱 (33)2.9.2 收件箱 (35)2.10综合查询 (37)2.10.1 招标询价方案查询 (37)2.10.2 招标询价书查询 (38)2.10.3 投标报价书查询 (39)2.10.4 供应商档案查询 (40)2.10.5 供应商产品查询 (41)2.10.6 供应商超市库存查询(请查阅《供应商用户操作手册完整版》) (42)3、出错处理和恢复 (42)1 软件说明1.1 功能“中国神华煤制油有限公司煤制油厂物资采购供应管理信息系统”供应商业务功能有:报价管理、中标通知、合同管理、送货通知管理、到货验收管理、供应商新产品管理、供应商产品管理、邮箱管理、供应商准入管理、综合查询等功能。
供应商关系管理系统(SRM)用户操作手册目录一、系统简介 (3)二、版本声明 (3)三、最终用户许可协议 (3)四、登录门户系统 (3)1、运行环境 (3)2、登录系统说明 (4)3、常见栏位说明 (4)五、供应商门户模块功能介绍及操作指导 (4)1、供应商信息 (5)2、计划管理 (7)2.1采购预测回复 (7)2.2采购预测查看 (8)3、订单回复 (8)3.1订单回复 (8)3.2代管料库存 (11)3.3PO交货情况 (11)4、结算管理 (12)4.1结算单管理 (12)4.2发票列表 (14)4.3对账单列表 (00)4.4付款通知 (00)5、修改信息申请 (17)6、修改密码 (18)六、操作书可能变更的情况 (18)一、系统简介感谢使用深圳创维数字技术有限公司(下称创维数字)供应商关系管理系统(简称SRM系统),该系统是创维数字推出的用于供应商与创维数字的业务往来办公软件。
SRM系统将会导引您完成例如采购预测回复及查看、PO确认及下载、交货及库存跟踪、结算查询对帐,发票上传及签收跟踪、供方信息注册及变更等工作,让您随时随地都可以通过SRM系统与创维进行业务往来,节省您的沟通成本。
二、版本声明SRM系统版权属于创维数字。
本系统为专业应用软件,允许创维数字的特许供应商在线使用。
本系统使用解释权归创维数字。
本程序受版权法和国际版权公约保护,用户未经授权不得擅自盗连或借予他人使用,违者责任自负,并将被追究相应法律责任。
三、最终用户许可协议许可:本系统版权属于创维数字。
本系统为专业应用软件,允许创维数字的特许供应商在线使用。
本系统使用解释权归创维数字。
警告:本程序受版权法和国际版权公约保护,用户未经授权不得擅自盗连或借予他人使用,违者责任自负,并将被追究相应法律责任。
许可终止:您若违返本协议的任一条款与条件,创维公司可能随时会终止许可。
终止许可之时,您必须立即销毁本系统及文档的所有拷贝,或归还给创维数字。