WDZ-5200系列装置说明书
- 格式:doc
- 大小:5.25 MB
- 文档页数:38

第十二章 6KV厂用系统WDZ-5200系列综保装置检修规程1 设备简介WDZ-5200系列微机厂用电综合保护测控装置是集保护、测量、计量、控制、通讯于一体的高性能微机综合保护测控装置。
采用逻辑组态技术,可编程输入输出技术,更完善的保护逻辑算法,功能、性能和技术指标处于国内领先水平。
WDZ-5200系列包含以下型号:•WDZ-5211线路保护测控装置•WDZ-5215短线路保护测控装置•WDZ-5226电抗器保护测控装置•WDZ-5231电动机差动保护装置•WDZ-5232电动机保护测控装置•WDZ-5233电动机保护测控装置•WDZ-5241变压器差动保护装置•WDZ-5242变压器保护测控装置•WDZ-5243变压器保护测控装置•WDZ-5271电压互感器保护测控装置•WDZ-5283线路测控装置•WDZ-5287多直流测控装置•WDZ-5288多电流测控装置2 设备规范2.1直流电源:220V±20% 或 110V±20%3V,100V交流电压:100/交流电流:5A或1A频率:50Hz2.2 功率消耗直流回路:正常≤15W跳闸≤20W交流电压回路:<0.5VA/相(额定57.74V时)交流电流回路:<0.5VA/相(额定5A时)2.3工作环境:环境温度:-10℃~+55℃保证正常工作相对湿度: 5~95%2.4 大气压力:86~106KPa2.5 精确工作范围电流:0.05In~20In电压:0.4V~120V频率:45Hz~55Hzdf/dt:0.03Hz/s~10Hz/s2.6热稳定性2倍额定电流可连续运行10倍额定电流可连续运行10秒40倍额定电流可连续运行1秒2.7定值误差电流及电压定值误差:<±5%整定值频率定值误差:<0.02Hz时间定值误差:无延时段:<30ms±10ms定时限延时段:<±1%整定时间+30ms反时限延时段:符合反时限曲线2.8 DCS测量接口输出电流满量程Ibm:5A/1A3*100*Ibm功率满量程Pbm:输出范围:4~20mA输出精度:0.5级2.9接点容量跳圈、合圈出口: 0.5~5A自适应(带操作板)跳、合闸出口(常开接点):5A,DC 220V(吸合)信号出口(常开接点):1A,DC 220V(吸合)开关量输入:空接点输入,导通电流<10mA2.10 测量精度电压,电流: 0.5级频率: 0.02HzP,Q,COSΦ: 1级遥信分辨率:<2ms电能计量精度:0.5级GPS对时精度:<1ms2.11 通讯RS485:通讯速率 9.6~115.2 kbps可调,支持双网,通讯介质支持屏蔽双绞线以太网:10M工业以太网,RJ45插座,通讯介质为五类非屏蔽双绞线2.12 抗干扰性能能承受GB/T14598.14-1998(idt IEC255-22-2)标准规定的严酷等级Ⅲ的静电放电试验。

WDZ-5200B系列保护测控装置说明书金智科技股份有限公司前言非常感谢您选用江苏金智科技股份有限公司(简称金智科技,股票代码002090)生产的WDZ-5200B系列保护测控装置。
本手册是该系列保护测控装置说明书,期望它能为您的工作带来帮助。
本说明书仅供设计选型参考,与实际产品可能存在细微差别,因此不建议作为工程设计依据。
建议工程设计时向我公司设计人员索取相关设计图纸。
如需相关产品、服务和支持的更多信息,请访问金智科技网站/。
本公司有权对本说明书的内容进行定期变更,恕不另行通知。
变更内容将会补充到新版本的说明书中。
如您需要更新版本,敬请与我公司联系。
_____________________________________________________________版权所有,请勿翻印、复印说明书版本号:V1.12目录第一章WDZ-5200B系列保护测控装置综述第二章WDZ-5211B线路保护测控装置第三章WDZ-5215B短线路综合保护测控装置第四章WDZ-5231B电动机差动保护装置第五章WDZ-5232 B电动机保护测控装置第六章WDZ-5241B变压器差动保护装置第七章WDZ-5242B变压器保护测控装置第八章WDZ-5271B电压互感器保护测控装置第九章WDZ-5281B单线路测控装置第十章WDZ-5284B双母线测控装置第十一章WDZ-5285B单线路测控装置第十二章WDZ-5286B双线路测控装置第十三章WDZ-5287B多直流测控装置第十四章WDZ-5288B多电流测控装置WDZ-5200B系列保护测控装置综述1装置概述WDZ-5200B系列保护测控装置是在基于WDZ-5200系列装置基础上,进行部分修改,用于维护WDZ-400系列装置,安装尺寸和开孔尺寸和WDZ-400装置一致,通讯方式和点表和WDZ-400一致,但需要进行接线重新设计,从而实现现场装置的替换。
WDZ-5200B系列装置型号和WDZ-400系列装置对照表如下:WDZ-5200B系列装置 WDZ-400系列装置WDZ-5211B线路保护测控装置 WDZ-410线路综合保护测控装置WDZ-5215B短线路综合保护测控装置 WDZ-415短线路差动保护装置WDZ-5231B电动机差动保护装置 WDZ-431电动机差动保护装置WDZ-5232B电动机保护测控装置 WDZ-430电动机综合保护测控装置WDZ-5241B变压器差动保护装置 WDZ-441低压变压器差动保护装置WDZ-5242B变压器保护测控装置 WDZ-440低压变压器综合保护测控装置WDZ-5271B电压互感器保护测控装置 WDZ-491电压互感器综合保护测控装置WDZ-5281B单线路测控装置 WDZ-481单线路测控装置WDZ-5284B双母线测控装置 WDZ-488双母线测控装置WDZ-5285B单线路测控装置 WDZ-485单线路测控装置WDZ-5286B双线路测控装置 WDZ-486双线路测控装置WDZ-5287B多直流测控装置 WDZ-489多直流测控装置WDZ-5288B多电流测控装置 WDZ-487多电流测控装置2基本技术参数2.1额定参数直流电源:220V或110V±20%交流电源:220V±20%交流电流:5A或1A交流电压:100/3V或100V额定频率:50Hz2.2功率消耗直流电源回路:正常≤15W,跳闸≤25W交流电流回路:<0.5V A/相(额定5A时);<0.25V A/相(额定1A时)交流电压回路:<0.5V A/相(额定57.74V时)2.3过载能力2倍额定电流可连续运行10倍额定电流可连续运行10s40倍额定电流可连续运行1s1.5倍额定电压可连续运行2倍额定电压可连续运行10s2.4输出接点跳圈、合圈出口: 0.3~4A自适应(带操作板)跳、合闸出口(常开接点):5A ,DC220V(吸合)信号出口(常开接点):5A ,DC220V(吸合)开关量输入:直流220V或110V,导通电流<10mA2.5精确工作范围电流:0.05In~20In零序电流:10mA~6A电压:0.4V~120V频率:40Hz~65Hz2.6动作时间差动速断:≤20ms,施加二倍整定值比率差动:≤30ms,施加二倍整定值过流速断:≤35ms,施加二倍整定值2.7定值误差电流及电压定值误差:≤±2.5%整定值零序电流误差:≤±2.5%整定值或±1mA定时限定值误差:≤±1%整定时间+35ms反时限定值误差:≤±2.5%理论时间+50ms2.84~20mA测量接口输出范围:4mA~20mA输出精度:±0.5%外接电阻:小于500欧姆2.9测量元件的准确度电流、电压:±0.2%有功功率、无功功率、功率因数:±0.5%硬件电能:±0.5%频率:±0.01Hz直流量(4~20mA、0~5V):±0.2%2.10事件记录SOE分辨率:≤2msGPS对时精度:≤1ms2.11通信接口和规约RS485:通讯速率 9.6~115.2 Kbps可调,支持双网,通讯介质支持屏蔽电缆CAN:通信速率10K~1Mbps,支持双网,通信介质为屏蔽电缆2.12电磁兼容能承受GB/T 14598.14中规定的严酷等级为IV级的静电放电试验能承受GB/T 14598.10中规定的IV级的快速瞬变干扰试验能承受GB/T 14598.13中规定的III级的脉冲群干扰试验能承受GB/T 14598.9中规定的严酷等级为III级的辐射电磁场干扰试验能承受GB/T 17626.5中规定的严酷等级为IV级的浪涌(冲击)抗扰度试验装置应能承受GB/T 14598.17中规定的严酷等级为III级的射频场感应的传导骚扰抗扰度试验装置应能承受GB/T 14598.19中规定的严酷等级为A级的工频抗扰度试验装置应能承受GB/T 14598.16-2005中规定的A类设备辐射骚扰限值,测量距离3m 装置应能承受GB/T 14598.16-2005中规定的电源端口传导骚扰准峰值及平均值不超过相应限值2.13环境条件环境温度:-10℃~+55℃相对湿度:5%~95%大气压力:80kPa~110kPa极限温度:-25℃~70℃2.14绝缘性能绝缘电阻:≥100 M介电强度:能承受频率为50Hz,历时1min的工频耐压试验冲击电压:直流电源输入回路、交流输入回路、输出触点回路对地,以及回路之间,能承受冲击电压波形为标准雷电波,幅值为5kV、1kV的试验电压2.15机械性能能承受GB/T 7261-2000中规定的严酷等级为1级的振动耐久能力试验和1级的振动响应能力试验能承受GB/T 14537中规定的严酷等级为1级的冲击耐久能力试验和1级的冲击响应能力试验能承受GB/T 14537中规定的严酷等级为1级的碰撞试验2.16故障录波记录故障前5个周波,故障后200个周波,最多可存储16组录波数据。
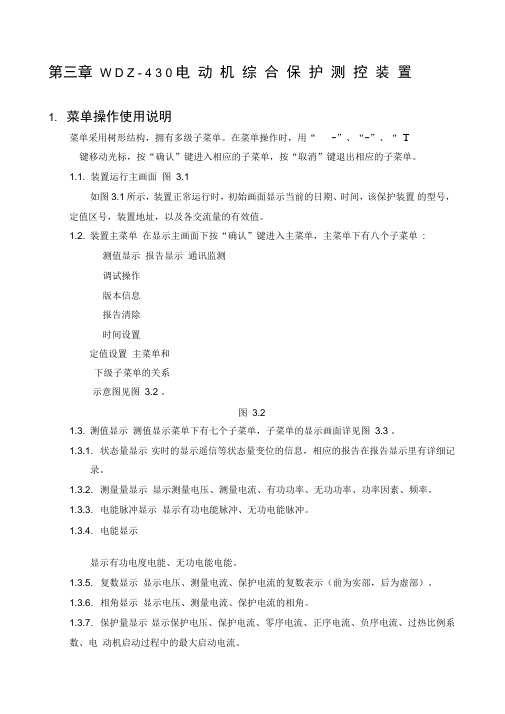
第三章W D Z - 4 3 0 电动机综合保护测控装置1. 菜单操作使用说明菜单采用树形结构,拥有多级子菜单。
在菜单操作时,用“-”、“-”、“ T 键移动光标,按“确认”键进入相应的子菜单,按“取消”键退出相应的子菜单。
1.1. 装置运行主画面图3.1如图3.1 所示,装置正常运行时,初始画面显示当前的日期、时间,该保护装置的型号,定值区号,装置地址,以及各交流量的有效值。
1.2. 装置主菜单在显示主画面下按“确认”键进入主菜单,主菜单下有八个子菜单:测值显示报告显示通讯监测调试操作版本信息报告清除时间设置定值设置主菜单和下级子菜单的关系示意图见图3.2 。
图 3.21.3. 测值显示测值显示菜单下有七个子菜单,子菜单的显示画面详见图3.3 。
1.3.1. 状态量显示实时的显示遥信等状态量变位的信息,相应的报告在报告显示里有详细记录。
1.3.2. 测量量显示显示测量电压、测量电流、有功功率、无功功率、功率因素、频率。
1.3.3. 电能脉冲显示显示有功电能脉冲、无功电能脉冲。
1.3.4. 电能显示显示有功电度电能、无功电能电能。
1.3.5. 复数显示显示电压、测量电流、保护电流的复数表示(前为实部,后为虚部)。
1.3.6. 相角显示显示电压、测量电流、保护电流的相角。
1.3.7. 保护量显示显示保护电压、保护电流、零序电流、正序电流、负序电流、过热比例系数、电动机启动过程中的最大启动电流。
图 3.31.4. 报告显示报告显示菜单下有七个子菜单,子菜单的显示画面详见图3.4 。
图 3.41.4.1. 动作报告显示动作报告显示画面就是故障时的显示主画面,见图3.5 。
图 3.5如图 3.5 所示,装置故障的时候,动作报告画面显示动作的时间、保护事件、故障相、故障量等信息。
图 3.5 是跳闸报告,预警报告类似。
1.4.2. 自检报告显示1.4.3. 遥信变位报告显示1.4.4. 远方命令显示1.4.5. 统计报告显示见图 3.6 。


WDZ-5271电压互感器保护测控装置1 装置功能WDZ-5271电压互感器保护测控装置主要用于发电厂10KV 、6KV 或380V 系统中PT 柜电压互感器的监测和电压保护,可以适用于Y/Y/开口三角、Y/Y/Y 类型电压互感器的保护和测控。
2 保护功能及原理2.1PT 断线告警三相电压中如果至少有一相电压正常,至少有一相电压低于低电压一段定值,则认为发生了PT 断线,瞬时闭锁低电压保护,并延时10秒后报警。
为防止PT 二次侧三相熔丝同时熔断时低电压保护误动作,本装置从熔丝前端引入U ca ’代替熔丝后的U ca ,进行相关保护逻辑的判断。
2.1.1保护动作逻辑框图U ab >U d1U bc >U d1U ca '>U U ab <U d1U bc <U d1U ca '<U2.1.2保护动作判据⎩⎨⎧<>1min1max d d U U U U 式中,U max :AB 、BC 、CA ’线电压(U ab 、U bc 、U ca ’)最大值(V )U min :AB 、BC 、CA ’线电压(U ab 、U bc 、U ca ’)最小值(V ) U d1:低电压一段保护动作电压动作值(V )2.2低电压一段保护装置提供三段低电压保护,并有独立的出口,可以用来作为该条母线上所有电动机的低电压保护的集中管理,充分利用PT 柜可以准确的判断出PT 断线的特点,可以实现电动机可靠的“集中式低电压保护”。
低电压保护为防止PT 断线时误动作,均需要PT 断线瞬时闭锁低电压。
由于低电压保护采用熔丝前端U ca ’代替熔丝后的U ca ,低电压动作的判据为三相电压同时低于整定值,因此发生PT 断线时低电压保护不可能动作,低电压保护动作时不可能满足PT 断线条件。
即此判据包含了PT 断线闭锁低电压的要求。
低电压保护受小车位置开入闭锁。
当PT 柜正常工作时,小车位置正常或二次插头正常插入,小车位置开入闭合,即为常闭接点接入。

WDZ-5200系列保护测控装置使用说明1装置面板布置2装置按键说明“复归”按键用于复归信号;“+”“—”按键用于对装置参数设置过程中的数值进行修改;“上”、“下”、“左”、“右”四个方向键用于选择菜单及光标位置;“确认”键用于进入菜单和保存修改内容;“取消”键用于返回上级菜单、取消操作等。
,3指示灯说明装置前面板最多可以有六个指示灯,对于不同型号的装置,其指示灯个数和定义各不相同,如下表所示:运行灯:装置正常运行时,该灯常亮;装置故障时,灯熄灭;报警灯:装置保护告警时点亮,复归后熄灭;跳闸灯:装置保护跳闸时点亮,复归后熄灭;调试灯:装置在调试态时点亮,装置退出调试态熄灭;分位灯:开关位置在分位时点亮,不在跳位时熄灭;合位灯:开关位置在合位时点亮,不在合位时熄灭;远方灯:装置在远方位置时点亮,不在远方位置时熄灭;合闸:备自投合分段开关时点亮,复归后熄灭;4跳线说明4.1Ma6-4010操作板JP1: 短接1、2,out1继电器,外部为25、26号端子,经启动继电器;短接2、3,不经启动继电器(板上已有图示),默认短接2、3。
JP2: 短接1、2,out2继电器,外部为27、28号端子,经启动继电器;短接2、3,不经启动继电器(板上已有图示),默认短接2、3。
JP3: 短接1、2,out3继电器,外部为29、30号端子,经启动继电器;短接2、3,不经启动继电器(板上已有图示),默认短接2、3。
JP4: 短接1、2,out4继电器,外部为31、32号端子,经启动继电器;短接2、3,不经启动继电器(板上已有图示),默认短接2、3。
JP5、JP6、JP8、JP9:用于配置外部为21、22号端子的联跳出口1和外部为23、24号端子的联跳出口2的联跳方式(板上已有图示)。
当JP5的1、2短接,JP8的i、ii短接,JP6的A、B短接,JP9的a、b短接,JP5的3和JP8的iii短接,JP6的C和JP9的c短接,则两个外部联跳出口为保护联跳;当JP5的2、3短接,JP8的ii、iii短接,JP6的B、C短接,JP9的b、c短接,JP8的iii和JP6的C短接,则两个外部联跳出口为位置联跳。
WDZ-5231电动机差动保护装置1装置功能WDZ-5231电动机差动保护装置主要用于10KV及以下2000KW及以上三相异步电动机的差动保护,与配套的WDZ-5232电动机保护测控装置共同构成大型电动机的全套保护。
WDZ-5200系列电动机保护装置还包括WDZ-5232电动机保护测控装置、WDZ-5233电动机综合保护测控装置,三者在保护、测控功能的区别见下表所示。
2保护功能及原理2.1电动机状态电动机按照运行状态,有停机态、起动态、运行态之分。
如果I max<0.125I e,电动机处于停机态;电动机原本处于停机态,检测到I max>0.125 I e:如果I max>1.125 I e,认为电动机进入起动态;如果I max ≤1.125 I e ,则认为电动机起动结束,直接进入运行态。
如果电动机处于起动态,检测I max ,如果0.125 I e <I max ≤1.125I e ,则电动机进入运行态;I max <0.125 I e ,则电动机进入停机态。
其中I max 为电动机机端电流最大值。
2.2差动起动元件装置差动速断和比率差动采用突变量起动元件和过流起动元件,当差动电流发生突变或者差动电流的最大值大于相应的过流定值时,起动元件动作并展宽10s ,开放起动继电器。
2.3差动电流制动电流计算公式按照同名端同在一侧的原则,进行差动电流的计算,即为两侧电流的矢量和;制动电流按照两侧电流绝对值和的一半计算。
差动电流:l h I I DI ∙∙+=制动电流:2/)(l h I I HI ∙∙+=2.4 差动速断保护 2.4.1保护动作逻辑框图I da >I cdsdI dc >I cdsdI db >I cdsd 2.4.2保护动作判据cdsd I DI >max式中,I cdsd :差动速断保护动作电流整定值(A ) 2.5比率差动保护装置采用三折线比率差动原理,其动作曲线如下图所示,第3折线斜率固定为1。
WDZ-5241变压器差动保护装置1装置功能WDZ-5241变压器差动保护装置主要用于10KV及以下容量为6300KV A以上或2000KV A以上电流速断保护灵敏性不满足要求的大容量低压变压器的差动保护,与配套的WDZ-5242变压器保护测控装置共同构成大型变压器的全套保护。
WDZ-5200系列变压器保护装置还包括WDZ-5242变压器保护测控装置、WDZ-5243变压器综合保护测控装置、WDZ-5244三卷变差动保护装置,其在保护、测控功能的区别见下表所示。
WDZ-5241 WDZ-5242 WDZ-5243 WDZ-5244 差动速断保护√√√比率差动保护√√√CT断线告警√√√√差流越限告警√√√过流一段保护√√过流二段保护√√负序一段保护√√负序二段保护√√过负荷保护√√接地保护一段√√接地保护二段√√低侧零序一段保护√√低侧零序二段保护√√FC过流闭锁√√熔断器保护√√开关量保护一√√开关量保护二√√开关量保护三√√测量功能√√控制功能√√硬件电能计量功能√√操作回路功能√√2保护功能及原理2.1差动起动元件装置差动速断和比率差动采用突变量起动元件和过流起动元件,当差动电流发生突变或者差动电流的最大值大于相应的过流定值时,起动元件动作并展宽10s,开放起动继电器。
2.2 差动电流制动电流计算公式按照同名端同在变压器侧或母线侧的原则,进行差动电流的计算,即为两侧电流的矢量和;制动电流按照两侧电流绝对值和的一半计算。
装置支持钟点数接线为YN,y/YN,d11/d,YN11/d,YN1,通过折算到高压侧的副边变比系数K phl 自动进行星三角转换,不需要通过外部转换。
额定二次值低侧额定一次值高侧高侧额定电压额定二次值高侧额定一次值低侧低侧额定电压CT CT CT CT ××××=phl K变压器钟点数为YN ,y :⎪⎪⎩⎪⎪⎨⎧×⎟⎠⎞⎜⎝⎛−+⎟⎠⎞⎜⎝⎛−=⎟⎟⎠⎞⎜⎜⎝⎛×⎟⎠⎞⎜⎝⎛−+⎟⎠⎞⎜⎝⎛−=••••••••phl cl al ch ah a phl cl al ch ah a KI I I I DI K I I I I HI 33233 ⎪⎪⎩⎪⎪⎨⎧×⎟⎠⎞⎜⎝⎛−+⎟⎠⎞⎜⎝⎛−=⎟⎟⎠⎞⎜⎜⎝⎛×⎟⎠⎞⎜⎝⎛−+⎟⎠⎞⎜⎝⎛−=••••••••phl al bl ah bh b phl al bl ah bh b KI I I I DI K I I I I HI 33233 ⎪⎪⎩⎪⎪⎨⎧×⎟⎠⎞⎜⎝⎛−+⎟⎠⎞⎜⎝⎛−=⎟⎟⎠⎞⎜⎜⎝⎛×⎟⎠⎞⎜⎝⎛−+⎟⎠⎞⎜⎝⎛−=••••••••phl bl cl bh ch c phl bl cl bh ch c KI I I I DI K I I I I HI 33233 式中: DI a 、DI b 、DI c :变压器A 、B 、C 差动电流HI a 、HI b 、HI c :变压器A 、B 、C 制动电流 I ah 、I bh 、I ch :变压器高压侧A 、B 、C 电流 I al 、I bl 、I cl :变压器低压侧A 、B 、C 电流变压器钟点数为YN ,d11:⎪⎪⎩⎪⎪⎨⎧×+⎟⎠⎞⎜⎝⎛−=⎥⎦⎤⎢⎣⎡×+⎟⎠⎞⎜⎝⎛−=••••••phl al bh ah a phl al bh ah a KI I I DI K I I I HI 323⎪⎪⎩⎪⎪⎨⎧×+⎟⎠⎞⎜⎝⎛−=⎥⎦⎤⎢⎣⎡×+⎟⎠⎞⎜⎝⎛−=••••••phl bl ch bh b phl bl ch bh b KI I I DI K I I I HI 323⎪⎪⎩⎪⎪⎨⎧×+⎟⎠⎞⎜⎝⎛−=⎥⎦⎤⎢⎣⎡×+⎟⎠⎞⎜⎝⎛−=•••••••phlcl ah ch c phl cl ah ch K I I I DI K I I I HIc 323变压器钟点数为d ,YN11:⎪⎪⎩⎪⎪⎨⎧×⎥⎦⎤⎢⎣⎡⎟⎠⎞⎜⎝⎛−+=⎥⎦⎤⎢⎣⎡×⎟⎠⎞⎜⎝⎛−+=••••••phl cl al ah aphl cl al ah a KI I I DI K I I I HI 323 ⎪⎪⎩⎪⎪⎨⎧×⎥⎦⎤⎢⎣⎡⎟⎠⎞⎜⎝⎛−+=⎥⎦⎤⎢⎣⎡×⎟⎠⎞⎜⎝⎛−+=••••••phl al bl bh bphl al bl bh b KI I I DI K I I I HI 323 ⎪⎪⎩⎪⎪⎨⎧×⎥⎦⎤⎢⎣⎡⎟⎠⎞⎜⎝⎛−+=⎥⎦⎤⎢⎣⎡×⎟⎠⎞⎜⎝⎛−+=••••••phl bl cl ch cphl bl cl ch c KI I I DI K I I I HI 323 变压器钟点数为d ,YN1:⎪⎪⎩⎪⎪⎨⎧×⎥⎦⎤⎢⎣⎡⎟⎠⎞⎜⎝⎛−+=⎥⎦⎤⎢⎣⎡×⎟⎠⎞⎜⎝⎛−+=••••••phl bl al ah aphl bl al ah a K I I I DI K I I I HI 323⎪⎪⎩⎪⎪⎨⎧×⎥⎦⎤⎢⎣⎡⎟⎠⎞⎜⎝⎛−+=⎥⎦⎤⎢⎣⎡×⎟⎠⎞⎜⎝⎛−+=••••••phl cl bl bh bphl cl bl bh b K I I I DI K I I I HI 323⎪⎪⎩⎪⎪⎨⎧×⎥⎦⎤⎢⎣⎡⎟⎠⎞⎜⎝⎛−+=⎥⎦⎤⎢⎣⎡×⎟⎠⎞⎜⎝⎛−+=••••••phl al cl ch cphl al cl ch c K I I I DI K I I I HI 3232.3 差动速断保护 2.3.1保护动作逻辑框图2.3.2保护动作判据cdsd I DI >max式中,I cdsd :差动速断保护动作电流整定值(A ) 2.4比率差动保护装置采用三折线比率差动原理,其动作曲线如下图所示,第3折线斜率固定为1。
WDZ-5200系列保护测控装置综述1装置概述WDZ-5200系列保护测控装置是金智公司在吸收WDZ-400EX已有成熟技术基础上、利用新一代平台技术开发出的全新一代厂用电综合保护测控装置。
集保护、测量、计量、控制、通讯于一体,组态化功能设计,其功能、性能和技术指标处于国内领先水平。
WDZ-5200系列保护测控装置包括以下型号:✧WDZ-5211线路保护测控装置✧WDZ-5215短线路综合保护测控装置✧WDZ-5216分布式线路差动保护装置✧WDZ-5221电容器保护测控装置✧WDZ-5222电容器保护测控装置✧WDZ-5226电抗器综合保护测控装置✧WDZ-5231电动机差动保护装置✧WDZ-5232电动机保护测控装置✧WDZ-5233电动机综合保护测控装置✧WDZ-5236分布式电动机差动保护装置✧WDZ-5241变压器差动保护装置✧WDZ-5242变压器保护测控装置✧WDZ-5243变压器综合保护测控装置✧WDZ-5244三卷变差动保护装置✧WDZ-5246分布式变压器差动保护装置✧WDZ-5271电压互感器保护测控装置✧WDZ-5272分布式单元✧WDZ-5276备用电源自投保护测控装置✧WDZ-5283线路测控装置✧WDZ-5287多直流测控装置✧WDZ-5288多电流测控装置2装置特点WDZ-5200系列保护测控装置在充分总结WDZ-400EX系列厂用电保护测控装置应用的基础上,借助新一代硬件、软件技术推出的全新一代产品。
2.1功能齐全WDZ-5200系列保护测控装置按照对象进行设计,集保护、测量、计量、控制、通讯于一体,同时支持发电厂电气自动化所需要的各种高级应用功能。
2.2先进的硬件装置采用最新型DSP硬件平台,高精度并行AD采样芯片,专用网络芯片,具备强大的数据处理、通讯能力。
装置所有模件包括电源模件、开入模件、开出模件、操作板模件、CPU模件、模拟量模件、通讯模件、电能板模件、非电量板模件等全部采用模块化设计思想,可靠性高,通用性强。
For other service manuals visit our website at:/service_manuals.aspDORNER MFG. CORP .INSIDE THE USA OUTSIDE THE USA P .O. Box 20 • 975 Cottonwood Ave.TEL: 1-800-397-8664TEL: 262-367-7600Hartland, WI 53029-0020 USA FAX: 1-800-369-2440FAX: 262-367-5827851-526 Rev. F3200, 5200 & 5300 Series Bottom Mount 90° Drive Package for Standard LoadGearmotorsInstallation, Maintenance & Parts ManualFeaturing:TechnologyDorner Mfg. Corp.2851-526 Rev. F3200, 5200 & 5300 Series Bottom Mount 90° Drive Package for Standard Load GearmotorsTable of ContentsIIntroduction........................................................................ 2Warnings - General Safety.................................................. 3Product Description............................................................. 4Specifications...................................................................... 5Gearmotor Mounting Package Models:........................... 5Table 1: Gearmotor Specifications.................................. 5U.S. Version................................................................. 5CE Version................................................................... 5Table 2: Belt Speeds for Fixed Speed 90° Gearmotors... 6U.S. Version (60 Hz Gearmotors)................................ 6CE Version (50 Hz Gearmotors).................................. 6Table 3: Belt Speeds for Variable Speed 90° DC Gearmo-tors ................................................................................... 7U.S. Version................................................................. 7CE Version................................................................... 7Table 4: Belt Speeds forFixed Speed 90° VFD Gearmotors (7)Installation............................................................................ 8Required Tools................................................................. 8Mounting.......................................................................... 8Preventive Maintenance and Adjustment.......................... 11Required Tools............................................................... 11Timing Belt Tensioning.................................................. 11Timing Belt Replacement............................................... 11Drive or Driven Pulley Replacement............................. 12Gear Reducer Replacement............................................ 12Motor Replacement........................................................ 14Service Parts....................................................................... 16Bottom Mount Drive Package for90° Industrial Gearmotors............................................. 1690° Industrial Gearmotors.............................................. 18U.S. Version................................................................ 18CE Version.................................................................. 19Return Policy. (20)IntroductionUpon receipt of shipment:•Compare shipment with packing slip. Contact factory regarding discrepancies.•Inspect packages for shipping damage. Contact carrier regarding damage.•Accessories may be shipped loose. See accessory instruc-tions for installation.Dorner 3200 Series conveyors are covered by patentnumbers 5156260, 5156261, 5203447, 5265714, 6871737, 6910571, 6971509, and patent applications in other countries.Dorner LPZ Series conveyors are covered by patent numbers 5156260, 5156261, 5203447, 5265714, 5875883 and patent applications in other countries.Dorner 5200 Series conveyors have patents pending.Dorner’s Limited Warranty applies.Dorner reserves the right to make changes at any time without notice or obligation.Dorner has convenient, pre −configured kits of Key Service Parts for all conveyor products. These time saving kits are easy to order, designed for fast installation, and guarantee you will have what you need when you need it. Key Parts and Kits are marked in the Service Parts section of this manual with the Performance Parts Kits logo.IMPORTANTSome illustrations may show guards removed. DO NOT operate equipment without guards.851-526 Rev. F3Dorner Mfg. Corp.3200, 5200 & 5300 Series Bottom Mount 90° Drive Package for Standard Load GearmotorsWarnings - General SafetyA WARNINGThe safety alert symbol, black triangle with white exclamation, is used to alert you to potential personal injury hazards.Climbing, sitting, walking or riding on conveyor will cause severe injury.KEEP OFF CONVEYORS.DO NOT OPERATE CONVEYORS IN AN EXPLOSIVE ENVIRONMENT.A WARNINGExposed moving parts can cause severe injury.LOCK OUT POWER before removing guards or performing maintenance.A WARNINGGearmotors may be HOT.DO NOT TOUCH Gearmotors.A WARNINGExposed moving parts can cause severe injury.REPLACE ALL GUARDS BEFORE RUNNING CONVEYOR.A WARNINGDorner cannot control the physicalinstallation and application of conveyors. Taking protective measures is the responsibility of the user.When conveyors are used in conjunction with other equipment or as part of a multiple conveyor system, CHECK FOR POTENTIAL PINCH POINTS and other mechanical hazards before system start-up.Dorner Mfg. Corp.4851-526 Rev. F3200, 5200 & 5300 Series Bottom Mount 90° Drive Package for Standard Load GearmotorsProduct DescriptionRefer to Figure 1 for typical components.Figure 1Mount Packages with Old Style Gearmotors prior toJune 2011Figure2Mount Packages with e-Drive GearmotorsFigure 31Conveyor 2Cover3Driven Pulley 4Timing Belt 5Drive Pulley 6Gearmotor7Timing Belt Tensioner 8Mounting Bracket12834567NOTEThe 90° industrial gearhead changed configuration in 2011. See below for configuration details.851-526 Rev. F5Dorner Mfg. Corp.3200, 5200 & 5300 Series Bottom Mount 90° Drive Package for Standard Load GearmotorsSpecificationsGearmotor Mounting Package Models:Example:Table 1: Gearmotor SpecificationsU.S. VersionCE VersionItem Standard Load GearmotorSingle- Phase Three Phase VFD Variable Speed DC Variable SpeedOutput Power 0.5 hp (0.37 kw)Input Voltage 115 VAC 208 – 230/460 VAC230 VAC 90VDC Input Frequency 60Hz 10 – 60Hz N/A Input Current (Amperes)7.4 2.1 – 2/1 1.6 5.0Gearmotor Ratios5:1, 10:1, 20:1Frame Size NEMA 56CMotor TypeT otally enclosed, Fan cooledItemStandard Load GearmotorSingle Phase Three PhaseVFD VariableSpeedOutput Power 0.37 kWInput Voltage 230 VAC 230/400 VAC 230 VACInput Frequency 50 Hz 25 to 63 HzInput Current 2.6Amperes 2.1/1.2 Amperes 2.1AmperesGearmotor Ratios 5:1, 10:1, 20:1Protection Rating IP55Frame SizeIEC 71 B5Dorner Mfg. Corp.6851-526 Rev. F3200, 5200 & 5300 Series Bottom Mount 90° Drive Package for Standard Load GearmotorsSpecificationsTable 2: Belt Speeds for Fixed Speed 90° GearmotorsU.S. Version (60 Hz Gearmotors)(vp) = voltage and phase 11 = 115 V , 1-phase23 = 208 – 230/460 V , 3-phaseCE Version (50 Hz Gearmotors)(vp) = voltage and phase 21 = 230 V , 1-phase 23 = 230 V , 3-phase 43 = 400 V , 3-phaseLight Load GearmotorsStandard Load Gearmotors Belt Speed Drive Pulley Driven Pulley Part Number RPM In-lb N-m Part Number RPM In-lb N-m Ft/min M/min 32M060EL4(vp)FN 2922625.532M060ES4(vp)FN 2922625.5237.0161632M040EL4(vp)FN 4323726.832M040ES4(vp)FN 4324727.93410.4161632M040EL4(vp)FN 4323726.832M040ES4(vp)FN 4324727.95215.8241632M020EL4(vp)FN 861421632M020ES4(vp)FN 8624827.96921.0161632M020EL4(vp)FN 861421632M020ES4(vp)FN 8624827.910331.4241632M010EL4(vp)FN 173788.832M010ES4(vp)FN 17315617.613741.8161632M010EL4(vp)FN 173788.832M010ES4(vp)FN 17315617.617252.4201632M010EL4(vp)FN173788.832M010ES4(vp)FN 17315617.620662.82416N/A N/A N/A N/A 32M005ES4(vp)FN 345819.127583.81616N/A N/A N/A N/A 32M005ES4(vp)FN 345819.1343104.52016N/AN/AN/AN/A32M005ES4(vp)FN345819.1412125.62416Light Load Gearmotors Standard Load Gearmotors Belt Speed M/minPart Number RPM N-m Part Number RPM N-m 62Z060ES4(vp)FN 2326.432Z060ES4(vp)FN 2326.8 5.862Z040ES4(vp)FN 3528.932Z040ES4(vp)FN 3529.48.562Z020ES4(vp)FN 7019.432Z020ES4(vp)FN 7029.917.162Z010ES4(vp)FN 14010.732Z010ES4(vp)FN 14021.533.862Z005ES4(vp)FN2805.632Z005ES4(vp)FN28011.268.0851-526 Rev. F7Dorner Mfg. Corp.3200, 5200 & 5300 Series Bottom Mount 90° Drive Package for Standard Load GearmotorsSpecificationsTable 3: Belt Speeds for Variable Speed 90° DC GearmotorsU.S. VersionCE VersionTable 4: Belt Speeds for Fixed Speed 90° VFD GearmotorsLight Load GearmotorsStandard Load Gearmotors Belt Speed Drive Pulley Driven Pulley Part Number RPM In-lb N-m Part Number RPM In-lb N-m Ft/min M/min 32M060ELD3DEN 4219822.432M060ESD9DEN 4219822.4 4.0 – 33 1.2 – 10161632M040ELD3DEN 6316318.432M040ESD9DEN 6321524.3 6.0 – 50 1.8 – 15161632M040ELD3DEN 6316318.432M040ESD9DEN 6321524.39.0 – 75 2.7 – 23241632M020ELD3DEN 1259811.132M020ESD9DEN 12519622.112 – 100 3.6 – 30161632M020ELD3DEN 1259811.132M020ESD9DEN 12519622.118 – 150 5.5 – 45241632M010ELD3DEN 25054 6.132M010ESD9DEN 25010812.224 – 2007.3 – 61161632M010ELD3DEN 25054 6.132M010ESD9DEN 25010812.230 – 2509.1 – 76201632M010ELD3DEN250546.132M010ESD9DEN25010812.236 – 30011 – 922416Light Load Gearmotors Standard Load Gearmotors Belt Speed M/min Part Number RPM N-m Part Number RPM N-m 62Z060HS423EN 2326.432Z060ES423EN 2326.8 2.8 - 7.162Z040HS423EN 3528.932Z040ES423EN 3529.4 4.2 - 1162Z020HS423EN 7019.432Z020ES423EN 7029.98.5 - 2162Z010HS423EN 14010.732Z010ES423EN 14021.517 - 4362Z005HS423EN2805.632Z005ES423EN28011.234 - 86Standard Load GearmotorsBelt SpeedDrive Pulley Driven Pulley Part Number RPM In-lb N-m Ft/min M/min 32M060ES423EN 2922625.5 2.3 – 22.90.7 – 7.0161632M040ES423EN 4324727.9 3.4 – 34.3 1.0 – 10.5161632M040ES423EN 4324727.9 5.1 – 51.5 1.6 – 15.7241632M020ES423EN 8624827.9 6.9 – 68.6 2.1 – 20.9161632M020ES423EN 8624827.910.3 – 103.0 3.1 – 31.4241632M010ES423EN 17315617.613.7 – 137.3 4.2 – 41.9161632M010ES423EN 17315617.617.2 – 171.6 5.2 – 52.3201632M010ES423EN 17315617.620.6 – 205.9 6.3 – 62.8241632M005ES423EN 345819.127.5 – 274.68.4 – 83.7161632M005ES423EN 345819.134.3 – 343.210.5 – 104.6201632M005ES423EN345819.141.2 – 411.912.6 – 125.62416NOTEFor belt speed other than those listed, contact factory for details.Dorner Mfg. Corp.8851-526 Rev. F3200, 5200 & 5300 Series Bottom Mount 90° Drive Package for Standard Load GearmotorsInstallationRequired Tools•Hex key wrenches:2 mm, 2.5 mm,3 mm, 5 mm •Straight edge •Torque wrenchMountingFigure 4Installation Component List:1.Typical components (Figure 5).Figure 5Figure 6A WARNINGExposed moving parts can cause severe injury.LOCK OUT POWER before removing guards or performing maintenance.A WARNINGFor Cleated Belt Conveyors, Gearmotors must be mounted as shown in Figure 4.Failure to do so creates pinch points which can cause severe injury.NOTEGearmotor position on Flat Belt conveyor shown below left, Figure 4. Gearmotor position on Cleated Belt conveyor shown below right, Figure 4.1Bottom Mount Assembly 2Drive Pulley 3Cover4M4 Socket Head Screws (4x)5Driven Pulley 6Output Shaft7Bearing Cover 8Spacer9Timing BeltNOTEGearmotor may be operated in positions 1, 3 or 4 (Figure 6).216587943851-526 Rev. F9Dorner Mfg. Corp.3200, 5200 & 5300 Series Bottom Mount 90° Drive Package for Standard Load GearmotorsInstallation2.If required, change gearmotor position by removing four (4) screws (Figure 7,item 1). Rotate gearmotor to other position and replace screws (Figure 7,item 1). Tighten to 110 in-lb (12 Nm).Figure 73.Locate drive output shaft (Figure 8,item 1). Remove two (2) M8 screws (Figure 8,item 2) and four (4) M6 screws (Figure 8,item 3) and discard.Figure 84.Attach mount assembly (Figure 9,item 1) with two (2) M8 screws (Figure 9,item 2) and four (4) M6 screws (Figure 9,item 3). Tighten M6 screws to 146 in −lbs (16.5 N −m) and M8 screws to 288 in −lbs (32.5 N −m).5.Install key(Figure 10,item 1).Figure 106.Wrap timing belt (Figure 10,item 2) around driven pulley (Figure 10,item 3) and drive pulley (Figure 10,item 4). Install driven pulley onto conveyor shaft.113321A WARNINGDrive shaft keyway may be sharp.HANDLE WITH CARE.2134231Dorner Mfg. Corp.10851-526 Rev. F3200, 5200 & 5300 Series Bottom Mount 90° Drive Package for Standard Load GearmotorsInstallation7.Using a straight edge (Figure 11,item 1), align driven pulley (Figure 11,item 1) with drive pulley (Figure 11,item 1).Figure 118.Tighten driven pulley taper-lock screws (Figure 12,item 1).Figure 129.Depending on conveyor belt travel (direction A or B), locate timing belt tensioner (Figure 13,item 1) as shown. Tension timing belt to obtain 1/8” (3 mm) deflection for 6 lb (3 Kg) of force at timing belt mid-point (Figure 13,item 2). Tighten tensioner screw to 110 in-lb (12 Nm).Figure 1310.Install cover (Figure 14,item 1) with four (4) screws(Figure 14,item 2). Tighten screws to 35 in-lb (4 Nm).Figure 14213121AB212851-526 Rev. F11Dorner Mfg. Corp.3200, 5200 & 5300 Series Bottom Mount 90° Drive Package for Standard Load GearmotorsPreventive Maintenance and AdjustmentRequired Tools•Hex key wrenches:2 mm, 2.5 mm,3 mm, 5 mm•Adjustable wrench (for hexagon head screws)•Straight edge •Torque wrenchTiming Belt Tensioning1.Remove four (4) screws (Figure 14,item 2) and remove cover (Figure 14,item 1).2.Loosen tensioner (Figure 15,item 1).Figure 153.Depending on conveyor belt travel (direction A or B), locate timing belt tensioner (Figure 13,item 1) as shown. Tension timing belt to obtain 1/8” (3 mm) deflection for 6 lb (3 Kg) of force at timing belt mid-point (Figure 13,item 2). Tighten tensioner screw to 110 in-lb (12 Nm).4.Install cover (Figure 14,item 1) with four (4) screws (Figure 14,item 2). Tighten screws to 35 in-lb (4 Nm).Timing Belt Replacement1.Remove four (4) screws(Figure 14,item 2) and remove cover (Figure 14,item 1).2.Loosen tensioner (Figure 15,item 1).3.Remove timing belt (Figure 16,item 1).Figure 164.Install new timing belt.5.Depending on conveyor belt travel (direction A or B), locate timing belt tensioner (Figure 13,item 1) as shown. Tension timing belt to obtain 1/8” (3 mm) deflection for 6 lb (3 Kg) of force at timing belt mid-point (Figure 13,item 2). Tighten tensioner screw to 110 in-lb (12 Nm).6.Install cover (Figure 14,item 1) with four (4) screws (Figure 14,item 2). Tighten screws to 35 in-lb (4 Nm).A WARNINGExposed moving parts can cause severe injury.LOCK OUT POWER before removing guards or performing maintenance.1A WARNINGExposed moving parts can cause severe injury.LOCK OUT POWER before removing guards or performing maintenance.NOTEIf timing belt does not slide over pulley flange, loosen driven pulley taper-lock screws(Figure 16,item 2) and remove pulley with belt (Figure 16,item 1). For re-installation, see steps 6 thru 8 on beginning on page 9.21Dorner Mfg. Corp.12851-526 Rev. F3200, 5200 & 5300 Series Bottom Mount 90° Drive Package for Standard Load GearmotorsPreventive Maintenance and AdjustmentDrive or Driven Pulley Replacement1.Complete steps 1 through 3 of “Timing Belt Replacement” section on page 11.2.Remove taper-lock screws (Figure 17,item 1). Insert one (1) of taper lock screws in remaining hole (Figure 17,item 2). Tighten screw until pulley is loose. Remove pulley and taper hub assembly.Figure 173.Complete steps 6 through 9 of “Installation” section beginning on page 9.Gear Reducer Replacement1.Remove four (4) screws(Figure 14,item 2) and remove cover (Figure 14,item 1).2.Loosen tensioner (Figure 15,item 1).3.Loosen taper-lock screws (Figure 18,item 1) andremove drive pulley: Insert one (1) of taper lock screws in remaining hole (Figure 18,item 2). Tighten screw until pulley is loose.Figure 184.Remove pulley (Figure 19,item 1), taper hub assembly (Figure 19,item 2), and timing belt (Figure 19,item 3).Figure 19A WARNINGExposed moving parts can cause severe injury.LOCK OUT POWER before removing guards or performing maintenance.NOTEIf drive pulley (Figure 19,item 1) is replaced, wrap timing belt around drive pulley and complete step 3.21A WARNINGExposed moving parts can cause severe injury.LOCK OUT POWER before removing guards or performing maintenance.21132851-526 Rev. F13Dorner Mfg. Corp.3200, 5200 & 5300 Series Bottom Mount 90° Drive Package for Standard Load GearmotorsPreventive Maintenance and Adjustment5.Remove four (4) gear reducer mounting screws (Figure 20,item 1). Remove gearmotor.Figure 206.Remove four screws (Figure 21,item 1). Detach motor (Figure 21,item 2) from gear reducer (Figure 21,item 3). Retain shaft key (Figure 21,item 4).Figure 217.Remove two (2) screws (Figure 22,item 1) and detach output shaft cover (Figure 22,item 2).Figure 228.Hold the driveshaft with a wrench (Figure 23,item 1) as shown to keep shaft from turning, while removing screw (Figure 23,item 2) with hex wrench (Figure 23,item 3).Figure 239.Remove driveshaft (Figure 24,item 1) and key (Figure 24,item 2).Figure 2410.Replace gear reducer (Figure 24,item 3).11.Apply anti-seize (Figure 25,item 1) to shaft.Figure 2511142321NOTEOutput shaft (Figure 23,item 1) is held in Gear Reducer with a tapered press fit.Removal may require use of an arbor press.1321231Dorner Mfg. Corp.14851-526 Rev. F3200, 5200 & 5300 Series Bottom Mount 90° Drive Package for Standard Load GearmotorsPreventive Maintenance and Adjustment12.Replace the original shaft components into new gearreducer (Figure 24).13.Apply anti-seize to motor shaft before assembling togearbox.With key (Figure 21,item 4) in keyway, slide motor (Figure 21,item 2) and gear reducer (Figure 21,item 3) together. Install screws (Figure 21,item 1) and tighten.14.Hold the driveshaft with a wrench (Figure 23,item 1)as shown to keep shaft from turning, while installing screw (Figure 23,item 2) with hex wrench (Figure 23,item 3) Tighten screw to 350 in-lb (39.5 Nm).Figure 2615.Install gearmotor to mounting bracket and tightenscrews (Figure 20,item 1) to 110 in-lb (12 Nm).plete steps 6 through 10 of “Installation” sectionbeginning on page 9.Motor Replacement1.For single phase motor, unplug power cord from outlet.2.For three phase and VFD variable speed motor:a.Loosen terminal box screws (Figure 27,item 1) and remove cover (Figure 27,item 2).Figure 27b.Record wire colors on terminals 1, 2 and 3. Loosen wire nuts and remove wires 1, 2 and 3.c.Loosen cord grip and remove cord.3.For DC variable speed motor, unplug motor cord at disconnect (Figure 28,item 1).Figure 28IMPORTANTBe extremely careful when coupling motor to gear reducer. Avoid misalignment and forcing the connection causing possible permanent gear reducer seal damage.NOTEGearmotor position on Flat Belt conveyor shown below left, Figure 26. Gearmotor position on Cleated Belt conveyor shown below right, Figure 26.NOTEDrive pulley (Figure 19,item 1) is removed. Wrap timing belt around drive pulley and complete step 15.A WARNINGExposed moving parts can cause severe injury.LOCK OUT POWER before removing guards or performing maintenance.Hazardous voltage will cause severe injury or death.LOCK OUT POWER BEFORE WIRING.2111851-526 Rev. F15Dorner Mfg. Corp.3200, 5200 & 5300 Series Bottom Mount 90° Drive Package for Standard Load GearmotorsPreventive Maintenance and Adjustment4.Remove four (4) screws (Figure 29,item 1). Detach motor (Figure 29,item 2) from gear reducer (Figure 29,item 3). Retain motor output shaft key.Figure 295.Apply anti-seize to motor shaft before assembling to gearbox. With key (Figure 30,item 1) in keyway, slide motor (Figure 30,item 2) and gear reducer together. Install screws and tighten.Figure 306.Replace wiring:•For a single phase motor, reverse step 1 on page 14.•For a three phase or VFD variable speed motor, reverse step 2 on page 14.•For a DC variable speed motor, reverse step 3 on page 14.IMPORTANTBe extremely careful when coupling motor to gear reducer. Avoid misalignment and forcing the connection causing possible permanent gear reducer seal damage.13221Service PartsNOTEFor replacement parts other than those shown on this page, contact an authorized Dorner Service Center or the factory. Key Service Parts and Kits are identified by the Performance Parts Kits logo . Dorner recommends keeping these parts on hand.Bottom Mount Drive Package for 90° Industrial Gearmotors3200, 5200 & 5300 Series Bottom Mount 90° Drive Package for Standard Load GearmotorsDorner Mfg. Corp.16851-526 Rev. F851-526 Rev. F17Dorner Mfg. Corp.3200, 5200 & 5300 Series Bottom Mount 90° Drive Package for Standard Load GearmotorsService PartsItem Part NumberDescription 1300871Drive Cover 2301076Drive T ensioner Slide 3301153Tensioner Bearing Assembly 4350115Adapter Ring 5350117Drive Shaft (for E-Drive 56 C FaceGearmotors)350133Drive Shaft (for E-Drive IEC 63B5 andIEC 71B5 Gearmotors)6350123Mounting Plate 7807-2016Drive-Bearing Shaft Cover 8911-013Flat Washer 9912-084Square Key, 0.188" x 1.50"(for E-Drive 56 C Face Gearmotors)980636M Square Key, 6 mm x 36 mm(for E-Drive IEC 63B5 and IEC 71B5 Gearmotors)10814-125Timing Belt, 1.0" W x 25.5" L814-059Timing Belt, 1.0" W x 27.0" L 814-060Timing Belt, 1.0" W x 28.0" L 814-079Timing Belt, 1.0" W x 30.0" L11811-133Driven Pulley, 14 Tooth,Taper Lock TL1108811-126Driven Pulley, 16 Tooth,Taper Lock TL110812811-133Drive Pulley, 14 Tooth,Taper Lock TL1108811-126Drive Pulley, 16 Tooth,Taper Lock TL1108811-127Drive Pulley, 18 Tooth,Taper Lock TL1210811-135Drive Pulley, 20 Tooth,Taper Lock TL1210811-136Drive Pulley, 22 Tooth,Taper Lock TL1610811-137Drive Pulley, 24 Tooth,Taper Lock TL161013811-288Taper Lock Bushing, 20 mm, TL1108811-289Taper Lock Bushing, 20 mm, TL1210811-290Taper Lock Bushing, 20 mm, TL161014920483M Flanged Socket Head Screw,M4 x 16 mm15920608M Socket Head Screw, M6-1.00 x 8 mm 16920612M Socket Head Screw,M6-1.00 x 12 mm17920620M Socket Head Screw,M6-1.00 x 20 mm18920835M Socket Head Screw,M8-1.25 x 35 mm19931018M Flat Screw, M10 - .50 x 18 mm 20961645M Hex Head Cap Screw,M16 - 2.00 x 45 mm21980018M Square Key, 6 mm x 18 mm 22980632M Square Key, 6 mm x 32 mm 23991610M Hex NutDorner Mfg. Corp.18851-526 Rev. F3200, 5200 & 5300 Series Bottom Mount 90° Drive Package for Standard Load GearmotorsService Parts90° Industrial GearmotorsU.S. Version12Item Part No.Description162MES411FN Motor, 0.25hp (0.19Kw), 115/230 Volts,60 Hz, 1-Phase62MES423FN Motor, 0.25hp (0.19Kw), 208−230/460 Volts, 60 Hz, 3-Phase22MSD3DEN Motor, 0.25hp (0.19Kw), 130 VDC 62MEH411FN Motor, 0.5hp (0.37Kw), 115/230 Volts, 60Hz, 1−Phase32MES423FN Motor, 0.5hp (0.37Kw) 208−230/460 Volts, 60Hz, 3 Phase62MHD9DEN Motor, 0.5hp (0.37Kw), 90 VDC 32MES423ENMotor, 0.5hp (0.37Kw), 230 Volts, 3 Phase Inverter Duty32MHD9DENMotor, 0.75 hp, (0.56Kw), 90 VDC 2 32M005EL Gear Reducer, 5:1, NEMA 42CZ 32M010EL Gear Reducer, 10:1, NEMA 42CZ 32M020EL Gear Reducer, 20:1, NEMA 42CZ 32M040EL Gear Reducer, 40:1, NEMA 42CZ 32M060EL Gear Reducer, 60:1, NEMA 42CZ 32M005ES Gear Reducer, 5:1, NEMA 56C 32M010ES Gear Reducer, 10:1, NEMA 56C 32M020ES Gear Reducer, 20:1, NEMA 56C 32M040ES Gear Reducer, 40:1, NEMA 56C 32M060ES Gear Reducer, 60:1, NEMA 56C 32M010EHGear Reducer, 10:1, NEMA 140 TC851-526 Rev. F19Dorner Mfg. Corp.3200, 5200 & 5300 Series Bottom Mount 90° Drive Package for Standard Load GearmotorsService PartsCE Version12Item Part No.Description1826-281Motor, 0.19 kW 230 Volts, 1400 RPM50 Hz, 1-Phase826-282Motor, 0.37 kW 230 Volts, 1400 RPM 50 Hz, 1-Phase826-284Motor, 0.19 kW 230/400 Volts, 1400 RPM 50 Hz, 3-Phase826-285Motor, 0.37 kW 230/400 Volts, 1400 RPM 50 Hz, 3-Phase262Z005ES Gear Reducer, 5:1, 63 B562Z010ES Gear Reducer, 10:1, 63 B562Z020ES Gear Reducer, 20:1, 63 B562Z040ES Gear Reducer, 40:1, 63 B562Z060ES Gear Reducer, 60:1, 63 B532Z005ES Gear Reducer, 5:1, 71 B532Z010ES Gear Reducer, 10:1, 71 B532Z020ESGear Reducer, 20:1, 71 B5Dorner Mfg. Corp. reserves the right to change or discontinue products without notice. Allproducts and services are covered in accordance with our standard warranty. All rights reserved. © Dorner Mfg. Corp. 2011DORNER MFG. CORP.975 Cottonwood Ave., PO Box 20Hartland, WI 53029-0020 USATEL 1-800-397-8664 (USA)FAX 1-800-369-2440 (USA)Internet: Outside the USA:TEL 1-262-367-7600FAX 1-262-367-5827Return PolicyReturns must have prior written factory authorization or they will not be accepted. Items that are returned to Dorner without authorization will not be credited nor returned to the original sender. When calling for authorization, please have the following information ready for the Dorner factory representative or your local distributor:1. Name and address of customer.2. Dorner part number(s) of item(s) being returned.3. Reason for return.4. Customer's original order number used when ordering the item(s).5. Dorner or distributor invoice number (if available, part serial number).A representative will discuss action to be taken on the returned items and provide a Returned Goods Authorization (RMA)number for reference. RMA will automatically close 30 days after being issued. To get credit, items must be new and undamaged. There will be a return charge on all items returned for credit, where Dorner was not at fault. It is the customer’s responsibility to prevent damage during return shipping. Damaged or modified items will not be accepted. The customer is responsible for return freight.Conveyors and conveyor accessoriesStandard catalog conveyors 30%MPB, 7200, 7300 Series, cleated and specialty belt50%AquaGard & AquaPruf Series conveyors non-returnable itemsEngineered to order products case by caseDrives and accessories30%Sanitary stand supports non-returnable itemsPartsStandard stock parts30%Plastic chain, cleated and specialty belts non-returnable itemsReturns will not be accepted after 60 days from original invoice date. The return charge covers inspection, cleaning, disassembly, disposal and reissuing of components to inventory. If a replacement is needed prior to evaluation of returned item, a purchase order must be issued. Credit (if any) is issued only after return and evaluation is complete.Dorner has representatives throughout the world. Contact Dorner for the name of your local representative. Our Customer Service Team will gladly help with your questions on Dorner products.For a copy of Dorner's Warranty, contact factory, distributor, service center or visit our website at .For replacement parts, contact an authorized Dorner Service Center or the factory.851-526 Rev. F Printed in U.S.A.。
WDZ-5200系列保护测控装置调试指导版本:试用版编制:朱曙光黄庆建审核:批准:日期:金智科技股份有限公司2010-4-9调试操作流程一、检查接线,装置上电:1、先确保装置供电直流空开在分开位置。
.2、确保万用表的线头插在在公共和电压端,选用直流1000V档,测量装置供电端子之间以及端子和地之间是否存在电压。
并且测量空开电压是否负荷装置供电电压。
(DC110V或DC220V,根据装置选型而定)3、确保无电压后,万用表选用欧姆通档,测量装置电源端子之间及电源端子和地之间是否存在短路。
4、确保无短路情况后,装置可以安全上电。
二、软件版本和工程配置检查:1、软件版本检查:2、工程配置检查:说明:工程配置在出厂调试时已按照工程进行修改,在现场调试时只需进行检查是否符合现场需要,若不符合,则按照下面步骤修改:a、恢复出厂设置:(现场无需修改)主菜单→定值设置→恢复出厂设置,输入密码:2006。
b、工程配置主菜单→调试操作(输入密码2006)→厂家设置,对照工程配置表,对以下几项进行配置:1)I/O配置:配置操作板或I/O板型号。
2)工程选配:CT:5A、1A;现场总线:CAN、PROFIBUS、RS485、以太网;4-20mA输出:一路、二路;PT接入方式:线电压(默认选择)、相电压;CT接入方式:三相、二相;开关位置接入:双位置接入(默认选择)、跳位接入、合位接入。
c、系统设置主菜单→定值设置,对以下几项进行配置(输入密码0001):1)CAN/RS485:设置为接口检查;(用于方便出厂调试)2)4--20mA输出关联测值:设置为MIa。
d、设置装置时间主菜单→时间设置,修改正常时间即可。
e、检查运行灯:查看运行灯是否为灯常亮,其它灯不亮。
三、精度验证、电能验证、4-20mA调试、脉冲调试(以WDZ-5242带操作板装置为例)1、装置采样:分为两个步骤a、第一步判断电压、电流相序是否接反:Ua、Ub、Uc三相电压各相施加20V、30V、40V,高、低压侧电流IA、IB、IC各相电流施加1A、2A、3A,查看装置对应相测量电压、电流以及保护电压、电流是否跟施加的相同。
若不同有可能装置的电压电流绕线接反或接错,或是外接线错位。
b、第二步精度校验(保护精度:2.5%,测量精度0.2%(其中有功P精度0.5%,无功精度0.5%)):施加电压Ua、Ub、Uc三相电压各相施加57.74V,电压角度分别加0 、240、120,电流IA、IB、IC各相电流施加5A(1A),电流角度分别加330 、210、90,各项测值范围如下:2、电能校验:(12步骤,以5A为例)说明:以下电压U表示Ua、Ub、Uc三相均要输入,电流I表示三相IA、IB、IC均要输入,∠UI表示电压电流夹角,P、Q表示三相有功、无功(电压单位:V,电流单位:A)注意:在施加电压电流前,电压的UA,UB相互交换(可在调试仪器对调),电流Ic角度180度(可在调试仪器的进和出对调);操作步骤:主菜单→调试操作(密码是“1”)→电能校正;输入电流电压后,等仪器功率稳定在范围内按确定即可。
上面步骤全部结束后,装置会显示“电能校验成功”,否则失败,需重新按照上面步骤重新进行。
出现失败的原因可能是有些步骤施加的量没有稳定下来造成。
3、脉冲调试:输入Ua、Ub电压为57.74V,Ia电流为额定5A/1A。
检查电度脉冲输出端子,是否有脉冲输出,检查方式如下(任选一):a、用万用表电阻档分别测量有功、无功脉冲输出+、-,正常阻值为0---几兆欧之间变化。
b、将有功、无功脉冲输出+、-接入4型保护开入量中,观察4型开入量是否在0、1之间变化,变化则正常。
4、DCS(4-20mA)调试:在装置上输入电流为额定5A/1A。
用万用表mA档测量装置端子4-20mA输出和公共端之间的电流值是否为20mA,偏差为±0.5%。
不输入电流时,测量值为4mA,偏差为±0.5%。
四、开入开出调试:说明:强电开入,电压等级同装置电压1、24路开入和装置闭锁信号检查:(电源板调试)装置开入为直流强电开入,直流电压等级(DC110V或DC220V)根据装置电源确定。
插槽5电源板端子说明:端子503-504为装置电源,503为直流负,504为直流正;端子506接直流电负电源;端子507-530为24路强电开入输入;端子531-532为装置闭锁信号输出,无源常闭接点。
a、在每路开入加直流正电源(可以从装置电源正引入),该路开入即有信号输入;查看装置对应开入显示:主菜单→调试操作(密码“1”)→开入遥信实验;开入圆圈为●表示开入正常接入,为○表示此路开入没有接入或通道损坏。
b、装置闭锁输出检查:关闭装置电源,该信号输出;给上装置电源,信号消失;无源常闭接点。
(实际运行过程中:装置24V掉电和CPU工作不正常时,该接点闭合)2、开入跳合闸调试、防跳调试:(操作板调试)插槽3操作回路板端子及接线说明:端子301-302为空接点跳位输出,即开关在跳位时,输出此接点;301-301为空接点合位输出,即开关在合位时输出此接点;端子304-305为控制回路断线输出信号,即开关不在合位也不在分位或者既在合位也在分位,输出此接点。
端子306经过串接开关常开辅助接点,再接至电源负端;端子307经过串接开关常闭辅助接点,再接至电源负端;端308,当装置保护动作,输出正电源,现场可与318短接;端子309接入正电源;端子310-311为遥控合跳闸输出正电源接点,端子310可与317短接,端子311可与319短接。
端子312-313为操作回路正负电源;314-315分别接开关的合圈和跳圈;端子317、318、319、320均为强电输入(直流正电源)。
a、开入跳合闸调试,步骤如下:(下面调试是基于带开关或者带模拟断路器情况下进行实验)①手动合闸:在端子317(手动合闸输入)加直流电源正端(可以并装置正电源),开关合上,装置面板合位灯亮。
②手动分闸:在端子319(手动跳闸输入)加直流电源正端(可以并装置正电源),开关分开,装置面板跳位灯亮。
③保护跳闸:在端子318(保护跳闸输入)加直流电源正端(可以并装置正电源),开关分开,装置面板跳位灯亮。
④DCS跳闸:在端子319(DCS跳闸输入)加直流电源正端(可以并装置正电源),开关分开,装置面板跳位灯亮。
⑤遥控合闸:进入主菜单→调试操作(密码“1”)→出口传动实验,先进行开出总启动:分→合按确认,然后遥合:分→合按确认,端子310(遥控合闸出口)输出正电源(500m),若端子310与端子317连接,开关合上。
(原开关在分位)⑥遥控分闸:进入主菜单→调试操作(密码“1”)→出口传动实验,先确保开出总启动:合→分状态,遥合:分→合状态,然后遥分:分→合按确认,端子311(遥控分闸出口)输出正电源(500m),若端子310与端子319连接,开关分开。
(原开关在合位)⑦保护跳闸出口:进入主菜单→调试操作(密码“1”)→出口传动实验,先确保开出总启动:合→分状态,然后动作出口(保护跳闸):分→合按确认,端子308(保护跳闸出口)输出正电源(500m),若端子308与端子318连接,开关分开。
(原开关在合位)⑧装置面板灯检查:上装上电,运行灯即常亮;在合闸和跳闸的过程中,装置面板的合位灯和跳位灯亮。
当进入调试操作后,调试灯常亮;当退出调试操作后,面板灯全闪亮。
⑨合监视和跳监视检查:端子306(合闸监视负)经过串接开关常开辅助接点,再接至电源负端;端子307经过串接开关常闭辅助接点,再接至电源负端。
装置面板的合位灯和跳位灯,开入26(合位)、开入25(分位),通过此端子点亮。
⑩25-28开入说明:开入25表示:开关跳位,开入26表示:开关合位,开入27表示:远方位置(端子309接入正电源),开入28表示:DCS输入;b、防跳回路调试:在现场调试,开关柜面板若有手合手跳,可以按照下面步骤进行防跳回路实验:按住手跳不放,然后按住手合此时开关能合一次,立即跳开后装置不能再合上。
若开关总是来回分开,表示防跳回路失效或没此功能。
说明:保正装置一直有跳闸出口(无论是保护跳或手跳),同时也保正装置一直有合闸出口(手合或遥合),开关只能合分一次,不能总是分合,说明防跳回路有效。
3、开出调试:(操作板)说明:开出4、开出5、装置故障信号、保护动作信号、保护告警信号、动作告警信号均为空接点输出,常开接点。
进入主菜单→调试操作(密码“1”)→出口传动实验;首先开出总启动:分→合按确认,使得开出总启动:“合→分”状态。
①动作出口(开出4)分→合按确认,输出保持信号,合→分按确认,该信号消失。
(该信号只是在调试态实验过程中为保持信号,在实际运行过程中,故障存在信号出口,故障消失,信号即消失;以下信号均如此)②动作出口(开出5):分→合按确认,输出保持信号,合→分按确认,该信号消失。
③装置故障信号:分→合按确认,输出保持信号,合→分按确认,该信号消失。
④保护动作信号:分→合按确认,输出保持信号,合→分按确认,该信号消失。
⑤保护告警信号:分→合按确认,输出保持信号,合→分按确认,该信号消失。
⑥动作告警信号:分→合按确认,输出保持信号,合→分按确认,该信号消失。
另外:开出4、开出5可以进行定义成跳闸出口和开出信号,具体根据现场实际情况而定。
控制回路断线信号:操作板电源失电,装置电源不失电,控制回路断线信号保持出口,操作板直流电源恢复后,该信号消失。
4、非电量调试:(非电量板)说明:205-207为非电量输入(强电),211-213为不保持信号输出(无源),217-219为保持信号输出(无源)。
首先接上控制电源(端子201控制电源负,端子203控制电源正)①非电量1:将端子203(控制电源正)接入非电量1,非电量出口1、出口2均有出口(无源脉冲),同时非电量1信号(端子211-210)输出不保持信号,非电量1信号(端子217-216)输出保持信号。
非电量2、3同1.五、保护功能调试:定值整定:主菜单→定值设置→保护定值设置(密码”1”)→定值单设置软压板投退:主菜单→定值设置→保护定值设置(密码”1”)→软压板(按右键设置)开入量自定义:主菜单→调试操作(超级密码2006)→厂家设置→开入配置→可编程定义(允许)→具体定义(按确认键进行关联电动机起动态:电动机Imax由0A瞬间变为大于1.125Ie电动机运行态:电动机在起动中,Imax小于等于1.125Ie电动机停止态:电动机在运行中,Imax小于1/8Ie(注:Imax为电动机机端电流最大值)可通过:主菜单→报告显示→电机起停报告,查看电动机状态。
保护精度2.5%1、带低电压闭锁三段过流保护(线路)说明:过流一段、二段保护可整定经低电压闭锁,当三个线电压中任意一个电压小于低电压闭锁定值,开放经低电压闭锁的过流一段保护。