摩托罗拉无线扫描枪 提示音 解释
- 格式:pdf
- 大小:117.18 KB
- 文档页数:1
摩托罗拉Motorola LI4278无线一维扫描枪文章出自:品牌:摩托罗拉Motorola类型:无线一维条码扫描枪型号:LI4278外观:扫描枪体积(长×宽×高):7.34 × 2.75 × 3.84 英寸重量:224 克摩托罗拉LI4278无线一维扫描枪的概述:摩托罗拉LI4278 将一维条形码扫描带入了新的水平,让作业人员可以更快的速度、更远的距离捕捉几乎任何一维条形码。
摩托罗拉LI4278无线扫描枪的设计适于日常整天使用,其蓝牙兼容性让您尽享无线自由。
它的加密功能更好,可增强安全性,同时还提供更佳的整体无线性能。
摩托罗拉LI4278 无线扫描枪向后兼容其关键配件-底座,可与 LS4278 和 DS6878 扫描仪的底座配合使用。
卓越的电池电能管理保证在每次电池充电后可进行最多次数的扫描,以支持高强度的扫描任务。
摩托罗拉LI4278 扫描枪可运用于多尘和潮湿的环境,并可承受从 6 英尺/1.8 m 的高处摔落。
摩托罗拉LI4278无线一维扫描枪的特性和优点:1)卓越的一维扫描性能:扫描速度出众,提供广阔的数据采集范围2)几乎可扫描任何表面(包括手机显示屏)上的所有一维条形码:可采集传统纸质标签上印刷的标签,以及手机、平板电脑或计算机屏幕上显示的移动条形码3)较宽的工作范围:可读取 1 英寸/2.54 cm 至 30 英寸/76.2 cm 的 UPC 条形码,并可在远距离读取高密度条形码,实现应用的灵活性4)卓越的运动容错、角容差以及全向扫描能力:更快地采集条形码,在各次扫描间无需停顿,也无需对齐扫描仪和条形码5)内置的可更换电池:每次充电后可进行最多次数的扫描,在最高使用配置下轻松实现全天服务;可更换电池确保了较长的使用寿命6)兼容 123Scan2 和远程扫描仪管理 (RSM):从初始配置到日常管理,都可为您大大地节省管理时间和成本7)可承受连续跌落至混凝土地面 100 次以上:防止因日常跌落造成损坏而引起停工8)灵活的垂直或水平安装:桌面底座功能多样,可适应独特的环境9)蓝牙 2.1 :安全性更高,性能更好,电能管理更佳,蓝牙无线连接配对更轻松10)向后兼容:可与 LS4278 底座配合使用,提供极具经济性的升级途径摩托罗拉LI4278无线一维扫描枪的规格参数:物理参数扫描枪体积(长×宽×高):7.34 × 2.75 × 3.84 英寸重量:224 克通讯座接口:RS232、RS485 (IBM)、USB、键盘插口颜色:黑色、白色电池:“环保可持续使用”可更换充电电池性能参数偏移视角公差:±65°倾斜视角公差:±65°旋转视角公差:±45°扫描模式:单条明亮瞄准线扫描角度水平:35°扫描速度:每秒扫描 547 次移动容错:25 英寸(63.5 厘米)/秒光源:lED Class 1 设备(617 纳米)(黄褐色)最小打印对比度:15% MRD每次充电后的扫描次数:多达 57000 次操作小时数每次充满电后:72 小时使用环境环境光抗扰度最大:108000 勒克斯工作温度:32° F 至 122° F/0° C 至 50° C存储温度:-40° F 至 158° F/-40° C 至 70° C湿度:5% 至 85%(无冷凝)跌落规格:在室温下能够承受从 5 英尺/1.5 米高度跌落100 次,能承受从 6 英尺/1.8 米高度跌落至混凝土地面的冲击环境密封:带垫圈的密封外壳可防止灰尘,并能够喷洒清洗条码符号:UPC/EAN: UPC-A、UPC-E、UPC-E1、EAN-8/JAN 8、EAN-13/JAN 13、Bookland EAN、Bookland ISBN Format、UCC Coupon Extended Code、ISSN EAN Code 128 Including GS1-128、ISBT 128、ISBT Concatenation、Code 39 including Trioptic Code 39、Convert Code 39 to Code 32 (Italian Pharmacy Code)、Code 39 Full ASCII Conversion Code 93 Code 11 Matrix 2 of 5 Interleaved 2 of 5 (ITF) Discrete 2 of 5 (DTF) Codabar (NW - 7) MSI Chinese 2 of 5 IATA Inverse 1D (except all GS1 DataBars) GS1 DataBar including GS1 DataBar-14、GS1 DataBar limited、GS1 DataBar Expanded无线连接射频:Bluetooth v2.1 Class 2 射频数据率:3.0 Mbit/s (2.1 Mbit/s) Bluetooth v2.1射频范围:330 英尺/100 米(视线)相关法规技术要求:EMC FCC Part 15 Class B、ICES 003 Class B、IEC60601-1-2 Environmental RoHS Directive 2002/95/EEC Electrical Safety C22.2No.60950-1、En 60950-1、IEC 60950-1、UL 60950-1 LED Class 1环境法规符合:RoHS实用程序:123Scan、远程扫描器管理 (RSM)、扫描器管理服务 (SMS)、摩托罗拉扫描器 SDK解码范围(标准工作范围*):3 mil :5-7 英寸/12.7-17.8 厘米4 mil: 4-10 英寸/10.2-25.4 厘米5 mil :3-13 英寸/7.6-33 厘米7.5 mil :1.5-19 英寸/ 3.8-48.3 厘米13 mil :(100% UPC-A) 1-31 英寸/2.5-78.7 厘米20 mil :1-42 英寸/2.5-106.7 厘米26 mil :(200% UPC-A) 3-55 英寸/7.6-140 厘米100 mil(纸质):>20 英尺/6 米* 除非另有说明,否则按照 Code 39 计算范围。
摩托罗拉扫描器如何调声音的大小?
由于工作环境不同,条码扫描器的声音大小也有不同的要求,比如说工作环境较嘈杂的工业场所,蜂鸣器声音过小,用户在扫描后无法判断是否已成功读取该条码,虽然除了蜂鸣器的声音,还可以通过“指示灯有无闪烁”来判断是否成功扫描,但大多数客户更习惯听声音;而在要求安静的图书馆里,太大的蜂鸣器声音就会显得突入,还可能会打扰正在看书的朋友。
所以不同的场所对条码扫描器的蜂鸣器声音大小的要求是不一样的。
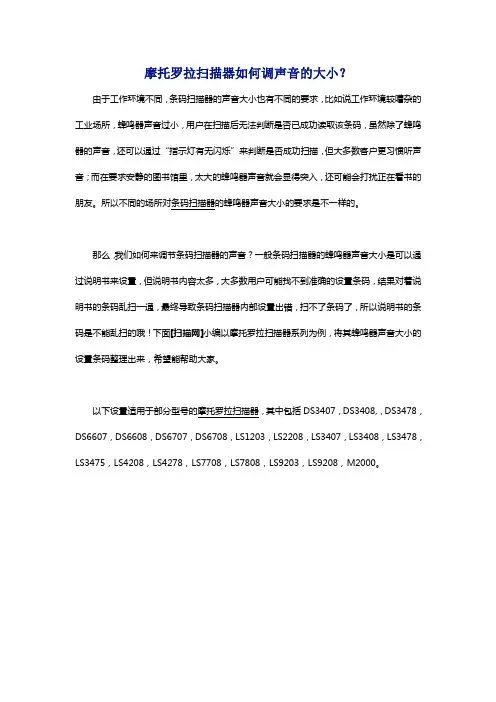
那么,我们如何来调节条码扫描器的声音?一般条码扫描器的蜂鸣器声音大小是可以通过说明书来设置,但说明书内容太多,大多数用户可能找不到准确的设置条码,结果对着说明书的条码乱扫一通,最终导致条码扫描器内部设置出错,扫不了条码了,所以说明书的条码是不能乱扫的哦!下面[扫描网]小编以摩托罗拉扫描器系列为例,将其蜂鸣器声音大小的设置条码整理出来,希望能帮助大家。
以下设置适用于部分型号的摩托罗拉扫描器,其中包括DS3407,DS3408,,DS3478,DS6607,DS6608,DS6707,DS6708,LS1203,LS2208,LS3407,LS3408,LS3478,LS3475,LS4208,LS4278,LS7708,LS7808,LS9203,LS9208,M2000。
如上图所示,从上往下摩托罗拉扫描器的蜂鸣器声音逐渐递增,依次为低音量,中音量,高音量等三种选择。
您可以根据自己的需求选择对应的条码,然后对准该条码扫一下即可。
鉴于有些条码扫描器扫不了电脑屏幕上的条码,您可以将上图的条码打印出来再扫描哦。

摩托罗拉DS4208二维码扫描枪设置自动换行
文章来源:扫描网
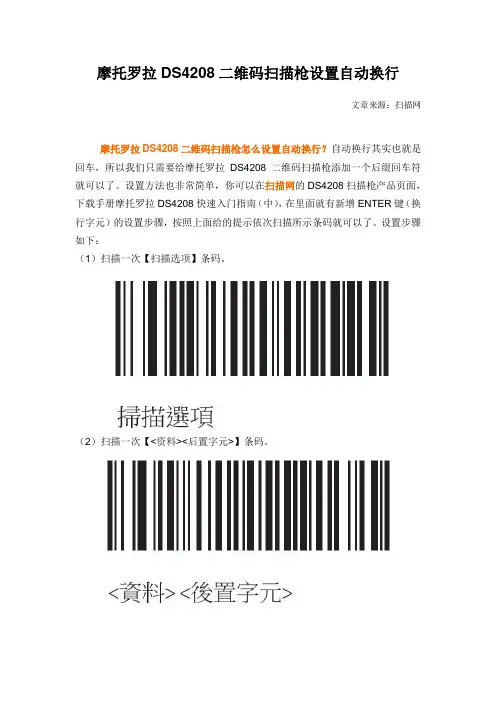
摩托罗拉DS4208二维码扫描枪怎么设置自动换行?自动换行其实也就是回车,所以我们只需要给摩托罗拉DS4208二维码扫描枪添加一个后缀回车符就可以了。
设置方法也非常简单,你可以在扫描网的DS4208扫描枪产品页面,下载手册摩托罗拉DS4208快速入门指南(中),在里面就有新增ENTER键(换行字元)的设置步骤,按照上面给的提示依次扫描所示条码就可以了。
设置步骤如下:
(1)扫描一次【扫描选项】条码。
(2)扫描一次【<资料><后置字元>】条码。
(3)扫描一次【ENTER】条码
以上3步骤就是摩托罗拉DS4208二维码扫描枪自动换行的设置了,如果在今后,你不再需要此功能,也可以通过扫描【Data Format Cancel】条码来取消自动换行的设置。
摩托罗拉mag one Q5对讲机简版常规说明书对讲机基本操作打开、关闭对讲机若要打开对讲机,请顺时针旋转开/关/音量钮。
对讲机发出开机声后进入接收待机状态。
若要关闭对讲机,请逆时针旋转开/ 关/音量钮,直至听到' 咔塔”声。
调节产音顺时针旋转开/ 关/ 音量钮提高音量,或逆时针旋转开/关/音量钮降低音量。
CPS 编程设置在对讲机正式使用前,必须运行配套的计算机编程软件(CPS) 设置本对讲机的信道参数和功能参数,包括可编程侧键1和侧键2 的定义。
选择信道若要选择某个信道,请旋转信道选择旋钮并选择所需信道号。
但若所选信道还没有设置频率,机子会发出空信道提示音。
用户可单独为每个信道编程,每个信道均拥有自己的接/发频率、亚音编1/解码和扫描设置等。
对讲机通话基本要求若要使用您的双向对讲机与某人通话,两台对讲机上的收发频率、亚音(PL/DPL) 必须匹配,即发射方的发射频率和发射亚音要和接收方的接收频率和接收亚音一样,本机可以设置收发异频。
建议收发双方设以相同的带宽,以获得最佳音质。
接收呼叫若当前频率上有信号活动并且信号强度超过所设的SQ 静噪门限时,对讲机会点亮绿灯指示接收,如本机的接收亚音设置为OFF,则同时打开喇叭收听,否则只有当收到的信号亚音匹配时才能打开喇叭收听。
故亚音又俗称为私线(PL/DPL) ,可帮助最大限度地减少干扰。
通话和监听在发射之前对通话进行监听非常重要,以免“干扰”正在进行的通话。
按一下编程为监听(MONITOR) 功能的侧键可监听信道通话情况。
如果信道中没有发射信号,您将听到背景噪音。
再按一下监听键以退出监听。
当信道中的通话结束后,按PTT 键开始您的呼叫。
注意射频辐射安全,将对讲机竖直放在面前,话筒至少距离鼻子或嘴唇2.5 厘米,天线应远离眼睛。
发射时LED 指示灯保持红灯长亮(低功率时橙灯长亮) 。
讲话结束时释放PTT 键以接听。
免提使用/声控发射Q5 对讲机支持免提操作(声控发射) ,当使用兼容的VOX 附件时,免提功能更佳。

使用说明书引言欢迎您成为摩托罗拉大家庭的一员恭喜您成为摩托罗拉移动电话的用户!无论您是使用通话功能,还是收发短信,亦或是喜爱用手机播放音乐,本手机都将满足您的需求。
本手机支持EVDO+GSM双网双待;可自由切换之天翼3G及WAPI/WLAN高速互联网双轨通道;3.0英寸WQVGA(电阻式)触摸屏,支持新一代智能手写;配备200万像素数码相机;预置GPS导航软件及QQ客户端;并全面支持天翼业务。
我们将通过这本手册为您介绍本机的特点,并将指导您如何使用本机。
如果您想了解更多关于本手机的使用信息,请登录/service/product.asp注:您的手机也许与本手册所列图片略有不同,但是将不会影响您的使用。
摩托罗拉全质量服务网页:/service服务电话:400-810-5050,(021)38784655服务时间:周一至周日,早9:00-晚17:30热线传真:(010)65668800若您有意订购摩托罗拉原装配件或手机,请访问,或致电销售热线4006-123456。
MOTOROLA 及目录引言 (1)目录 (3)快速入门 (6)关于手册 (6)原装配件 (6)准备和安装 (8)开机与关机 (9)屏幕解锁 (9)触屏提示 (9)待机界面 (10)信号栏图标说明 (10)主菜单 (11)使用手机的一些小窍门 (11)延长手机待机时间 (12)设置时间和日期 (13)拨打和接听电话 (13)信息 (13)文本输入 (14)手机基本设置 (18)模式选择 (18)显示设置 (18)提示音设置 (18)通话设置 (19)手机设置 (19)配置设置 (20)数据连通 (20)附件设置 (20)保密设置 (21)网络选择模式 (21)恢复出厂设置 (21)通话指南 (22)拨打电话 (22)拨打国内电话 (23)接听和挂断电话 (23)紧急呼叫 (24)联系人 (26)查看联系人 (26)保存新的电话号码 (27)呼叫联系人 (27)单键拨号 (27)删除全部姓名 (28)转存全部姓名 (28)复制全部姓名 (28)导入和导出 (29)来电防火墙 (29)信息功能 (30)新建信息 (30)收件箱 (30)草稿 (31)发件箱 (31)已发信息 (32)已存信息 (32)废件箱 (32)发送情况报告 (32)语音信息 (33)删除信息 (33)信息设置 (33)多媒体 (34)更新音乐库 (34)播放音乐 (34)播放列表 (35)全部歌曲 (35)全部视频 (35)照相机 (36)录音 (37)浏览器 (39)互联网 (39)通过数据通话上网 (40)连接设备 (50)蓝牙 (50)WLAN (50)天翼导航 (52)更多应用程序 (55)文件管理 (55)闹钟 (55)日历 (56)备忘 (56)待办事项 (57)计算器 (57)定时器 (57)秒表 (57)单位转换 (58)房贷计算器 (58)故障处理 (59)安全和法律信息 (60)快速入门警告:在使用手机前,请阅读手册的安全和法律信息。

目录1 手持终端介绍1.1 motorola mc31902 手持终端日常操作2.1 充电方法2.2 开关机、热启动、冷启动3 手持终端无线网络配置3.1 无线网络配置4 手持终端联机pc机4.1 概述4.2 同步工具安装4.3 手持终端中文字库安装5 手持终端键盘功能设置 6手持终端机故障分析1 手持终端介绍1.1 motorola mc3190motorola 讯宝symbol mc3190数据采集终端作为symbol mc3090手持终端的升级替代产品,mc3190是构建于成功的mc3090之上,mc3190采集器系列分为3100批处理盘点机和包含无线局域网wifi的mc3190条码采集器两款。
新的摩托罗拉mc3190系列可为公司内部的按键应用提供成本高效的移动性和用户舒适度。
符合人体工程学的耐用型 mc3190 提供先进的计算能力以及数据采集能力、增强的安全性以及企业级的运动传感能力。
motorola 讯宝symbol mc3190数据采集终端性能参数:数据采集选项-1d 激光扫描仪、1d/2d 成像仪、dpm 内存 (flash/ram)-128mb ram/256 mb flash 或 128mb ram/512mb flash 处理器 (cpu)-marvell pxa320 @ 624 mhz 操作系统 (os)-microsoft windows mobile 6.1 classic, microsoft windows ce 6.0 pro 无线数据通讯:wpan(支持蓝牙技术)-ii 级、v2.1 增强数据速率 (edr), 集成天线wlan-三重模式 ieee? 802.11a/b/g;经过 ccxv4 认证;支持 ipv6;经过 fips140-2 认证(仅限mc3190)线性一维条码扫描器:光学分辨率-最小元素宽度 4 mil 扫描速率-104(+/- 12)次扫描/秒(双向)使用环境:环境密封-ip54(2 类)工作温度--4°至 122° f/-20°至 50° c 跌落规格-在工作温度范围内,多次从 4 英尺/1.2 米高处跌至水泥地面;满足并超过mil-std 810g 滚落规格-根据 iec 68-2-32,在室温条件下,500 次从 1.64 英尺/0.5 米高滚落(1,000次)2.1 充电方法摩托罗拉的每个手持终端都配了两粒电池,同时配了四位充电座。
SmartSound无线方向识别红外语音提示器WT01W0450使用说明书V1.1目录1. 简介 ................................................................................................................................................... - 0 -2. 产品特性 ............................................................................................................................................ - 0 -3. 产品示意图......................................................................................................................................... - 0 - 3.1. 主机: ......................................................................................................................................... - 0 -3.2. 探测器:...................................................................................................................................... - 1 -4. 技术参数 ............................................................................................................................................ - 1 -5. 安装条件 ............................................................................................................................................ - 2 - 5.1. 探头安装条件: ........................................................................................................................... - 2 -5.2. 主机安装条件: ........................................................................................................................... - 2 -6. 探测范围示意图.................................................................................................................................. - 2 -7. 安装步骤 ............................................................................................................................................ - 2 - 7.1. 探头安装: .................................................................................................................................. - 2 - 7.2. 主机安装: .................................................................................................................................. - 3 - 7.3. 探头操作说明............................................................................................................................... - 3 -功能设置 ......................................................................................................................................... - 3 - 8. 主机操作说明 ..................................................................................................................................... - 3 - 8.1. 语音更换...................................................................................................................................... - 3 - 8.2. 语音试听及音量调节 .................................................................................................................... - 3 -8.3. 测试............................................................................................................................................. - 3 -9. 注意事项 ............................................................................................................................................ - 4 -10. FAQ.................................................................................................................................................... - 4 -SmartSound无线方向识别红外语音提示器说明书1.简介“SmartSound无线方向识别红外语音提示器”是我司SmartSound系列产品中的一员,采用先进的方向识别和无线技术,提供了高精度的方向识别能力。
MOTO MC-3190手持扫码机网络设置
1,网络配置:
显示红叉,表示无线模块没有启动
显示叹号,表示无线连接发生异常
显示蓝色,表示无线已连接,信号柱表示信号强度2,启动无线模块:点击无线图标,进入无线菜单—Enable
3,修改配置:点击Options选项--
4,进入Options菜单,选择Regulatory – Anguilla
取消Enable 802.11bd的√,点击Save.
5,查找无线网络信号,点击Find WLANs
6,选择可用无线网络
7,点击无线点右键配置-Create Profile
8, Next 下一步
9,Country:Allow Any Country, Next
10,选择加密模式,规矩路由设置选择,选择WPA2-Personal ,下一步。
11,数据加密模式选择:AES
Enter Preshared Key(PSK)using选择:pass-phrase 勾选For added security-entered
12,通过软键盘输入无线密码Next
13设备是DHCP协议自动分配,直接勾选全部。
14,发射功率选择:Automatic,点击Next
自动连接上。
连接完成会弹出,连接的网络。
Motorola® Saber™ Radio Service Software User’s Guide业余无线电中文计划注意:·本说明书参照Motorola 68P81062C95-F文档翻译,内容有删改。
·本说明书针对的RSS(Radio Service Software)版本为R07.01.00,该版本软件已经可以支持高时钟频率的计算机,并拥有最全面的功能,推荐您采用。
·译者英语和无线电知识水平有限,难免有错误和不足,敬请各位老师指正!版权声明:The Motorola equipment described in this manual may includecopyrighted Motorola computer programs stored in semiconductor memories or other media. Laws in the United States and other countries preserve for Motorola certain exclusive rights for copyrighted computer programs, including the exclusive right to copy or reproduce in any form the copyrighted computer program. Accordingly, any copyrighted Motorola computer programs contained in the Motorola equipment described in this manual may not be copied or reproduced in any manner without the express permission of Motorola. Furthermore, the purchase of Motorola equipment shall not be deemed to grant either directly or by implication, estoppel, or otherwise, any license under the copyrights, patents or patent applications of Motorola, except for the normal nonexclusive, royalty free license to use that arises by operation of law in the sales of a product.版本:Ver. 0.1(02/12/2007)本项目参与者:暂无请您加入“业余无线电中文计划”,为中国业余无线电发展献出一份力量!第一部分 SERVICE: alignment, service aids, board replacement一、Align Radio Parameters注意:当您修改了本菜单中的任何设置后,您需要为电台重新编程(Reprogram Radio),才能使改动生效。
摩托罗拉system saber说明书By BG2SFOVer. 1.0Radio Configuration(电台配置)Radio Wide(电台范围)General(常规)Radio Cloning:选中此项允许电台复制或被复制。
两台电台之间通过一条特殊的电缆,完成CodePlug的复制。
该过程不需要CPS。
CPS也提供复制Codeplug的功能,但与此选项无关。
Block Pending CA/PC:选中此项允许无人值守的电台忽略Call Alert和Private Call呼叫。
Maximum Channels:最大信道数。
Out of range Indicator:用于指示在集群系统中的“超出范围”事件,可以选择任意的提示方法或关闭提示。
Emergency(紧急)Silent Alarm:选中此项电台将在紧急模式时工作在隐蔽模式,没有任何声音和显示的反馈。
Keep Alive:选中此项电台在紧急模式下将会保持工作,不管开关的处于何种位置。
Unmute Option:Emergency Channel Selector Lock:选中此项,电台如果在紧急模式工作,将会锁定在紧急信道上。
Channel Delay:选择电台在传输紧急模式数据前等待的时间。
Man Down Pre-Alert:此两项都是关于人员意外跌倒时报警的,没有相关配件时此两项无作用。
Man Down Post-Alert:如上。
Alert Tones(警告音)Alert Tone:选中此项允许电台发出警报音。
Volume Adjust Tone Offset:选中此项将警告音量维持在一个恒定的值。
Power-up Self Test Alert:选中此项电台将在开机发出提示音,在自检完成后再发出一次提示音。
Zero Level Audio Mute:选中此项,如果音量旋钮在制定的值之下,那么电台将关闭警告音。
Minimum:最小音量。
摩托罗拉扫码枪中文说明书
1.校准指针位置。
用扫描笔尖点击“十字”中心(连续点击正中、左上、左下、右下、右上后,在键盘上按“ENT”键)
2.在弹出界面中,点击“Exit”关闭当前界面,进入系统主界面
3.点击右下角圈中的图标,点击“绿色Enable Radio按钮”,打开无线网络连接;当显示“黑色Disab1e Radio按钮”后,无线网络链接成功,右下角显示信号强度
4.设置系统待机时间。
点击左下角图标,点击“设置一控制面板--Power"在“battery”页,查看电池电量
在Advanced页,设置待机时间。
勾选“on Battery power—turn off device ......”,设置描枪键多长分钟无操作后自动待机;不勾选,描永不待机。
(为了延长电池使用,建议勾选待机设置,并点击铤盘右下角按钮,使扫描枪进入待机状态)
另:点击键盘右下角按钮后,关闭屏幕背景灯﹔点击键盘右下角按钮后,进入待机状态
5.点击右下角圈中的图标,再点击“Config--Setup”弹出界面。
勾选圈中的三个选项,点击“OK”(重要操作)
6.查找【PDA产品流向追溯系统】的’文件位置,并设置程序运行快捷方式到桌面
打开“我的设置一Application文件夹--SATURNTTS文件夹”,选中“产品流向追溯系统”图标,点击左上角“文件--发送到--桌面快捷方式”。
关闭当前窗口,点击桌面快捷方式即可登录系统(请勿操作“我的设置”中的其他文
件,以免造成系统无法正常运行)。
Operating InstructionsTo Receive:Turn the control head ON/OFF switch to ON. A tone(s) sounds to indicate the radio condition (see TONE TABLE). The display indicates the receive mode. Adjust the volume with the Vol up/down rocker button. The BUSY indicator lights when the channel has activity.To Transmit:Scroll to the desired mode using the Mode up/down rocker button. Press and hold the PTT button; when the red XMIT indicator comes on, speak into the microphone in a normal voice. If a tone sounds when you press the PTT button, the system is alerting you to a certain condition (see TONE TABLE).TONE TABLETone Cause What To Do1 High-Pitched Beep at Power-Up Radio Passed Self-Test No Action NecessarySeries of High-Pitched Beeps at Power-Up Radio Did NOT PassSelf-TestRadio Requires Service;Notify Service Personnel1 Low-Pitched Beep Tone Invalid Selection Select Another Button 1 High-Pitched Beep "CHIRP" Valid Selection No Action NecessaryLow Constant Tone When Pressing PTT * Transmitting MDC Data Wait for Tone to CompleteBefore TalkingLow Constant Tone UponPressing PTTBlank Transmit Frequency Selected Mode is Receive-OnlyLow Constant Tone While Transmitting Time-Out Timer Has Expired Transmission Terminated;Release PTT* Optional tone dependent on radio programmingTalk-around:Use the Dir ect button for talk-around operation. When the Dir indicator is not lit, the programmed transmit frequency and squelch information are used. By momentarily pressing Dir (indicator lights), talk-around is enabled and the receive frequency and squelch code are used for talk-around transmit frequency information. To turn talk-around off, momentarily press Dir again.Multiple PL Codes:Momentarily press the MPL button to turn on multiple PL feature. The MPL indicator lights and the selected code is momentarily displayed. When MPL is active, the selected code overrides the mode-slaved Tx and Rx squelch codes. To turn MPL off, momentarily press MPL again. To change the selected MPL code, press and hold the MPL button until a "chirp" sounds and the MPL indicator flashes to indicate you are in the MPL "configuration" mode. Use the Mode up/down rocker button to scroll to the desired MPL code. The new displayed MPL code pair becomesOperating Instructionsimmediately active (even before exiting the configuration mode). To exit theconfiguration mode, press either the MPL or the Home button.Monitor VHF/UHF:The system defaults to coded-squelch operation on power-up. To change to carrier squelch, momentarily press the Mon button; a single "chirp" sounds and the Mon indicator lights up. Return to coded-squelch by momentarily pressing Mon again. To un-squelch the radio, press and hold Mon until a second "chirp" sounds. Adjust the volume with the Vol up/down rocker button. Momentarily press Mon again to return to coded squelch operation.Low Band Radio with Adjustable Squelch:The adjustable squelch control feature allows the operator to adjust the squelch threshold, via a squelch control knob located on the control head.• Coded-Squelch OperationThe radio defaults to coded squelch operation upon powering up. To change to adjustable carrier squelch, if Private-Line® (PL) or Digital Private-Line® (DPL) is programmed, momentarily press the Mon button; a single "chirp" sounds and the Mon indicator lights. Return to coded squelch by momentarily pressing Mon again.To un-squelch the radio, press and hold Mon until a second "chirp" sounds. Adjust the volume with the Vol up/down rocker button. Momentarily press Mon again to return to coded squelch operation.• Carrier-Squelch OperationRotate the squelch-control knob to the fully counterclockwise position. When the channel is clear, slowly rotate the squelch-control knob clockwise until the noise stops. This is the threshold squelch setting. The operator may adjust the squelch knob to reduce interference when necessary.Operating InstructionsScan:Press the Scan button to turn scan on; a "chirp" sounds and the Scan indicator lights (solid) indicating the system is scanning. Momentarily press Scan again toOperating Instructionsturn scan off. When on a preset internal scan list or an operator selectable scan list the radio scans for activity. While scanning, if activity on the priority mode isdetected, the Pri indicator flashes. When activity is detected on a non-priority mode, the Non-Pri indicator lights up solid.Scan with talkback:When talkback scan is enabled by programming, after activity has ceased, the radio will suspend scan and stay on the same channel for the duration of receive talkback hang-time. Priority sampling will continue. The Pri ority indicator/BUSY indicator will show priority information. Whenever the PTT button is released and the radio de-keys, scan will be suspended and stay on the same channel for the duration oftransmit talkback hang-time. Priority sampling will continue. If the PTT button is pressed while scan is suspended in hang-time, the radio will key up on the lastmode that had activity. Priority indicators will show priority information. The display will show the channel that had activity. After the talkback hangtime is expired, the radio will resume scan.Edit User's Scan List:Press and hold the Scan button until a "chirp" sounds. The Scan indicator flashes to indicate scan "configuration" mode. Use the Mode up/down rocker button or Rcl (recall) to review the user's scan list. The Pri indicator flashes when the prioritymode has been selected or the Non-Pri indicator lights solid when a non-priority mode has been selected. Use the Sel button to scroll from "not-in-the-list" to "non-priority" to "priority" and back to "not-in-the-list". The effect each Sel button press has on a selected mode's scan list is explained in the following table.If Condition Is: One Sel Press Will: Indicators Change To:Selected Mode NOT in the List Add Mode to the List asNon-PriorityNon-Pri lights (Pri Off)Selected Mode in List as Non-Priority Raise Mode's Status toPriority *Pri flashes (Non-Pri off)Selected Mode in Listas PriorityDelete Mode from List Both lights off* If another mode was previously designated as a priority mode, the previously designated priority mode's status is lowered to non-priority when you exit theconfiguration mode.To exit the configuration mode and simultaneously save the scan list changes, momentarily press the Scan or the Home button.Home Mode:Use the Home button to select the internally programmed Home mode and to exit any configuration mode.Operating InstructionsDimmer Button:Pressing the DIM mer button once dims the display's brightness. Pressing theDIM mer button a second time returns the display back to full brightness.Standard Features Note:PL Channel Scan TM, talk-around, Quik-Call II TM and Stat-Alert TM decode features are shipped from the factory disabled and require field programming. Refer to theMaraTrac Radio Service Software and Radio Signaling Options manuals forprogramming instructions.Stat-Alert TM and Quik-Call II TM Operation Procedures:• Call AlertTMWhen a Call Alert is received, four beeps sound every five seconds and the armed external alarms* will operate. The display flashes "CA". To clear the alarms, take the microphone off-hook or press the Mon button. The display shows the current mode number. If scan was on the display shows the priority mode. To reply to the Call Alert, press the PTT button.• Selective CallWhen a Selective Call is received, the radio will beep twice. The display flashes "SC". A voice message will follow.Wait until the voice message is complete. The display stops flashing and shows the current mode number. Pick up the microphone, press the PTT button and reply to the Selective Call.Telephone Interconnect:Requires DTMF Microphone and DTMF Decoder Kit installedWhen a phone call comes in, telephone-type ringing sounds and the armed external alarms* will operate. The display flashes "PH".To respond, pick up the DTMF microphone and enter the connect code (normally the "*" button), press the PTT button, and speak into the microphone. To listen,release the PTT button. Explain to the land-line caller that they must wait until you release the PTT button (indicated by a soft beep) before they can speak.When the call is complete, enter the disconnect code (normally the "#" button) and hang up the microphone.* External Alarms:When the external alarms option is installed in a VHF or UHF MaraTrac radio, the horn and lights can be activated by pressing the H/L button. To change thisOperating Instructionsconfiguration, press and hold the H/L button until the radio enters the select mode (a single "chirp" will sound). Use the Mode up/down rocker button to change thedesired horn and lights setting. Once the desired setting has been selected, press the Home or H/L button to exit and return to normal operation. When a Call Alert is received, the external alarms will respond with your selected alarm setting.On a low band radio with adjustable squelch, pressing the H/L button activates both the horn and lights; they are not independently selectable.Single Tone TM Encode:Requires Single Tone Kit installed• To Select Single Tone:To select Single Tone, momentarily press the ST button on the control head. The radio sounds one beep and displays the selected tone for two seconds. The red indicator under the ST button will light.• To Send Single Tone:Press the PTT button. The talk inhibit side-tone will be heard if it is programmed to enable. The selected tone will be displayed for the duration of the tone if the display tone on PTT is programmed to enable. Wait for the Single Tone to complete, then speak normally in to the microphone.• To Turn Off Single Tone:To turn off Single Tone, momentarily press the ST button on the control head. The radio will sound one beep and the red indicator light under the ST button will be off. • To Enter Configuration Mode:To enter the configuration mode, press and hold the ST button on the control head until the radio beeps and the red indicator under the ST button flashes. The display will show the selected tone. Use the Mode up/down button to scroll through the available tones.• To Select a Tone and Exit Configuration Mode:Press the ST button, or the Home button, to exit configuration mode and to select the Single Tone currently displayed.NOTEIf Single Tone is selected, and you scroll to a non-Single Tone mode, the STindicator will be off until you reach a mode with Single Tone.。
无线扫描枪如何使用
无线扫描枪如何使用呢?对于有些刚接触无线扫描枪的用户可能还不太了解。
其实,无线扫描枪的用法和有线扫描枪是差不多的,主要是要注意扫描枪和底座搭配的问题。
不太懂使用无线扫描枪的朋友,往往是没搞懂这个问题,下面远竞达就来说明一下。
先来了解下扫描枪和底座的搭配是怎么回事?无线扫描枪通常都会有个标配的底座,而这个底座主要是用来传输数据用的。
所以,我们需要将扫描枪和底座搭配好,这样扫描到的条码信息才能顺利传输到系统。
如果没搭配好,那扫到的条码信息也读不出来了。
清楚了搭配的原理,那么,无线扫描枪和底座具体怎么搭配呢?不同的生产厂家,搭配的方式也会略有不同,具体的我们可以看下使用说明书。
下面我们总结下三种常见的搭配方式。
大部分的无线扫描枪,底座上是有个条形码的,只要扫描下这个条形码,便搭配成功了。
例如:摩托罗拉LI4278无线扫描枪,如图
有些无线扫描枪,是将扫描枪和底座连接好后,按下底座上的红色按钮M键就搭配成功。
例如:新大陆HR15Z无线扫描枪,如图
还有部分无线扫描枪,不需要直接搭配,因为他们有数据接收器,只要把数据接收器连接电脑,便可以正常使用了。
例如:灵猫T220,如图。