天文望远镜说明书
- 格式:docx
- 大小:36.98 KB
- 文档页数:2

Libra 天秤系列天文望远镜使用说明书使用产品前请仔细阅读本说明书,并妥善保管CE.S2LIBRA1.2106.HTS81601 S81602杭州天文科技有限公司地址:浙江省杭州市拱墅区莫干山路1418-32号网址: E-mail:********************.cn 全国服务热线:400-874-7878更多信息,请关注“星特朗”公众号01恭喜您购买了Libra 天秤系列天文望远镜。
经纬仪是一种容易使用的双轴支架—高度角(俯/ 仰)和水平角(左/ 右)。
此望远镜为初学者设计,性价比高,结构紧凑而便携,其光学性能足够满足初级天文爱好者。
另外,也可用于地面观测,其较高的倍率会让你大开眼界。
在您着手进行观测之前,请花一些时间阅读这本说明书。
您可能需要通过几个观测时段来熟悉使用您的望远镜,因此在完全掌握望远镜的操作之前,建议您把说明书一直带在身边。
本说明书给出了使用中每个步骤的详细参考信息,并提供所需的参考资料和帮助提示,从而保证您的观测体验简单而愉快。
您的望远镜可以满足数年有价值的观测。
然而,在使用望远镜之前有几个注意事项,来保证您的安全以及望远镜的正常工作。
警告!不要直接利用裸眼或者是通过天文望远镜直视太阳(除非您已经有适当的太阳滤光镜)。
这将会对您的眼睛造成永久且无法挽回的伤害。
任何时候都不能用望远镜把太阳投影到任何表面上。
内部聚集的热量会损坏望远镜或望远镜上的附件。
任何时候都不能使用目镜端太阳滤光镜或赫歇尔棱镜天顶。
聚集在望远镜内部的热量会导致这些设备出现裂缝或爆炸,使漏出的阳光直接照射到人眼。
任何时候都不能让望远镜处于无人管理的状态,或交给孩子以及不熟悉正确操作程序的成年人。
产品简介产品简介部件说明0302安装本部分包含如何组装望远镜。
建议您在室内完成望远镜的首次安装,这样便于在户外安装前,识别各种附件,并且熟悉正确的组装程序。
连接望远镜镜筒到经纬仪1、松开鸠尾槽侧面的锁紧螺丝将鸠尾板滑入鸠尾槽。

Travel Scope系列说明书Travel Scope 70 # 21035 Travel Scope 50 # 21038警 告•禁止使用裸眼和未妥善滤光的望远镜直接观测太阳,这将导致永久性的视力损伤。
•不要用望远镜来将太阳直接投影到任何平面上,聚焦的光束可能损坏望远镜内的光学元件。
•不要使用置于目镜前端的太阳滤光片,不要使用未经安全认证的赫歇尔棱镜天顶来观测太阳。
望远镜的聚焦作用将可能导致这些元件剧烈吸热和爆裂。
爆裂之后日光将毫无过滤的射入人眼导致损伤。
•望远镜不要疏于管理。
在操作时要有熟悉操作的成人在现场,尤其是在有小孩在场的情况下。
目 录简介 (02)部件介绍 (03)组装 (04)望远镜基础知识 (07)天文学基础 (08)天体观测 (10)技术规格 (13)01简 介恭喜你购买了星特朗天文望远镜。
星特朗天文望远镜使用高级的材料,保证了稳定性和耐久性。
所有这些加起来可以带给你终生的观测乐趣,而只需要很少的维护。
在你着手进行观测之前,请花一些时间阅读这本说明书。
你可能需要通过几个观测时段来熟悉使用你的望远镜,因此在完全掌握望远镜的操作之前,你最好把说明书一直带在身上。
本说明书给出了使用中每个步骤的详细参考信息,并提供所需的参考资料和帮助提示,从而保证你的观测体验简单而愉快。
你的望远镜可以满足你数年有价值的观测。
然而,在使用望远镜之前有几个注意事项,来保证你的安全以及望远镜的正常工作。
02部件介绍1物镜8高度角调节手柄2镜筒9三脚架锁紧夹3寻星镜支架10三脚架4寻星镜11中轴锁紧旋钮5目镜12方位角锁紧旋钮6正像天顶镜13三脚架云台7调焦旋钮3456 7811312111092图1-1 Travel Scope 70 (Travel Scope 50类似)03044. 要升高三脚架,您先松开三脚架每一条腿底部的锁紧夹(见图2-4),再将三脚架腿拉出到您需要的高度,再锁紧锁紧夹。
伸展后的样子见图2-5。
O m n i X L T系列天文望远镜用户手册Omni XLT 102Omni XLT 102EDOmni XLT 120Omni XLT127Omni XLT 150ROmni XLT 150目录简介 (02)Omni XLT 结构图 (03)组装Omni XLT系列望远镜 (06)天文望远镜基础 (11)天文学基础 (14)天体观测 (18)望远镜维护 (21)附录 A - 技术规格 (26)附录B – 星图 (27)01恭喜您购买了 Omni XLT 系列天文望远镜!Omni XLT 系列望远镜有以下几个不同型号:102 毫米折射式望远镜, 102 毫米 ED 折射式望远镜, 120 毫米折射式望远镜, 150 毫米 折射式望远镜, 150 毫米牛顿式反射望远镜, 127 毫米施密特-卡塞格林式望远镜。
Omni 系列天文望远镜采用优质制造材料来保证它的稳定性及耐久性。
所有这些将使得您以很小的维护成本换来一生的快乐。
并且,您的星特朗天文望远镜会伴随着您对天文的兴趣增长而同步增长。
这个手册涵盖了 Omni XLT 的所有不同型号。
无论您目前的天文观测水平的高低,Omni XLT 系列望远镜都会向您和您的朋友展示宇宙中的奇妙景象。
Omni XLT 系列天文望远镜的一些主要特征如下:•手工精选的光学玻璃配合纯手工加工的镜片,为您提供优质的成像。
•星特朗 Starbright XLT 光学镀膜为您提供上好的反差和锐利的图像。
•带有坚固而稳定不锈钢三脚架的重型赤道仪。
•赤道仪双轴均内置滚珠轴承,保证跟踪平滑顺畅。
它还拥有许多其它高性能特征!Omni XLT的豪华特性结合星特朗的传奇般的光学标准提供给业余天文爱好者一款目前市场上精致且容易使用的望远镜。
在您着手观测整个宇宙之前,请花一些时间阅读这本说明书。
您可能需要花几个观测时段来熟悉您的望远镜,因此在完全掌握望远镜的操作之前,请把说明书带在身上。
本说明书给出了使用中每个步骤的详细信息以及所需的参考资料和帮助提示,从而保证您的观测体验简单而愉快。
LCM 系列天文望远镜使用说明书警 告•禁止使用裸眼和未妥善滤光的望远镜直接观测太阳,这将导致永久性的视力损伤。
•不要用望远镜来将太阳直接投影到任何平面上,聚焦的光束可能损坏望远镜内的光学元件。
•不要使用置于目镜前端的太阳滤光片,不要使用未经安全认证的赫歇尔棱镜天顶来观测太阳。
望远镜的聚焦作用将可能导致这些元件剧烈吸热和爆裂。
爆裂之后日光将毫无过滤的射入人眼导致损伤。
•望远镜不要疏于管理。
在操作时要有熟悉操作的成人在现场,尤其是在有小孩在场的情况下。
目 录简介 (02)部件介绍 (03)组装及使用 (05)望远镜基础知识 (10)天体观测 (12)望远镜维护 (14)技术规格 (16)01简 介恭喜您购买了Celestron LCM 系列天文望远镜!LCM 系列望远镜引领了新一代计算机自动化望远镜。
LCM 望远镜只要定位三颗明亮的天体就可以简单而友好的使用了。
这是望远镜实用性与便携性的完美结合。
如果您刚入门,您也许可以使用LCM 望远镜内置的巡天功能(SkyTour),驱动LCM 望远镜找到天空中最有趣的天体以及自动转向它们。
如果您比较有经验了,您将会感谢拥有超过4,000 天体的综合数据库,包括所有深空天体、行星和亮的双星的自定义表单。
无论您目前的天文观测水平的高低,LCM 系列望远镜都会向您和您的朋友展示宇宙中所有的奇妙景象。
LCM 系列天文望远镜的一些主要特征如下:• 难以置信的3°/s 的旋转速率。
•全密封的电机和光学编码器用于确定方位。
• 拥有4,000 颗天体数据的计算机化手控器。
• 可编程的存储器让用户能够自定义天体;以及很多其它高性能特征!LCM 望远镜的豪华特性结合星特朗的传奇般的光学标准提供给业余天文爱好者一款目前市场上最精致最容易使用的望远镜。
在您着手观测宇宙之前,请花一些时间阅读这本说明书。
您可能需要花几个观测时段来熟悉您的望远镜,因此在完全掌握望远镜的操作之前,您最好把说明书一直带在身上。

NEQ3天文望远镜说明书一、主要功能1.微机接口操作望远镜快速、缓慢、微小、恒定的运动和方向:2、手控盒控制望远镜快、慢、微、方向;3.计算并显示当前时间的本地星时;4、实时读取望远镜的当前位置;5.望远镜参数和状态显示;6、赤经限位、水平保护:7.自动寻星,自动返回初始位置:8、跟踪恒星(包括恒星、行星、星云、星团、星系)、跟踪月亮;9.微机接口操作圆顶的方位移动(仅限购买圆项随动模块的员);10、圆顶随动控制(购买圆项随动模块的才有);11.自动校正望远镜赤经和赤纬的零点:12、赤经除盘东的物理零点外,增加一个盘西逻辑赤经零点;13.从电子星图中自动获取目标恒星的坐标(赤经和赤纬),直接从天图中找到目标恒星;14、可设定电机控制参数、圆项随动参数、--般操作参数。
硬件环境:能平稳运行windows98、windows2000、windowsxp系统的pc系列微机;至少有一个空的pci扩展槽,用于安装6562卡;100m以上的可用硬盘空间软件环境。
1.操作系统为windows98se、Windows2000和WindowsXP.建议使用Windows XP以获得最佳性能;2.使用1024X768显示分辨率;3、最暗星等7.5等,有各类天体共约5万颗(可以添加至2等扩展星表,各类天体共约255万颗);1.系统组成在系统安装光盘上,通常有以下文件(不同版本可能会有所不同,恕不另行通知)(1)本软件的安装程序,文件名为,其版本号可能不断更新。
(1)、望远镜控制卡驱动器(6562):(2)、skymap8demo汉化版2.望远镜控制软件安装(1)首先安装skymap8中文版,然后安装此程序(2).运行光盘上的安装程序安装后,程序组和桌面快捷方式将自动生成。
1.安装望平信营节告精理所文档在不同操作系统世要谢动程印的万法物下vindors 98驱动程序安装:1.关掉电脑电源;2.将pc16562板卡插入pci插槽中:二1、打开计算机电源,启动windows98;2.Windows 98将显示查找新硬件(查找PCI简单通信设备)并继续下一步:3、在添加硬件向导窗口中选择搜索设备的最新驱动程序,下一步:4.选择驱动所在目录,进行安装;5.windows98将显示找到,提示进行下一步:6.驱动已经安装完成。

执行产品标准:GB/T10156-2009B30A/B40A:2016L263-44日本测量仪器制造厂商协会1/2点竖立水准标尺,读取a 值(后视)。
点竖立水准标尺,读取b 值(前视)。
的差值就是从A 点到B 点的高差。
h=a-b=1.735m-1.224m=0.511mA、B 两点间距离长或者高差大时>将距离分成若干个区间,分别观测每一区间段的高差。
A、B 两点间的高差则为每一区间段的高差总和。
一般计算公式为:被测点的高程=已知点的高程+后视值的总和-前视值的总和• 这种简单的水准测量方法是没有误差检核的。
最好是从A 点观测到B 点后,再返测到A 点,以便可以计算闭合差。
6.检验和校正圆水准器检验和校正1. 旋转整平脚螺旋, 使圆水准气泡居中。
2. 将仪器旋转180°(或200哥恩)。
如果气泡在圆圈内,则仪器不需要校正。
如果气泡不在圆圈内,则仪器需要按下述步骤校正。
3. 旋转整平脚螺旋,使圆水准气泡调回偏移量的一半。
1/2整平脚螺旋调整量使用六角扳手转动圆水准器调整螺丝,来调整剩余的二分之一偏移量,使得气泡居中。
1/2调整脚螺旋调整量2. 安置仪器在离A 点2m 处,读取读数a2和b2。
此时,望远镜照准B 点。
b2’=a2-(a1-b1)b2’=b2,则十字丝的水平丝正常,无需校正。
否则按如下步骤进行校正:b2’和b2不同时,按如下步骤调整十字丝:3. 取下调整螺丝的保护盖。
4. 用六角扳手调整,消除b2’与b2之间的差值。
在第步的示例中,b2’大于b2,水平丝需要下移。
要将水平丝下移,请使用校正针仔细微量松动校正螺丝。
要将水平丝上移,则拧紧校正螺丝。

天文望远镜中文说明书(精选5篇)第一篇:天文望远镜中文说明书安裝順序說明:天文望遠鏡中文說明書1,裝三角架2,裝附件盤3,裝上主鏡筒4,裝上詢星鏡5,裝上目鏡6,進行調焦和對焦:(一)是進行對焦,使詢星鏡正中間看到的物體和目鏡看到的物體是相同物體(二)是進行調焦,使用看到的物體是最清楚,最明亮的7,微調:如發現有色差或是進光不夠等情況時,可以對聚光鏡和轉角鏡進行一個細微的調節,使用進光全部能利用到,並能成直接角度進行成像(請在必要時進行調節,不般是不用調的,廠家出廠都已調好)目鏡組合方式1,直接接上目鏡,2,裝上正像鏡再接上目鏡3,裝上增倍鏡再接上目鏡4,裝上正像鏡,再裝上增倍鏡再接上目鏡如何觀景:天文望遠鏡在觀景方面,要選擇一個空氣透明度高的時間看,在空間大一點的空曠地方,觀看遠處的景色和靜止物體有較強的功能,因為他放的大,看的遠,看近的物體反而不清楚!如何觀星:觀景是天文望遠鏡主要的功能,能到美麗的深太空是一件很美的享受,不過要看星空也是要有付出一定的努力的,不然會在星空中找了半天,找不到什麼東東。
經常注意網上和電視關於一此天文奇觀的事。
也可以對一個星座你長年進行很好的觀注,看其中的變化。
豐富知識,瞭解星座和人的關係。
看星星時,一般適合初一,空氣寧靜度高,周邊光害小(光害就是邊上不要有城市燈,一個沒有最好),在家中先對設備進行調好,然後帶上手電筒,出去看星。
結伴而行是最好的了。
使用方式中,也是選項用20MM目鏡進行對焦和對物體進行定位好了,再選項用大的目鏡,一般不建議用上增倍鏡和別的鏡,那樣會在使用中,調節較難。
在第一次觀看時,常在目鏡中看到自已的睫毛,使用多了就習慣了,就不會出就這種情況。
為了使物體看的清楚,觀看時,肉眼不要和望遠鏡有直接的接觸,不然人的任何動作,都會使星體振動。
放大倍數和使用倍數:很多朋友都一直想要很高倍數的天文望遠鏡,其實是一個誤區,一般在使用過程中,我們都用在50-300倍間就很可以了,放的太大,會造成物體跟蹤不到或是找不到目標。
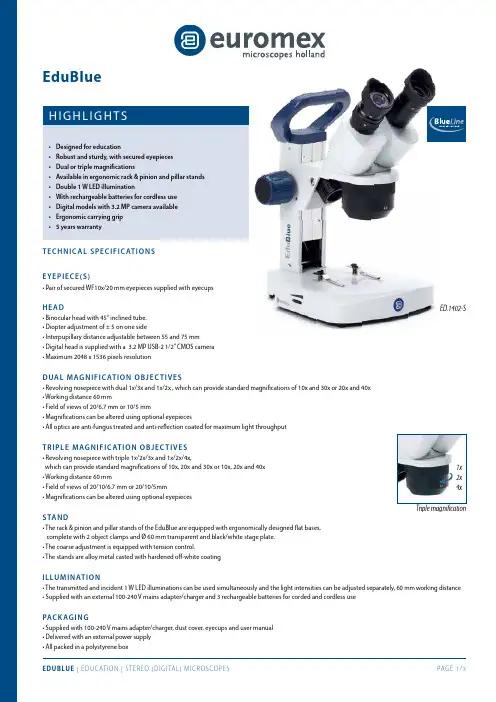
H I GH LI GH TS• Designed for education• Robust and sturdy, with secured eyepieces • Dual or triple magnifications• Available in ergonomic rack & pinion and pillar stands • Double 1 W LED illumination• With rechargeable batteries for cordless use • Digital models with 3.2 MP camera available • Ergonomic carrying grip • 5 years warrantyTEC HNI C A L S P E C IF IC AT I ON S EYEP I E C E (S )• Pair of secured WF10x/20 mm eyepieces supplied with eyecupsHE A D• Binocular head with 45° inclined tube. • Diopter adjustment of ± 5 on one side• Interpupillary distance adjustable between 55 and 75 mm • D igital head is supplied with a 3.2 MP USB-2 1/2” CMOS camera • Maximum 2048 x 1536 pixels resolutionDUA L MAG NI F I C AT I ON O B J E C T IV E S• Revolving nosepiece with dual 1x/3x and 1x/2x , which can provide standard magnifications of 10x and 30x or 20x and 40x • Working distance 60 mm• Field of views of 20/6.7 mm or 10/5 mm• M agnifications can be altered using optional eyepieces• All optics are anti-fungus treated and anti-reflection coated for maximum light throughputTRI P LE MAG NI F I C AT I ON OB J E C T IV E S• Revolving nosepiece with triple 1x/2x/3x and 1x/2x/4x,which can provide standard magnifications of 10x, 20x and 30x or 10x, 20x and 40x • Working distance 60 mm• F ield of views of 20/10/6.7 mm or 20/10/5mm • Magnifications can be altered using optional eyepiecesSTAN D• The rack & pinion and pillar stands of the EduBlue are equipped with ergonomically designed flat bases, complete with 2 object clamps and Ø 60 mm transparent and black/white stage plate. • The coarse adjustment is equipped with tension control. • The stands are alloy metal casted with hardened off-white coatingI LLU MI N AT I O N• The transmitted and incident 1 W LED illuminations can be used simultaneously and the light intensities can be adjusted separately, 60 mm working distance • Supplied with an external 100-240 V mains adapter/charger and 3 rechargeable batteries for corded and cordless usePAC K AG I N G• Supplied with 100-240 V mains adapter/charger, dust cover, eyecups and user manual • Delivered with an external power supply • All packed in a polystyrene boxEduBlueED.1402-S1x 2x 4xTriple magnificationDigital head1x/3x objectives 2x/4x objectives 1x/2x/3x objectives 1x/2x/4x objectivesPillar standRack & pinionstandED.1302-P ••ED.1302-S ••ED.1305-S •••ED.1402-P ••ED.1402-S ••ED.1405-S •••ED.1502-S ••ED.1505-S •••ED.1802-S ••ED.1805-S•••M O D E L SDI GI TAL MO DE LS C AME R A• Digital models are equipped with a 3.2 MP USB 2 1/2 inch sensor CMOS USB-2 camera• Maximum resolution is 2048 x 1536 pixels, 24 bits color depth, up to 10 frames per second. Smaller resolutions are selectable • Delivered with the ImageFocus 4 software, for capturing of images and videos, USB-2 cable and a micrometer 1mm/100 slide • Warranty for the camera is 2 yearsSOF T WA RE• Delivered with ImageFocus 4 for capturing of images and videos• This software also allows a full range of analysis like measurements on still and live images and annotations on captured images • Save images in .jpg, .tif or .bmp formats, save videos in .avi format• Images can be annotated and measurements can be performed on live or captured images • Compatible with Windows XP , Vista, 7, 8 and 10, all 32 and 64 bits configurations • For Mac OS more basic software is available• Updates can be downloaded on our website ED.1505-SED.1302-PACC E S S O RI E S A ND S PA RE PA R TSED.6005 Pair of HWF 5x/22 mm eyepieces ED.6010 Pairof HWF 10x/20 mm eyepieces ED.6015 Pair of HWF 15x/12 mm eyepieces ED.6020 Pair of HWF 20x/10 mm eyepiecesED.6110 HWF 10x/20 mm eyepiece with 10 mm/100 micrometer ED.6099 Pair of eyecupsED.9570 Pair of object clamps for stageED.9950 Stage plate frosted glass, opaque, Ø 60 mm ED.9956 Stage plate black/white, Ø 60 mm ED.9975 External 100-240 V mains adapter/ charger ED.4300 Aluminium transport case for EduBlue microscopesSL.5504 LED replacement unit for EduBlue, incident illumination SL.5505 LED replacement unit for EduBlue, transmitted illuminationAE.1112 Micrometer 76 x 26 mm slide, 50 mm/50 divisions PB.5245 Lens cleaning paper, 100 sheets per pack PB.5274 Isopropyl alcohol 99% (200 ml)PB.5275 Cleaning kit: lens cleaning fluid, lint free lens tissue, brush, air blower, cotton swabsD I ME N S I O N S258260463822017513548EuromexMicroscopenbv•Papenkamp20•6836BDArnhem•TheNetherlands•T+31(0)263232211•F+31(0)263232833•****************•。
VIXENED80Sf ED100SfVixen Optics a Division of MrStarGuy, Inc. PREFACET hankyouvery much for your purchase of a Vixen astronomical telescopeThis manual applies to the ED80Sf and ED100Sf telescopes. You may occasionally find descriptions in the text not relevant to your particular model. Read the instructions for your mount along with this manual if you purchased the telescope as a complete package.WARNING! Never look directly at the sun with the telescope or its finder or guide scope.Permanent and irreversible eye damage may result.CAUTIONDo not leave the optical tube uncapped in the daytime. Sunlight passing through the telescope or finder scope may cause a fire.Do not use the product while moving or walking, injuries could result from a collision with objects or from stumbling or falling.Keep small caps, plastic bags, or plastic packing materials away from children. These may cause a danger of swallowing or suffocation.Do not use the product in a wet environment and do not handle with wet hands.HANDLING AND STORAGEDo not leave the product inside a car in bright sunshine or in other hot places. Keep any strong heat sources away from the product.When cleaning, do not use solvents such as paint thinner or similar products. Do not expose the product to rain, water, dirt or sand.Avoid touching any lens or mirror surfaces directly with your hands. In case a lens or mirror becomes dirty with fingerprints or general smears, gently wipe it using acommercially available lens cleaner and a lens cleaning paper or cloth, or consult your local Vixen dealer.Blow off dust on lenses using a commercially available blower brush. Do not use compressed air.For storage, keep the product in a dry place and do not expose to direct sunlight.SETTING UP THE TELESCOPE- Refer to your mount instructions along with this manual.ATTACHING THE TELESCOPE TO THE MOUNT (GP2 mount and A80Mf optical tubeshown here)Loosen both the dovetail ‐plate lock screw and safety screw until the tips of these screws nolonger extended into the inner part of the dovetail block. Slide the dovetail mounted scope into the dovetail mounting block as shown in the figure. Tighten the dovetail lock screw (centered on the notch) onto the dovetail tube plate until snug.First tighten the dovetail lock screw, and then tighten the small chrome safety screw onto the dovetail mounting block until snug.Page 1ATTACHING THE FINDER SCOPE(1)Backouttheadjustmentscrewon the finder bracket to allow passage of the finder scope. (Make sure the adjustment screws do not fall off the bracket.)(2)Side the rubber O ‐ring onto the eyepiece end of the finder. There are two grooves on the finder tube. Position the O ‐ring on the narrow groove at the middle of the finder tube.(3) Pull up the fixed stud on the bracket ring and pull it so that the finder tube slides into the bracket ring from its eyepiece end. Release the fixed stud so the wide groove on the finder tube is underneath the stud.(4) Tighten the two adjustment screws so that the finder scope is aligned as shown in the figure.Loosen the finder bracket lock thumbscrew on the telescope.Attach the finder bracket as shown in the figure, tighten the finder bracket lock thumbscrew securely.ALIGNING THE FINDER SCOPE – Be sure to align the finder scope before you begin observing.(1) Choose a conspicuous target in the distance and place the target inthe center of the field of view of the telescope. (In the illustration, a distant tower is brought into the center of the field of view of the telescope.)(2) Next, look through the finder scope. You should probably find thesame target somewhere within the finder’s field of view. (The finder scope has crosshairs.)(3) Align the optical axis (field of view) of the finder scope with theoptical axis (field of view) of the telescope. Adjust the finder scope by loosening or tightening the adjustment screws A and B(In Figure #4 Above) until the target is in the same position, in the center of the crosshairs. (In the illustration, the top of the tower is in the center of the crosshairs.)Page 2ACCESSORY CHART – You may need an eyepiece as sold separately.Visual ConfigurationExample: Calculating the eyepiece magnification of a telescope with 1035mm focal length.Eyepiece Focal length of telescope Focal length of eyepiece MagnificationPL20mm 600 mm 20mm 30xPL 5mm 600 mm 5mm 120x PHOTOGRAPHIC CONFIGURATIONPhotographic Configuration Prime Focus PhotographyEyepiece Projection PhotographyAfocal Imaging Photography Please check if your camera has a filter thread which can fit our DG‐DX ring.Page 3SPECIFICATIONSSpecifications ED80Sf ED100SfItem # 3228 3229Optical Design ED Achromatic RefractorEffective Aperture 80mm 100mmFocal Length 600mm (f/7.5)900mm (f/9.0)Resolving Power 1.45 arc.; 11.3 1.16arc sec; 11.8Light Gathering Power 131x 204xTube Diameter, Length & Weight 100mmx570mm; 3.4kg100mm x 880mm; 3.7kgFinderscope 9x50mm 9x50mmThreads 60mm, 42mm threaded for T‐ring/50.8mm, 31.7mm push‐fit for Tring/31.7mm push‐fitAccessories Flip Mirror, Aluminum Carry Case, Mount Rings, Dovetail PlatePhotographyTotal Weight 8.9kg 19.6 lbs total weight11.5kg25.3 lbs total w/case7.5 lbs optical tube8.2 lbs optical tubeABOUT THE CRAYFORD FOCUSERBoth the ED80Sf and ED100Sf telescopes have the Crayford focuser which uses friction for the focusing mechanism. Follow these instructions for its use.Tighten the tension adjustment screw if the drawtube is loose.Even with the tension knob fully tightened , it is possible , though not recommended, to rotate the focus knobs.Never apply lubricant to the focuser.MrStarGuy, Inc. 1010 Calle Cordillera, San Clemente, CA 92673Page 4。
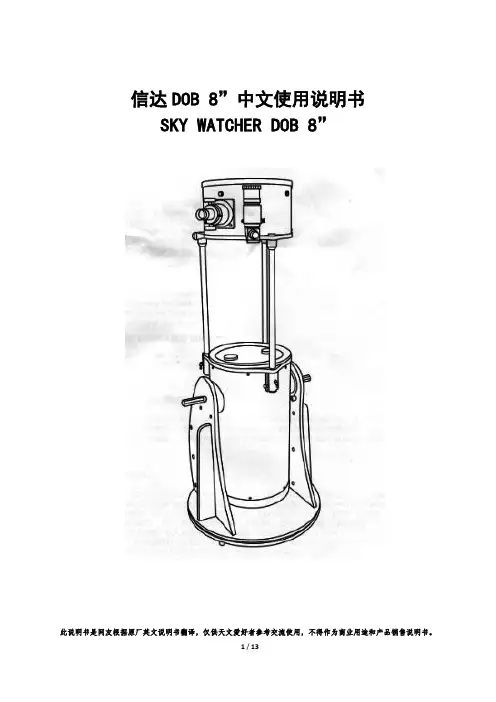
信达DOB 8”中文使用说明书SKY WATCHER DOB 8”此说明书是网友根据原厂英文说明书翻译,仅供天文爱好者参考交流使用,不得作为商业用途和产品销售说明书。
目录组装望远镜 (2)基座组装 (2)主镜筒安装 (5)操作你的望远镜 (8)校准寻星镜 (8)对焦 (8)使用巴洛镜 (9)使用张力控制把手 (9)DOB指向 (10)观测天空 (10)天空条件 (10)选择观测地点 (10)选择最佳观测时间 (11)冷却望远镜 (11)眼睛的适应 (11)保养望远镜 (13)准直 (16)清洁望远镜 (17)开始前本使用说明书适用于封面上列出的所有型号。
在开始之前认真完整地阅读说明书。
你的望远镜应该在白天组装。
选择一个大型、开放的区域,有足够的空间将所有的零部件从包装中取出。
小心!不要使用你的望远镜直接看太阳。
眼睛会导致永久性损伤。
使用适当的太阳滤镜观测太阳。
当观测太阳的防尘盖置于你寻星镜,以保护它免受暴露。
永远不要使用目镜式太阳滤镜和永远不要用望远镜将阳光投影到另一个表面上,这样内部的热积累会损伤望远镜光学元件。
基座安装(DOB 8”)1.B板连接的A1和A2板。
确保标识在Al和A2板的外侧。
B板有三个小孔的边应朝前面。
2.连接组装到圆板C上。
3.把3个脚装在D板上。
4.将特氟隆垫放置在第 2 步的组装件和D板之间。
从第2包中取出黑色的管子插入他们的中心。
5. 从第2包中取出带垫圈的螺栓,并插入黑色的管中。
使用配套的两个扳手将螺母和垫圈装上。
不要将螺栓拧得过度紧。
确保基座自由旋转。
定。
7.从包裹4中取出手柄,用包裹5中的六角扳手和螺丝钉安装到B板上。
8.从包裹5取出圆柱鞍和螺丝,拆开。
如图,将圆柱鞍和螺丝分两侧安装在 A1和A2板上。
主镜筒安装(DOB 8”)1.在A1和A2板之间放置主镜筒。
请确保主镜筒侧边的轴支撑在4个侧板的圆柱上。
2.将手柄安装到A1和A2板上的孔。
不要将手柄拧得过紧。
为了方便,请确保张力控制手柄安装在调焦座的同一侧。
天狼星天文望远镜使用说明书天狼星天文望远镜使用说明书欢迎购买天狼星天文望远镜!此款望远镜是一款功能强大、高性能的天文观测工具,旨在帮助您探索宇宙的奥秘和观测星空的美丽。
为了确保您能充分享受观测的乐趣和获得最佳成果,以下是使用天狼星天文望远镜的详细说明,希望对您有所帮助。
1. 展开和安装在使用望远镜之前,您需要将其展开和安装。
首先,将三脚架打开并放置在平坦稳固的地面上。
确保三脚架稳固无晃动。
接下来,将望远镜本体与三脚架连接,注意确保连接牢固且安全。
最后,使用紧固螺丝将望远镜固定在三脚架上,并调整高度和角度以适应您观测的需要。
2. 进行校准在使用天狼星望远镜观测星空之前,需要进行校准。
首先,在白天选择一个远离大楼和树木的开阔区域,将目镜对准一个远处的地标(例如建筑物、电线杆等)。
然后,使用望远镜的调焦机构调整视野清晰度。
同时,根据地理位置的经纬度将地平仪调平,以确保观测的准确性和稳定性。
3. 使用观测镜头天狼星望远镜配备了多款观测镜头,以满足不同观测需求。
在观测前,您可以根据需要更换不同倍数的目镜。
较低倍数的目镜适用于广角观测,可以观察更大范围的星空;较高倍数的目镜适用于细节观测,可以观察更清晰、更详细的天体。
请注意,在更换目镜时,务必小心操作,以免损坏望远镜。
4. 调整焦距和焦点天狼星望远镜可以通过调节调焦机构来改变焦距和焦点。
当观测远处的星体时,可以通过向外旋转调焦机构放松视野,从而获得更清晰的图像。
当观测近处的天体时,可以通过向内旋转调焦机构来缩小焦距并提高清晰度。
根据观测对象的距离和大小调整焦点,以获得最佳的观测效果。
5. 处理天文台湾问题当您在观测中遇到天文台湾问题时,不必担心。
天狼星望远镜配备了一个自动跟踪系统,可用于追踪和跟踪天体。
只需使用附带的控制器选择您要观测的天体,并启动自动跟踪功能,望远镜会自动进行微调以保持天体在视野中心。
这将使您的观测更加方便、稳定和精确。
6. 维护和保养为了确保天狼星望远镜的良好状态和长期使用,请在使用后及时进行清洁和维护。
103 APO使用说明书User s Manual,欢迎使用ASKAR 103APO 中文版(简体)E n g l i s h使用产品前请仔细阅读本使用说明书。
产品尺寸及部件图S t e p s o f D e t a c h i n g t h e E x t e n d e r T u b eI n s t r u c t i o n s f o r u s e警告w w w.s.m103 APOUser s Manual,w w w.s.mAskar 103APO是一款拥有103mm口径,700mm焦距,原生焦比f/6.8的天文望远镜。
Askar 103APO的镜片结构秉持了锐星光学的APO镜片传统,为三片式APO全分离镜头设计,其中含有一片ED玻璃。
Askar 103APO镜筒全部使用高质量CNC加工工艺,经过阳极氧化和表面喷漆处理。
主镜筒内置光阑,且内壁全部进行消光处理,有效减少杂散光对成像的影响,此外,遮光罩使用可伸缩设计,并配有加大的遮光罩手拧锁紧螺丝,防止遮光罩在使用过程中滑落。
在Askar 103APO的调焦器上,共设有2组寻星镜基座,分布在调焦器的两侧。
除了在更换寻星镜位置时无需拆装,还能提供更多位置接驳天文配件。
Askar 103APO 抱箍的轻量化设计,使其整体重量仅750g。
提手的多功能设计,使其同样可以接驳需要使用寻星镜基座的天文配件。
抱箍使用C N C 定制手拧螺丝搭配蚌壳式开口设计,无需多余工具,可直接拆装。
鸠尾板规格为Vixen型,可搭配同规格赤道仪或经纬仪,鸠尾板多孔的设计,便于调整鸠尾板相对抱箍的位置,其长度达到290m m ,在使用时更方便配平。
Askar 103APO 采用分段式主镜筒设计,在不使用延长管时,可搭配专用0.6倍减焦镜或可搭配双目目镜使用。
装配延长管后,即可使用0.8倍减焦镜或1.0平场镜,或连接天顶搭配目镜观测天体。
在调焦器选择上,Askar 103APO 采用了双速齿轮齿条式3.3英寸刚性调焦器,CNC高精度加工,兼容大部分电动调焦设备,提供100mm调焦行程,并搭载高精度重型构图旋转器,采用激光雕刻长度方向与圆周方向的S p e c i f i c a t i o nAperture size: 103mm Focal length: 700mm Focal ratio: f/6.8Objective lens: Triplet air-spaced APO (including one ED glass) Total length: 600mm (when the dew shield is contracted) 711mm (when the dew shield is stretched) Net weight: 4.75kg Gross weight: 5.5kgRear-end adapter: 2" adapter, 1.25" adapterStandard package items: a 103APO OTA, a pair of tube rings, a handle, an Askar 290mm Vixen dovetail plate, a manual,a transportation bagI t e m s i n 103A P O P a c k a g i n g说明书箱包一个103APO OTA, a pair of tube rings, a handle, a 290mm Vixen dovetail plateInstruction manual锁紧螺丝示意图包装含有The Locking Screw Position Diagram有效口径:103mm 焦距:700mm 焦比:f/6.8物镜类型:三片式全分离APO(包括一片ED玻璃)全长:600mm(遮光罩缩进状态)711mm(遮光罩伸出状态)本体重量:4.75kg 标准装重量:5.5kg末端接口:2英寸接口、1.25英寸接口标配:103APO本体一个,抱箍一对,提手一个,290mm Vixen 窄型鸠尾板一个,说明书一份,箱包一个标尺,便于用户调整和信息记录。
目录概述 (03)部件清单 (03)组装和设置 (05)用你的智能终端控制望远镜 (07)用SKY PORTAL应用校准EVOLUTION 望远镜 (08)用SKY PORTAL控制望远镜指向目标和其他望远镜功能 (09)SKY PORTAL望远镜设置和控制菜单 (10)用NEXSTAR+手控器控制望远镜 (12)两种常见的校准方法概述 (14)使用斜劈进行南/北半球赤道仪模式校准 (15)NEXSTAR+手控器里设置EVOLUTION望远镜 (15)NEXSTAR EVOLUTION手控器目录树 (16)高级目录树 (17)望远镜维护 (18)附录A:规格 (20)附录B:高级WIFI (22)附录C:LED状态 (23)概述1高度锁紧旋钮2电源和充电指示LED 3搬运把手4WIFI LED 指示灯5USB 电源输出口6电源输入口7辅助接口3# 4#8水准泡9三脚架支撑螺母和垫片10附件盘11三脚架腿伸缩固定旋钮12望远镜光学镜筒13红点寻星镜14目镜15目视后背16天顶镜17调焦旋钮18辅助接口1# 2#19WIFI 开关20重启开关21水平锁紧旋钮22搬运把手23电源开关24中轴25三脚架26三脚架腿高度指示刻度部件清单光学镜筒组件1.25寸天顶40mm PL 目镜13mm PL 目镜红点寻星镜叉式支架三脚架附件盘交流电源适配器(USA EU UK 和AU 接口)•准备一个交流插座,并使用指定的交流适配器给望远镜充电。
•请准备一个使用IOS7.0或以上的苹果设备,或者一个使用安卓4.0或以上的安卓设备。
(如果没有NEXSTAR+手控器的话)•从APP 商店或GOOGLE PLAY 下载免费的CELESTRON SKYPORTAL 应用。
(如果没有NEXSTAR+手控器的话)•用十字螺丝刀把红点寻星镜安装到望远镜上。
太阳警告• 不要直接利用裸眼或者是通过天文望远镜直视太阳(除非您已经有适当的太阳滤光镜)。
星特朗NexStar SLT天文望远镜使用说明书NexStar 60,NexStar 80,NexStar 102,NexStar 114,NexStar 130目 录简介 (6)警告 (6)组装 (9)组装NexStar望远镜 (9)安装手控器的支架 (10)三脚架上安装叉臂 (10)叉臂上安装望远镜筒 (10)天顶镜 (10)目镜 (11)调焦 (12)星点寻星镜 (12)安装星点寻星镜 (12)操作星点寻星镜 (13)安装手控器 (13)NexStar供电 (14)手控器 (15)手控器介绍 (15)手控器操作 (16)校准程序 (17)星空校准 (17)两星校准 (19)一星校准 (20)太阳系校准 (20)NexStar重新校准 (21)天体分类 (22)选择天体 (22)回转指向天体 (22)寻找行星 (23)漫游模式 (23)星群漫游 (23)方向键 (24)速率键 (24)设置步骤 (25)跟踪模式 (25)跟踪速率(Tracking Rate) (25)观察时间-地点(View Time-Site) (25)用户定义目标(User Defined Objects) (25)Get RA/DEC (26)Goto R.A/Dec (26)辨认 (26)望远镜设置功能 (27)设定时间-位置 (27)消齿隙 (27)回转极限 (27)选星范围 (28)方向键 (28)实用功能(Utility Features) (28)GPS开/关 (28)出厂设置 (29)版本 (29)Get Alt-Az (29)Go Alt-Az (29)休眠(Hibernate) (29)太阳菜单 (29)滚动菜单 (30)调焦 (31)图像取向 (31)望远镜基础知识 (31)计算放大倍率 (32)测量视场 (32)一般观测提示 (32)天文观测 (33)观测月球 (33)观测行星 (33)行星观测提示 (33)观测太阳 (34)太阳观测提示 (34)观测深空天体 (34)观看条件 (34)透明度 (34)宁静度 (35)望远镜维护 (36)光学器件护理和清洁 (36)准直 (36)可选配件 (37)附录A: 技术指标 (40)附录B: 时区图 (41)附录C: 全年星图 (43)简介恭喜您购买了星特朗NexStar望远镜。
Seestar S50使用说明书目录前言 (2)温馨提示 (3)包装清单 (4)一、产品介绍 (5)二、性能参数 (6)三、使用方法 (8)3.1本体结构名称及功能 (8)3.2安装设备和Seestar App (10)3.3连接Seestar设备 (11)3.4Seestar App介绍 (14)3.5安装和拆卸 (21)3.6观星和观景 (22)3.7关机并收纳 (23)四、观测/拍摄技巧 (24)五、结构尺寸 (24)六、免责声明 (25)七、售后 (26)八、质保 (27)前言感谢您购买智能天文望远镜Seestar S50。
历经5年研发,整合前沿智能化技术及人性化设计,Seestar面向全球天文爱好者推出:集大众化、轻量化、智能化于一体的智能天文望远镜Seestar S50。
Seestar是ZWO旗下智能天文设备品牌,Seestar S50智能天文望远镜是一种一体式集成化智能天文摄影解决方案,将经纬仪、望远镜、相机、主控、图像后期处理等集成于一体,机身仅2.5kg,使用手机APP就能浏览望远镜镜头中的画面,并提供目标的介绍,方便用户快速地开展天文观测和天文科普的活动。
本说明书的编写目的是以文字说明和图例的方式为用户介绍智能天文望远镜的使用方法,提醒可能存在的不当操作或危险情况。
请确保在使用智能天文望远镜前,仔细阅读本说明书,并严格按照说明书的指示谨慎操作。
任何因不当操作而引起的设备损坏以及人身伤害均由使用者本人承担。
本说明书能够指导用户安全高效地使用本设备,在使用设备前,请确保仔细阅读以下温馨提示,并在实际使用过程中严格遵守本说明书的指导。
本说明书的内容可能会有更改。
有关如何使用本产品的最新说明,请参阅https:///提供的在线手册。
1、在未配备专门的太阳滤镜情况下,请勿直接观测太阳,会导致产品不可逆转的损坏。
2、未成年人需在成人监护下使用本产品。
3、请使用正规制造商制造的充电器给产品充电,Seestar不对因电源充电器造成的损坏负责(充电器规格:支持USB BC1.2。
天文望远镜说明书
天文望远镜说明书
本说明书旨在帮助您了解天文望远镜的使用方法及注意事项,使您能够正确、安全地操作望远镜,获得更好的观测体验。
1. 组装指南:
- 首先,将望远镜的三脚架打开并调整到合适的高度,确保
稳定性。
- 将望远镜的光学管装配到三脚架的中央接口上,并通过扳
手固定好。
- 将望远镜的目镜装配到光学管上,并轻轻旋转使其对准目标。
- 检查所有连接处是否牢固,确保安全使用。
2. 校准过程:
- 首先,将目镜对准地平线上的一个稳定、容易辨认的目标,例如建筑物或远处的树木。
- 使用垂直调节旋钮或杠杆,将视场中心的交叉线对准所选
择的目标。
- 然后,使用水平调节旋钮或杠杆,将视场中心的交叉线与
所选择目标的水平线对齐。
- 再次检查校准是否准确。
3. 观测技巧:
- 在选择观测目标之前,确保望远镜已校准并调整好焦距。
- 使用较低的放大倍数开始观测,以获得更广阔的视野和更
清晰的图像。
- 寻找一个稳定的观测位置,远离环境干扰和光污染,并尽可能避免大气湍流。
- 当调整望远镜方向时,使用缓慢而平稳的动作,以避免影响观测。
4. 注意事项:
- 在使用望远镜时,避免触摸光学镜片,因为指纹或划痕会影响观测效果。
- 当您不使用望远镜时,可以使用防尘罩或盖子保护光学部件。
- 请避免将望远镜暴露在潮湿、尘土或极端温度的环境中,以免损坏设备。
- 在观测太阳、月亮或其他明亮的天体时,务必使用适当的滤镜,以避免眼睛受伤。
本说明书仅提供了天文望远镜的基本操作和安全事项的概览。
具体的使用指导和注意事项请参阅您所购买的望远镜的用户手册。
了解和遵守所有使用规则和安全指南,将有助于您充分利用望远镜并保持安全。