CI-50中断器操作手册课案
- 格式:doc
- 大小:2.99 MB
- 文档页数:18

51单片机中断实施的步骤介绍中断是指在程序运行的过程中,当发生特定条件的时候,中断会打断程序的正常执行,转而执行中断服务程序。
51单片机中断实施的步骤可以帮助开发者合理地利用中断的功能,提高程序的灵活性和效率。
本文将详细介绍51单片机中断实施的步骤。
步骤一:设置中断向量表中断向量表是存放中断服务程序入口地址的一组地址。
首先,需要用特定的指令将中断服务程序的入口地址存入中断向量表的相应位置。
51单片机具有8个中断源,对应的中断向量表从0x0003~0x001B,每个中断源有两个地址,分别为中断入口地址和重定向入口地址。
步骤二:开放中断在51单片机中,中断允许位和中断优先级相互影响,因此在开放中断之前,需要设置好相关的中断优先级和中断允许位。
设置中断优先级的方法有两种,一种是通过设置中断允许位的方式,另一种是通过设置寄存器中的优先级位的方式。
步骤三:编写中断服务程序中断服务程序是在中断发生时执行的一段特定的代码。
在编写中断服务程序时,需要注意以下几点: - 中断服务程序必须使用org指令指定入口地址,保证程序正确执行; - 中断服务程序中不应该包含太长的延时和大量的计算; - 中断服务程序中可以操作的寄存器有限,需要仔细查看相关的资料。
步骤四:设置中断允许位为了使中断能够正常工作,需要在中断实施前设置相关的中断允许位。
在51单片机中,P33为总中断允许位,P34为定时器0中断允许位,P3^5为定时器1中断允许位,以此类推。
设置中断允许位的代码如下:EA=1; // 总中断允许位ET0=1; // 定时器0中断允许位ET1=1; // 定时器1中断允许位...步骤五:配置中断源在实施中断之前,需要配置好中断源。
在51单片机中,中断源可以是外部中断、定时器中断、串口中断等等。
配置中断源的代码如下:IT0=1; // 外部中断0下降沿触发IT1=0; // 外部中断1低电平触发...步骤六:启动中断通过设置中断允许位和配置中断源后,即可启动中断。
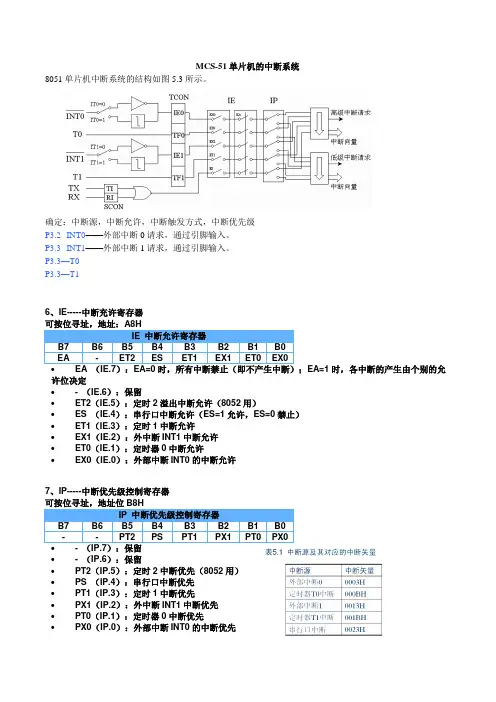
MCS-51单片机的中断系统8051单片机中断系统的结构如图5.3所示。
确定:中断源,中断允许,中断触发方式,中断优先级P3.2--INT0——外部中断0请求,通过引脚输入。
P3.3--INT1——外部中断1请求,通过引脚输入。
P3.3—T0P3.3—T1入低电平时,置位IE0;IT0=1,为脉冲触发方式。
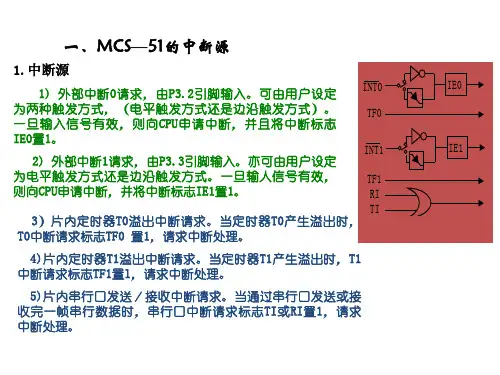
5.2.1 中断源8051中断系统的5个中断源为:INT0——外部中断0请求,通过P3.2引脚输入。
INT1——外部中断1请求,通过P3.3引脚输入。
T0——定时器/计数器0溢出中断请求。
T1——定时器/计数器1溢出中断请求。
TI/RI——串行口中断请求。
四、中断程序设计1.中断程序设计的一般方法:(1) 主程序中的中断系统初始化1)设置中断系统特殊功能寄存器(例中断源的触发方式);2)设置中断优先极;3)设置中断允许寄存器(开中断);4)中断服务程序的前期初始化(例如入口参数等)。
(2) 中断响应与中断服务程序1. 中断响应条件CPU响应中断的条件有:✓有中断源发出中断请求。
✓中断总允许位EA=1,即CPU开中断。
✓申请中断的中断源的中断允许位为1,即中断没有被屏蔽。
✓无同级或更高级中断正在被服务。
✓当前的指令周期已经结束。
✓若现行指令为RETI或者是访问IE或IP指令时,该指令以及紧接着的另一条指令已经执行完毕。
例1假设允许片内定时器/计数器中断,禁止其他中断。
试根据假设条件设置IE的相应值。
根据题目要求,要允许内部定时器中断,就需要将IE寄存器的EA、ET1、ET0置1,其他位清0,可分别通过字节寻址或者位寻址进行。
(1) 用字节操作指令:MOV IE,#8AH 或者,MOV` A8H,#8AH(2) 用位操作指令:SETB ET0 ;定时器/计数器0允许中断SETB ET1 ;定时器/计数器1允许中断SETB EA ;CPU开中断例1系统要求设定8051的片外中断为高优先级中断,片内中断为低优先级。


盛年不重来,一日难再晨。
及时宜自勉,岁月不待人。
单片机实验指导书目录第一章:实验设备简介 (1)1.1 系统实验设备的组成 (1)1.2 Silicon Labs C8051F 单片机开发工具简介 (1)1.3 DICE-C8051F嵌入式实验/开发系统简介 (3)第二章集成开发环境KEIL C软件使用指南 (7)2.1 KEIL C软件具体使用说明 (7)第三章实验指导 (20)3.1 C8051F 单片机I/O 口交叉开关设置 (20)3.2 数字I/O端口实验 (22)3.3 定时器实验 (24)3.4 外部中断实验 (27)3.5 键盘显示实验 (29)3.6 六位动态LED数码管显示实验 (31)3.7 RS3232串口通讯实验 (33)3.8 综合设计 (35)使用特别说明:(1) 每次实验前,请仔细阅读实验指导,连线完毕,检查无误后,方可打开电源。
即连线时必须在断电状态下。
(2) 程序运行过程中,不要关闭电源,如果要断电,必须停止运行程序,并且退出程序调试状态,否则会引起KEIL C软件非正常退出,甚至引起DICE-EC5仿真器工作异常。
(3) 如出现上述(2)的的误操作,引起DICE-EC5仿真器工作异常,可对DICE-EC5仿真器进行复位。
(在光盘中找到文件夹“USB Reset”中的“USB Debug Adapter Firmware Reset”文件,双击运行,在弹出的对话框中点击“Update firmware”按钮,在提示成功后,点击“OK”按钮,退出复位程序。
DICE-EC5仿真器即可正常工作。
在下一次调试、下载程序时会提示“Do you want to update serial adapter now? ”,点击“确定”即可。
第一章:实验设备简介1.1 系统实验设备的组成DICE-C8051F嵌入式实验/开发系统由C8051F020 CPU 板、DICE-EC5仿真器和系统实验板三部分组成,应用该设备可进行片上系统单片机较典型应用的实验,请参见以下介绍。

ATION MANUALREC-50MRead and understand all of the instructions and safety informationin this manual before operating or servicing this tool.REGISTRATION/ TABLE OF CONTENTSTHANK YOU...for purchasing an Huskie Tools product. Our mission is to supply the finest steel cableconnecting and cutting tools and cable-related products to the transmission and distribution markets. Huskie Tools products will represent state-of-the-art tools and be dependable and safe. All products will carry an unconditionalguarantee to be free from defects and to perform as advertised.Please take the time to read this manual carefully to learn how to correctly operate and maintain your tool.WARRANTYWarrantyHuskie Tools products carry a warranty that makes us a leader in the tool industry. No other manufacturer dares to back its tools as we do.All Huskie REC-SERIES battery operated products carry a 5 year warranty. The ECO-SERIES battery operated products carry a 1 year warranty. The BP-80 & BP-84 batteries carry a 5 year warranty from the date stamped on the battery. The BP-82 battery carries a 1 year warranty.PRODUCT WARRANTYREC-Series battery operated products 5 Y earsECO-Series battery operated products 1 Y earsBatteries (BP-80, BP-84) 5 years/ (BP-82) 1 yearChargers (CH-90, CH-94) 5 Y earsThe warranty does not cover any damages incurred from a Huskie tool including damages to property, bodily injuries and lost wages resulting from such injuries. This warranty solely covers the repair or replacement of tools supplied by Huskie. These remedies are exclusive, and the total liability of Huskie Tools, LLC whether based on contract, warranty, negligence, indemnification, strict liability or otherwise, shall not exceed the purchase price of the tool. In no event shall Huskie Tools, LLC be liable for consequential, incidental or special damages.HUSKIE TOOLS, LLC MAKES NO OTHER WARRANTIES OF ANY KIND, EXPRESSED OR IMPLIED, AND ALL IMPLIED WARRANTIES INCLUDING ANY WARRANTY OF MERCHANTABILITY AND FITNESS FOR A PARTICULAR PURPOSE ARE DISCLAIMED.Huskie reserves the right to determine all warranty claims. Huskie will not warranty tools containing parts or batteries not originally supplied by Huskie. Failure due to misuse, improper maintenance, misapplication, not following instructions or warnings, abuse or repairs attempted by anyone other than Huskie Tools, LLC, or an authorized service center renders this warranty null and void.Repair and Warranty ClaimsAll claims must be sent to Huskie for inspection and authorization. A Return Goods Authorization (RGA) is required before shipping tools to Huskie. Secure the authorization by telephoning or writing to Huskie’s main office with detailsof the claim. Non-warranty repairs are handled using the same procedure. Repairs exceeding 50 percent of the cost of a new tool will be advised before repairs are made.Payment TermsUpon credit approval Huskie’s standard payment terms are net-30 days. Visa, Mastercard, Discover and American Express are also accepted.FreightAll Huskie tools are FOB, Glendale Heights, Illinois. Goods will be shipped pre-paid and added, unless otherwise specified. Freight shipments over $17,000 are pre-paid.QuotationsSpecial quantity quotations should be phoned in to discuss the scope of your tool requests.Complete Support ServicesOur customers have direct access to us for training, service, and problem solving. As specialists in tools, we maintaina trained repair staff and a large stock of parts. This contrasts with many tool suppliers who carry tools as a sideline without offering support services. Here are some reasons why our customers love to do business with us:• Quick delivery• We maintain inventory at our headquarters.• Training and troubleshooting services.• Fast repair service.• Design and engineering service for special tool needs.SAFETYThis safety alert symbol indicates a potential per-Electric Shock hazard:Pinch Point Hazard:Compression Dies at high force can cause severe per-sonal injury. Keep all bodyKIT INCLUDESBattery and Charger• BP-84 Huskie Tools Lithium Ion Battery • CH-94 Huskie Tools Charger• This charger can charge the BP-84, BP-82 and BP-80 only. Huskie Tools batteries, including the BP-70, BP-70EI and the BP-70MH must be charged with the CH-90, CH-80, or previous charger models.• 1 Battery Powered Tool • 1 Carrying Case • 1 CH-94 Charger• 2 BP-84 Lithium Ion Batteries •1 Carrying StrapSPECIFICATIONSREC-50MThe REC-50M battery operated slicing tool cuts 2” cable with the touch of a finger. It features a powerful gear reduction motor that pulls a moveable blade through the toughest copper and aluminum cables.The REC-50M comfortably fits into the lineman’s gloved hand, and repetitive ratcheting movement is entirely eliminated. Just a squeeze of the rocker arm trigger is all it takes to make a cut and almost no muscle power is needed. As a result, the risk of sprains, strains, and lost time due to muscle related injuries can be significantly reduced. The moveable blade has wide gear teeth for extra power and full cutting traction. Gear guides are attached on both ends of the movable blade to align the gear teeth with the internal pinion gear.OPERATING INSTRUCTIONS CHARGING THE BATTERY1. Insert the plug end into a 120V power source. The LED (Power) indicator willbe steady green indicating the charger is now in “stand-by” mode and ready tocharge the battery. Do not plug the charger into a generator as this will likelycause the fuse in the charger to short, and will not operate.2. To charge a drained battery, insert the battery into the charger. The LEDindicator shows a steady amber while charging. A depleted battery will becompletely charged in approximately 50-70 minutes. The LED indicator will showa steady green when the battery is fully charged.3. If the LED indicator goes out or is flashing quick amber, this could be a possibleshort in the battery circuit, or a problem with the charger itself. It is best to consultthe factory at 1-800-860-6170 for service if such a condition occurs.4. For technical questions or difficulty in operation, please call our customerservice department at 1-800-860-6170.ATTACHING THE BATTERY CARTRIDGE1. While pressing the latch, pull out the battery cartridge. T o replace the batterycartridge, push the new cartridge firmly into place.2. After inserting a battery cartridge, check that it is securely inplace by pulling gently. Do not press the latch when pulling the cartridge.TRIGGER AND RELEASE BUTTON1. The ram advances when the trigger is pressed and stops when the trigger isreleased.2. To retract the ram, push the release button. The ram continues to retract whilethe release button is pressed.CUTTING1. Retract blades by pressing the release button.2. Be sure that material being cut is within the specified cutting capacity of the tool.3. Place the material to be cut between the blades and press the advance trigger until blades hold the material in place.4. Check material for proper alignment to the cutting blades. It should be at a 90° degree angle to the blades. Any other angle will cause the blades to spread apart and possibly break.5. Continue to advance the blades until the material is cut. If material is cut and tool has not yet by passed, it may be difficult to retract blades. If this occurs, continue to advance tool and build pressure. A series of clicks will be heard while the tool running in a “neutral” mode. This indicates that the tool has built full pressure and bypassed and can now be released.MAINTENANCE AND INSPECTION1. Daily maintenance is required to ensure that the tool is kept in good working condition.2. Sharpen blades occasionally with a sharpening stone on the back side of the blades to remove any burrs that may occur.3. Do not store the tool in a humid environment.4. Wipe away any excess oil with a soapy cloth.5. Provided that maintenance of the tool is carried out regularly, the tool should providemany years of service.6. Should you experience any difficulty with the operation and maintenance of this tool,contact Huskie’s technical support department at 1-800-860-6170.PRECAUTION FOR THE TOOLPRECAUTION FOR THE CHARGER1. Select appropriate dies for the connector to be compressed. Incorrect combinations result in inferior connections of the conductors. Consult your connector manufacturer for the recommended die/connector combinations.2. Always point the tool AWAY from other people.3. If the tool is stored for an extended period at a temperature of less than 25º F (-5ºC), the tool should be allowed to return to room temperature to ensure smooth operation Use the tool only after it has been at room temperature for 1 hour.4. Do not drop the tool. Dropping the tool may damage the hydraulic circuit and result in the tool not functioning correctly.5. Keep the head and ram clean and free of debris. Solvents can be used to clean the head, but should not be used on the plastic body. Use soap and water to clean the body.6. Do not use tool for continous use. If any sign of over heating, allow the tool to cool for 15 mins.7. Do not allow tool to be submerged in water. The tool may be used in damp or wet environ-ments. However it is recommended for tool to be air-dried before use.PRECAUTION FOR THE BATTERY CARTRIDGE1. Do not short circuit the contacts or expose the cartridge to water, oil or solvents.2. Do not disassemble or attempt to repair the battery cartridge or dispose of in a fire.3. Do not drop or otherwise abuse the battery cartridge.4. Do not leave the cartridge in locations where it will be exposed to a temperature greater than 140ºF (60ºC) for an extended period.5. The battery has a limited life. When the crimping capacity becomes about 1/2 that of the original capacity, the battery should be replaced.6. If the battery cartridge is stored without being charged, natural drainage will cause the power to be reduced. The battery should be charged every 3 months if not in use.1. The LED indicator lights up amber and remains lit when the unit starts charging a battery cartridge. The indicator turns green when charging is completed.2. The BP-84 can be charged with any of the Huskie Lithium-Ion chargers including the CH-80, CH-90 & CH-94.3. Allow battery cartridges to cool before charging. Allow at least 15 minutes between charges when charging several cartridges in succession.4. Charge batteries at an ambient temperature of 50º-95ºF (10º-35º C). Charging time is approximately 50-70 minutes for the BP-84.5. Never short circuit the output terminals.6. Do not expose the charger to water, oil or solvents.7. Do not disassemble, attempt to modify, drop or otherwise abuse charger.BREAKDOWNPARTS LISTNO.DESCRIPTION CODE QTY.11 M3 X 3 Screw RC50-03 212 Gear Guide (B) RC50-04 113 Moving Blade RC50-16 114 Shoulder Screw RC50-05 115 Gear Guide (A) RC50-15 116 Stationary Blade RC50-18 117 M6 Lock Washer (Ni) RC50-06 118 M6 Lock Nut RC50-07 119 M3 X 8 Screw RC50-08 520 Bearing Case RC50-10 121 Cutter Plate RC50-11 122 M5 X 14 Screw RC50-09 1123 Bearing 6001 RC50-12 124 Pinion Gear RC50-13 125 Bearing 6002 RC50-14 126 Needle Pin 3 X 11.8 RC50-17 227 Gear Case Ass'y RC50-19 128 M4 X 8 Screw RC50-20 229 Gear RC50-21 130 Gear Plate RC50-22 231 Gear Cover RC50-23 132 Housing Set 50M-HS 133 Hanging Strap 558-07A 134 M3 X 14 Screw (T.P.) RC50-01 235 M4 X 20 Screw 558-01 937 Brush RC50-32 138 Motor 50M- Motor 139 Switch Unit Ass'y 50M- Switch 140 Switch Knob RC50-29 141 Spring (524) RC50-30 142 Switch Lock RC50-31 1TROUBLESHOOTING GUIDENOTESNOTESNOTES195 Internationale Blvd Glendale Heights, IL 60139 Phone 800-860-6170Fax 800-345-3767。
单片机定时器及中断的使用(含原创完整精讲例程)STC89C52定时器/计数器的使用一、寄存器 1. 数据寄存器TLx[1]8AH8BH不可位寻址复位清0 8位寄存器保存计数值的低8位。
THx8CH8DH不可位寻址复位清08位寄存器保存计数值的高8位。
工作原理计数时从TL开始加1计数计满后想TH进位直至TH溢出置TF标志然后申请中断CPU进行中断处理。
2. 模式选择寄存器TMOD89H不可位寻址复位清0高4位用于控制定时器1低4位用于控制定时器0GATE—门控制位=0TC[2]的启停仅由寄存器TCON中的TRx控制=1TC的启停由外部中断引脚的电平状态和TCON中的TRx共同控制。
C/T—模式选择位=0定时器对内部机器周期[3]计数=1计数器对外部输入计数由Tx[4]引脚输入注意计数模式下从采样到计数值更新需要2个机器周期共24个时钟周期因此时钟频率为f MHz时最高计数频率为1/2f MHz。
M1M0—工作方式选择位=00方式013位TH全用TL低5位=01方式116位TH TL全用=10方式28 位自动重装载定时器当溢出时将 TH 存放的值自动重装入 TL=11方式3仅适用于T0。
定时器 0 此时作为双 8 位TC。
TL0作为一个 8 位TC通过标准定时器 0 的控制位控制。
TH0 仅作为一个 8 位定时器由定时器 1 的控制位控制。
T1停止计数。
注意在方式2中计数溢出后CPU会自动将THx中的值装入TLx。
因此在定时器启动前在THx和TLx中装入的初值必须是相同的以保证计数的准确性。
3. 控制寄存器TCON88H可位寻址复位清0位符号TF1 TR1 TF0 TR0 IE1 IT1 IE0 IT0位地址8FH 8EH 8DH 8CH 8BH 8AH 89H 88H高位在前。
后4位用于外部中断。
TFx—Tx溢出标志位Tx计数溢出时硬件置1并申请中断。
进入中断服务子程序后硬件自动清零。
如果不使用定时器中断而采用软件查询的方法则需要软件清零。
一、安全措施CI-50/GPS电流中断器的安装在整流器上,接上电源, CI-50/GPS 电流中断器既可中断整流器的直流输出也可中断交流输入。
安装断流器时,请遵守下面的注意事项:1.在连接CATH-TECH CI-50/GPS 电流中断器之前,关上整流器的交流电源。
2.如果要中断交流供电,使用标有“AC”的两黑色插头连接器,使用AC中断专用电缆。
为避免对CATH-TECH CI-50/GPS 电流中断器造成损坏,千万不要将AC供电接头连接到DC端口上。
3.若中断整流器的DC输出,使用CATH-TECH CI-50/GPS 电流中断器一侧的红色“+”和黑色“-”端口和DC中断专用电缆。
为了避免损坏请不要将DC供电连接到AC连接器上。
4.CATH-TECH CI-50/GPS 电流中断器要注意防潮和防雨淋,确保散热片没有被遮挡,将中断器安置在空气可以流动的地方,以便于它散热。
5.为安全起见,请不要在雷雨天操作,以免造成GPS同步电流中断器和整流器都被损坏。
二、CATH-TECH CI/GPS 电流中断器的控制键和特征三、CATH-TECH CI/GPS 电流中断器充电电流中断器配备了72伏2200毫安时的镍氢化物电池。
为了延长电池的使用寿命,在第一次使用前应对电池整夜充电。
在使用电流中断器时,在与整流器相连时应始终与充电器相连,这样电池始终保持在充电状态。
电流中断器配备了专用导线,通过电流中断器一侧的两个香蕉形插座孔,提供12-14伏直流电。
注意:如在电池电量较低时开启电流中断器,中断器就有可能无法打开;如开启电流中断器后,显示屏上显示两个很明显的黑杠,就说明电压低,仪器已经停止工作。
电流中断器充电几分钟后,按下“复位键”,仪器就可以恢复使用了。
四、设置CATH-TECH CI/GPS 电流中断器程序⑴、开启 CATH-TECH CI/GPS 电流中断器按键盘上的“*”键或复位键,开启电流中断器。
屏幕上将显示主菜单的信息:E-program:设置电流中断器的程序;如在设置过程中输入了错误值,需要重新设置。
关于程序设计的详细资料请参考E-program部分。
C-GPS-power:需要同步操作,必须安装好GPS天线,GPS引擎必须处于打开状态。
详细资料请参照C-GPS-power部分。
O-RS232:电流中断器也可以经由0-RS232接口,通过计算机进行设置。
关于设置的详细资料请参看0-RS232部分。
I-off:按“I”键可以关闭电流中断器;断流器可以通过按“*”或复位键被重新开启。
注意:如果没有按任何键,15秒后电流中断器将自动启动并进入运行模式。
自动启动显示如下:⑵、运行模式:①、GPS未锁定如上图所示,开始时GPS应该是未被锁定的。
在电流中断器搜寻有效执行程序的过程中,屏幕上将循环出现程序代号。
这时整流器将不会被中断(电源是打开的)。
直至捕捉到最少四颗卫星时,电流中断器屏幕上将显示“未锁定”字样。
注意:如果CATH-TECH CI/GPS 电流中断器挪到50KM以外的地方,GPS引擎将需要30分钟的时间锁定卫星、重新建立与其他GPS定位设备同步。
②、GPS锁定当GPS引擎捕捉到最少数目(4)的卫星信号并且已经计算出信息传送系统的位置时,电流中断器将显示出其当前所处位置的经度和纬度。
如上图所示,当显示出经度和纬度时,电流中断器利用卫星信号来使整流器同步;这时,程序号应被一实心方块所固定,这就表明程序是有效且已经被激活了。
第二个实心方块应不断闪现,表明电流中断器正在中断环路。
注意:若程序号未被固定且实心方块未出现,说明一个有效的程序还未被设定。
请参看手册后面E-program部分关于程序设计的详细资料。
③、GPS 关如在GPS关闭的模式下,电流中断器屏幕看起来将与上图所示的略有不同。
在这种情况下,基于这个程序所显示的时间将会稍早一些。
注意:如果时间显示的都是零并且不能正常读数(记数),这种情况下就需要重新调整。
请参看手册后面关于N-time部分的详细资料。
程序号被一个实心方块固定而不是上下移动的,这就表示程序是有效的且已经被激活了。
第二个方块应该是空的并且不断闪现。
说明在非GPS同步模式下CATH-TECH CI/GPS 电流中断器中断电路。
如果程序号未被固定并且方块未出现,就表示没有一个有效的程序被设定。
请参看手册后面E-program部分关于程序设计的详细资料。
④、C-GPS-Power电流中断器在GPS引擎打开/关闭状态下,都可以进行操作。
在主菜单屏幕上,按“C“可在‘开’和‘关’两种状态间选择。
⑶、GPS 关闭状态下设置如电流中断器在GPS引擎关闭状态下进行操作,将需要手动进行时间设置。
为完成这一操作,主菜单上提供了一个额外的入口,这个入口只在GPS关闭状态下才能使用。
N-time(时间设置)用24小时制的时间格式输入当前时间。
YY=年;MM=月;DD=日;HH=小时;MM=分钟;SS=秒。
在输入完这些信息后, 电流中断器将自动返回主菜单,这时主菜单上将显示出刚被更新过的时间值。
当电流中断器在GPS关闭状态下中断时,与其他断流器或测量设备的GPS将不同步。
而断流器仍会按照先前设定的时间继续运转并中断整流器。
⑷、GPS ON下设置连接GPS天线将GPS天线连接到电流中断器一侧TNC银色连接孔上,GPS天线须放在晴朗少云的天气下进行定位。
通常情况下,如在室外,整流器的顶部将是最佳位置,GPS天线装备了一个磁性底座。
如果电流中断器移动到50KM以外的地方,GPS引擎将要用30分钟的时间锁定卫星、重新建立与其他GPS定位设备同步。
E-program在GPS同步电流中断器运行之前,必须对它进行程序设定。
按”E”键进入编程界面。
OFF time如果屏幕上显示的是上面的信息,就可以设定每个循环周期内整流器关闭时间值。
中断时间允许范围:10--99999毫秒按C进行改变重新输入中断时间:4位数字按C来更改输入值,直至满意,然后按N对刚才输入的值进行确认,并进入下一级菜单。
(继续设置)循环时间当屏幕上显示如上图所示的信息的时,就可以设定循环时间。
按C进行改变,屏幕上将循环依次显示每一个循环时间值。
循环时间值是: ¼, ½, 1, 2, 3, 4, 5, 6, 10, 12, 15, 20, 30秒和1,2,3,4,5,6分钟.当选定了循环时间值时,按N进行确认并进入下一步。
注意:中断时间必须始终小于循环时间。
起始时间(从…)如果屏幕上显示的是如图所示的信息,就可以设置中断起始时间。
这个值用24小时格式、UTC时间输入。
按C改变输入中断循环起始时间:四位数字格式HH=小时;MM=分钟当输入值确定时,按N确认,进入下一部设置。
注意:CATH-TECH CI/GPS 电流中断器所使用的GPS时间是与UTC一致的。
.因此,必须按UTC的标准输入时间(北京时间,UTC-8小时)。
停止时间(到…)如果屏幕上显示的是如图所示的信息,就可以设置中断停止时间。
这个值用24小时格式输入并且必须包含UTC偏差。
按C改变输入中断循环停止时间:四位数字格式HH=小时;MM=分钟;当输入值确定时,按N确认,进入下一步设置。
起始日期(从…)如果屏幕上显示的图中所示的信息,就可以设置中断起始日期。
按C改变输入中断循环起始日期:四位数字的格式.MM=月;DD=日。
当输入值确定时,按N确认,进入下一步设置。
注意:CATH-TECH CI/GPS 电流中断器所使用的GPS时间是与UTC一致的.因此,你必须按UTC的标准输入时间(北京时间,UTC-8小时)。
停止日期(到…)如果屏幕上出现图中所示信息,就可以设置中断结束日期。
按C改变.输入中断循环结束日期:4位数字的格式.MM=月;DD=日。
当输入值确定时,按N确认,进入下一步设置。
其他程序设置根据上面的方法还可以设置5种相互通用的程序。
当需要改变或增补某段时间内工作时,必须设置其他程序。
按N,不进入其他程序设置,返回主菜单;按F进入下一个程序设置。
注意:如果需要设置额外的程序,重复程序2—5;要是删除程序2--5,将时间和日期设置成0000即可。
⑸、通过O-RS-232接口设置程序电流中断器还可以经由控制面板上的RS232接口进行程序设计.波特率在主屏幕菜单下按微型键盘上的0键进入RS232界面.如出现新的显示信息,则说明RS232界面被打开。
以下的设备需要用来与电流中断器连接。
有RS232接口个人电脑,用匹配的传输线与电流中断器进行连接。
超级终端在计算机桌面上,点击‘开始’进入‘程序\附件\通讯\超级终端’。
输入下列设置:连接名称:‘CURRENT INTERRUPTER’点击‘确定’连接时使用:选择连接口,COM1或COM2,选择好后点击‘确定’。
端口属性设置:每秒位数:19200数据位:8奇偶校验:无停止位:1数据流控件:无点击‘确定’。
设置好后,就准备连接电流中断器。
发送:“?”显示设置命令。
显示:?-命令C—改变程序D—显示程序E—结束选择“D”显示如下:0300ms off 05 s cyclefrom to from to# hhmm hhmm mmdd mmdd1 0000 0000 0000 00002 0000 0000 0000 00003 0000 0000 0000 00004 0000 0000 0000 00005 0000 0000 0000 0000Send:"C" 改变程序如下:0300ms off C-change N-ok ["C" SENT]0200 ["0200" SENT]0200ms off C-change N-ok ["N" SENT]05 s cycle C-change N-ok ["C" SENT]06 s cycle C-change N-ok ["C" SENT]10 s cycle C-change N-ok ["C" SENT]12 s cycle C-change N-ok ["C" SENT]15 s cycle C-change N-ok ["C" SENT]20 s cycle C-change N-ok ["C" SENT]30 s cycle C-change N-ok ["C" SENT]01 m cycle C-change N-ok ["C" SENT]02 m cycle C-change N-ok ["C" SENT]03 m cycle C-change N-ok ["C" SENT]04 m cycle C-change N-ok ["C" SENT]05 m cycle C-change N-ok ["C" SENT]06 m cycle C-change N-ok ["C" SENT]1/4s cycle C-change N-ok ["C" SENT]1/2s cycle C-change N-ok ["C" SENT]01 s cycle C-change N-ok ["N" SENT]from to from to# hhmm hhmm mmdd mmdd1 0000 2359 0101 1231 more? Y N ["0000235901011231Y" SENT]2 0000 0000 0000 0000 ["0000000000000000" SENT]3 0000 0000 0000 0000 ["0000000000000000" SENT]4 0000 0000 0000 0000 ["0000000000000000" SENT]5 0000 0000 0000 0000 ["0000000000000000" SENT]"E" 结束程序设置,返回,中断器运行。