尿微量白蛋白(MAU)测定试剂盒(荧光免疫层析法)产品技术要求sz
- 格式:docx
- 大小:14.55 KB
- 文档页数:2
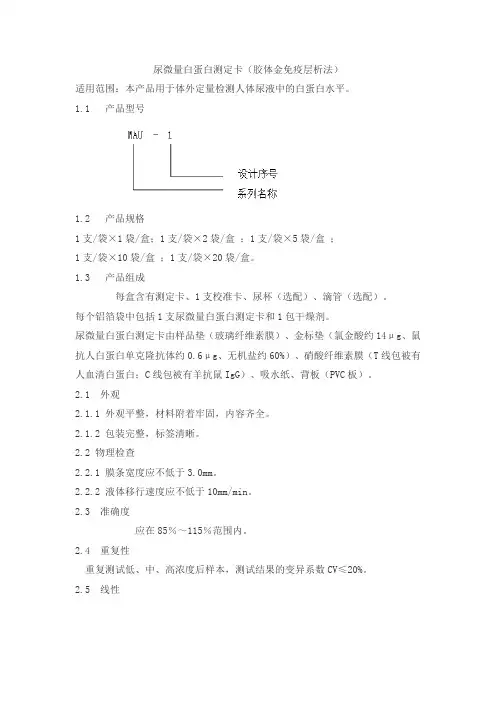
尿微量白蛋白测定卡(胶体金免疫层析法)适用范围:本产品用于体外定量检测人体尿液中的白蛋白水平。
1.1 产品型号1.2 产品规格1支/袋×1袋/盒;1支/袋×2袋/盒;1支/袋×5袋/盒;1支/袋×10袋/盒;1支/袋×20袋/盒。
1.3 产品组成每盒含有测定卡、1支校准卡、尿杯(选配)、滴管(选配)。
每个铝箔袋中包括1支尿微量白蛋白测定卡和1包干燥剂。
尿微量白蛋白测定卡由样品垫(玻璃纤维素膜)、金标垫(氯金酸约14μg、鼠抗人白蛋白单克隆抗体约0.6μg、无机盐约60%)、硝酸纤维素膜(T线包被有人血清白蛋白;C线包被有羊抗鼠IgG)、吸水纸、背板(PVC板)。
2.1 外观2.1.1 外观平整,材料附着牢固,内容齐全。
2.1.2 包装完整,标签清晰。
2.2 物理检查2.2.1 膜条宽度应不低于3.0mm。
2.2.2 液体移行速度应不低于10mm/min。
2.3 准确度应在85%~115%范围内。
2.4 重复性重复测试低、中、高浓度后样本,测试结果的变异系数CV≤20%。
2.5 线性在[10,30]mg/L的范围内,线性相关系数(r)应不小于0.990。
样品中白蛋白浓度为[10,20)mg/L时,测量平均值与理论值的绝对偏差不超过±3.0mg/L;样品中白蛋白浓度[20,30]mg/L时,测量平均值与理论值的相对偏差不超过±15%。
2.6 空白限空白限应不超过3mg/L。
2.7 批间差批间相对极差R≤15%。
2.8 特异性用下列浓度的干扰物加入后测定结果的相对偏差应不超过±15%。
2.9 稳定性4℃~30℃保存,有效期(15个月)到期后三个月内的留样,应符合2.3、2.4、2.5、2.6的要求。
2.10 校准信息溯源性校准卡中的校准曲线,按照GB/T 21415-2008 《体外诊断医疗器械生物样品中量的测量标准品和控制物质赋值的计量学溯源性》的要求溯源,溯源到怡成公司企业校准品,选用罗氏尿微量白蛋白测试系统对校准品进行比对赋值。
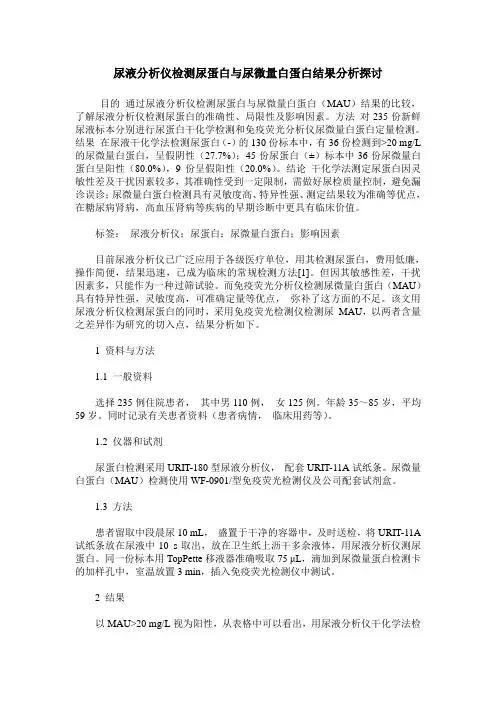
尿液分析仪检测尿蛋白与尿微量白蛋白结果分析探讨目的通过尿液分析仪检测尿蛋白与尿微量白蛋白(MAU)结果的比较,了解尿液分析仪检测尿蛋白的准确性、局限性及影响因素。
方法对235份新鲜尿液标本分别进行尿蛋白干化学检测和免疫荧光分析仪尿微量白蛋白定量检测。
结果在尿液干化学法检测尿蛋白(-)的130份标本中,有36份检测到>20 mg/L 的尿微量白蛋白,呈假阴性(27.7%);45份尿蛋白(±)标本中36份尿微量白蛋白呈阳性(80.0%),9份呈假阳性(20.0%)。
结论干化学法测定尿蛋白因灵敏性差及干扰因素较多,其准确性受到一定限制,需做好尿检质量控制,避免漏诊误诊;尿微量白蛋白检测具有灵敏度高、特异性强、测定结果较为准确等优点,在糖尿病肾病,高血压肾病等疾病的早期诊断中更具有临床价值。
标签:尿液分析仪;尿蛋白;尿微量白蛋白;影响因素目前尿液分析仪已广泛应用于各级医疗单位,用其检测尿蛋白,费用低廉,操作简便,结果迅速,已成为临床的常规检测方法[1]。
但因其敏感性差,干扰因素多,只能作为一种过筛试验。
而免疫荧光分析仪检测尿微量白蛋白(MAU)具有特异性强,灵敏度高,可准确定量等优点,弥补了这方面的不足。
该文用尿液分析仪检测尿蛋白的同时,采用免疫荧光检测仪检测尿MAU,以两者含量之差异作为研究的切入点,结果分析如下。
1 资料与方法1.1 一般资料选择235例住院患者,其中男110例,女125例。
年龄35~85岁,平均59岁。
同时记录有关患者资料(患者病情,临床用药等)。
1.2 仪器和试剂尿蛋白检测采用URIT-180型尿液分析仪,配套URIT-11A试纸条。
尿微量白蛋白(MAU)检测使用WF-0901/型免疫荧光检测仪及公司配套试剂盒。
1.3 方法患者留取中段晨尿10 mL,盛置于干净的容器中,及时送检,将URIT-11A 试纸条放在尿液中10 s取出,放在卫生纸上沥干多余液体,用尿液分析仪测尿蛋白。
沭阳县仁慈医院检验科生化室作业指导书文件编号:SYXRCYYLAB-SH –SOP第A版编制:路珊珊钱丽萍审核:李萍批准:侯波生效日期:2012年10月01日沭阳县仁慈医院检验科修订页血清总胆红素(T-BIL)测定一、目的保证总胆红素测定的结果准确、可靠。
二、修改程序本标准操作程序的改动,可由任一使用本SOP的工作人员提出,并报经下述人员批准签字:质量主管、授权人(科主任)。
三、适用范围钒酸盐氧化法测定总胆红素。
四、试剂来源本标准操作程序适用于上海执诚生物科技股份有限公司生产的总胆红素测定试剂盒。
五、溯源全国临床检验操作规程(第二版)。
六、原理此方法基于样品中的总胆红素在pH3.0 环境中,在有机复合物氧化剂的作用下,可以被氧化成胆绿素,而胆红素特有的黄色也随即消失,在450nm 处测定吸光度的变化,即可计算出样品中总胆红素的浓度。
七、试剂R1:硫磺酸缓冲液(pH2.9) 0.1mol/L表面活性剂R2:磷酸缓冲液(pH7.0) 10mmol/L有机钒酸盐 4mmol/L 不同批号试剂盒中各组份不能互换。
本试剂对光敏感,2~8℃密闭避光保存可以稳定18个月(勿冷冻);首次开启试剂后,避光保存于2~8℃防污染环境中,可继续稳定至效期。
校准液: Randox 公司提供的系列校准品。
八、标本采血清总胆红素(T-BIL)测定血清、血浆。
样本2~8℃保存可以存放约3天,-20℃保存可以存放3个月,但只能冻融一次。
九、操作步骤1、标本编号,分离血清,依顺序置样品架上。
2、按标本编号在全自动化生化仪器上输入标本的基本信息和测定要求,进行测定。
3、仪器校准:将校准液置试管架上,输入校准液浓度,然后进行测定(测定参数与下同),其吸光度贮存在电脑中,浓度值测定符合要求即可应用。
一般每3~6个月校准一次,若更换不同批号的试剂、质控超标或仪器维修处理后应进行校准。
4、测定参数:血清量 7μl试剂Ⅰ 200μl试剂Ⅱ 50μl主波长 444nm次波长 548nm反应类型终点法;负反应测定时间 10分钟温度 37℃报告单位μmol/L5、结果计算:ΔA 样品样本中总胆红素的含量 = ------- ×标准液浓度ΔA 标准单位换算:mg/dl×17.1=μmol/L十、正常参考值5.1-20μmol/L血清总胆红素(T-BIL)测定十一、室内质控质控方法:每天测定样品前做一组质控,在标本中间插一组质控,最后再做一组质控品,共三组。
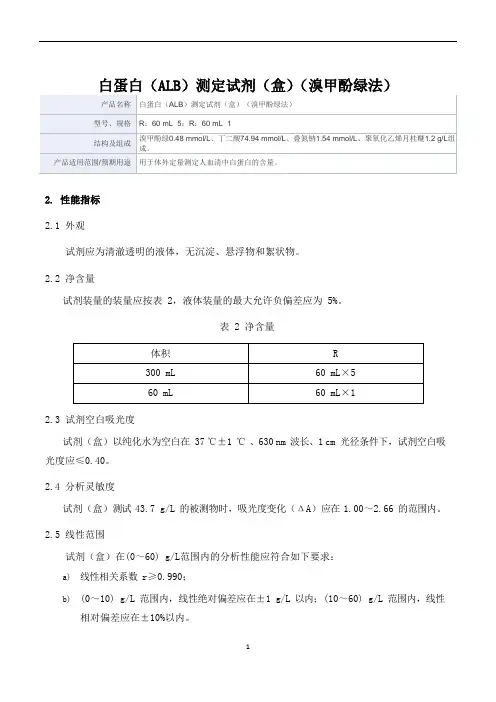
白蛋白(ALB)测定试剂(盒)(溴甲酚绿法)
2.性能指标
2.1外观
试剂应为清澈透明的液体,无沉淀、悬浮物和絮状物。
2.2净含量
试剂装量的装量应按表 2,液体装量的最大允许负偏差应为 5%。
表 2 净含量
2.3试剂空白吸光度
试剂(盒)以纯化水为空白在 37 ℃±1℃ 、630 nm 波长、1 cm 光径条件下,试剂空白吸光度应≤0.40。
2.4分析灵敏度
试剂(盒)测试 43.7 g/L 的被测物时,吸光度变化(ΔA)应在 1.00~2.66 的范围内。
2.5线性范围
试剂(盒)在(0~60) g/L范围内的分析性能应符合如下要求:
a)线性相关系数r≥0.990;
b)(0~10) g/L 范围内,线性绝对偏差应在±1 g/L以内;(10~60) g/L 范围内,线性
相对偏差应在±10%以内。
2.6测量精密度
2.6.1重复性
用校准品重复测试所得结果的变异系数CV≤4%。
2.6.2批间差
试剂(盒)批间相对偏差R≤6%。
2.7准确度
校准品的相对偏差 B 在±10%以内。
2.8分析特异性
血红蛋白浓度在 400 mg/dL 内、甘油三酯浓度在 500 mg/dL 内、抗坏血酸浓度在 30 mg/dL 内、胆红素浓度在 40 mg/dL 内,对试剂检测结果的偏差影响应在±10%以内。
尿微量总蛋白测定原理尿微量总蛋白(urine microalbumin)是指尿液中微量存在的白蛋白,通常用于评估肾脏疾病的早期诊断和监测疾病进展情况。
测定尿微量总蛋白的原理主要是利用免疫学方法,通过特定的试剂与蛋白质发生免疫相应,从而定量测定尿液中微量蛋白的浓度。
本文将从测定尿微量总蛋白的原理、常用的测定方法和临床应用等方面进行详细介绍。
一、测定原理尿微量总蛋白的测定原理主要是利用免疫学方法,即抗原与抗体的免疫相应原理。
通常采用免疫层析、免疫电泳、免疫荧光检测、免疫比浊法等方法进行测定。
1.免疫层析法免疫层析法是通过将尿样添加特定的抗体或抗原,使之与待测蛋白进行特异性结合,然后通过一系列步骤来分离和测定目标蛋白。
其原理是将试样通过一定具有特异性的固相支持介质,使之与固定的抗体或抗原结合,并随着尿样中存在的微量总蛋白一起被分离出来。
2.免疫电泳法免疫电泳法是将待测尿样加入到具有孔隙性的凝胶中,然后加上特异性的抗体或抗原,使之与待检蛋白结合,再通过电泳方法分离并测定蛋白的浓度。
3.免疫荧光检测法免疫荧光检测法是利用荧光标记的抗体或抗原与待测样品中的蛋白质特异结合,然后通过使用激光或紫外光源来激发荧光染料的发光信号,最后测定光信号的强度来计算出蛋白质的浓度。
4.免疫比浊法免疫比浊法是将待测尿样与特定的抗体或抗原结合,形成抗原-抗体复合物,然后通过测定溶液的浑浊度来计算蛋白质的浓度。
通过上述免疫学方法,可以快速、准确地测定尿液中微量总蛋白的浓度,具有较高的敏感性和特异性,能够有效的评估肾脏损伤的程度,为临床诊断和治疗提供重要依据。
二、常用的测定方法尿微量总蛋白的测定方法主要包括半定量法和定量法两种,其中定量法的测定结果更为准确。
1.半定量法半定量法通常采用尿液尿蛋白/肌酐比值进行测定,这是一种简便快速的半定量测定方法。
可以通过免疫比浊法或免疫电泳法等进行半定量分析,但由于其测定结果受尿液稀释度的影响较大,准确性较差。
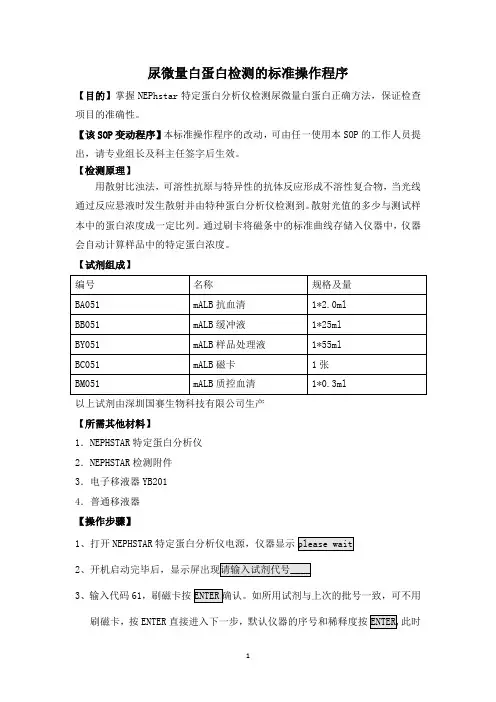
尿微量白蛋白检测的标准操作程序【目的】掌握NEPhstar特定蛋白分析仪检测尿微量白蛋白正确方法,保证检查项目的准确性。
【该SOP变动程序】本标准操作程序的改动,可由任一使用本SOP的工作人员提出,请专业组长及科主任签字后生效。
【检测原理】用散射比浊法,可溶性抗原与特异性的抗体反应形成不溶性复合物,当光线通过反应悬液时发生散射并由特种蛋白分析仪检测到。
散射光值的多少与测试样本中的蛋白浓度成一定比列。
通过刷卡将磁条中的标准曲线存储入仪器中,仪器会自动计算样品中的特定蛋白浓度。
【试剂组成】以上试剂由深圳国赛生物科技有限公司生产【所需其他材料】1.NEPHSTAR特定蛋白分析仪2.NEPHSTAR检测附件3.电子移液器YB2014.普通移液器【操作步骤】1、打开NEPHSTAR特定蛋白分析仪电源,仪器显示23、输入代码61,刷磁卡按刷磁卡,按ENTER直接进入下一步,默认仪器的序号和稀释度按此时4、将装有搅拌子和20ul尿液样品的测量杯放入测量室。
5移液器YB201将400ul缓冲液和40ul抗血清加入测量杯。
6、NEPHSTAR特定蛋白分析仪自动感应试剂的加入,搅拌子开始搅拌,测试开始。
测试完毕后仪器自动显示打印结果。
【参考区间】mALB<25mg/L【临床意义】1、正常情况下白蛋白在血液中检测出,并由肾脏过滤,当肾脏功能正常时白蛋白不会出现在尿液中,当肾小球基底膜受到损伤至通透性改变时,会有小部分白蛋白漏入尿液,形成微量白蛋白尿,高血压、糖尿病及系统性红斑狼疮等常伴有肾脏病变的缓慢进行性恶化,尿液中可较早发现异常。
2、尿液中白蛋白排泄量变动较大,随机尿标本一次尿微量白蛋白升高可能并无意义,如连续2-3次升高均超过参考区间方有诊断价值。
【注意事项】1、不要将批号的试剂要刷磁卡,磁卡里含有重要的标准曲线信息。
不同批号试剂不能混用。
2、试剂盒未开启前应存于2-8℃冰箱。
缓冲液和样品处理液在使用前放置室温平衡至18-26℃.抗血清和质控可稳定1个月。
Human microalbunminuria(MAU/ALB) ELISA kit Catalog Number. CSB-E08970hFor the quantitative determination of human microalbunminuria(MAU/ALB) concentrations in serum, plasma, urine.This package insert must be read in its entirety before using this product.If You Have ProblemsTechnical Service Contact informationPhone: 86-27-87582341Fax: 86-27-87196150Email:****************Web: In order to obtain higher efficiency service, please ready to supply the lot numberof the kit to us (found on the outside of the box).1PRINCIPLE OF THE ASSAYThis assay employs the competitive inhibition enzyme immunoassay technique. Antibody specific for MAU has been pre-coated onto a microplate. Standards and samples are pipetted into the wells with biotin-conjugated MAU. A competitive inhibition reaction is launched between MAU (Standards or samples) and biotin-conjugated MAU with the pre-coated MAU antibody. After washing, avidin conjugated Horseradish Peroxidase (HRP) is added to the wells. Following a wash to remove any unbound reagent, a substrate solution is added to the wells and color develops in opposite to the amount of MAU bound in the initial step. The color development is stopped and the intensity of the color is measured.DETECTION RANGE0.078 µg/ml-5 µg/ml.SENSITIVITYThe minimum detectable dose of human MAU is typically less than 0.019 µg/ml. The sensitivity of this assay, or Lower Limit of Detection (LLD) was defined as the lowest human MAU concentration that could be differentiated from zero.SPECIFICITYThis assay has high sensitivity and excellent specificity for detection of human MAU. No significant cross-reactivity or interference between human MAU and analogues was observed.Note: Limited by current skills and knowledge, it is impossible for us to complete the cross-reactivity detection between human MAU and all the analogues, therefore, cross reaction may still exist.2PRECISIONIntra-assay Precision (Precision within an assay): CV%<8%Three samples of known concentration were tested twenty times on one plate to assess.Inter-assay Precision (Precision between assays):CV%<10%Three samples of known concentration were tested in twenty assays to assess.LIMITATIONS OF THE PROCEDUREFOR RESEARCH USE ONLY. NOT FOR USE IN DIAGNOSTIC PROCEDURES.The kit should not be used beyond the expiration date on the kit label.Do not mix or substitute reagents with those from other lots or sources.If samples generate values higher than the highest standard, dilute the samples with Sample Diluent and repeat the assay.Any variation in Sample Diluent, operator, pipetting technique, washing technique, incubation time or temperature, and kit age can cause variation in binding.This assay is designed to eliminate interference by soluble receptors, binding proteins, and other factors present in biological samples. Until all factors have been tested in the Immunoassay, the possibility of interference cannot be excluded.3MATERIALS PROVIDEDReagents QuantityAssay plate (12 x 8 coated Microwells) 1(96 wells) Standard (Freeze dried) 2Biotin-conjugate (100 x concentrate) 1 x 60 µlHRP-avidin (100 x concentrate) 1 x 120 µlBiotin-conjugate Diluent 1 x 10 mlHRP-avidin Diluent 1 x 20 ml Sample Diluent 2 x 20 mlWash Buffer (25 x concentrate) 1 x 20 mlTMB Substrate 1 x 10 mlStop Solution 1 x 10 ml Adhesive Strip (For 96 wells) 4Instruction manual 1STORAGEUnopenedkitStore at 2 - 8°C. Do not use the kit beyond the expiration date.Opened kitCoated assayplateMay be stored for up to 1 month at 2 - 8°C.Try to keep it in a sealed aluminum foil bag,and avoid the damp.Standard May be stored for up to 1 month at 2 - 8° C.If don’t make recent use, better keep it storeat -20°C.HRP-avidinBiotin-conjugateBiotin-conjugateDiluentMay be stored for up to 1 month at 2 - 8°C. HRP-avidinDiluentSample DiluentWash BufferTMB SubstrateStop Solution*Provided this is within the expiration date of the kit.4OTHER SUPPLIES REQUIREDMicroplate reader capable of measuring absorbance at 450 nm, with the correction wavelength set at 540 nm or 570 nm.An incubator which can provide stable incubation conditions up to 37°C±0.5°C.Squirt bottle, manifold dispenser, or automated microplate washer.Absorbent paper for blotting the microtiter plate.100ml and 500ml graduated cylinders.Deionized or distilled water.Pipettes and pipette tips.Test tubes for dilution.PRECAUTIONSThe Stop Solution provided with this kit is an acid solution. Wear eye, hand, face, and clothing protection when using this material.5SAMPLE COLLECTION AND STORAGESerum Use a serum separator tube (SST) and allow samples to clot for30 minutes before centrifugation for 15 minutes at 1000 x g, 2 - 8°C.Remove serum and assay immediately or aliquot and store samples at -20°C or -80°C. Avoid repeated freeze-thaw cycles. Centrifuge the sample again after thawing before the assay.Plasma Collect plasma using EDTA, or heparin as an anticoagulant.Centrifuge for 15 minutes at 1000 x g, 2 - 8°C within 30 minutes of collection. Assay immediately or aliquot and store samples at -20°C or -80°C. Avoid repeated freeze-thaw cycles. Centrifuge the sample again after thawing before the assay.Urine Use a sterile container to collect urine samples. Remove any particulates by centrifugation for 15 minutes at 1000xg, 2 - 8°C and assay immediately or aliquot and store samples at -20°C or -80°C. Avoid repeated freeze-thaw cycles. Centrifuge again before assaying to remove any additional precipitates that may appear after storage.SAMPLE PREPARATIONRecommend to dilute the serum or plasma samples 50000-fold before test.The suggested 50000-fold dilution can be achieved by adding 2µl sample to 398µl of normal saline. Complete the 50000-fold dilution by adding 2µl of this solution to 498µl of Sample Diluent. The recommended dilution factor is for reference only. The optimal dilution factor should be determined by users according to their particular experiments.Recommend to dilute the urine samples with Sample Diluent(1:40) before test. The suggested 40-fold dilution can be achieved by adding 6µl sample to 234µl of Sample Diluent. The recommended dilution factor is for reference only. The optimal dilution factor should be determined by users according to their particular experiments6Note:1. CUSABIO is only responsible for the kit itself, but not for the samplesconsumed during the assay. The user should calculate the possible amount of the samples used in the whole test. Please reserve sufficient samples in advance.2. Samples to be used within 5 days may be stored at 2-8°C, otherwisesamples must be stored at -20°C (≤1month) or -80°C (≤2month) to avoid loss of bioactivity and contamination.3. Grossly hemolyzed samples are not suitable for use in this assay.4. If the samples are not indicated in the manual, a preliminary experiment todetermine the validity of the kit is necessary.5. Please predict the concentration before assaying. If values for these arenot within the range of the standard curve, users must determine the optimal sample dilutions for their particular experiments.6. Tissue or cell extraction samples prepared by chemical lysis buffer maycause unexpected ELISA results due to the impacts of certain chemicals.7. Owing to the possibility of mismatching between antigen from otherresource and antibody used in our kits (e.g., antibody targets conformational epitope rather than linear epitope), some native or recombinant proteins from other manufacturers may not be recognized by our products.8. Influenced by the factors including cell viability, cell number and alsosampling time, samples from cell culture supernatant may not be detected by the kit.9. Fresh samples without long time storage are recommended for the test.Otherwise, protein degradation and denaturalization may occur in those samples and finally lead to wrong results.7REAGENT PREPARATIONNote:Kindly use graduated containers to prepare the reagent. Please don't prepare the reagent directly in the Diluent vials provided in the kit. Bring all reagents to room temperature (18-25°C) before use for 30min.Prepare fresh standard for each assay. Use within 4 hours and discard after use.Making serial dilution in the wells directly is not permitted.Please carefully reconstitute Standards according to the instruction, and avoid foaming and mix gently until the crystals have completely dissolved.To minimize imprecision caused by pipetting, use small volumes and ensure that pipettors are calibrated. It is recommended to suck more than 10µl for once pipetting.Distilled water is recommended to be used to make the preparation for reagents. Contaminated water or container for reagent preparation will influence the detection result.1. Biotin-conjugate (1x) - Centrifuge the vial before opening.Biotin-conjugate requires a 100-fold dilution. A suggested 100-fold dilution is 10 µl of Biotin-conjugate + 990 µl of Biotin-conjugate Diluent.2. HRP-avidin (1x) - Centrifuge the vial before opening.HRP-avidin requires a 100-fold dilution. A suggested 100-fold dilution is 10 µl of HRP-avidin + 990 µl of HRP-avidin Diluent.3. Wash Buffer(1x)- If crystals have formed in the concentrate, warm up toroom temperature and mix gently until the crystals have completely dissolved. Dilute 20 ml of Wash Buffer Concentrate (25 x) into deionized or distilled water to prepare 500 ml of Wash Buffer (1 x).894.StandardCentrifuge the standard vial at 6000-10000rpm for 30s.Reconstitute the Standard with 1.0 ml of Sample Diluent . Do not substitute other diluents. This reconstitution produces a stock solution of 5 µg/ml. Mix the standard to ensure complete reconstitution and allow the standard to sit for a minimum of 15 minutes with gentle agitation prior to making dilutions.Pipette 150 µl of Sample Diluent into each tube (S0-S6). Use the stock solution to produce a 2-fold dilution series (below). Mix each tube thoroughly before the next transfer. The undiluted Standard serves as the high standard (5 µg/ml). Sample Diluent serves as the zero standard (0 µg/ml).Tube S7 S6 S5S4 S3 S2 S1 S0 µg/ml52.51.250.6250.3120.1560.078ASSAY PROCEDUREBring all reagents and samples to room temperature before use. Centrifuge the sample again after thawing before the assay.It is recommended that all samples and standards be assayed in duplicate.1. Prepare all reagents, working standards, and samples as directed in theprevious sections.2. Refer to the Assay Layout Sheet to determine the number of wells to beused and put any remaining wells and the desiccant back into the pouch and seal the ziploc, store unused wells at 4°C.3. Set a Blank well without any solution.4. Add 50µl of standard and sample per well.5. Add 50µl of Biotin-conjugate(1x) to each well(not to Blank well). Coverwith a new adhesive strip. Incubate for 60 minutes at 37°C.(Biotin-conjugate(1x) may appear cloudy. Warm up to room temperature and mix gently until solution appears uniform.)6. Aspirate each well and wash, repeating the process two times for a total ofthree washes. Wash by filling each well with Wash Buffer (200µl) using a squirt bottle, multi-channel pipette, manifold dispenser, or autowasher, and let it stand for 2 minutes, complete removal of liquid at each step is essential to good performance. After the last wash, remove any remaining Wash Buffer by aspirating or decanting. Invert the plate and blot it against clean paper towels.7. Add 100µl of HRP-avidin(1x) to each well(not to Blank well). Cover themicrotiter plate with a new adhesive strip. Incubate for 60 minutes at 37°C.8. Repeat the aspiration/wash process for five times as in step 6.9. Add 90µl of TMB Substrate to each well. Incubate for 20 minutes at 37°C.Protect from light.10. Add 50µl of Stop Solution to each well, gently tap the plate to ensurethorough mixing.1011. Determine the optical density of each well within 5 minutes, using amicroplate reader set to 450 nm. If wavelength correction is available, set to 540 nm or 570 nm. Subtract readings at 540 nm or 570 nm from the readings at 450 nm. This subtraction will correct for optical imperfections in the plate. Readings made directly at 450 nm without correction may be higher and less accurate.*Samples may require dilution. Please refer to Sample Preparation section. Note:1. The final experimental results will be closely related to validity of theproducts, operation skills of the end users and the experimental environments.2. Samples or reagents addition: Please use the freshly prepared Standard.Please carefully add samples to wells and mix gently to avoid foaming. Do not touch the well wall as possible. For each step in the procedure, total dispensing time for addition of reagents or samples to the assay plate should not exceed 10 minutes. This will ensure equal elapsed time for each pipetting step, without interruption. Duplication of all standards and specimens, although not required, is recommended. To avoid cross-contamination, change pipette tips between additions of each standard level, between sample additions, and between reagent additions.Also, use separate reservoirs for each reagent.3. Incubation: To ensure accurate results, proper adhesion of plate sealersduring incubation steps is necessary. Do not allow wells to sit uncovered for extended periods between incubation steps. Once reagents have been added to the well strips, DO NOT let the strips DRY at any time during the assay. Incubation time and temperature must be observed.4. Washing: The wash procedure is critical. Complete removal of liquid ateach step is essential to good performance. After the last wash, remove any remaining Wash Solution by aspirating or decanting and remove any drop of water and fingerprint on the bottom of the plate. Insufficient washing will result in poor precision and falsely elevated absorbance reading. When using an automated plate washer, adding a 30 second soak period following the addition of wash buffer, and/or rotating the plate 180 degrees between wash steps may improve assay precision.115. Controlling of reaction time: Observe the change of color after adding TMBSubstrate (e.g. observation once every 10 minutes), TMB Substrate should change from colorless or light blue to gradations of blue. If the color is too deep, add Stop Solution in advance to avoid excessively strong reaction which will result in inaccurate absorbance reading.6. TMB Substrate is easily contaminated. TMB Substrate should remaincolorless or light blue until added to the plate. Please protect it from light.7. Stop Solution should be added to the plate in the same order as the TMBSubstrate. The color developed in the wells will turn from blue to yellow upon addition of the Stop Solution. Wells that are green in color indicate that the Stop Solution has not mixed thoroughly with the TMB Substrate.1213ASSAY PROCEDURE SUMMARY*Samples may require dilution. Please refer to Sample Preparation section.CALCULATION OF RESULTSUsing the professional soft "Curve Expert" to make a standard curve is recommended, which can be downloaded from our web.Average the duplicate readings for each standard and sample and subtract the average optical density of Blank.Create a standard curve by reducing the data using computer software capable of generating a four parameter logistic (4-PL) curve-fit. As an alternative, construct a standard curve by plotting the mean absorbance for each standard on the x-axis against the concentration on the y-axis and draw a best fit curve through the points on the graph. The data may be linearized by plotting the log of the MAU concentrations versus the log of the O.D. and the best fit line can be determined by regression analysis. This procedure will produce an adequate but less precise fit of the data.If samples have been diluted, the concentration read from the standard curve must be multiplied by the dilution factor.14人尿微量白蛋白(MAU/ALB)酶联免疫试剂盒使用说明书【产品编号】CSB-E08970h【预期应用】ELISA法定量测定人血清、血浆、尿液中MAU含量。
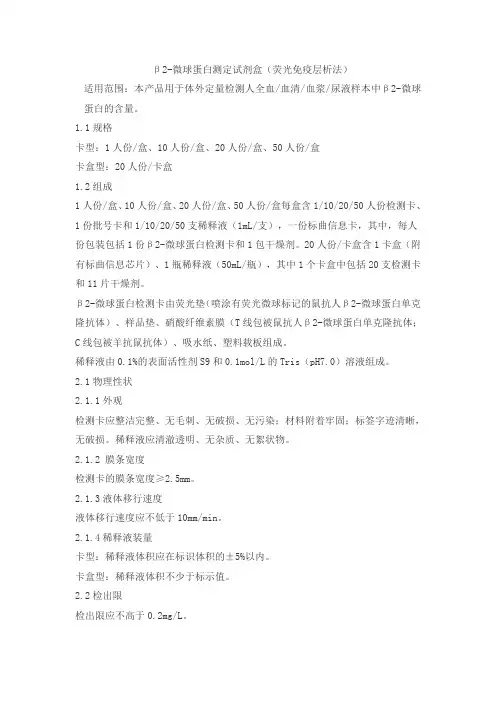
β2-微球蛋白测定试剂盒(荧光免疫层析法)适用范围:本产品用于体外定量检测人全血/血清/血浆/尿液样本中β2-微球蛋白的含量。
1.1规格卡型:1人份/盒、10人份/盒、20人份/盒、50人份/盒卡盒型:20人份/卡盒1.2组成1人份/盒、10人份/盒、20人份/盒、50人份/盒每盒含1/10/20/50人份检测卡、1份批号卡和1/10/20/50支稀释液(1mL/支),一份标曲信息卡,其中,每人份包装包括1份β2-微球蛋白检测卡和1包干燥剂。
20人份/卡盒含1卡盒(附有标曲信息芯片)、1瓶稀释液(50mL/瓶),其中1个卡盒中包括20支检测卡和11片干燥剂。
β2-微球蛋白检测卡由荧光垫(喷涂有荧光微球标记的鼠抗人β2-微球蛋白单克隆抗体)、样品垫、硝酸纤维素膜(T线包被鼠抗人β2-微球蛋白单克隆抗体;C线包被羊抗鼠抗体)、吸水纸、塑料载板组成。
稀释液由0.1%的表面活性剂S9和0.1mol/L的Tris(pH7.0)溶液组成。
2.1物理性状2.1.1外观检测卡应整洁完整、无毛刺、无破损、无污染;材料附着牢固;标签字迹清晰,无破损。
稀释液应清澈透明、无杂质、无絮状物。
2.1.2 膜条宽度检测卡的膜条宽度≥2.5mm。
2.1.3液体移行速度液体移行速度应不低于10mm/min。
2.1.4稀释液装量卡型:稀释液体积应在标识体积的±5%以内。
卡盒型:稀释液体积不少于标示值。
2.2检出限检出限应不高于0.2mg/L。
2.3重复性分别用高、中、低3个浓度的样本,各重复检测10次,CV(%)应不高于10.0%。
2.4批间差用3个批号的试剂卡,分别检测高、中、低3个浓度的样本,批间变异系数应不高于15.0%。
2.5线性样本在[0.2,10]mg/L的范围内,线性相关系数应不低于0.990。
2.6准确度检测β2-微球蛋白国际标准品(NIBSC code: B2M),相对偏差应不大于10%。
2.7稳定性将测定试剂盒在4℃~30℃的环境中放置18个月后,过有效期后3个月内,分别检测2.1、2.2、2.3、2.5、2.6项,结果应符合各项目的要求。
尿微量白蛋白胶体金法说明书全文共四篇示例,供读者参考第一篇示例:尿微量白蛋白是指尿液中微量存在的蛋白质,通常情况下正常健康人的尿中微量白蛋白的含量是很低的,但是当身体处于某些疾病状态时,尿微量白蛋白的含量会显著增加。
尿微量白蛋白的检测对于一些慢性疾病的早期诊断和疾病进展的监测具有重要意义。
为了更准确地检测尿微量白蛋白,人们研发了尿微量白蛋白胶体金法。
下面我们就来详细介绍一下关于尿微量白蛋白胶体金法的说明书。
一、仪器与试剂准备1. 仪器:将仪器通电,预热至合适温度;2. 试剂:将试剂从冰箱中取出,放置于室温下融化;3. 样本:准备待检测的尿样本;4. 其他:准备好一次性的吸管、试管、试管架、试管夹等辅助工具。
二、操作步骤1. 取适量的尿样本,用试管收集,并标注好样本编号;2. 将收集好的样本放入离心管中,进行离心分离;3. 取得上清液,在洁净的试管中取样,加入胶体金试剂;4. 将混合液均匀摇匀,确保胶体金试剂充分与尿样本发生反应;5. 将试管放入光度计,设置好检测参数并进行测量;6. 检测结果出来后,根据标准曲线得出尿微量白蛋白的含量;7. 结果分析和报告。
三、注意事项1. 操作过程中要注意无菌操作,避免外界污染;2. 操作过程中要避免尿样本受到过多的震动,以免影响测量结果;3. 试管和光度计要经常保持干净,以免影响测量精度;4. 在整个操作过程中要严格按照操作规程进行,确保结果的准确性。
四、结果解读根据测得的尿微量白蛋白含量,可以判断患者尿蛋白症的程度,进而指导治疗方案的制定和调整。
通常情况下,尿微量白蛋白含量过高可能与糖尿病、高血压、肝肾功能异常等慢性疾病有关,需要及时进行治疗。
第二篇示例:尿微量白蛋白胶体金法是一种用于检测尿液中微量白蛋白含量的方法,通过将胶体金与免疫学原理相结合,可以快速、准确地检测出微量白蛋白的存在,对于早期诊断和监测肾脏疾病具有重要意义。
一、仪器与试剂准备1. 仪器:胶体金检测仪2. 试剂:胶体金检测试剂盒、尿液收集器、吸管等二、操作步骤1. 将收集到的尿液样本转移到专用的尿液收集器中。

微量白蛋白检测方法微量白蛋白(microalbumin)是指在尿液中微量存在的白蛋白,通常被用作评估肾脏损伤的指标。
下面是关于微量白蛋白检测方法的详细描述:1. 尿液微量白蛋白定量试纸法:这是一种常用的快速、便捷的微量白蛋白检测方法。
试纸上有特定抗体,在与尿液中的微量白蛋白结合后,导致特定的颜色反应。
根据试纸颜色的转变,可以定量测量尿液中的微量白蛋白的浓度。
2. 免疫荧光法:这种方法利用特定的抗体与尿液中的微量白蛋白结合,在荧光显微镜下观察和测量荧光强度来评估微量白蛋白的浓度。
3. 酶联免疫吸附测定法:这种方法利用酶与抗体结合,在酶的催化作用下产生颜色变化,从而测量尿液中微量白蛋白的含量。
4. 免疫化学法:这种方法利用特定的抗体与尿液中的微量白蛋白结合,然后使用化学发光、颜色反应等方法来测量微量白蛋白的浓度。
5. 固相放射免疫分析法:这种方法利用放射性同位素标记的特定抗体与尿液中的微量白蛋白结合,然后使用放射测量技术来测量微量白蛋白的含量。
6. 毛细管电泳法:这种方法利用毛细管电泳的原理,通过对尿液样品进行电泳分离,从而分析和测量微量白蛋白的浓度。
7. 质谱法:这种方法使用质谱仪测量尿液中微量白蛋白的质量,并根据峰的强度来计算其浓度。
8. 高效液相色谱法(HPLC):这种方法利用高效液相色谱仪,结合特定柱和检测器,将尿液样品中的微量白蛋白分离、识别和定量。
9. 生物传感器法:这种方法利用特定的生物传感器,如电极、荧光探针等,与尿液中的微量白蛋白相互作用,从而产生信号,通过检测信号来测量微量白蛋白的浓度。
10. 核磁共振波谱法:这种方法利用核磁共振仪对尿液中的微量白蛋白进行谱学分析,从而获得微量白蛋白的浓度和结构信息。
以上是关于微量白蛋白检测方法的10条详细描述,每种方法都有各自的优势和适用范围,可以根据实际需要选择合适的方法进行微量白蛋白的检测。
本试剂盒只能用于科学研究,不得用于医学诊断人(Human)尿微量白蛋白(MAU/ALB)ELISA检测试剂盒使用说明书检测原理试剂盒采用双抗体一步夹心法酶联免疫吸附试验(ELISA)。
往预先包被尿微量白蛋白(MAU/ALB)抗体的包被微孔中,依次加入标本、标准品、HRP标记的检测抗体,经过温育并彻底洗涤。
用底物TMB显色,TMB在过氧化物酶的催化下转化成蓝色,并在酸的作用下转化成最终的黄色。
颜色的深浅和样品中的尿微量白蛋白(MAU/ALB)呈正相关。
用酶标仪在450nm 波长下测定吸光度(OD 值),计算样品浓度。
样品收集、处理及保存方法1. 血清:使用不含热原和内毒素的试管,操作过程中避免任何细胞刺激,收集血液后,3000转离心10分钟将血清和红细胞迅速小心地分离。
2. 血浆:EDTA、柠檬酸盐或肝素抗凝。
3000转离心30分钟取上清。
3. 细胞上清液:3000转离心10分钟去除颗粒和聚合物。
4. 组织匀浆:将组织加入适量生理盐水捣碎。
3000转离心10分钟取上清。
5. 保存:如果样本收集后不及时检测,请按一次用量分装,冻存于-20℃,避免反复冻融,在室温下解冻并确保样品均匀地充分解冻。
自备物品1.酶标仪(450nm)2.高精度加样器及枪头:0.5-10uL、2-20uL、20-200uL、200-1000uL3.37℃恒温箱操作注意事项1. 试剂盒保存在2-8℃,使用前室温平衡20分钟。
从冰箱取出的浓缩洗涤液会有结晶,这属于正常现象,水浴加热使结晶完全溶解后再使用。
2. 实验中不用的板条应立即放回自封袋中,密封(低温干燥)保存。
3. 浓度为0的S0号标准品即可视为阴性对照或者空白;按照说明书操作时样本已经稀释5倍,最终结果乘以5才是样本实际浓度。
4. 严格按照说明书中标明的时间、加液量及顺序进行温育操作。
5. 所有液体组分使用前充分摇匀。
试剂盒组成名称96孔配置48孔配置备注微孔酶标板12孔×8条12孔×4条无标准品0.3mL*6管0.3mL*6管无样本稀释液6mL 3mL 无检测抗体-HRP 10mL 5mL 无20×洗涤缓冲液25mL 15mL 按说明书进行稀释底物A 6mL 3mL 无底物B 6mL 3mL 无终止液6mL 3mL 无封板膜2张2张无说明书1份1份无自封袋1个1个无注:标准品(S0-S5)浓度依次为:0、20、40、80、160、320μg/mL试剂的准备20×洗涤缓冲液的稀释:蒸馏水按1:20稀释,即1份的20×洗涤缓冲液加19份的蒸馏水。
尿微量白蛋白的检测方法
尿微量白蛋白的检测方法包括以下几种:
1. 尿常规检测:尿常规检测是最常用的白蛋白检测方法之一。
通过尿液的颜色、透明度、比重、pH值和白细胞、红细胞等
指标来判断尿液中是否有白蛋白的异常。
2. 定量测定法:这是一种比尿常规更准确的白蛋白检测方法,可以测量尿液中白蛋白的具体含量。
常用的定量测定法有比浊法、免疫印迹法和酶联免疫吸附试验(ELISA)等。
3. 尿微量白蛋白/肌酐比值:尿微量白蛋白/肌酐比值是一种常
用的筛查方法。
通过测量尿液中微量白蛋白和肌酐的含量,并计算它们的比值,可以判断尿液中是否存在微量白蛋白的异常。
4. 尿电泳:尿电泳是一种检测尿液中白蛋白异常的方法。
它可以通过电泳分离尿液中的蛋白质,并通过对分离出的蛋白带进行染色或通过蛋白质免疫印迹等方法,来判断尿液中是否存在白蛋白异常。
请注意,这些方法仅供参考,具体选择哪种方法需要根据具体情况和医生的建议来确定。
尿微量白蛋白生化法
尿微量白蛋白生化法是一种利用生物化学分析技术来检测尿液中微量白蛋白的方法。
该方法是目前临床诊断糖尿病肾病和高血压肾病的常用检测方法之一。
操作步骤:
1.采集尿液样本,通常采用早晨空腹尿,首次排尿所得。
2.在样本采集后1小时内进行检测。
如果不能立即进行检测,应将尿液放在4度以下温度保存,最好在24小时内完成检测。
3.将尿液样本倒入标本试管中,并保持干燥。
4.加入包含Microalbumin测定试剂盒中的显色剂,使其充分反应。
注意,显色剂的稀释比例要遵循试剂盒的说明。
5.读取反应结果,可以使用光度计将吸光度值降解为微量白蛋白含量。
通常微量白蛋白正常参考值为10-30 mg/L。
优点:
1. 检测灵敏度高,可以检测到微量白蛋白。
2. 检测速度快,可以在1小时内完成检测。
3. 操作简单方便,适应于临床现场检测。
缺点:
1. 依赖于设备和试剂盒等耗材。
2. 检测结果受尿液采集和储存条件影响。
3. 不支持定量分析,只能提供大致的病情判断。
泰安市公安干警尿微量白蛋白、血糖检测结果分析王晖;郑琳;王艳姣;刘烁【摘要】目的通过了解泰安市公安干警的尿微量白蛋白(MAU)和血糖(GLU)水平情况,为预防疾病和健康教育提供科学依据,制定合理预防保健措施.方法选择泰安市公安局机关单位及辖区各派出所公安干警1311人,按性别、年龄分组,采用酶法、胶体金法分别对人群进行GLU和MAU检测,数据结果采用SPSS 17.0软件进行统计学分析.结果空腹血糖受损(IFG)占11.1%(145/1311),高GLU症占8.8%(116/1311),MAU异常率占23.6%(309/1311).GLU平均水平为(5.56±1.43)mmol/L,MAU平均水平为(17.98±12.16)μg/mL.IFG和高GLU症异常率均以50~59岁组最高,<30岁组最低,差异有统计学意义(P<0.05).MAU异常率以≥60岁组最高,<30岁组最低,差异有统计学意义(P<0.05);<30岁组和30~39岁组、30~39岁组和40~49岁组比较,差异无统计学意义(P>0.05).结论泰安市公安干警GLU、MAU异常率偏高,这主要与工作性质、生活习惯、精神和情绪有关,应加强对GLU升高、MAU升高者进行相应的医疗检查、健康宣教和跟踪随访,结合公安干警职业特点采取积极有效的综合预防治疗措施.重视健康体检工作,提高工作、生活质量.【期刊名称】《中国疗养医学》【年(卷),期】2017(026)002【总页数】3页(P216-218)【关键词】血糖;尿微量白蛋白;异常率;公安干警;卫生保健【作者】王晖;郑琳;王艳姣;刘烁【作者单位】271000 解放军第88医院体检中心;271000 解放军第88医院体检中心;271000 解放军第88医院体检中心;271000 解放军第88医院体检中心【正文语种】中文公安系统人员由于工作性质的特殊性,长期处于紧张而疲劳的生活状态中,对身体健康不够重视,忽视健康体检,各种慢性病普遍存在,为了解疾病的发病因素,提出有效的干预措施。