Debian6.0的heartbeat安装与配置
- 格式:doc
- 大小:3.68 MB
- 文档页数:6

Heartbeat安装与使用Heartbeat安装安装libnet1.下载libnet,我使用的版本是libnet-0.10.112.进入到libnet目录3.将makfiles中的pork.mak拷贝到外层目录4.执行make5.执行make install可能会出现的错误:1.chat/_coniox.h:42:21: 错误:ncurses.h:没有那个文件或目录解决办法:yum install ncurses ncurses-devel安装Cluster-Glue1.下载Reusable-Cluster-Components-glue--glue-1\[1\].0.7.tar.bz22.解压3.进入到该目录4../autogen.sh5../configure6.make7.make install可能会出现的错误:1.You must have autoconf installed to compile the cluster-glue package解决办法:说明机器上面没有相应的环境yum install autoconf automake autoheader aclocal2.You must have libtool installed to compile the cluster-glue package解决办法:说明机器上面没有相应的环境yum install libtool3../autogen.sh时出现libtoolize: `COPYING.LIB' not found in `/usr/share/libtool/libltdl'解决办法:yum install libtool-ltdl-devel4../configure时出现configure: error: libxml2 config not found解决办法:yum install libxml2 libxml2-devel5../configure时出现configure: error: BZ2 libraries not found解决办法:yum -y install bzip2-devel glib2-devel6.make时出现lib/pils/.libs/libpils.so -lbz2 -lxml2 -lc -lrt -ldl -lglib-2.0 -lltdl./.libs/libplumb.so: undefined reference to `uuid_parse'./.libs/libplumb.so: undefined reference to `uuid_generate'./.libs/libplumb.so: undefined reference to `uuid_copy'./.libs/libplumb.so: undefined reference to `uuid_is_null'./.libs/libplumb.so: undefined reference to `uuid_unparse'./.libs/libplumb.so: undefined reference to `uuid_clear'./.libs/libplumb.so: undefined reference to `uuid_compare'collect2: ld returned 1 exit statusgmake[2]: *** [ipctest] Error 1解决办法:yum install e2fsprogs-devel libuuid-devel7.make时出现error : Operation in progresswarning: failed to load external entity"/release/xsl/current/html/formal.xsl"compilation error: file /release/xsl/current/html/docbook.xsl line 46 element includexsl:include : unable to load /release/xsl/current/html/formal.xsl/release/xsl/current/html/table.xsl:1: parser error : Document isempty/release/xsl/current/html/table.xsl:1: parser error : Start tag expected, '<' not foundcompilation error: file /release/xsl/current/html/docbook.xsl line 47 element includexsl:include : unable to load /release/xsl/current/html/table.xsl解决办法:一些文档需要到互联网上去下,目前为止make过程中除了doc没有安装外,其他的都已经成功安装了,所以该问题可以忽略。

Heartbeat原理及部署 ⼀,Heartbeat简介 ⼆,安装Heartbeat 环境查看 服务器规划IP⽤途主机名192.168.1.101主服务器hdp3192.168.1.102备服务器hdp4 初始配置 禁⽤防⽕墙systemctl disable firewalld 关闭senlinux 设置主机名并设置hosts⽂件 两台主机名不⼀样,hosts⽂件⼀样 # cat /etc/hosts192.168.1.101 hdp3192.168.1.102 hdp4 安装依赖包yum -y install glib2-devel libtool-ltdl-devl net-snmp-devel bzip2-devel ncurses-devel openssl-devel libtool libxml2 libxml2-devel gettext bison flex zlib-devel mailx which libxslt docbook-dtds docbook-style-xsl PyXML shadow-utils opensp autoconf 下载安装包Heartbeat 3.0.6:/heartbeat-STABLE_3_0/archive/958e11be8686.tar.bz2Cluster Glue 1.0.12:/glue/archive/0a7add1d9996.tar.bz2Resource Agents 3.9.6:https:///ClusterLabs/resource-agents/archive/v3.9.6.tar.gz 添加 haclient 组和 hacluster 账户,这个⽤户主要⽤来配置respawn的。
groupadd haclientuseradd -g haclient -M -s /sbin/nologin hacluster 安装Cluster Glue 1.0.12tar -xf 0a7add1d9996.tar.bz2cd Reusable-Cluster-Components-glue--0a7add1d9996/./autogen.sh./configure --prefix=/usr/local/heartbeat LIBS='/lib64/libuuid.so.1'make && make install 安装Resource Agentstar -xf v3.9.6.tar.gzcd resource-agents-3.9.6/./autogen.sh./configure --prefix=/usr/local/heartbeatmake && make install 安装heartbeat-3-0-6tar -xf 958e11be8686.tar.bz2cd Heartbeat-3-0-958e11be8686/#设置,否则安装会报错export CFLAGS="$CFLAGS -I/usr/local/heartbeat/include -L/usr/local/heartbeat/lib"#删除配置⽂件的最后⼀⾏sed -i '/^#define HA_HBCONF_DIR /d' /usr/local/heartbeat/include/heartbeat/glue_config.h./bootstrap./configure --prefix=/usr/local/heartbeat LIBS='/lib64/libuuid.so.1'make && make install 拷贝配置⽂件cd /usr/local/heartbeat/share/doc/heartbeatcp authkeys ha.cf haresources /usr/local/ heartbeat/etc/ha.d/ 设置配置⽂件权限及软连接cd /usr/local/heartbeat/etc/ha.dchmod 600 authkeysln -svf /usr/local/heartbeat/lib64/heartbeat/plugins/RAExec/* /usr/local/heartbeat/lib/heartbeat/plugins/RAExec/ln -svf /usr/local/heartbeat/lib64/heartbeat/plugins/* /usr/local/heartbeat/lib/heartbeat/plugins/ 编辑配置⽂件 192.168.1.101上的ha.cf⽂件内容如下# cat /usr/local/heartbeat/etc/ha.d/ha.cf# 保存调试信息⽂件debugfile /var/log/ha-debug# ⽇志⽂件logfile /var/log/ha-log# 表⽰使⽤系统⽇志logfacility local0# ⼼跳的时间间隔,单位秒keepalive 1# 超出该时间间隔未收到对⽅节点的⼼跳,则判定对⽅死亡deadtime 30# 超出该时间间隔未收到对⽅节点的⼼跳,则发出警告记录到⽇志中warntime 10# 在某系统上,系统启动或重启之后需要经过⼀段时间⽹络才能正常⼯作,该选项⽤于解决这种情况产⽣的时间间隔,取值⾄少为deadtime的2倍initdead 120# 设置⼴播通信使⽤的端⼝,694为默认使⽤的端⼝号udpport 694# 传播⼼跳的⼴播播⽹卡信息bcast eth0# 设置对⽅机器⼼跳检测的IP# 第⼆列为⽹卡名第三列为⼼跳IP,⽣产中⼼跳需要与数据⽹络分开ucast eth0 192.168.1.102# 在该选项设为on的情况下,⼀旦主节点恢复运⾏,则⾃动获取资源并取代从节点auto_failback off# 配置主从的节点信息node hdp3node hdp4# 如果ping不通该地址,就认为当前断⽹,需要转移vipping 192.168.1.9# 指定与heartbeat⼀同启动和关闭的进程,该进程被⾃动监视,遇到故障则重新启动。

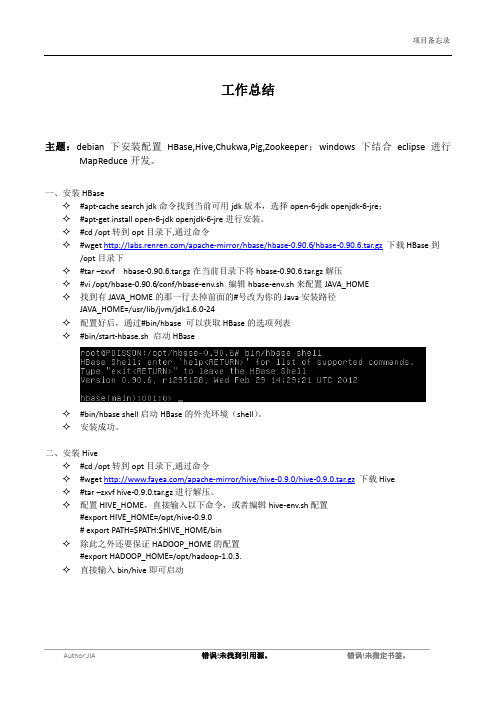
工作总结主题:debian下安装配置HBase,Hive,Chukwa,Pig,Zookeeper;windows下结合eclipse进行MapReduce开发。
一、安装HBase✧#apt-cache search jdk命令找到当前可用jdk版本,选择open-6-jdk openjdk-6-jre;✧#apt-get install open-6-jdk openjdk-6-jre进行安装。
✧#cd /opt转到opt目录下,通过命令✧#wget /apache-mirror/hbase/hbase-0.90.6/hbase-0.90.6.tar.gz下载HBase到/opt目录下✧#tar –zxvf hbase-0.90.6.tar.gz在当前目录下将hbase-0.90.6.tar.gz解压✧#vi /opt/hbase-0.90.6/conf/hbase-env.sh 编辑hbase-env.sh来配置JAVA_HOME✧找到有JAVA_HOME的那一行去掉前面的#号改为你的Java安装路径JAVA_HOME=/usr/lib/jvm/jdk1.6.0-24✧配置好后,通过#bin/hbase 可以获取HBase的选项列表✧#bin/start-hbase.sh 启动HBase✧#bin/hbase shell启动HBase的外壳环境(shell)。
✧安装成功。
二、安装Hive✧#cd /opt转到opt目录下,通过命令✧#wget /apache-mirror/hive/hive-0.9.0/hive-0.9.0.tar.gz下载Hive✧#tar –zxvf hive-0.9.0.tar.gz进行解压。
✧配置HIVE_HOME,直接输入以下命令,或者编辑hive-env.sh配置#export HIVE_HOME=/opt/hive-0.9.0# export PATH=$PATH:$HIVE_HOME/bin✧除此之外还要保证HADOOP_HOME的配置#export HADOOP_HOME=/opt/hadoop-1.0.3.✧直接输入bin/hive即可启动✧安装成功三、安装Pig✧#cd /opt转到opt目录下,通过命令✧#wget /pig/pig-0.10.0/pig-0.10.0.tar.gz下载Pig✧#tar –zxvf pig-0.10.0.tar.gz在当前目录下解压✧直接在命令行输入以下命令配置好PIG_HOME#export PIG_HOME=/opt/pig-0.10.0#export PATH=$PATH:$PIG_HOME/bin✧还需要设置JAVA_HOME环境变量,以指明Java安装路径✧#pig –help可获得使用帮助✧#bin/pig –x local这样就能启动Grunt。

Debian6.0的heartbeat安装与配置Debian 6.0的heartbeat(3.0.2)安装与配置一、安装heartbeat1、在测试的过程中发现,光驱有时不能弹出,因此需要将ISO文件拷贝到webserver上,然后手动挂载到光驱;2、将光盘DVD1放入webserver的光驱,然后用#mount查看光盘的挂载点,如/dev/sr0;3、将DVD1的iso文件拷贝到/home/scada/DebianDVD;#mkdir /home/scada/DebianDVD#dd if=/dev/sr0 of=/home/scada/DebianDVD/Debian6DVD1.iso4、按照上面的方法将DVD2也拷贝到/home/scada/DebianDVD;5、配置webserver的/etc/exports添加如下内容:6、在sever1上,挂载/DebianDVD:#mkdir /home/scada/DebianDVD#mount -t nfs 192.168.1.3:/home/scada/DebianDVD /home/scada/DebianDVD #cd /home/scada/DebianDVD #mount -t iso9660 -o loop Debian-602-dvd1.iso /media/cdrom07、用aptitude安装heartbeat,在提示插入DVD-2时,#mount -t iso9660 -o loop Debian6DVD2.iso /media/cdrom0(此时如果提示不能umount,执行#umount -l /media/cdrom0强制卸载,然后再挂载DVD2)8、回车继续,直到安装完成。
二、配置heartbeat1、安装完成后,需要在/etc/ha.d配置三个文件:ha.cf、authkeys、haresources2、三个文件/etc/ha.d里面是没有的,要从/usr/share/doc/heartbeat里copy 压缩包过去,然后解压:#cd /usr/share/doc/heartbeat#cp authkeys /etc/ha.d#cp ha.cf.gz /etc/ha.d#cp haresources.gz /etc/ha.d#cd /etc/ha.d#gunzip ha.cf.gz#gunzip haresources.gz这样heartbeat的配置文件就完整了,接下来按照如下配置1)配置ha.cflogfile /var/log/ha-log # 日志文件存放位置keepalive 2 # 发送心跳信号时间间隔(秒)deadtime 30 #无心跳信号多少秒表明服务器宕机warntime 10ucast eth1 172.16.1.2 #eth1指本地心跳连接的网口,172.16.1.2指对端IPauto_failback off #当宕机的服务器重新可用后,是否切换回来node server1 server2 #集群中有多少服务器ping_group group1 192.168.1.3 192.168.1.4 #ping一组稳定的计算机,只要一台能ping 通,表明这个集群正常工作,但是这组IP 地址不能是集群中的数据服务器(server1,server2).respawn hacluster /usr/lib/heartbeat/ipfail2)配置心跳的加密方式(authkeys),我们采用交叉网线做心跳线,所以采用最简单的crc 方式,执行如下两条:auth 11 crc然后,给authkeys赋600权限#chmod 600 authkeys3)配置资源(haresources)内容如下(参考):(注:16为子网掩码的位数:255.255.255.0为24,255.255.0.0为16)三、测试heartbeat#cd /etc/init.d#./heartbeat start #检查heartbeat是否可以运行,没有报错就是运行成功#df #查看/data盘是否自动挂载了如下图#ifconfig #查看eth0:0的ip192.168.1.201是否启用,如下图:#ps ax|grep mysql #查看mysql的相关进程,如下图:#ps ax|grep java #查看java进程,应该msgserver和serverapp 各一个:#./heartbeat stop #检查heartbeat是否能正常停止,没报错即为正常;此时再将上面的几项查看一下,应该都没有;而在备用服务器上查看,应该都有。

Debian6.0安装图解(DVD版双系统)
本文介绍Debian6.0的安装过程,和XP组成双系统。
Debian 6.0 下载:/blog/2375
推荐下载DVD版,这样安装会节省许多时间。
曾经安装过Debian4.0
/blog/118,用的是最小版,安装过程联网花费了很长时间。
选择图形化安装,当然你也可以选择字符界面或者专家模式。
DVD带有多国语言,选择china
接下来是输入一些用户名信息
ROOT 密码
由于是双系统,所以选择手动分区
选择目标分区,挂载根分区,格式化。
如图所示,检查无误则可将修改写入磁盘。
开始安装基本系统
虽然是DVD,但还是要联网获取资源,这里选否。
之后会有定制软件的界面。
等待漫长的安装,包括联网下载。
系统检测到windows xp的存在,提示安装grub。
终于大功告成。
重启之后会发现grub引导,很奇怪的是XP没有自动引导。
在我见过这么多系统中,它还是第一个不认windows。
不过这个不要紧,完全可以通过手动来引导。
登录界面
纯净的gnome桌面,无加任何修饰,DIY人士专属。
原文地址:/blog/2379。
使用linux heartbeat 的一些经验字体大小:大 - 中 - 小skyxia发表于 09-03-15 19:51 阅读(1056) 评论(0)硬件:2台hpe800,一条心跳线用于串口信息的检测,一条交叉线用于UDP协议的通讯。
双网卡,一块用于连接交叉线,一块用于连接交换机。
软件:REDHAT 7.3(MANDRAKE 8.2测试也通过),heartbeat-0.4.9.1-1.i386.rpm 其它准备:HPE800(1),主机名:CLUSTER-101-SERVER ,IP地址:192.9.100.101 HPE800(2),主机名:CLUSTER-101-SERVER ,IP地址:192.9.100.101虚拟主机名:CLUSTER-SERVER ,IP地址:192.9.100.100从网站下载最新的Heartbeat 软件包,目前的版本为heartbeat-0.4.9.1,分别解压:rpm –ivh heartbeat-0.4.9.1-1.i386.rpm。
首先配置第一台hpe800 ,解压后得到目录/etc/ha.d,主要配置三个文件/etc/ha.d/ha.cf、/etc/ha.d/haresources、/etc/ha.d/authkeys我主要配置的http 与 smb的HA集群,三个文件的主要配置如下:/etc/ha.d/ha.cf# If any of debugfile, logfile and logfacility are defined then they # will be used. If debugfile and/or logfile are not defined and# logfacility is defined then the respective logging and debug# messages will be loged to syslog. If logfacility is not defined# then debugfile and logfile will be used to log messges. If# logfacility is not defined and debugfile and/or logfile are not# defined then defaults will be used for debugfile and logfile as# required and messages will be sent there.## File to wirte debug messages todebugfile /var/log/ha-debug### File to write other messages to#logfile /var/log/ha-log### Facility to use for syslog()/logger#logfacility local0### keepalive: how many seconds between heartbeats#keepalive 2## deadtime: seconds-to-declare-host-dead#deadtime 10### Very first dead time (initdead)## On some machines/OSes, etc. the network takes a while to come up # and start working right after you've been rebooted. As a result # we have a separate dead time for when things first come up.# It should be at least twice the normal dead time.#initdead 120## hopfudge maximum hop count minus number of nodes in config#hopfudge 1## serial serialportname ...serial /dev/ttyS0### Baud rate for serial ports...#baud 19200## What UDP port to use for communication?#udpport 694## What interfaces to heartbeat over?#udp eth1## Set up a multicast heartbeat medium# mcast [dev] [mcast group] [port] [ttl] [loop]## [dev] device to send/rcv heartbeats on# [mcast group] multicast group to join (class D multicast address # 224.0.0.0 - 239.255.255.255)# [port] udp port to sendto/rcvfrom (no real reason to differ# from the port used for broadcast heartbeats)# [ttl] the ttl value for outbound heartbeats. this effects# how far the multicast packet will propagate. (0-255)# [loop] toggles loopback for outbound multicast heartbeats.# if enabled, an outbound packet will be looped back and# received by the interface it was sent on. (0 or 1)##mcast eth1 225.0.0.1 694 1 1## Watchdog is the watchdog timer. If our own heart doesn't beat for # a minute, then our machine will reboot.#watchdog /dev/watchdog## "Legacy" STONITH support# Using this directive assumes that there is one stonith# device in the cluster. Parameters to this device are# read from a configuration file. The format of this line is:## stonith <stonith_type> <configfile>#333# NOTE: it is up to you to maintain this file on each node in the # cluster!##stonith baytech /etc/ha.d/conf/stonith.baytech## STONITH support# You can configure multiple stonith devices using this directive. # The format of the line is:# stonith_host <hostfrom> <stonith_type> <params...># <hostfrom> is the machine the stonith device is attached# to or * to mean it is accessible from any host.# <stonith_type> is the type of stonith device (a list of# supported drives is in /usr/lib/stonith.)# <params...> are driver specific parameters. To see the# format for a particular device, run:# stonith -l -t <stonith_type>### Note that if you put your stonith device access information in# here, and you make this file publically readable, you're asking # for a denial of service attack ;-)###stonith_host * baytech 10.0.0.3 mylogin mysecretpassword#stonith_host ken3 rps10 /dev/ttyS1 kathy 0#stonith_host kathy rps10 /dev/ttyS1 ken3 0## Tell what machines are in the cluster# node nodename ... -- must match uname -nnode cluster-101-servernode cluster-102-server/etc/ha.d/haresources## 135.9.216.110##------------------------------------------------------------------- ## Assuming the adminstrative addresses are on the same subnet...# A little more complex case: One service address, default subnet# and netmask, and you want to start and stop http when you get# the IP address...## 135.9.216.110 http#------------------------------------------------------------------- ## A little more complex case: Three service addresses, default subnet # and netmask, and you want to start and stop http when you get# the IP address...## 135.9.216.110 135.9.215.111 135.9.216.112 httpd#------------------------------------------------------------------- ## One service address, with funny subnet and bcast addr# Stop and start httpd service with the subnet address## 135.9.216.3/4/135.9.216.12 httpd##------------------------------------------------------------------- ## An example where a shared filesystem is to be used.# Note that multiple aguments are passed to this script using# the delimiter '::' to separate each argument.##node1 10.0.0.170 Filesystem::/dev/sda1::/data1::ext2cluster-101-server 192.9.100.100 httpd smb/etc/ha.d/authkeys# Authentication file. Must be mode 600### Must have exactly one auth directive at the front.# auth send authentication using this method-id## Then, list the method and key that go with that method-id## Available methods: crc sha1, md5. Crc doesn't need/want a key.## You normally only have one authentication method-id listed in this file ## Put more than one to make a smooth transition when changing auth# methods and/or keys.### sha1 is believed to be the "best", md5 next best.## crc adds no security, except from packet corruption.# Use only on physically secure networks.#auth 11 crc#2 sha1 HI!#3 md5 Hello!很重要的一点,一定要去确保两台机器的配置文件一样,包括smb.conf等需要集群的配置文件,如果有共享存储的话还要注意很多问题,具体我没有测试过,也没有相关的硬件设备。
heartbeat使用手册heartbeat使用手册1. 简介Heartbeat是一种开源工具,用来监控和管理分布式系统中的服务可用性和故障恢复。
本文档将详细介绍heartbeat的安装、配置和使用方法。
2. 安装2.1 系统要求- 操作系统:支持Linux、Unix和Windows等常见操作系统。
- 硬件要求:具备足够的计算资源和存储空间。
2.2 和安装- 访问Heartbeat的官方网站,最新版本的安装包。
- 解压安装包并执行安装脚本,按照提示完成安装过程。
3. 配置3.1 配置文件- 在Heartbeat安装目录下找到配置文件heartbeat.cfg。
- 使用编辑器打开文件,根据需求进行配置,包括节点信息、监控项等。
3.2 节点配置- 在配置文件中添加监控节点信息,包括节点名称、IP地址、端口号等。
- 根据需求,可以配置多个节点,以实现高可用和负载均衡。
3.3 监控项配置- 在配置文件中定义要监控的服务和资源,包括各个节点上的服务类型、端口号等。
- 根据需求,可以添加、修改或删除监控项。
4. 使用4.1 启动Heartbeat服务- 执行启动命令,启动Heartbeat服务。
- 根据需要,可以指定配置文件路径和日志文件路径等参数。
4.2 监控和管理服务- 在Web界面或命令行界面上查看和管理节点状态和服务健康状况。
- 根据警报信息,可以及时采取措施进行故障恢复或调整配置。
5. 附件本文档附带以下附件,供参考和进一步了解:- heartbeat.cfg 示例配置文件- 快速入门指南- 故障恢复示例6. 法律名词及注释- Heartbeat: Heartbeat是一个开源的工具,用来监控和管理分布式系统中的服务可用性和故障恢复。
- 节点: 在heartbeat中,节点代表参与集群的机器或实例。
- 监控项: 监控项是需要被Heartbeat监控的服务或资源。
- 高可用: 高可用是指在系统发生故障时,仍能保持服务可用性的能力。
Debian 6.0的heartbeat(3.0.2)安装与配置
一、安装heartbeat
1、在测试的过程中发现,光驱有时不能弹出,因此需要将ISO文件拷贝到webserver上,然后手动挂载到光驱;
2、将光盘DVD1放入webserver的光驱,然后用#mount查看光盘的挂载点,如/dev/sr0;
3、将DVD1的iso文件拷贝到/home/scada/DebianDVD;
#mkdir /home/scada/DebianDVD
#dd if=/dev/sr0 of=/home/scada/DebianDVD/Debian6DVD1.iso
4、按照上面的方法将DVD2也拷贝到/home/scada/DebianDVD;
5、配置webserver的/etc/exports添加如下内容:
6、在sever1上,挂载/DebianDVD:
#mkdir /home/scada/DebianDVD
#mount -t nfs 192.168.1.3:/home/scada/DebianDVD /home/scada/DebianDVD #cd /home/scada/DebianDVD
#mount -t iso9660 -o loop Debian-602-dvd1.iso /media/cdrom0
7、用aptitude安装heartbeat,在提示插入DVD-2时,
#mount -t iso9660 -o loop Debian6DVD2.iso /media/cdrom0
(此时如果提示不能umount,执行#umount -l /media/cdrom0强制卸载,然后再挂载DVD2)
8、回车继续,直到安装完成。
二、配置heartbeat
1、安装完成后,需要在/etc/ha.d配置三个文件:ha.cf、authkeys、haresources
2、三个文件/etc/ha.d里面是没有的,要从/usr/share/doc/heartbeat里copy 压缩包过去,然后解压:
#cd /usr/share/doc/heartbeat
#cp authkeys /etc/ha.d
#cp ha.cf.gz /etc/ha.d
#cp haresources.gz /etc/ha.d
#cd /etc/ha.d
#gunzip ha.cf.gz
#gunzip haresources.gz
这样heartbeat的配置文件就完整了,接下来按照如下配置
1)配置ha.cf
logfile /var/log/ha-log # 日志文件存放位置
keepalive 2 # 发送心跳信号时间间隔(秒)
deadtime 30 #无心跳信号多少秒表明服务器宕机
warntime 10
ucast eth1 172.16.1.2 #eth1指本地心跳连接的网口,
172.16.1.2指对端IP
auto_failback off #当宕机的服务器重新可用后,是否切换回来
node server1 server2 #集群中有多少服务器
ping_group group1 192.168.1.3 192.168.1.4 #ping一组稳定的计算机,只要一台能ping 通,表明这个集群正常工作,但是这组IP 地址不能是集群中的数据服务器(server1,server2).
respawn hacluster /usr/lib/heartbeat/ipfail
2)配置心跳的加密方式(authkeys),我们采用交叉网线做心跳线,所以采用最简单的crc 方式,执行如下两条:
auth 1
1 crc
然后,给authkeys赋600权限#chmod 600 authkeys
3)配置资源(haresources)
内容如下(参考):
(注:16为子网掩码的位数:255.255.255.0为24,255.255.0.0为16)
三、测试heartbeat
#cd /etc/init.d
#./heartbeat start #检查heartbeat是否可以运行,没有报错就是运行成功#df #查看/data盘是否自动挂载了如下图
#ifconfig #查看eth0:0的ip192.168.1.201是否启用,如下图:
#ps ax|grep mysql #查看mysql的相关进程,如下图:
#ps ax|grep java #查看java进程,应该msgserver和serverapp各一个:
#./heartbeat stop #检查heartbeat是否能正常停止,没报错即为正常;此时再将上面的几项查看一下,应该都没有;而在备用服务器上查看,应该都有。
重启两台服务器,完成后查看以上资源,主用(server1)应该获取资源,备用(server2)应该没有资源;拔掉server1的网线,server1应该释放资源server2应该获取资源。
四、在桌面上设置“切换到主用”(hb_takeover)、“切换到备用”(hb_standby)的快捷方式
1、heartbeat(3.0.2)安装完成后,将一些常用的命令脚本都放到了
/usr/share/heartbeat里面,如下图:
2、需要将hb_takeover和hb_standby两个命令脚本拷贝到/usr/lib/heartbeat 里面,并赋予755的权限:
#cd /usr/share/heartbeat
#cp hb_takeover /usr/lib/heartbeat
#cp hb_standby /usr/lib/heartbeat
#cd /usr/lib/heartbeat
#chmod 755 hb_takeover
#chmod 755 hb_standby
3、建立“切换到主用”(hb_takeover)的快捷方式
4、建立“切换到备用”(hb_standby)的快捷方式
5、按以上方式建立的快捷方式是不能直接运行的。
因为脚本里面有一个远程连接到本机root用户的过程(ssh root@localhost),如下图:
这就需要我们先配置“免密钥本机登录”,详细方法见:建立免密钥本机登录.doc
6、到这里heartbeat就配置完成了,检验方法详见:配置好heartbeat后的测试。