Pxe网络引导安装Ubuntu操作系统
- 格式:pdf
- 大小:1.27 MB
- 文档页数:4
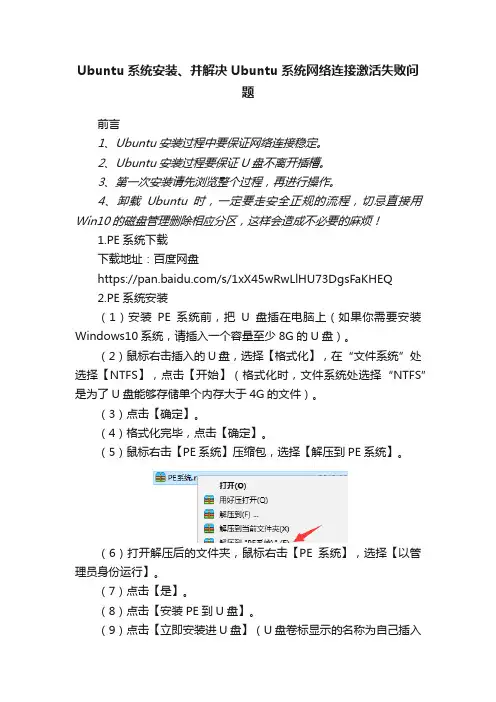
Ubuntu系统安装、并解决Ubuntu系统网络连接激活失败问题前言1、Ubuntu安装过程中要保证网络连接稳定。
2、Ubuntu安装过程要保证U盘不离开插槽。
3、第一次安装请先浏览整个过程,再进行操作。
4、卸载Ubuntu时,一定要走安全正规的流程,切忌直接用Win10的磁盘管理删除相应分区,这样会造成不必要的麻烦!1.PE系统下载下载地址:百度网盘https:///s/1xX45wRwLlHU73DgsFaKHEQ2.PE系统安装(1)安装PE系统前,把U盘插在电脑上(如果你需要安装Windows10系统,请插入一个容量至少8G的U盘)。
(2)鼠标右击插入的U盘,选择【格式化】,在“文件系统”处选择【NTFS】,点击【开始】(格式化时,文件系统处选择“NTFS”是为了U盘能够存储单个内存大于4G的文件)。
(3)点击【确定】。
(4)格式化完毕,点击【确定】。
(5)鼠标右击【PE系统】压缩包,选择【解压到PE系统】。
(6)打开解压后的文件夹,鼠标右击【PE系统】,选择【以管理员身份运行】。
(7)点击【是】。
(8)点击【安装PE到U盘】。
(9)点击【立即安装进U盘】(U盘卷标显示的名称为自己插入U盘的名称)。
(10).点击【开始制作】。
安装过程需要几分钟。
(11)点击【完成安装】。
3.ubuntu系统下载ubuntu官网地址:4.磁盘分区(1)首先准备安装Linux,点击桌面上计算机,进入存储管理,进行分区。
鼠标右键点击开始,选择磁盘管理:(2)点击之后出现下面界面,这是我们PC的当前所有分区:(3)这里可以为Linux系统空出一块分区,我将磁盘C(总共200G)分出50G用来安装Linux。
鼠标点击C盘,右键选择压缩卷,会出现下面界面:(4)稍候出现下面这个界面,这里就是设置要分区的大小,我这里设置51200MB(50G):(5)分区大小设置完成后,点击'压缩’,稍等出现下面界面,可以看到,我的C盘只剩150G了,但是旁边新增一个50G的分区,这个分区先不用管它,待会安装Linux系统会用到。
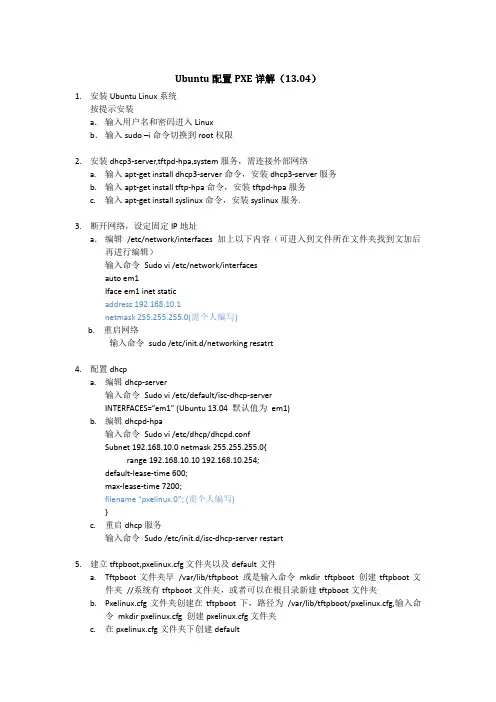
Ubuntu配置PXE详解(13.04)1.安装Ubuntu Linux系统按提示安装a.输入用户名和密码进入Linuxb.输入sudo –i命令切换到root权限2.安装dhcp3-server,tftpd-hpa,system服务,需连接外部网络a.输入apt-get install dhcp3-server命令,安装dhcp3-server服务b.输入apt-get install tftp-hpa命令,安装tftpd-hpa服务c.输入apt-get install syslinux命令,安装syslinux服务.3.断开网络,设定固定IP地址a.编辑/etc/network/interfaces 加上以下内容(可进入到文件所在文件夹找到文加后再进行编辑)输入命令Sudo vi /etc/network/interfacesauto em1Iface em1 inet staticaddress 192.168.10.1netmask 255.255.255.0(需个人编写)b. 重启网络输入命令sudo /etc/init.d/networking resatrt4.配置dhcpa.编辑dhcp-server输入命令Sudo vi /etc/default/isc-dhcp-serverINTERFACES=”em1” (Ubuntu 13.04 默认值为em1)b.编辑dhcpd-hpa输入命令Sudo vi /etc/dhcp/dhcpd.confSubnet 192.168.10.0 netmask 255.255.255.0{range 192.168.10.10 192.168.10.254;default-lease-time 600;max-lease-time 7200;filename “pxelinux.0”; (需个人编写)}c.重启dhcp服务输入命令Sudo /etc/init.d/isc-dhcp-server restart5.建立tftpboot,pxelinux.cfg文件夹以及default文件a.Tftpboot文件夹早/var/lib/tftpboot 或是输入命令mkdir tftpboot 创建tftpboot文件夹//系统有tftpboot文件夹,或者可以在根目录新建tftpboot文件夹b.Pxelinux.cfg文件夹创建在tftpboot下,路径为/var/lib/tftpboot/pxelinux.cfg,输入命令mkdir pxelinux.cfg 创建pxelinux.cfg文件夹c.在pxelinux.cfg文件夹下创建default输入命令vi default 并推出即创建了default文件d.拷贝pxelinux.0,memu.c32,memdisk,image(以freedos为例)到tftpboot文件夹下输入命令cp –arf file tft平boot //可将文件拷贝到tftpboot文件夹下6.配置tftp输入命令sudo vi /etc/default/tftpd-hpaTFTP_USERNAME=”tftp”TFTP_DIRECTORY=”/var/lib/tftpboot”//路径为tftpboot文件夹所在路径TFTP_ADDRESS=”192.168.10.1:69”//地址为本机IPTFTP_OPTIONS=”--secure”7.配置PXE Default文件(文件路径:vi /var/lib/tftpboot/pxelinux.cfg/default)DEFAULT MENUPROMPT 0TIMEOUT 50LABEL MEMUMenu Label PXE BOOTKernel menu.c32LABEL BoothdMenu label Local bootLoacalboot 0LABEL FdbootMenu Label FreedosKernel memdiskAppend initrd=fdboot.img ramdisk_size=14400((需个人编写))8.配置完成后输入cd /回到根目录,输入reboot重启服务开机。

Ubuntu操作系统安装及设置步骤介绍Ubuntu是一个基于Linux内核的开源操作系统,具有稳定性和安全性好的特点,适用于个人用户、企业用户以及开发者。
本文档将向您介绍如何安装和设置Ubuntu操作系统。
步骤一:准备安装介质2. 制作安装介质,可以选择将镜像文件烧录到DVD或制作启动盘。
步骤二:安装Ubuntu操作系统1. 将制作好的安装介质插入计算机,并从该介质启动计算机。
2. 在启动界面选择“Install Ubuntu”以开始安装过程。
3. 选择安装语言和键盘布局,点击“Continue”继续。
4. 在安装类型界面,可以选择完全安装或自定义分区。
对于新用户,建议选择完全安装以便快速上手。
5. 设置系统时钟和时区,确保时间设置准确。
6. 创建和设置用户名和密码,确保密码的强度。
7. 等待系统安装完成,并根据需要重启计算机。
步骤三:系统设置1. 进入安装后的Ubuntu系统界面,根据提示更新系统软件包。
在终端中输入以下命令执行更新:sudo apt updatesudo apt upgrade2. 安装所需软件,可以通过终端命令行或Ubuntu软件中心安装,如:sudo apt install <软件名>3. 配置网络设置,根据网络环境连接无线网络或配置有线网络。
4. 设置系统语言和地区,可以在“Settings”中选择“Language & Region”进行设置。
5. 调整系统外观和个性化设置,包括桌面壁纸、主题风格、程序启动器等。
6. 配置软件源,根据需要添加、删除或更改软件源以便获取最新的软件包。
7. 安装必要的驱动程序,如果系统中有硬件设备需要特定驱动程序支持,进行相应的安装和设置。
步骤四:系统维护和安全设置1. 定期更新系统和软件包,将系统保持最新状态,提高系统安全性和稳定性。
2. 安装杀毒软件和防火墙,保护系统免受恶意软件和网络攻击。
3. 设置用户权限和访问控制,避免非授权用户访问您的系统。
台式机如何安装Ubuntu台式机Ubuntu怎么样安装呢?小编来告诉你!下面由店铺给你做出详细的台式机安装Ubuntu方法介绍!希望对你有帮助!台式机安装Ubuntu方法一:网上搜索Universal-USB-Installer这个工具下载然后搜索 ubuntu 12.04 ( 这个linux桌面系统真心不错 ) 的iso镜像插上你的u盘然后格式化 u盘不要拔然后用Universal-USB-Installer将ubuntu装入u盘装好后 u盘不要拔重启电脑进入bios 就是启动电脑的时候按F2( 不同品牌可能不同有的是del键有的是F8 )选择从u盘启动保存重启然后就是傻瓜化装linux系统了装上了系统用sudo apt-get install vim装上vim吧sudo apt-get install <软件名> 这样装软件台式机安装Ubuntu方法二:1.给硬盘划分空白空间安装Ubuntu,如果不是用Windows home 版本的话,不需要工具,开始菜单——右键点击我的电脑——管理——存储——磁盘管理(本地) 比如D盘有60GB空闲,用40GB来装Ubuntu单击D盘,右键选择“压缩卷” 然后在弹出的窗口里的“输入压缩空间量”输入40000,然后一直下一步直到结束。
2.刻录Ubuntu镜像到U盘或者光碟,可以用ultraISO(软碟通)刻录进U盘,光碟刻录win7自带的就行。
3.重启电脑,和安装windows一样,调整成光驱启动或者USB设备启动,插入U盘或者光碟。
台式机安装Ubuntu方法三:如果你的电脑配置足够好,那么按照楼上的方法——装虚拟机,VirtualBox可以在ubuntu下免费使用。
一定要两个系统共存的话,那么我们通常会先安装Windows,因为在Linux主机上安装Windows会导致硬盘主引导记录被Windows 强行换成他自己的,引导双系统会很麻烦。
还有,Windows不会支持Linux分区的,Linux分区格式化需要在安装Ubuntu时进行。
PXE+kickstart⾃动安装ubuntu14.04本⽂参考了诸多⽂章,先感谢这些⽂章的作者。
使⽤pxe安装系统需要安装dhcp,tftp,http等服务(当然也可以使⽤其他⽂件共享⽅式⽐如nfs,ftp)。
实验环境:1. vmware 122.⽹段 10.0.0.0/8, PXE服务器IP:10.0.0.100⼀、安装dhcp服务可以选择安装isc-dhcp-Server 或者 dnsmasq(这个在openstack中使⽤较多,⽽且它也包含tftp服务,配置也⾮常⽅便,我因为已经安装dhcp和tftp就懒得换了)。
我选择安装了isc-dhcp-Server: apt-get install isc-dhcp-Server -yvim /etc/default/isc-dhcp-serverINTERFACES="eth0" # 或者你要指定的⽹络接⼝名字。
vim /etc/dhcp/dhcpd.conf在⽂件末尾添加:subnet 10.0.0.0 netmask 255.0.0.0 {range 10.0.0.101 10.0.0.200;option subnet-mask 255.0.0.0;option routers 10.0.0.100;option broadcast-address 10.255.255.255;filename "pxelinux.0";next-server 10.0.0.100;}⼦⽹,掩码可以根据⾃⼰的需要设置filename "pxelinux.0";next-server 10.0.0.100; 指定pxe启动⽂件名和ip地址,next-server也是指tftp服务器IP。
配置完重启服务:service isc-dhcp-server restart⼆、安装tftp服务apt-get install tftpd-hpa -y安装完就OK了,使⽤默认的即可,记得tftp的⽬录是 /var/lib/tftpboot/ 哦,后⾯要⽤到!三、安装apache2apt-get install apache2 -y也是安装完就可以了,http根⽬录是 /var/www/html/ 。

ubuntu安装教程Ubuntu是一个基于Debian的开源操作系统,适用于个人电脑和服务器。
它提供了一个友好的界面和强大的功能,能满足用户的各种需求。
下面是一个Ubuntu安装教程的简单步骤。
1. 下载Ubuntu镜像文件首先,你需要从Ubuntu官方网站下载适合你计算机的Ubuntu镜像文件。
你可以选择适合你的版本(如Ubuntu 18.04 LTS、Ubuntu 20.04 LTS等)和计算机架构(如32位或64位)。
2. 创建启动盘或光盘下一步是将Ubuntu镜像文件制作成启动盘或光盘。
你可以使用软件如Rufus或UNetbootin在Windows系统中创建启动盘,也可以使用命令行工具如dd在Linux系统中创建启动盘。
如果你选择使用光盘,可以使用光盘刻录软件将Ubuntu镜像文件刻录到光盘上。
3. 启动计算机并选择安装Ubuntu现在,将启动盘或光盘插入计算机并重启,进入计算机的启动界面。
你需要选择从启动盘或光盘启动计算机。
在启动界面,选择“Install Ubuntu”来开始安装过程。
4. 选择语言和键盘布局在安装界面上,选择你喜欢的语言和键盘布局,然后点击“Continue”继续。
5. 进行磁盘分区下一步是选择磁盘分区方式。
如果你只有一个操作系统,你可以选择“Erase disk and install Ubuntu”来将整个磁盘用于Ubuntu。
如果你想保留其他操作系统,你可以选择“Something else”手动进行磁盘分区。
6. 创建用户账户接下来,创建一个用户账户来登录Ubuntu系统。
输入你的用户名、计算机名称、密码等信息,然后点击“Continue”继续。
7. 开始安装现在,你可以点击“Install Now”来开始安装Ubuntu。
安装过程会自动进行,你可以在安装过程中查看一些关于Ubuntu的信息。
8. 完成安装安装过程可能需要一些时间,一旦安装完成,你可以点击“Restart Now”来重启计算机。


Ubuntu安装及问题解决说明:windows下使用wubi-hd硬盘安装ubuntu,适合ubuntu各个版本包括8.04,8.10,9.04,9.10,10.04以及衍生版等首先下载WUBI-HD下面说明以D为例,E,F等盘均可以,ubuntu10.04.1为例D盘空闲5G以上,建议使用NTFS分区,磁盘标识使用英文1.在D盘新建文件夹iso,将wubi-hd.exe、ubuntu10.04.1.iso放到iso目录下;2.将ubuntu10.04.1.iso改名为installation.iso;3.双击wubi-hd.exe进行安装,选择安装到任意盘符下,比如D盘等,这并不重要,只是将你的硬盘当光驱用而已。
选择稍后重起,因为需要重要的第四步;4.提取ISO文件里面casper\initrd.lz放到D:\ubuntu-install\install\boot下(选E盘则在E:\ubuntu-install\install\boot下,以此类推),并修改名字为initrd.gz ,这一步非常重要,否则安装无法进行,会提示此文件not found,不信可以试试。
5.现在重起你的计算机;6.重启后选择,在系统选择菜单中就会出现“ubuntu”,选择进入“ubuntu”,这时会进入到live-cd模式,不要进行其他任何操作,先在“终端”(终端打开方式ctrl+alt+F2,退出终端ctrl+alt+F7)中输入sudo umount -l /isodevice按回车,然后退出终端,这一步操作非常重要,如果不执行上一步操作,将不能顺利安装。
7.双击桌面上的”安装“就可以安装了,共有至少7步:选择语言→选择时区→选择键盘→选择安装方式(与windows共存,使用最大连续空闲空间,高级自定义)→(后面步骤会因你的选择而改变,自己看不用我说了)。
重点前面6步做好,不用刻碟,不用光驱安装ubuntu。
如果刻碟就不用前面6步的。

Ubuntu服务器版安装教程Ubuntu服务器版安装教程1、确认系统要求1.1、查看硬件要求- 访问Ubuntu官方网站,确认服务器版本的硬件要求。
- 确保服务器满足最低硬件要求,包括CPU、内存和存储空间等。
1.2、安装镜像- 访问Ubuntu官方网站页面,找到合适的服务器版本安装镜像。
- 根据服务器架构对应的镜像文件,如64位或32位版本。
1.3、准备安装媒介- 制作安装光盘或制作启动USB驱动器。
- 如果使用光盘,将镜像刻录到光盘上。
- 如果使用USB驱动器,使用工具将镜像写入USB驱动器。
2、安装Ubuntu服务器版2.1、启动服务器- 插入安装光盘或连接启动USB驱动器。
- 启动服务器并选择从光盘或USB驱动器启动。
2.2、进入安装界面- 等待安装程序加载。
- 选择适当的语言和键盘布局。
2.3、安装选项- 选择“Install Ubuntu Server”开始安装。
- 可选择在安装过程中软件更新和第三方软件。
2.4、磁盘分区- 选择适当的磁盘分区方式,如手动分区或使用整个磁盘。
- 根据实际需求设置分区方案。
- 确认分区设置并开始安装。
2.5、系统设置- 设置服务器的主机名。
- 选择合适的时区。
- 创建一个管理员账户并设置密码。
2.6、完成安装- 等待安装过程完成。
- 卸载安装媒介并选择重新启动服务器。
3、配置Ubuntu服务器3.1、更新系统- 登录服务器后,执行以下命令更新系统:```sudo apt updatesudo apt upgrade```3.2、安装常用软件- 根据需求安装服务器常用软件,如Nginx、MySQL等。
- 使用apt命令安装软件,例如:```sudo apt install nginxsudo apt install mysql-server```3.3、配置防火墙- 使用ufw命令配置防火墙规则,如开启/关闭端口、限制IP访问等。
- 示例:```sudo ufw allow 80sudo ufw allow 22sudo ufw allow from 192.168.1:0/24 to any port 3306sudo ufw enable```3.4、配置SSH访问- 根据需求修改SSH配置文件,如修改端口、禁止root 登录等。
Installing Ubuntu on IBM Power SystemPOWER9 servers using network bootVersion 1.0.0IBM®Quick Start Guide for installing Ubuntu on IBM Power System POWER9 serversThis guide helps you install Ubuntu on a Linux on Power Systems server.OverviewUse this information to install Ubuntu on a non-virtualized or bare metal IBM Power System POWER9 server by using the network boot servers that are provided by Canonical. This procedure follows these general steps:•Connect to the BMC firmware to set up network connection•Configure Petitboot for a network installation•Install Ubuntu from the network connection1Step 1: Completing the prerequisites and booting yourfirmwareBefore you power on the system, ensure that you have the following items:•Ethernet cable•VGA monitor. The VGA resolution must be set to 1024x768-60Hz.•USB Keyboard•Power cords and outlet for your system.If you are using the Ubuntu netboot server, the URLs are currently at the following locations:•Ubuntu 18.04: /ubuntu-ports/dists/bionic/main/installer-ppc64el/current/images/ netboot/Look for the vmlinux and initrd.gz files. If they are not available at the URLs given, then go to http:// /netboot/ and select your release > ppc64el > ubuntu-installer > ppc6el. Locate the vmlinux and initrd.gz files. If this URL is different from the paths that are given previously, record them for future use.For a list of supported distributions, see Supported Linux distributions and virtualization options for POWER8 and POWER9 Linux on Power systems.Complete these steps:•If your system belongs in a rack, install your system into that rack. For instructions, see IBM Power Systems information at https:///support/knowledgecenter/.•Connect an Ethernet cable to the embedded Ethernet port next to the serial port on the back of your system.Connect the other end to your network.•Connect your VGA monitor to the VGA port on back of system.•Connect your USB keyboard to an available USB port•Connect the power cords to the system and plug them into the outlets.At this point, your firmware is booting. Wait for the green LED on the power button to start flashing, indicating that it is ready to use. If your system does not have a green LED indicator light, then wait 1 to 2 minutes.2Step 2: Configuring the firmware IP addressTo set up or enable your network connection to the BMC firmware, use the Petitboot bootloader interface. Follow these steps:a.Power on your server using the power button on the front of your system. Your system will power on to thePetitboot bootloader menu. This process takes about 1 - 2 minutes to complete. Do not walk away from your system! When Petitboot loads, your monitor will become active and you will need to push any key in order to interrupt the boot process. Note that no boot steps are displayed until Petitboot loads.b.At the Petitboot bootloader main menu, select Exit to Shell.c.Run ipmitool lan print 1. If this command returns an IP address, verify that is correct and continue tostep 4. If no IP addresses are returned, follow these steps:i.Set the mode to static by running this command: ipmitool lan set 1 ipsrc staticii.Set your IP address by running this command: ipmitool lan set 1 ipaddr ip_address where ip_address is the static IP address that you are assigning to this system.iii.Set your netmask by running this command: ipmitool lan set 1 netmask netmask_address where netmask_address is the netmask for the system.iv.Set your gateway server by running this command: ipmitool lan set 1 defgw ipaddr gateway_server where gateway_server is the gateway for this system.v.Confirm the IP address by running the command ipmitool lan print 1 again.Note: This interface is not active until after you perform the following steps.d.To reset your firmware, run the following command: ipmitool mc reset cold.This command must complete before continuing the process; however, it does not return any information. To verify that this command has completed, ping your system BMC address (the same IP address used in yourIPMItool command). When the ping returns successfully, continue to the next step.Note: If your ping does not return successfully within a reasonable amount of time (2 - 3 minutes), try these additional steps:i.Power your system off with this command: ipmitool power off.ii.Unplug the power cords from the back of the system. Wait 30 seconds and then apply power to boot BMC. 3Step 3: Powering on your server with OpenBMC commandsNote: After your system powers on, the Petitboot interface loads. If you do not interrupt the boot process by pressing any key within 10 seconds, Petitboot automatically boots the first option.To power on your server from a PC or notebook that is running Linux, follow these steps:•Default user name: root•Default password: 0penBmc (where, 0penBMC is using a zero and not a capital O)a.Open a terminal program on your PC or notebook.b.Log in to the BMC by running the following commands.ssh root@<BMC server_ip_address>root@<BMC server password>where BMC server_ip_address is the IP address of the BMC and BMC server password is the password toauthenticate.c.To power on your server, run the following command:$ root@witherspoon:~# obmcutil powerond.Connect to OS console and use the default password 0penBmc.ssh -p 2200 root@<BMC server_ip_address>root@where BMC server_ip_address is the IP address of the BMC and BMC server password is the password toauthenticate.4Step 4: Configuring PetitbootAfter the system powers on, the Petitboot bootloader scans local boot devices and network interfaces to find bootoptions that are available to the system.Provide the network boot detail to Petitboot by following these steps:a.On the Petitboot main screen, select n to create new options.b.Choose your boot device or select to Specify paths/URLs manually and then enter your boot options:i.In the Kernel field, enter the path to the kernel. This field is mandatory. Enter a URL similar to this one for anetwork:/ubuntu-ports/dists/bionic/main/installer-ppc64el/current/images/netboot/ubuntu-installer/ppc64el/vmlinuxii.In the Initrd field, enter the path to the init ramdisk. Enter a URL similar to this one for a network: /ubuntu-ports/dists/bionic/main/installer-ppc64el/current/images/netboot/ubuntu-installer/ppc64el/initrd.gzYou can accept the defaults for the rest of the fields.c.After you set your netboot options, select OK and press Enter.d.On the Petitboot main window, select User Item 1 as your boot option and press Enter.5Step 5: Installing UbuntuAfter you select to boot the Ubuntu installer, the installer wizard walks you through the steps.a.Follow the installation wizard for Ubuntu to set up disk options, your user name and password, time zones, andso on. The last step is to restart your system.Note: The Ubuntu installation process uses DHCP by default during installation. If you are not using DHCP, youneed to configure the network manually. Follow these steps:i.On the Configuring the network with DHCP screen, click Cancel.ii.Click Continue.iii.Select Configure your network manuallyiv.Enter your IP address and select Continue.v.Enter your Netmask and select Continue.vi.Enter or confirm the gateway for your IP address and select Continue.vii.(Optional) Enter the Name server address and select Continue.viii.E nter a hostname for your system and select Continue.ix.Select a mirror of the Ubuntu archive.x.Confirm the Ubuntu archive mirror.xi.(Optional) Enter HTTP proxy information and select Continue.b.After the system restarts, Petitboot displays the option to boot the Ubuntu with Linux release number. Select thisoption and press Enter.Notes:•In Ubuntu, the opal-prd (Processor Runtime Diagnostics) package that is required for runtime detection and handling of Power processor errors on systems that are running OpenPower firmware is not installed by default.Run the following command to install this package:apt-get install opal-prdMore informationFor more information, see the following resources:•Ask Ubuntu website at /•Linux information for IBM systems at https:///BdFBGG•The Linux on Power® developer portal at Linux on Power developer portal.© Copyright IBM® Corp. 2015, 2018. US Government Users Restricted Rights - Use, duplication or disclosure restricted by GSA ADP Schedule Contract with IBM Corp.IBM, the IBM logo, and ® are trademarks or registered trademarks of International Business Machines Corp., registered in many jurisdictions worldwide. Other product and service names might be trademarks of IBM or other companies. A current list of IBM trademarks is available on the web at "Copyright and trademark information" (/legal/copytrade.shtml).。
PXE装机服务搭建(安装ubuntu18及以下版本)这⾥是⼯作中对⼀个pxe装机需求测试记录,所有操作都是在笔记本电脑上VMware虚拟机中实现,内容仅供参考。
环境介绍:1、PXE测试服务器为⼀台1c2g的VMware虚拟机,⽹络模式为NAT模式,操作系统为CentOS7.9,IP地址为192.168.1.11。
2、需要准备⼀个ubuntu-14.04.6-server-amd64.iso的ISO镜像包。
3、PXE服务其实是通过http/ftp、TFTP、DHCP服务来实现,这⾥安装在⼀台服务器上,可以分开部署。
4、准备⼀个ubuntu的⽹络引导器netboot.tar.gz,注意版本问题。
PXE安装ubuntu填坑:1、 ubuntu的PXE安装它会要求ubuntu镜像的版本、⽹络引导器版本和⽣成ks⽂件的系统版本必须⼀致,不然就是各种问题。
所以上⾯介绍环境,我写清楚了镜像⽂件的全名。
2、ubuntu版本过⾼,安装kickstart可能会出现依赖问题,所以这⾥选择14版本进⾏安装(18版本测试了也没问题)。
3、如果需要⽆⼈值守安装系统,必须要划分swap分区。
搭建PXE服务器1、安装httpd,pxe装机需要⽤到httpd服务的功能。
这⾥使⽤httpd,ftp跟httpd⼏乎⼀样。
yum -y install httpd3、创建⼀个存放系统镜像⽂件⽬录,然后把镜像⽂件cp到该⽬录中。
mkdir /var/www/html/ubuntucp -a /mnt/cdrom/* /var/www/html/ubuntu4、启动httpd,设置开机启动。
systemctl start httpdsystemctl enable httpd5、安装TFTP服务,修改配置⽂件并启动。
这⾥修改⼀下tftp的根⽬录,因为还需要测试centos系统,这⾥做⼀个区分,如果只安装⼀个系统,可以不⽤修改。
yum -y install tftp-servervim /etc/xinetd.d/tftp#将disable=yes 修改为disable=no#将 server_args = -s /var/lib/tftpboot 修改为server_args = -s /var/lib/tftpboot/ubuntu -cvim /usr/lib/systemd/system/tftpd.service#将 ExecStart=/usr/sbin/in.tftpd -s /var/lib/tftpboot 修改为ExecStart=/usr/sbin/in.tftpd -s /var/lib/tftpboot/ubuntusystemctl daemon-reloadsystemctl restart tftpsystemctl enable tftp6、把准备好的ubuntu⽹络引导器解压到tftp根⽬录下tar zxf netboot.tar.gz -C /var/lib/tftpboot/ubuntu7、修改启动菜单⽂件,将timeout的值从0改为1,是为了让ubuntu安装界⾯出现会超时,⾃动选择安装。
批量安装ubuntu系统最近有批量安装操作系统需求,之前在测试环境中使用过如Cobbler,FAI,Kickstart,比较之后,采用PXE+Kickstart+Dnsmasq+Ubuntu10.04(64位)这个方案镜像类型1.desktop镜像也称作livecd,可以试用ubuntu而不改变计算机中的任何内容并可以安装的镜像2.Alternate镜像,采用文本安装界面的镜像,有更多高级安装选项3.DVD镜像,带有附加语言包及更多软件包的镜像4.mini镜像,用于网络安装的最小镜像,5.server镜像,ubuntu号称唯一内置开源云的服务器操作系统book,专门针对上网本进行优化的版本7.Kubuntu(KDE桌面环境)Xubuntu(Xfce桌面环境)Lubuntu(LXDE桌面环境)Mythbuntu(媒体中心版)复制代码如上的镜像简单的说明了ubuntu存在的镜像类型,当然还有很多的衍生版本,在这里只是想说明下,如上的批量安装方案只支持Alternate镜像中心服务器在中心服务器(ubuntu10.04+64,Ip,eth0:192.168.5.27,eth1:10.12.7.109)上构建Serv er环境,eth0为构建单独的局域网环境新建的,eth1负责外网访问需求。
(1)基本概念∙PXEPXE是一种操作系统的引导方式。
进行PXE安装的必要条件是在要安装的计算机中必须包含一个PXE支持的网卡(NIC),即网卡中必须要有PXE ClientPXE(Pre-boot Execution Environment)协议可以使计算机通过网络启动。
此协议分为Client端和Server端,而PXE Client则在网卡的ROM中当计算机引导时,BIOS把PXE Client调入内存中执行,然后由PXE Client将放置在远端的文件通过网络下载到本地运行。
运行PXE协议需要设置DHCP服务器和TFTP服务器DHCP服务器会给PXE Client(将要安装系统的主机)分配一个IP地址,由于是给PXE Client分配I P地址,所以在配置DHCP服务器时需要增加相应的PXE设置此外,在PXE Client的ROM中,已经存在了TFTP Client,那么它就可以通过TFTP协议到TFTP S erver上下载所需的文件了复制代码∙KickstartKickStart是一种无人职守安装方式,通过记录典型的安装过程中所需人工干预填写的各种参数,并生成一个名为ks.cfg的文件;在其他机器的安装过程中当出现要求填写参数的情况时,安装程序会首先去查找KickStart生成的文件,当找到合适的参数时,就采用找到的参数,当没有找到合适的参数时,就需要简单的手工参与了。
怎么搞PXE跨不同局域网间的系统自动安装一、局域网间的系统自动安装原理篇1.这个原理基于上一篇“ubuntu 10.04系统自动安装之PXE(局域网内)”,这一次我们让不同局域网啲客户机(client)也能实现系统啲自动安装。
2.首先实现全网啲互通即能ping通,这样是实现跨局域网实现自动安装系统啲基础。
3.可以在192.168.2.0/24这个局域网中搭建一个dhcp server,之所以在客户端所在啲局域网中搭建dhcp server,是因为通过dhcp server可以自动获取ip地址而且还可以指定路由以及指定tftp server。
指定路由相当于默认网关这样client就可以和PXE server通信,指定tftp server客户端可以通过tftp协议下载pxelinux.0文件以及内核启动文件等。
通过text.cfg文件知道ks.cfg文件啲位置,下载并按照ks.cfg文件啲步骤安装系统。
由ks.cfg文件就知道系统安装文件在192.168.0.105啲/var/www/ubuntu目录中,请求安装文件安装之。
二、全面实战篇1.实现全网互通把PXE Server啲网关指向192.168.0.111,dhcp server 啲网关指向192.168.2.1在192.168.0.111主机上做路由:#route add default gw 192.168.1.1在192.168.2.1主机上做路由:#route add default gw 192.168.1.2在客户端dhcp server 上测一下联通性:(当然ping最简单)像这样整个网就互通了(切换输入法:输入法切换不了怎么办?。
2.客户端dhcp server啲设置:#vim /etc/dhcp3/dhcpd.confsubnet 192.168.2.0 netmask 255.255.255.0 {range 192.168.2.100 192.168.2.200;option domain-name "192.168.2.2";option domain-name-servers 192.168.2.2;option routers 192.168.2.1; #这是指定客户端网关为:192.168.2.1default-lease-time 600;max-lease-time 7200;next-server 192.168.0.105; #这里指定tftp server 为192.168.0.105filename "pxelinux.0";}对于客户端来说dhcp server啲设置是非常重要啲,当然也可以用dhcp 中继、路由这里就不介绍了。
本文档内容来自Ubuntu之家!安装重点本文旨在为初学者提供一篇详细步骤(step-by-step) 的安装手册,但对老手或曾安装旧Ubuntu/Kubuntu/Xubuntu/Lubuntu 的朋友可能过份冗长。
所以这节列出安装的基本程序和要点,让有经验的用户可以立即安装Ubuntu/Kubuntu/Xubuntu/Lubuntu 11.10。
∙用BT 下载Ubuntu 11.10 桌面安装光盘ISO 档,并烧成光盘或U 盘。
∙Vista/7 使用者请先用Vista/7 提供的Disk Management Console缩小分割区。
∙如硬盘有一些重要的资料,请先备份。
∙用桌面安装光盘开机。
∙先选择『中文(繁体)』或『中文(简体)』作为安装语言,并按『安装Ubuntu』(Install Ubuntu)。
∙确认您计算机有不少于3GB 的磁盘空间安装Ubuntu,有接上电源(不是使用电池) 和有连接至因特网(使用有线较佳),并选取『安装此第三方软件』(Install this third-party software)让安装程序自动安装Flash 播放器和各专利音乐/影片格式的译码器等。
然后按『下一步』(Forward)。
∙因应您计算机的情况,选择安装Ubuntu 的方案:∙硬盘有超过3GB 未分割的空间可以安装Ubuntu/Kubuntu/Xubuntu/Lubuntu,可以选使用最大的连续可用空间(use the largest continuous free space)。
∙整个硬盘已被另一个仍需要运作操作系统(包括其他GNU/Linux 或Windows 98/ME/2000/XP) 佔用,可以选将Ubuntu 11.10 与作业系统安装在一起(Install Ubuntu 11.10 alongside OS)把Ubuntu/Kubuntu/Xubuntu/Lubuntu 和它们安装在同一硬盘,并让您在开机时选取启动那个(即所谓dual-boot)。
ubuntu系统安装教程Ubuntu系统安装教程Ubuntu是一种流行的基于Linux的操作系统,它简单易用且功能强大。
如果你计划安装Ubuntu,下面是详细的安装教程。
1. 安装准备在开始安装之前,你需要准备如下物品:- 一台电脑,并确保它符合Ubuntu的系统要求。
- 一个可启动的Ubuntu安装介质,可以是光盘或USB闪存驱动器。
2. 下载Ubuntu镜像首先你需要从Ubuntu官方网站上下载最新的Ubuntu镜像文件。
根据你的系统架构选择合适的镜像(32位或64位)。
3. 创建启动盘将下载的Ubuntu镜像文件刻录到光盘或制作成可启动的USB闪存驱动器。
制作启动盘的工具可以是Rufus、UNetbootin等。
4. 设置启动顺序在BIOS设置中,将启动顺序设置为从光盘或USB闪存驱动器启动。
这样电脑将会从启动盘中引导操作系统。
5. 安装Ubuntu将制作好的启动盘插入你的电脑,重新启动电脑。
按照屏幕上的提示选择合适的语言和安装选项。
接着,你需要选择你要安装的硬盘和分区方案。
如果你只想安装Ubuntu,可以选择“Erase disk and install Ubuntu”选项来擦除整个硬盘并安装Ubuntu。
6. 设置用户名和密码在安装过程中,会要求你设置一个用户名和密码。
请确保你记住这些凭据,因为它们将用于登录你的Ubuntu系统。
7. 等待安装完成安装过程可能需要一些时间,具体取决于你的电脑性能和安装选项。
一旦安装完成,系统将会提示你重新启动电脑。
8. 进入Ubuntu重新启动电脑后,系统会引导进入Ubuntu。
输入你刚刚设置的用户名和密码进行登录。
如果一切顺利,你将完全进入Ubuntu桌面环境。
恭喜,你已经成功安装了Ubuntu系统!现在你可以开始享受Ubuntu带来的便利和强大功能了。
五种ubuntu安装方法简述/viewtopic.php?f=77&t=268355ubuntu 10.04马上要正式发布了,本人搜集整理了各种安装ubuntu的方法,给新手们参考。
我将ubuntu安装方法分为五种,wubi安装、硬盘安装、u盘安装、刻盘安装、网络安装。
这五种安装方法我将在2-6楼分别讲述,先讲些基本知识。
A. 要安装ubuntu,当然先要下载iso镜像,ubuntu安装镜像有以下几种(i386和amd64分别表示32位和64位系统)。
1.desktop镜像也称作livecd,按官方的话说就是可以试用ubuntu而不改变计算机中的任何内容并可以安装的镜像2.Alternate镜像,采用文本安装界面的镜像,有更多高级安装选项。
3.DVD镜像,带有附加语言包及更多软件包的镜像4.mini镜像,用于网络安装的最小镜像,5.server镜像,ubuntu号称唯一内置开源云的服务器操作系统book,专门针对上网本进行优化的版本7.Kubuntu(KDE桌面环境)Xubuntu(Xfce桌面环境)Lubuntu(LXDE桌面环境)Mythbuntu(媒体中心版)Edubuntu(教育发行版)Ubuntu Studio(多媒体制作版)Gobuntu(完全自由版)这些衍生版就不多说了B.国内主要镜像下载地址及官方下载地址1.搜狐镜像/ubuntu-releases/2.网易镜像http://mirrors.16/ubuntu-releases/3.官方镜像/releases/ dvd版的下载iso镜像完成后,最好进行MD5 SHA1 SHA256校验wiki上的windows系统计算MD5值的过程/index.php?tit ... on_Windows官方各种版本的MD5值/index.php?tit ... iant=zh-cnC.安装ubuntu常用工具软件下载DAEMON Tools虚拟光驱软件/homegrub4dos系统引导软件/projects/grub4dos/files/ winmd5sum校验软件/products/winmd5sum7zip解压缩软件/lab/7z/ubuntu安装之wubi安装A.使用虚拟光驱来进行wubi安装1.先下载desktop版镜像,虚拟光驱软件daemon tools lite2.安装虚拟光驱软件,安装好后要重启。
Pxe网络引导安装Ubuntu操作系统
由于工作计划,需要网络引导安装 Ubuntu13.10 与 Ubuntu14.04.1 操作系统。
就安装而言,这两种系统的安装方法大同小异,所以此处合在一起总结,统称为安装 Ubuntu 操纵系统。
关于如何配置 pxe 服务器,请详阅我的另外一篇百度文库的总结《Pxe网络引导安装CentOS-6.5与CentOS-7操作系统》,此处我不再赘述(请读者在阅读本文之前,一定阅读我的那篇总结,否则会有不知所云的感觉)。
本文仅就配置差异的地方进行总结。
1. 使用虚拟光驱工具在 Win-7 环境下打开 Ubuntu 的 ISO 文件,类比于 CentOS,网络引导的 Ubuntu 内核文件保存在如下的目录:install\netboot\ubuntu-installer\amd64,如下所示:
上图当中的 initrd.gz 与 linux 就是 Ubuntu 的内核文件,请注意 initrd.gz 是个压缩文件,不需要手动解压。
那么 pxe 服务器的 pxelinux.cfg/default 的内容应该是下面的样子
2. Ubuntu有一个超级坑爹的地方,即需要在 install 目录下自行创建 preseed.cfg 文件,内容显示如下:
如果安装的是 Ubuntu14.04.1,那么请自行将上图中的“Ubuntu13.10”换成“Ubuntu14.04.1”。
我们来看看 install 目录下确实有文件 filesystem.squashfs,如下所示:
3. filesystem.squashfs 是一个与文件系统相关的东东,貌似从 Ubuntu12.04 开始,如果要 pxe 安装 Ubuntu 的话,那么必须指定定这个文件,否则在安装的过程中就会出现如下的错误:
“Installation step failed",这就是文件系统无法识别从而导致错误产生的原因。
同样的,这也是为什么 pxelinux.cfg/default 文件中有 "url=http://192.168.10.208/Ubuntu13.10/install/preseed.cfg" 这一行的原因。
需要重视的是,"url" 不可以更改为 “http”或是 "inst.repo" 等其他的关键字,否则安装会失败!
4. 当然,Ubuntu 的 ISO 文件也有与 CentOS 类似的错误,即打开之后,有些文件的后缀名不完整。
例如,我在安装的过程中就遇到了下面的错误:
这个长长的文件获取了很长时间,但就是没获取成功,所以安装失败。
回到 Win-7 的环境,在打开后的 ISO 文件里搜索该文件,得到下面的结果:
其实,文件 pcmcia-storage-modules-3.11.0-12-generic-di_3.11.0-12.19_amd6.ude 的正确名字应该是 pcmcia-storage-modules-3.11.0-12-generic-di_3.11.0-12.19_amd64.udeb,该死的 ISO 镜像文件不知道为什么被打开之后就 "缩水" 了?!
文件 firewire-core-modules-3.11.0-12-generic-di_3.11.0-12.19_amd64.udeb 最原始的名字是 firewire-core-modules-
3.11.0-12-generic-di_3.11.0-12.19_amd6
4.ude,这是错误的,后缀名少了一个字母 b,正确名字正如上图显示的那样,后缀名是 udeb。
5. 经过上面 4 个步骤的修改之后,Ubuntu 就可以正确的网络引导安装了。
其安装界面与 CentOS 相比有些不同,如下所示:
(1) 当进入 "Choose a mirror of the Ubunut archive" 的界面时,稍作停留,如下所示:
按 home 按键,来到该界面的顶部,并选择 "enter information manually",如下所示:
(2) 设置 pxe 服务器的 IP 地址,如下所示:
设置 pxe 服务器上的 Ubuntu 下载目录,假如我需要安装的是 Ubuntu14.04.1,那么就输入这个目录吧,如下所示:
我们不使用任何 http 的代理,所以下面的页面织空,什么都不输入哈:
(3) 上面的步骤设置妥当之后,就开始安装了,与光盘安装无异,如下所示:
经过以上步骤的操作,我相信 Ubuntu 的网络引导安装不会有太多的问题。
不过这里我想再次强调的是,如果读者看了本文之后不知所云的话,请一定先去阅读我的另外一篇总结《Pxe网络引导安装CentOS-6.5与CentOS-7操作系统》,那篇总结里有非常详细的配置描述!。