固高GT2用户手册
- 格式:pdf
- 大小:3.35 MB
- 文档页数:68
TCPIP通讯TCPIP 通讯(即SOCKET通讯)是通过网线将服务器Server端与客户机Client端进行连接,在遵循类似ISO/OSI模型的四层层级架构的基础上通过TCP/IP协议建立的通讯。
控制器可以设置为服务器端或者客户端。
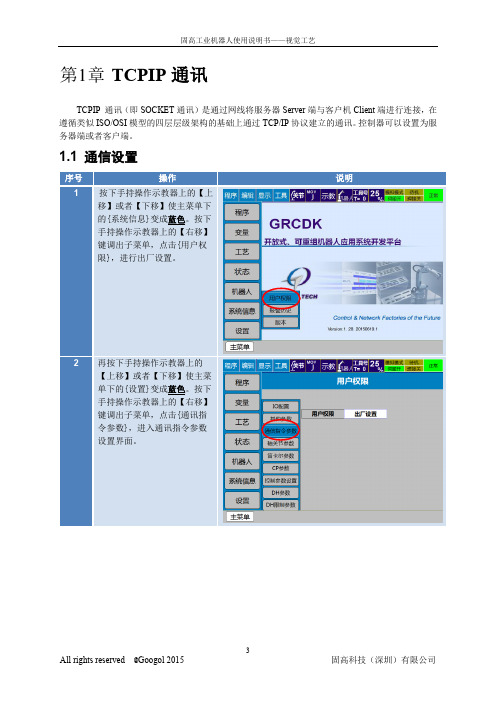
1.1 通信设置按下手持操作示教器上的【上移】或者【下移】使主菜单下。
按下手持操作示教器上的【右移】【上移】或者【下移】使主菜。
按下手持操作示教器上的【右移】的通讯功能可以同时开通,你可以点击通路选择下面的向左或者向右按每次改变或者设置新的通路选择参才出按服务器地址:即服务器端的IP地址,当机器人控制器作为客户端时,则需要填入服务器IP地址;当机器人控制器作为服务器端,则可以不填该参数。
端口:服务器端口又是本地端口号,前者是对于控制器作为客户端而言,后者是对于控制器作为服务器端而言。
这里要求服务器和客户端的这个参数必须相同。
结束符:参数默认就是CLRF,回车换行符。
是从控制器发送出的数据带回车换行符。
超时时间:Socket 通讯时非阻塞模式下的延迟时间,对于接收指令SOCKRECV,控制器会在这段时间内不停扫描设备端是否有数据发送过来,如果有则马上接收,如果超出这段时间仍然没有数据发送至控制器,则示教程序会自动执行SOCKRECV的下一条指令。
通路名:参数是给Socket取的名字,相当于控制器端Socket的ID。
1.2指令说明1.2.1打开通讯SOCKOPEN Str1 Type= CLIENTStr1:表示此次打开的Socket的名字,需要和界面设置的【通路名】赋值一样。
所以在使用该指令时要先进入主界面里的【变量】-【数值变量】设置里面使得字符型变量S001的值为【通路名】的值。
例如,在上图设置了【#301】的【通路名】为‘robot’,那么在S001中的值应该为’robot’。
STR1对应的是S001,STR2对应的是S002,以此类推,如果用户在S002里面写入了Socket名字,那么参数STR1改为STR2。

Door/Window Sensor Installation InstructionsProduct Overview• Z-Wave™ enabled device which provides open/closed position status• Transmits open/closed status• Reports tamper condition when cover is open• Battery life approximately 3 yearsProduct Specifi cations• For indoor use only• Operating frequency: 908.42 MHz• Operation range: Up to 100 feet (30.5 meters) line-of-sight• Operating temperature: 0° – 49°C, 32° – 120°F (ambient temperature)• Battery type required: 3V Lithium CR123A• Battery life approximately 3 yearsP516-485Optional Installation ToolLIGHTING &MODULES CAMERAS CLIMATESECURITY & SENSORS Setup DeviceSensors Save Changes Cancel sCFigure 1Figure 25Install the Sensor and Magnet!The Sensor and Magnet may be installed using either adhesive tape or screws. Follow steps for the preferred method.!For door applications, determine door handing before installation (see examples shown below).Install the Sensor with screws a. Use the two fl at-head screws to attach the Sensor mounting bracket to the door jamb or window frame.b. Attach the Sensor to the mounting bracket, then push down (or up) to secure the Sensor on the bracket.OR Install the Sensor with adhesive tapea. Attach the Sensor mounting bracket to the door jamb or window frame using a strip of double-sided adhesive tape.b. Attach the Sensor to the mounting bracket, then push down (or up) to secure the Sensor on the bracket. Note: Extended use of double-sided tape may damage paint or wallboard.Left hand doorORRight hand doorOR!The top of the magnet must be within ¹⁄₄” (6 mm) of the arrow on the Sensor (as shown above).!Install the magnet no more than ³⁄₄” (19 mm) away from the Sensor for optimal performance.Install the Magnet with screwsa. Remove the base from the magnet.b. Use two small screws to attach the base of the magnet to the door or window.c. Press the magnet onto the base.OR Install the Magnet with adhesive tapea. Attach the magnet to the door or window using a strip of double-sided tape. Note: Extended use of double-sided tape may damage paint or wallboard.IMPORTANT!Sensor and magnet must be aligned as shown¹⁄₄” (6 mm)maximumArrowT abs point downTabs point upOR6Sensor OperationThe Sensor detects and sends open/closed position status to the Nexia Portal. The Sensor is not intended to operate as a Z-Wave repeater.ActivitySensor LED Sensor unenrolled Continuous blinking Enrollment completed Solid light T amperSolid light Open or closed detectionSingle blinkMaintenanceChange the Sensor Batterya. Press the tab on the top of the Sensor and pull forward to remove the front cover.b. Remove the old battery.c. Insert a new 3V CR123A battery. Observe polarity.d. Replace the Sensor front cover.Note: Sensor enrollment is not required after battery change.SAFETY HAZARD! BATTERY MAY EXPLODE IF NOT PROPERL Y HANDLED.DO NOT RECHARGE, DISASSEMBLE OR DISPOSE OF IN FIRE.If necessary to remove a Sensor from the Nexia account, follow these steps to exclude the Sensor froma Z-Wave Network:a. Install a fresh, high-quality 9-volt battery into the Bridge.b. Hold the Bridge within 6 feet (1.8 meters) of the Sensor during the entire exclusion process.c. Press and release the “–” button on the Bridge.d. Remove the battery from the Sensor.e. Leave the battery out for at least ten (10) seconds.f. Reinstall the battery into the Sensor.g. Observe lights on the Bridge. The orange LED will blink rapidly while exclusion is taking place. Exclusion is complete when theorange LED lights solid.h. Remove the battery from the Sensor after exclusion is complete.For more information, refer to the Nexia Home Bridge User Guide.FCC StatementThis device complies with part 15 of the FCC rules. Operation is subject to the following two conditions: (1) This device may not cause harmful interference, and (2) this device must accept any interference received, including interference that may cause undesired operation.Changes or modifi cations to this equipment not expressly approved by the Schlage could void the user’s authority to operate the equipment.FCC ID: P2GBE369 IC: 7654A-BE369U.S.A. /Canada(877) 288-7707© 2012 Schlage Lock CompanyPrinted in CountryP516-485 Rev. 03/12-a15。

第1章码垛分类及简介简易码垛支持三种模式:普通模式、奇偶行变化(对称)模式、行间隔变化模式。
针对不同应用场合选择正确码垛模式。
1.1普通模式列方向图1普通模式如图1所示,码垛工件形状一致,摆放方向相同,行列分布均匀且呈标准长方形布局,该类型码垛称为普通模式。
建立码垛需要配置表1中参数。
表1普通模式参数配置说明1.2奇偶行变化(对称)列方向图2奇偶行变化(对称)模式如图2所示,码垛工件所有奇数行摆放姿态一致,所有偶数行摆放姿态与奇数行不同但也保持一致,列分布均匀,奇数行与偶数行都是均匀分布。
该类型码垛称为奇偶行不同(对称)模式。
注意,该模式只支持行方向奇偶行不同,不支持列方向变化。
建立此类型码垛需要配置表2中参数。
表2奇偶行不同模式参数配置1.3行间隔变化如图3所示,码垛工件形状一致,摆放方向相同,某些行间距与其他行均不同,列分布均匀。
该类型码垛称为行间距变化模式。
注意,该模式只支持行方向间隔变化,不支持列方向变化,且目前只支持变化1个行间隔或者2个行间隔,如果是2个行间隔,行间隔相同。
建立此类型码垛需要配置表3中参数。
列方向图 3 行间隔变化模式表 3 行间隔变化模式第2章界面及操作步骤第3章码垛指令介绍3.1 PALINI指令格式:PALINI ID=1 TYPE=0功能:设置码垛机初始化。
参数:ID=码垛机ID,TYPE=码垛类型Type=0 码垛Type=1 取跺3.2 PALPREU指令格式:PALPREU P=1004 I=1功能:读取离开工件加速点位置到位置型中,I=1中保存的是当前正在码垛的工件是第几个工件。
参数:P=位置型变量Pxxx(xxx为变量1000~1019)I=存放工件ID的整型变量3.3 PALPRED指令格式:PALPRED P=1001 I=1功能:读取工件的近工件减速点位置到位置型变量中,I=1中保存的是当前正在码垛的工件是第几个工件。
参数:P=位置型变量Pxxx(xxx为变量1000~1019)I=存放工件ID的整型变量3.4 PALENT不用这个指令指令格式:PALENT P=1002 I=1功能:读取工件的进入码垛过渡位置到位置型变量1000中,I=1中保存的是当前正在码垛的工件是第几个工件。


Googol Technology两维视觉数控转台GPT系列用户手册务必将此说明书交给客户非常感谢您选购固高科技GPT系列数控转台在您使用之前,请仔细阅读此手册,确保正确使用如果您在使用过程中遇到技术故障,欢迎随时来点来函咨询,并请将此书妥善保存,以备随时查阅.二零零四年十月目录目录 (1)前言 (2)第一章注意事项 (3)1. 开箱注意事项 (3)2. 使用中注意事项 (3)第二章系统概述 (4)第三章系统安装 (6)1. 安装运动控制卡 (6)2. 连线 (6)3. 安装软件 (7)第四章软件使用说明 (8)1. 确认控制器驱动已经正确安装 (8)2. 进入相应的演示软件文件夹 (8)3. 界面说明 (8)4. 操作说明 (8)第五章维护及常见故障处理 (10)前言固高科技(深圳)有限公司GPT两维数控转台主要用于教学和科研。
在安装,使用和维护之前,请仔细阅读本使用手册。
请将本手册备在身边,以备需要时随时查阅。
警告标志第一章注意事项1. 开箱注意事项开箱之后,检查倒立摆有无损坏检查所配附件有无短缺,损坏(参照装箱单)2. 使用中注意事项转台要摆放在有足够强度平整地面不要在高温和潮湿的环境中使用该设备第二章系统概述GPT系列转台为模拟火炮或雷达跟踪系统运动模块的类工业旋转运动系统。
其组成如下图所示,它包含电控箱、转台本体及由运动控制卡和普通PC 机组成的控制实验平台等三大部分。
PCI电控箱转台本体主要由以下几个部分组成:1) 机械结构件(含PAN和TILT)2) 驱动用交流伺服电机(两套)3) 谐波减速器4) 斜齿轮5) 限位开关电控箱内安装有如下主要部件:1) 交流伺服驱动器2) I/O接口板3) 开关电源4) 开关、指示灯等电气元件控制平台主要由以下部分组成:1) 与IBM PC/AT机兼容的PC机(公司不提供),带PCI插槽2) GT-400-SV-PCI运动控制卡3) GT-400-SV-PCI运动控制卡用户接口软件4) 系统演示软件第三章系统安装1. 安装运动控制卡1) 检查运动控制卡的外观有无损坏2) 关闭计算机电源,打开机箱3) 将运动控制卡插入空闲的PCI槽中4) 用螺钉锁紧运动控制卡和转接头5) 将转接头和卡上的JP2插座用转接电缆连上6) 合上机箱2. 连线1) 将电控箱的断路器打到关闭(OFF)的位置2) 将运动控制卡的CN1插口和电控箱的CN1插口用屏蔽电缆连结起来3) 将转接头CN2的插口和电控箱的CN2插口用屏蔽电缆连结起来4) 将电控箱与转台本体相应的插口用相应的电缆连接起来(如下图)5) 将电源线一端插入电控箱插座,另一端接入220V AC电源3. 安装软件系统附带的演示和实验软件在Windows环境中运行。

ADVANCED DIGITAL INFORMATION CORPORATIONFastStor 2™用户指南版权所有 © 2003-2005 ADIC本文档中的信息如有更改,恕不另行通知。
本文档所含产权信息受版权保护。
保留所有权利。
未经 ADIC 事先书面同意,不得影印、复制本文的任何部分或翻译成另一种语言。
ADIC 将不对本文中的错误承担责任,也不对因与本材料的提供、性能或使用有关的意外或者相因而生的损害(包括利润损失)承担责任,无论是依据保修条款、合同或其他法律理论。
本文档所含的所有商标均为其相应所有者的资产。
版权所有 © 2003-2005 ADIC Europe TM保留所有权利。
不经 ADIC Europe (ZAC des Basses Auges, 1 rue Alfred de Vigny, 78112 - Fourqueux, FRANCE) 事先书面许可,本文中的任何部分都不得以任何形式或任何方式复印或复制。
ADIC Europe 对本文中可能出现的任何错误都不承担责任,而且保留随时修改这些规范和说明的权利,恕不另行通知。
本出版物中阐述的设计可能已经获得专利,或者是正在申请专利。
ADIC Europe 不会通过发布此信息,转让任何专利的许可或任何其他权利。
ADIC Europe 对本文档内容不作任何声明或担保,明确声明不对适销性或特定用途的适用性作任何默示担保。
另外,ٛADIC Europe 保留修订或修改本文档的权利,且 ADIC Europe 不必就此类修订通知任何个人或组织。
我们已尽一切可能明确商标其及所有人。
商标名称的使用仅仅是为了进行商品识别或例证:如有遗漏,绝非故意。
ADIC 属注册商标,ADIC Europe 是 Advanced Digital Information Corporation 的商标。
出版时间:2005 年 6 月文档号:6-00515-04 Rev A ADIC USA11431 Willows Road NERedmond, Washington98052-4952USA电话: 1-800-336-1233传真: 1-425-881-2296ADIC Europe ZAC des Basses Auges 1, rue Alfred de Vigny 78112 Fourqueux, France 电话: 33-0-1-30-87-53-00传真: 33-0-1-30-87-53-01ADIC-Germany GmbH&Co.KG Eschenstra ße 389558 B öhmenkirch Germany 电话: 49-0-7332-83-0传真: 49-0-7332-83-135目录1 关于本指南和产品1产品安全声明 . . . . . . . . . . . . . . . . . . . . . . . . . . . . . . . . . . . . . . 1产品型号 . . . . . . . . . . . . . . . . . . . . . . . . . . . . . . . . . . . . . . . . 1对符号和注释的说明 . . . . . . . . . . . . . . . . . . . . . . . . . . . . . . . . . . . 1可能需要的其它文档 . . . . . . . . . . . . . . . . . . . . . . . . . . . . . . . . . . . 2获取详细信息和帮助 . . . . . . . . . . . . . . . . . . . . . . . . . . . . . . . . . . . 2 2 说明3功能 . . . . . . . . . . . . . . . . . . . . . . . . . . . . . . . . . . . . . . . . . . 3开关和指示灯 . . . . . . . . . . . . . . . . . . . . . . . . . . . . . . . . . . . . . . 4前面板. . . . . . . . . . . . . . . . . . . . . . . . . . . . . . . . . . . . . . . . 4后面板. . . . . . . . . . . . . . . . . . . . . . . . . . . . . . . . . . . . . . . . 4 3 入门5打开包装和检查 . . . . . . . . . . . . . . . . . . . . . . . . . . . . . . . . . . . . . 5检查附件. . . . . . . . . . . . . . . . . . . . . . . . . . . . . . . . . . . . . . . 5打开自动装填器的包装. . . . . . . . . . . . . . . . . . . . . . . . . . . . . . . . . 5安装条形码解读器 . . . . . . . . . . . . . . . . . . . . . . . . . . . . . . . . . . . . 6选择安装位置 . . . . . . . . . . . . . . . . . . . . . . . . . . . . . . . . . . . . . . 8预备主机系统 . . . . . . . . . . . . . . . . . . . . . . . . . . . . . . . . . . . . . . 9 SCSI 主机系统适配器和连接准则 . . . . . . . . . . . . . . . . . . . . . . . . . . . . 9自动装填器 SCSI 连接 . . . . . . . . . . . . . . . . . . . . . . . . . . . . . . . . . . 9连接 SCSI 和电源电缆. . . . . . . . . . . . . . . . . . . . . . . . . . . . . . . . . 9连接多个自动装填器. . . . . . . . . . . . . . . . . . . . . . . . . . . . . . . . . .10 4 操作自动装填器11操作员面板 . . . . . . . . . . . . . . . . . . . . . . . . . . . . . . . . . . . . . . .11 LCD 屏. . . . . . . . . . . . . . . . . . . . . . . . . . . . . . . . . . . . . . . .11 LED 指示灯. . . . . . . . . . . . . . . . . . . . . . . . . . . . . . . . . . . . . .12控制按钮. . . . . . . . . . . . . . . . . . . . . . . . . . . . . . . . . . . . . . .12理解菜单结构. . . . . . . . . . . . . . . . . . . . . . . . . . . . . . . . . . . . .13自动装填器加电 . . . . . . . . . . . . . . . . . . . . . . . . . . . . . . . . . . . . .13配置条形码解读器 . . . . . . . . . . . . . . . . . . . . . . . . . . . . . . . . . . . .14 FastStor 2用户指南iii配置远程管理装置 . . . . . . . . . . . . . . . . . . . . . . . . . . . . . . . . . . . .14使用数据磁带 . . . . . . . . . . . . . . . . . . . . . . . . . . . . . . . . . . . . . .15磁带写保护. . . . . . . . . . . . . . . . . . . . . . . . . . . . . . . . . . . . . .15导入磁带. . . . . . . . . . . . . . . . . . . . . . . . . . . . . . . . . . . . . . .16导出磁带. . . . . . . . . . . . . . . . . . . . . . . . . . . . . . . . . . . . . . .16使用成批交换. . . . . . . . . . . . . . . . . . . . . . . . . . . . . . . . . . . . .17装入磁带. . . . . . . . . . . . . . . . . . . . . . . . . . . . . . . . . . . . . . .17卸下磁带. . . . . . . . . . . . . . . . . . . . . . . . . . . . . . . . . . . . . . .17重新盘点磁带. . . . . . . . . . . . . . . . . . . . . . . . . . . . . . . . . . . . .18维护磁带. . . . . . . . . . . . . . . . . . . . . . . . . . . . . . . . . . . . . . .18清洁磁带驱动器 . . . . . . . . . . . . . . . . . . . . . . . . . . . . . . . . . . . . .195 管理自动装填器21重设自动装填器 . . . . . . . . . . . . . . . . . . . . . . . . . . . . . . . . . . . . .21查看或更改 SCSI ID . . . . . . . . . . . . . . . . . . . . . . . . . . . . . . . . . . .21查看或更改自动装填器的 SCSI ID. . . . . . . . . . . . . . . . . . . . . . . . . . . .22查看或更改磁带驱动器的 SCSI ID. . . . . . . . . . . . . . . . . . . . . . . . . . . .22自动装填器的操作模式 . . . . . . . . . . . . . . . . . . . . . . . . . . . . . . . . . .22随机模式. . . . . . . . . . . . . . . . . . . . . . . . . . . . . . . . . . . . . . .23顺序模式. . . . . . . . . . . . . . . . . . . . . . . . . . . . . . . . . . . . . . .23循环模式开启/关闭 . . . . . . . . . . . . . . . . . . . . . . . . . . . . . . . .23自动装入模式开启/关闭 . . . . . . . . . . . . . . . . . . . . . . . . . . . . . .23更新固件 . . . . . . . . . . . . . . . . . . . . . . . . . . . . . . . . . . . . . . . .24使用固件升级磁带. . . . . . . . . . . . . . . . . . . . . . . . . . . . . . . . . . .24使用串行端口. . . . . . . . . . . . . . . . . . . . . . . . . . . . . . . . . . . . .24执行系统测试 . . . . . . . . . . . . . . . . . . . . . . . . . . . . . . . . . . . . . .25检索信息 . . . . . . . . . . . . . . . . . . . . . . . . . . . . . . . . . . . . . . . .25查看错误日志. . . . . . . . . . . . . . . . . . . . . . . . . . . . . . . . . . . . .25显示循环计数. . . . . . . . . . . . . . . . . . . . . . . . . . . . . . . . . . . . .26显示产品版本. . . . . . . . . . . . . . . . . . . . . . . . . . . . . . . . . . . . .26查看序列号. . . . . . . . . . . . . . . . . . . . . . . . . . . . . . . . . . . . . .26显示自动装填器的序列号 . . . . . . . . . . . . . . . . . . . . . . . . . . . . . .26显示驱动器的序列号 . . . . . . . . . . . . . . . . . . . . . . . . . . . . . . . .27查看固件级别. . . . . . . . . . . . . . . . . . . . . . . . . . . . . . . . . . . . .27显示自动装填器的固件版本 . . . . . . . . . . . . . . . . . . . . . . . . . . . . .27显示驱动器的固件版本 . . . . . . . . . . . . . . . . . . . . . . . . . . . . . . .276 使用远程管理装置29概述 . . . . . . . . . . . . . . . . . . . . . . . . . . . . . . . . . . . . . . . . . .29登录 . . . . . . . . . . . . . . . . . . . . . . . . . . . . . . . . . . . . . . . . . .30在 RMU 上保存和恢复重要产品数据. . . . . . . . . . . . . . . . . . . . . . . . . . . . .30检查快速状态 . . . . . . . . . . . . . . . . . . . . . . . . . . . . . . . . . . . . . .31使用 RMU 信息页. . . . . . . . . . . . . . . . . . . . . . . . . . . . . . . . . . . . .31使用 RMU 状态页. . . . . . . . . . . . . . . . . . . . . . . . . . . . . . . . . . . . .32使用 RMU 配置页. . . . . . . . . . . . . . . . . . . . . . . . . . . . . . . . . . . . .33配置设备. . . . . . . . . . . . . . . . . . . . . . . . . . . . . . . . . . . . . . .33配置网络. . . . . . . . . . . . . . . . . . . . . . . . . . . . . . . . . . . . . . .33配置用户. . . . . . . . . . . . . . . . . . . . . . . . . . . . . . . . . . . . . . .34配置实时时钟. . . . . . . . . . . . . . . . . . . . . . . . . . . . . . . . . . . . .34配置日志. . . . . . . . . . . . . . . . . . . . . . . . . . . . . . . . . . . . . . .34 iv目录配置事件通知. . . . . . . . . . . . . . . . . . . . . . . . . . . . . . . . . . . . .35重设配置. . . . . . . . . . . . . . . . . . . . . . . . . . . . . . . . . . . . . . .35使用 RMU 维护页. . . . . . . . . . . . . . . . . . . . . . . . . . . . . . . . . . . . .35运行操作. . . . . . . . . . . . . . . . . . . . . . . . . . . . . . . . . . . . . . .35运行常规诊断检测. . . . . . . . . . . . . . . . . . . . . . . . . . . . . . . . . . .36运行高级诊断检测. . . . . . . . . . . . . . . . . . . . . . . . . . . . . . . . . . .36更新固件. . . . . . . . . . . . . . . . . . . . . . . . . . . . . . . . . . . . . . .36重设自动装填器. . . . . . . . . . . . . . . . . . . . . . . . . . . . . . . . . . . .36访问日志文件 . . . . . . . . . . . . . . . . . . . . . . . . . . . . . . . . . . . . . .367 故障排除和诊断37安装问题 . . . . . . . . . . . . . . . . . . . . . . . . . . . . . . . . . . . . . . . .37故障排除矩阵 . . . . . . . . . . . . . . . . . . . . . . . . . . . . . . . . . . . . . .38取出卡在插槽中的磁带 . . . . . . . . . . . . . . . . . . . . . . . . . . . . . . . . . .41查看自动装填器错误代码 . . . . . . . . . . . . . . . . . . . . . . . . . . . . . . . . .43了解错误消息. . . . . . . . . . . . . . . . . . . . . . . . . . . . . . . . . . . . .43查看错误日志. . . . . . . . . . . . . . . . . . . . . . . . . . . . . . . . . . . . .43解决错误. . . . . . . . . . . . . . . . . . . . . . . . . . . . . . . . . . . . . . .43获得帮助 . . . . . . . . . . . . . . . . . . . . . . . . . . . . . . . . . . . . . . . .528 规格53物理规格 . . . . . . . . . . . . . . . . . . . . . . . . . . . . . . . . . . . . . . . .53容量 . . . . . . . . . . . . . . . . . . . . . . . . . . . . . . . . . . . . . . . . . .53环境 . . . . . . . . . . . . . . . . . . . . . . . . . . . . . . . . . . . . . . . . . .54磁带机 . . . . . . . . . . . . . . . . . . . . . . . . . . . . . . . . . . . . . . . . .54介质 . . . . . . . . . . . . . . . . . . . . . . . . . . . . . . . . . . . . . . . . . .54FastStor 2 用户指南vvi目录FastStor 2 用户指南1关于本指南和产品本指南包含了正常操作和管理 FastStor 2 所需的信息和说明。
目录版权声明 (1)声明 (1)联系我们 (1)第1章TCPIP通讯 (3)1.1通信设置 (3)1.2指令说明 (5)1.2.1打开通讯 (5)1.2.2关闭通讯 (5)1.2.3接收数据 (5)1.2.4发送数据 (6)1.3示教程序 (6)第2章RS232串口通信 (7)2.1通信设置 (7)2.2指令说明 (9)2.2.1 打开串口端口 (9)2.2.2 关闭串口端口 (9)2.2.3接收数据 (9)2.2.4发送数据 (9)2.3示教程序 (10)第3章字符串处理指令 (13)3.1指令说明 (13)3.1.1 整型转字符串 (13)3.1.2 位置型转字符串 (13)3.1.3 实数型转字符串 (13)3.1.4 字符串转整型 (13)3.1.5 字符串转位置点 (13)3.1.6 字符串转实数 (13)3.1.7 字符串连接 (14)3.1.8 字符串拆分 (14)3.1.9 字符串比较 (14)3.1.10 计算字符串长度 (14)3.1.11 字符串取左 (14)3.1.12 字符串取右 (14)3.1.13 取字符串中间的部分字符 (14)TCPIP通讯TCPIP 通讯(即SOCKET通讯)是通过网线将服务器Server端与客户机Client端进行连接,在遵循类似ISO/OSI模型的四层层级架构的基础上通过TCP/IP协议建立的通讯。
控制器可以设置为服务器端或者客户端。
1.1 通信设置按下手持操作示教器上的【上移】或者【下移】使主菜单下。
按下手持操作示教器上的【右移】【上移】或者【下移】使主菜。
按下手持操作示教器上的【右移】的通讯功能可以同时开通,你可以点击通路选择下面的向左或者向右按每次改变或者设置新的通路选择参才出按服务器地址:即服务器端的IP地址,当机器人控制器作为客户端时,则需要填入服务器IP地址;当机器人控制器作为服务器端,则可以不填该参数。
端口:服务器端口又是本地端口号,前者是对于控制器作为客户端而言,后者是对于控制器作为服务器端而言。
INSTALL INSTRUCTIONSThis document describes the basic installation information for the 2GIG‐2GIG‐TS1 and the steps necessary to “pair” (or learn in) the Touchscreen Wireless Keypad to the Control Panel.Box Contents•2GIG‐TS1•AC Power Supply•AC Power Supply Bracket•Screws and anchorsTIP: The box contents will vary depending on whether the 2GIG‐TS1 was purchased as part of a kit or not.BEFORE YOU BEGINIs the 900 MHz Transceiver installed in the Panel? For the 2GIG‐TS1 to communicate with the Control Panel, the 900 MHz Transceiver (2GIG‐XCVR2) must be already be installed in the Control Panel.Is the 2GIG-TS1 paired with the Control Panel?The 2GIG‐TS1 and the Control Panel have to be paired to communicate with each other.To check for to see if the 2GIG-TS1 is paired with the Control PanelUpon power up, the 2GIG‐TS1 displays the following screen:2GIG-TS1 PRODUCT OVERVIEWThe Model 2GIG‐2GIG‐TS1 Touch Screen Wireless Keypad is a remote control device that offers the functionality of a system keypad but also extends all user control of the 2GIG Control panel to other locations in a user’s home. Using the 2GIG‐TS1, users can control lights, thermostat and door locks and see the status of every zone in their home using the exact same and familiar interface found on the Control Panel. The keypad is designed for indoor use only.IMPORTANT: Not for UL 985 installations.The paneland buttons serve as controls as well asindicators.Pressingthe (Emergency) button displays emergency icons on thedisplay for Panic, Fire, and Emergency alarm activation (each hasprogrammable options and can be enabled or disabled). Pressing the(Home) button changes the system display to the Home Screen. Thekeypad is powered from a plug‐in power supply. The 2GIG‐TS1 exchangesinformation through a secure 2‐way wireless connection with the ControlPanel.NOTE: Before using the 2GIG‐TS1 it must be “learned” into theControl Panel.Mounting ToolsSome special tools may be required to mount the 2GIG‐TS1 onto thewall:•Screwdriver•Pencil•Wire stripper•Staple gun•Drywall saw (or equivalent)•LadderPREPARING THE KEYPADNOTE: Check that the 2GIG‐TS1 Keypad is functioning beforeselecting a location for the Keypad.1Remove the screw.2Flip open the back cover of the 2GIG-TS1.3Disconnect the hanging strap.4Use the back cover as the mounting plate.Touch Screen Wireless KeypadFor Remote Control of the 2GIG Security System2©2013 2GIG Technologies Inc. All Rights Reserved.SELECTING A LOCATION FOR THE KEYPAD1Make sure that AC Power is available nearby.TIP: Be careful of studs, electrical wires and pipes in the wall.2Use the keypad’s back cover as a template to mark the screw holes with a pencil and the power (wiring) access hole.3Use adrywall saw to cut the wiring hole.Mounting the Keypad1Use the 3 screws andanchorsthat aresupplied to attach the mounting plate to the wall.2Route 18 AWG wire between the keypad and the location of the power supply.Wire Size and LengthTo ensure proper operation, Do Not exceed the following maximum length for the wire size installed:To ensure that the appropriate wire size and length are installed, measure the voltage between the power connection terminals at the back of the control panel. The voltage measured must not fall below 11 volts DC or nuisance “AC Power Loss” messages may be displayed and reported.NOTE: In the United States, wiring routed inside walls, ceilings, andfloors must comply with requirements of the National Electrical Code, ANSI/NFPA 70 and local building codes. For wiring from the output of the 2GIG class II power supply, wiring rated CL2, CL2X, CL2R, or PLTC is recommended to satisfy theserequirements. If this wiring is installed in an air plenum (space used for environmental air exchange) it must be rated CL2P (plenum rated).Connect the Power Wires to the Keypad1Re ‐connect the hanging strap.2Use #6 insulated spade terminals (not supplied) to connect wires from the power supply to the keypad.3Close the keypad.4Connect the power wires to the power supply.Wire Size Maximum Length22 AWG 55 feet (16.8 meters)20 AWG85 feet (25.9 meters 22 AWG 2‐pairs(19 AWG equivalent)110 feet (33.5 meters)18 AWG135 feet (41.1 meters)A Snap case closed.B Tighten case screw.A Left Terminal 14 VDC(+)B Right Terminal 14 VDC (-)C 18 AWG/2-Conductor©2013 2GIG Technologies Inc. All Rights Reserved.3LEARNING/PAIRING THE KEYPAD WITH THE CONTROL PANEL1Make sure that the Control Panel has power using the supplied AC adapter and confirm that the adapter is connected.WARNING: A Control Panel without the 900 MHz Transceiver installed cannot communicate with the 2GIG ‐TS1.2Make sure that the 2GIG ‐TS1 has power from the supplied ACtransformer. Connect the AC adapter to the 2GIG ‐TS1. Confirm that the wires are connected using the correct polarity.3As the 2GIG ‐TS1 powers up, the following message is visible on thedisplay.4FromtheControl Panel’sInstallerToolbox, selectSystemConfiguration .5Select the Go To button.6To go to question 4, enter 04.7Select the RF Keypad number to assign to the 2GIG ‐TS1. Use the → arrow to select the RF Keypad number (1‐4). After selecting the RF Keypad number, press the ↓ arrow to start con figuring the speci fic parameters for the RF Keypad.8Press the → arrow or press the number 1 on the keypad toggle the se ng on the first ques on to “used”. Press the ↓ arrow to con nue configuring options.9Set the RF Keypad Equipment Code to 1059 by pressing the → arrow until “(1059) 2GIG ‐TS1 wireless touchscreen keypad” appears. Press the ↓ arrow to advance to the next op on.10Learn the 2GIG ‐TS1 into the Control Panel. A er pressing the ↓arrow in the previous step, the Learn button appears.INITIATING THE PAIRING PROCESSInitiate the pairing process at the Control Panel by pressing the Learn button.4©2013 2GIG Technologies Inc. All Rights Reserved.1On the Control Panel press the Learn button.2On the 2GIG ‐TS1 press the Pair with Panel button. The Control Panel displays the message:Pair with 2GIG ‐TS1. Initiating learning process.When learning is complete, both the 2GIG ‐TS1 and Control Panel display the message:The learn operation succeeded.2a The Control Panel displaysthe message:Type: 2GIG ‐TS1 Wireless Keypad ID#: X(where X is the RF Keypad number configured for the 2GIG ‐TS1).2b The 2GIG ‐TS1 displays “Network ID: xxxx” where xxxx is a uniquehexadecimal number and a keypad ID. The hexadecimal number is a unique number associated with the Control Panel that you are using. The keypad ID indicates the keypad that you are learning into the Control Panel.2c To complete the learning process, press the OK button on boththe Control Panel and the 2GIG ‐TS1.3After successfully learning the 2GIG ‐TS1 into the Control Panel, press the ↓ arrow to exit the learning menu.The 2GIG ‐TS1 displays a message indicating that the security system is temporarily inoperable. The 2GIG ‐TS1 remains in this state while the Control Panel is in system configuration (programming) mode.Repeat the steps above to learn in additional TS1s.4To exit programming, click skip then end and exit . Upon exit, the Control Panel takes a several seconds to reboot.REMOVING A 2GIG-TS1 FROM A CONTROL PANEL (UNLEARNING THE 2GIG-TS1)To remove a 2GIG ‐TS1 from a Control Panel’s configuration do the following:1From the Control Panel, go to Installer Toolbox / SystemConfiguration .2Select the Go To button and enter 04. The Control Panel displaysQ4: select RF keypad # (1 to 4). Select the configured 2GIG ‐TS1 you wish to remove and press the ↓ arrow.3Mark the RF Keypad number selected as “unused” by pressing the →arrow. This action toggles the setting on the first question between“used” and “unused.” Press the ↓ arrow to advance to the next option.4To exit programming, click skip then end and exit . Upon exit, the panel takes several seconds to reboot.RESETTING A 2GIG-TS1 TO FACTORY DEFAULTSTo reset the 2GIG ‐TS1 to defaults so that it may be used again on another Control Panel, do the following:1While power cycling the 2GIG ‐TS1, hold both the (Emergency)and the (Home) buttons down simultaneously until they light up (approximately 20 seconds). When both buttons light up, the 2GIG ‐TS1 has successfully been reset to all default settings.The 2GIG ‐TS1 displays the message:This Device is Not Paired with a Control Panel.SECRET DURESS BUTTONTIP: The logo on the bottom corner of the Home Screen does notaccess the Installer Toolbox on the 2GIG ‐TS1.If a user presses the logo on the bottom corner of the 2GIG ‐TS1 Home Screen , the user can enter the duress code only. Installers must remember that the Installer Toolbox can only be accessed from the Control Panel. The 2GIG ‐TS1 cannot access the Installer Toolbox.TIP: Although there is a default master code: 1111, there is nodefault duress code.Check to ensure that the 2GIG-TS1 firmware version matches the Control Panel firmware versionThe 2GIG ‐TS1 and the Control Panel are required to have the same firmware version to fully communicate with each other (e.g. CP v1.10 and 2GIG ‐TS1 v1.10).1From both the 2GIG ‐TS1 and Control Panel Home Screen , chooseSecurity / Menu / Toolbox .2From the Toolbox Screen, use the → arrow un l you see the Version Screen.2GIG-TS1 Version ScreenControl Panel Version ScreenREGULATORY INFORMATIONWireless Product NoticeRadio controls provide a reliable communications link and fill an important need in portable wireless signaling; however, there are some limitations which must be observed.•For U.S. installations only: The radios are required to comply with FCC Rules and Regulations as Part 15 devices. As such, they havelimited transmitter power and therefore limited range(approximately 400 ft.).•A receiver cannot respond to more than one transmitted signal at a time and may be blocked by radio signals that occur on or near their operating frequencies, regardless of code settings.•Changes or modifications to the device may void FCC compliance.•Infrequently used radio links should be tested regularly to protect against undetected interference or fault.•A general knowledge of radio and its vagaries should be gained prior to acting as a wholesale distributor or dealer, and these facts should be communicated to the end users.FCC NOTICEThis device complies with Part 15 of the FCC Rules. Operation is subject to the following two conditions:(1) This device may not cause harmful interference, and(2) This device must accept any interference received, including interference that may cause undesired operation.This equipment has been tested and found to comply with the limits for Class B Digital Device, pursuant to Part 15 of the FCC Rules. These limits are designed to provide reasonable protection against harmful interference in a residential installation. This equipment generates and can radiate radio frequency energy and, if not installed and used in accordance with the instructions, may cause harmful interference to radio communications. However, there is no guarantee that interference will not occur in a particular installation. If this equipment does cause harmful interference to radio or television reception, which can be determined by turning the equipment off and on, the user is encouraged to try to correct the interference by one or more of the following measures.•Reorient or relocate the receiving antenna•Increase the separation between the equipment and receiver •Connect the equipment into an outlet on a circuit different from that to which the receiver is connected•Consult the dealer or an experienced radio/TV technician for help Any changes or modifications not expressly approved by the party responsible for compliance could void the user’s authority to operate the equipment.Les changements ou modifications non approuvés expressément par la partie responsable de la conformité pourrait annuler l'autorité del'utilisateur à faire fonctionner l'équipement.Industry Canada NoticesThis device complies with Industry Canada licence‐exempt RSS standard(s). Operation is subject to the following two conditions: (1) this device may not cause interference, and (2) this device must accept any interference, including interference that may cause undesired operation of the device.Le présent appareil est conforme aux CNR d'Industrie Canada applicables aux appareils radio exempts de licence. L'exploitation est autorisée aux deux conditions suivantes : (1) l'appareil ne doit pas produire de brouillage, et (2) l'utilisateur de l'appareil doit accepter tout brouillage radioélectrique subi, même si le brouillage est susceptible d'en compromettre le fonctionnement.Repairs to certified equipment should be made by an authorized Canadian maintenance facility designated by the supplier. Any repairs or alterations made by the user to this equipment, or equipment malfunctions, may give the telecommunications company cause to request the user to disconnect the equipment.Users should ensure for their own protection that the electrical ground connections of the power utility, telephone lines and internal metallic water pipe system, if present, are connected together. This precaution may be particularly important in rural areas.WARNING: Users should not attempt to make such connections themselves, but should contact the appropriate electricinspection authority, or electrician, as appropriate.Operating and Storage TemperatureThe recommended storage temperature for all Touch Screens is ‐10°C to 60°C (14°F to 140°F).For optimal Touch Screen use, operational temperature is 0°C to 49°C (32°F to 120°F).LIMITED WARRANTYThis 2GIG Technologies product is warranted against defects in material and workmanship for 1 year. This warranty extends only to wholesale customers who buy direct from 2GIG Technologies or through 2GIG Technologies’ normal distribution channels. 2GIG Technologies does not warrant this product to consumers. Consumers should inquire from their installing dealer as to the nature of the dealer’s warranty, if any.There are no obligations or liabilities on the part of 2GIG Technologies for consequential damages arising out of or in connection with use or performance of this product or other indirect damages with respect to loss of property, revenue, or profit, or cost of removal, installation, or reinstallation. All implied warranties for functionality, are valid only until the warranty expires. This 2GIG Technologies Warranty is in lieu of all other warranties expressed or implied.For technical support in the USA and Canada:855‐2GIG‐TECH (855‐244‐4832)Email: ********************Internet: Visit web site for technical support hours of operationFor technical support outside of the USA and Canada:Contact your regional distributorVisit for a list of distributors in your region.PN 77‐000090‐001 Rev. D©2013 2GIG Technologies Inc. All Rights Reserved.5。