触摸屏上传步骤
- 格式:doc
- 大小:20.00 KB
- 文档页数:1
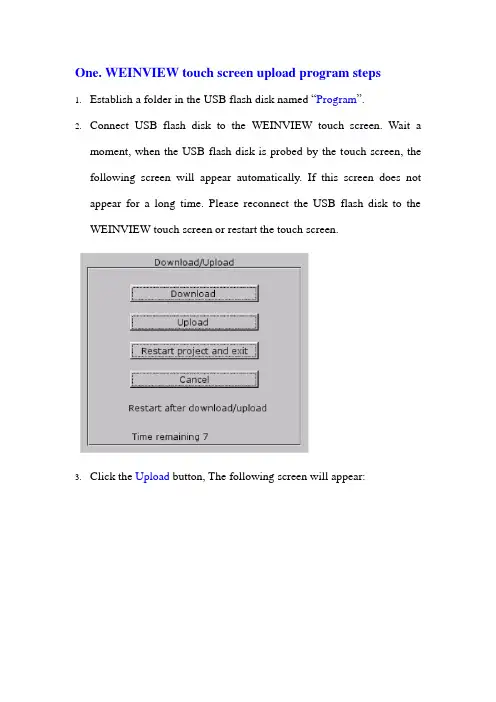
One. WEINVIEW touch screen upload program steps1.Establish a folder in the USB flash disk named “Program”.2.Connect USB flash disk to the WEINVIEW touch screen. Wait amoment, when the USB flash disk is probed by the touch screen, the following screen will appear automatically. If this screen does not appear for a long time. Please reconnect the USB flash disk to the WEINVIEW touch screen or restart the touch screen.3.Click the Upload button, The following screen will appear:screen will appear:5.Choose “usbdisk” and Click into, the folder in the USB flash disk willappear, choose the folder program.6.Click the button OK, waiting for the touch screen upload programautomatically, it will restart when finished. When all of these is accomplished, Unplug USB flash disk.7.Connect the USB flash disk to computer. You will find the uploadprogram folder in the program folder.Two. WEINVIEW touch screen download program steps1.Establish a folder in the USB flash disk named “download”. Copy atouch Screen program “mt8000”into the folder “download”. The name of the folder “mt8000”can not be changed! It must be “mt8000”.2.Connect USB flash disk to the WEINVIEW touch screen. Wait amoment, when the USB flash disk is probed by the touch screen, the following screen will appear automatically. If this screen does not appear for a long time. Please reconnect the USB flash disk to the WEINVIEW touch screen or restart the touch screen.3.Click the Download button, The following screen will appear:4.Input passport(Usually the default for “111111”) Then the followingscreen will appear:5.Choose “usbdisk” and Click into, the folder in the USB flash disk willappear, choose the folder which you save the folder “mt8000”, you must select the folder download which is the parent directory folder of “mt8000”. As the picture below:6.Must select the folder download which is the parent directory of thefolder “mt8000” and click it (as the picture above), then select ok, just waiting for the touch screen download program automatically, it will restart when finished. When all of these is accomplished, Unplug USB flash disk. All is over.Three. WEINVIEW PC software EB8000 installation1.Open the /download.php website.2.Click EB8000V450_20110923, download the EB8000 software.3.Unzip the EB8000V450_20110923.zip file. Double-clickthefile, select the English language and complete the installation.Click hereClick hereFour. Use EB8000 software change the button’s Label1.Open the EB8000 installation folder. Delete the font and library folder.2.Copy the new font and library folder and paste to the EB8000installation folder.3.Open the file you want edit use EB8000. TakeCHH100_SCREEN-V3.01.mtp for example.4.Click language select button select L3 Russian.5.Change the button lable for example. Double-clickthis button, the Function Key Object’s Properties screen will appear.6.Click the Label button, then click the Label Library button.Click here7.The Label Tag Library screen will apear. Click the button settings .8.The Label Tag Content screen will apear. Edit the Language 3 tochangethe button’s label. After that click the OKbutton.Click hereEdit hereClick here。
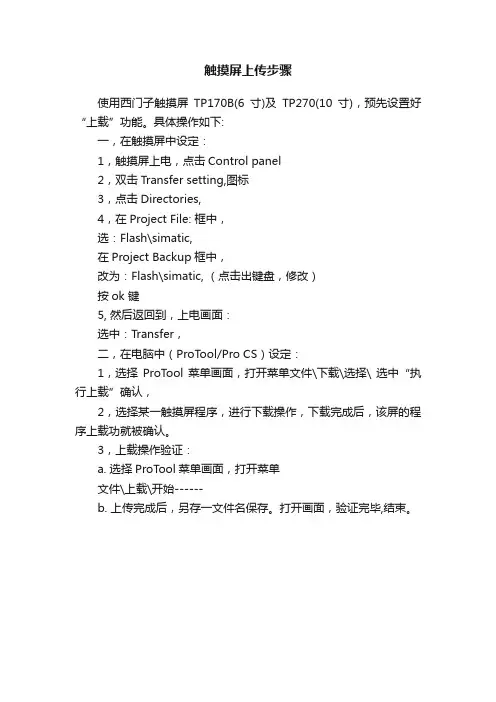
触摸屏上传步骤
使用西门子触摸屏TP170B(6寸)及TP270(10寸),预先设置好“上载”功能。
具体操作如下:
一,在触摸屏中设定:
1,触摸屏上电,点击Control panel
2,双击Transfer setting,图标
3,点击Directories,
4,在Project File: 框中,
选:Flash\simatic,
在Project Backup框中,
改为:Flash\simatic, (点击出键盘,修改)
按ok 键
5, 然后返回到,上电画面:
选中:Transfer,
二,在电脑中(ProT ool/Pro CS)设定:
1,选择ProTool菜单画面,打开菜单文件\下载\选择\ 选中“执行上载”确认,
2,选择某一触摸屏程序,进行下载操作,下载完成后,该屏的程序上载功就被确认。
3,上载操作验证:
a. 选择ProTool菜单画面,打开菜单
文件\上载\开始------
b. 上传完成后,另存一文件名保存。
打开画面,验证完毕,结束。
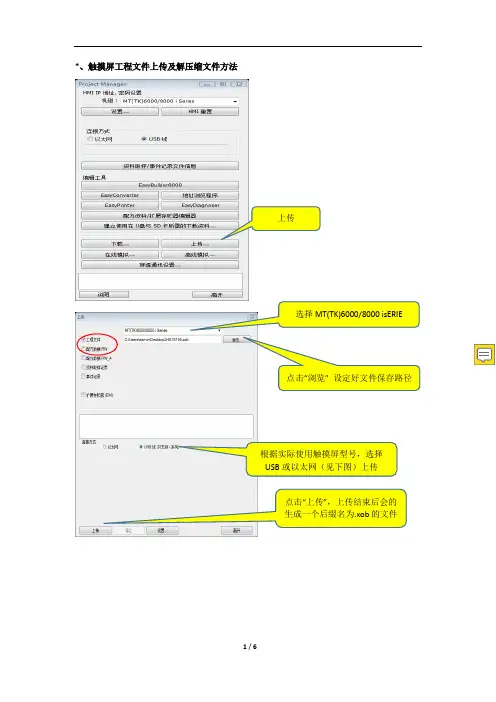
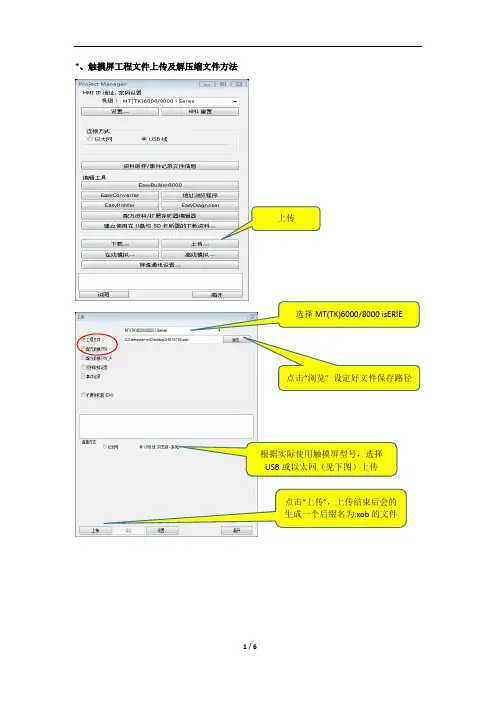
*、触摸屏工程文件上传及解压缩文件方法
上传
点击“浏览” 设定好文件保存路径
根据实际使用触摸屏型号,选择
USB或以太网(见下图)上传
点击“上传”,上传结束后会的
生成一个后缀名为.xob的文件
输入IP地址,或者搜寻触摸
上传完成后,会得到一个*.xob 文件,需要打开EB8000软件进行反编译才可使用
打开EB8000
点击取消
依次单击“工具” “反编译”
找到刚上传的*.xob文件
设置反编译后文件的存储路径最后开始反编译
*解压缩文件
打开EB8000软件
反编译成功后会得到一个*.mtp文件,单击关闭,最后用EB8000打开*.mtp文件即可
得到该文件单击解压缩
1、找到需要解压缩的文件(后缀名cmp)
2、设置解压缩后文件存储路径解压缩过程中如果出现该对话框,选择全是
解压缩成功后,点击关闭。
找到刚保存的文件路径打开解压缩的*.mtp文件即可。

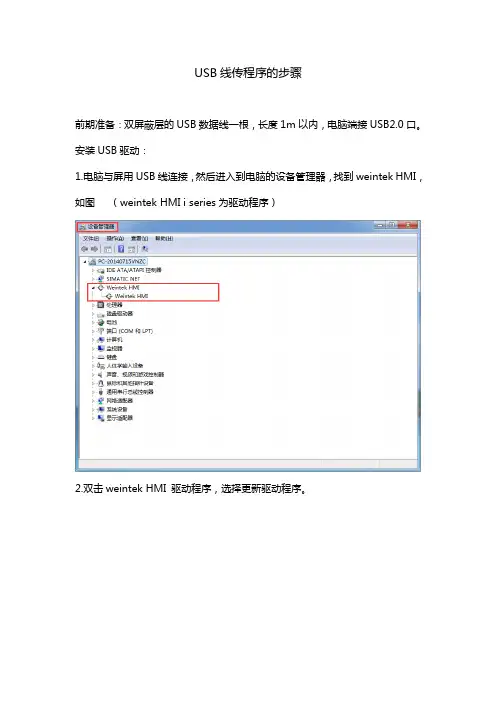
USB线传程序的步骤前期准备:双屏蔽层的USB数据线一根,长度1m以内,电脑端接USB2.0口。
安装USB驱动:1.电脑与屏用USB线连接,然后进入到电脑的设备管理器,找到weintek HMI,如图(weintek HMI i series为驱动程序)2.双击weintek HMI 驱动程序,选择更新驱动程序。
3.弹出的提示对话框选择第二项,查看驱动的安装路径,将安装路径指定为编程软件安装目录下的usbdriver文件夹,然后点【下一步】。
如下图:路径指定正确后,点选下一步完成安装。
4.当USB驱动正确安装完成后。
有两种方法传程序。
下载程序方法1:步骤1.打开EBProV600软件→打开要下载的程序→编译程序→单击【工程文件】菜单→单击【下载】。
如图:步骤2.输入下载程序密码,默认是111111,勾选字体、韧体,勾选下载后启动工程画面,然后点【下载】。
如图:下载程序方法2:步骤1.双击EBPro软件快捷图标【Utility Manager】,选择正确的人机系列,单击【传输】→单击【下载】。
如图:程画面,然后点【下载】。
如图:上传程序方法1打开EBProV600软件→单击【文件】菜单→单击【上传】。
输入上传程序密码,默认是111111,选择HMI型号,指定工程文件存放路径,点【上传】。
如图:上传程序方法2步骤1.双击EBPro软件快捷图标【Utility Manager】,选择正确的人机系列,单击【传输】→单击【上传】。
如图:传】。
如图:上传出来的程序为exob文件格式,需要通过EBPro软件反编译之后才能打开。
*、触摸屏工程文件上传及解压缩文件方法
上传
点击“浏览” 设定好文件保存路径
根据实际使用触摸屏型号,选择
USB或以太网(见下图)上传
点击“上传”,上传结束后会的
生成一个后缀名为.xob的文件
输入IP地址,或者搜寻触摸
上传完成后,会得到一个*.xob 文件,需要打开EB8000软件进行反编译才可使用
打开EB8000
点击取消
依次单击“工具” “反编译”
找到刚上传的*.xob文件
设置反编译后文件的存储路径最后开始反编译
*解压缩文件
打开EB8000软件
反编译成功后会得到一个*.mtp文件,单击关闭,最后用EB8000打开*.mtp文件即可
得到该文件单击解压缩
1、找到需要解压缩的文件(后缀名cmp)
2、设置解压缩后文件存储路径解压缩过程中如果出现该对话框,选择全是
解压缩成功后,点击关闭。
找到刚保存的文件路径打开解压缩的*.mtp文件即可。
如何实现矩阵程序编程实例
触摸屏SETUP 设置简单介绍
红外编辑软件IREdit的应用
新建主机程序设计文件简介
网络型主机Telnet调试方法
Debug 在调试过程中的用法
如何对继电器操作程序编写
如何实现网络中控网页控制
如何设置连接并设置固定IP
触摸屏与主机编程通信原理
如何定义控制设备接口程序
n R
e g
i s
t e
r e
d
192.168.1.30,根据自己的实际情况填写相关的IP地址,如下图:
按OK后,就可以返回来,选择下拉菜单,选择192.168.1.30,这就是刚创建的连接选项.最后选择连接.
如下图所示:
现在我们就可以,选择上传程序的按钮实现程序的上传了.
U
n R
e g
i s
t e
r e
d
点击这后,出现如下图:
选择出现的MVP8400,这就是系统连接上的触摸屏,点击发送Send,上传!
底下出现上传条,显示正在传输,直到完全传输完成.
U
n R
e g
i s
t e
r e
d。
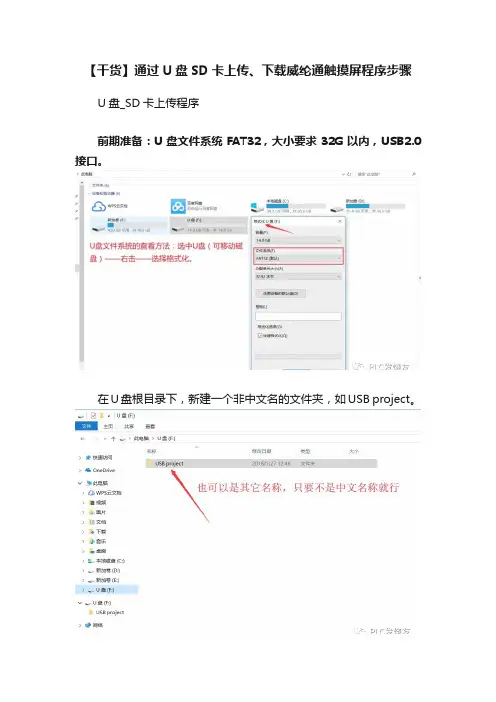
【干货】通过U盘SD卡上传、下载威纶通触摸屏程序步骤U盘_SD卡上传程序前期准备:U盘文件系统FAT32,大小要求32G以内,USB2.0接口。
在U盘根目录下,新建一个非中文名的文件夹,如USB project。
上传程序步骤:1.U盘连接至触摸屏,屏幕识别到后弹出下图所示窗口,选择【Upload】。
(建议此时触摸屏断开通讯)2.输入上传程序的密码,默认111111,选择上传程序,点OK。
3.密码输入正确后弹出下图所示窗口,点usbdisk→usbdisk_a_1→选中USB project 文件夹,点OK。
4.程序上传需要一个过程,等触摸屏恢复到原来的画面就可以将U盘拔下,连接至电脑,将程序拷贝至电脑盘。
找到001文件夹下的mt8000文件,mt8000文件加上.exob 的后缀,再通过EBPro软件反编译生成EMTP文件即可打开。
U盘_SD卡下载程序前期准备:U盘文件系统FAT32,大小要求32G以内,USB2.0接口。
在U盘根目录下,新建一个非中文名的文件夹,如USB project。
方法1步骤1.打开EBProV600软件→打开要下载的程序→编译程序→单击【工程文件】菜单→单击【建立U盘与SD卡所需的下载资料】。
如图:步骤2.单击【建立U盘与SD卡所需的下载资料】后,弹出对话框,选择保存下载资料的目录(选择U盘根目录下的USB project文件夹),点【建立】。
如图:步骤3.建立成功后,U盘从电脑端拔下,连接至触摸屏,屏幕识别到后弹出下图所示窗口,选择【Download】。
(建议此时触摸屏断开通讯)步骤4.输入下载程序的密码,默认是111111,之后点OK。
如图:步骤 5.密码输入正确后弹出下图所示窗口,点usbdisk→usbdisk_a_1→选中USB project文件夹,点OK。
(注意:选择到USB project这一层就可以了)程序开始下载------Download project Files...方法2步骤1.双击EBPro软件快捷图标【Utility Manager】,单击【传输】→单击【建立U 盘与SD卡所需的下载资料】。
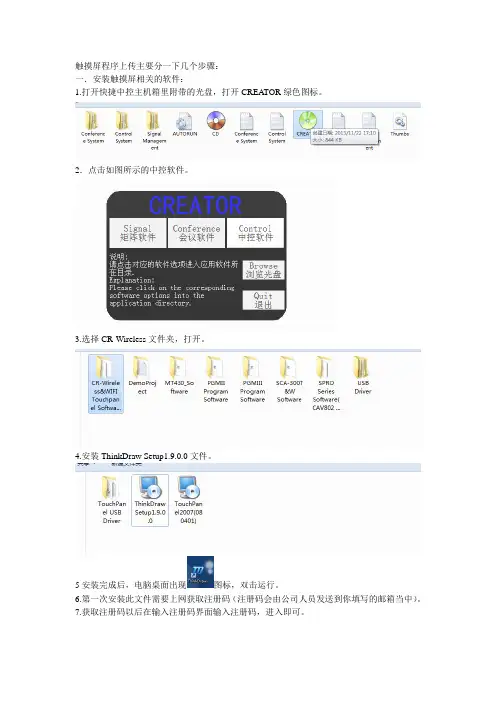
触摸屏程序上传主要分一下几个步骤:
一.安装触摸屏相关的软件:
1.打开快捷中控主机箱里附带的光盘,打开CREATOR绿色图标。
2.点击如图所示的中控软件。
3.选择CR-Wireless文件夹,打开。
4.安装ThinkDraw Setup1.9.0.0文件。
5安装完成后,电脑桌面出现图标,双击运行。
6.第一次安装此文件需要上网获取注册码(注册码会由公司人员发送到你填写的邮箱当中)。
7.获取注册码以后在输入注册码界面输入注册码,进入即可。
二.程序上传
1.打开文件,连接好触摸屏和电脑之间的连线。
2选择Transfer选项。
3.选择send to panel 选项。
4.等待触摸屏更新程序完,即可使用。

轻松学会威纶通触摸屏上传与反编译说到上传,大家并不陌生,上传顾名思义:就是把实际触摸屏画面上传到电脑EasyBuilder Pro软件上,上传的作用是什么呢?可以修改触摸屏上原有的画面,所以说在上传这两字在工控中是非常重要的,接下来进入学习!一准备设备8071 IP威纶通触摸屏一款(支持以太网)2.网线一根(普通网线)3.220V转24V开关电源一台4.导线若干(比较细的都可以)5.插头一个(用于220供电)6.触摸屏插头(用于给触摸屏供24V电源)二设备接线第一步:(开关电源连接)L N接220电源进线,V+ V- 24V输出接触摸屏供电端即可。
第二步:(连接网线)将一个网线一头插入触摸屏网口,一头插入电脑网口即可。
三上传配置第一步:(设置电脑本地连接IP地址)在电脑本地连接属性IPV4设置一下IP地址,如下图所示:第二步:(在触摸屏设置IP地址)1.点击威纶通触摸屏右下角一个方向往左的箭头2.点击右下角齿轮设置图标(如下图所示)3.选择使用下面的IP地址:IP地址:192.168.0.150子网掩码:255.255.255.0其它不用设置,点击应用—OK即可。
第三步:(软件上传设置)1.在左上角菜单栏常用—点击(上传(HMI->PC))2.填写IP地址,这里要注意,这里的IP地址一定要填写和触摸屏上设置的IP地址是一致的,否则上传会失败,型号需要选择和实际触摸屏型号一致,工程文件保存桌面,文件名123.EXOB即可!第四步:(点击上传按钮,开始上传。
)例如我们要把如下图所示实际的触摸屏画面上传上来:1.点击上传按钮,进行上传。
2.此时触摸屏画面已经上传到了之前选择的桌面,你会发现后缀名是.exob,根本打不开,此时就需要反编译才能打开。
四反编译功能第一步:(在左上角菜单栏常用—点击反编译并打开)第二步:(在EXOB文件名称选择我们刚才上传到桌面的123.exob)第三步:(工程文件名称是指反编译完成后生成的文件格式,123.emtp才是威纶通触摸屏组态画面文件正确格式)第四步:(点击反编译,直到反编译成功)第五步:(此时我们在桌面上找到反编译生成123.emtp文件)第六步:(直接鼠标双击打开123.emtp文件进入组态画面,上传成功。
威纶触摸屏进行上传的详细步骤TK6070iQ?通过?U?盘上传程序1?.将?U?盘插入触摸屏上,等待几秒钟后,弹出?Download/Upload?窗口,点击?Upload?按钮:2.?弹出?Upload?Settings?窗口:2.1?.用?Upload?project?上传工程a:输入密码,初始密码为?111111?;?选中?Upload?Project;?点击?OKb:弹出“Pick?a?Directory”窗口,?展开?usbdisk,选中?usbdisk?的下级目录?disk_a_1?;点选右上角“+”?号;?弹出?New?Directory?窗口?,输入文件夹名,例如?upload;?点击?OK:c:将蓝色横条定位在?upload(上一步建立的文件夹),点击?OK?按钮开始上传:2.2.用?Upload?all?project?files?上传工程a:输入密码,初始密码为?111111?;选中?Upload?all?project?files;点击?OK b:弹出“Pick?a?Directory”窗口,?展开?usbdisk,选中?usbdisk?的下级目录?disk_a_1;点选右上角“+”号;?弹出?New?Directory?窗口?,输入文件夹名,例如?upload-all;点击?OK:c:将蓝色横条定位在?upload-all(上一步建立的文件夹),点击?OK?按钮开始上传:3.?上传完成后,触摸屏画面如下图所示:4.?将?U?盘插到电脑上,?如果用?2.1?的方法(Upload?project)上传的工程,在?upload?文件夹?里面会有一个?project.xob?的文件。
?如果用?2.2?的方法(Upload?all?project?files?)上传的工程,打开?upload-all?文件夹,找到?mt8000\001?文件夹,对其中的?mt8000?文件增加“.xob”后缀名,使其变成?mt8000.xob。
AB触摸屏程序上载及程序转换步骤一、AB触摸屏程序上载步骤:1. 事先准备:确保已经安装好以下软件:RSLogix软件、PanelBuilder32软件、RSLinx软件。
2.连接设备:将电脑与AB触摸屏通过串口线或以太网线连接。
3. 启动RSLogix软件:打开RSLogix软件,点击"Launch”按钮,选择PanelBuilder324. 创建项目:点击"New Project”,选择需要上传程序的触摸屏型号。
5. 打开程序:在打开的PanelBuilder32界面中,点击"Transfer",选择RSLogix进行程序上传。
6. 选择通信接口:在弹出的RSLogix窗口中,选择通信接口,点击"OK"。
7.确认通信设置:按照需求选择通信设置,点击"OK"。
8. 选择上传程序:在RSLogix软件中选择需要上传的程序,点击"Open"。
9. 上载程序:点击"Upload"按钮,等待上传过程完成。
10. 完成:程序上传完成后,会在PanelBuilder32界面中看到上载的程序。
二、AB触摸屏程序转换步骤:1. 事先准备:确保已经安装好以下软件:RSLogix软件、PanelBuilder32软件、RSLinx软件。
2. 启动RSLogix软件:打开RSLogix软件,创建一个新的工程。
3. 编写程序:在RSLogix软件中,根据需求编写需要转换的程序。
4. 配置触摸屏:打开PanelBuilder32软件,选择需要转换程序的触摸屏型号,创建一个新项目。
6.配置通信:选择通信接口,配置触摸屏与PLC之间的通信设置。
7. 转换程序:点击"Convert"按钮,将RSLogix软件中的程序转换为PanelBuilder32软件可识别的格式。
8. 完成:转换完成后,可以在PanelBuilder32界面中看到转换后的程序。
上电时按左上角进入(系统菜单)进入英文系统画面
下载OS 退出系统安装下载OS
改变系统设置清除画面数据
下载画面
传送正确的显示
传送模式维修模式
传送工具
如果有英文提示就表示有错误则需要清理内存
显示历史
画面数据
报警历史
内存初始话内存表内存开关
维护模式
有必要时将其全部初始化一下即可
下图进入可选择通讯方式
内存开关
一般此类型的屏做到这样就可以了同时按上面两个角可以在有画面跳过报错进入系统。
下载线:。
上传说明
1、上传准备:
上传之前请确认电脑的数据线已经和触摸屏连接,并且触摸屏在正常供电。
2、系统连机:
选择“操作”>>>“系统连机”,弹出“连接”对话框以后选择正确的串口,波特率默认为115200即可,点击“连接”按钮,连接成功以后在编程软件最右下角状态栏可以看到当
前连接状态如图。
3、程序传送
A、“下载全部编辑图”:传送所有图片。
B、“下载编译”:传送编程程序,包括触点和代码。
注:如果只是要单独修改一张图片则选用“下载当前编辑图”
4、完成
所有程序传送完成以后,需要重新行系统连机,并且把“波特率”修改为“9600”。
使用西门子触摸屏TP170B(6寸)及TP270(10寸),预先设置好“上载”功能。
具体操作如下:
一,在触摸屏中设定:
1,触摸屏上电,点击Control panel
2,双击Transfer setting,图标
3,点击Directories,
4,在Project File: 框中,
选:Flash\simatic,
在Project Backup框中,
改为:Flash\simatic, (点击出键盘,修改)
按ok 键
5, 然后返回到,上电画面:
选中:Transfer,
二,在电脑中(ProTool/Pro CS)设定:
1,选择ProTool菜单画面,打开菜单文件\下载\选择\ 选中“执行上载”确认,
2,选择某一触摸屏程序,进行下载操作,下载完成后,该屏的程序上载功就被确认。
3,上载操作验证:
a. 选择ProTool菜单画面,打开菜单
文件\上载\开始------
b. 上传完成后,另存一文件名保存。
打开画面,验证完毕,结束。